If you’re on this blog, I’m guessing you share my love for making things. Perhaps you’ve thought about starting a blog for a long time, like I did. I want you to know that “making” a blog has been one of the most rewarding projects I’ve tackled.
For quite a while, I felt so intimidated by the technicalities of starting a blog. I just didn’t know where to start. I’m hoping that the following tutorial will help simplify the process for you.
Beyond the creative nourishment of blogging, there is also real earning potential. And what is better than sharing something that you love and earning money doing it? I personally am now able to earn enough money through Make & Do Crew to work on the site full time. (And if you’re wondering–yes, I’ve actually replaced the income from the salary of my last job!)
I am incredibly grateful everyday that I get to work on something that I love and that really matters to me. When I started, I honestly didn’t know if this would ever be possible, but I knew I had to give it a shot because I wanted to find a way to work creatively and have a flexible schedule for my family.
I am here to tell you that if you share the same dream I had–it’s POSSIBLE! It’s totally possible. It’s hard. And it takes time. But earning money from a blog over time is a legit option these days. How lucky are we to live in the age of the internet? I mean, really.
THE BASICS OF STARTING A BLOG
In order to claim your own little piece of the internet, you need two things. One is a domain name (URL) and that is what readers type into their browser when they visit your blog (like MakeAndDoCrew.com). Secondly, you need hosting, which is like the container that will hold all pieces of your website and essentially give them a place to live.
This post contains affiliate links for products that I have used and think highly of. If you make a purchase, I may earn a small commission at no extra charge to you. Thanks for supporting Make & Do Crew!
Choosing a Domain Name
As an advertising copywriter, I have done my fair share of naming projects, from new ice cream flavors to cable subscription plans.
A couple of tips that I’d recommend when naming your blog:
- Consider the length. Don’t name your site something so ridiculously long that it’s hard to remember or difficult to type into a browser.
- Avoid confusion. Made up or complicated words, if the spelling isn’t super obvious, can be leave people wondering how to spell your site name. If your name includes numbers, consider if it will be clear that your name is Example1.com versus ExampleOne.com.
- Use your name to explain what the site is about. Or don’t. This one can go either way. When you write about knitting patterns, for example, and your name is BeginningKnittingPatterns.com, Google has an easier time knowing what type of information is there and consequently, might show your site to more people in more search results. (The art and science of making your website show up toward the top of search results in engines like Google is called “SEO”–search engine optimization.)
The flips side of this is that if down the road, you decide you want to also blog about another topic, say crock pot recipes, your URL of BeginningKnittingPatterns.com might be confusing to readers who came to you for crockpot recipes. I personally think it’s good to split the difference and name your site something that is slightly specific, so a new visitor knows what to expect, but broad enough that it can logically tie together any topics you plan to blog about. A couple great examples of this are Funky Junk Interiors, Pinch of Yum and Idle Hands Awake.Bust a Name is a cool tool that helps you combine words to come up with a name and see if anyone else is already using it.
Register Your Domain Name
This basically means that you’re staking your claim to your blog name—buying your real estate essentially. You can do this separately from your hosting if you want, but if you’re just starting out, I’d recommend just doing it through your host. (I’ll explain how to get it for free in the next step.)
Choosing a Host
First things first, if you have any hopes of earning money from your blog in the future, I suggest you avoid starting a blog on a platform like Blogger or WordPress.com. When you use these platforms, your site is free, but you have far less control over it and it’s much harder to monetize. Instead, pay a little money to host your site and create it with WordPress.org.
There are a ton of hosting options out there. When I started Make & Do Crew, I began with Bluehost because their starter package is super affordable. I have since moved up to a slightly more expensive plan with Bluehost, but their starter tier is completely sufficient if you’re well, starting out.
(The other great thing about Bluehost is that they allow you to cancel at anytime. So if you want to give blogging a go and decide in a year it’s not right for you, you’re not on the hook for a contract.)
Okay, this might seem like a lot of steps, but it’s only because I’ve broken them down into bite size tasks (since that’s how I like to learn!) Don’t worry, this shouldn’t take longer than an episode of Portlandia.
- Head to Bluehost.com. You’ll see a big green button, click it. (See what I mean? Baby steps.)
- Register your domain. Since you’ve already come up with a snappy blog name, type it in the “new domain” box, click “next” and claim that cleverness. (Some hosts make you pay for the domain separately, but Bluehost includes it for free.)
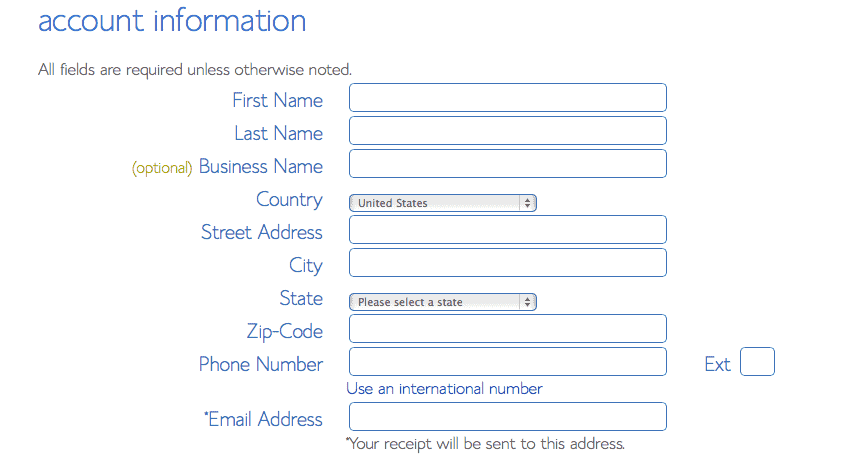
- Fill out your contact info.
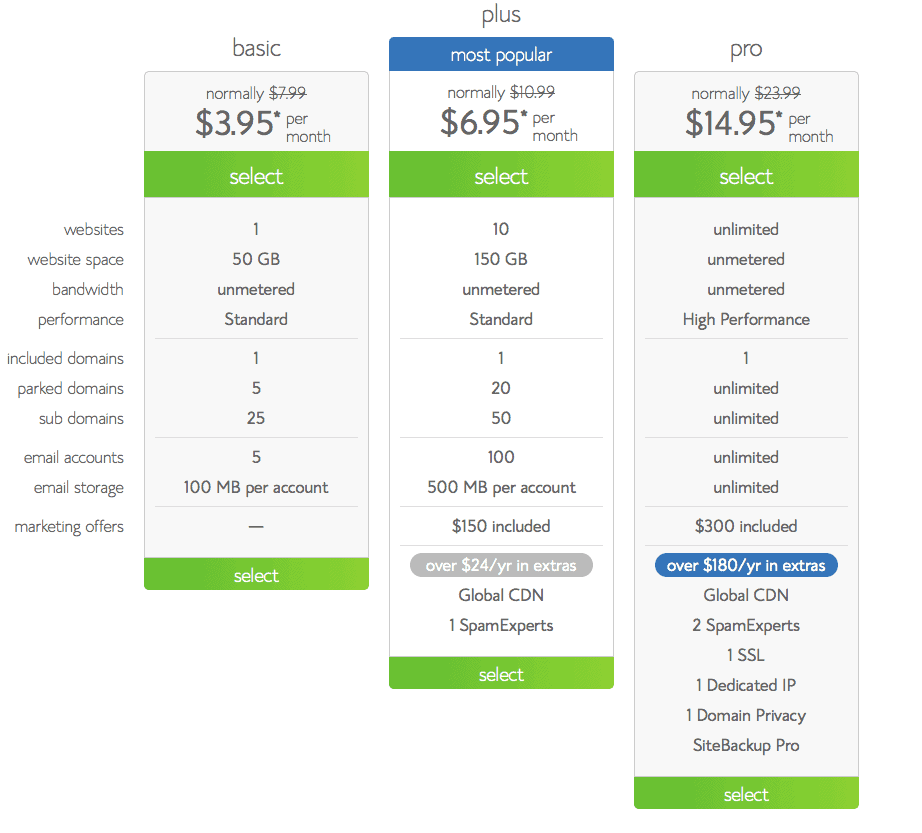
- Choose a plan. I started out on the “basic” plan. The next tier up adds more websites and email addresses, but those are most likely not necessary if you’re just starting one new blog.
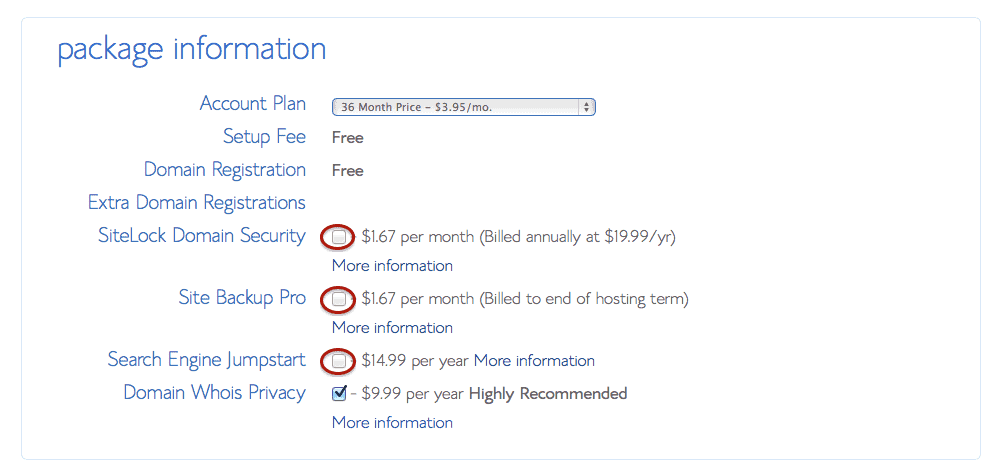
It’s important to note that in order to get the most affordable price, you will be paying for three years up front. Like I mentioned though, you can cancel at anytime and receive a prorated refund for the remainder of your contract. If paying for three years up front doesn’t work for you, consider signing up for the 12 month plan at a slightly higher monthly price. - Specify package details. You don’t have to worry about most of these options right now. You can always add them later.I do recommend backing up your site somewhere separate from your host just in case something happens with your host’s server. I use VaultPress for $5 a month. It’s also a good idea to pay for the “Domain Whois Privacy.” Without it, anyone can look up your contact information as the owner of your website, including your mailing address.
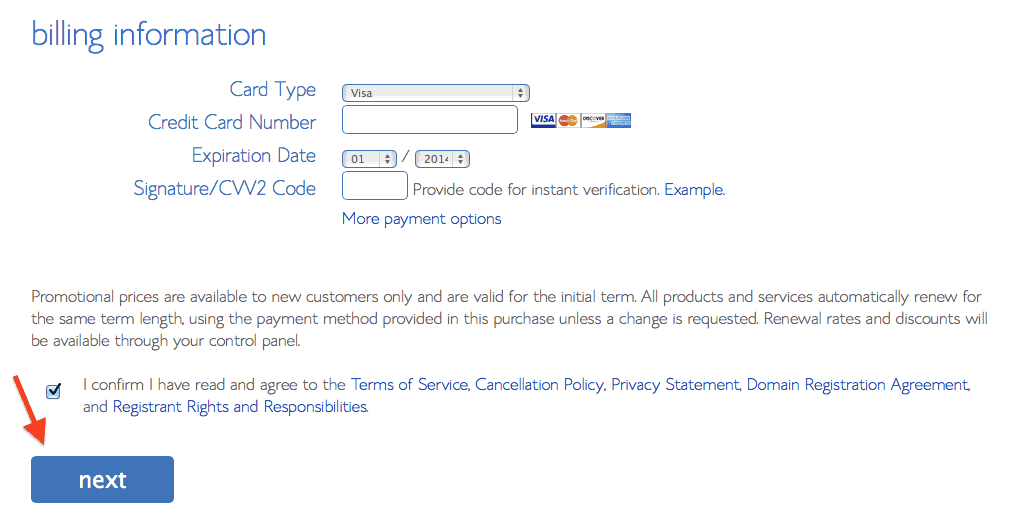
- Enter your billing info, accept the terms and conditions and click “next.”
- Woohoo! You have a blog! Create your password. Make it a toughie so that your site won’t get hacked and write it down somewhere. (Trust me. This advice comes from experience :))
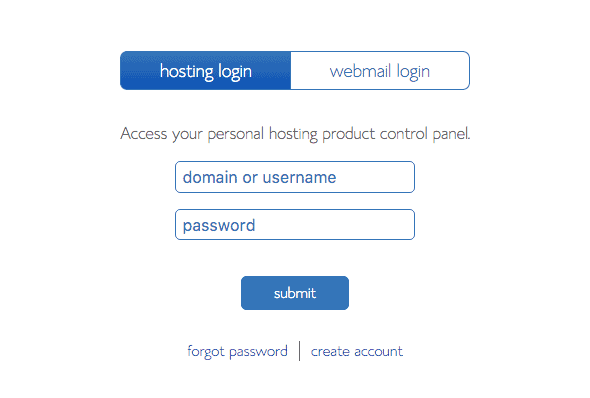
- Log into your brand new blog account at https://my.bluehost.com/web-hosting/cplogin. (Make sure you log into “hosting” and not “webmail.”)
- You will see a welcome message. You can close it out because I will be acting as your personal tour guide in the following steps.
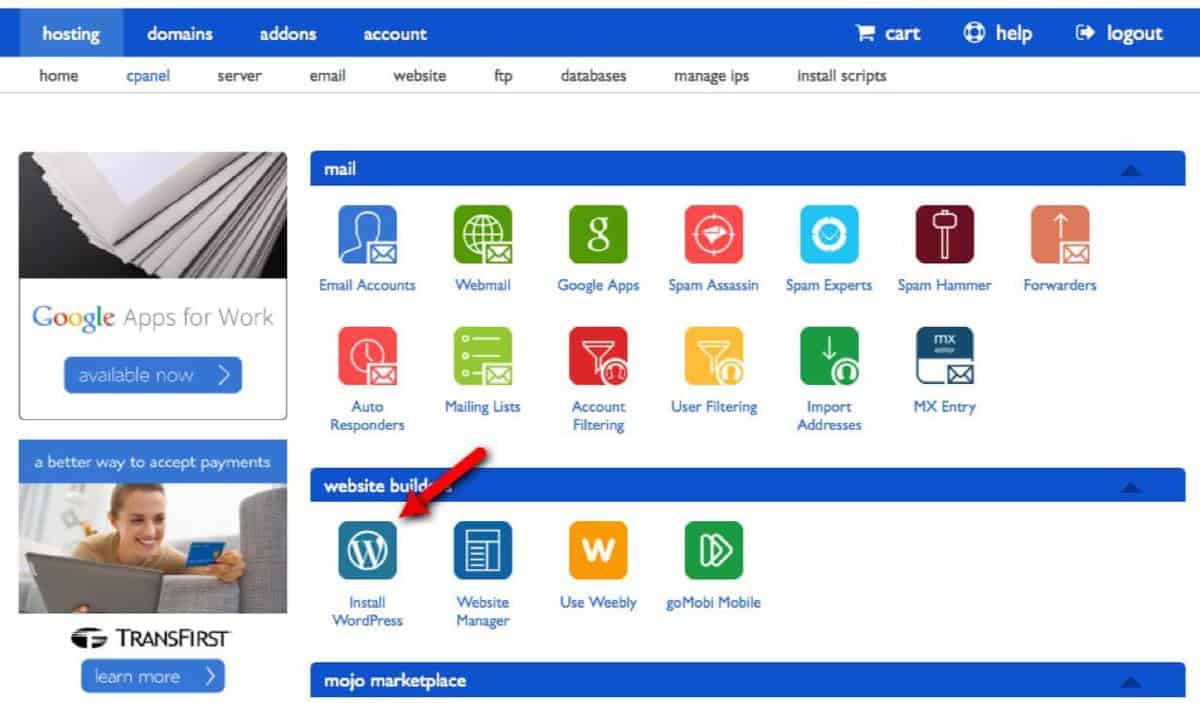
- Now you’re in your “cPanel,” which is essentially where you can access some of the “under the hood” tools that make your blog function. You need to install WordPress now. Click on the “WordPress” box toward the bottom of your screen.
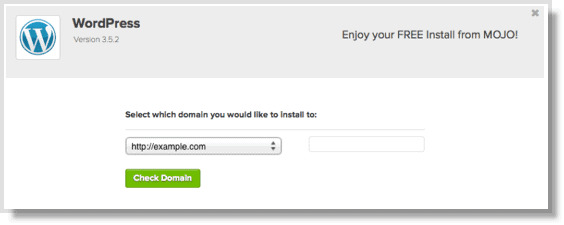
- On the WordPress installation page, click the green “start” button.
- Enter your brand spankin’ new blog name.
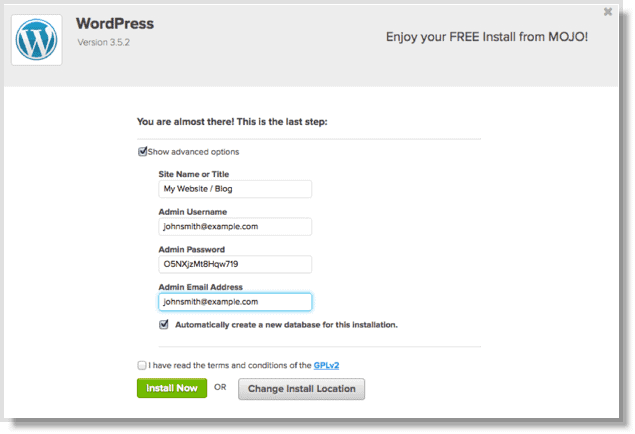
- On the next screen, click “show advanced options” and enter your information. Make sure that “Automatically create a new database for this installation” and “I have read the terms and conditions of the GPLv2” are checked. Click “Install Now.”
- Once WordPress is installed, you’ll receive an email that gives you your login credentials as well as your WordPress admin URL and WordPress username. (I was originally very confused about the difference between my cPanel and my WordPress dashboard. Here’s the deal–you access your cPanel by logging into Bluehost. It’s where you might do something with your backend site files. Your WordPress dashboard is a place you’ll be far more often and can always be found at yoursitename.com/wp-admin. This is where you’ll write new posts, upload photos and reply to comments on your blog.)
Fancy it up!
Okay, you’ve made it to the fun part! A “theme” is what gives your site a certain look and makes it look different from other blogs online. It will determine the font possibilities, colors and layout of your website. There are thousands of themes available for WordPress blogs. Some are free and some you have to pay for.
I use the Genesis Framework by StudioPress because it provides an excellent foundation for building a blog. Then I use the “Foodie Pro” theme by Shay Bocks, to specifically influence the visual details of my site. Despite having limited technical abilities, I have found both really intuitive to use. (If you decide to use Foodie Pro as well, Minimalist Baker has some excellent video tutorials to help you get your site customized to your liking. I lived inside these videos as I was setting up my theme.)
A few other designers to check out as you’re looking for a child theme include Restored 316 Designs, Pretty Darn Cute Designs and StudioPress (the same people who make the Genesis Framework). All of these developers offer beautiful options and good support as you’re getting set up.
As soon as you have these technical details set up, you’ll be able to enjoy the true fun of blogging—creating awesome content and sharing it with people!
Please let me know if you have any questions. I will help you however I can.
And once your blog is set up, send me the link! I’d love to check it out. 🙂

