Believe it or not, two simple granny hexagons are the foundation of this free crochet hexagon sweater pattern. Part 1 of the free pattern is below, Part 2 is available here and Part 3 is here. You can also purchase the complete ad-free, printable PDF here.
This easy crochet hexagon sweater is part of a collaboration with Lion Brand Yarn. This post contains affiliate links.
Like building a campfire in the middle of a June thunderstorm, designing this free crochet hexagon sweater pattern did not come easily. I tore parts of it out so many times I thought the yarn might evaporate in my hands. (I’m pretty sure my husband doesn’t want to have any more conversations about the width of sweater stripes for a while.)
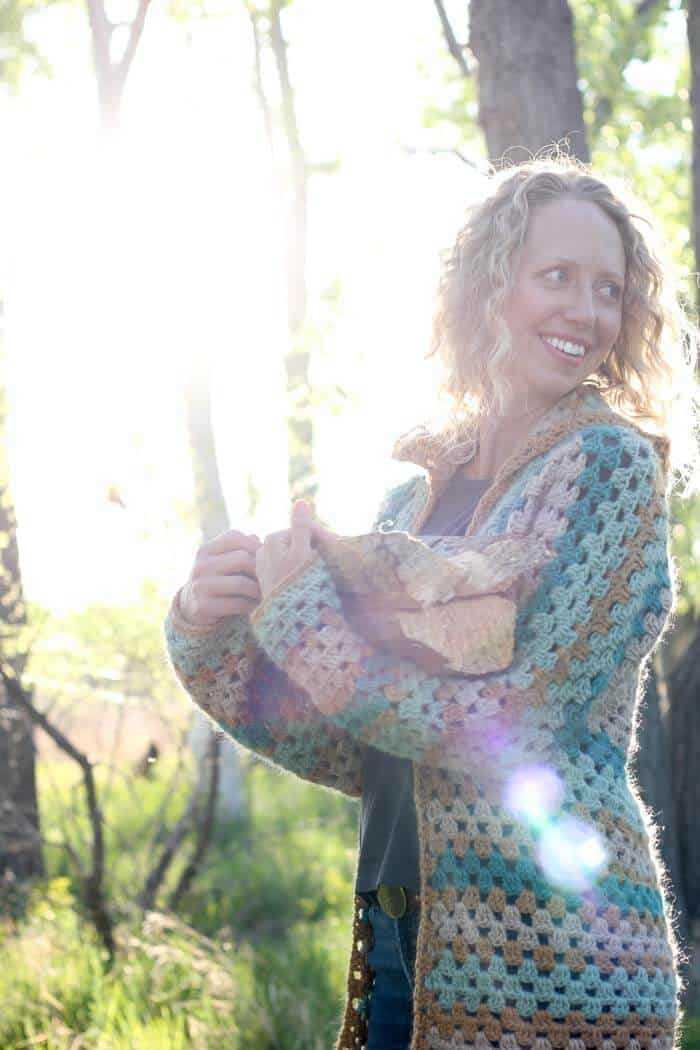
But alas, I’m so happy with the result! And most importantly, I think YOU will be able to make this modern cardigan really easily! The construction of this crochet hexagon sweater is what makes it so fun. Can you spot the two granny hexagons?
I know, right!? It’s like a magic trick! You crochet them and then–poof!–they just disappear into the coziest little lightweight sweater you’ve ever worn. Since we’re in on the business of making cool crochet things together though, let me pull back the curtain for you.
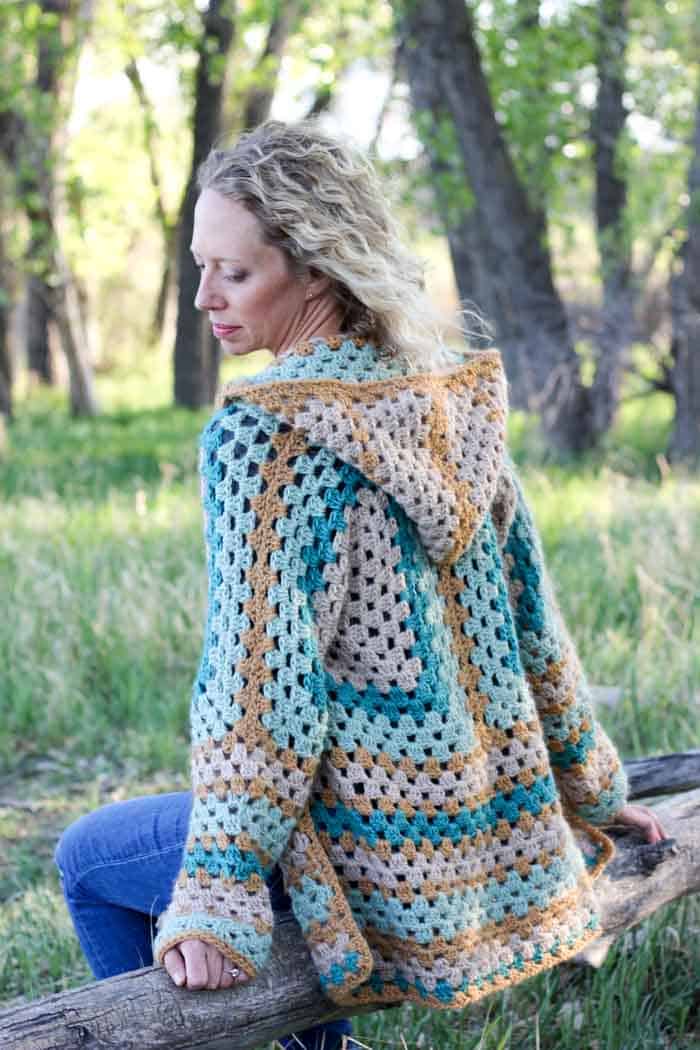
The two simple granny hexagons are what form the chest and shoulders of the sweater. Once they’re seamed in the back and shoulders, you’ll add rows of granny stitch lengthen the sweater in Part 2. You’ll also add longer sleeves, again with basic granny stitch (and some decreases if you’d like). Lastly in Part 3, you’ll pop a basic rectangular hood on the top to make your crochet hexagon sweater extra comfy and work a simple border around all the sweater edges.
Sounds pretty doable, doesn’t it? It is! I really love crochet patterns that look complex, but are actually made from creating simple shapes with basic techniques. (Check out my free Urban Gypsy Boho Bag pattern if you do too! And this chunky crochet hexagon sweater pattern is what originally inspired the idea for my version.)
If you’ve never crocheted a sweater before, the “Campfire Cardigan” would be a great pattern to start with. It’s also VERY customizable if you enjoy tweaking patterns to suite your body. I’ve included notes in each section on how you can take simple steps to adjust the pattern to your liking.
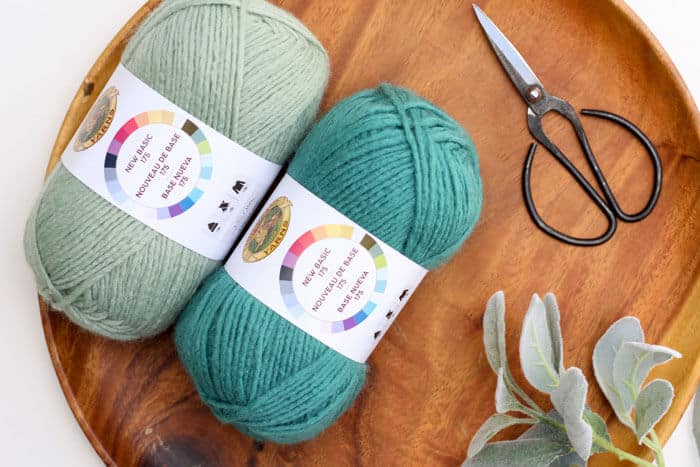
The yarn I used for this free crochet hexagon sweater pattern is from Lion Brand and it’s called New Basic 175. It’s lightweight and soft and I love how it resembles roving yarn. Plus, how great are these colors? Unfortunately, New Basic has been discontinued since I first designed this sweater. Lion Brand Heartland, Red Heart Colorscapes and Premiere Yarns Aurora serve as good substitutes.
If you’d like to peruse the entire pattern before you get started, you can check out Part 2 (here!) and Part 3 (here!) (Or purchase the ad-free, printable PDF of the complete patternhere on LoveCrafts.com or here on Etsy if you can’t wait that long! 😉 )
And as an overview, here’s a quick peek at the process of making the Campfire Cardigan from start to finish. I hope you enjoy this pattern!
More Free Crochet Sweater Patterns Made From Hexagons
Do you love the easy construction of the Campfire Cardigan? Here are some more free crochet patterns for sweaters made from hexagons. You can always find all of our crochet sweater patterns here.
Purchase a kit that includes all the yarn necessary to make your own Campfire Cardigan, plus a printed copy of the pattern here.
Please do not publish or share this pattern as your own. You may make items to sell with this pattern. In exchange, please link back to this post. DoNOT use my photos as your own sales photos. You can read my policies here. Now let’s make something awesome!
“The Campfire Cardigan” Free Crochet Hexagon Sweater Pattern Part 1
Measurements of Finished Sweater (when laying flat): S/M: Length: 28.5”, Chest Width: 17.5”, Arm Length: 21”, but easily customized M/L: Length: 30”, Chest Width: 20.5”, Arm Length: 22”, but easily customized (see “overall pattern notes” below for more details on this size) L/XL: Length: 30”, Chest Width: 23.5”, Arm Length: 22”, but easily customized (see “overall pattern notes” below for more details on this size) Sample pictured is a size S/M.
Supplies: • Lion Brand New Basic 175* (Weight: 4/medium – 175 yds, 3.5 oz) – Color A: Café Au Lait – 3 (4, 4) balls – Color B: Juniper – 1 (2, 2) balls – Color C: Thyme – 2 (3, 3) balls – Color D: Camel – 2 (3, 3) balls • Tapestry needle • Size L (8 mm) crochet hook • Stitch markers or safety pins
*This yarn has been discontinued. Lion Brand Heartland, Red Heart Colorscapes and Premiere Yarns Aurora serve as good substitutes.
Gauge: • 3 granny clusters + 3 spaces = 4”, slightly less than 6 rows = 4” worked in double crochet granny pattern
Abbreviations and Glossary (US terms): ch – chain dc – double crochet tch – turning chain yo – yarn over RS – right side WS – wrong side cluster – 3 dc stitches in same sp rep – repeat sp – space ch1sp – the space created by chaining 1 in the previous row/round ch3sp – the space created by chaining 3 in the previous row/round
Explanation: Two simple granny hexagons are the foundation of this modern crochet cardigan. You’ll work two identical hexagons first and seam them to make the chest and shoulders of the sweater. Next you’ll add length with rows of granny stitch, two sleeves and a rectangular hood. Lastly, you’ll finish off the sweater with a border.
Overall Pattern Notes: • Pattern includes sizes S/M, M/L and L/XL, but you can easily adjust the size of this cardigan to suite your body. To make a smaller sweater, crochet smaller hexagons. To make a larger sweater, crochet larger hexagons. Notes are given throughout on further customizations. Stitch counts at the end of each round are for sizes (S/M, M/L, L/XL).
• When crocheting larger hexagons for the larger sizes, the arm holes will also become larger. Some readers making the M/L or L/XL size have expressed that they’d prefer narrower sleeves. A Make & Do Crew reader, Laura, had a great suggestion to create extra space in the chest/back area without increasing the sleeve circumference:
Work a hexagon as outlined for the S/M size. Then on one side of the hexagon, work additional rows in the granny stitch back and forth to make that single side deeper than the rest. Repeat for the second hexagon. These two deeper sides will be what you seam for the back seam of the cardigan. (For an idea of how to add the extra rows, simply follow the “cardigan bottom” details for adding rows in Part 2 of the pattern.)
After seaming the back and shoulders as the pattern describes, add length to the bottom as the pattern outlines in Part 2. At this point, add additional rows vertically to the front of both sides of the cardigan in order to give it more coverage over your hips, stomach and chest. From here, you can proceed with the pattern as written and work the sleeves as described for the S/M size. I hope this idea is helpful for those wishing to customize their cardigan even further!
• When working in the round, sl st into the third ch from the beginning of the round to join.
• Ch 3 at beginning of round/row counts as 1 dc throughout pattern.
•The colors per round/row are simply a suggestion. Don’t be afraid to customize your cardigan as you wish! (Just keep in mind this may affect the yardage needed of each color.)
HEXAGONS
Notes: • Hexagons are worked in the round with RS facing at all times. Do not turn work at end of round.
• Hexagons will not lie flat and instead be wavy. This is intentional and should not be considered a mistake in your crocheting.
• Corner spaces will always be comprised of 3 ch. Spaces along the sides of the hexagon will be made with 1 ch.
• When switching colors for a new round, there is no need to work the final 3 sl st of the round before your fasten off. Simply sl st to join the round and fasten off. When beginning a new round in the same color as the last round though, you’ll work the 3 sl st at the end of the round in order to get into the next ch3sp.
Make 2.
Foundation Round: Using color A,Ch 4, sl st to first ch to form a ring.
Round 1: Ch 3, 2 dc in ring, ch 1, (3 dc in ring, ch 1) 5 times, sl st to join. (1 cluster/side)
Round 2: 3 sl st into next ch1sp, ch 3, (2 dc, ch 3, 3 dc) all in first ch1sp, ch 1, [(3 dc, 3 ch, 3 dc, ch 1) all in next ch1sp] 5 times, sl st to join, 3 sl st into next ch3sp. (2 clusters/side)
Round 3: Ch 3, (2 dc, ch 3, 3 dc) all in first ch3sp, ch 1, 3 dc in next ch1sp, ch 1, *(3 dc, 3 ch, 3 dc) all in next ch3sp, ch 1, 3 dc in next ch1sp, ch 1; repeat from * 4 more times, sl st to join, 3 sl st into next ch3sp. (3 clusters/side)
Round 4: Ch 3, (2 dc, ch 3, 3 dc) all in first ch3sp, ch 1, (3 dc, ch 1) in each ch1sp to corner, *(3 dc, 3 ch, 3 dc) all in next ch3sp, ch 1, (3 dc, ch 1) in each ch1sp to corner; repeat from * 4 more times, sl st to join, 3 sl st into next ch3sp. (4 clusters/side)
Round 5: Rep Round 4. (5 clusters/side)
Round 6: Rep Round 4. (6 clusters/side)
Round 7: Rep Round 4. (7 clusters/side)
Size S/M: Fasten off.
Sizes M/L and L/XL: Continue with next two rounds.
Round 7 Repeat: Rep Round 4. (8 clusters/side)
Round 7 Repeat: Rep Round 4. (9 clusters/side)
Size M/L: Fasten off.
Size L/XL: Continue with next two rounds.
Round 7 Repeat: Rep Round 4. (10 clusters/side)
Round 7 Repeat: Rep Round 4. (11 clusters/side)
Size L/XL: Fasten off.
All Sizes: Attach Color B in any corner ch3sp.
Round 8: Using Color B, rep Round 4. (8, 10, 12 clusters per side)
Round 9: Using Color B, rep Round 4. (9, 11, 13 clusters per side)
Fasten off.
Attach Color C in any corner ch3sp.
Round 10: Using Color C, rep Round 4. (10, 12, 14 clusters per side)
Round 11: Using Color C, rep Round 4. (11, 13, 15 clusters per side)
Round 12: Using Color C, rep Round 4. (12, 14, 16 clusters per side)
Fasten off.
Attach Color D in any corner ch3sp.
Round 13: Using Color D, rep Round 4. (13, 15, 17 clusters per side)
Fasten off.
SEAMING HEXAGONS
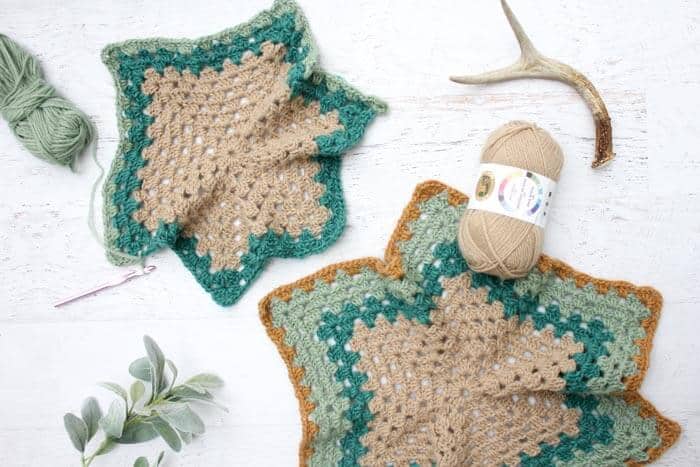
Bring opposite corners of hexagon (the 3rd and 6th corner, for example) together to fold the hexagon into an “L” shape with the RS facing out. Repeat with second hexagon.
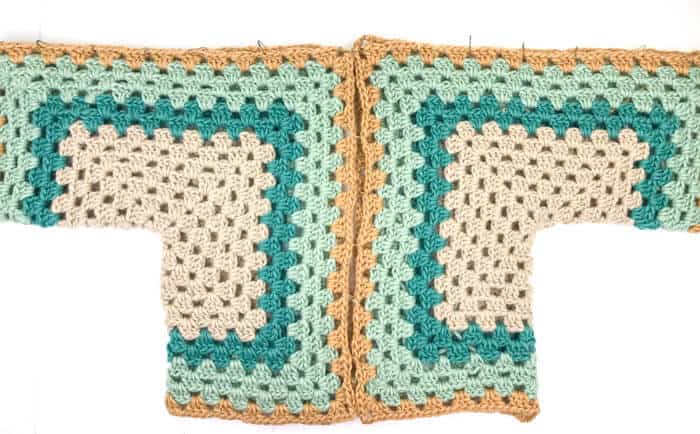
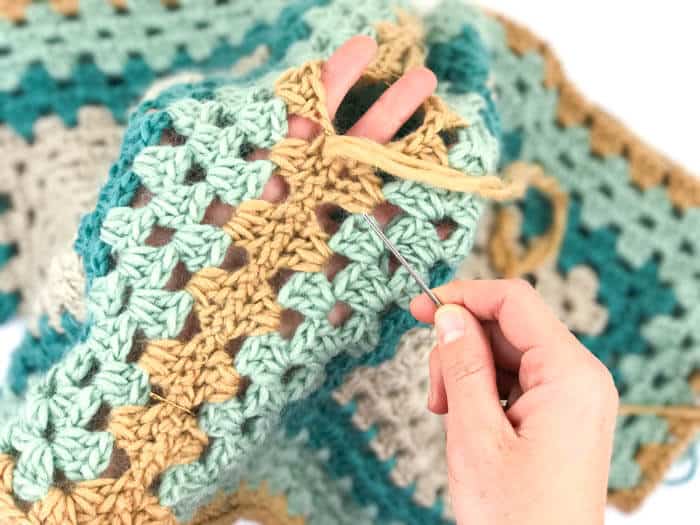
Orient folded hexagons with long sides touching as in photo above. Using safety pins or stitch markers, pin back seam of hexagons as well as the top sleeve seems. This is a great time to try your cardigan on to see if you like how it’s fitting around your back and shoulders. Customize the fit by adding or remove rounds as desired.
Using a tapestry needle and a doubled-over length of Color D, sew back seam using the mattress stitch. (Moogly has a great mattress stitch tutorial.)
Sew both seams on the top of the sleeves using the same technique.
Now you’re ready for Part 2 where you’ll add some length to the bottom and sleeves to the armholes.
More Free Crochet Sweater Pattens With Video Tutorials
If you found it helpful to have a step-by-step video tutorial to follow along with while crocheting your Campfire Cardigan, here are some more free crochet sweater patterns that include detailed video tutorials.
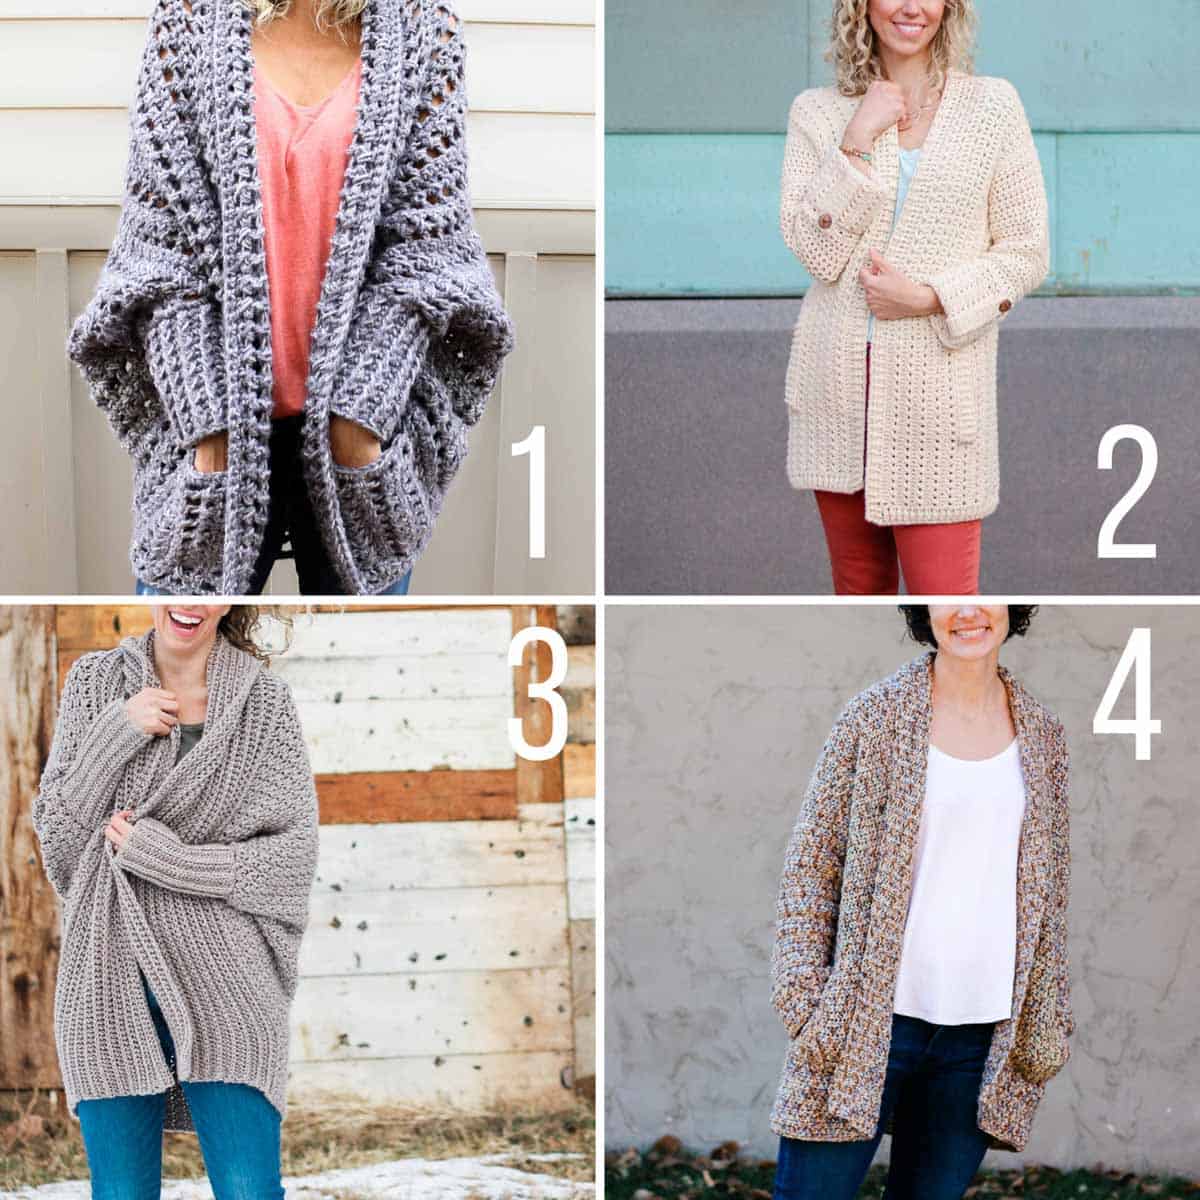
1. Dwell Sweater – Creatively constructed from a simple rectangle, this flattering chunky crochet sweater comes together easily with zero shaping, increasing or decreasing.
2. Alchemy Cardigan – This lightweight sweater is perfect to toss on for some summer stargazing or layer with a long-sleeve shirt in the colder months.
3. Habitat Cardigan – No one will guess you created this figure-flattering cardigan from a simple rectangle. Made with extremely soft yarn for a cozy-but-not-too-bulky look, you’ll find yourself reaching for this beginner crochet sweater over and over again.
4. Up North Cardigan – This easy, cotton crochet cardigan pattern for beginners uses a very simple construction to create a show-stopping look with entry level skills.
WANT MORE FREE CROCHET PATTERNS?
I've got more free crochet goodness for you that'll knock your little handmade socks off.
Welcome to the Crew! Please check your email. Your inbox just got a whole lot more crafty.
The 3 sl st go into the top of the 3 double crochet from the previous round. So yes, you do a slip stitch to join the round to the ch 3 at the beginning of the round, then you slip stitch into those three double crochet in order to move your yarn over to work in the next space. Does that make sense?
darn! wish i saw this comment before i proceeded to “3 slip stitch into next ch3 space” for 7 rounds!!! it should say “3 sl stitch TO next ch space” !!!
Did you purchase the Campfire Cardigan pattern? If so, you should have received an email from LoveCrochet.com. If you search your email and don’t see it, please send me a note and I’ll email it to you directly. 🙂
Hey, ive brought the pattern and its missing some info? I’m feeling pretty stupid as this pattern is so very hard to follow…like: Round 2: 3 sl st into next ch1sp??? Its impossible to put in 3 sl st into one ch1sp… Do you have a video of your instructions for this pattern???
Thanks for your purchase. What info do you believe is missing? The pattern should include all the relevant info from the free pattern the blog post, but if there’s something you see isn’t there, I’d love to know.
Assuming that the part of the pattern you’re referring to is the hexagon, I think the confusion with the sl sts might be that the pattern says “3 sl st into next ch3sp” (not ch1sp). 🙂
I’m sorry, I don’t have a longer tutorial at this time. Please let me know if you have more questions though.
It should read slip st “to” the next ch1sp. So you are carrying the yarn over to the space where you will start your dc of this round. I didn’t figure it out until I had yarn and hook in my hand.
Yes, that’s true, you do need to move over to the ch1sp. I just wrote it as the beginning of the next round instead of the end of the current round. Make sense? It works either way you think of it. 🙂 Jess
What a fantastic idea! This sweater is amazing and I love the colors you chose. I really enjoy making sweaters for myself, but I’ve never tried to write out a pattern for one. Thanks for sharing this. I’m going to have to try it out very soon!
Thank you, Erica! Pattern writing is always so intimidating to me. What’s good about this one is that the hexagons do all the work for the shoulders and chest, so there’s less shaping for me to figure out. 🙂
I’m loving this pattern. Is the yarn Chunky or Super Chunky? Can’t easily get the 175 easily or economically here in the UK although I really like Lion Brand!
It’s actually worsted weight, although it feels slightly thicker because of it’s roving texture. I think any heavy worsted yarn would be a good substitute. You might be able to look at the site YarnSub.com to find a replacement you can get your hands on easily.
An easy way to substitute the yarn is, go to the yarn company’s website, find the yarn called for in the pattern, look at the gauge (and yardage) information, and then just use a yarn that has the same gauge. The only thing that sometimes doesn’t work is using a different fiber, as that can have an effect on the way the finished garment looks/wears/drapes. In most cases though, wool can be used in place of acrylic and vice versa (unless knitting and blocking is required, then acrylic won’t work). I’m planning on making this sweater in a wool yarn (in fall colors) that has a slight halo to it for extra warmth.
I’m working on a video. 🙂 In the meantime, if you pick up two opposite corners of the hexagon (like the first and fourth corners, for example) and bring them together in your hands, the hexagon should sort of naturally form an L shape as pictured above. Then you can straighten out the edges, but this should get you headed in the right direction!
Hmm. Great question. Let me see if I can find out for you. It’s a new-ish yarn from Lion Brand so sometimes those aren’t in stores right away. LionBrand.com does periodically have free shipping though, which could be a great way for you to get it for a similar price to a box store. I’ll respond to this comment again if I can get an answer for you!
Thanks for sharing your lovely and ingenious patterns. I know a lot of time and effort goes into creating them, and I love the fresh, modern face all your designs have.
It’s so hard to find things done in granny stitch that don’t look dated, and this one is beautiful. I’m going to make it in a fuzzy wool for fall and add pockets and toggle buttons. I’m also going to take a stab at making a pair of your sweater boots with the same yarn (1 color only) to match.
I really appreciate your kind feedback, Autumn. I do put a lot of effort into these, but it sure is a lot of fun!
I totally agree about granny stitch. Working with it for this sweater really gave me a new appreciation for it. I’d love to see your sweater when you finish. I think the idea of adding pockets and toggle buttons sounds just beautiful!
You have a couple options. You can have someone help you measure your back from underarm to underarm and then choose the sweater size with a similar width. Alternatively, you can start making your hexagons and periodically measure them around your back/chest and shoulder. If you look at the photos, you’ll see how the hexagon folds to form the shoulder section, so you can even pin it together and try it on until you get the perfect fit for your particular body.
HI there! Working on my first hexagon… When I get to 9 clusters, I am not going to change colours…doing the sweater in one colour… Please advise how I continue…just make more rows? Thanks so much
Yup, that’s exactly it! Just disregard any mentions of switching colors and keep working rounds until you have the number the pattern size calls for. 🙂
I purchased ur pattern. But i haven’t receive it yet. Its very exciting 4 me. I check my p.o. box almost every day. 😂But no pattern. My name is Yolanda Castillo p.o. box 240756 San Antonio Texas 78224. . I read n reread all ur beautiful patterns. But this Campfire cardigan is a must have 4 me. Its very beautiful. I thank u so much 4 thinking of me when u fixed the sleves to fit me. N i love the hoodie. Again love ur work. N u r so kind to me n others
Hi Jess, I am working on my 2nd hexagon right now and loving the pattern! I will be trying it on for fit shortly and am trying to figure out from your pictures if the sweater needs to meet in the front while being worn. It looks like it doesn’t quite close in the front (which would make sense as measurement across back would be smaller than across bust.) Thanks for your help. It is such a fun pattern!!
How exciting, Sandi! I love the part of trying it on for the first time, even if just in pieces. It isn’t intended to meet in the front. I think it’s more important to see if you like how it’s fitting around your back and shoulders. The wider you make it in the front, the wider the sleeves will be, which is why I opted to keep it a little more open in the front.
I don’t know if you’ll get back to this comment section (I only returned here because my browser opened this webpage on the comments for some reason), but I made this sweater and here’s how I got it to close in front without widening the sleeves: I made a single crochet band all the way around the front opening, (including the hood), and sewed on buttons. Since I used toggle buttons, I didn’t make button holes, I made little placards with loops and sewed them on opposite the buttons, but button holes would be very easy to do (and less work than placards).
I’m making another one now for my sister with some of that new striped “Cake” yarn. It’s coming out beautiful!
I just love the idea of toggle buttons! I might have to try that myself! I’m so happy you enjoyed the pattern and your lucky sister will get a sweater too. 🙂
I’ve tried and tried to make a sweater , cardigan to no avail. Will give it one more try , sooo you will be hearing from me I’m sure. Love ALL of your patterns.
Sweaters can be a big undertaking for sure. One thing that I think makes this pattern well-suited to a starter sweater is that you can try it on as you go and see if you like how it’s turning out. You might also like my recent Stonewash Shrug pattern. It’s a great entry-level sweater pattern too!
Well, I crochet a lot. 🙂 But that said, I made it about 1.5-2 weeks. It really goes pretty quickly as far as sweater patterns are concerned because the openness of the granny stitch means fewer actual stitches to make.
Piękny tes swetr ale daj jakąs rozpiskę jak zacząć to robić roz.48 Jestem poczatkująca nie bardzo rozumie a bardzo bym chciała zrobić sobie taki swetr Bardzo cię proszę pomóz mi Zofia
In reading this pattern, It give the impression its FREE. Hello it is not, unless I am missing something. You get 2 and 3 but what good are they without part one which is $2.50. I would really like to make this sweater.
Part 1 of the free pattern is directly above this comment area. Look for the pink title that says “Campfire Cardigan Free Pattern” and it’s right below that. All three portions are free. It’s just the ad-free, printable pdf that costs $2.50.
I need to apologize, for my saying that the pattern was not free. I found pt 1 and perusing the site a little further. Please accept my apology. I will definitely be making this for my Daughter. I will probably print it out so that I do not have to go back and forth to the computer for details. Sincerely Dorothy
Thank you so much for your note. I know it can be a little confusing when you see I’m also offering a paid version. I’m glad you figured out how to get what you were looking for. 🙂
Hi, I’ve just made this cardigan, but have to say it’s not been successful! I made the largest size and the sleeves are just way too wide. It’s going to be an unpick and re think I’m afraid!
I’m so sorry to hear that! I’m curious, did you use the narrower sleeve option or the wider sleeve option? I’d also love to know what size sweater you made as the overall size of the hexagons influences the sleeve width. Anyhow, I’d love to hear more details so I can either make recommendations or take it into consideration for pattern revisions in the future.
Hi, jess. I made the largest size option from the pattern, with the narrower sleeve option, but the part of the sleeve formed by the hexagon is too wide. Think I’m going to try making the smallest size, to get less width on the sleeves, but adding extra rows just to the front, back and side edges of the part of the hexagon that forms the body. Hopefully this will give the larger chest size, but with narrower sleeves. Will let you know how it turns out!
I think that’s a fantastic idea! I really would love to know how it turns out because I’d like to be able to suggest your idea to anyone else who might want narrow sleeves, but more chest/back coverage.
Hi Jess, so far so good with this pattern, I’m making all one color just to simplify. My question is if you stitch the shoulders together all the way how is there room for your neck? Am I missing something but seems the front sections would tend to rub the neck. My first sweater as I am fairly new to crocheting and I can’t wait to finish!! THank you!!
The way the hood drapes backward opens the cardigan a bit and allows room for your neck. You can see in the photos, it’s cozy around the neck, but not like a strangulation hazard cozy. 😉
I know you are using an L hook and 4 weight yarn for this but I was wondering if I can use a smaller hook and 3 weight yarn. I have a bunch of Lion Brand Mandala yarn and would love to do this with that. Also I have issues using larger size hooks.
Yes! I just saw someone who made this with Mandala and it was stunning! You can def size down your hook and just add a few rows to your hexagons, sweater bottom and sleeves if you feel like you need them.
PS. You’re so lucky to have scored some Mandala! It’s so hard to come by at the moment. 🙂
Yup, an L is what I used. This yarn has a bit of a halo because it looks sort of like roving yarn. The consequence is that using a smaller hook just results in a fabric that feels to “tight.” If you’re substituting another worsted weight yarn, feel free to size down your hook and just add a few rounds to your hexagon.
It might be in your download folder on your computer. I believe you can always access it from the email LoveCrochet sent you, but I will also email it to you in case you didn’t already find it somewhere. 🙂
Is there a video showing how to stitch together? I have done it before but I wanted to compare styles. Also is there a video showing how to add hood? Those are my downfall… Loving the pattern!!!
Have you checked out Part 3 of the pattern yet? I do have a photo in there showing how the hood is worked, which might be helpful. It’s really quite straightorward as you’re just adding rows on top of the shoulder part of the sweater, and doing simple granny increases (explained in the pattern) as you go. As far as stitching it together, I used the mattress stitch and Moogly has a great video tutorial.
It just sort of depends on the size you’re making. My small measures 9″ from the center of the hexagon to one of the sides (so essentially the radius). You can try it on as you go if it’s for you though and just stop when you feel like it’s hitting you in about at your spine. Then make a second one the same size.
Ive never been good at reading patterns ive always been good at watching and learning. I really want to try and make this but its all like a foriegn language to me is there by chance any video tutorials on this and others you can link me with?
I dont know if this question has been asked but where in the pattern does is suggest where to stop when doing the matress stitch when sewing the sleeve together. I see vaugly in the picture when using the stitch marker but its not exsplained. This is becoming a very popular want to crochet item in a group I’m in but a lot are lost on this particular part in the pattern.
I can see how that might be confusing in the pattern. I will update it to include more details. You actually just sew across the entire hexagon edge (both for the back and the sleeves). If you watch the video, you might be able to see what I mean right after the “seam” sections when I lay the sweater down flat. 🙂
I hope that helps you! It sounds so fun to make a project together in a group!
Hi, I purchased the pattern yesterday but I am not good with written patterns. Do you think you’ll be doing a video tutorial for the cardigan? I would love that! The cardigan is beautiful and this is the first time I’ve seen one that I want to make.
This is gorgeous and I’ve started making it, however I’m suing thinner yarn and a smaller hook! Because that’s what I had! Could you tell me the meaurements of the original hexagon please? I could work the rest out from there! many thanks Trudi
I love this! I have just recently finished part 1. Now, I’m on to part 2. I wish there was a way to post a picture here on the comments but I don’t see a way to do it. I did do a post on my blog about it and put a picture there. I’m so excited to get this finished. I’m looking forward to doing another one soon too. This would make a wonderful present for s loved one!
I know! I wish sharing a photo was an option too. If you use Instagram, you can always tag me in your photo there (@makeanddocrew). I went to your blog, but I wasn’t able to find the pic. Will you direct me to it? I’d love to see it!
I’m about half way through Part 2 of your pattern. I have the length added to the bottom. It’s almost so pretty like this that I want to stop. I’m going to finish it out with the long sleeves and the hood but I think I will probably be making at least 3 more modified versions of this. So glad that you have shared this! I don’t use Instagram often but I will log in and upload my pics so far and tag you so you can see my progress. I’m waiting to post part 2 on my blog until I have it finished. Then it’s on to part 3!
Yes! I think it could. I’ve been wanting to try that as well. You’d just want to make sure you’re increasing each round (at the corners) by the same number of stitches as the pattern so that you can have a hexie that is able to fold in half like mine did.
My favorite way of attaching new yarn is to tie a slip knot on the hook, then enter the hook in the ch3sp, yarn over and pull the yarn through. Then the yarn is attached and you can proceed with the pattern. 🙂
Yes, I think so! I’d actually like to try a version like that. You just want to make sure that when you fold your hexagon in half, it forms a “T” shape like in my photos above. Does that make sense?
I have made part one with a 7mm hook. I did the smallest size and the sleeves still seem really wide. What is the smallest size hook I can make this with without is being too small? I need it to be the largest size but the sleeves are way too wide. Thanks!
I’m not sure I can comment on the smallest size hook you could possibly work, but I did include some notes toward the top of the pattern on how to adjust it for smaller sleeves when working the largest size. There are some ideas there that might be useful. Assuming you’re too far along to consider those though, I would just work some extra decreases in your sleeve. 🙂
Hi there. I have been asked to make this sweater for a friend of a friend who has a bust size of 50. I am awful at adjusting patterns. Could you please give me some help as to how big I need to make the hexagons so I continue with the sweater? And once I make the hexagons larger all I really have to do is make the sleeves longer and the body of the sweater longer, correct. The people isn’t near by so I don’t have her to try the sweater on. Thanks so much. I usually make baby sweaters so this is the first adult sweater I’ve made in a long time. I really appreciate your help and can’t wait to get started on it. I just can’t figure out how to make it a larger size (like a 2X).
My best guess is that you’d want to make a hexagon with a diameter of about 22-23″. You could always ask your friend to have someone measure from her spine to about her nipple line, or a little further to the center of her body. That measurement is how far apart you’d want two opposite sides of your hexagon to be apart.
Jess – I am struggling with the sleeve. The first round seems okay but I am struggling at the end of round one after the slip stitch into the top of the beginning double crochet to join. I don’t understand the 2 slip stitches to end of cluster. Where am I slip stitching? I have 3 single double crochets and spaces and it looks odd to me. Help?
The two slip stitches to the end of the cluster are there to move your yarn over so that the beginning chains of the next round are starting in a space instead of right on top of the cluster you just slip stitched into to join. Does that make any sense? So you’ll just sl st in the next two double crochets of that cluster that you just joined in and that’ll move your yarn over into a space.
I think I must have done something wrong on the first round then. I attached color A to the middle of the sleeve cluster then chained 3 and then 1 dc in the next space, so that means there is no cluster when I come back around to join that first row, just that 1 dc in the middle of the cluster. I think this is where I am misunderstanding given your instructions in your comment.
Hi. I haven’t started the cardigan yet, but I was wondering if the pattern would work well without a hood. Or does it just look strange? If the current pattern wouldn’t wrk well without a hood, do you have any suggestions on how it could be finished off or modified? TIA!
Made the M/L…had to leave off a few rows …sleeves are huge and to long.. sweater would have been way below my knees……so I do Love it .I will make another ..super easy only took about 2 days.. “this pattern was extremely fun , watching it come together ” thank you
Hi Jess! I recently purchased the pattern and was going to use Caron Simply Soft yarn as I can not find the New Basic 175 near me. Do you think this will work or will it stretch too much and not hold the shape?
I think it will probably work. 🙂 Just try on the hexagon as you go and stop when you’re happy with the way it’s fitting on your shoulder/back (just in case the gauge is a bit different than the New Basic 175).
Jess and Ladies, I am positive I am the only one to ever make this mistake….> A FIVE SIDED HEXAGON.!! Didn’t think a thing was wrong until I had finished the first hexagon ….It did not fold into an L. NO WAY. After much stomping around and gnashing of teeth I realized it was supposed to have 6 sides. I have never crocheted a garment before and this pattern seemed the IDEAL pattern to do. So…I am froggin it and starting over…determined to make it. I hope you all find this funny because I have. Go ahead and LOL or ROFL. I am making the LXL size with Caron Cake Confetti. Wish me luck.
thank you so much for this pattern! I’ve been working on a pattern I designed (before yours was published) so I appreciate the work you have put into the design. I have a question about enlarging the hexagons please. When you stated a diameter measurement of 22-23″ is this the same as a radius measurement? thanks again Gigi
Is really is hard work isn’t it!? The diameter measurement I’m stating is the hexagon from one point to the opposite point on the other side (so all the way across the hexagon). 🙂
Hi Jess! I’m a bit confused with the Mattress stitch. Should I see it with right sides facing in or out. This is my first time putting sides together like this so I’m confused. Thanks so much!
I’ve seen many using Caron Cakes that turned out beautifully. I think people are just starting from the same color in two different cakes when making each of the hexagons. 🙂
This is my first time making a sweater. My first hexagon looks like a boot. Is there supposed to be 6 granny squares in the center. I only have 5 in the first one but I started a second one and I put 6 in the center of that and it has the L shape it’s supposed to have. I want to make sure it is right before I continue.
Congrats on making a sweater! There should be six sides on the hexagon, so you’re right, it does form a boot or “L” shape when folded in half. To achieve this, start out with 6 little granny clusters at the beginning because those will eventually form your 6 sides. 🙂
Great pattern! About how much yarn did you have leftover in all the colours when you finished this sweater? I am thinking of making this in one colour or with a variegated yarn, so wondering how many yards I would need? Hoping to cut down on cost a little! (In a size small) Thanks! Val
Gosh, Val, I wish I could remember better. I totally understand your desire to just buy what you need. I believe I really didn’t have much left over of most of the colors when I made the small. I believe I had the most leftover of the Cafe Au Lait color. I’m thinking my leftovers might have totaled one full skein of New Basic 175…?
Love this! Would like to make a matching one for my 10 year old. Ever try for a child? She’s small. Maybe a size 8-10. Any suggestions to make this work for her?
I’d like to try that too! I’d just start with the same hexagon, only reduce the number of total rounds by quite a bit. You can keep trying it on her as you go to see when the hexagon is about the right size to cover her shoulder and meet in the middle of her back. From there, you can follow most of the pattern pretty similarly, with just adjusting the hood to be smaller for her 10 yr old head. 🙂
I want to make this with a different stitch, rather than granny square…..but it’s not making an “L” when I fold it. Why? Can you assist me? I am making a hexagon but the fold isn’t making an “L”
Hi there. I’m sorry to bother you again. I got the whole sweater done and everything was fine but the woman says the sleeves are too wide. She says they look wider than the picture. That’s because I had to make the largest size to fit her chest. Since it’s all sewn together and you’re a designer and I’m not do you have any ideas on how to make the sleeves narrower even if the sweater it all sewn together. I’m in tears right now. The thought of unraveling the whole thing is more than I can bear to think about. I hope there’s a way to salvage the sweater. Thanks for your help. I worked on it none stop and now the woman doesn’t like it. Thanks so much for any suggestions you might have to salvage the sweater. I spend a lot of time on it.
Hi there. You helped me before and I’m hoping you can help me again. I made the sweater in a large and the woman is now complaining that the sleeves are too wide. I have sewn the whole sweater together and can’t figure out a way to taper the sleeves more without having a big seam on the idea. I can’t really take the whole sweater apart since I’ve woven in all the lose ends, etc. I am so upset with this woman because I was doing it to be nice and it’s been nothing but problems. Do you have any magic tips to make the sleeves smaller even when the sweater is already all sewn together? I broke down and cried earlier!! Thanks so much..
Oh, Sue. That sounds so frustrating. I know how hard it can be to convey to someone else that you’re not just a magic yarn machine.
I’m sorry that I don’t have any specific tips to help, although I wonder if you just tore out several inches of the sleeve if you could add a cuff similar to this sweater to sort of tighten things up near the wrists?
Maybe someone could correct the pattern instructions on the websites that this pattern has been posted? I was on Row 8, when I started questioning “3 sl st into next ch3sp”. Now I have to rip it all out and start over. 🙁
I’m sorry you’re having trouble. I’m not sure exactly what you mean by “correct the pattern instructions on the websites that this pattern has been posted.” If you’d like to explain more, I’d be happy to try to help.
I’m having a hard time with the sleeves. Where do you end for the head? I Feel like of I follow all the way across I’m going.to stitch the front ends together and then it’s not left open? If I stitch one arm at a time do I leave any part of the back undone? I’m going crazy! LoL
Not sure if this was mentioned, but when I made the Large/ex large version of your sweater, the only change in the pattern was to increase the number of rounds for the first color.
I recommend spreading the increased number of rounds over all your color choices or at least the first two, as I was left with an unbalanced look with way to much of color A. It sits unfinished now as I am deciding whether to frog it all and start over.
Hello there! I’ve just downloaded two of your cardigan patters. I’m excited to try them. My question is, in the photos are you wearing one in which you tapered the sleeves or were these the regular sleeves? Also is that a s/m you are wearing? I’m trying to get s feel for how large the sleeves will be and if I need to taper or use the other option suggested by the other user by adding rows along the joined sides. Thanks!
How did you do the tapered sleeve on the sweater you are wearing? This is a gorgeous sweater! Can’t wait to try it but wanted to make sure how to taper sleeves as I love how the one your wearing looks. Thank you so much for sharing this beautiful pattern!
In this one I’m wearing, I made the smallest size and then followed the “taper sleeve” instructions in order to decrease a bit as the sleeve progressed. If you’re interested in making a larger size with tapered sleeves, checking out the note in the pattern about a Make & Do Crew reader’s idea would be really helpful. 🙂
I want to make my daughter a campfire cardigan. She is six, growing out of size 6 and into size 7-8 soon. I want to make her a campfire cardigan in a girls size 7. How do I do that?
Hello, I am making this sweater for a friend. I was having trouble with the extension and I noticed several others hae had the same issue. The stitches don’t add up right o the extentsion. I then paid for the pattern thinking it would make more sense. I saw somewhere that the stitches were corrected. I thought I saw it also, but now I can’t find where I saw it. Can you please tell me what they are. Row 1 is 45 spaces and I have that correct, but after that I don’t get 95 sts. I can’t just go with it and see if it will be ok, I am one who needs it to be right. I appreciate it if you can help. Thank you
Can someone tell me if this one fits slimmer in the arms than the hexagon sweater did. that one was a bit loose in the arms and making the wrist helped keep it on your wrist. I want to make this one, but just looking for feedback. thanks
153 Comments
anne
May 15, 2017 at 7:56 pmhow do you 3 sl at the beginning of a round? is it like a chain stitch?
Jess @ Make and Do Crew
May 15, 2017 at 9:06 pmHey Anne,
The 3 sl st go into the top of the 3 double crochet from the previous round. So yes, you do a slip stitch to join the round to the ch 3 at the beginning of the round, then you slip stitch into those three double crochet in order to move your yarn over to work in the next space. Does that make sense?
🙂
Anne
May 19, 2017 at 11:28 pmit does, thankyou! is there a video tutorial for sewing the hexagons together?
Thanks!
Sarah
May 29, 2017 at 7:14 pmThank you! I was wondering the same thing….
Laura Lee
January 12, 2018 at 9:44 amdarn! wish i saw this comment before i proceeded to “3 slip stitch into next ch3 space” for 7 rounds!!! it should say “3 sl stitch TO next ch space” !!!
Marja Benner
July 12, 2017 at 11:44 amI ask for a patron for this vest and payed for it
Please when do Get it Please???
Jess @ Make and Do Crew
July 16, 2017 at 2:35 pmHey Marja,
Did you purchase the Campfire Cardigan pattern? If so, you should have received an email from LoveCrochet.com. If you search your email and don’t see it, please send me a note and I’ll email it to you directly. 🙂
Jess (at) Make and do crew (dot) com
Brenda
July 14, 2017 at 9:36 pmHey, ive brought the pattern and its missing some info?
I’m feeling pretty stupid as this pattern is so very hard to follow…like:
Round 2: 3 sl st into next ch1sp??? Its impossible to put in 3 sl st into one ch1sp…
Do you have a video of your instructions for this pattern???
Jess @ Make and Do Crew
July 16, 2017 at 2:32 pmHey Brenda,
Thanks for your purchase. What info do you believe is missing? The pattern should include all the relevant info from the free pattern the blog post, but if there’s something you see isn’t there, I’d love to know.
Assuming that the part of the pattern you’re referring to is the hexagon, I think the confusion with the sl sts might be that the pattern says “3 sl st into next ch3sp” (not ch1sp). 🙂
I’m sorry, I don’t have a longer tutorial at this time. Please let me know if you have more questions though.
Jess
Edwina Thomas
August 17, 2017 at 10:52 amIt should read slip st “to” the next ch1sp. So you are carrying the yarn over to the space where you will start your dc of this round. I didn’t figure it out until I had yarn and hook in my hand.
Jess @ Make and Do Crew
August 18, 2017 at 12:10 amHey Edwina,
Yes, that’s true, you do need to move over to the ch1sp. I just wrote it as the beginning of the next round instead of the end of the current round. Make sense? It works either way you think of it. 🙂
Jess
Erica
May 16, 2017 at 6:44 amWhat a fantastic idea! This sweater is amazing and I love the colors you chose. I really enjoy making sweaters for myself, but I’ve never tried to write out a pattern for one. Thanks for sharing this. I’m going to have to try it out very soon!
Jess @ Make and Do Crew
May 18, 2017 at 2:00 pmThank you, Erica! Pattern writing is always so intimidating to me. What’s good about this one is that the hexagons do all the work for the shoulders and chest, so there’s less shaping for me to figure out. 🙂
I hope you enjoy making your sweater!
Jess
Jenn
May 16, 2017 at 7:07 amI’m loving this pattern. Is the yarn Chunky or Super Chunky? Can’t easily get the 175 easily or economically here in the UK although I really like Lion Brand!
Cheers!
Jess @ Make and Do Crew
May 18, 2017 at 1:57 pmHey Jenn!
It’s actually worsted weight, although it feels slightly thicker because of it’s roving texture. I think any heavy worsted yarn would be a good substitute. You might be able to look at the site YarnSub.com to find a replacement you can get your hands on easily.
Happy crocheting!
Jess
Autumn
May 20, 2017 at 10:09 amAn easy way to substitute the yarn is, go to the yarn company’s website, find the yarn called for in the pattern, look at the gauge (and yardage) information, and then just use a yarn that has the same gauge. The only thing that sometimes doesn’t work is using a different fiber, as that can have an effect on the way the finished garment looks/wears/drapes. In most cases though, wool can be used in place of acrylic and vice versa (unless knitting and blocking is required, then acrylic won’t work). I’m planning on making this sweater in a wool yarn (in fall colors) that has a slight halo to it for extra warmth.
Jess @ Make and Do Crew
May 24, 2017 at 4:24 pmThanks for this advice, Autumn! I’m sure many people will find it helpful! 🙂
maria bucciarelli
May 16, 2017 at 8:10 amsei veramente molto brava nello spiegare……….
Patricia
May 16, 2017 at 8:24 amI’ve been making this pattern in baby/ toddler sizes for over ten years and it’s so easy and fun to make.
Jess @ Make and Do Crew
May 18, 2017 at 1:55 pmIt’s a great concept isn’t it? I’d really like to try sweaters for my daughters too. Maybe now is your chance to make one for yourself! 😉
Jess
Doris
May 22, 2017 at 11:13 amI can not figure out the fold on this sweater either . Please can you give us a tutorial.
Jess @ Make and Do Crew
May 24, 2017 at 4:21 pmHey Doris,
I’m working on a video. 🙂 In the meantime, if you pick up two opposite corners of the hexagon (like the first and fourth corners, for example) and bring them together in your hands, the hexagon should sort of naturally form an L shape as pictured above. Then you can straighten out the edges, but this should get you headed in the right direction!
Jess
Elizabeth
September 3, 2017 at 7:53 pmWhen I fold mine it looks more like a boot than an L. Is there supposed to be 6 sets in the center?
Jess @ Make and Do Crew
September 9, 2017 at 5:17 pmYes–6 sets in the center! Looking like and “L” is just right! 🙂
Jane
May 16, 2017 at 4:42 pmMy goodness, that is beautiful! I will definitely be trying that out after I am finished with my current project!
Stella
May 16, 2017 at 6:09 pmWas there ever a Part 3?
Jess @ Make and Do Crew
May 18, 2017 at 1:53 pmThere will be a part 3 published tomorrow! 🙂
Anne
May 18, 2017 at 8:09 amIs the Lion Brand New Basic 175 yarn available at any box stores or does it have to be purchased directly from Lion Brand’s website?
Jess @ Make and Do Crew
May 18, 2017 at 1:55 pmHmm. Great question. Let me see if I can find out for you. It’s a new-ish yarn from Lion Brand so sometimes those aren’t in stores right away. LionBrand.com does periodically have free shipping though, which could be a great way for you to get it for a similar price to a box store. I’ll respond to this comment again if I can get an answer for you!
Jess
Tracy King
May 18, 2017 at 11:42 amAmazing job Jess! It’s beautiful, classic and modern at the same time. Super stoked to try it!
Autumn
May 20, 2017 at 10:29 amThanks for sharing your lovely and ingenious patterns. I know a lot of time and effort goes into creating them, and I love the fresh, modern face all your designs have.
It’s so hard to find things done in granny stitch that don’t look dated, and this one is beautiful. I’m going to make it in a fuzzy wool for fall and add pockets and toggle buttons. I’m also going to take a stab at making a pair of your sweater boots with the same yarn (1 color only) to match.
Jess @ Make and Do Crew
May 24, 2017 at 4:25 pmI really appreciate your kind feedback, Autumn. I do put a lot of effort into these, but it sure is a lot of fun!
I totally agree about granny stitch. Working with it for this sweater really gave me a new appreciation for it. I’d love to see your sweater when you finish. I think the idea of adding pockets and toggle buttons sounds just beautiful!
Jess
Elizabeth Pond-Kirk
May 20, 2017 at 4:07 pmHow to I measure it to fit myself?
Jess @ Make and Do Crew
May 24, 2017 at 4:28 pmHey Elizabeth,
You have a couple options. You can have someone help you measure your back from underarm to underarm and then choose the sweater size with a similar width. Alternatively, you can start making your hexagons and periodically measure them around your back/chest and shoulder. If you look at the photos, you’ll see how the hexagon folds to form the shoulder section, so you can even pin it together and try it on until you get the perfect fit for your particular body.
Hope that helps. Happy crocheting!
Jess
katie whysall
May 21, 2017 at 12:32 amYou are so talented I enjoy making your patterns. It’s a good distraction from uni assignments lol
Jess @ Make and Do Crew
May 24, 2017 at 4:23 pmHaha, I’m glad I can give you something do to! Have you ever crocheted in class? I always wanted to but never had the nerve! 🙂
Linda
May 29, 2017 at 3:13 pmHI there!
Working on my first hexagon…
When I get to 9 clusters, I am not going to change colours…doing the sweater in one colour…
Please advise how I continue…just make more rows?
Thanks so much
Linda🌸
Jess @ Make and Do Crew
June 4, 2017 at 9:31 pmHey Linda,
Yup, that’s exactly it! Just disregard any mentions of switching colors and keep working rounds until you have the number the pattern size calls for. 🙂
Jess
Linda
June 5, 2017 at 6:58 pmThanks Jess!
Almost ready to start second hexagon….
Yolanda
June 1, 2017 at 3:27 pmI purchased ur pattern. But i haven’t receive it yet. Its very exciting 4 me. I check my p.o. box almost every day. 😂But no pattern. My name is Yolanda Castillo p.o. box 240756 San Antonio Texas 78224. . I read n reread all ur beautiful patterns. But this Campfire cardigan is a must have 4 me. Its very beautiful. I thank u so much 4 thinking of me when u fixed the sleves to fit me. N i love the hoodie. Again love ur work. N u r so kind to me n others
Jess @ Make and Do Crew
July 16, 2017 at 2:37 pmThanks for your purchase, Yolanda. The pattern is a digital file and it’s available to download right after you pay for it from LoveCrochet.com.
I will email it to you directly now. 🙂
Jess
Sandi
June 4, 2017 at 6:15 amHi Jess,
I am working on my 2nd hexagon right now and loving the pattern! I will be trying it on for fit shortly and am trying to figure out from your pictures if the sweater needs to meet in the front while being worn. It looks like it doesn’t quite close in the front (which would make sense as measurement across back would be smaller than across bust.) Thanks for your help. It is such a fun pattern!!
Jess @ Make and Do Crew
June 4, 2017 at 9:08 pmHow exciting, Sandi! I love the part of trying it on for the first time, even if just in pieces. It isn’t intended to meet in the front. I think it’s more important to see if you like how it’s fitting around your back and shoulders. The wider you make it in the front, the wider the sleeves will be, which is why I opted to keep it a little more open in the front.
Happy hexagon making!
Jess
Autumn
August 19, 2017 at 10:25 amI don’t know if you’ll get back to this comment section (I only returned here because my browser opened this webpage on the comments for some reason), but I made this sweater and here’s how I got it to close in front without widening the sleeves: I made a single crochet band all the way around the front opening, (including the hood), and sewed on buttons. Since I used toggle buttons, I didn’t make button holes, I made little placards with loops and sewed them on opposite the buttons, but button holes would be very easy to do (and less work than placards).
I’m making another one now for my sister with some of that new striped “Cake” yarn. It’s coming out beautiful!
Jess @ Make and Do Crew
August 22, 2017 at 9:59 pmI just love the idea of toggle buttons! I might have to try that myself! I’m so happy you enjoyed the pattern and your lucky sister will get a sweater too. 🙂
Jess
Daisy
June 4, 2017 at 6:57 amI’ve tried and tried to make a sweater , cardigan to no avail. Will give it one more try , sooo you will be hearing from me I’m sure. Love ALL of your patterns.
Jess @ Make and Do Crew
June 4, 2017 at 9:06 pmHey Daisy!
Sweaters can be a big undertaking for sure. One thing that I think makes this pattern well-suited to a starter sweater is that you can try it on as you go and see if you like how it’s turning out. You might also like my recent Stonewash Shrug pattern. It’s a great entry-level sweater pattern too!
Can’t wait to see what you make!
Jess
Debbie C.
June 6, 2017 at 10:29 pmFor me, this is one of those “got to make it for myself” patterns. Thanks!
Jess @ Make and Do Crew
June 18, 2017 at 3:16 pmHaha, I LOVE those kind!
Jennifer Culek
June 9, 2017 at 7:27 amHow long did it take to make?
Jess @ Make and Do Crew
June 18, 2017 at 3:06 pmWell, I crochet a lot. 🙂 But that said, I made it about 1.5-2 weeks. It really goes pretty quickly as far as sweater patterns are concerned because the openness of the granny stitch means fewer actual stitches to make.
Happy crocheting!
Jess
ChrisTine
July 2, 2017 at 4:55 amMerci pour cette vidéo, je comprends enfin cette construction au crochet.
zofia
July 2, 2017 at 8:20 amPiękny ten swetr pragnę sobie taki zrobić czy będziesz mogła mi odpowiedziec na moje pytania bi nie bardzo rozumię
zofia
July 2, 2017 at 9:24 amPiękny tes swetr ale daj jakąs rozpiskę jak zacząć to robić roz.48 Jestem poczatkująca nie bardzo rozumie a bardzo bym chciała zrobić sobie taki swetr
Bardzo cię proszę pomóz mi
Zofia
dorothy
July 5, 2017 at 10:49 amIn reading this pattern, It give the impression its FREE. Hello it is not, unless I am missing something. You get 2 and 3 but what good are they without part one which is $2.50. I would really like to make this sweater.
Jess @ Make and Do Crew
July 16, 2017 at 2:36 pmHey Dorthy,
Part 1 of the free pattern is directly above this comment area. Look for the pink title that says “Campfire Cardigan Free Pattern” and it’s right below that. All three portions are free. It’s just the ad-free, printable pdf that costs $2.50.
🙂
Jess
dorothy
July 5, 2017 at 1:58 pmI need to apologize, for my saying that the pattern was not free. I found pt 1 and perusing the site a little further. Please accept my apology. I will definitely be making this for my Daughter. I will probably print it out so that I do not have to go back and forth to the computer for details. Sincerely Dorothy
Jess @ Make and Do Crew
July 6, 2017 at 11:29 pmHey Dorthy,
Thank you so much for your note. I know it can be a little confusing when you see I’m also offering a paid version. I’m glad you figured out how to get what you were looking for. 🙂
Happy crocheting!
Jess
Rachel Scott
July 6, 2017 at 1:29 amHi, I’ve just made this cardigan, but have to say it’s not been successful! I made the largest size and the sleeves are just way too wide. It’s going to be an unpick and re think I’m afraid!
Jess @ Make and Do Crew
July 6, 2017 at 11:23 pmHey Rachel,
I’m so sorry to hear that! I’m curious, did you use the narrower sleeve option or the wider sleeve option? I’d also love to know what size sweater you made as the overall size of the hexagons influences the sleeve width. Anyhow, I’d love to hear more details so I can either make recommendations or take it into consideration for pattern revisions in the future.
Thanks!
Jess
Rachel Scott
July 11, 2017 at 12:27 pmHi, jess. I made the largest size option from the pattern, with the narrower sleeve option, but the part of the sleeve formed by the hexagon is too wide. Think I’m going to try making the smallest size, to get less width on the sleeves, but adding extra rows just to the front, back and side edges of the part of the hexagon that forms the body. Hopefully this will give the larger chest size, but with narrower sleeves. Will let you know how it turns out!
Jess @ Make and Do Crew
July 11, 2017 at 3:50 pmI think that’s a fantastic idea! I really would love to know how it turns out because I’d like to be able to suggest your idea to anyone else who might want narrow sleeves, but more chest/back coverage.
Thanks for your creative thinking, Rachel. 🙂
Jess
Debbie Burnett
July 6, 2017 at 10:43 pmHi Jess, so far so good with this pattern, I’m making all one color just to simplify. My question is if you stitch the shoulders together all the way how is there room for your neck? Am I missing something but seems the front sections would tend to rub the neck. My first sweater as I am fairly new to crocheting and I can’t wait to finish!! THank you!!
Jess @ Make and Do Crew
July 16, 2017 at 2:42 pmHey Debbie,
The way the hood drapes backward opens the cardigan a bit and allows room for your neck. You can see in the photos, it’s cozy around the neck, but not like a strangulation hazard cozy.
😉
I bet it will be really pretty in all one color!
Jess
Jessica Sharpe
July 7, 2017 at 9:41 amI know you are using an L hook and 4 weight yarn for this but I was wondering if I can use a smaller hook and 3 weight yarn. I have a bunch of Lion Brand Mandala yarn and would love to do this with that. Also I have issues using larger size hooks.
Jess @ Make and Do Crew
July 11, 2017 at 8:57 pmHey Jessica,
Yes! I just saw someone who made this with Mandala and it was stunning! You can def size down your hook and just add a few rows to your hexagons, sweater bottom and sleeves if you feel like you need them.
PS. You’re so lucky to have scored some Mandala! It’s so hard to come by at the moment. 🙂
Jess
Judy
July 7, 2017 at 7:47 pmAn L hook seems so large foe worsted weight. Is that what you used?
Jess @ Make and Do Crew
July 11, 2017 at 8:55 pmYup, an L is what I used. This yarn has a bit of a halo because it looks sort of like roving yarn. The consequence is that using a smaller hook just results in a fabric that feels to “tight.” If you’re substituting another worsted weight yarn, feel free to size down your hook and just add a few rounds to your hexagon.
Happy crocheting!
Jess
Joan
July 8, 2017 at 1:49 pmI paid and downloaded the PDF of campfire cardigan but had to restart computer. Where can I find the PDF I downloaded?
Jess @ Make and Do Crew
July 11, 2017 at 8:46 pmHey Joan,
It might be in your download folder on your computer. I believe you can always access it from the email LoveCrochet sent you, but I will also email it to you in case you didn’t already find it somewhere. 🙂
Jess
Sandy
July 9, 2017 at 5:09 pmIs there a video showing how to stitch together? I have done it before but I wanted to compare styles. Also is there a video showing how to add hood? Those are my downfall… Loving the pattern!!!
Jess @ Make and Do Crew
July 11, 2017 at 8:37 pmHey Sandy,
Have you checked out Part 3 of the pattern yet? I do have a photo in there showing how the hood is worked, which might be helpful. It’s really quite straightorward as you’re just adding rows on top of the shoulder part of the sweater, and doing simple granny increases (explained in the pattern) as you go. As far as stitching it together, I used the mattress stitch and Moogly has a great video tutorial.
Hope that’s helpful!
Jess
Kelly
July 10, 2017 at 2:27 pmHow big should the octagon measure?
Kelly
July 10, 2017 at 2:56 pmSorry I meant hexagon
Jess @ Make and Do Crew
July 11, 2017 at 8:31 pmHey Kelly,
It just sort of depends on the size you’re making. My small measures 9″ from the center of the hexagon to one of the sides (so essentially the radius). You can try it on as you go if it’s for you though and just stop when you feel like it’s hitting you in about at your spine. Then make a second one the same size.
Hope that’s helpful!
Jess
Christina
July 11, 2017 at 7:41 amIve never been good at reading patterns ive always been good at watching and learning. I really want to try and make this but its all like a foriegn language to me is there by chance any video tutorials on this and others you can link me with?
Jess @ Make and Do Crew
July 16, 2017 at 2:40 pmHey Christina,
I don’t currently have an in-depth video tutorial, but I searched around and this one is fairly similar. I hope it’s helpful to you!
Jess
Rena Duran
July 11, 2017 at 12:07 pmI dont know if this question has been asked but where in the pattern does is suggest where to stop when doing the matress stitch when sewing the sleeve together. I see vaugly in the picture when using the stitch marker but its not exsplained. This is becoming a very popular want to crochet item in a group I’m in but a lot are lost on this particular part in the pattern.
Jess @ Make and Do Crew
July 11, 2017 at 3:52 pmHey Rena,
I can see how that might be confusing in the pattern. I will update it to include more details. You actually just sew across the entire hexagon edge (both for the back and the sleeves). If you watch the video, you might be able to see what I mean right after the “seam” sections when I lay the sweater down flat. 🙂
I hope that helps you! It sounds so fun to make a project together in a group!
Jess
Nancy Hildebrand
July 13, 2017 at 7:56 pmHi, I purchased the pattern yesterday but I am not good with written patterns. Do you think you’ll be doing a video tutorial for the cardigan? I would love that! The cardigan is beautiful and this is the first time I’ve seen one that I want to make.
Jess @ Make and Do Crew
July 16, 2017 at 2:33 pmHey Nancy,
Thanks so much for your purchase. If there’s enough interest in a detailed video tutorial, I’ll def consider making one. Thanks for the feedback!
Jess
Trudi Oliver
July 15, 2017 at 7:37 amThis is gorgeous and I’ve started making it, however I’m suing thinner yarn and a smaller hook! Because that’s what I had! Could you tell me the meaurements of the original hexagon please? I could work the rest out from there!
many thanks
Trudi
Rebecca Rowe
July 16, 2017 at 11:12 amI love this! I have just recently finished part 1. Now, I’m on to part 2. I wish there was a way to post a picture here on the comments but I don’t see a way to do it. I did do a post on my blog about it and put a picture there. I’m so excited to get this finished. I’m looking forward to doing another one soon too. This would make a wonderful present for s loved one!
Jess @ Make and Do Crew
July 16, 2017 at 2:26 pmI know! I wish sharing a photo was an option too. If you use Instagram, you can always tag me in your photo there (@makeanddocrew). I went to your blog, but I wasn’t able to find the pic. Will you direct me to it? I’d love to see it!
Happy crocheting, Rebecca!
Jess
Rebecca Rowe
July 23, 2017 at 1:33 pmHere’s the blog post for Part 1: http://muldrowgal.com/my-sweater-part-1/
I’m about half way through Part 2 of your pattern. I have the length added to the bottom. It’s almost so pretty like this that I want to stop. I’m going to finish it out with the long sleeves and the hood but I think I will probably be making at least 3 more modified versions of this. So glad that you have shared this! I don’t use Instagram often but I will log in and upload my pics so far and tag you so you can see my progress. I’m waiting to post part 2 on my blog until I have it finished. Then it’s on to part 3!
Jess @ Make and Do Crew
August 9, 2017 at 9:51 pmAw, Rebecca, it’s looking awesome! I can’t wait to see it finished!
Jess
Sharon Leckey
July 17, 2017 at 8:10 pmI’m trying to add the hood and wonder if I attach it to the front corner clusters chain 2 space. Thank you.
Dawn Baran
July 19, 2017 at 4:29 pmHi, I was wondering if this can be made with a solid hexagon ? Thank you.
Kay
July 22, 2017 at 6:52 pmI love the look of this cardigan and want to give it a go. What size hook do I need to use for it? Many thanks.
Jess @ Make and Do Crew
August 9, 2017 at 9:50 pmHey Kay,
I used an L. All the other supplies I used are listed about in the “Supplies” area. 🙂
Jess
Dawn Baran
July 24, 2017 at 9:10 amI was wondering if this can be made with a solid hexagon. My girls abhor the granny stitch but I’m dying to make this for all 4 of them.
Jess @ Make and Do Crew
August 9, 2017 at 9:49 pmHey Dawn,
Yes! I think it could. I’ve been wanting to try that as well. You’d just want to make sure you’re increasing each round (at the corners) by the same number of stitches as the pattern so that you can have a hexie that is able to fold in half like mine did.
Happy crocheting!
Jess
Hope
July 26, 2017 at 9:20 amI really love this pattern but I’m a little confused!!
How do you attach the new yarn in the 3chain space?
Jess @ Make and Do Crew
August 9, 2017 at 9:44 pmHey Hope,
My favorite way of attaching new yarn is to tie a slip knot on the hook, then enter the hook in the ch3sp, yarn over and pull the yarn through. Then the yarn is attached and you can proceed with the pattern. 🙂
Jess
Dawn Baran
July 26, 2017 at 3:48 pmCan this be made with a solid hexagon ?
Jess @ Make and Do Crew
August 3, 2017 at 5:02 pmYes, I think so! I’d actually like to try a version like that. You just want to make sure that when you fold your hexagon in half, it forms a “T” shape like in my photos above. Does that make sense?
Happy crocheting!
Jess
Robin reynolds
July 27, 2017 at 4:19 pmHow do you do the hood on the campfire cardigan
Kerry Frederick
July 30, 2017 at 7:53 pmI have made part one with a 7mm hook. I did the smallest size and the sleeves still seem really wide. What is the smallest size hook I can make this with without is being too small? I need it to be the largest size but the sleeves are way too wide. Thanks!
Jess @ Make and Do Crew
August 9, 2017 at 9:39 pmHey Kerry,
I’m not sure I can comment on the smallest size hook you could possibly work, but I did include some notes toward the top of the pattern on how to adjust it for smaller sleeves when working the largest size. There are some ideas there that might be useful. Assuming you’re too far along to consider those though, I would just work some extra decreases in your sleeve. 🙂
Jess
Sue Pado
August 1, 2017 at 7:06 amHi there. I have been asked to make this sweater for a friend of a friend who has a bust size of 50. I am awful at adjusting patterns. Could you please give me some help as to how big I need to make the hexagons so I continue with the sweater? And once I make the hexagons larger all I really have to do is make the sleeves longer and the body of the sweater longer, correct. The people isn’t near by so I don’t have her to try the sweater on. Thanks so much. I usually make baby sweaters so this is the first adult sweater I’ve made in a long time. I really appreciate your help and can’t wait to get started on it. I just can’t figure out how to make it a larger size (like a 2X).
Sue
Jess @ Make and Do Crew
August 9, 2017 at 9:53 pmHey Sue!
My best guess is that you’d want to make a hexagon with a diameter of about 22-23″. You could always ask your friend to have someone measure from her spine to about her nipple line, or a little further to the center of her body. That measurement is how far apart you’d want two opposite sides of your hexagon to be apart.
Happy crocheting!
Jess
Sandie
August 1, 2017 at 4:40 pmDaft question should there be 6 sides to the hexagon or five? Ive GOT Only five think its wrong
Sandie
August 1, 2017 at 4:43 pmDaft question should there be 6 sides to the hexagon or 5 think i have gone wrong?
Jess @ Make and Do Crew
August 3, 2017 at 4:35 pmThere should be six sides! 🙂
Carol
August 2, 2017 at 6:03 pmJess – I am struggling with the sleeve. The first round seems okay but I am struggling at the end of round one after the slip stitch into the top of the beginning double crochet to join. I don’t understand the 2 slip stitches to end of cluster. Where am I slip stitching? I have 3 single double crochets and spaces and it looks odd to me. Help?
Jess @ Make and Do Crew
August 3, 2017 at 4:23 pmHey Carol,
The two slip stitches to the end of the cluster are there to move your yarn over so that the beginning chains of the next round are starting in a space instead of right on top of the cluster you just slip stitched into to join. Does that make any sense? So you’ll just sl st in the next two double crochets of that cluster that you just joined in and that’ll move your yarn over into a space.
Let me know if it’s still confusing!
Jess
Carol
August 3, 2017 at 5:05 pmI think I must have done something wrong on the first round then. I attached color A to the middle of the sleeve cluster then chained 3 and then 1 dc in the next space, so that means there is no cluster when I come back around to join that first row, just that 1 dc in the middle of the cluster. I think this is where I am misunderstanding given your instructions in your comment.
Katie
August 3, 2017 at 6:33 pmHi. I haven’t started the cardigan yet, but I was wondering if the pattern would work well without a hood. Or does it just look strange? If the current pattern wouldn’t wrk well without a hood, do you have any suggestions on how it could be finished off or modified? TIA!
Jess @ Make and Do Crew
August 9, 2017 at 9:35 pmHey Katie,
Yes, you could def make it without a hood! You’d just work the border round around the neck instead of the hood. 🙂
Jess
TARA
August 13, 2017 at 5:05 amMade the M/L…had to leave off a few rows …sleeves are huge and to long.. sweater would have been way below my knees……so I do Love it .I will make another ..super easy only took about 2 days.. “this pattern was extremely fun , watching it come together ” thank you
Jess @ Make and Do Crew
September 9, 2017 at 5:19 pmI’m so happy to hear you found a way to make it work for you! You are a SPEEDY crocheter! I love those projects I can finish in a weekend!
Jess
Amanda
August 16, 2017 at 1:02 pmHi Jess! I recently purchased the pattern and was going to use Caron Simply Soft yarn as I can not find the New Basic 175 near me. Do you think this will work or will it stretch too much and not hold the shape?
Jess @ Make and Do Crew
August 16, 2017 at 4:19 pmI think it will probably work. 🙂 Just try on the hexagon as you go and stop when you’re happy with the way it’s fitting on your shoulder/back (just in case the gauge is a bit different than the New Basic 175).
Happy crocheting!
Jess
Sarah
August 24, 2017 at 11:09 amHi! I used your lovely pattern as a reference for my own hexagonal cardigan! Thank you so much for sharing! It’s just lovely!
~Sarah
https://sarahndipities.indiemade.com/blog/whats-new-glorious-green-hexagonal-cardigan
Jess @ Make and Do Crew
October 16, 2017 at 3:19 pmIt’s lovely Sarah! I love the button you added!
Happy crocheting!
Jess
Rebecca
August 27, 2017 at 12:46 pmJess and Ladies, I am positive I am the only one to ever make this mistake….> A FIVE SIDED HEXAGON.!! Didn’t think a thing was wrong until I had finished the first hexagon ….It did not fold into an L. NO WAY. After much stomping around and gnashing of teeth I realized it was supposed to have 6 sides. I have never crocheted a garment before and this pattern seemed the IDEAL pattern to do. So…I am froggin it and starting over…determined to make it. I hope you all find this funny because I have. Go ahead and LOL or ROFL. I am making the LXL size with Caron Cake Confetti. Wish me luck.
Jess @ Make and Do Crew
September 9, 2017 at 5:18 pmLol, I’ve totally done this before! You’re getting a crochet garment lesson along with a geometry lesson at the same time! Bonus! 😉
Gigi Lee
September 1, 2017 at 4:34 pmthank you so much for this pattern! I’ve been working on a pattern I designed (before yours was published) so I appreciate the work you have put into the design. I have a question about enlarging the hexagons please. When you stated a diameter measurement of 22-23″ is this the same as a radius measurement?
thanks again Gigi
Jess @ Make and Do Crew
October 16, 2017 at 3:18 pmHey Gigi,
Is really is hard work isn’t it!? The diameter measurement I’m stating is the hexagon from one point to the opposite point on the other side (so all the way across the hexagon). 🙂
Jess
Rachael
September 2, 2017 at 10:43 amHi Jess!
I’m a bit confused with the Mattress stitch. Should I see it with right sides facing in or out. This is my first time putting sides together like this so I’m confused.
Thanks so much!
Jess @ Make and Do Crew
September 3, 2017 at 11:51 amHey! You can seam it with the right sides facing out. Moogly has a great video tutorial if you need extra help. 🙂
Jess
DARCY WHITE
September 3, 2017 at 2:51 pmHas anyone done this with Caron cakes? I’m interested in knowing how you did it to come out basically the same on both sides.
Jess @ Make and Do Crew
September 9, 2017 at 5:18 pmI’ve seen many using Caron Cakes that turned out beautifully. I think people are just starting from the same color in two different cakes when making each of the hexagons. 🙂
Elizabeth
September 4, 2017 at 8:38 amThis is my first time making a sweater. My first hexagon looks like a boot. Is there supposed to be 6 granny squares in the center. I only have 5 in the first one but I started a second one and I put 6 in the center of that and it has the L shape it’s supposed to have. I want to make sure it is right before I continue.
Jess @ Make and Do Crew
September 4, 2017 at 8:18 pmHey Elizabeth,
Congrats on making a sweater! There should be six sides on the hexagon, so you’re right, it does form a boot or “L” shape when folded in half. To achieve this, start out with 6 little granny clusters at the beginning because those will eventually form your 6 sides. 🙂
Happy crocheting!
Jess
Val
September 4, 2017 at 2:58 pmGreat pattern!
About how much yarn did you have leftover in all the colours when you finished this sweater? I am thinking of making this in one colour or with a variegated yarn, so wondering how many yards I would need? Hoping to cut down on cost a little!
(In a size small)
Thanks!
Val
Jess @ Make and Do Crew
September 9, 2017 at 5:21 pmGosh, Val, I wish I could remember better. I totally understand your desire to just buy what you need. I believe I really didn’t have much left over of most of the colors when I made the small. I believe I had the most leftover of the Cafe Au Lait color. I’m thinking my leftovers might have totaled one full skein of New Basic 175…?
Gerri
September 6, 2017 at 8:52 amI’m really confused after attaching the hood.
There are 4 clusters from the shoulder seams. Do I now attach to the hood m? Then do the border?
Wendy
September 9, 2017 at 8:29 amLove this! Would like to make a matching one for my 10 year old. Ever try for a child? She’s small. Maybe a size 8-10. Any suggestions to make this work for her?
Thanks and keep up the good work!
Jess @ Make and Do Crew
October 16, 2017 at 3:17 pmI’d like to try that too! I’d just start with the same hexagon, only reduce the number of total rounds by quite a bit. You can keep trying it on her as you go to see when the hexagon is about the right size to cover her shoulder and meet in the middle of her back. From there, you can follow most of the pattern pretty similarly, with just adjusting the hood to be smaller for her 10 yr old head. 🙂
Jess
Tamra Smith
September 14, 2017 at 6:25 amI want to make this with a different stitch, rather than granny square…..but it’s not making an “L” when I fold it. Why? Can you assist me? I am making a hexagon but the fold isn’t making an “L”
SuePado
September 18, 2017 at 8:24 amHi there. I’m sorry to bother you again. I got the whole sweater done and everything was fine but the woman says the sleeves are too wide. She says they look wider than the picture. That’s because I had to make the largest size to fit her chest. Since it’s all sewn together and you’re a designer and I’m not do you have any ideas on how to make the sleeves narrower even if the sweater it all sewn together. I’m in tears right now. The thought of unraveling the whole thing is more than I can bear to think about. I hope there’s a way to salvage the sweater. Thanks for your help. I worked on it none stop and now the woman doesn’t like it. Thanks so much for any suggestions you might have to salvage the sweater. I spend a lot of time on it.
Sue
Sue Pado
September 18, 2017 at 1:26 pmHi there. You helped me before and I’m hoping you can help me again. I made the sweater in a large and the woman is now complaining that the sleeves are too wide. I have sewn the whole sweater together and can’t figure out a way to taper the sleeves more without having a big seam on the idea. I can’t really take the whole sweater apart since I’ve woven in all the lose ends, etc. I am so upset with this woman because I was doing it to be nice and it’s been nothing but problems. Do you have any magic tips to make the sleeves smaller even when the sweater is already all sewn together? I broke down and cried earlier!! Thanks so much..
Jess @ Make and Do Crew
September 19, 2017 at 9:47 pmOh, Sue. That sounds so frustrating. I know how hard it can be to convey to someone else that you’re not just a magic yarn machine.
I’m sorry that I don’t have any specific tips to help, although I wonder if you just tore out several inches of the sleeve if you could add a cuff similar to this sweater to sort of tighten things up near the wrists?
Sonya
September 30, 2017 at 10:38 amMaybe someone could correct the pattern instructions on the websites that this pattern has been posted? I was on Row 8, when I started questioning “3 sl st into next ch3sp”. Now I have to rip it all out and start over. 🙁
Jess @ Make and Do Crew
October 6, 2017 at 2:59 pmHey Sonya,
I’m sorry you’re having trouble. I’m not sure exactly what you mean by “correct the pattern instructions on the websites that this pattern has been posted.” If you’d like to explain more, I’d be happy to try to help.
Jess
Jamie Burns
October 2, 2017 at 11:49 amI’m having a hard time with the sleeves. Where do you end for the head?
I Feel like of I follow all the way across I’m going.to stitch the front ends together and then it’s not left open?
If I stitch one arm at a time do I leave any part of the back undone?
I’m going crazy! LoL
Jess @ Make and Do Crew
October 3, 2017 at 4:04 pmYou seam the entire top shoulder edges (so the complete hexagon sides). There is enough room for your neck in the gap that’s left in the front. 🙂
Yolanda Hernandez-Madsen
October 2, 2017 at 5:12 pmSue Can the ends of the sleeves be gathered by a tie of sorts? Would that look ok?
nysia
October 3, 2017 at 12:24 pmNot sure if this was mentioned, but when I made the Large/ex large version of your sweater, the only change in the pattern was to increase the number of rounds for the first color.
I recommend spreading the increased number of rounds over all your color choices or at least the first two, as I was left with an unbalanced look with way to much of color A. It sits unfinished now as I am deciding whether to frog it all and start over.
Brittany
October 12, 2017 at 2:24 amI’ve been staying away from cardigans and sweaters because they look really hard, this one is pretty easy so far. Thanks for the pattern!
Jennifer
October 26, 2017 at 3:12 pmI love this pattern and will be trying it in the next week or so. Roughly how long did this take you to make?
Jess @ Make and Do Crew
October 28, 2017 at 9:04 pmMy best guess is about a week and a half, working on it for an hour to two or three hours a day. 🙂
Mery
November 19, 2017 at 1:13 pmI love the campfire cardigan, but i am fairly new at crochet and need a tutorial, so do you have any idea when you will put one out?
Heather
May 11, 2018 at 6:44 pmHello there! I’ve just downloaded two of your cardigan patters. I’m excited to try them. My question is, in the photos are you wearing one in which you tapered the sleeves or were these the regular sleeves? Also is that a s/m you are wearing? I’m trying to get s feel for how large the sleeves will be and if I need to taper or use the other option suggested by the other user by adding rows along the joined sides. Thanks!
Jess @ Make and Do Crew
May 14, 2018 at 9:53 pmHey Heather,
In the photos I’m wearing the S/M with the tapered sleeve option. 🙂
Happy crocheting!
Jess
Shirley
May 18, 2018 at 11:41 pmHow did you do the tapered sleeve on the sweater you are wearing? This is a gorgeous sweater! Can’t wait to try it but wanted to make sure how to taper sleeves as I love how the one your wearing looks. Thank you so much for sharing this beautiful pattern!
Jess @ Make and Do Crew
May 20, 2018 at 3:08 pmHey Shirley,
In this one I’m wearing, I made the smallest size and then followed the “taper sleeve” instructions in order to decrease a bit as the sleeve progressed. If you’re interested in making a larger size with tapered sleeves, checking out the note in the pattern about a Make & Do Crew reader’s idea would be really helpful. 🙂
Jess
Carrie
June 19, 2018 at 5:52 pmI want to make my daughter a campfire cardigan. She is six, growing out of size 6 and into size 7-8 soon. I want to make her a campfire cardigan in a girls size 7. How do I do that?
Jackie
July 27, 2018 at 1:31 pmHello, I am making this sweater for a friend. I was having trouble with the extension and I noticed several others hae had the same issue. The stitches don’t add up right o the extentsion. I then paid for the pattern thinking it would make more sense. I saw somewhere that the stitches were corrected. I thought I saw it also, but now I can’t find where I saw it. Can you please tell me what they are. Row 1 is 45 spaces and I have that correct, but after that I don’t get 95 sts. I can’t just go with it and see if it will be ok, I am one who needs it to be right.
I appreciate it if you can help.
Thank you
JACKIE
October 2, 2018 at 7:16 pmCan someone tell me if this one fits slimmer in the arms than the hexagon sweater did. that one was a bit loose in the arms and making the wrist helped keep it on your wrist. I want to make this one, but just looking for feedback. thanks
kimberlie price
September 9, 2019 at 10:23 amthis site is using your picture and pattern.
https://sophieella.com/collections/tml-collection34-1/products/multicolor-hoodie-long-sleeve-outerwear
Jess
September 10, 2019 at 7:36 pmThank you for letting me know!