This simple, elegant crochet ballet wrap sweater is made seamless thanks to raglan construction. Get the free pattern below or purchase the ad-free, printable PDF here.
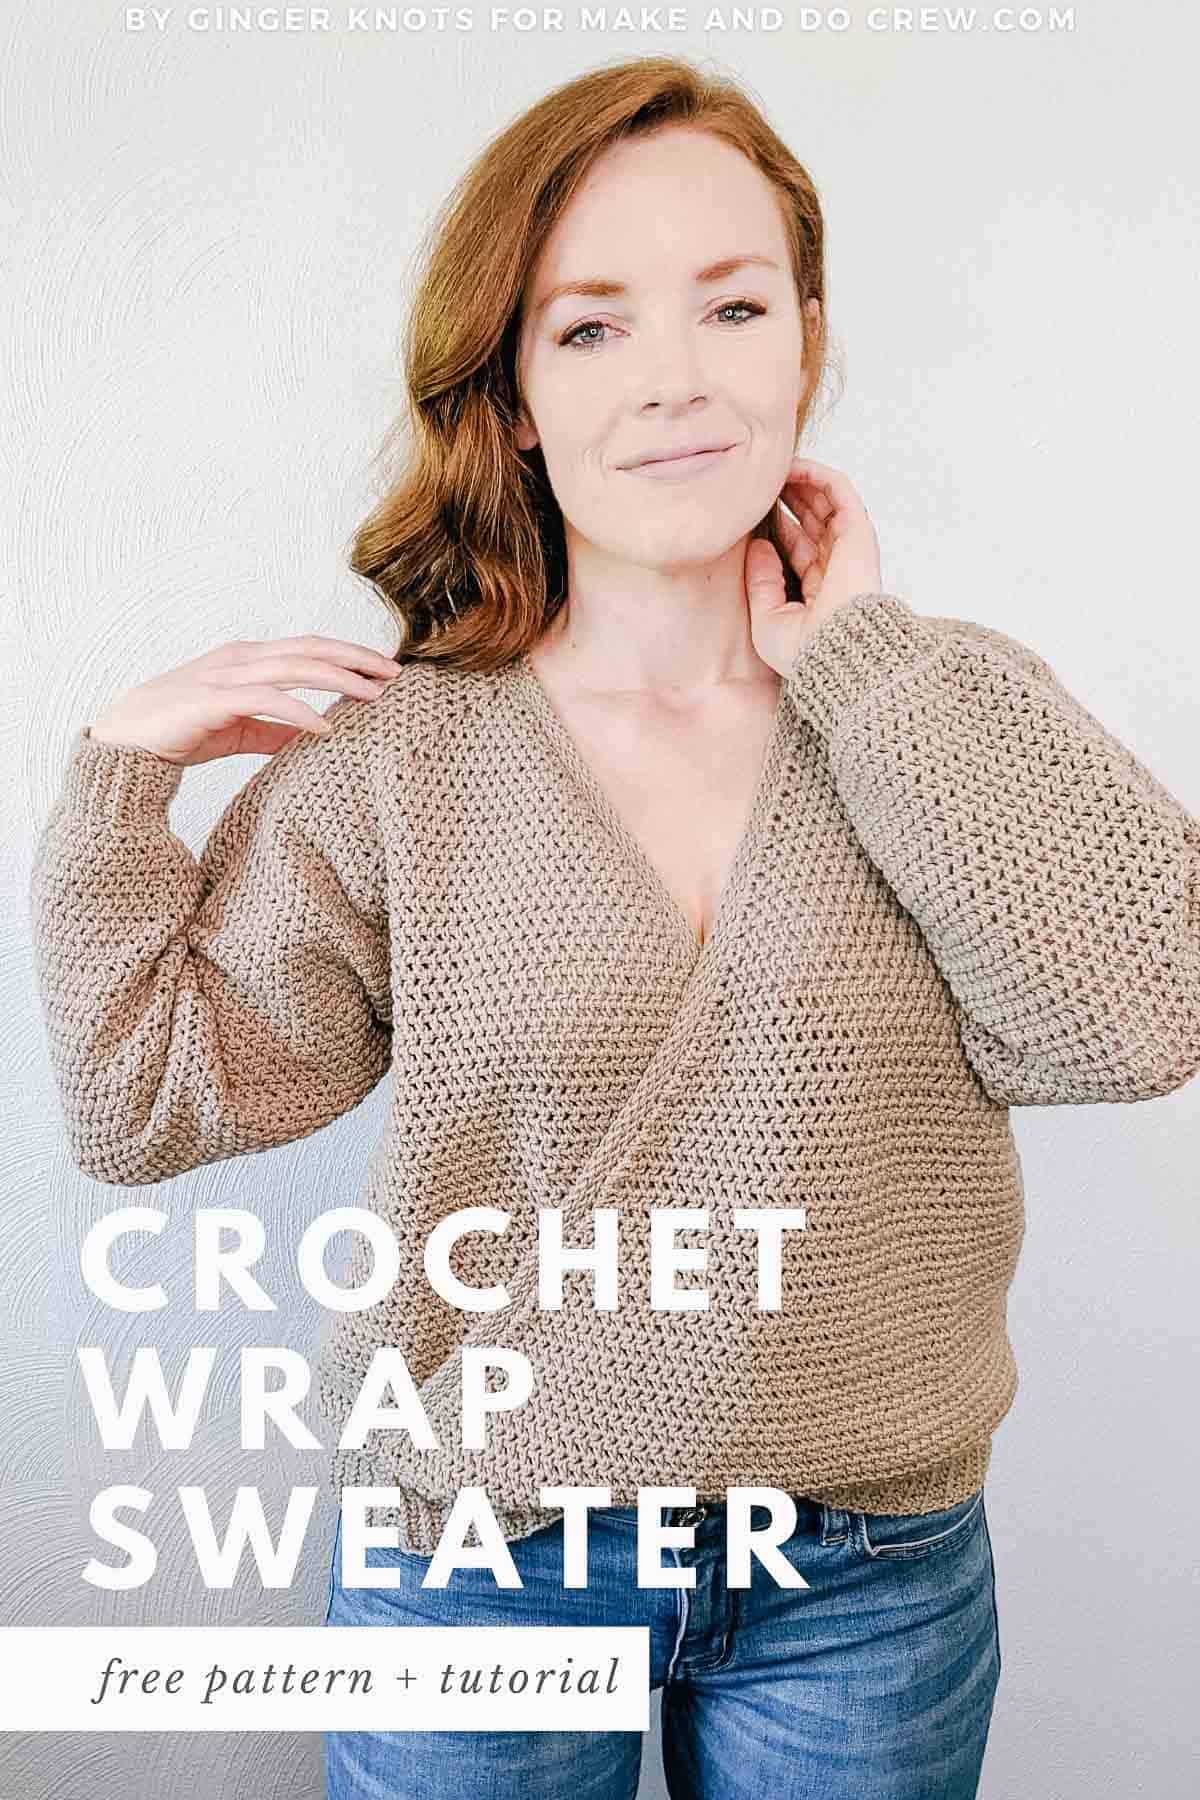
Thanks to Lion Brand Yarns for supplying the yarn for this ballet wrap crochet sweater pattern. This post contains affiliate links.
Jump to:
Today Courtney from Ginger Knots is here with her free crochet ballet wrap sweater pattern! You can see lots of of Courtney’s crochet patterns in her Etsy shop, Ginger Knots. And be sure to check her out on social media too: Facebook, Instagram and Pinterest. Courtney, take it away!
Why I Chose to Design a Crochet Wrap Sweater
Some of the sweaters I’ve made in the past have found their way to the back of my closet. While they are beautiful and I love them, they also have a tendency to be a bit hot to wear all day or stiff. My main goal was wearability.
I hoped to create a design with minimal seaming, a slightly over-sized fit, and a breezy fabric. The Cross Body Sweater checks all those boxes for me!
Related: 25+ Easy, Free Crochet Sweater Patterns ⇨
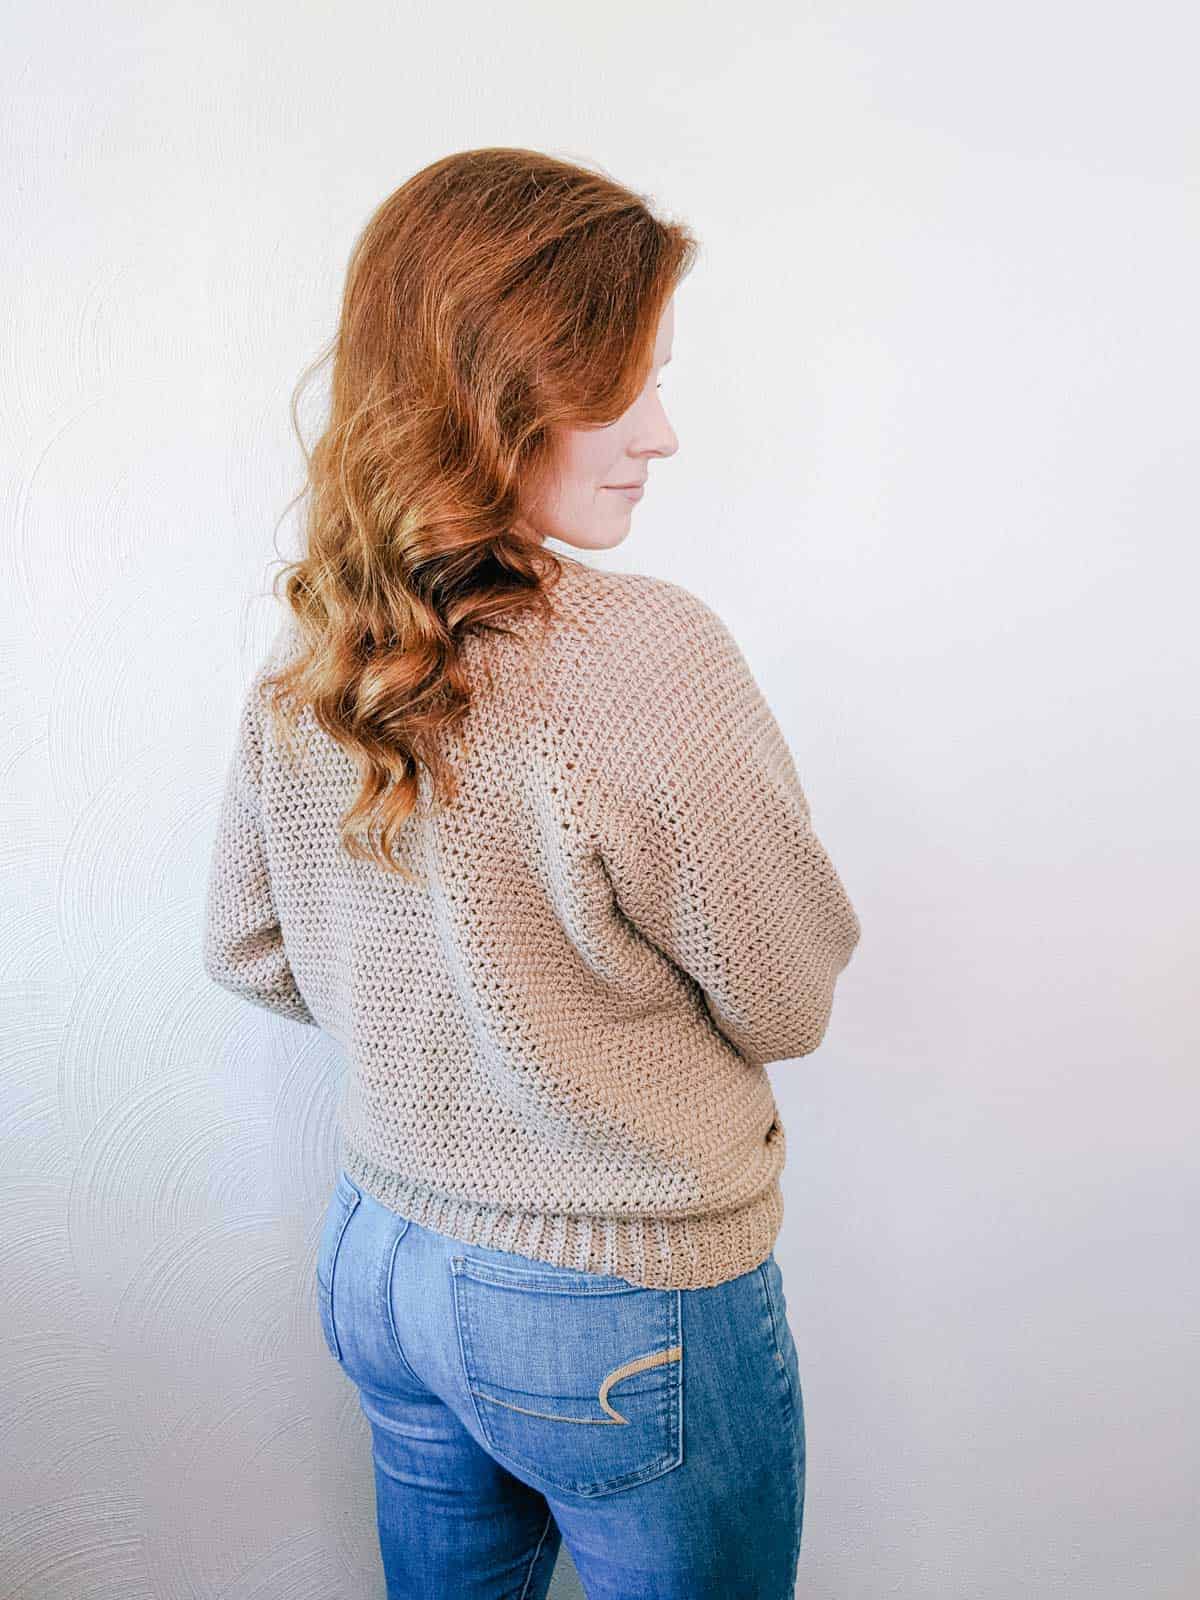
The Best Wearable Yarn For a Lightweight Sweater
I used Superwash Merino by Lion Brand for this design. That choice could not be more perfect. Superwash Merino is incredibly soft and light, but has enough heft to give the perfect drape. I plan to use it for many more sweaters in the future.
Related: 30+ Free Crochet Top Patterns for Warm Weather
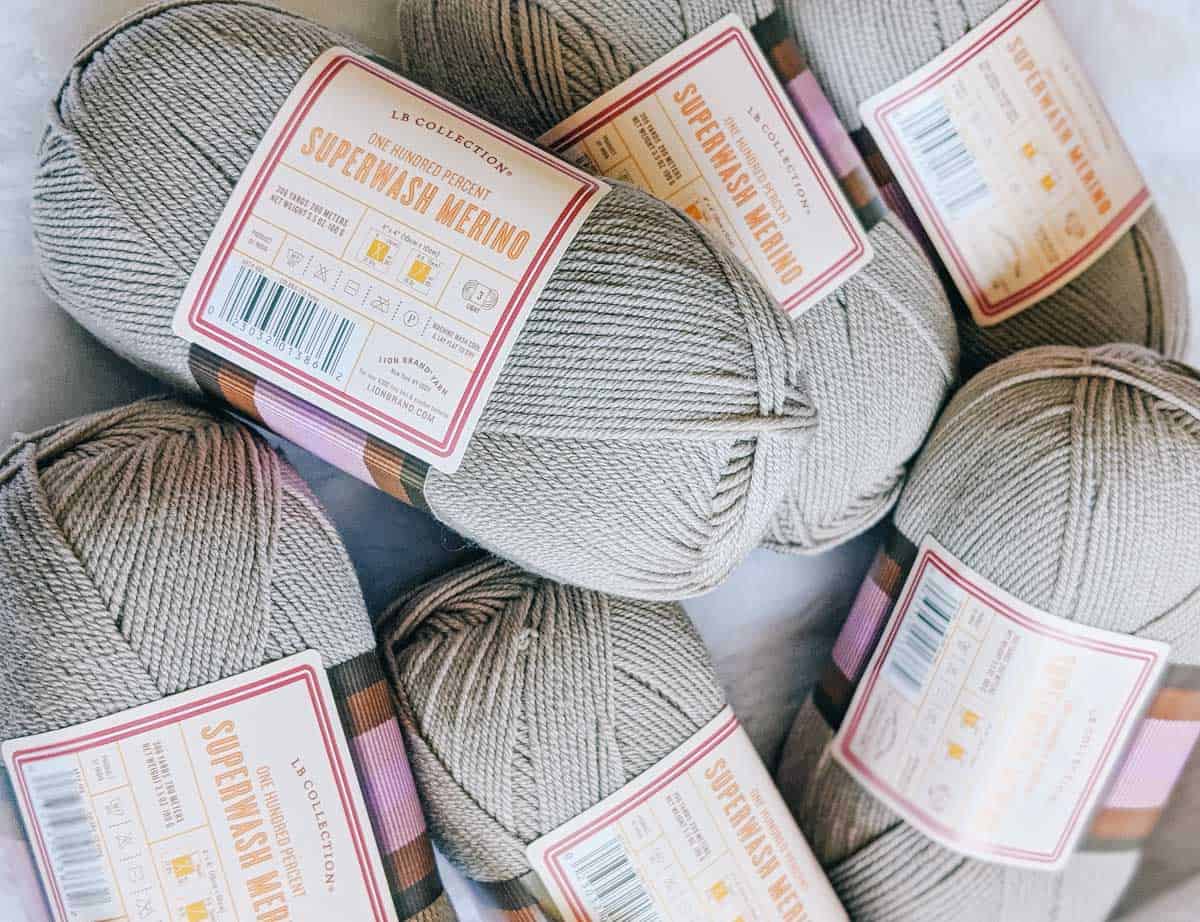
My testers tried out a few different yarns with wonderful results. (See their Cross Body Sweaters here!) They substituted with other lighter weight yarns like Coboo and Heartland, also by Lion Brand!
Crochet Skills Needed
Advanced beginners or intermediate crocheters should be able to complete this ballet sweater pattern well. The structure is a raglan shape with half double crochet used nearly the whole way.
You’ll learn my favorite way to attach trim by using single crochet and slip stitches.
New to making garments? Don’t miss our beginner’s guide to crocheting your first sweater.
A Versatile Handmade Garment
This is a great fall transition piece! It can be layered under jackets on chilly mornings or out in the sunshine when the days warm up unexpectedly.
I can already see myself overdressing at the pumpkin patch, being cozy at holiday parties, or keeping warm during overly air conditioned business meetings!
RELATED for your furry friends – easy crochet dog sweater pattern for small and large dogs

Pin It! click to pin this pattern for later ⇨
More Free Crochet Sweater Patterns
Crochet sweater patterns don’t need to be difficult. In fact, most of ours are made with very simple shapes. Dive into the wonderful world of crochet garments with cardigans, pullovers, ponchos, shrugs and more!
See more free crochet sweater patterns →
Crochet Cross Body Sweater –
Free Pattern
Purchase the ad-free, printable PDF here.
Pin this pattern for later here.
Explanation: This light and airy wrap sweater is the perfect fall transition piece. Using a lighter yarn with a simple stitch technique, this sweater has a wonderful slouchy shape and drapey fit.
There are notes in the pattern to allow for customization to fit the sleeve and body length to you.
The techniques you’ll need to know are single crochet, half double crochet, increases, and decreasing. The border around the neckline is slip stitches worked loosely and the trim of the sleeves and bottom of the sweater is single crochet.
Supplies:
• Lion Brand Superwash Merino (Weight: 3/light – 306 Yds, 3.5 oz)
– Hemp (#486-123) – 6 balls (XS – M), 7 balls (L), 8 balls (XL), 9 balls (2X – 3X)
• U.S K (6.50 mm) crochet hook
• U.S J (6.00 mm) crochet hook
• Yarn needle
• Stitch markers
• Scissors
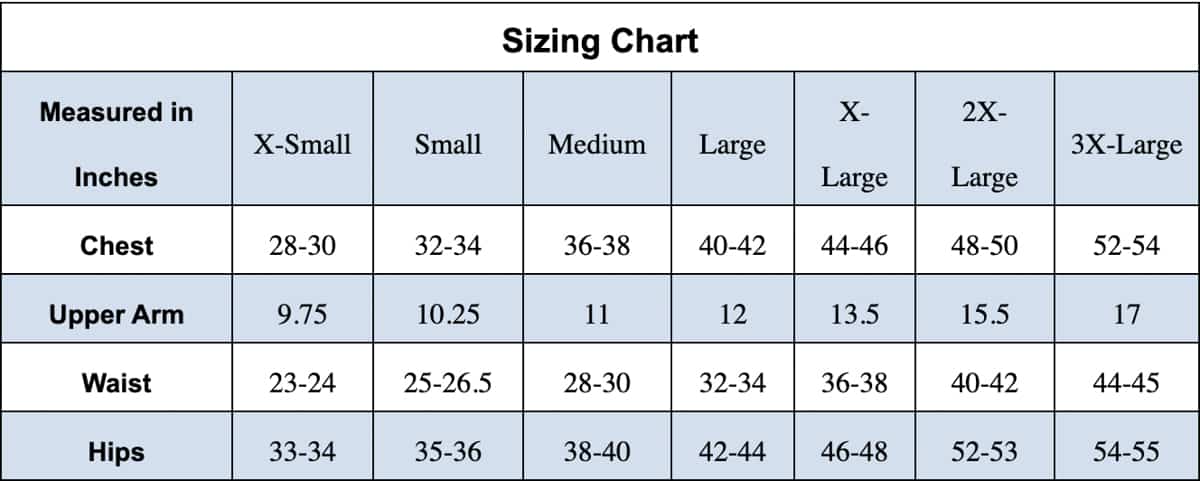
Sizes/Measurements:
Gauge:
• 13 sts and 16 rows = 4 x 4 square
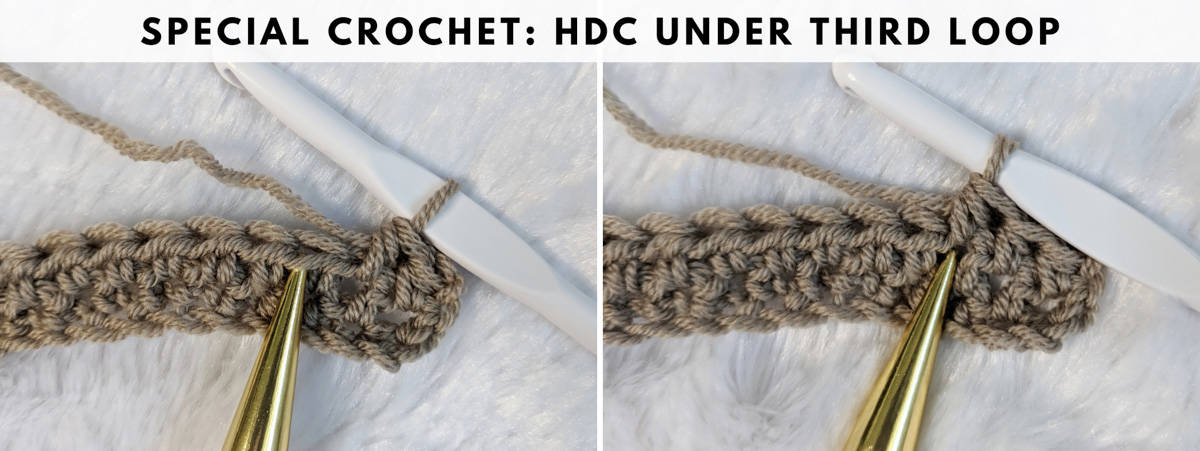
• Use special HDC st under the third loop
Abbreviations and Glossary (US Terms):
Ch = chain
Sc = single crochet
Dc = double crochet
Hdc = half double crochet
Sl St = slip stitch
BLO = Back Loop Only
RS = right side
WS = wrong side
Hdc2tog = half double crochet two together
HDC under third loop = referred to as special stitch
Special Stitch: Nearly all HDC sts throughout the pattern are worked under both loops as well as the third loop as noted after Row 2

Starting The Ballet Wrap Sweater
Set up foundation for neckline
Start with larger hook. Ch 41 for XS – L and 48 for XL – 3X
Row 1: SC in second ch from hook and in each st across. Add PM to st 13(13, 13, 13, 15, 15, 15) and 28(28, 28, 28, 33, 33, 33).
Begin Increasing with back shoulder

Row 2: Ch 1 and turn HDC in each st until PM, (dc, ch 1, dc) in st with PM, HDC in each st until next PM, (dc, ch1, dc) in st with PM, HDC in remaining sts across. Remove PM’s.
**All HDC sts are worked under both loops as well as the third loop for the rest of the pattern. There will be 5 increases along each row: 4 for the arms and 1 at the end of each row.**
Add increases for front shoulder
Row 3: Ch 1 and turn, HDC in first st, (dc, ch 1, dc) in next, HDC 11(11, 11, 11, 13, 13, 13), (dc, ch 1, dc) in ch 1 space from previous round, HDC 16(16, 16, 16, 19, 19, 19), (dc, ch 1, dc) in ch1 space from previous round, HDC 11(11, 11, 11, 13, 13, 13), (dc, ch 1, dc) in next st, 2 HDC in last st
Row 4: 18(22, 26, 30, 34, 38, 42): Ch 1 and turn, HDC to ch 1 space [Be sure to crochet all the way to the ch 1 space or the top of the first DC for each increase..
It feels like an extra stitch, but it is needed for the increase], (dc, ch 1, dc) in ch1 space, HDC to next ch 1 space, (dc, ch 1, dc), HDC to 3rd ch 1 space, (dc, ch 1, dc), HDC to last ch 1 space, (dc, ch 1, dc), HDC until 1 st remains, 2 HDC in last st
Body
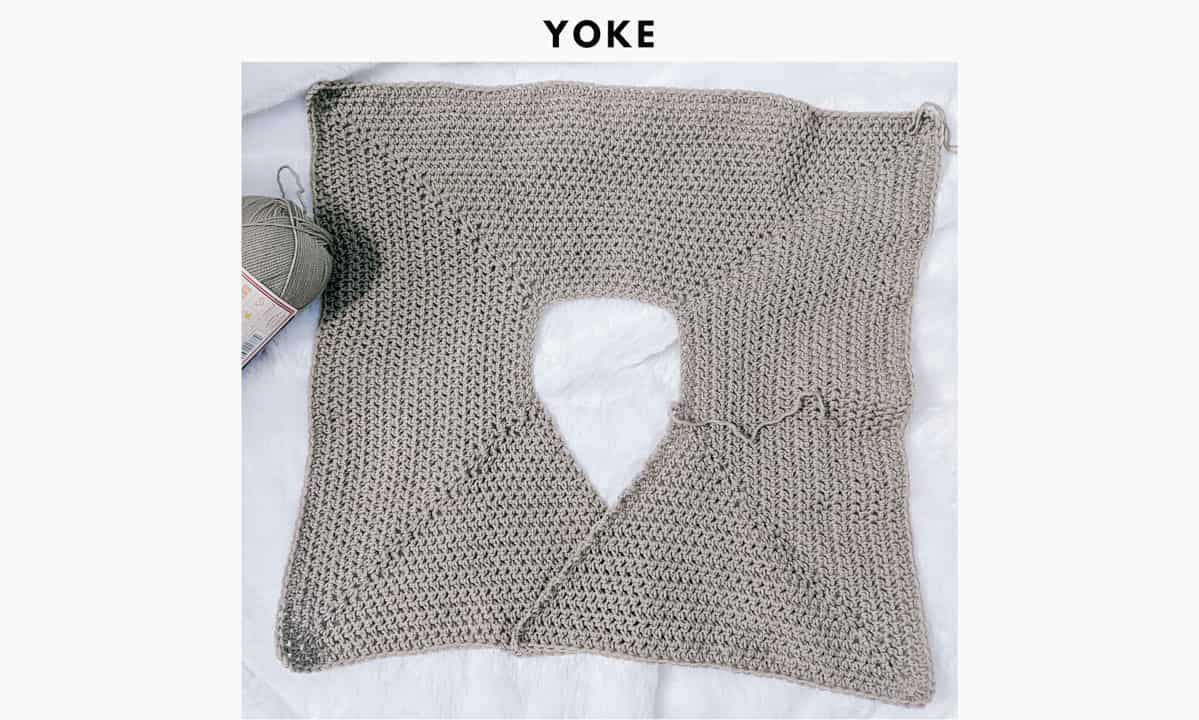
Using a PM, connect the two ch1 spaces on the sides together to form the arm holes. The stitches for the arms will be left out as you work the next row.
Row 1 – 48(44, 40, 44, 40, 36, 32): Ch 1 and turn, HDC in each stitch until 1 remains, 2HDC in last st. Test the length by putting your sweater on and add more rows if you’d like more length.
There will be an additional 2.5 inches added to the bottom for the trim.
Leave the bottom unfinished for now. The bottom ribbing is the last step of this pattern.
Sleeves
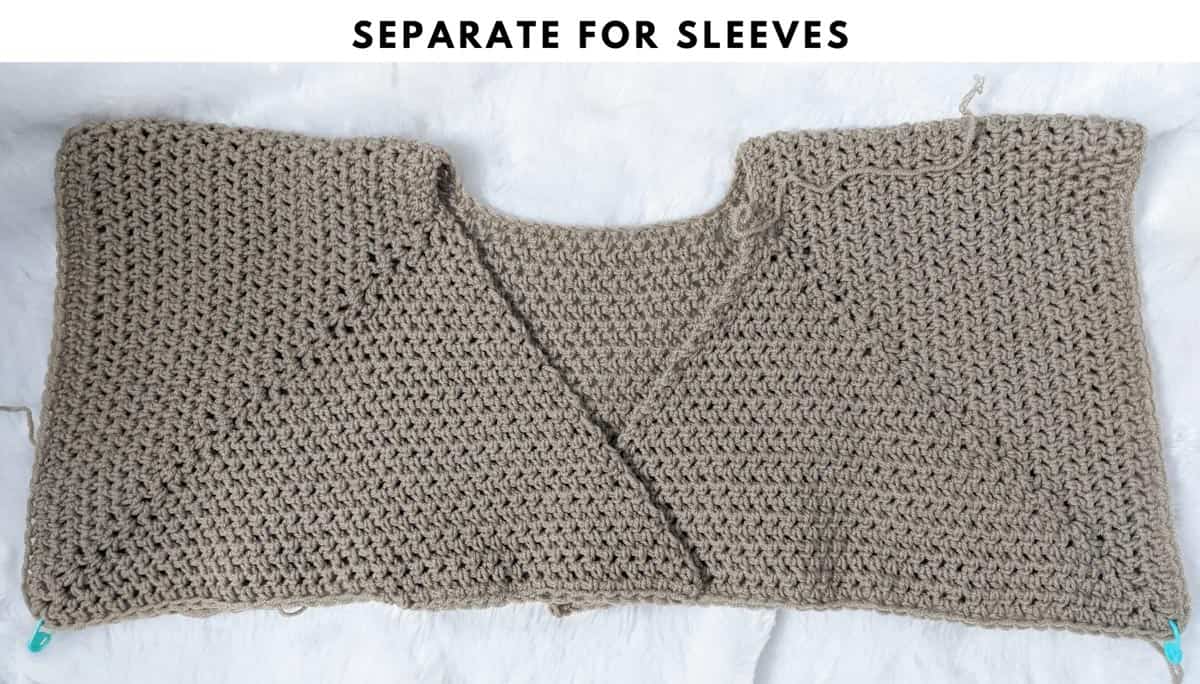
I have short arms. I made this to fit me so please don’t be discouraged if this pattern doesn’t have enough rows for longer arms. Add extra rows so your sleeves end where your wrist meets your hand.
We’ll add a cuff so that will ensure it is long enough to still be a little slouchy.
Join yarn where PM’s are (underarm).
Round 1: Working with the third loop facing you, HDC around the arm opening, sl st to join
Round 2: 56(56, 60, 64, 64, 66, 70): Ch 1 and turn, HDC in each st around, sl st to join
Decrease rounds: For each size, work the following decrease rounds separated below by each size. If you have the wrong number of starting stitches, you can add or remove decreases to adjust so the ending is correct.
Decrease: Ch 1 and turn, HDC in next 2 sts, HDC2tog, HDC around until 4 sts remain, HDC2tog, HDC in last 2 sts
XS (44 beginning sts): Rounds 7, 14, 21, 28, 35, 42 (End with 32 sts) – Every 7th row
S (52 sts): Rounds 5, 10, 15, 20, 25, 30, 35, 40, 45 (End with 34 sts) – Every 5th row
M (60 sts): Rounds 4, 8, 12, 16, 20, 24, 28, 32, 36, 40, 44, 48 (Ending with 36 sts) – Every 4th row
L (68 sts): Rounds 4, 8, 12, 16, 20, 24, 28, 32, 36, 40, 44, 48, 52, 56, 60 (Ending with 38 sts) – Every 4th row
XL (76 sts): Rounds 3, 6, 9, 12, 15, 18, 21, 24, 27, 30, 33, 36, 39, 42, 45, 48, 51, 54 (Ending with 40 sts) – Every 3rd row
2X (84 sts): Rounds 3, 6, 9, 12, 15, 18, 21, 24, 27, 30, 33, 36, 39, 42, 45, 48, 51, 54, 57, 60, 63 (Ending with 42 sts) – Every 3rd row
3X (92 sts): Rounds 2, 4, 6, 8, 10, 12, 14, 16, 18, 20, 22, 24, 26, 28, 30, 32, 34, 36, 38, 40, 42, 44, 46, 48 (Ending with 44 sts) – Every 2nd row
Without cutting your yarn, begin working the sleeve trim before repeating for the other sleeve.
Trim On Sleeves
Switch to the 6.00mm/J hook for a smaller trim.
You will attach the trim rows along the end of the last HDC row of your sleeve
After joining your last round, ch 11.
Row 1: sc in second ch from hook and in each st across (10 sts), attach with a sl st to the next HDC st along the sleeve row, sl st into next st and turn
Row 2: skip both sl sts and sc in next st, sc in BLO in next 8 sts, sc in last st, ch 1 and turn
Row 3: sc in first st, sc in BLO in next 8 sts, sc in last st, attach with a sl st to the next HDC st along the sleeve row, sl st into next HDC st and turn.
Row 4- 32(34, 36, 38, 40, 42, 44): Repeat rows 2 and 3.
Cut a long tail and weave the last row to the beginning ch row to close your trim using mattress stitch.
Slip Stitch Border Along Front and Collar
With the RS facing you, attach yarn to the bottom of the crossed front. You may want to go up a hook size or two for this section.
Row 1: Sl st LOOSELY in the end of each row up towards the neckline, across the neck, and down the other side, ch 1 and turn. These sts should not cause your sweater to bunch
Row 2: Sl st to the top loop only from the previous round (I didn’t say front or back loop because slip stitches are so tilted. You’ll always work in the one on top)
Row 3 and 4: Repeat row 2
Do not bind off and move on to the bottom trim.
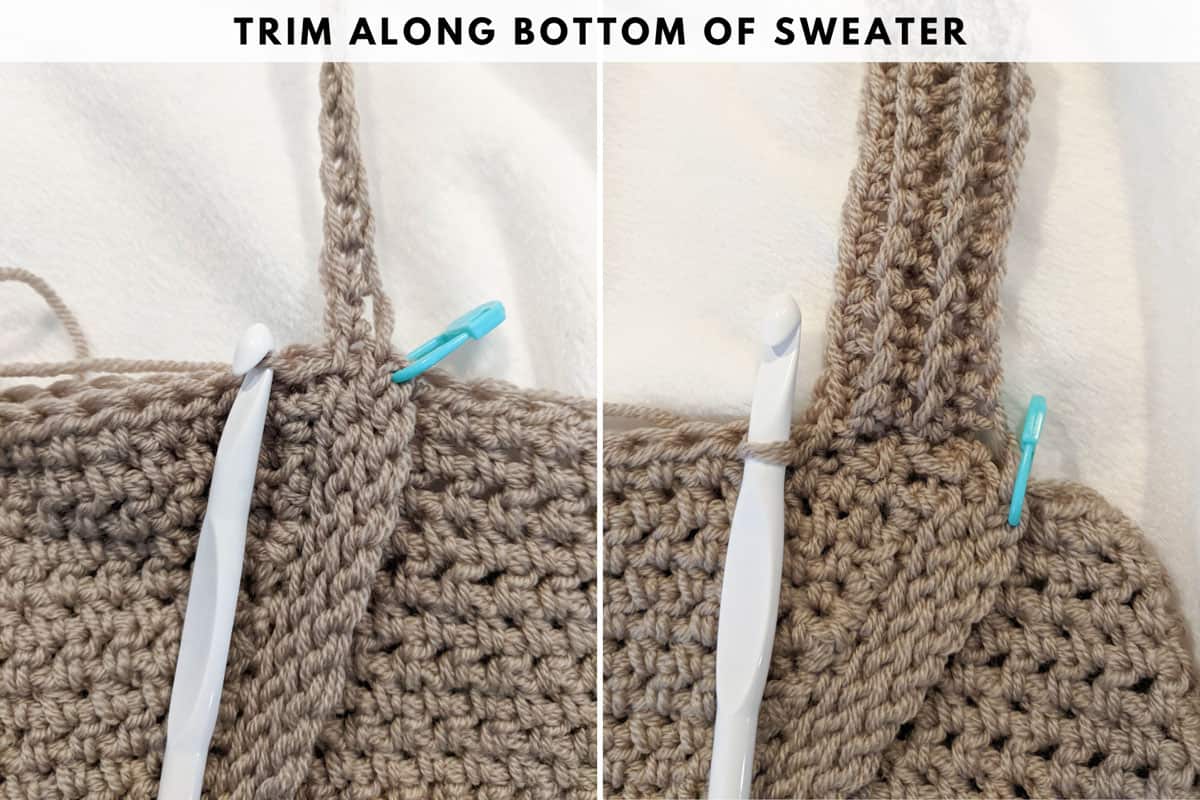
Trim Along Bottom of Body
Switch to the 6.00mm/J hook
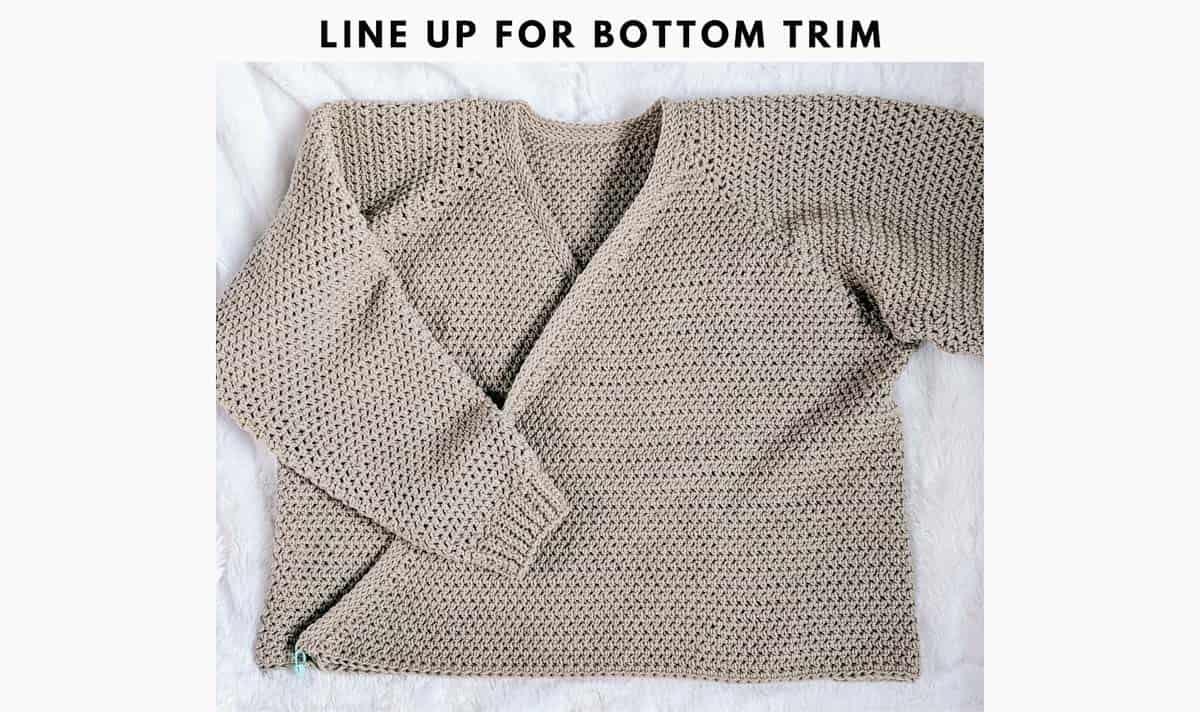
Lay your sweater flat with the front panels crossed and place PM on each of the points to attach them where you want them. You can adjust this alignment to fit tighter or looser on your hips depending on how you want your sweater to fit.
Repeat the same steps you used on your wrists for the bottom. Hold both layers of the front together and work through both layers to join them.
Attach your yarn to one of the PM and ch 13 from there
Row 1: sc in second ch from hook and in each st across (12 sts), attach with a sl st to the next HDC st along the sleeve row, sl st into next st and turn
Row 2: skip both sl sts and sc in next st, sc in BLO in next 10 sts, sc in last st, ch 1 and turn.
Row 3: sc in first st, sc in BLO in next 8 sts, sc in last st, attach with a sl st to the next HDC st along the sleeve row, sl st into next HDC st and turn.
Repeat rows 2 and 3 until you complete the trim around the bottom. Cut a tail long enough to sew the last row and the starting chain together using mattress stitch.
Bind off and weave in your ends!
Congratulations! You’ve finished your Cross Body Sweater. You may choose to lightly block it to create the best drape.
Crochet Ballet Wrap Sweater Conclusion
Wow, you crocheted your own ballet wrap sweater. Throw it on with jeans or over a crochet dress for an extra layer. Then, give your hook a high five and start planning your next project.
Thanks again to Courtney from Ginger Knots for sharing this free crochet wrap sweater pattern! Be sure to check out Courtney’s blog for lots more modern crochet patterns!
Find Your Next Sweater Project
Easy crochet sweaters are our absolute fave. Level up your handmade wardrobe with some of our most loved cardigan, pullover, and hoodie patterns.
You must use the category slug, not a URL, in the category field.That was so fun! Now what?
Learn a New Skill
When you’re ready to master a new skill, check out our detailed guides that include everything you need to know to level up your crochet game.
- How to Corner to Corner (C2C) Crochet for Beginners – with video tutorials to get you started
- How to Crochet a Beginner Hat – make an entire beanie in 1.5 hours!
- How to Crochet Amigurumi for Beginners – the ultimate guide to making your own toys and plushies
- How to Tunisian Crochet – learn with this video and a standard hook
Invitation to our Facebook group
Come discuss crocheting wrap sweater patterns and lots of other crochet projects and techniques in our Make & Do Crew Facebook group. Here thousands of helpful crocheters answer each others questions and share their stitches. Come join us here.






Maria says
Hello, do you happen to know what size the sample sweater is? I’m about the same size, but I would like my sweater to fit a little more closely. So excited to try this pattern and a new yarn!
Maria says
Hello, do you know what size Courtney made? I’m about her build, and I would like my sweater to fit a little more closely. So excited to try this beautiful pattern and a yarn I didn’t know Lion Brand offered!
Lora Fischer says
The ballet sweater is gorgeous!! In the free patern there is no explanation to the abbreviation PM, I’m sure it’s something simple but I can’t think of what it could be. Can you explain?
Lucy Fyfe says
Love the sweater but I got lost at the start. What are PM’s?? Is that another way of identifying the stitch markers?
Thanks.