Learning how to read a knitting pattern is crucial for embarking on new projects. But for beginners, these written knitting instructions can seem like a different language!
In this article, we'll demystify knitting abbreviations, symbols, and charts into understandable parts. By the end, you'll be able to follow a knitting pattern with confidence.
This guide contains affiliate links.
Jump to:
- Quick Start Guide To Following a Pattern
- Knitting Patterns vs. Knitting Stitch Patterns
- How to Read Knitting Patterns
- Understanding Abbreviations and Symbols
- How to Read A Knitting Chart Pattern
- Knitting Garments
- Gauge and Swatching
- Materials in Knitting Patterns
- Pattern Errata
- Avoid Common Mistakes
- FAQs
- A Final Word of Encouragement
- Invitation to our Facebook group
Quick Start Guide To Following a Pattern
Reading a knitting pattern is similar to following step-by-step recipe instructions. Here is an infographic that shows how each section of knitting instructions can be broken down into small chunks of information.
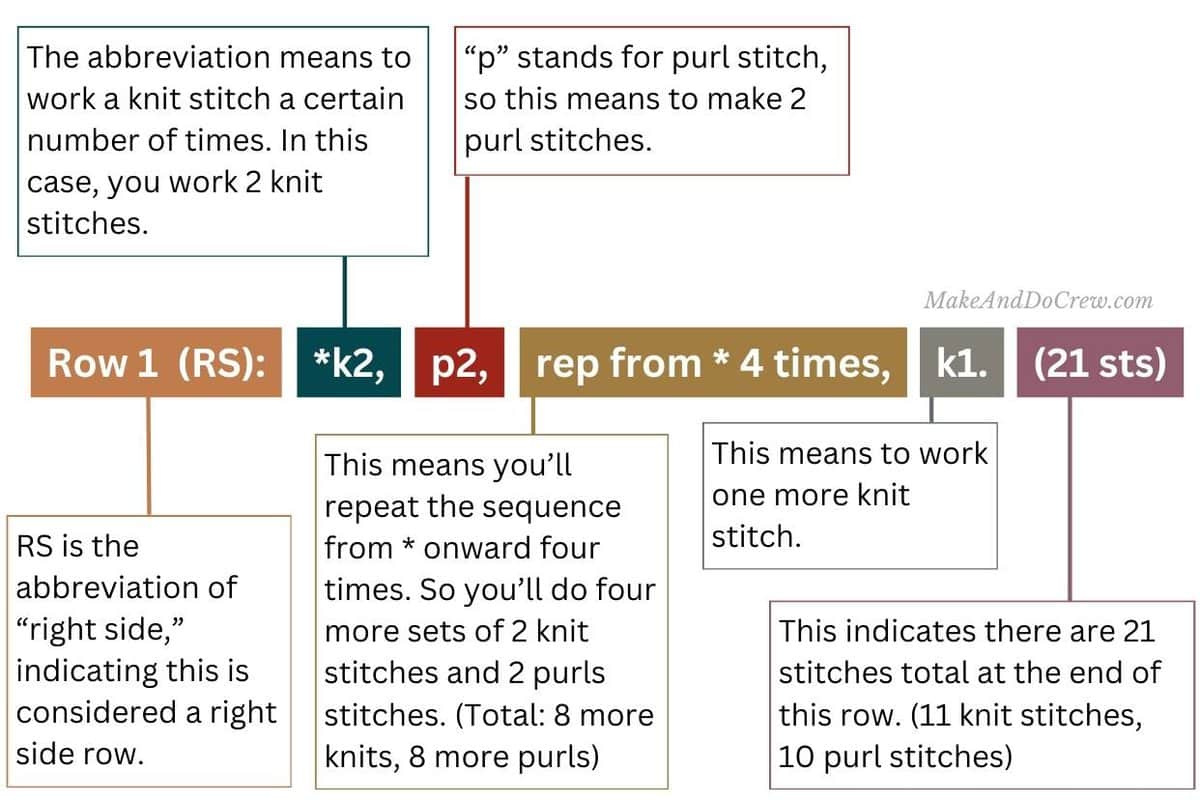
If you already have a specific question about reading knitting patterns, jump to that section of the article.
- Learning the abbreviations
- What do parenthesis, brackets and asterisks mean?
- What do the symbols on a pattern mean?
- How do I check my gauge?
- Common mistakes and how to fix them
Knitting Patterns vs. Knitting Stitch Patterns
You’ll likely run into the terms “knitting pattern” and “knitting stitch pattern,” which sound interchangeable. These are both types of knitting instructions but differ from one another in the information they provide.
What is a Knitting Pattern?
While knitting has many gorgeous general motifs, we use the term ‘knitting pattern’ to refer to the comprehensive set of instructions you follow to make your project. You may also see people simply calling these documents ‘patterns.’
You can think of knitting patterns as similar to a recipe. The creator will tell you all the equipment and materials and how to combine them for the finished product. A knitting pattern will likely include:
- Step-by-step instructions for creating the entire item
- Recommendations for the type of yarn, needle size, and gauge
- Expected measurements of the final project
What is a Knitting Stitch Pattern?
‘Knitting stitch patterns’ are the instructions for individual elements within larger projects. For example, the moss stitch, knit ribbing, and stockinette stitch are all combinations of basic knit and purl stitches, otherwise known as stitch patterns.
Repeating designs or textural components are divided into separate stitch patterns within the knitting pattern for a whole item.
How to Read Knitting Patterns
You’ll see knitting stitch patterns presented in two forms:
- Written patterns – a few lines of text written in a knitters’ shorthand.
- Knitting pattern charts – a diagram depicting each stitch and its properties.
You may even find both forms in the same knitting pattern.
Whether you’re following written instructions or a chart, I recommend thoroughly reading or examining the instructions before diving into a project. Knowing what to expect will help you visualize your end goal and recognize if you’ve gotten off track.
Following Written Instructions
At first, a written knitting pattern may seem like a cryptic collection of letters and numbers. I promise you this is not the case.
Within those short lines of text and the alarmingly low ratio of letters to words are row-by-row instructions for your project. Think of reading patterns as learning to interpret a crafty hieroglyphic code shared by the knitting community.
Though there is no standardized convention for writing knitting patterns, designers often use similar templates and styles. Common elements you may find in knitting patterns are:
- Presentation in rows
- Numbers
- Bold and italics
- Abbreviations
- Symbols
Getting Started
Pattern designers structure instructions in a deliberate order so that you can work through them methodically. When learning to follow a knitting pattern, read the content and any columns on the page from left to right.
The first step in any pattern will be to cast on a specified number of stitches. Your first slip knot always counts as a stitch, unlike in crochet. Some patterns will specify a particular cast-on method. Use that, or stick with any technique you know well.
Lines
Projects often involve repeating a chunk of knitting, such as a stitch, a row, or a sequence of rows. To keep patterns uncluttered and straightforward to follow, designers condense these repeats into lines of instructions for stitch and row repeats.
Right Side, Wrong Side
Each time you turn your work around to start a new row, you work on the project's opposite side. If you see ‘RS’ and ‘WS’ in a pattern, be relieved that it isn’t a new technique you need to master.
These letters indicate which side of the project is the ‘right side’ – or the side most likely to be on show when the item is in use – and which is the ‘wrong side’ – the most likely to be hidden.
Though some projects look the same on both sides [reversible stitch LINK], others build up their ‘right’ and ‘wrong’ sides with alternating rows. Often, patterns will explicitly state which is a right-side row and a wrong-side row as a helpful guidepost to help you keep track of how your knitting relates to the pattern instructions.
Numbers
A number following an abbreviation or a bracketed sequence tells you how many times you must complete that stitch or sequence. Don’t worry; we’ll talk about brackets more in a moment.
k6, p4
The above example is telling us to knit six stitches, then purl the next four.
Numbers also appear in abbreviated instructions. For example, k2tog stands for ‘knit two together.’ Be aware of any such abbreviations in your pattern by reading it through before you begin.
Bold and Italics
Often, designers use bold or italic writing to structure the pattern or highlight certain information. For example, the beginning of a new row is often written in bold so you can follow the pattern more easily.
Row 1: K1, [P2, K2] 6 times, K1
Italics can be used to add clarification to a complicated instruction. Designers might also use italics to give knitters helpful tips or reminders at tricky stages in the pattern, like in this example:
Note: Make sure to slip the first stitch of every row purlwise to create a neat edge.
Understanding Abbreviations and Symbols
Common ways to express stitches and repeats include abbreviations and symbols. Designers do this to avoid writing out the same instruction multiple times. This saves space and keeps the pattern concise and readable.
In my experience, deciphering this type of “knitting code” is one of the most intimidating aspects for a beginner pattern reader. Let’s look at how you can make sense of knitting shorthand.
Abbreviations
Thankfully, abbreviations remain more or less consistent across English-language patterns. In your knitting journey, you'll meet abbreviations covering any technique you can imagine.
For this reason, you shouldn’t worry about learning every possible abbreviation while reading your first pattern. Check out a knitting stitch glossary if your pattern doesn’t include a legend.
Read the instructions all the way through before you begin, and look up any abbreviations you need clarification on. Here are some common knitting abbreviations:
| Abbreviation | Meaning |
|---|---|
| BO | Bind off |
| CO | Cast on |
| dec | Decrease |
| inc | Increase |
| K or k | Knit |
| P or p | Purl |
| Pat or patt | Pattern |
| RS | Right side |
| WS | Wrong side |
| ssk | Slip slip knit |
| St or sts | Stitch or stitches |
Symbols
Since many knitting patterns involve a lot of repeated stitches or techniques, designers use parentheses, brackets, and asterisks to keep instructions concise and readable.
Single Asterisks (*)
You will see asterisks (*) and double asterisks (**) in many knitting patterns. These symbols mark repeats (aka sections of the pattern to complete multiple times).
Asterisks work similarly to parenthesis in algebra problems as they group information together. In this case, they indicate a set of stitches you should repeat.
Mostly, designers use single asterisks (*) to bookend a repeat, showing where a set of instructions begins and ends. A number following the asterisk-surrounded steps tells you how many times you should repeat those instructions.
Round 12: *K 10, dec, rep from * 5 more times
What it means: Knit 10 stitches, then work a decrease. Repeat this same sequence (knit 10, decrease) five more times, so you'll have a total of 60 regular knit stitches and six decreases. This is because you are repeating the instructions six times in total.
Double Asterisks (**)
Double asterisks (**) often denote larger or more complex groups of steps for a major part of the pattern.
Double asterisks are also often used so that the pattern doesn’t become a confusing mash of icons. If two separate repeating sequences exist in the same row, double asterisks may be used to distinguish the second element from the first.
Brackets []
Brackets are another way to indicate a specific repeat. They express a sequence of stitches to be repeated. As with asterisks, following the bracketed grouping of stitches is the number of times you should repeat this sequence. There is some variation in where designers use brackets and asterisks, making them often interchangeable.
[Yo, k] 5
What it means: This instruction is telling us to do one yarn over, then knit the next stitch, and repeat these two steps four more times, for a total of five times. At this point, you’d have five yarnovers and five knit stitches on your needle.
Parentheses ()
Some designers may use parentheses in the same way as brackets. However, parentheses generally signal a group of stitches you will work together into one stitch.
Wanna save this pattern?
Row 4: K4, (K1, P1, K1) all in next st, K10, (K1, P1, K1) all in next st, K4
What it means: In this example, the sets of stitches in parentheses are worked into the same stitch. Knitting the same stitch helps create texture in techniques such as the bobble or popcorn stitches.
Now that we've covered written knitting instructions, let's learn how to decode the heirogliphs of knitting charts.

How to Read A Knitting Chart Pattern
Deciphering knitting diagrams can seem tricky at first, but these charts can be a super helpful resource once you know what you are looking at. Many more experienced knitters find them more intuitive than written instructions.
Getting comfortable with interpreting knitting pattern charts brings plenty of benefits.
Knitting pattern charts are:
- Suited to visual learners
- Straightforward for keeping track of your place
- Clear and less open to misinterpretation than written instructions
- Accessible to anyone, removing language barriers
What You Need to Know to Get Started
The basics of learning how to read a knitting chart are simple. Consider the chart or diagram as a sequence of information nuggets that will help you visualize the finished section.
Each point shows you the type and location of each stitch. The horizontal numbered rows count the number of stitches in the row. Vertical numbering keeps track of the number of rows.
Reading Right to Left and Back Again
Remember that the chart represents the final fabric, seen from the right side. This is why most knitting charts start in the bottom right corner, where your first stitch will be in the fabric if you’re right-handed. From there, read the first row from right to left.
Once you reach the end of the first row of flat knitting, you will likely need to read the next row from left to right. This is to account for the fact that you have turned your project around to the wrong side, but the chart only shows the right side.
Stitch Legend
Like any good map, a knitting diagram will include a legend. This key will indicate which symbol represents which technique. Blank boxes typically represent a knit stitch. It might seem complex, but it won’t take long to become familiar with the legend once you are concentrating on the project.
Knitting Garments
Knit sweaters and clothing patterns can seem intimidating because of their many parts, so I suggest breaking the process down into smaller steps.
When preparing to follow a garment pattern, look out for these key elements:
- Gauge details: This tells you what stitch tension you need to achieve.
- Shaping and sizing: Different sizes may have different stitch counts and shaping instructions.
- Neckline and collar: Familiarize yourself with the small details of these sections.
- Sleeves and armholes: Get acquainted with the shaping instructions and how to join sleeves to the body.
Some patterns use terms such as ‘reverse shaping’ or ‘work same as left.’ In this case, you should repeat the same shaping instructions. Writing these phrases avoids the need to rewrite the shaping instructions.
Repeating the same shaping ensures the final item is symmetrical, perfect for garments such as knit cardigans.
Patterns with Multiple Sizes
Knitting patterns for blankets or garments usually include instructions for different sizes of the finished products. You will see the smallest size in the main body of the instructions, followed by parentheses for stitch counts and numbers of repeats for each larger size.
CO 12 (14, 16, 18, 20)
In the above example, a different number of stitches are needed to cast for each size.
Small: Cast on 12.
Medium: Cast on 14.
Large: Cast on 16.
Extra Large: Cast on 18
Double Extra Large: Cast on 20.
Important: Only follow instructions for one size. Make the pattern easier to follow by identifying your pattern’s counts and repeats before you start knitting. I recommend highlighting the numbers pertaining to your size before getting started. Check your work regularly to catch mistakes early on.
Understanding Schematics and Choosing a Size
To help choose your size, most patterns include bust measurements and often other measurements. Some patterns will also visualize the expected measurements of different sizes in a schematic.
A schematic is a line drawing of the garment that visually represents its dimensions and shape. They can be a helpful way to compare pattern sizing and measurements to your own body.
Studying the schematic also helps you understand how the different pieces of the project fit together before you cast on.
Gauge and Swatching
Many knitting patterns will state a required gauge. This means how many stitches and rows fit into an inch of the final knitted fabric. Achieving this gauge is essential as it affects the finished item's dimensions and the garment's fit.
By knitting a swatch (a sample square of fabric), you can check your knitting style, yarn, and needles match the pattern’s requirements. Because knitting tension is very personal, adjusting your needle size to match the pattern gauge is always acceptable.
Learn more about needle size here.

Materials in Knitting Patterns
Every knitting pattern will have a materials section. This will include:
- Yarn - Most patterns state the yarn weight, type of fiber, and yardage (amount of yarn) required to create an item of the dimensions displayed. A pattern will often tell you the number of skeins of yarn [LINK] you’ll need if using the same materials as the sample.
- Needles - Patterns indicate the recommended needle size and type to achieve the desired gauge and shape.
- Additional tools - You may need stitch markers, tapestry needles, or crochet hooks to help you with the project or do certain techniques.
Pattern Errata
While most designers do their best to avoid mistakes, sometimes a knitting pattern will be published with an error that must be corrected. These updates to knitting patterns are called “errata.” Occasionally, a publication or designer will include an errata section on the pattern website or Ravelry page.
Avoid Common Mistakes
Reading knitting patterns like a pro takes practice and patience. Don’t worry if you make a few mistakes; most things are fixable. You will get more comfortable with patterns over time. Take your time and try to enjoy knitting as the relaxing hobby it is!
Confusion of Which Direction to Work
One mistake I see beginners make most often is to pick up their work mid-row and forget which direction they’re working. This can result in knitting the same stitches over again instead of finishing the unworked stitches of the row.
First, make sure you begin in the right place. Often, you will see an arrow pointing in the direction you should start working.
Place a stitch marker on the right side of your fabric a few rows into the pattern so you can easily see if you’re working a right side row or a wrong side row. It helps to check regularly by identifying the side you’re working on and comparing it with the row instructions.
Losing Your Place
The best way to avoid losing your place in a knitting pattern is to count your stitches and record your progress frequently. A conventional way of doing this is by using stitch markers.
Using a place marker at the beginning and end of repeats or sections can also help. You can also use markers in conjunction with other aids, such as a row counter app. I like My Row Counter for tracking, downloading, and organizing projects.
A written note is handy if you take a break and need to pick up where you left off. When possible, set your knitting down at strategic places in the repeat. Picking up at the start of a row or round is much easier than starting in the middle of one.
Learning to recognize stitches and compare these against the diagram will help you regain your orientation if you lose your place.
Preparation
One source of common mistakes is not preparing properly before you dive in. Reading the pattern thoroughly in advance gives you an overview of the project. This is your chance to pinpoint and clear up uncertainties.
If you need help with something, wise Grandmother YouTube is a click away, and there are endless tutorials to guide you. I’d love to have you join our Facebook group where thousands of helpful crocheters and knitters answer each other's questions.
Misunderstanding Abbreviations and Instructions
Reading knitting pattern abbreviations requires focus and attention to detail. When reading your first pattern, it can help to highlight the abbreviations. Then, you can spot them quickly when they come up in the instructions.
Keep a knitting glossary available while you work. This could be a physical reference book, an online resource, or a printable kept in your knitting bag. Pull it out when you need a reminder of the new knitting language you’re learning.
Misinterpreting Charts and Diagrams
Interpreting knitting charts is a learning journey. The best approach is thoroughness and care. If you are new to charts, practice with simple charts to build your experience and confidence.
Novice or experienced knitter, you should take your time getting to grips with your chosen chart before you begin. Beginners and verbal learners can try writing out each row to help them understand the pattern.
FAQs
At first, reading knitting patterns can be daunting. You’ll need to get used to pattern designers' abbreviations, symbols, and layout. Thankfully, many helpful online resources and glossaries guide beginners through their first projects. Try beginning with a simple pattern, such as this blanket knit on straight needles.
To choose the right size in a knitting pattern, refer to the sizing information and measurements listed in the pattern. Compare this to your or the intended recipient’s body measurements. Follow the instructions for the correct size and make any adjustments necessary.
Often a pattern will tell you how much “positive ease” is recommended, which means the intended difference between the wearer's body measurements and the finished garment measurements.
If you make a mistake while following a knitting pattern, stay calm and locate where you went wrong. You may need to rip out a few rows or stitches to correct the error. Supplies like a stitch holder and a crochet hook can be handy before you unravel your knitting.
Use online resources or ask an experienced knitter for help fixing the mistake, then pick up where you left off in the pattern.
Sizes in knitting patterns are listed smallest to largest, with the basic instructions written for the smallest size and stitch counts for larger sizes following in parentheses. It’s important only to follow the counts for one size.
It can help to highlight the counts for your size before you begin. Stitch markers are your best friend for keeping track of the counts while you work. Use these handy tools to mark key points or repeats, or simply place them every 10-20 stitches to make it easier to check that your stitch count is on target. Regularly counting your stitches is also good practice to ensure accuracy.
If you see ‘repeat’ in a knitting pattern, this means you should repeat a set of stitches or instructions. Groups of steps are often indicated using asterisks, brackets, or parentheses. The number following the grouping indicates how many times you should repeat the sequence.
A Final Word of Encouragement
While the lack of a completely uniform pattern writing style might sound confusing, it’s also what makes the tradition of hand knitting so charming.
Read through the entire pattern to get a feel for the designer’s pattern writing style, and you’ll soon feel fluent in many different knitting pattern “dialects.” Happy knitting!
That was so fun! Now what?
Invitation to our Facebook group
Come discuss learning how to read knitting patterns and lots of other =projects and techniques in our Make & Do Crew Facebook group. Here thousands of helpful crocheters and knitters answer each other's questions and share their stitches. Come join us here.



Leave a Reply