Well, who enters a place called Quilting Adventures and doesn’t find any inspiration? Not these girls. We happened upon this awesome wool felt in colors that had fall written all over them.
I had seen some DIY felt flowers around the internets for a while now and always wanted to try to make some. They are adorable and seemed perfect to pin to a sweater, a purse, a cowl a headband, a toaster. Okay maybe not a toaster, but you get the idea. They’re cute EVERYWHERE!
I explained how I thought we’d go about making them to my mom (which was really more of a formality—she’s not one to turn down a project, familiar or foreign.) And there in the middle of Quilting Adventures, we decided it was time for our felt-y garden to begin to grow.
1. This Make and Do Girl template for the petals and flower foundation (DIY_Felt_Flower_Template)
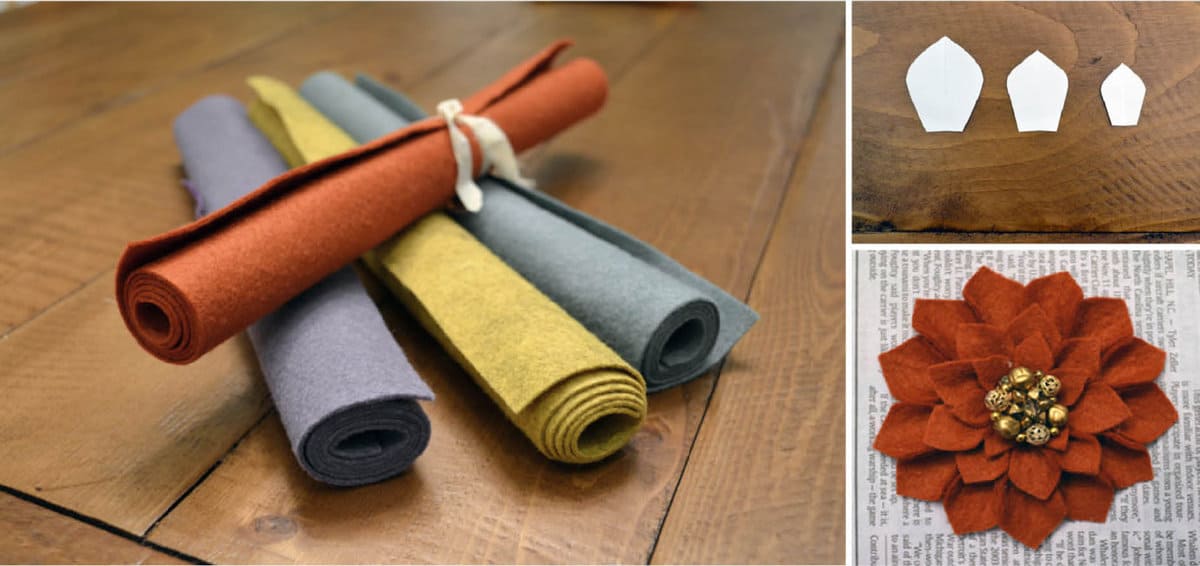
2. Felt (Ours came in 12”x18” pieces and there’s more than enough to make a few flowers out of one piece. We used 100% wool felt, but you could use any kind of felt depending on how flexible or stiff you want your petals to be.)
3. Scissors
4. Hot glue gun and glue
5. Paintbrush or something with a similar tip at the end (a pen or screwdriver would work)
6. Thin cardboard (from a cereal or shoe box)
7. Button, clip-on earring or bead for the center of the flower
8. Pin, barrette or comb for the back of the flower
Begin by printing the DIY_Felt_Flower_Template. Print it at 100% if you want to make flowers the same scale I did (about 4.5-5” wide petal-to-petal) or resize it if you want your flower to be bigger or smaller. If you resize it, you may have to adjust how many petals you cut of each size.
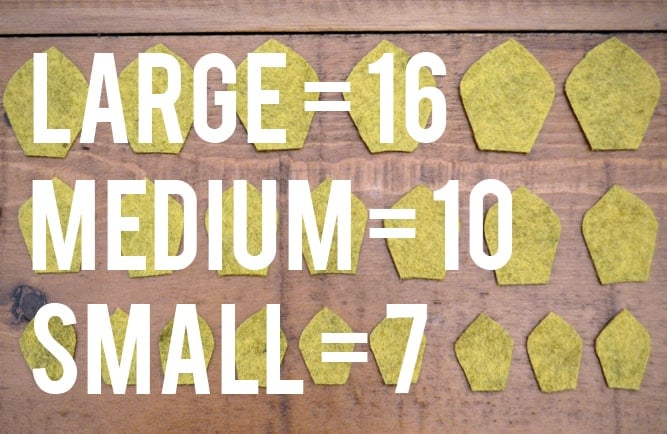
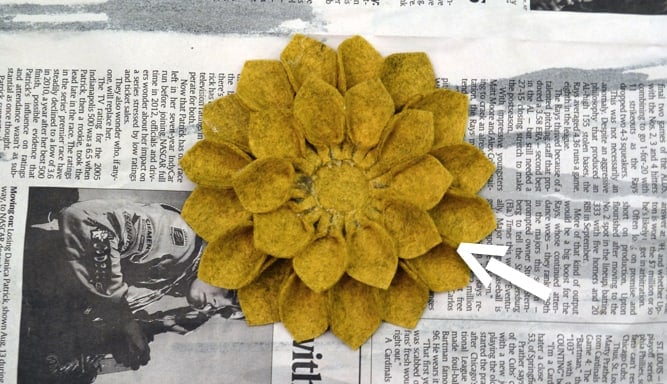
Here are the number of petals of each size I needed for the largest yellow flower.
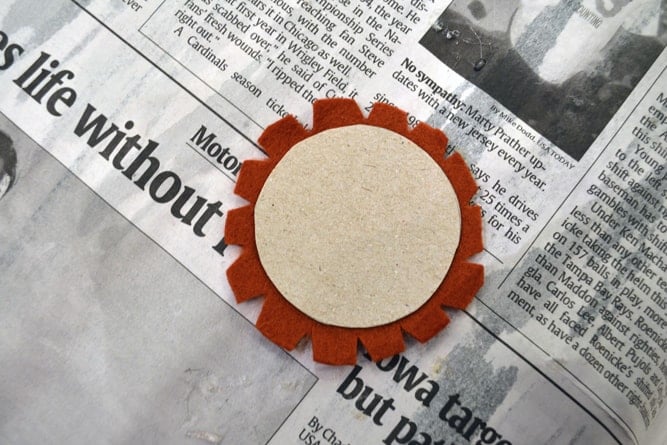
Use the circle template to cut the cardboard for the back of the flower as well as the two circles of felt. Snip the felt backing for it as pictured and glue it to the cardboard and then glue down the little tabs of felt around the edges.
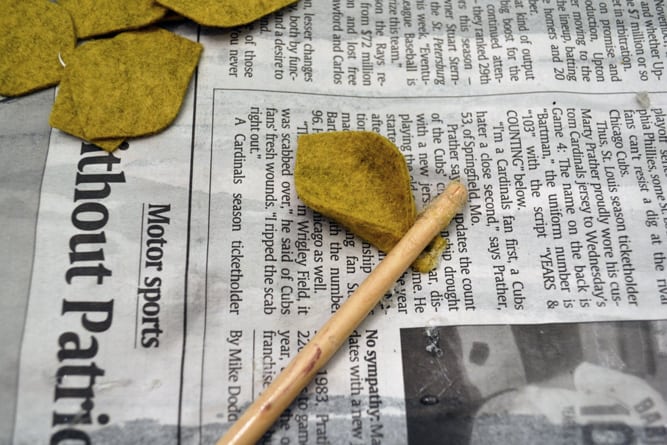
Use a very small amount of hot glue to secure pleats in all the felt petals. We used the end of a paintbrush to hold the pleat while it was cooling. Anything but your finger will work!
Once you have all your petals glued, it’s time to start adhering the largest ones to the circle base. Apply a bit of glue to the circle and press the petal down about ¼” from the circle’s edge. Continue this way, making sure there are no gaps between your petals.
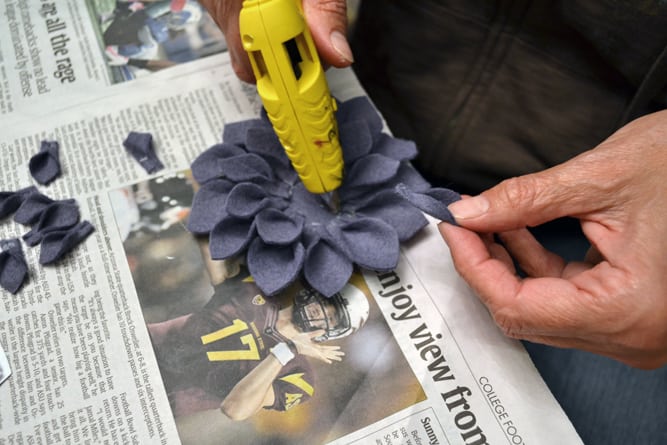
Now it’s time to finish off the back of your pin/hair piece/etc. Either sew or glue your barrette, pin or comb onto the circle of felt you cut previously. Then glue that circle onto the back of your flower.
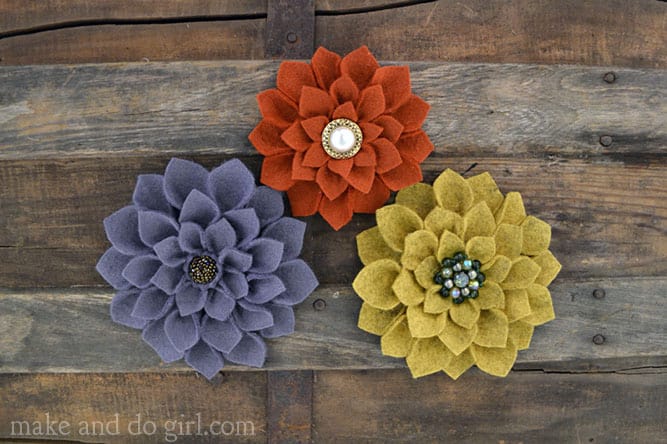
Turn that puppy back around. Now it’s time to accessorize! We tried several centers for our flowers until we found just the perfect accents.
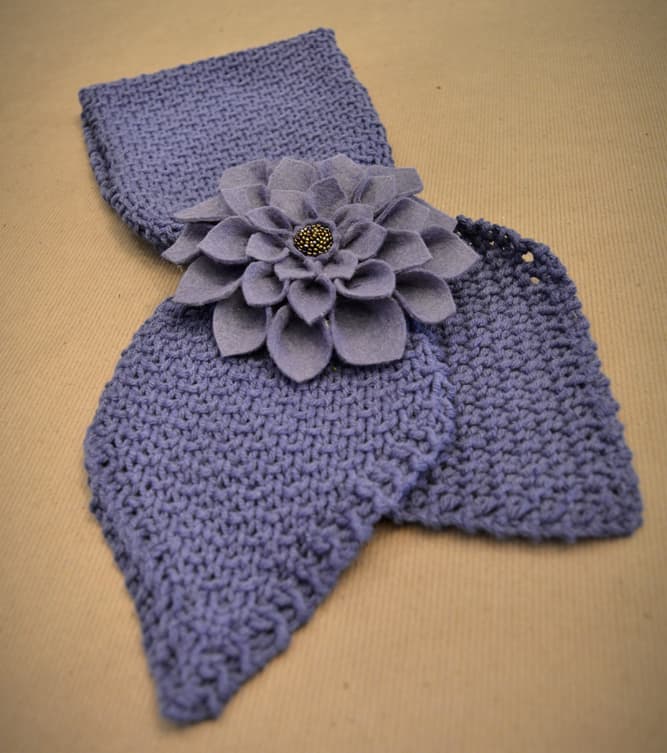
In the purple flower, my mom used a beaded button she picked up at a knitting store. I think it actually looks a lot like the center of a real flower, minus all the allergy-inducing pollen. For the yellow one, I used a clip-on earring I bought at a street festival this summer. I just peeled off the clip-on part and was left with this beautiful beaded fanciness. The center of the orange flower is pearl button. It’s interesting how the style of the center really transforms the look of the flower.
My mom used her purple felt flower as a cute little accent on her Anthro-Inspired Scarflet.
I think these would also make awesome adornments to headbands or even as the foundation of a fascinator like this.
There are so many ways to wear these little felt flowers! They’d make perfect DIY Christmas presents. Or bridesmaids gifts. Or What-The-Heck-It’s-Tuesday treats.
I found awesome inspiration for this project here. If you use this felt flower tutorial, leave me a comment and I’ll link to your photos!
63 Comments
Frankie
October 22, 2011 at 1:43 amThese came out so great. The mustard yellow one is really fabulous! I have seen these types of tutorials floating around the internet. I keep planning to make one. Perhaps I’ll give it a go this weekend 🙂
Make and Do Girl
October 22, 2011 at 3:39 pmYou should! Send me a pic if you do!
Kate
October 22, 2011 at 2:32 amWow those are gorgeous! Thanks for sharing!
Anne @ Domesblissity
October 22, 2011 at 1:15 pmJust popping over from Whipperberry. Just beautiful. I’ve got a thing going for felt and fabric flowers and these are some of the best I’ve seen.
Anne xx
Make and Do Girl
October 22, 2011 at 3:40 pmThanks Anne! These were surprisingly easy to whip up. I think there will definitely be a few under the Christmas tree this year.
Tracey
October 23, 2011 at 3:42 amThanks very much for this, I have been looking for the template for ages as I want to make some with stems for the table centepieces at my wedding. I have just made one and the first try was not bad! Thanks
Mandy
October 23, 2011 at 8:40 amI think I will try to supersize your template and see if I can transform these head-turners into a decorative pillow for my bed… Thank you sooooo much for the inspiration!
Susan
October 26, 2011 at 4:21 amThese are beautiful. Thank you for sharing your template. I am excited to make some of these for my girls as gifts for Christmas. Thank you again!
Make and Do Girl
October 26, 2011 at 4:00 pmThese would make a great Christmas gift. I admire your early planning!
Maureen
October 28, 2011 at 5:04 pmThese are FABULOUS! Absolutely fabulous!!!
I’d love fo you to link up to my very first Fresh Friday Link party!
http://www.releasemecreations.com/2011/10/fresh-fridays-link-party.html
-Maureen
Make and Do Girl
October 29, 2011 at 2:19 amThanks Maureen! I’ll swing by.
Nita
November 6, 2011 at 1:28 amAdorable felt flower and great tutorial.
Thanks for sharing.
Lauren
November 19, 2011 at 3:31 pmLOVE this tutorial! I must admit though – I gave up on using an apparatus and went with my fingers instead. I actually have blisters. But they were worth it! Perhaps I should invest in a low-temp glue gun?
Make and Do Girl
November 20, 2011 at 10:51 amGlad you found it helpful! In the moment, those burns seem so worth it, don’t they? It’s only when I’m trying to fall asleep later and my fingers are throbbing that I second guess myself.
Felt Flower Tutorial + Free Hat Pattern + Cute Baby = Perfection
November 23, 2011 at 12:50 pm[…] = 'wpp-262'; var addthis_config = {"data_track_clickback":false};A little while ago, I posted this felt flower tutorial. I love to use these little flowers as pins, hair flair and even as floating […]
Kias Gockman
November 29, 2011 at 11:34 amHi! where do you get your felt? I love the colors! Great tutorial!
Make and Do Girl
November 29, 2011 at 12:00 pmThanks Kias! I got the felt at a store in Richmond called “Quilting Adventures.” I have seen similar felt at Joann’s and Hancock Fabrics though. This felt was 100% wool. It worked beautifully and I think it’ll be more durable than polyester felt, although I’ve seen that look pretty good also. Good luck!
Easy DIY wall decor and an Anthropologie-inspired scarf to knit
November 29, 2011 at 3:46 pm[…] 4. Anthropologie-inspired scarflet: my sister, Michelle, found this effortlessly chic pattern on Ravelry. When my mom and I went to look it up, I realized I had actually downloaded the exact same one in a previous binge of pattern hoarding. Mich and I are sort of twinsies in how we dress. (We often go shopping together and each buy the same thing, or even weirder, go shopping separately and find out later we bought the same thing.) So it didn’t come as much of a surprise that out of the 61,346 patterns that are available on Ravelry at this moment, we fell in love with the same scarf. And as I mentioned, my mom is a one-woman sweatshop, so she cranked out this scarflet on Saturday and dolled it up with a felted dahlia on Sunday. I think it’s pretty much pure awesomeness. UPDATE: To make a felt flower yourself, check out my tutorial here! […]
Dee
December 14, 2011 at 5:21 pmAbsolutely love these! Gorgeous colors! I had to share on my CraftBliss Facebook http://on.fb.me/kDlUKj page and link back to you. Thanks for creating and sharing! ~Dee
Make and Do Girl
December 15, 2011 at 9:18 amAwesome! Thanks, Dee!
Kat
December 20, 2011 at 4:52 amThese are so cute and I love your felt colors! Where did you find them? I’m going to attempt them today for a family photo shoot coming up! I’m hoping this cute flowers will mask the not-so-cute dress my daughter has to wear! Thanks for the tutorial!
Make and Do Girl
December 20, 2011 at 9:17 amHey Kat! I think these flowers could mask a lot of things, but I’m sure you’re daughter’s dress isn’t that bad. I got my felt at a local store in Richmond called Quilting Adventures. Any fabric store should have some felt options though. I used 100% wool, but polyester felt would also work. Hope you enjoy and good luck with the photo shoot!
A Very Merry (Homemade) Christmas « om&nom
December 27, 2011 at 2:35 am[…] found lots of great tutorials for making the felt flowers! They’re super easy and it only cost 25 cents or less to make […]
Alanna
January 10, 2012 at 2:41 pmThis tutorial is great! I was thinking about making a pillow of it. Would you mind sending me the enlarged template? Also, could I sew the petals instead of gluing them? I’m not sure how to do this though…
Make and Do Girl
January 11, 2012 at 2:54 pmHey Alanna, I’d be happy to send you an enlarged template. Do you know about how big you want the flower to be? I think you could definitely sew the petals instead of glue them. That would probably be a preferable way to go for a pillow. I think you could simple do a couple of whip stitches on the right and left side of each petal to hold the curled edge down (just replacing the glue with a stitch instead). Does that make sense? If not, let me know and I’ll try to explain it differently. I’ll send you the template shortly!
Free Knitting Pattern: Embellish This! Hat | ruthie pearl
February 2, 2012 at 12:24 pm[…] (I used this tutorial to make the felt flower as […]
How to use vintage clip on earrings to make hair accessories
February 28, 2012 at 5:23 pm[…] lobe, yeah, they might be a little gaudy. But in the center of a felt flower? Perfection! (Get the tutorial here.)And how about as some toe candy? Yes please!Tomorrow, I’ll show you how to use vintage […]
Michelle McGee
May 4, 2012 at 1:30 pmI just found your site. I absolutely love the flowers and can’t wait to make them. Those colors are to die for. Thanks for sharing.
Susan Smith
June 24, 2012 at 1:00 amHi
Have just finished one I’ll upload onto my blog during the week. Thanks for the tute! Can’t do any more until I get some more glue sticks.
Dotti H
July 30, 2012 at 11:36 amI woudl love the enlarged apttern to make a pillow. I just ran across this and think it is reallly neat.
Melissa
August 31, 2012 at 1:09 pmFound you on pintrest. Thanks to your tutorial my seven year old has a beautiful hairclip!
Sewing with Felt | Sew News
September 10, 2012 at 10:10 am[…] flowers from Make and Do Girl are gorgeous! Play around with the number of petals to make the flowers bigger or smaller. This […]
ange
September 11, 2012 at 8:15 amThank you for this awesome tutorial, complete with the link for printing it out. I printed the template out on cardstock to make it a little sturdier. Love all your beautiful flowers with the different centers! I facebooked this and will be sharing the link in my post for my fall wreath.
Artesanato passo a passo em feltro - Faça esta flores em feltro! | Artesanato
September 14, 2012 at 1:47 am[…] Veja aqui o passo a passo! […]
candice m
October 4, 2012 at 4:33 pmThank you for this tutorial!! Made my 2 year old a lovely flower bow with cream felt and teal glitter vented (just poured a puddle of hot glue in the vented and dumped on glitter).
Fall Wreath – Tutorial/ Link collection | Our Homegrown Adventures
October 11, 2012 at 7:45 pm[…] more defined ones. One of my favorites turned out to be the “Dahlia” which I found in this tutorial by the “Make-and-do Girl”:Cutting out all the little petals can get a little tedious but putting it together was pretty easy […]
Tutorial for a Fall Wreath - Joyful Musings
October 28, 2012 at 10:09 am[…] used this DIY Tutorial for the […]
Fiori di feltro | Mammacraft
January 7, 2013 at 8:14 am[…] QUI si può stampare il pattern in pdf mentre il tutorial completo lo trovate su Makeanddogirl. […]
Inspiration of the Day: Oversized Fabric Rosettes! | The Knot Blog – Wedding Dresses, Shoes, & Hairstyle News & Ideas
January 22, 2013 at 8:25 am[…] If you’re the crafty type, this would make an easy DIY project! We found paper flower-making kits at Paper-Source.com for $10.95-19.95 per kit or make them from scratch with these detailed instructions on Make & Do Girl blog. […]
aniwasabi
February 4, 2013 at 12:51 amThese flowers are lovely. I have pin it on my board.
http://pinterest.com/lcyeang/felt-crafts-that-i-love/
Make and Do Girl
February 5, 2013 at 9:33 amAwesome! I love that you have a board completely devoted to felt. How fuzzy and fun.
j
pallaso
February 16, 2013 at 7:48 amsuper ces fleurs!!!!! a-t-elle bien que nous allons organiser un après midi feutrine à l atelier avec les copines pour en fabriquer de toutes les couleurs merci
Cin Huffman
February 17, 2013 at 12:26 pmHey!! Thank you sooo much for your helpful tutorial!! I made one for my daughters crochet headband that I made. It really dressed it up! How do I post a pic so you can see it? I can’t wait to check out the rest of your site.
Major xoxoxoxox!!!
Cin 😉
Make and Do Girl
February 18, 2013 at 5:56 amCin,
Aweeeesooome! I’d love to see it. Please send it to me at jessicacoppom (at) gmail.com!
Can’t wait!
j
Learn how to make felt flowers - Debbiedoo's
March 3, 2013 at 4:27 am[…] Dhalia Pattern (no sew) […]
Emily
June 11, 2013 at 11:05 amCould you email me the enlarged template? (Crafty but not on the computer!!) I’d love the finished dimensions to be about 10″ across. Going to glue them to a painted wooden plaque and put it up in my daughters big girl room! Thanks!!
Vittoria
May 8, 2014 at 8:52 amHi You dont happen to be able to send me a copy of the enlarged flowers? 10×10 I am in love with these !
Dana
September 24, 2013 at 6:13 amI know I’m a bit late coming to the party, but I just got my first glue gun and I’m eager to make some flowers for my daughter. She has gorgeous long hair and loves wearing flower barrettes! Can’t wait! Thanks for the tutorial!
Make and Do Girl
October 29, 2013 at 7:59 amWell, welcome to the party, Dana! Your life will never be the same!
Happy glueing.
j
crazypatch
October 24, 2013 at 6:55 amIt’s gorgeous!; thanks
Elena Kaneta
November 26, 2013 at 1:10 pmLove the flowers that you created. Like many others, would love to have the template for the 10″ dahlia for a pillow. Would you mind emailing me as well?
Make and Do Girl
December 6, 2013 at 9:01 amHey Elena,
I don’t have an exact pattern for it right now. You could try enlarging this one for the flower pins by just printing the pieces bigger. Otherwise, stay tuned and I’ll work on a tutorial in the near future!
Thanks for reading.
j
charlis
January 5, 2014 at 7:03 pmHappily tumbled onto your website just today! I love your projects and your sense of humor; I think it is quite alright if you want to glue one of these flowers to your toaster. ;-}
I’ve been knitting berets and stocking caps lately and one of your flowers with be the icing on the cake for them.
Thanks for a great website. I’ve already subscribed to your newsletter.
Felt Flower Wreath | Andrea Luhman
April 13, 2014 at 9:08 am[…] using a wonderful step by step instructions and free for personal use printable template at Make & Do Girl Blog. Even if you don’t want to make one, check out her blog and ogle the ones she made with hand […]
Free Knitting Pattern: Embellish This! Hat | BASTE + GATHER
May 4, 2014 at 8:27 pm[…] (I used this tutorial to make the felt flower as […]
Crafternoon: Felt flowers | a case of the Crafties
July 21, 2014 at 2:04 pm[…] we supplied felt, scissors, glue, thread, needles, buttons, and beads. Sites included How Joyful, Make and Do Girl, Lines Across, and some general ones I found through google image search that I can’t locate […]
Felt Flower Tutorial + Free Hat Pattern + Cute Baby = Perfection
November 12, 2015 at 3:45 pm[…] little while ago, I posted this felt flower tutorial. I love to use these little flowers as pins, hair flair and even as floating […]
Felt Flower Tutorial + Free Hat Pattern = Perfection
November 12, 2015 at 3:47 pm[…] little while ago, I posted this felt flower tutorial. I love to use these little flowers as pins, hair flair and even as floating […]
The year's best DIY projects -- 2011: What We Made And Did
January 2, 2016 at 9:10 pm[…] Simultaneously, and I mean literally as the paint was drying, we made a gaggle of these pretty felt flowers. […]
How to Make Felt Flowers
December 28, 2016 at 12:18 amYou are the flower making queen!! I especially am impressed by your photo tutorial. I would find myself lost making something like this alone, but you’re photos really help a girl out.