In Part 2 of the Idlewild Dress Crochet Along, we'll crochet the bodice back and seam our front and back pieces together. Scroll down for the free kids' pattern + video tutorial.
Remember you can find all the Idlewild Crochet Along resources, links to pattern stages and more photos here. Each time a new pattern stage is released, you'll find it there!
Get the Entire Pattern Immediately in the Printable PDF
You're always welcome to follow the free pattern as it's released each week as you participate in the Idlewild Crochet Along. We're so happy to have you crocheting along with us!
If you'd like the "premium" pattern experience, I recommend upgrading to the ad-free, printable PDF. You'll get the complete pattern immediatly without waiting for free pattern releases and you'll have access to bonus visual stitch diagrams, measurements and photo tutorials not included with the free pattern.
Click here to purchase the pattern PDF ⇨
Idlewild Dress Video Tutorial
Part 2
Links mentioned in the video:
• Find all relevant Idlewild Dress resources on the main page
• View Part 1 of the children's pattern + video tutorial
• Purchase the ad-free, printable PDF with stitch charts
• Join the Make & Do Crew Facebook group
• Purchase a kit with all the Lion Brand Beautiful You yarn + printed copy of pattern
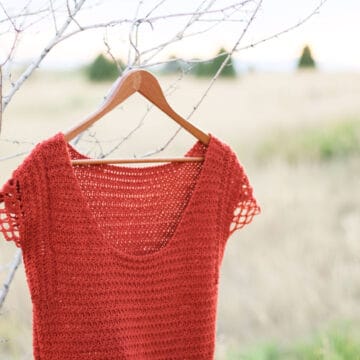
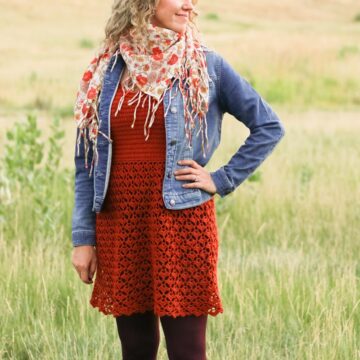
Idlewild Dress: Part 2
Children's Sizes - Free Pattern
Supplies:
This pattern contains affiliate links at no extra cost to you.
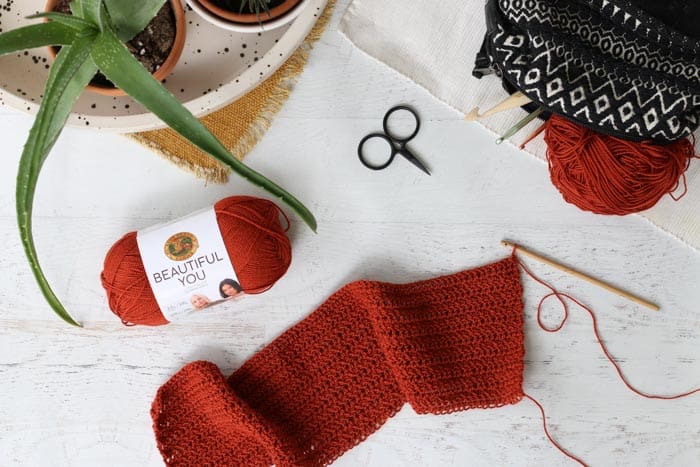
• Lion Brand Beautiful You (Weight: 2/fine - 326 yds, 3.5 oz)
Aquatic (#165-105) – 2 (2, 3, 3, 4, 5, 5, 5) skeins [(approx. 140 (200, 240, 300, 360, 410, 440, 470) g]
Colors also pictured:
Arrowood (#165-194) (child's peplum top)
Rooibos Tea (#165-138) (women's dress)
• Size G (4.25mm) crochet hook
• Tapestry needle
• Stitch markers or safety pins
• An iron with steam setting or handheld steamer for blocking
• T-pins or rustproof straight sewing pins for blocking
Sizes + Measurements:
Sizes: 2 (4, 6, 8, 10, 12, 14, 16)
Fits: 20.5 (23, 25, 26.5, 28, 30, 31.5, 32.5)" bust
*Additional measurements included in printable PDF if desired.
Overall Pattern Notes:
• Ch 3 at beginning of row or round counts as a dc throughout.
• Pattern is written in smallest sizes with larger sizes following in parenthesis.
• Watch video tutorial above this pattern for extra instruction.
• If you have a pattern question or just need some extra encouragement, please join the Make & Do Crew Facebook group where there are several thousand other kind crocheters supporting each other.
BODICE BACK
Notes:
- Bodice Back is worked just as the front until Row 17 (21, 25, 29, 35, 35, 37, 37).
- If you modified the bodice length by working additional rows before the arm indent, do the same thing for the Back as you did for the front.
- When beginning Foundation Row/Chain, leave a 25” tail of unworked yarn for seaming sides.
- See stitch chart and photos C, D, E and F in printable pattern PDF for additional visual guidance.
Make 1.
Preferred Foundation Row 1 (RS): Fdc 49 (55, 59, 63, 67, 71, 75, 77). [49 (55, 59, 63, 67, 71, 75, 77) fdc]
Alternative Foundation Row: Ch 51 (57, 61, 65, 69, 73, 77, 79).
Alternative Foundation Row 1 (RS): Dc in 4th ch from hook, dc in each ch to end of row; turn. [49 (55, 59, 63, 67, 71, 75, 77) dc]
Row 2 (WS): Ch 1, (sc, dc) in first dc, sk next dc, *(sc, dc) in next dc, sk next dc; rep from * across to last st, sc in tch; turn. [49 (55, 59, 63, 67, 71, 75, 77) sts]
Row 3 (RS): Ch 3, sk first st, dc in each st; turn.
Rep Rows 2 and 3 two (three, four, seven, nine, nine, nine, nine) more times.
Rep Row 2 once more.
There should be 8 (10, 12, 18, 22, 22, 22, 22) Rows including Foundation Row 1 and piece should measure approx. 2.25 (2.75, 3.5, 5.25, 6.25, 6.25, 6.25, 6.25)” high.
If a longer Bodice is desired, work additional repeats of Rows 2 and 3 ending with a Row 2 before moving on to Indenting for Armholes.
Wanna save this pattern?

Indent for Armholes:
Row 1 (RS): Ch 1, sl st in first 3 (3, 3, 3, 3, 3, 5, 5) sts, ch 3, PM in third ch, dc in next st, dc in each dc until 2 (2, 2, 2, 2, 2, 4, 4) sts remain, PM; turn. [45 (51, 55, 59, 63, 67, 67, 69) sts]
Remaining rows are worked between marked stitches only, move markers up each row if desired.
Row 2 (WS): Ch 1, (sc, dc) in first dc, *sk next dc, (sc, dc) in next dc; rep from * across, sc in tch; turn. [45 (51, 55, 59, 63, 67, 67, 69) sts]
Row 3 (RS): Ch 3, sk first st, dc in each st; turn.
Rep Rows 2 and 3 two (three, four, three, four, four, five, five) more times.
Rep Row 2 once more.
Piece should have 16 (20, 24, 28, 34, 34, 36, 36) rows total. Keep yarn attached.
BACK
Rows 17 (21, 25, 29, 35, 35, 37, 37) - 22 (26, 30, 38, 42, 44, 46, 46): Continuing in pattern, rep Rows 3 and 2 of Bodice 3 (3, 3, 5, 4, 5, 5, 5) more times. Back should now have 22 (26, 30, 38, 42, 44, 46, 46) rows.
Now we’ll divide for the neck. With yarn attached:
First Side of Neck:
Decreasing:
Note: In Row 2, marker is placed in dec because it can be hard to see.
Row 1 (RS): Ch 3, sk first dc, dc in next 10 (10, 10, 10, 12, 14, 14, 14) dc, dc2tog; turn, leaving rem sts unworked. [12 (12, 12, 12, 14, 16, 16, 16) dc]
Row 2 (WS): Ch 1, sc2tog, PM in dec, dc in same st as second leg of sc2tog, *sk next dc, (sc, dc) in next dc; rep from * across, sc in tch; turn. [11 (11, 11, 11, 13, 15, 15, 15) sts]
Stop here for sizes 2, 4, 6, & 8.
Sizes 10, 12, 14, & 16 only:
Row 3 (RS): Ch 3, sk first dc, dc in each st until 2 remain, dc2tog in st before marked st and marked st; turn. [- (-, -, -, 12, 14, 14, 14) dc]
Row 4 (WS): Rep Row 2. [- (-, -, -, 11, 13, 13, 13) dc]
All sizes:
Neckline should have a total of 2 (2, 2, 2, 4, 4, 4, 4) rows. Counting from bottom of Front, you should have 24 (28, 32, 40, 46, 48, 50, 50) total rows on this side.
Fasten off leaving a 25” tail for seaming.
Second Side of Neck:
Counting in from opposite edge, attach yarn in 13th (13th, 13th, 13th, 15th, 17th, 17th, 17th) st. There will be 19 (25, 29, 33, 33, 33, 33, 35) sts unworked at center of neckline.
Decreasing:
Row 1 (RS): Ch 2, dc in next st, (counts as dc2tog), dc in each st across; turn. [12 (12, 12, 12, 14, 16, 16, 16) dc]
Row 2 (WS): Ch 1, (sc, dc) in first dc, *sk next dc, (sc, dc) in next dc; rep from * across until 2 dc remain, sc2tog, leave tch unworked; turn. [11 (11, 11, 11, 13, 15, 15, 15) sts]
Stop here for sizes 2, 4, 6, & 8.
Sizes 10, 12, 14, & 16 only:
Row 3 (RS): Ch 3, sk first dc, dc in each st until 2 remain, dc2tog in st before marked st and marked st; turn. [- (-, -, -, 12, 14, 14, 14) dc]
Row 4 (WS): Rep Row 2. [- (-, -, -, 11, 13, 13, 13) dc]
All sizes:
Neckline should have a total of 2 (2, 2, 2, 4, 4, 4, 4) rows. Counting from bottom of Front, you should have 24 (28, 32, 40, 46, 48, 50, 50) total rows on this side. Piece should measure approximately 6.75 (8, 9.25, 11.5, 13.25, 13.75, 14.25, 14.25) inches.
Fasten off leaving a 25” tail for seaming.
SEAMING FRONT + BACK
Shoulder Seams: Use tail from fastening off for seaming. With RS facing each other, sl st under both loops of the final row on both Front and Back. Rep on second side.
Side Seams: With RS facing each other, use stitch markers to pin Front and Back together at sides. Take care to line up visual stripes of Bodice. With a tapestry needle, seam sides using the mattress stitch.
On a crocheting roll?
Grab the the pattern PDF and you'll have instant access to the full pattern so you can keep up your crochet momentum. Otherwise, we'll see you back next week for Part 3 of the Idlewild Crochet Along!
(Remember, you can always find each new CAL stage linked on the main Idlewild Dress page here.)
[convertkit form=5272900]
Leave a Reply