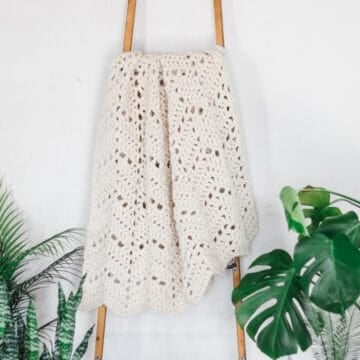
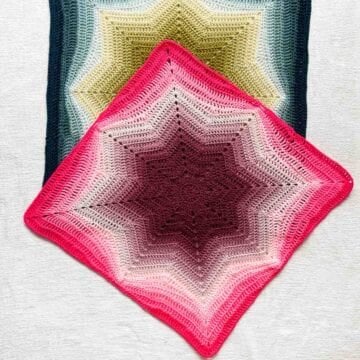
Learn how to take a crochet eight point star and transform it into a square blanket. Part 2 of the free pattern is below or you can purchase complete pattern in the ad-free, printable PDF here.
This free crochet star blanket pattern is part of a collaboration with Lion Brand Yarns. This post contains affiliate links.
Rising Star Blanket Table of Contents:
How do I print the pattern?
Free Pattern: Part 1 // Part 2 (below)
How do I print this pattern?
As a reminder, you can find Part 1 and Part 2 of the pattern in one easily printable place in the Rising Star Blanket PDF. You'll get the printable written pattern, plus the bounty of photo tutorials and helpful diagrams all in one easily to use package.
Related: 33+ Crochet Border Patterns for Blankets
Print it! Purchase the ad-free PDF ⇨
Rising Star Blanket
• Crochet Star Blanket - Free Pattern - Part 2 •
Purchase the ad-free, printable PDF on Etsy here and on LoveCrafts here.
Save this pattern to your Ravelry here.
Pin this pattern for later here.
Explanation:
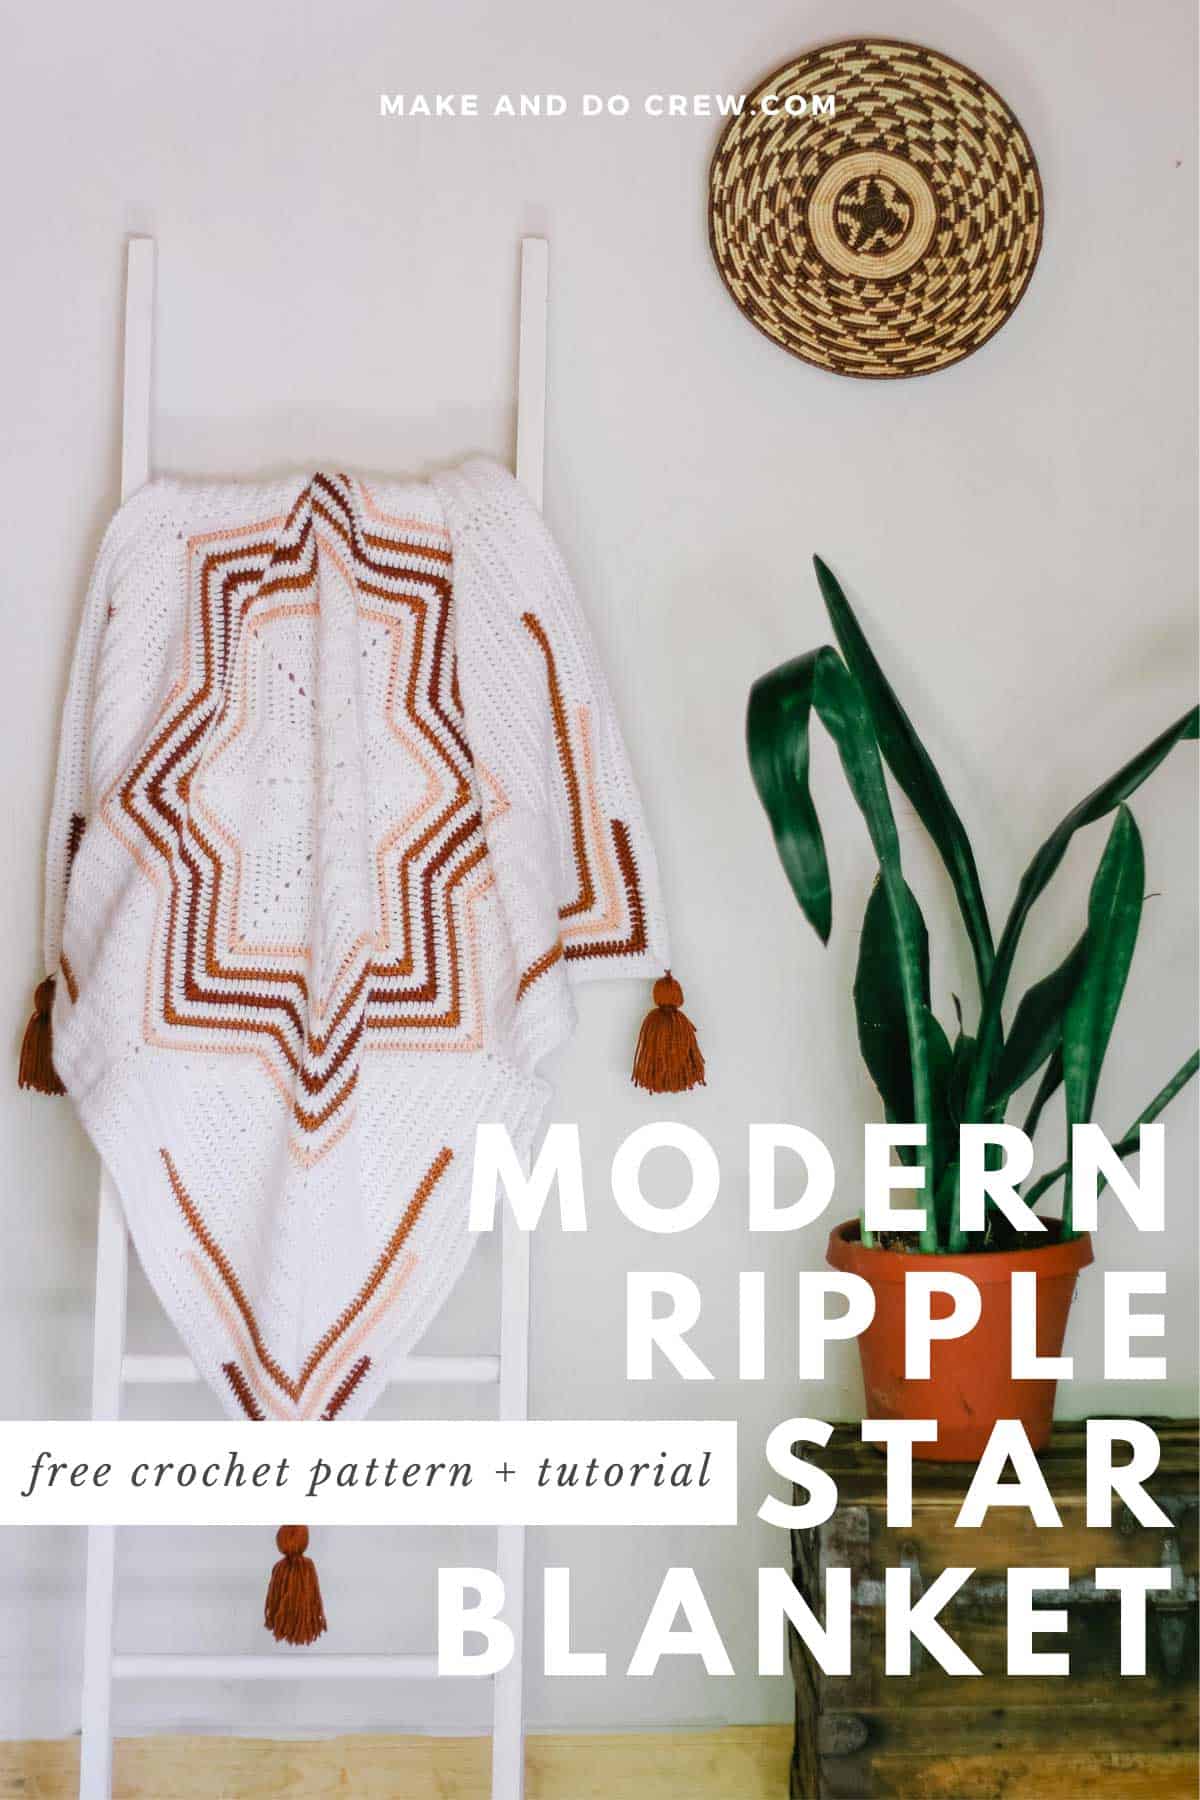
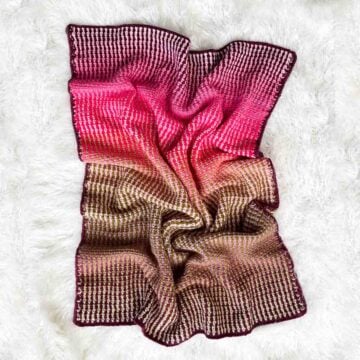
Learn how to take a traditional eight point crochet star and turn it into a modern piece of art! While star blankets are usually just that, a star shape, in this pattern, you’ll square the points off to create a more practical and contemporary blanket. Crochet a baby blanket, couch throw or add borders to customize an afghan any size you wish.
Supplies:
Order an all-in-one kit from Lion Brand here.
• Lion Brand Pound of Love (Weight: 4/medium - 1020 yds, 16 oz)
- Color A: White [550-100] – 2 balls (approx. 600 g)
• Lion Brand Skein Tones (Weight: 4/medium - 185 yds, 3.5 oz)
- Color B: Peachy [202-184] – 1 ball (approx. 60 g)
- Color C: Honey [202-134] – 1 ball (approx. 60 g)
- Color D: Adobe [202-135] – 1 ball (approx. 60 g)
• Tapestry needle
• Size J (6.00 mm) crochet hook or size needed to obtain gauge
• Stitch markers or safety pins
Measurements:
Approximately 38 x 38”
Gauge:
14 dc x 8 rows = 4”
Abbreviations and Glossary (US Terms):
ch – chain
chsp – chain space
ch1sp – chain one space
ch2sp – chain two space
dc – double crochet
dc2tog – double crochet two together
dc3tog – double crochet two together
rep – repeat
RS – right side
rsc – reverse single crochet
sc – single crochet
sc3tog - single crochet 3 together
sk – skip
slst – slip stitch
st(s) – stitch(es)
WS – wrong side
yo – yarn over
Overall Pattern Notes:
• As written, pattern uses just over one skein of Lion Brand Pound of Love. Therefore, if a larger blanket is desired, there will be plenty of extra Color A to enlarge the main center star. Similarly, there will be 10-40 extra grams of each other color for the stripes and border.
• Unless noted, photo tutorials are shown from right-handed perspective.
• Ch 3 counts as a dc throughout.
• Ch 2 does not count as a double crochet, but rather a portion of a dc2tog or dc3tog decrease.
SQUARING OFF
In can be helpful to place a marker on the RS of star at this point to make WS/RS obvious while squaring off corners.
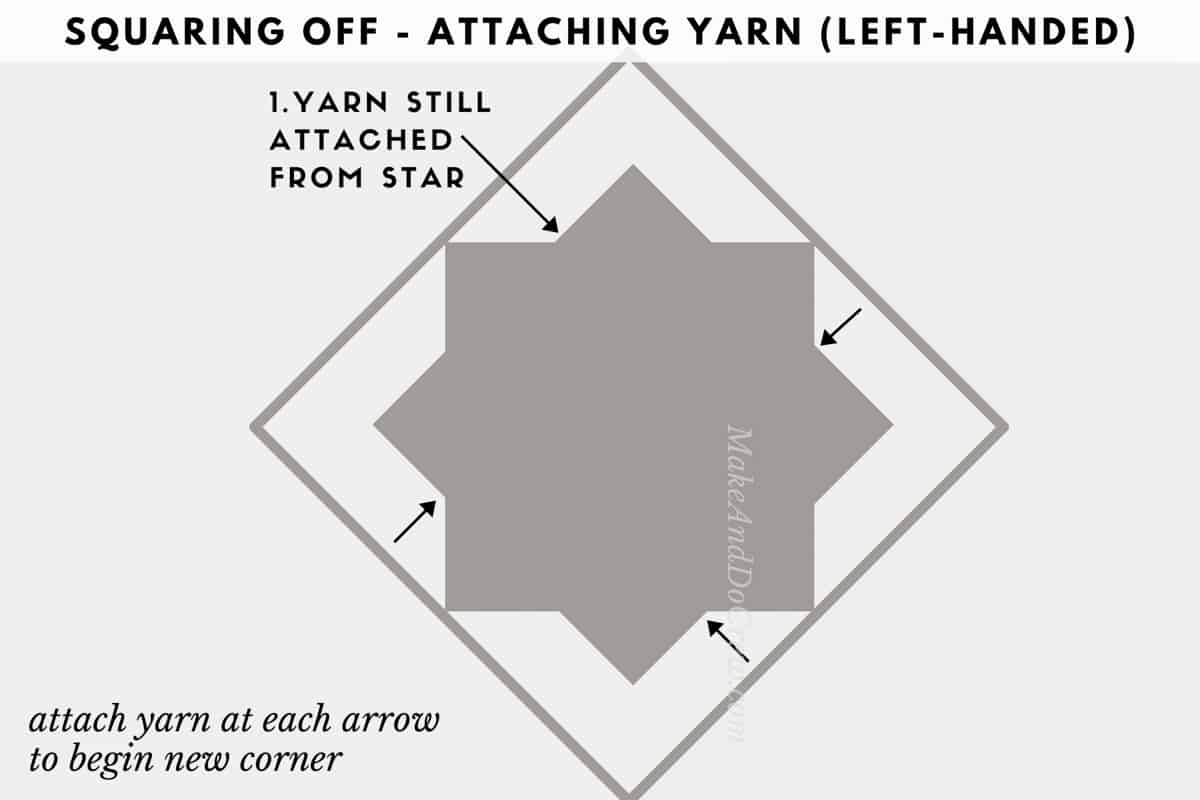
Squaring off is worked in four sections around star (one section per square corner). Each corner section is worked over four sides of star. See placement in diagram below. Click here for left-handed version.

Wanna save this pattern?
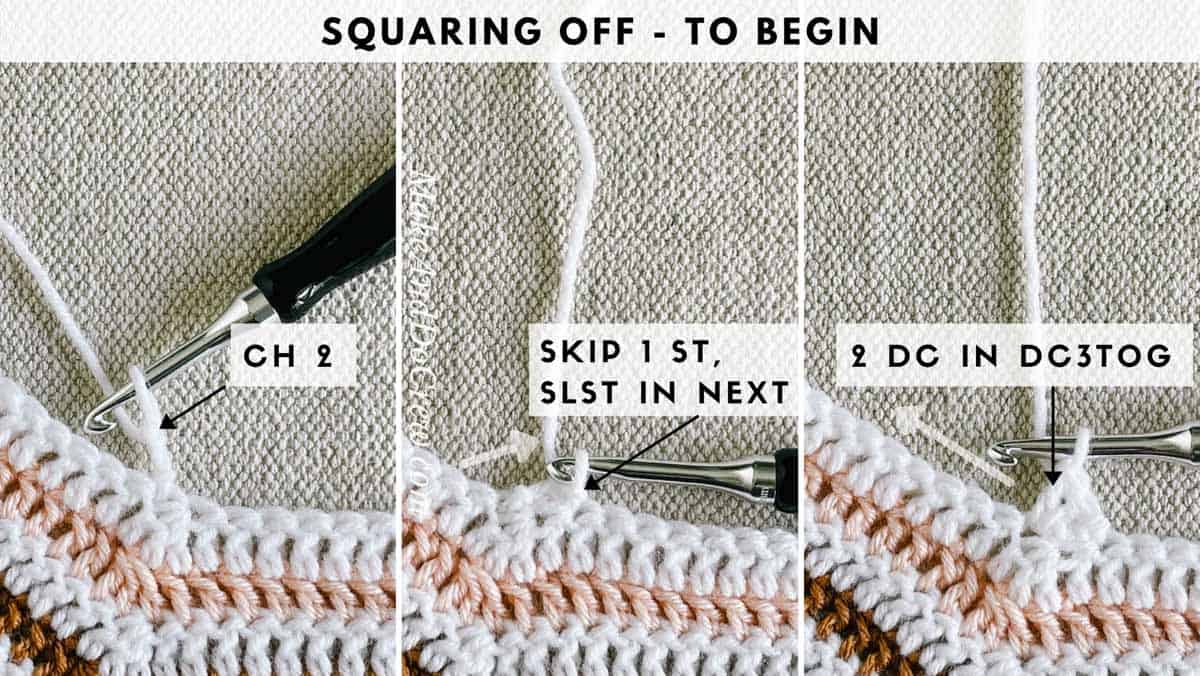
**With Color A still attached and RS of work facing:
Row 1 (RS): Ch 2, sk 1 st to the right (left-handed: to the left), slst in next st to the right (left-handed: to the left), without turning, begin working back in opposite direction to the left as usual (left-handed: to the right as usual): 2 dc in dc3tog from previous round, dc in each dc to corner, (2 dc, ch 2, 2 dc) in corner ch2sp, dc in each dc to next dc3tog, 2 dc in dc3tog, sk next dc on adjacent side, slst in next dc on adjacent side, ch 2, sk next dc, slst in next dc; turn. (50 dc)
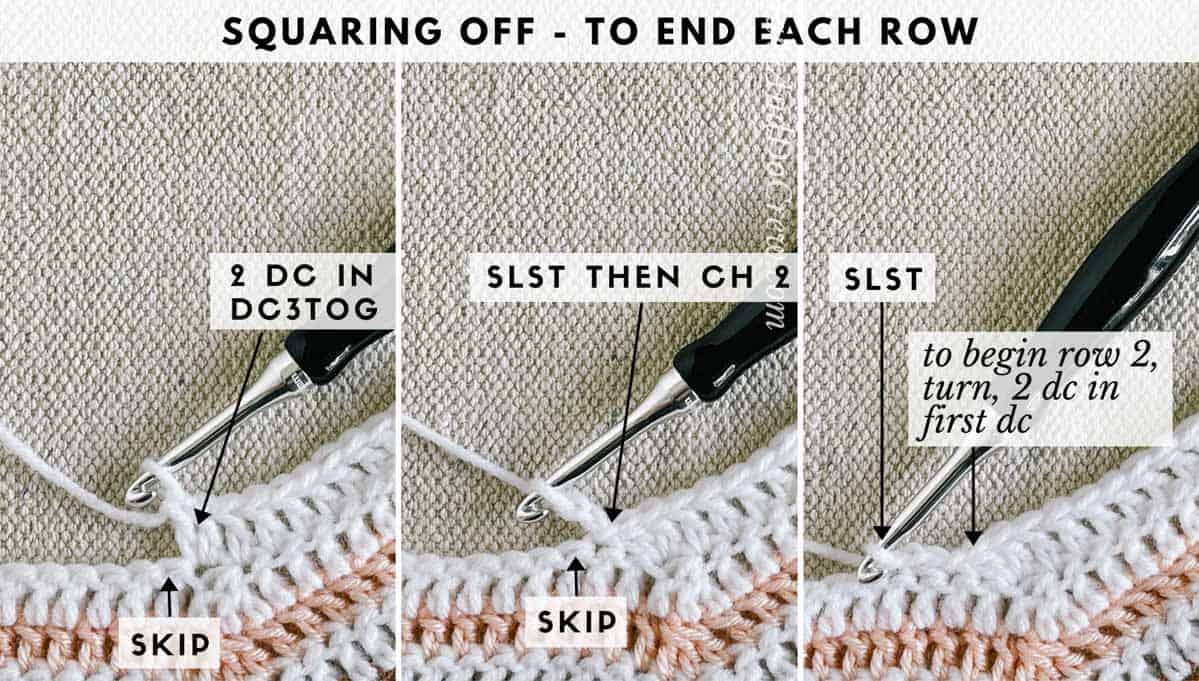
Row 2 (WS): Sk ch 2, 2 dc in first dc, dc in each dc to corner, (2 dc, ch 2, 2 dc) in corner ch2sp, dc in each dc until 1 dc remains on this side of star, 2 dc in last dc, sk 1 dc along adjacent side of star, slst in next dc on adjacent side, ch 2, sk 1 dc along adjacent side of star, slst in next dc on adjacent side of star; turn. (56 dc)
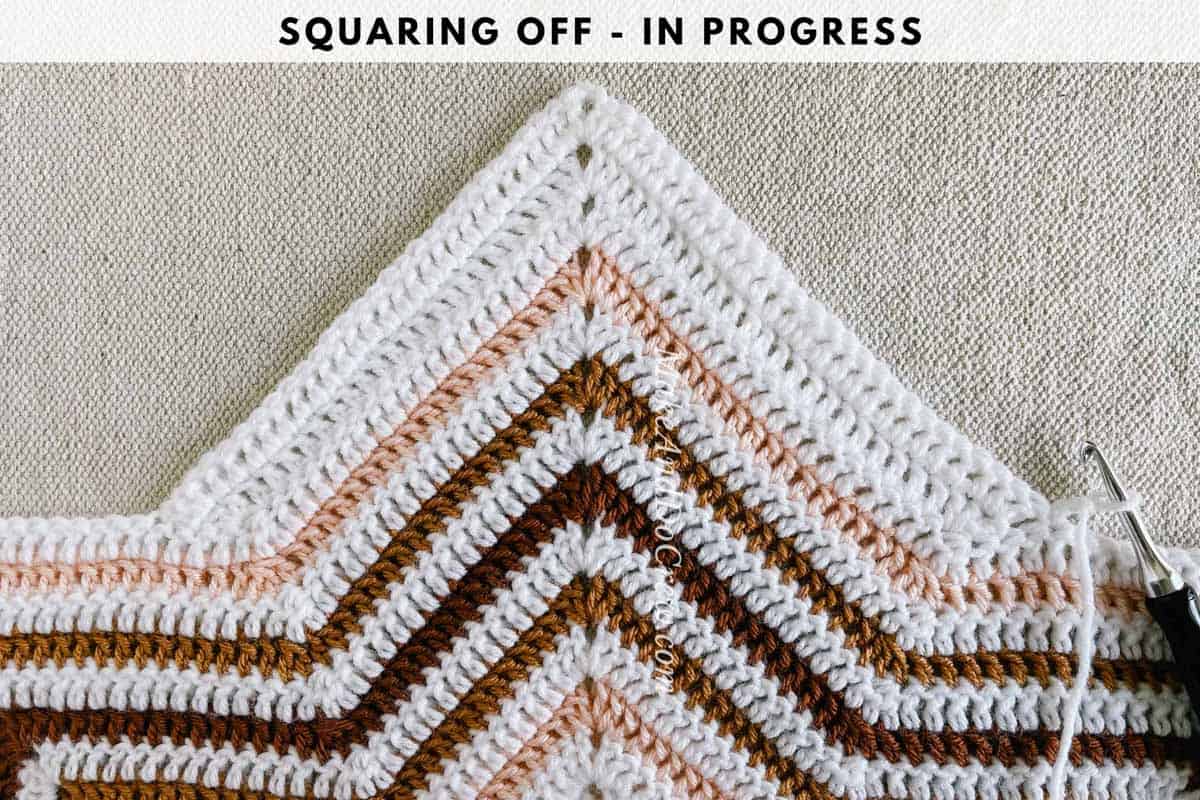
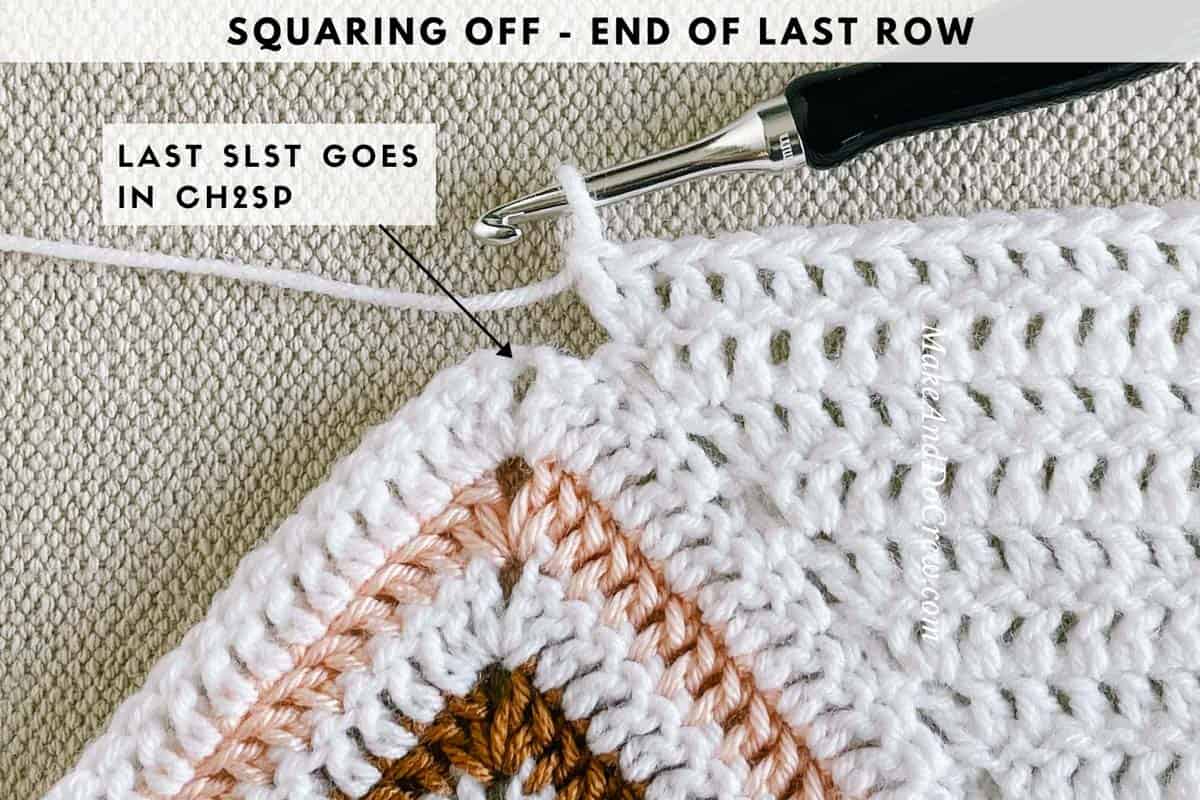
Rep Row 2 ten more times. Each row will increase by 6 dc total. In final row, slip stitches at beginning and end of row are worked into corner ch2sps. Fasten off.*
✨Unlock this free subscriber-exclusive pattern ✨
Follow these steps to view the full free pattern below
For remaining three corners of square:
Attach Color A in dc3tog as outlined in diagram above. Rep from ** to * to complete each corner. When fourth corner is complete, keep yarn attached.
BORDERS
Notes:
• Begin border with WS facing. (This means first border round is worked in opposite direction as last row of corners.)
• Ch 3 at beginning of round counts as a double crochet.
• See color note below each round to understand when to switch colors on each side.
• When switching colors, complete final yarn over of last dc in new color. See photo on p12. During corner sections using Color B, C and D, carry Color A underneath to create fewer ends to weave in.
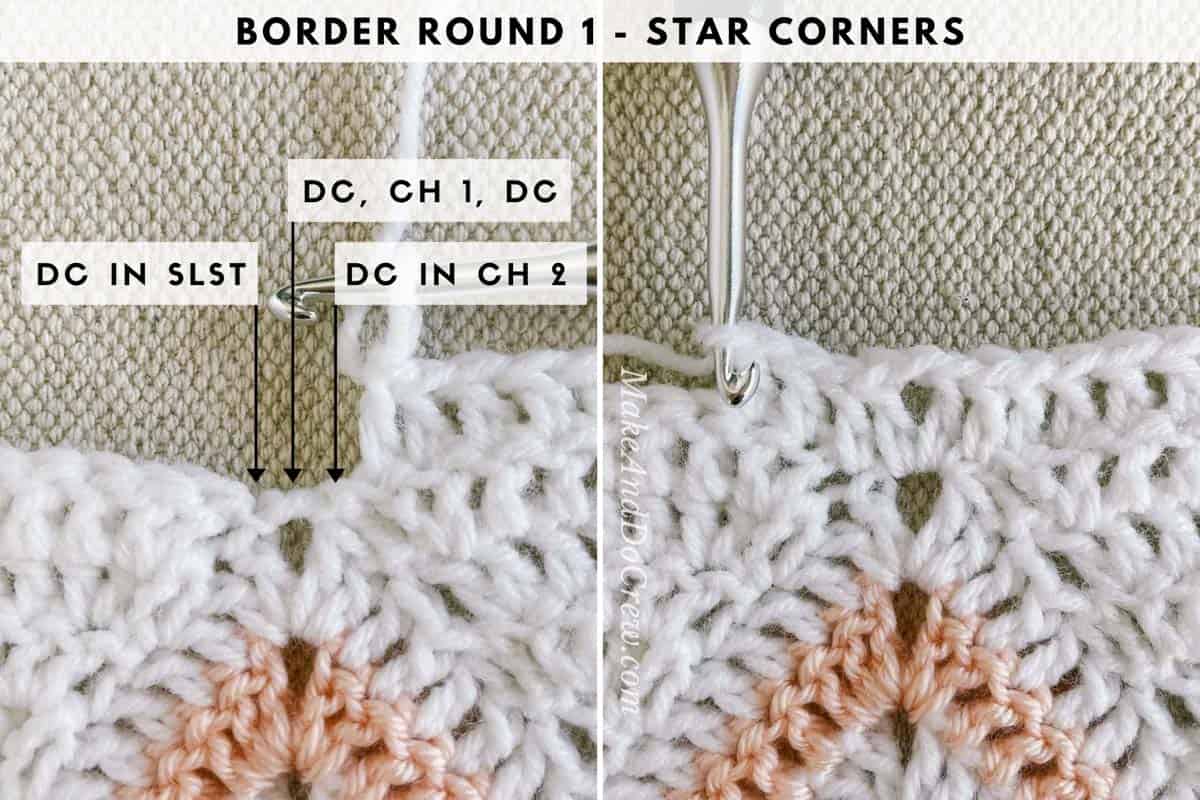
Round 1 (WS): Continuing with Color A: Ch 3, dc in first dc, dc in each dc to corner, (2 dc, ch 2, 2 dc) in corner ch2sp, *dc in each dc until point of star in the middle of square side, dc in top of ch 2 from last row of squaring off, (dc, ch 1, dc) in star corner, dc in slst from last row of squaring off, dc in each dc to next corner, (2 dc, ch 2, 2 dc) in corner ch2sp; rep from * twice more, dc in each dc to end of round, dc in top of ch 2 from last row of squaring off, (dc, ch 1, dc) in star corner, slst to top of ch 3 from beginning of round to join; turn.
Round 1 Colors:
Side 1 (first half): Ch 3 + 12 more dc in color A, next 43 dc + corner in Color C (45 dc total in Color C).
Sides 2, 3, 4: Corner + next 43 dc in Color C (45 dc total in Color C), switch to Color A until 43 dc remain on side, next 43 dc + corner in Color C (45 dc total in Color C).
Side 1 (second half): Corner + next 43 dc in Color C (45 dc total in Color C), switch to Color A for remainder of round.
45 dc in Color C should intersect at each corner. See photos for reference.
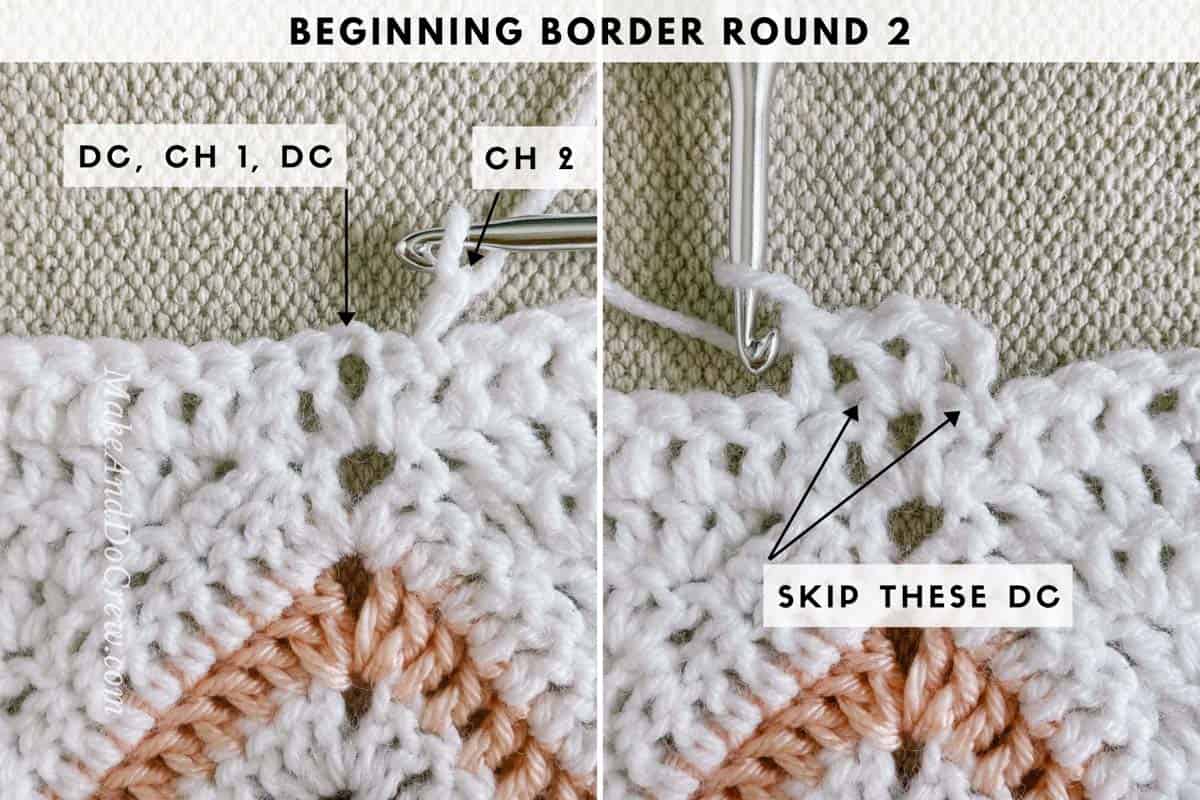
Round 2 (RS): Continuing with Color A: Ch 3, (dc, ch 1, dc) in ch1sp, sk next dc, dc in each dc to corner, (2 dc, ch 2, 2 dc) in ch2sp corner, *dc in each dc until 1 dc remains before ch1sp, sk next dc, (dc, ch 1, dc) in ch1sp, sk next dc, dc in each dc to corner, (2 dc, ch 2, 2 dc) in ch2sp corner; rep from * twice more, dc in each dc, slst to ch 3 from beginning of round to join; turn.
Round 2 Colors:
Use Color A for entire round.
Round 3 (WS): Continuing with Color A: Ch 3, dc in first dc, dc in each dc to corner, (2 dc, ch 2, 2 dc) in corner ch2sp, *dc in each dc until 1 dc remains before ch1sp, sk next dc, (dc, ch 1, dc) in ch1sp, sk next dc, dc in each dc to corner, (2 dc, ch 2, 2 dc) in ch2sp corner; rep from * twice more, dc in each dc until 1 dc remains before ch1sp, (dc, ch 1, dc) in ch1sp, sk next dc, slst to ch 3 from beginning of round to join; turn.
Round 3 Colors:
Side 1 (first half): Ch 3, 27 more dc in color A, next 32 dc + corner in Color C (34 dc total in Color C).
Sides 2, 3, 4: Corner + next 32 dc in Color C (34 dc total in Color C), switch to Color A until 32 dc remain on side, next 32 dc + corner in Color C (34 dc total in Color C).
Side 1 (second half): Corner + next 32 dc in Color C (34 dc total in Color C), switch to Color A for remainder of round.
34 dc in Color C should intersect at each corner.
Round 4 (RS): Rep Round 2.
Round 4 Colors:
Use Color A for entire round.
Round 5 (WS): Rep Round 3.
Round 5 Colors:
Side 1 (first half): Ch 3, 44 more dc in color A, next 19 dc + corner in Color D (21 dc total in Color D).
Sides 2, 3, 4: Corner + next 19 dc in Color D (21 dc total in Color D), switch to Color A until 19 dc remain on side, next 19 dc + corner in Color D (21 dc total in Color D).
Side 1 (second half): Corner + next 19 dc in Color D (21 dc total in Color D), switch to Color A for remainder of round.
21 dc in Color D should intersect at each corner.
Finishing Border (RS): Ch 1, rsc in each dc and chsp around, except the dc right before and after the ch1sps in the middle of each side, slst to first st to join. Fasten off.
TIP: If Finishing Border is looking a little wavy, decrease one hook size for rsc stitches.
FINISHING
Final Touches:
Weave in remaining ends.
Block blanket according to fiber content. When in doubt, steam blocking works beautifully. Pin blanket to blocking board or towel on floor using T-pins. Aim steam from an iron or steamer at blanket, keeping 4-8” of distance from yarn. (DO NOT touch yarn with iron or steamer as this can melt any synthetic components of yarn.)
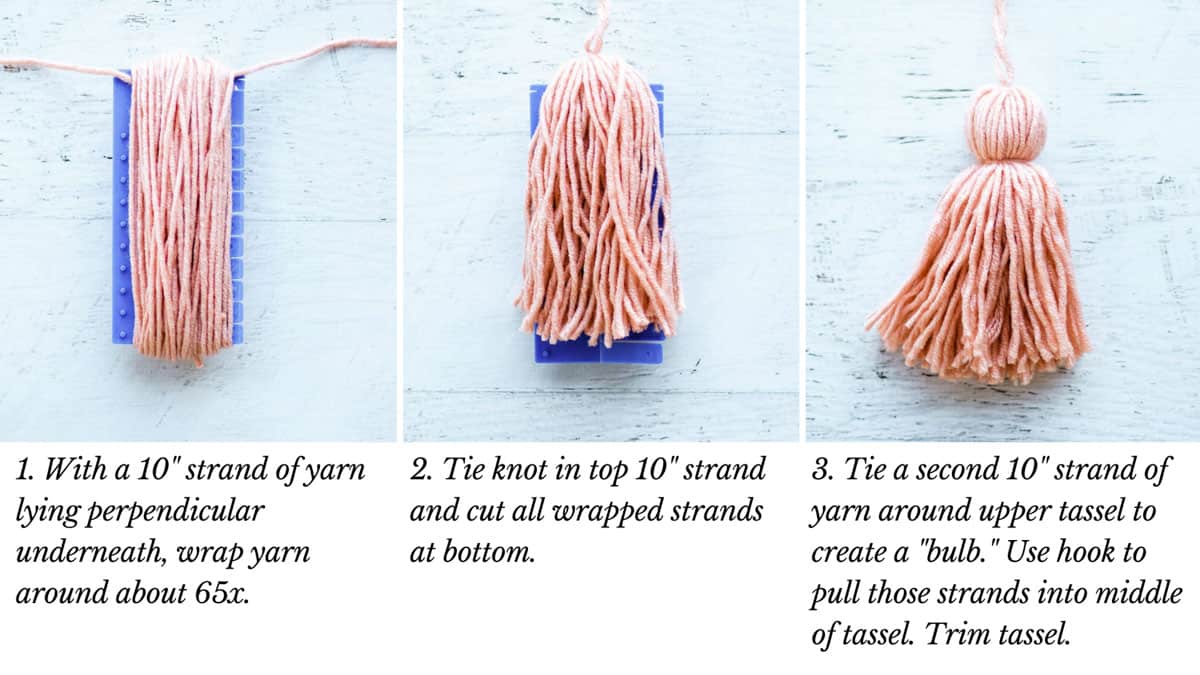
Adding Tassels:
To create tassels, wrap yarn approximately 65 times around a 7” piece of cardboard or book. Tidy tassel bottoms with scissors and steam if desired. Attach one tassel to each blanket corner and then use crochet hook to pull extra knot tails through center of tassel.
Give yourself a high five for being a rising crochet star!
Share your work! Mention @MakeAndDoCrew and tag #MakeAndDoCrew + #RisingStarBlanket to show off your stitches ⇨
Leave a Reply