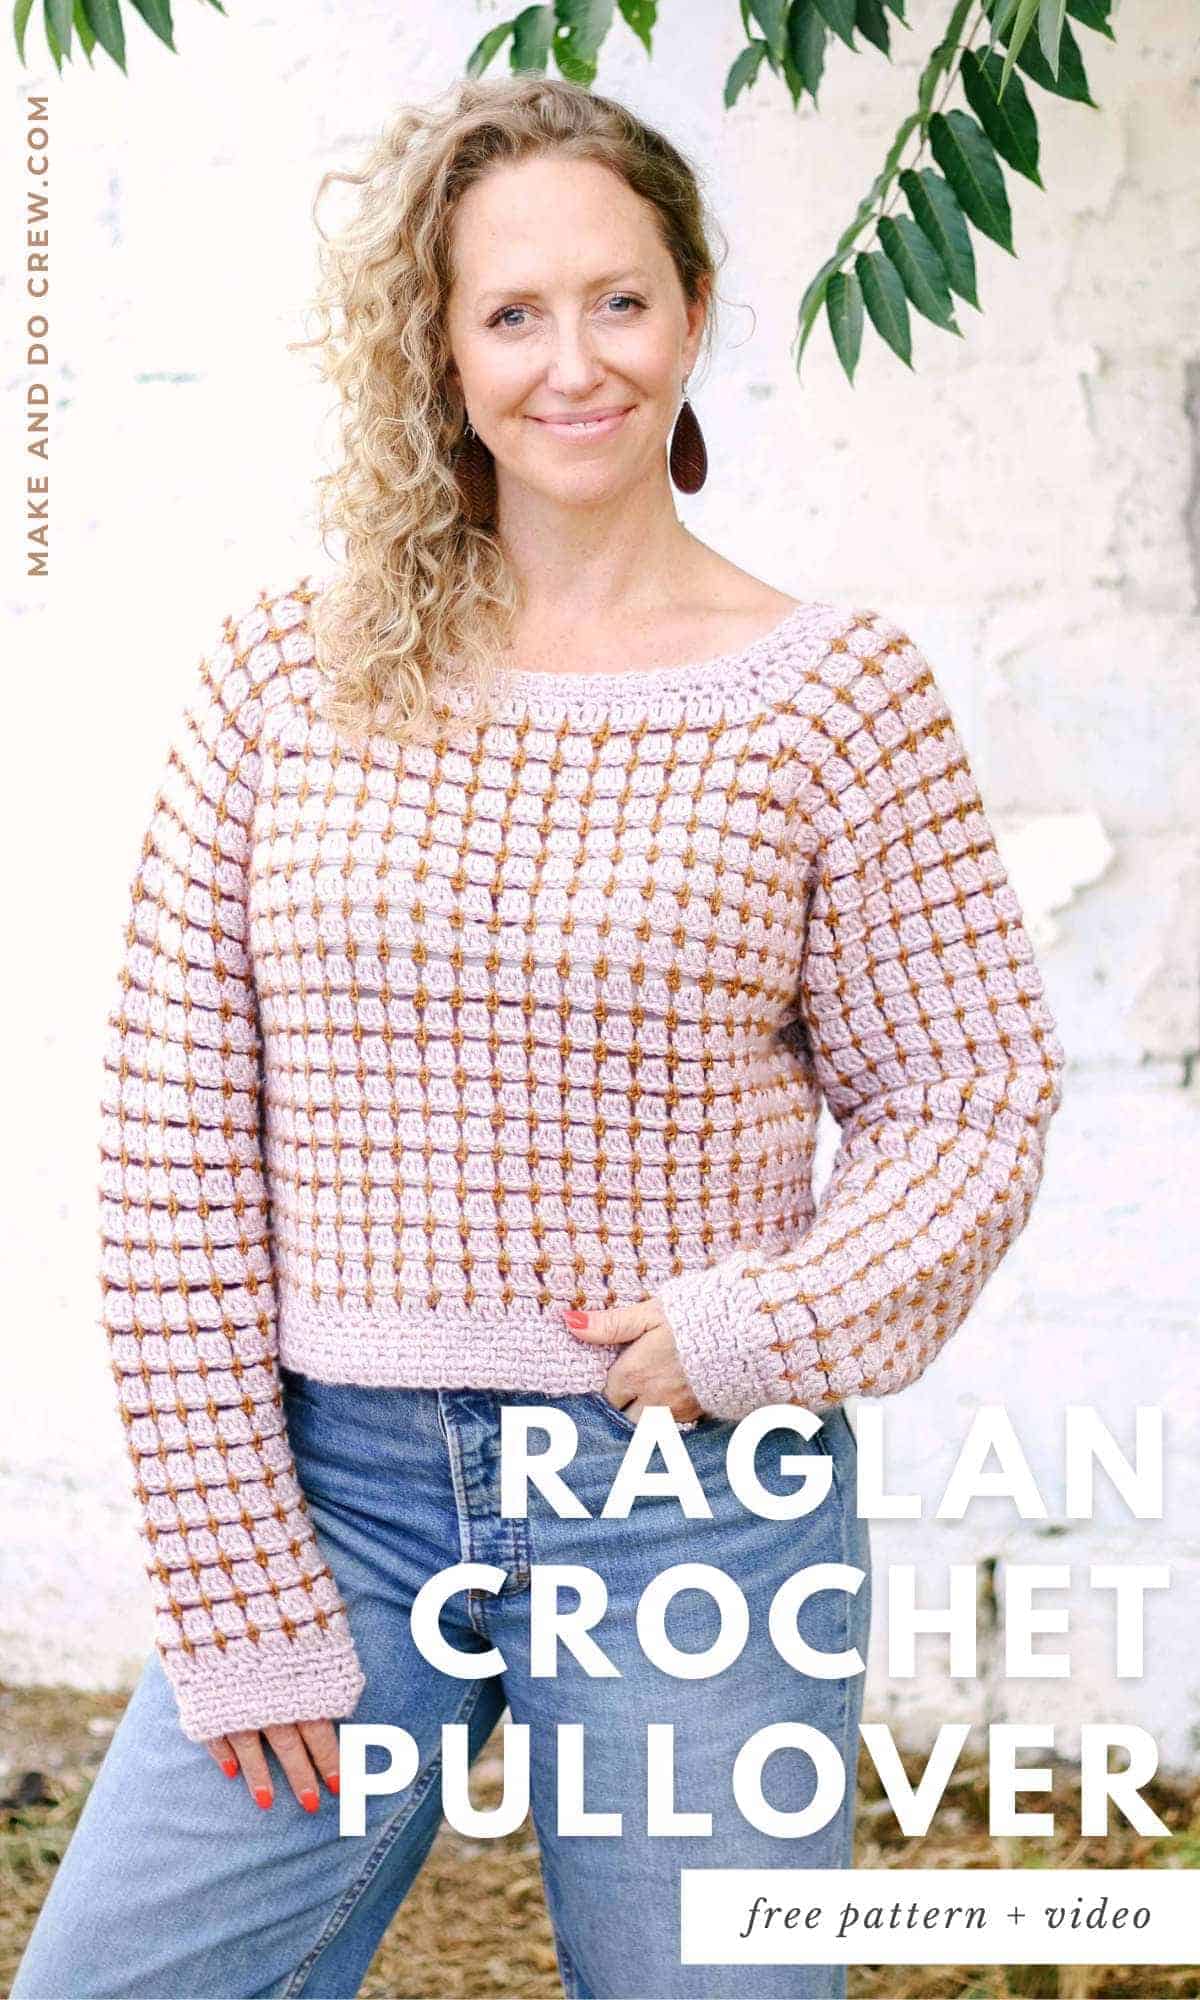
This simple crochet raglan sweater is worked from the top down so you can try it on and check your progress as you go. It’s a straightforward project with a polished result, perfect for everyday wear.
The free pullover pattern with video tutorial is below or purchase the ad-free, printable PDF.
This raglan pattern is part of a collaboration with Lion Brand Yarns. This post contains affiliate links.
Jump to:
- Cobblestone Raglan Sweater - Free Pattern
- Skill Level
- All-in-One Crochet Kit
- Print this Pattern
- Supplies + Materials
- Measurements
- Gauge
- Abbreviations + Glossary (US Terms)
- Follow the Cobblestone Raglan Video Tutorial
- Overall Pattern Notes
- !! Gauge Check !!
- Starting the Yoke
- Adding the Back Extension
- Creating the Armholes
- Extending the Body
- Adding the Bottom Edging
- Extending Each Sleeve
- Adding the Sleeve Cuff Trim
- Creating the Neckline Trim
- Finishing Details
- Invitation to our Private Community
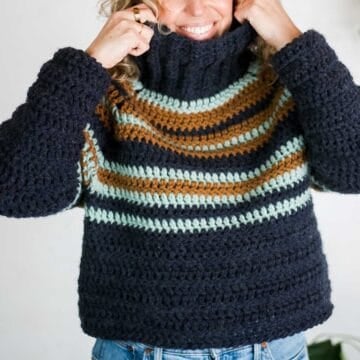
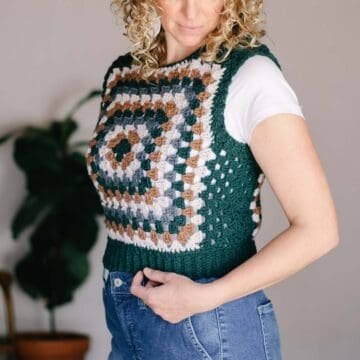
Cobblestone Raglan Sweater - Free Pattern
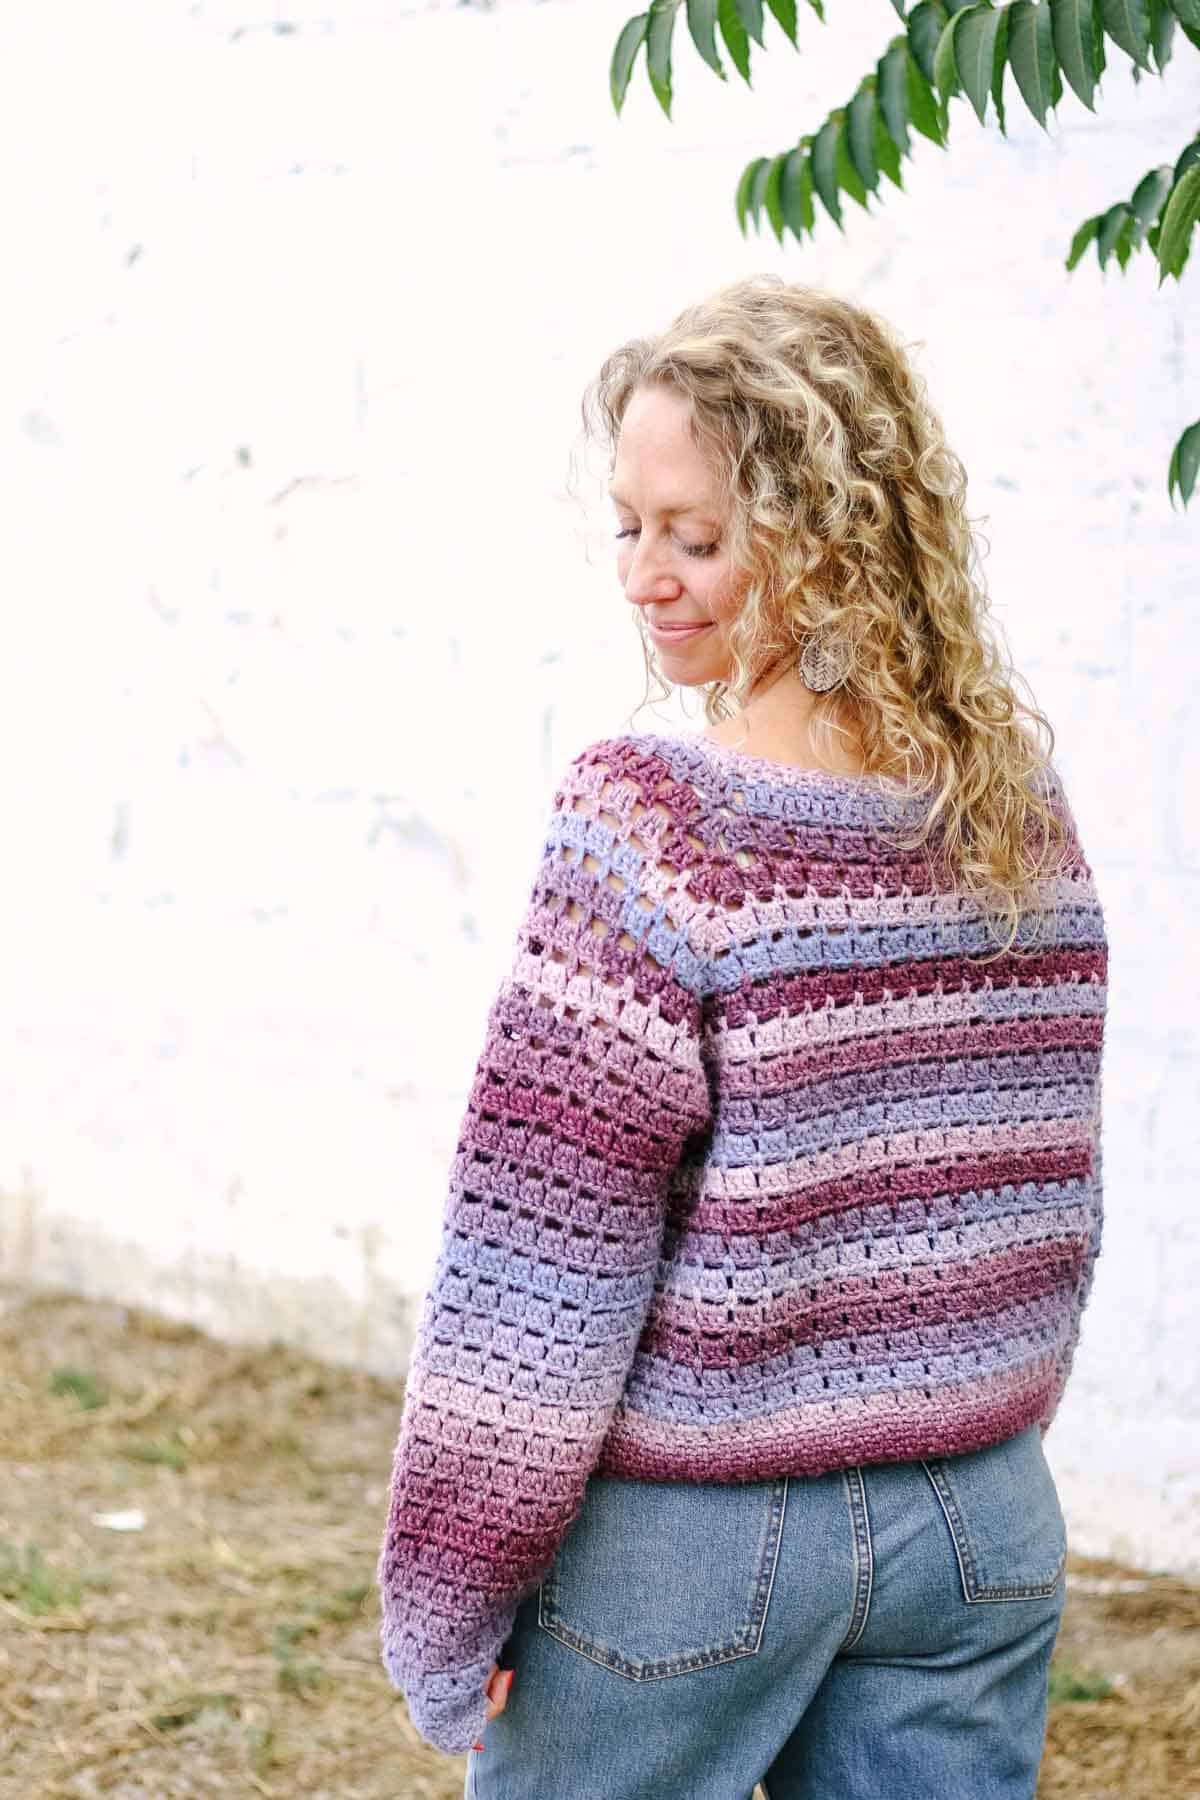
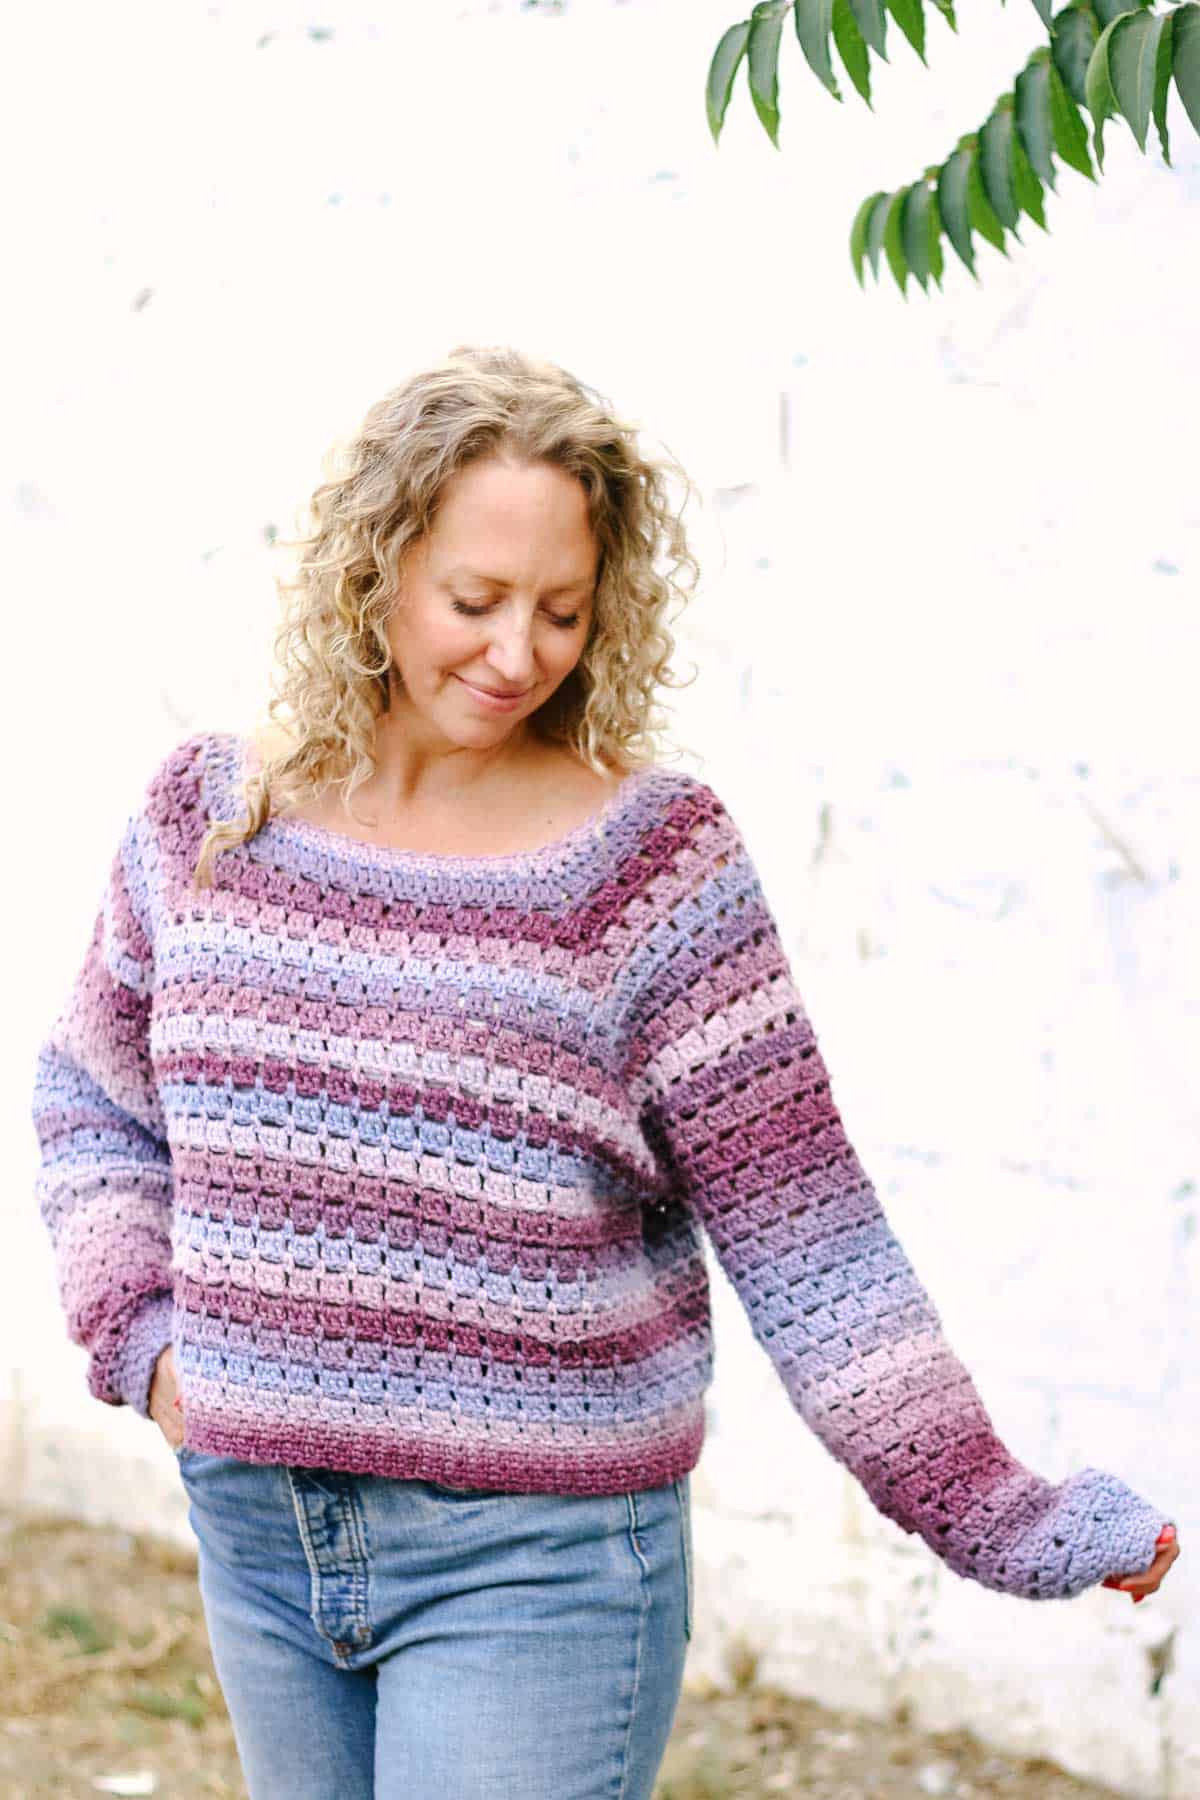
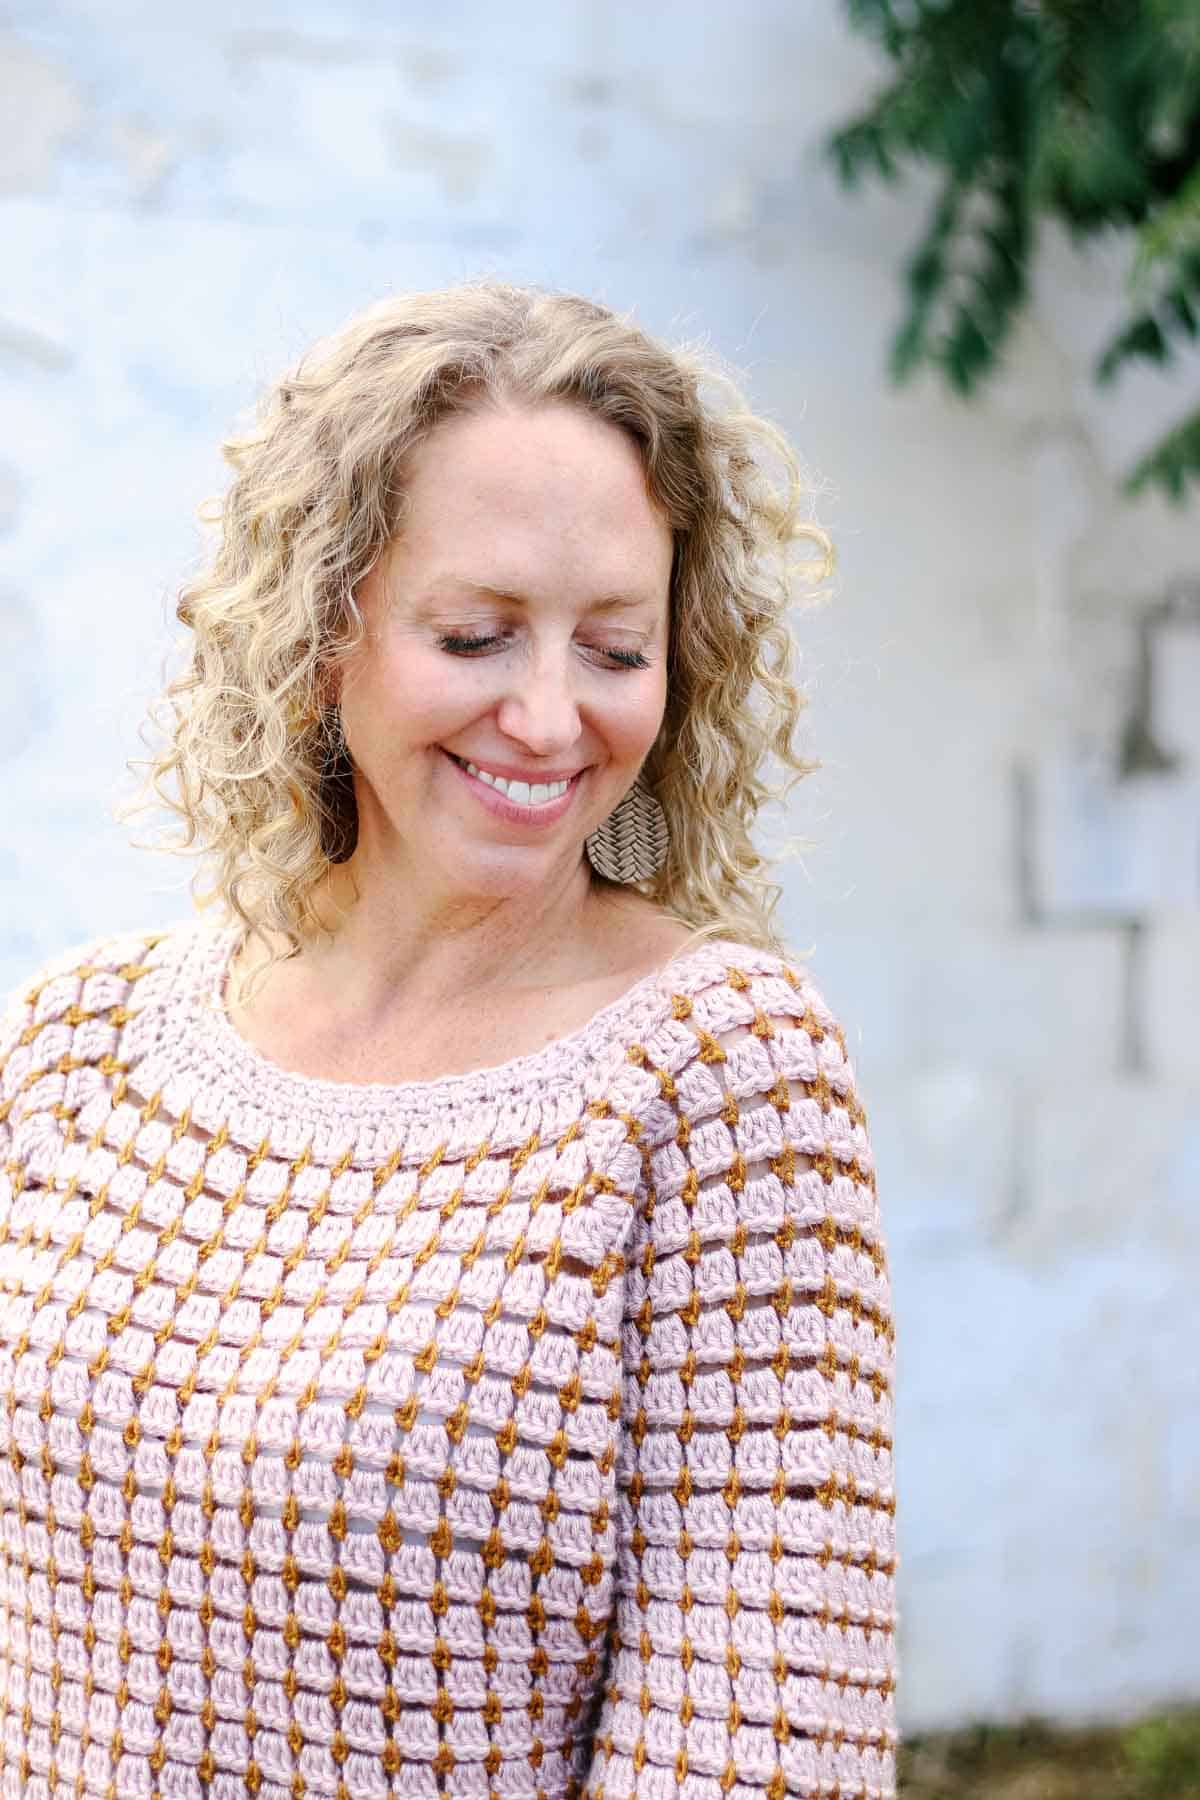
This raglan-style crochet pullover has a clean, modern silhouette with just the right amount of texture. The block stitch creates a subtle grid-like pattern, making it visually interesting without being fussy.
Keep it simple with a single color or add a pop of contrast by letting a second color peek through.
Grab your hook and get ready to make a sweater you’ll wear on repeat!
Skill Level
This project is appropriate for advanced beginners, but it's a more intermediate project if you use two colors. Consider sticking to a single color of yarn if you're new to crocheting garments.
In this pattern, you'll practice:
- alternating rounds of two different stitch repeats
- working in the round
- changing colors (optional)
- keeping two colors attached (optional)
- measuring gauge
- stitch anatomy
- reading a chart (available in the PDF)
- pattern reading
All-in-One Crochet Kit
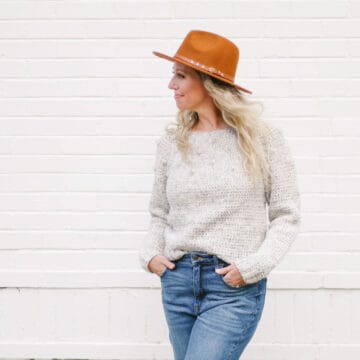
The yarn used in the purple sample pictured is Landscapes Renewed and it's insanely soft and comfy. I'm talking like brand-new-never-been-washed sweatshirt level of coziness.
The all-in-one kit from Lion Brand includes all the Landscapes Renewed yarn you'll need, plus a bonus printable PDF of the pattern (delivered digitally).
Print this Pattern
Prefer to crochet on the couch? Need a portable, printable pattern? You'll love the premium PDF! The instantly downloadable, ad-free file is formatted for easy printing and includes the complete pattern, all the photo tutorials, a link to the video tutorial and a stitch chart.
Premium PDF
easier and faster with fewer mistakes.
- Complete pattern + photo tutorials
- Instant download
- Formatted for easy printing
Supplies + Materials
Order an all-in-one kit from Lion Brand here.
Yarn Pictured In Variegated Sweater:
• Lion Brand Landscapes Renewed (4/medium - 232 yds, 5.3 oz, 150 g)
- Dreamcatcher [542-208AN] – 6 (6, 6, 7, 7, 7, 8, 8) skeins [(approx. 770 (810, 860, 920, 1000, 1100, 1120, 1190) g)]
Yarn Pictured In Multi-Color Sweater:
• Lion Brand Heartland (4/medium - 251 yds, 5 oz, 142 g)
- COLOR A: Capitol Reef [136-140Q] – 6 (6, 6, 7, 7, 7, 8, 8) skeins
- COLOR B: Canyonlands [136-131N - 1 (1, 1, 1, 1, 2, 2, 2) skein(s)
Additional Supplies:
• Tapestry needle
• Size L (8.0 mm) crochet hook or size needed to obtain gauge
Measurements
Choose your pattern size based on the measurement of your bust.
| Size | Fits Actual Bust* | Sweater Length* | Chest Width* |
|---|---|---|---|
| XS/S | 31” | 20.5” | 19.5” |
| S/M | 35” | 20.5” | 22.25” |
| M/L | 39” | 21.5” | 24” |
| L/1X | 43” | 21.5” | 25.75” |
| 1X/2X | 47” | 22.5” | 27.75” |
| 2X/3X | 51” | 23” | 30.5” |
| 3X/4X | 55” | 23.25” | 32.25” |
| 4X/5X | 59” | 23.5” | 34” |
Gauge
13 double crochet worked in block stitch pattern = 4”
4.5 double crochet rounds + 4 chain space rounds = 4”
Abbreviations + Glossary (US Terms)
block – 2 or 3 dc in one chain space
ch – chain
chsp – chain space
dc – double crochet
PM – place marker
rep – repeat
RS – right side
sc – single crochet
sk – skip
slst – slip stitch
st(s) – stitch(es)
tch - turning chain
WS – wrong side
yo – yarn over
Follow the Cobblestone Raglan Video Tutorial
Learn how to crochet your Cobblestone Raglan step-by-step in the video tutorial below.
Print This Pattern: purchase the ad-free, printable PDF

Don't spend hours for a "meh" result!
Tired of crocheting garments that don't fit? Learn our C.R.A.F.T. Framework to make sweaters that fit and feel amazing!
Overall Pattern Notes
- If you’re new to reading crochet patterns, check out more info here.
- Instructions are written with the stitch count for the smallest size first and each larger size following in parentheses, for example: XS/S (S/M, M/L, L/1X, 1X/2X, 2X/3X, 3X/4X and 4X/5X). It can be very helpful to highlight the numbers for your size before beginning the project. When only one number is given, it pertains to all sizes.
Stitch counts at the end of each round are for given sizes.
- Pattern is written with instructions on alternating two yarn colors throughout. Assume that Color A is used for all double crochet rounds and Color B is used for all single crochet/ch3sp rounds. If you are using a single yarn color, simply disregard these instructions.
- If this is your first garment project, consider instead using one color of yarn throughout. In this case, ignore mentions of switching to a different color between rounds.
- Chain 3 at beginning of rounds counts as one double crochet throughout pattern.
- “Block” refers to each set of 3 double crochet in odd-numbered rows/rounds. (In Sleeves, Block also refers to each set of 2 double crochets in odd-numbered rounds.)
How To Change Colors Without Fastening Off
Two or more colors can be alternated throughout pattern without fastening off between rounds.
For the cleanest color transitions, complete the final slip stitch of round with the color that will be used in the next round. Drop color that’s not being used to the wrong side of the project so it can be picked up again in the following round.
!! Gauge Check !!
Please don’t skip this step or you will risk your sweater not fitting as expected. Gauge swatch can be worked in one color.
Foundation Row: Ch 25.
Row 1 (WS): Dc in the fourth ch from hook and each ch to end of row. (23 dc)
Row 2 (RS): Ch 1, sc in first dc, *ch 3, sk next 3 dc, sc in between next two dc (4th and 5th); rep from * to end of row placing last sc in tch of previous row. (7 ch3sps)
Row 3 (WS): Ch 3, place 3 dc in each ch3sp across row until last sc remains, dc in last sc; turn. (7 blocks + 1 dc at each row end)
Row 4 (RS): Ch 1, sc in first dc, *ch 3, sk one block, sc between two blocks; rep from * until 1 block remains, ch 3, sk last block, sc in last sc; turn. (7 ch3sps)
Rep Rows 3 and 4 five more times.
Measuring Your Gauge
Measure center four inches of swatch vertically and horizontally. Compare to pattern gauge listed above.
- If there are too many stitches in 4” horizontally, increase your hook size and re-swatch.
- If there aren’t enough stitches in 4” horizontally, decrease your hook size and re-swatch.
- If swatch is measuring too small vertically, make a deliberate effort to pull loops up a bit higher before completing each double crochet.
- If swatch is measuring too large vertically, make an effort to work the loops of each double crochet a little tighter.
- This video is incredibly helpful if you’re having trouble achieving the correct vertical gauge
Want some company while you crochet?
Get support (and camaraderie!) in the Make & Do Crew community. Join for free here.
Premium PDF
easier and faster with fewer mistakes.
- Complete pattern + photo tutorials
- Instant download
- Formatted for easy printing
Starting the Yoke
- Yoke is worked in turned rounds. In Round 1, we create a rectangle. In each subsequent odd-numbered round, we increase in each rectangle corner.
- While it may seem like an error that some larger sizes begin with fewer chains in the foundation round, it's indeed correct. This allows each size to achieve the desired ease at the bust.
With Color A:
Foundation Round: Ch 90 (90, 108, 102, 120, 138, 132, 156) slst to first ch to join taking care to avoid twisting chain. (90 (90, 108, 102, 120, 138, 132, 156) ch)
Continue with Color A:
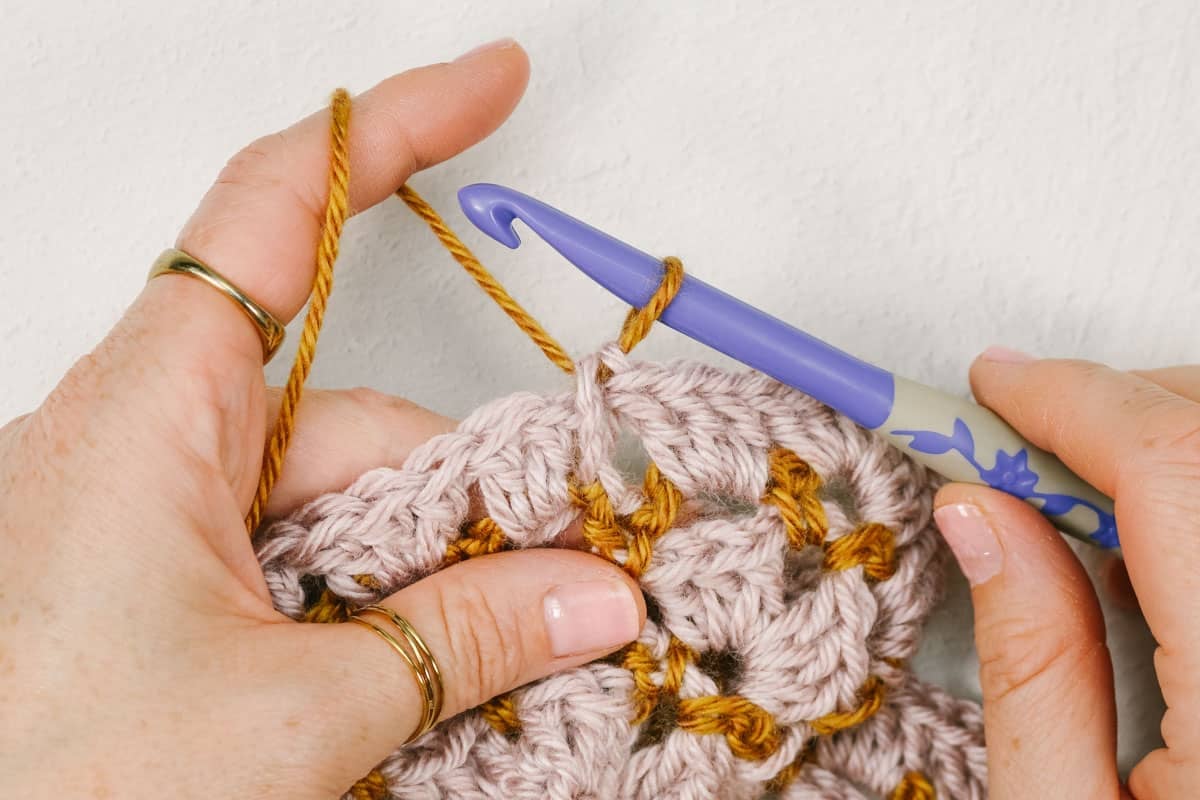
Round 1 (RS): Ch 3, sk first ch, dc in next 23 (26, 32, 32, 38, 44, 44, 50) ch, ch 2 (corner created), [dc in next 21 (18, 21, 18, 21, 24, 21, 27) ch, ch 2 (corner created), dc in next 24 (27, 33, 33, 39, 45, 45, 51) ch, ch 2 (corner created), dc in next 21 (18, 21, 18, 21, 24, 21, 27) ch, ch 2 (corner created), slst to top of tch to join; turn.
With Color B:
Round 2 (WS): Ch 1, [sc, ch 3, sc] in corner ch2sp *[ch 3, sk 3 dc, sc between next two dc] repeat until 3 dc remain before corner, ch 3**, [sc, ch 3, sc] in corner; rep from * around rectangle ending at **, slst to first sc to join; turn. (34 (34, 40, 38, 44, 50, 48, 56) ch3sps)
Continue using Color A for all dc rounds and Color B for all sc/ch3sp rounds.
Round 3 (RS): Ch 3, 2 dc in first ch3sp, *3 dc in each ch3sp to corner, [3 dc, ch 3, 3 dc] in corner; rep from * three times, slst to top of tch to join; turn.
Round 4 (WS): Ch 1, sc between tch from previous round and next dc, ch 3, [sc, ch 3, sc] in first corner, *[ch 3, sc between next two blocks] repeat from * around rectangle placing, [sc, ch 3, sc] in each corner; slst to first sc to join; turn.
Round 5 (RS): Ch 3, 2 dc in first ch3sp, *3 dc in each ch3sp to corner, [3 dc, ch 3, 3 dc] in corner; rep from * three times, 3 dc in each ch3sp to end of round, slst to top of tch to join; turn.
Round 6 (WS): Ch 1, sc between tch from previous round and next dc, *[ch 3, sc between next two blocks] repeat around rectangle placing, [sc, ch 3, sc] in each corner; slst to first sc to join; turn
Round 7 (RS): Ch 3, 2 dc in first ch3sp, *3 dc in each ch3sp to corner, [3dc, ch 3, 3 dc] in corner; rep from * three times, 3 dc in each ch3sp to end of round, slst to top of tch to join; turn.
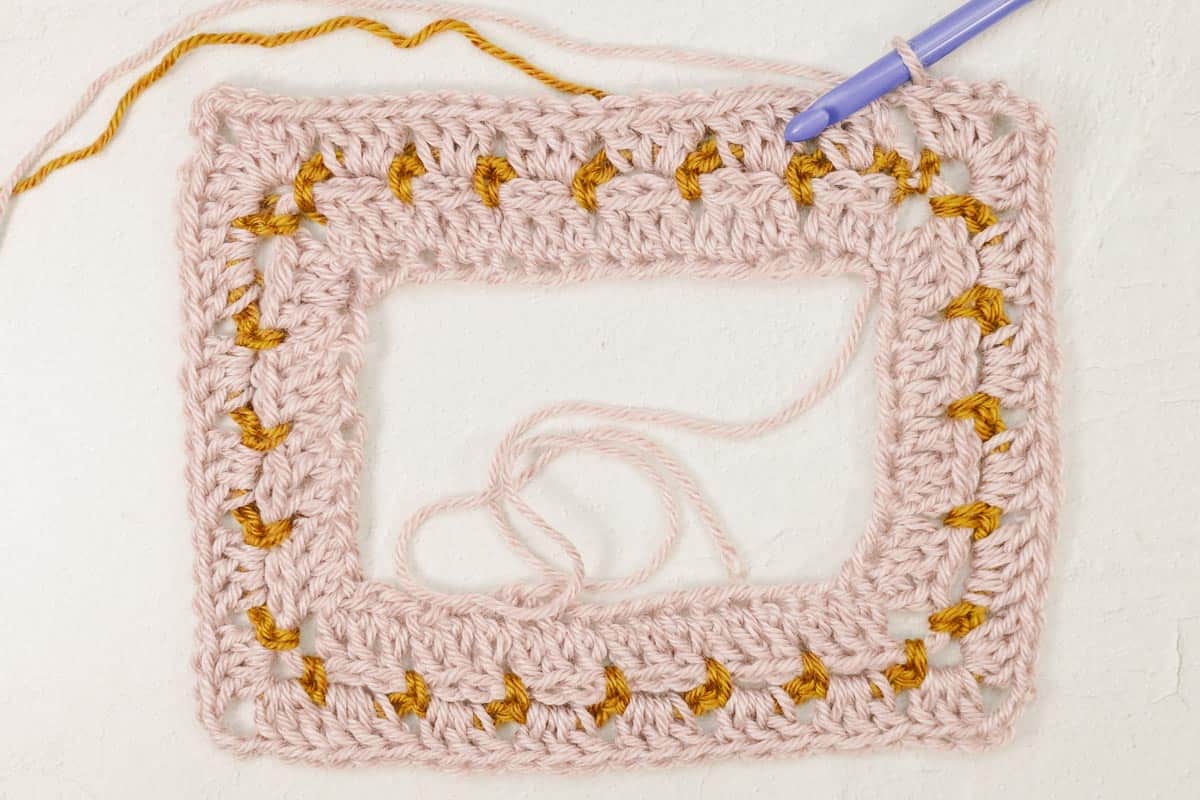
Rep Rounds 6 and 7 [3 (4, 4, 5, 5, 5, 6, 6)] more times. At this point, rectangle should contain 13 (15, 15, 17, 17, 17, 19, 19) rounds and measure approximately 18.5 x 17.5 ([21.25 x 18.5], (23 x 19.5), [ 25 x 20.25], (26.75 x 21.25), [28.5 x 22.25], (30.5 x 23), [32.25 x 25])”. Fasten off.
Label rectangle sides:
It’s helpful to label the sides of the rectangle at this point. This is done the same way, whether you’re right or left-handed.
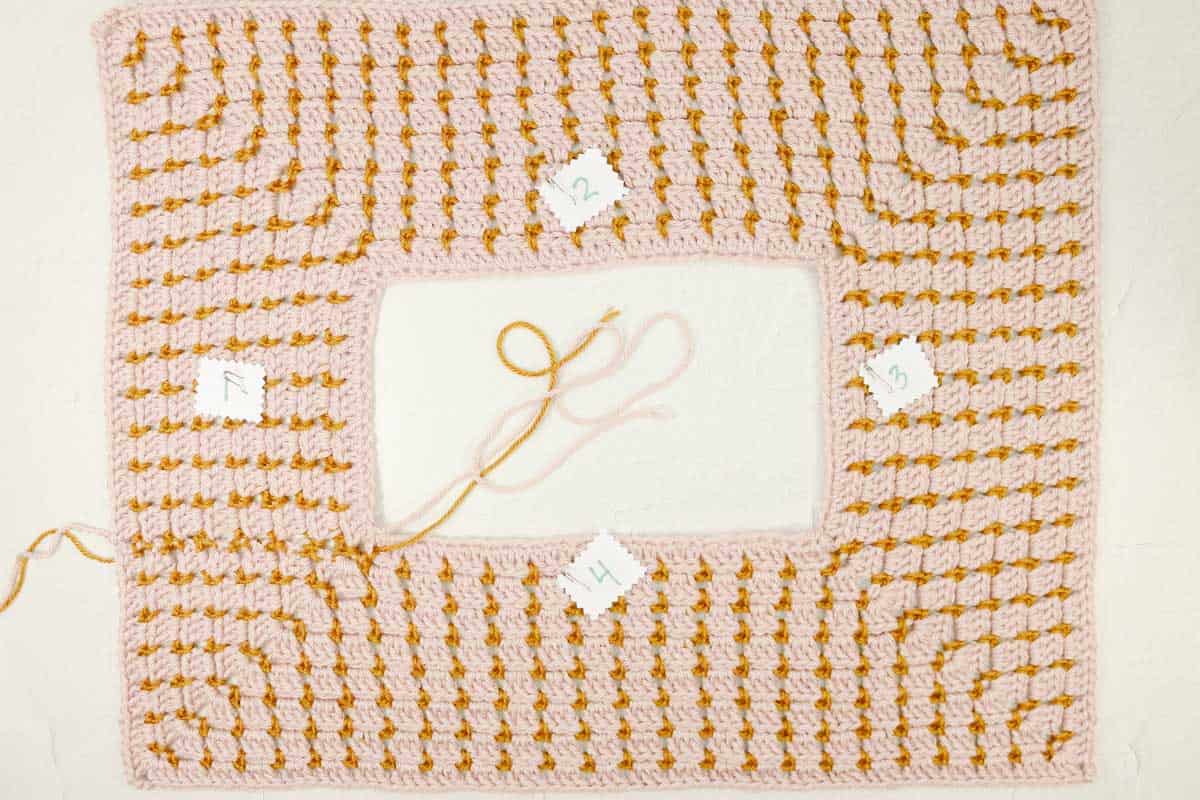
Print labels at end of the pattern PDF or write 1-4 on small pieces of paper and pin them to your rectangle clockwise around as follows:
Side 1: first short side where round begins/ends
Side 2: first full long side
Side 3: second short side
Side 4: second long side
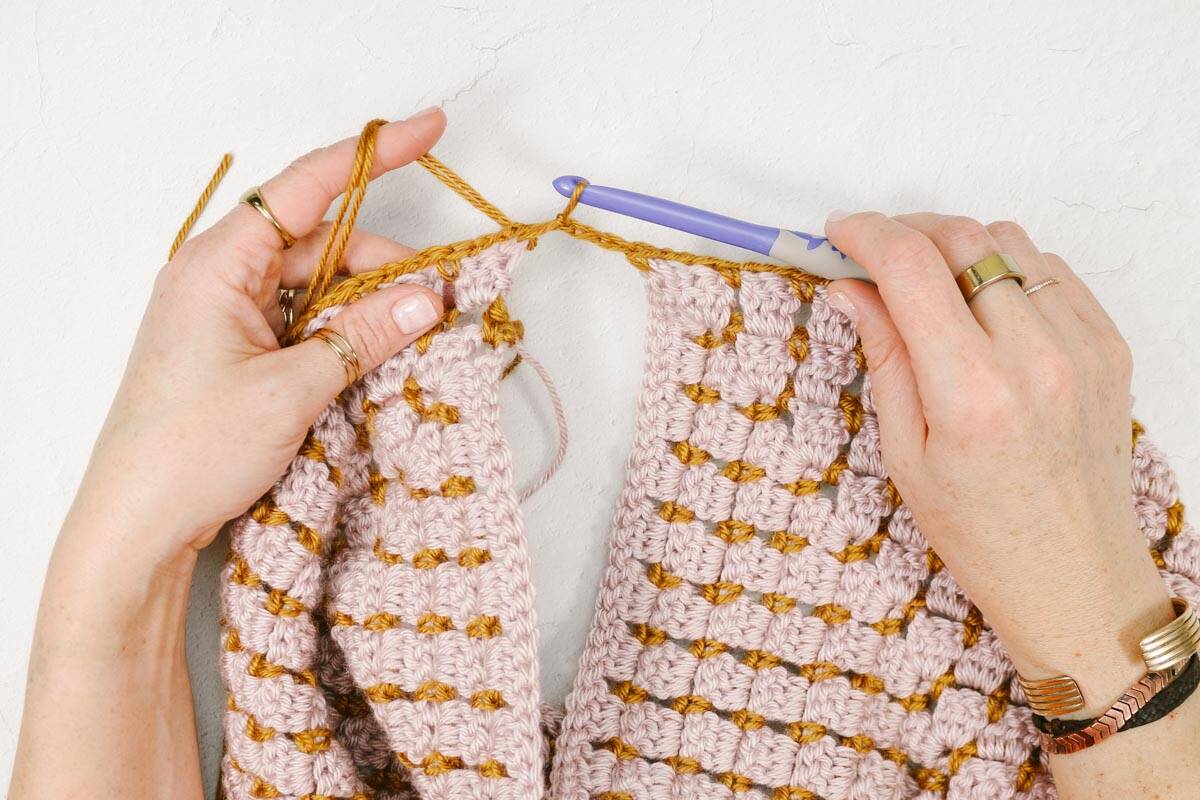
Adding the Back Extension
Two rows are added to the back of the sweater (side #4) only to help the neckline fit more comfortably.
Right-handed crocheters: Attach Color B in corner between sides #3 and #4.
Left-handed crocheters: Attach Color B in corner between sides #1 and #4.
With WS facing:
Row 1 (WS): Ch 1, sc in corner, [ch 3, sc between next two blocks] repeat across side #4 only ending with a sc in next corner space; turn.
Switch to Color A:
Row 2 (RS): Ch 3, 2 dc in first ch3sp, 3 dc in each ch3sp to end of side #4; turn.
Continue using Color A for all dc rounds and Color B for all sc/ch3sp rounds
Creating the Armholes
The following round is worked into sides #2 and #4 only. Chains are added between each side; these will become the underarms later on.
With Color B:
Round 1 (WS): Ch 4 (counts as 1 sc and ch3sp), sc between next two blocks, [ch 3, sc between next two blocks] repeat across side #4 only ending with a sc in top of tch from previous row, ch 3 (3, 3, 3, 3, 6, 6, 6) (underarm created)...
Fold rectangle in half so long sides are together.
…sc in corner space between sides #1 and #2 (left-handed: sides #2 and #3), [ch 3, sc between next two blocks] repeat across side #2 only ending with a sc in next corner space, ch 3 (3, 3, 3, 3, 6, 6, 6) (underarm created), slst to first ch from beginning of round to join; turn.
Extending the Body
With Color A:
Round 2 (RS): Ch 3, 2 (2, 2, 2, 2, 5, 5, 5) dc in armhole, 3 dc in each ch3sp around, to second armhole, 3 (3, 3, 3, 3, 6, 6, 6) dc in second armhole, 3 dc in each ch3sp around to beginning of round, slst to top of tch to join; turn.
Round 3 (WS): Ch 1, sc between tch from previous round and next dc, *[ch 3, sc between next two blocks] repeat around to underarm sts, [sc, ch 3, sk 3 dc, sc between dc sts] 1 (1, 1, 1, 1, 2, 2, 2) times rep from *; slst to first sc to join; turn.
Round 4 (RS): Ch 3, 2 dc in first ch3sp, 3 dc in each ch3sp around, slst to top of tch to join; turn.
Rep Rounds 3 and 4 [8 (8, 8, 8, 8, 8, 7, 7)] more times. At this point, Body section should contain 20 (20, 20, 20, 20, 20, 20, 18) rounds. Add or eliminate rounds here to adjust sweater length. Be sure to end with a RS round.
Fasten off Color B. Keep Color A attached.
Adding the Bottom Edging
With Color A and RS facing:
Round 1 (RS): Ch 1, sc in top of tch, ch 1, sk next st, [sc in next st, ch 1, sk next st] around, slst to first sc to join; turn.
Round 2 (WS): Ch 1, sc in first chsp, ch 1, [sc in next chsp, ch 1] around, slst to first sc to join; turn.
Rep Round 2 four more times. At this point, edging should contain 6 rounds. Fasten off.
Extending Each Sleeve
With WS facing, attach Color B in edge of underarm chain on the side of your dominant hand.
Right-handed: Attach yarn on the right side of the underarm chain stitches.
Left-handed: Attach yarn on the left side of the underarm chain stitches.
Left Sleeve:
(Left-handed crocheters, follow these instructions to create Right Sleeve)
Round 1 (WS): Ch 1, [sc, ch 3, sk 3 dc, sc] in underarm chain 1 (1, 1, 1, 1, 2, 2, 2) times, ch 3, skip back extension rows, sc in corner space, [ch 3, sc between next two blocks] repeat around, sk next corner space, slst to first sc to join; turn. (21 (22, 23, 24, 25, 27, 28, 30) ch3sps)
Right Sleeve:
(Left-handed crocheters, follow these instructions to create Left Sleeve)
Round 1 (WS): Ch 1, [sc, ch 3, sk 3 dc, sc] in underarm chain 1 (1, 1, 1, 1, 2, 2, 2) times, ch 3, skip corner space, sc between next two blocks, [ch 3, sc between next two blocks] repeat until corner space on opposite side, ch 3, sc in corner sp, sk back extension rows, slst to first sc to join; turn. (21 (22, 23, 24, 25, 27, 28, 30) ch3sps)
Right and Left Sleeves:
Rounds 2 and 4 use two double crochet to create blocks at the beginning and end of each round. This sets up for a decrease in the following round.
Round 2 (RS): Ch 3, 2 dc in first ch3sp, 2 dc in each of next two ch3sps, 3 dc in each ch3sp around until three ch3sps remain, 2 dc in each of next two ch3sps, 3 dc in last ch3sp, slst to top of tch to join; turn. (21 (22, 23, 24, 25, 27, 28, 30) blocks)
Round 3 (WS dec): Ch 1, sc between tch from previous round and next dc, ch 3, sc between next two blocks, ch 3, sk both 2-dc-blocks (decrease made), sc between next two blocks, [ch 3, sc between next two blocks] repeat around until three blocks remain, ch 3, sk both 2-dc-blocks (decrease made), sc between next two blocks, ch 3, slst to first sc to join; turn. (19 (20, 21, 22, 23, 25, 26, 28) ch3sps)
Round 4 (RS): Rep Round 2. (19 (20, 21, 22, 23, 25, 26, 28) blocks)
Round 5 (WS dec): Rep Round 3. (17 (18, 19, 20, 21, 23, 24, 26) ch3sps)
Round 6 (RS): Ch 3, 2 dc in first ch3sp, 3 dc in each ch3sp around, slst to top of tch to join; turn. (17 (18, 19, 20, 21, 23, 24, 26) blocks)
Round 7 (WS): Ch 1, sc between tch from previous round and next dc, [ch 3, sc between next two blocks] repeat around; slst to first sc to join; turn.
Rep Rounds 6 and 7 [8 (7, 7, 7, 7, 5, 4, 2)] more times. At this point, Sleeve should contain 23 (21, 21, 21, 21, 17, 15, 11) rounds.
Now we’ll decrease only at the beginning or end of each odd-numbered round.
Round 8 (RS): Ch 3, 2 dc in first ch3sp, 2 dc in each of next two ch3sps, 3 dc in each ch3sp around, slst to top of tch to join; turn. (17 (18, 19, 20, 21, 23, 24, 26) blocks)
Round 9 (WS dec end of round): Ch 1, sc between tch from previous round and next dc, [ch 3, sc between next two blocks] repeat around until three blocks remain, ch 3, sk both 2-dc-blocks (decrease made), sc between next two blocks, ch 3, slst to first sc to join; turn. (16 (17, 18, 19, 20, 22, 23, 25) ch3sps)
Round 10 (RS): Ch 3, 2 dc in first ch3sp, 3 dc in each ch3sp around until three ch3sps remain, 2 dc in each of next two ch2sps, 3 dc in last ch3sp, slst to top of tch to join; turn. (16 (17, 18, 19, 20, 22, 23, 25) blocks)
Round 11 (WS dec beginning of round): Ch 1, sc between tch from previous round and next dc, ch 3, sc between next two blocks, ch 3, sk both 2-dc-blocks (decrease made), sc between next two blocks, [ch 3, sc between next two blocks] repeat around, ch 3, slst to first sc to join; turn. (15 (16, 17, 18, 19, 21, 22, 24) ch3sps)
Rep Rounds 8-11 [1 (1, 1, 1, 1, 2, 2, 3)] more times. (13 (14, 15, 16, 17, 17, 18, 18) ch3sps)
Rep Rounds 8-9 once. (12 (13, 14, 15, 16, 16, 17, 17) ch3sps)
Rep Rounds 6-7 once.
Rep Rounds 10-11 once. (11 (12, 13, 14, 15, 15, 16, 16) ch3sps)
Rep Round 6 once. Sleeve should contain 33 (36, 39, 42, 45, 45, 48, 48) sts and 38 (36, 36, 36, 36, 36, 34, 34) rounds.
Work additional repeats of Rounds 6-7 to extend the sleeve if desired. Be sure to end with a Round 6. Fasten off Color B. Keep Color A attached.
Adding the Sleeve Cuff Trim
With Color A and RS facing:
Sizes: XS/S ( - , M/L, - , 1X/2X, 2X/3X, - , - )
Round 1 (RS): (dec) Ch 1, beginning in the top of the turning ch, *sc2tog, ch 1, sk next st, [sc in next st, ch 1, sk 1] 4 ( -, 5, - , 6, 6, - , - ) times; rep from * around, sl st to first st to join; turn. (12 ( - , 15, - , 18, 18, - , - ) sts)
Sizes: - (S/M, - , L/1X, - , - , 3X/4X, 4X/5X)
Round 1 (RS): (dec) Ch 1, beginning in the top of the turning ch, sc2tog, ch 1, sk next st, [sc in next st, ch 1, sk 1] - (7, - , 9, - , - , 10, 10) times, sc2tog, ch 1, sk next st, [sc in next st, ch 1, sk 1] - (8, - , 9, - , - , 11, 11) times, sl st to first st to join; turn.. (- (17. - ,20, - , - , 24, 24) sts)
All Sizes:
Round 2 (WS): Ch 1, sc in first chsp, ch 1, [sc in next chsp, ch 1] around, slst to first sc to join; turn.
Rep Round 2 four more times. At this point, trim should contain 6 rounds. Fasten off.
Creating the Neckline Trim
Try on your sweater and evaluate the neckline. If you like how it’s fitting, proceed with the neckline trim without doing the optional decreases. For a tighter neckline, work the decreases explained in Rounds 2-3.
Right-handed crocheters: With RS facing attach Color A in fifth foundation chain from corner between sides #1 and #4.
Left-handed crocheters: With RS facing attach Color A in fifth foundation chain from corner between sides #3 and #4.
Round 1 (RS): Ch 1, sc in same ch yarn attached in, ch 1, sk 1 ch, [sc in next st, ch 1, sk next st] around,
Ch 1, sc in top of tch, ch 1, sk next st, [sc in next st, ch 1, sk next st] around slst to first sc to join; turn.
Round 2 (WS optional dec): Ch 1, [sc in next chsp, ch 1] around, slst to first sc to join; turn.
- If a tighter neckline is desired, as you approach each corner: [sc2tog over last 2 ch1sps of side, ch 1, sc2tog over first 2 ch1sps of next side].
- If a tighter neckline isn’t desired, continue in pattern without decreasing in the corners.
Wanna save this pattern?
Round 3 (RS optional dec): Rep Round 2.
Fasten off.
Finishing Details
Weave in remaining ends: Learn more here.
Blocking: Once all ends are woven in, you may do a light steam blocking using either a steamer or iron with steam setting. Focus on any areas that aren’t laying as flat as you’d like, such as the sleeve or neckline decreases. Do not touch steamer or iron directly to yarn. Detailed info here.
Toss on your new sweater and start dreaming up the colors for your next one!
Permissions + Copyright:
Please do not publish or share this pattern as your own. You may make items to sell with this pattern. In exchange, please link back this post. Do NOT use our photos as your own sales photos.
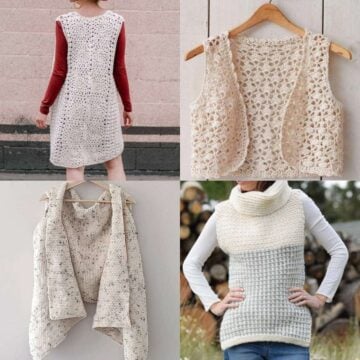
More Free Crochet Sweater Patterns
Let's crochet some more clothes together! We've got lots of free patterns and tutorials to inspire you.
- 3 Day Crochet Raglan Pattern For Beginners + Video
- Cropped Hexagon Sweater - Free Crochet Pattern
- Nearly Seamless Crochet Cardigan - Easy Free Pattern
- Marika Swancho | A Lacy Crochet Sweater Poncho
- Easy C2C Crochet Cardigan Pattern Made From Rectangles
- Taylor Swift Crochet Dress Pattern | Made From Granny Stitch Hexagons


That was so fun! Now what?
Invitation to our Private Community
Come discuss crocheting a top down raglan and lots of other projects and techniques in our Make & Do Crew community. Here thousands of helpful crocheters answer each other's questions and share their stitches. Join us!

Leave a Reply