Creating an ombre effect on any knit or crocheted wool item is easy using just some basic supplies. Learn how to dye yarn with food coloring in this fun video tutorial!
This post contains affiliate links.
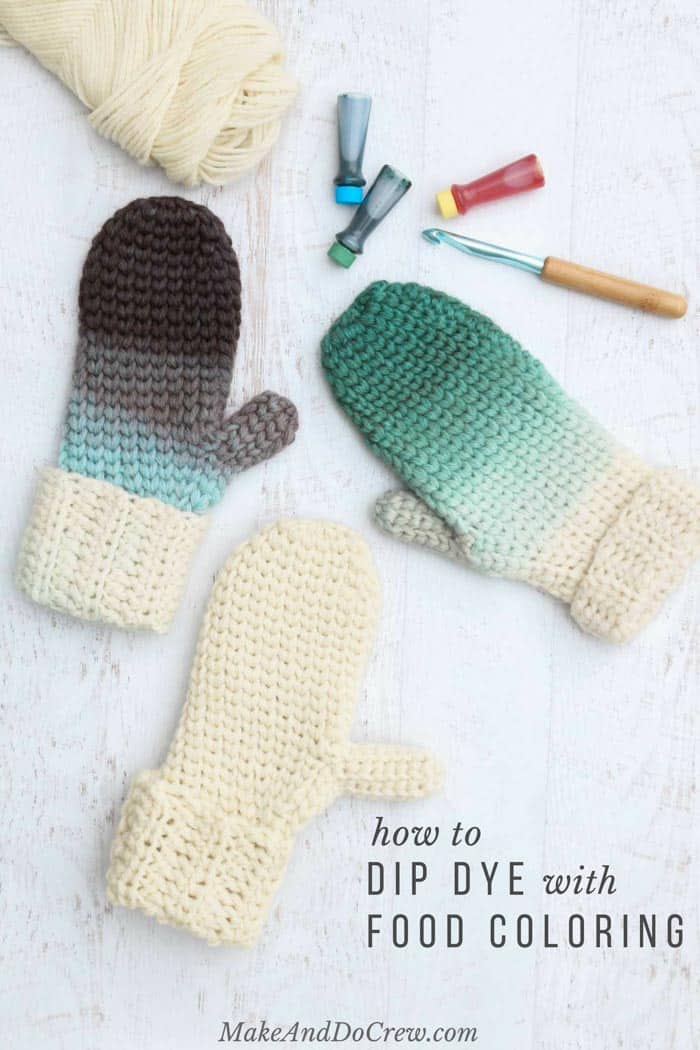
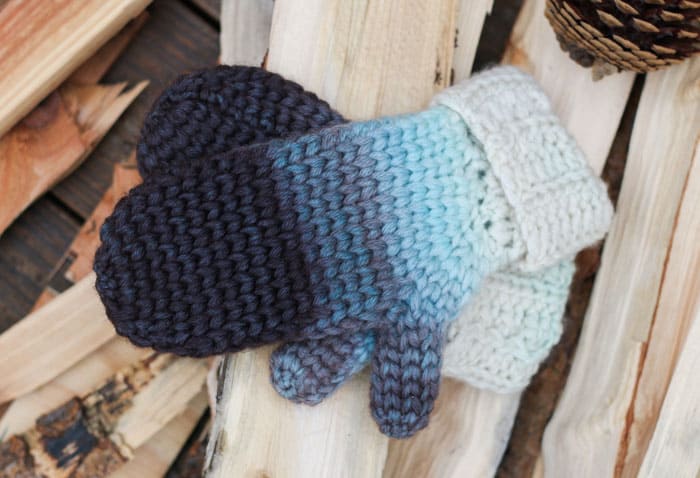
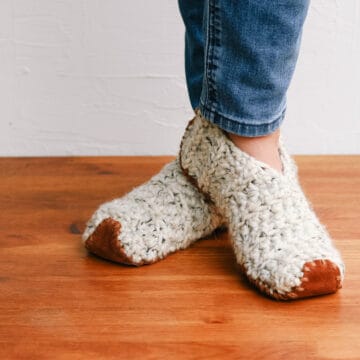
Can we agree there's a very fine line separating kitchen and craft supplies? In my house that distinction is just based on which room something was last abandoned in. I love finding new uses for regular, old items laying around the house (like this Dollar Store twine that combined with a leather belt to become a basket!), so when I whipped up the Morning Mittens recently, I knew they wouldn't stay white wool for long.
I mean, let's be honest, I'm destined to stain them, so I might as well just do it deliberately.
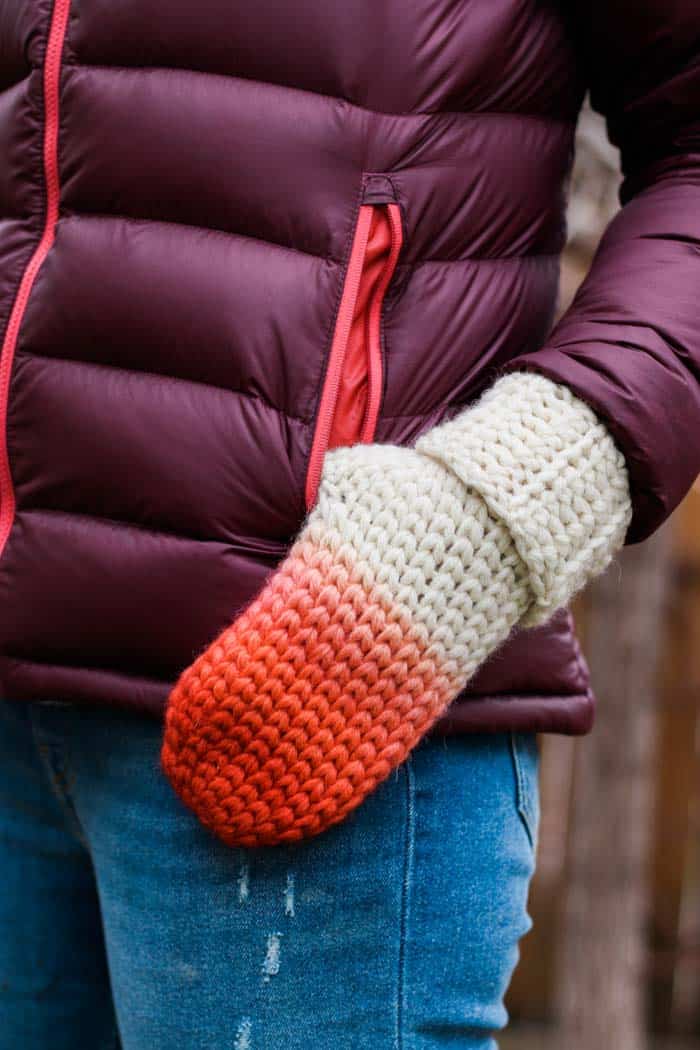
That's where the idea of dip dying a finished crochet or knit item to create an ombre effect was born. At first I considered using Kool-Aid, but Kool-Aid comes in a narrower range of colors. I liked the idea of having every theoretical color as an option, so I opted for food coloring instead. While doing some research on how exactly you dye yarn with food coloring, I came across a few helpful posts, like this one and this one, that outlined how to dye loose wool yarn.
I figured dying a finished crochet or knit item made from wool couldn't be that different from dying the loose yarn, so I got to work experimenting in my crochet lab kitchen. There are a few things I learned:
1. I'm pretty sure any knit or crocheted item made from 100% wool would work for dying. I used Fishermen's Wool by Lion Brand to make these mittens and it worked beautifully. (It was even softer after dying!)
2. I have a lot to learn about color theory.
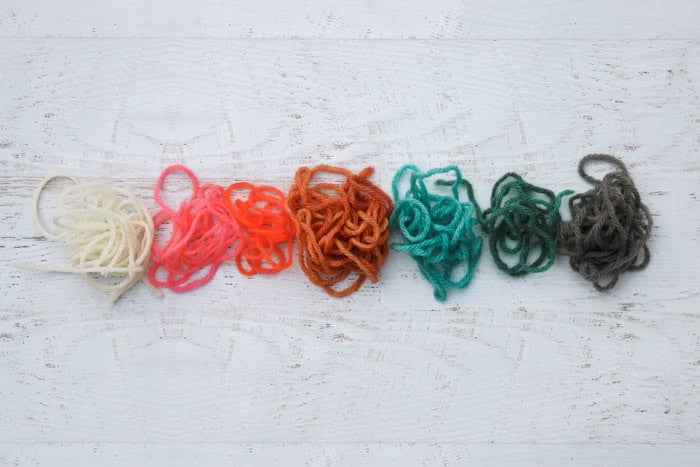
Seriously, guys. You think you know color. And then you try to create a deep, moody navy blue from primary colors and you're like, "huh?" I found this cake decorating post helpful in dissecting the "recipes" for color, especially as it relates to food coloring. I don't have an exact formula for recreating the colors in these photos because it was a whole lot of "a little of this and a little of that."
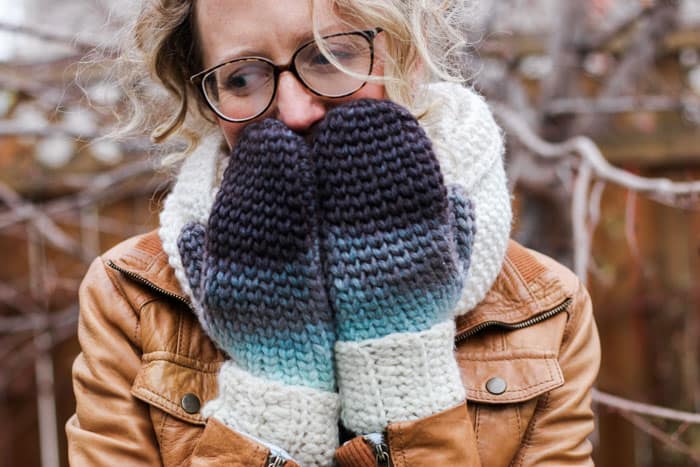
The main colors I used were from a set of neon and a set of primary grocery store liquid food coloring. I also added a drop of black to the navy mittens in attempt to deepen and muddy the shade.
I put together a super quick :50 second video tutorial below that shows you the process start to finish. You can find the full written instructions on how to dye yarn with food coloring below the video.
As a side note, my 4-year-old LOVED this project. She was dying her own yarn "noodles" right alongside me. I think it would be so fun to make little beanies, mittens or cowls for the kiddos in your life and then let them choose the colors to create their own personalized dip dye look. Since the water for the dye is extremely hot though, make sure an adult is the one to actually do the dunking into the dye.
If you're interested, the free crochet mitten pattern pictured in these photos can be found here. It looks knit--but it's not!
Lion Brand has created a kit with the 100% wool yarn needed to make these mittens, plus a copy of the pattern. You can pick up that kit here.
Wanna save this pattern?
How To Dye Yarn With Food Coloring
(loose yarn or finished crochet/knit items)
Pin this yarn dying tutorial for later here.
Supplies:
So you can spend more time dying and less time shopping, this post contains affiliate links at no extra cost to you.
• loosely wound yarn or finished crochet/knit item--in either case it needs to be 100% wool (I used Fishermen's Wool by Lion Brand)
• basic grocery store food coloring (I used liquid, but I've heard gel creates even more saturated colors)
• non-aluminum pan
• non-aluminum spoon (wood will likely get stained)
• wooden chopstick or skewer (optional--but helpful to prop items up in the dye bath)
• water
• white vinegar
• access to a stove, hot plate or microwave
• rubber gloves (optional)
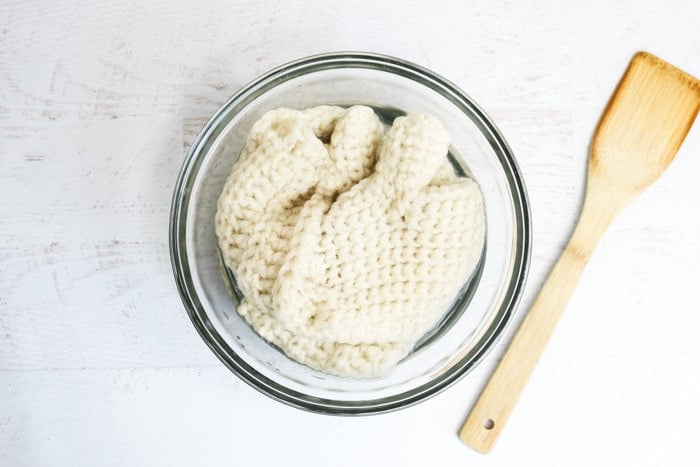
1. In a glass or plastic bowl, soak finished crochet/knit item (or loose yarn) in a mixture of one quart water to ¼ cup vinegar. Make sure yarn is fully saturated and let set for at least 30 mins. If you have leftover wool yarn, it's a good idea to soak some to use as strands to test the color mixture later. (Soaking in this water + vinegar mixture is great way to soften wool yarn or items made from wool yarn, even if you don't plan to dye them.)
2. Remove crochet/knit item, gently squeeze out excess water and set aside.
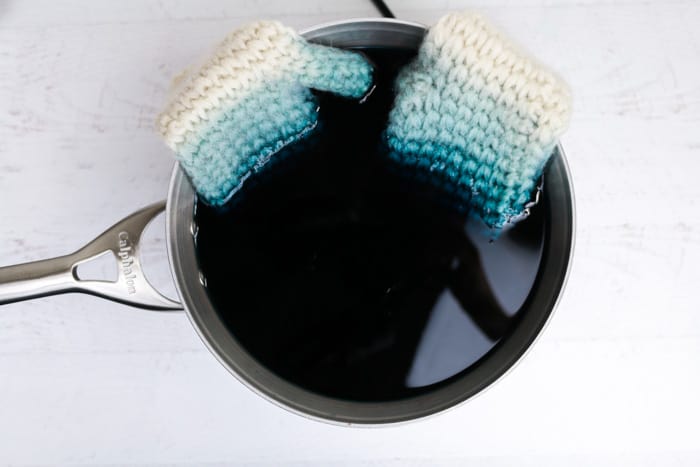
3. In non-aluminum pot, combine one quart water to ¼ cup vinegar. Depending on the size of your pot and the item you're dying, you may need more than one quart of water. Add ¼ cup vinegar for every quart of water.
4. Boil water. Turn off heat.
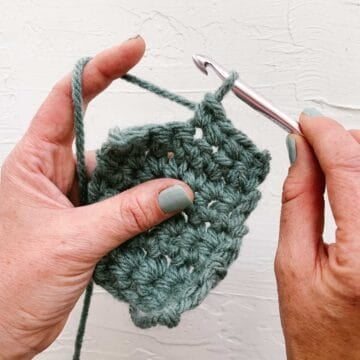
5. Add food coloring, starting with a little and adding more as you go. Use the extra strands you soaked in the vinegar water to test the color of the dye bath until you're happy with it. You may find that you want to do the first submersion and soak with one color and then add additional food coloring to soak another part of your item even more thoroughly. This is how I created the ombre effect and I could see it working for a rainbow-type effect too. (Just be sure to start with the lightest color first.)
6. (Optional) Gently insert a chop stick through the crochet/knit item so as to create a way to prop it evenly in the dye bath. See the video for an example of this.
7. The best part--dip your yarn-y item into the dye bath and behold the magic of food coloring! As you can see in the video tutorial, you may choose to just dunk it a few times and be done, or you may let it soak for a long while until the all the dye in the bath has been absorbed by the yarn.
(It sounds nuts, but it really doesn't matter how much water is in the dye bath. The saturation of the color is dependent on how much dye is in the water. One mitten completely absorbed the dye until the water was almost clear again!)
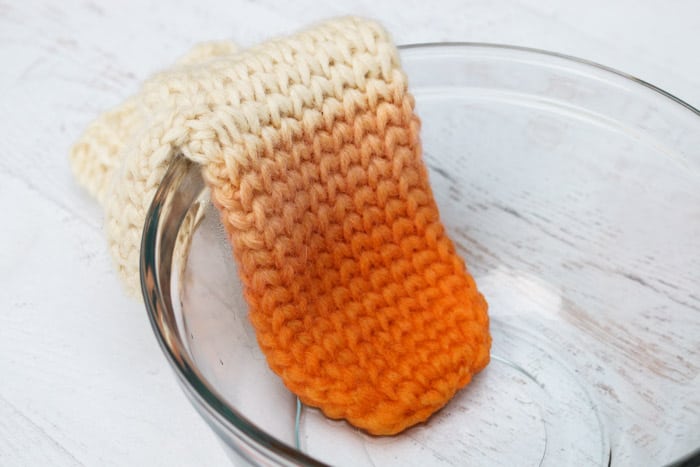
8. Since wool can felt from the combination of hot water and friction, be careful not to swirl your yarn or crochet/knit item around in the dye like a torpedo. Do check your item frequently until yarn color is a smidge darker than you'd like. Wearing rubber gloves, carefully remove the item and rinse it in cold water--it may still be quite hot. Very little dye will rinse out.
9. Gently lay your item flat and let it air dry.
10. Get started on your next wooly crochet or knit project so you'll have something new to dye! You can find all my free patterns here.
Here are a few more free crochet patterns and tutorials you might enjoy:
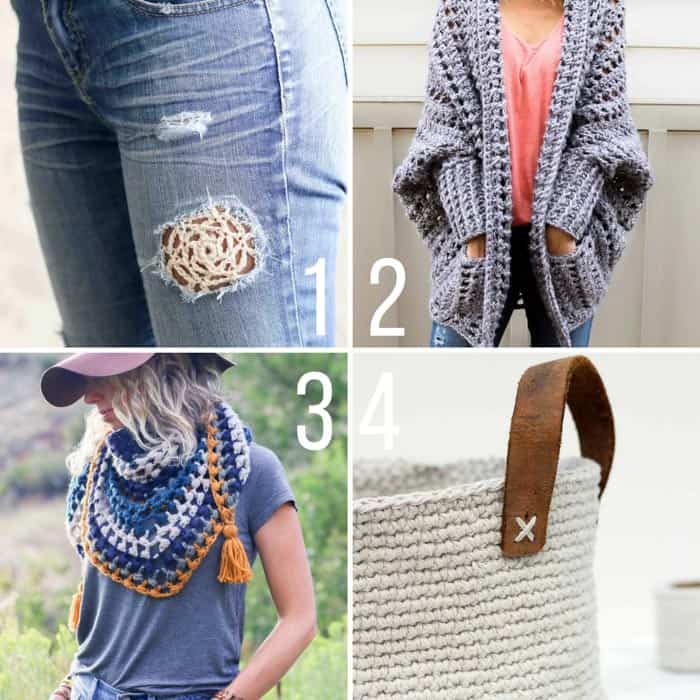
1. How to Patch Jeans with Crocheting - free tutorial + pattern
2. Dwell Sweater - free chunky crochet pattern + video tutorial
3. The Revival Scarf - free crochet triangle scarf pattern + video tutorial
4. Dollar Store Twine + Thrifted Belt Basket - free crochet pattern
Lauren says
Does the dye transfer to anything when you wear them? I just want to be sure! Thanks for your help!
Jess @ Make and Do Crew says
Nope, it' shouldn't! 🙂 The vinegar sets it. Even the very first rinse out of the dye bath is amazingly clear.
Ashlyn says
These are stunning! Love the pop of color.
Jess @ Make and Do Crew says
Thank you, Ashlyn! I do too!
Jessica Hanson says
I’m soaking my mittens as I type! I can’t wait to see how they turn out! ??
Jess @ Make and Do Crew says
Yay! I can't wait to hear either! Send me a pic or tag me on IG if you'd like. 🙂 (@makeanddocrew)
Jess
judy Melish says
Hi Jess,
Love all your crochet ideas. I was wondering if you had a pattern for a hat for a newborn? Our hospitals in Cincinnati ask for red knit or crochet hats for newborns in February (heart and Valentine Month) and the one that I used last year is kind of boring although I did manage to put a little border on it. Wonder if you have a more stylish design. You are never to young for style!! Thanks for any help you could give me. I thought I might get started a little early with this project if you have a suggestion or pattern. Keep up the wonderful emails.
judy
Cindy says
Thank you for all your wonderful ideas! I love them all! Will this work on any other yarn besides wool?
Jess @ Make and Do Crew says
Hey Cindy,
My pleasure! 🙂 I think it should work on any 100% natural fiber yarn (like cotton). You wouldn't want any acrylic component to the yarn.
Hope that helps!
Jess
Denise Stetler says
Hi. I happen to be allergic to wool. Would this process work with any other kinds of yarn?
Jess @ Make and Do Crew says
Hey Denise,
I think it should work on any 100% natural fiber yarn, like cotton or another animal fiber that might suite you better. (No acrylic though because it won't accept the dye.)
Jess
Kristen says
This is awesome! Is the cowl you're wearing the same one you shared in the directions? Thanks. LOVE. THIS. ?
Kristen says
Lol! Thanks. 🙂
Jennifer says
Great tutorial, Jess! I really like playing around with dying yarn *before* I crochet it, and never thought of doing it after! Super clever!
Jess @ Make and Do Crew says
Thanks Jennifer! That's exactly what I thought. It's a really different effect to dye afterward. Now I kinda want to try it on everything!
Jess
Victoria Hechtman says
This looks beautiful!! However, I worry that the food coloring dye would spread/transfer if the item got wet again. Do you know anything about that? My mittens are destined to get wet in snow, so I'm wondering if I should only try this on items that would never be exposed to liquid.
Jess @ Make and Do Crew says
Hey Victoria,
The vinegar actually sets the dye, so even in the very first rinse after the dye bath, very little color bleeds out. You should have no trouble using this on items that will get wet. Just keep in mind that anything 100% wool should be hand washed in cold water so as not to felt. 🙂
Jess