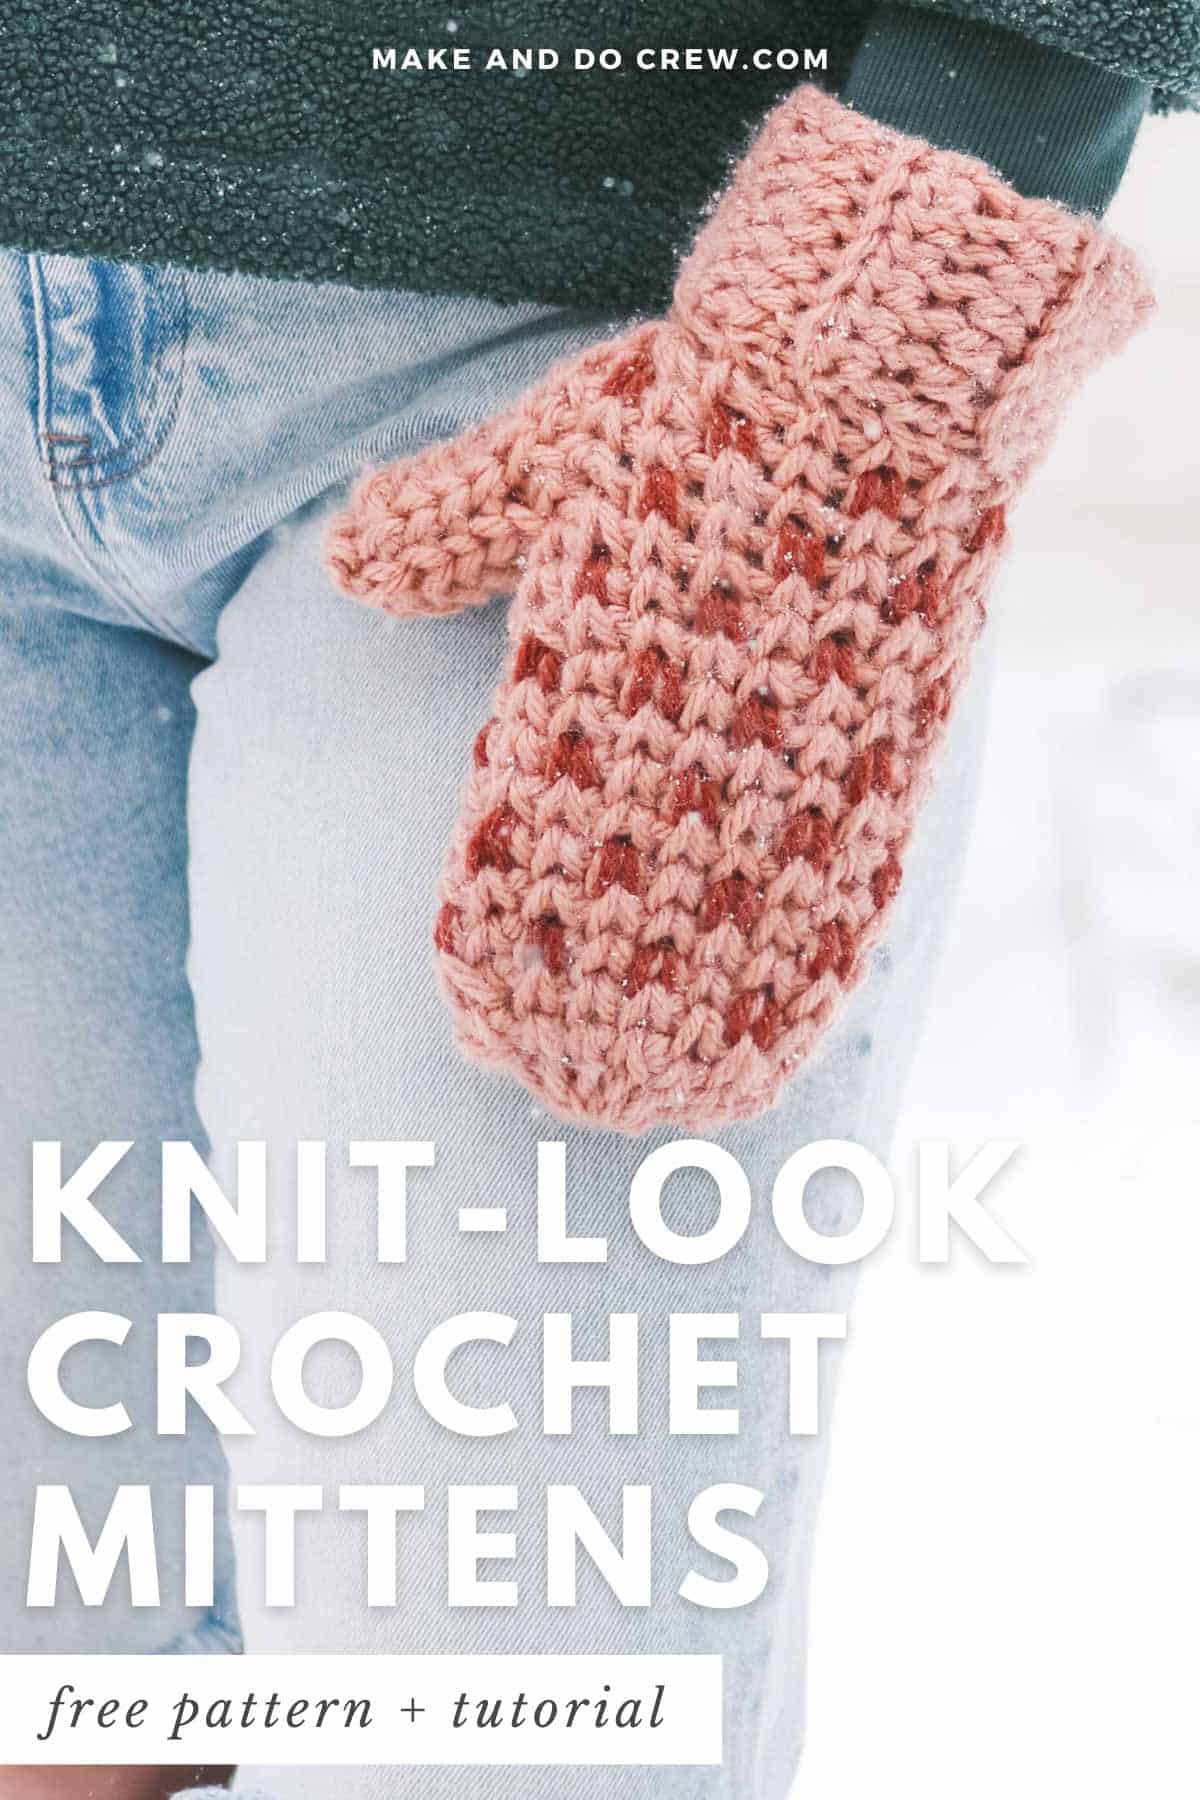
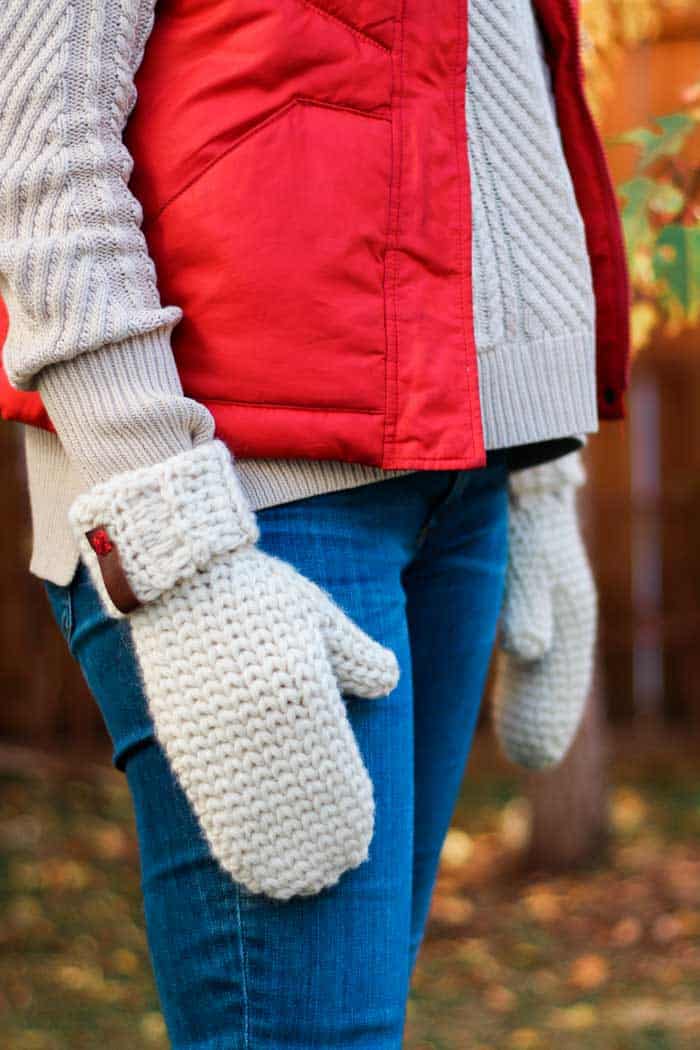
This free crochet mitten pattern uses cozy wool and a knit-looking stitch to create a timeless mitten style that's perfect for personalizing and gift-giving.
Get the full free pattern below or purchase the ad-free, printable PDF here.
This classic crochet mitten pattern is part of a collaboration with Lion Brand yarn. This post may contain affiliate links.
Jump to:
- A Classic Mittens Pattern for Adults
- Make a Matching Beanie
- The Look of Knitting with Crochet
- Skills You'll Practice
- Waistcoat Crochet Stitch Tips
- Classic Wool Mitten Yarn
- Acrylic Yarn Option
- How to Dip Dye Your Wool Mittens
- All-in-One Crochet Kit
- Print this Pattern
- Morning Mittens - Free Pattern
- That was so fun! Now what?
- Invitation to our Facebook group
- More Inspiration
A Classic Mittens Pattern for Adults
Did anyone else grow up wearing knit wool mittens? My mom would make my sisters and me each a pair (usually out of much finer yarn that I'm often willing to deal with!) and tie them together with a braid to hold them securely in our coat sleeves all winter.
Even as a kid, I knew something handmade had a special value.
Related: If you like the look of knit mittens, you'll love our 3 Hour Chunky Crochet Mittens pattern
Complete beginner? Check out our guide on How to Crochet for Beginners
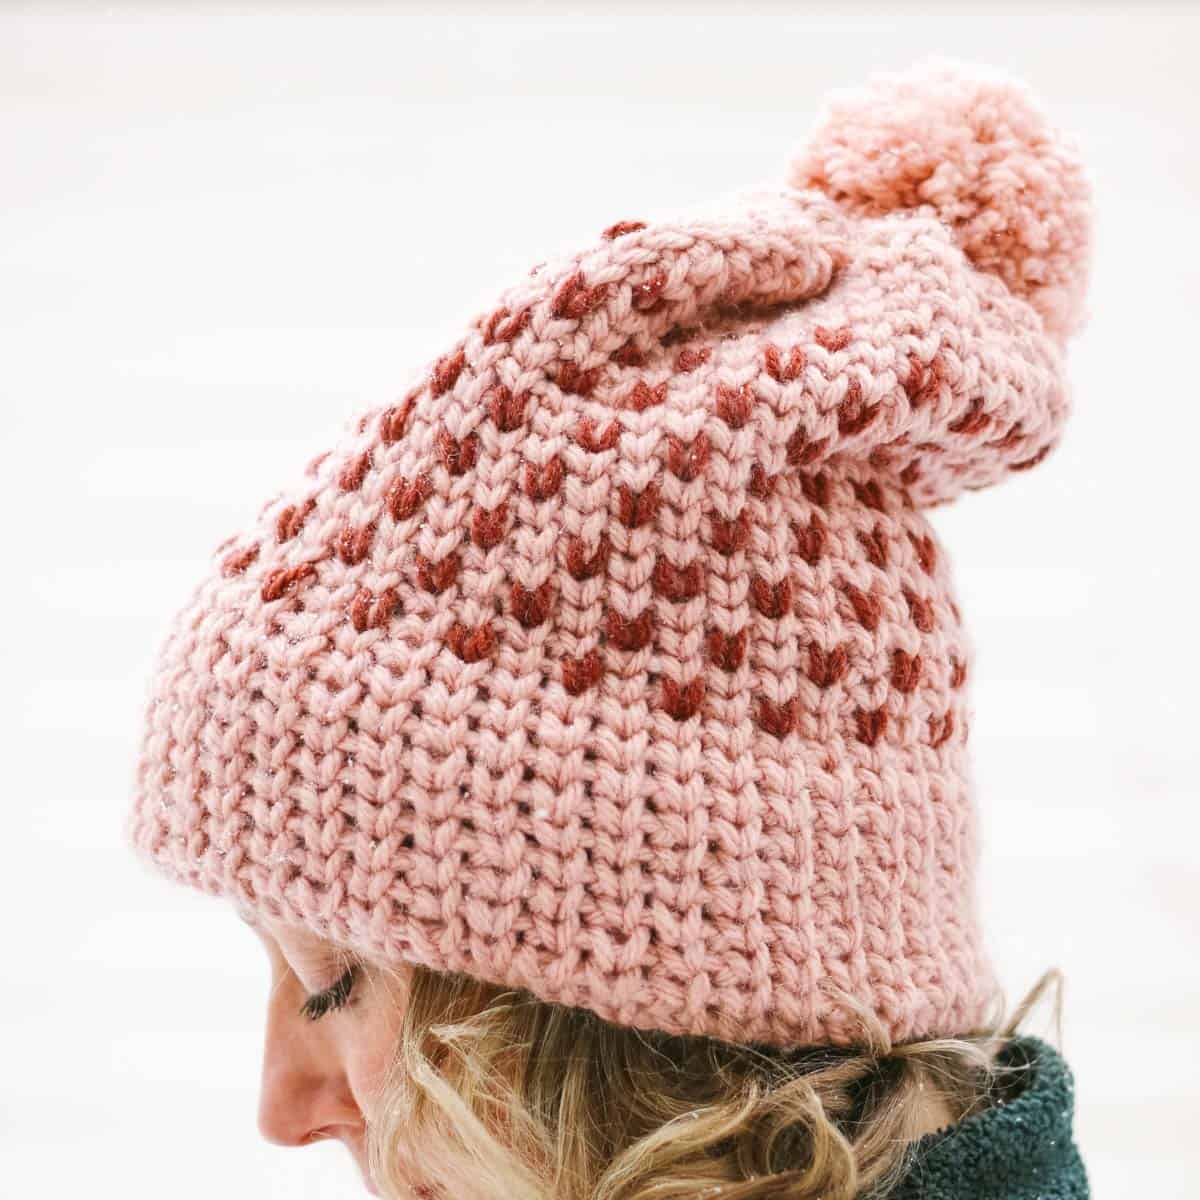
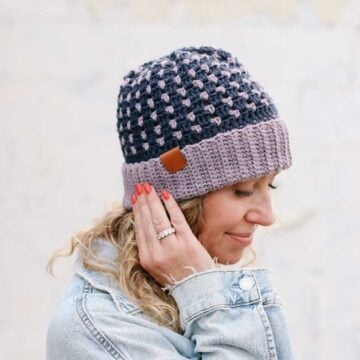
Make a Matching Beanie
Follow our knit-look beanie crochet pattern to make a matching hat and mitten set.
This pattern uses the same skills as the mitten pattern below, making an ideal crochet gift idea.
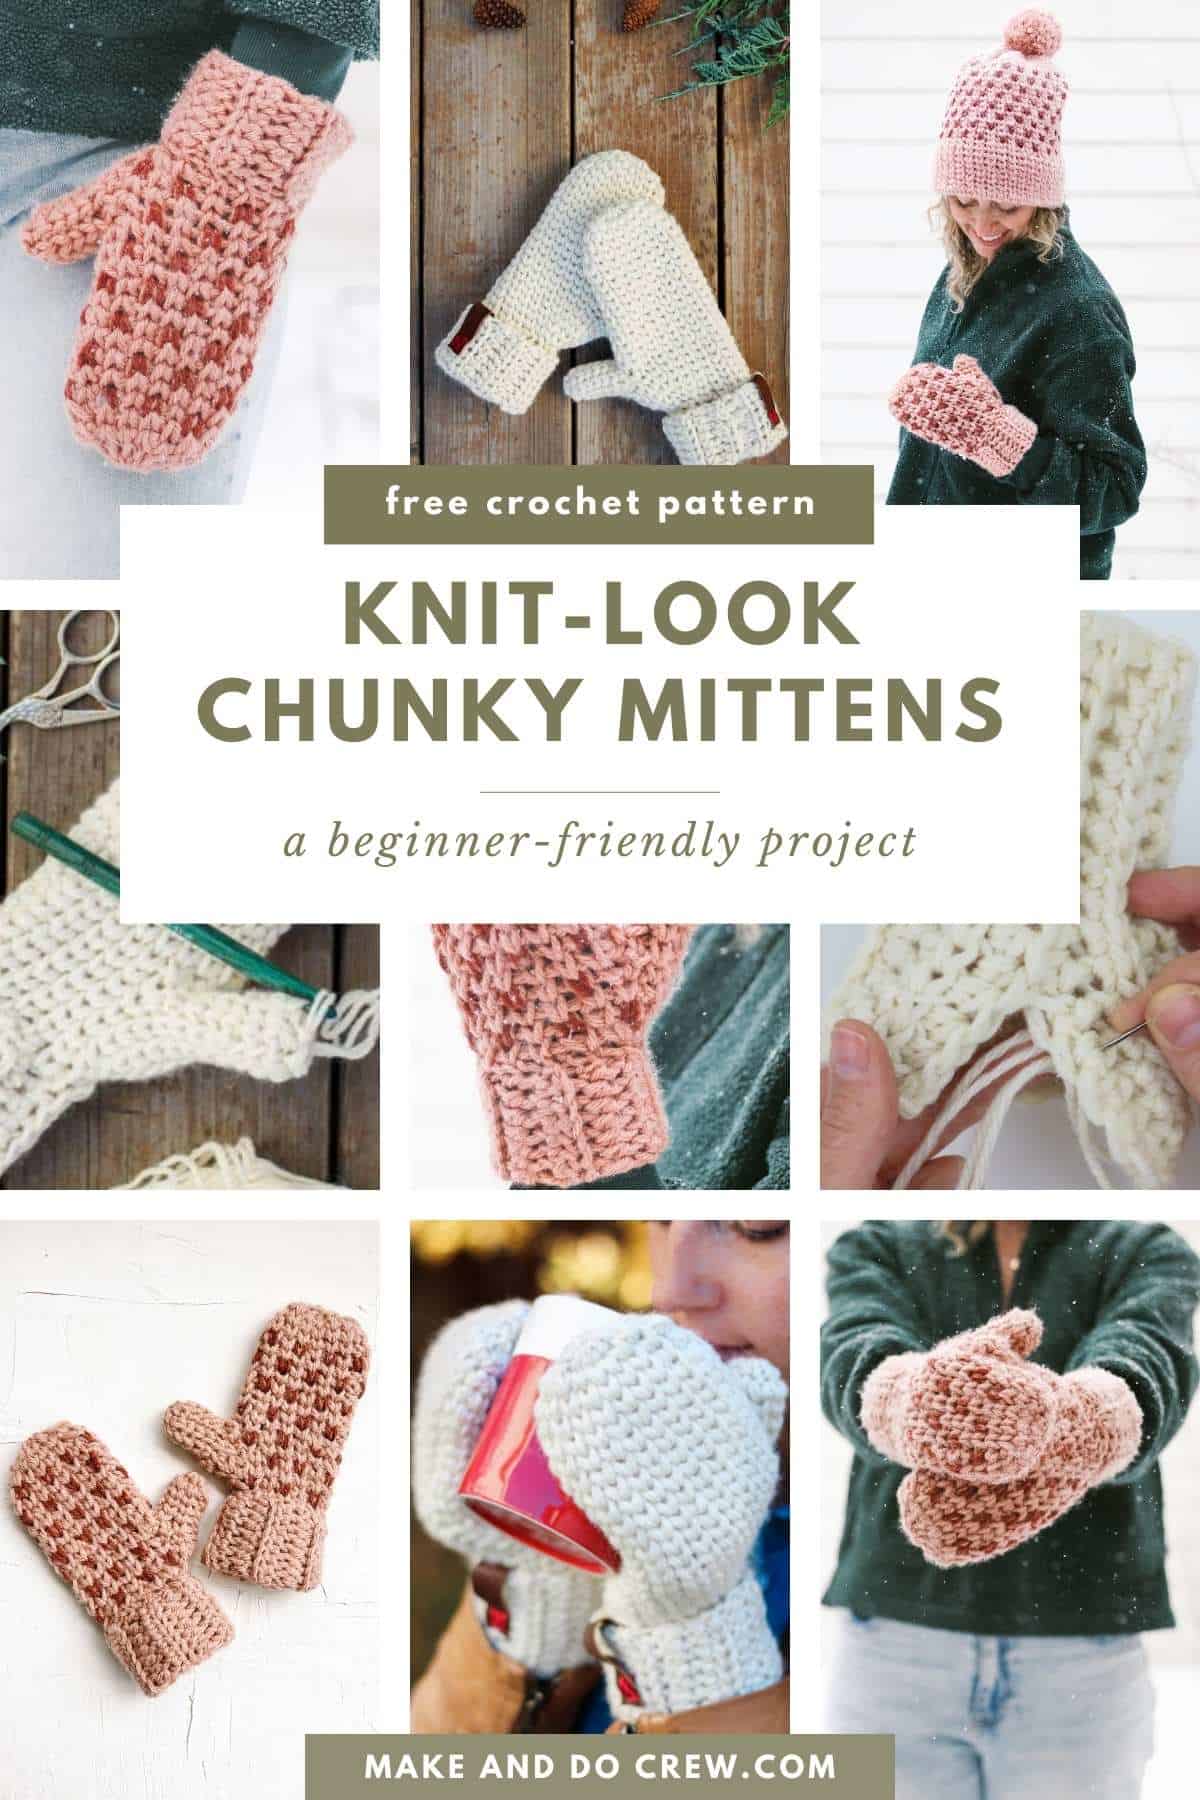
The Look of Knitting with Crochet
It was this memory of classic wool mittens that I had in mind when designing this free crochet mitten pattern. And while I've seen a lot of people using the waistcoat crochet stitch lately to achieve a knit-look with crochet, I've n...e...v...e...r been able to get it to work for me before.
It's always been too tight and wonky-looking and I've given up on at least four occasions this year. This time, I was determined to make it work because I knew it was pretty much the only way I could make "knit" mittens with crochet.
If you're feeling intimidated starting with mittens, check out our favorite easy crochet fingerless gloves patterns first.
Skills You'll Practice
As you work on this project, you'll have a chance to practice the following crochet techniques:
- Creating a starting chain
- Half double crochet (hdc)
- Single crochet (sc) to create the waistcoat stitch
- Increasing
- Working in the round
Waistcoat Crochet Stitch Tips
Watch our detailed tutorial on how to crochet the waistcoat stitch before getting started on this pattern. Here are a few tips for better success with the "knit" stitch.
- You have to crochet loosely. Like seriously, loosely. I sized up my hook three times before finding the right gauge.
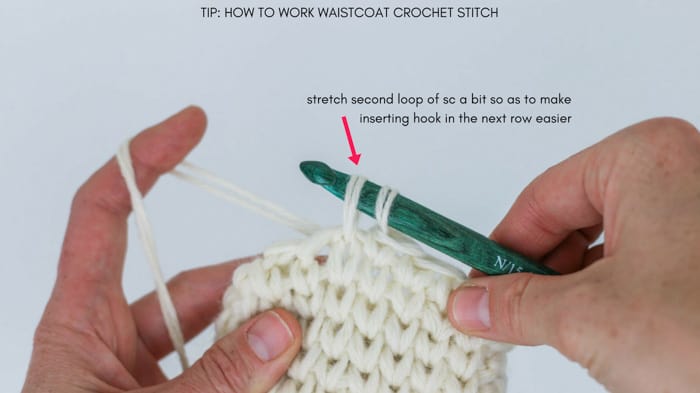
- When you're working your single crochet stitches, it's helpful to stretch the yarn you pick up in the middle of the stitch (so the second loop on your hook) up a little more than you usually would in order to create a looser gap between the two posts of your stitch. (I included a photo of this in the free crochet mittens pattern below.)
Pin it! click to pin this pattern for later ⇨
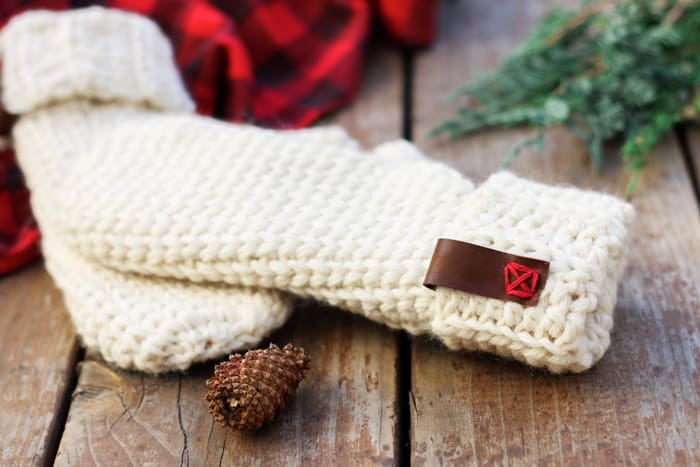
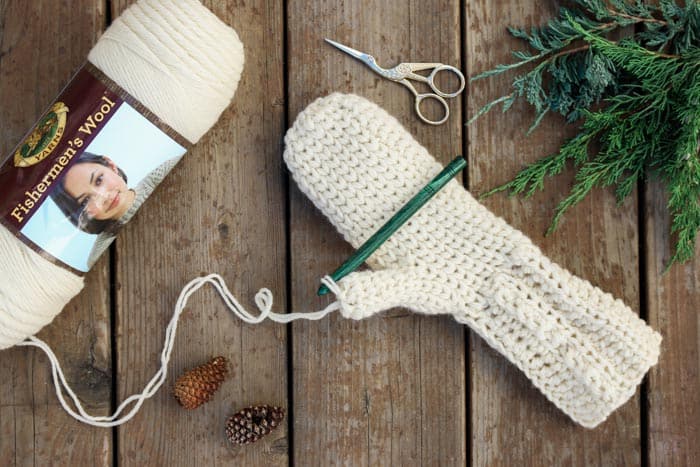
Classic Wool Mitten Yarn
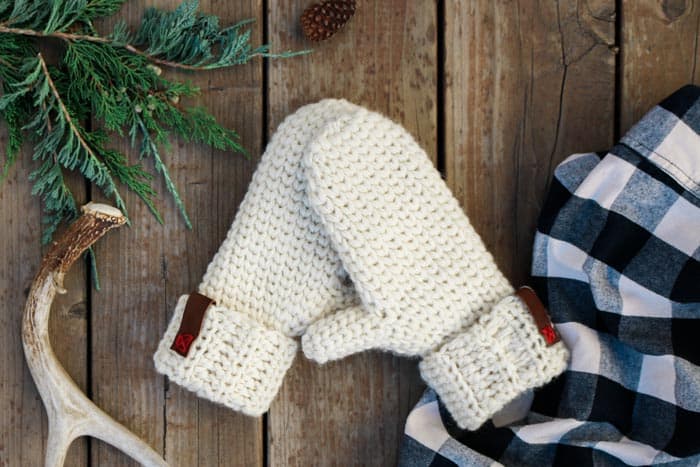
Lion Brand Fisherman's Wool is a perfect fiber to whip up some knit-looking crochet mittens because as 100% wool, it's super warm and cozy for cold winter days and it's naturally water resistant.
The wool fiber really conjures that classic mitten vibe and I'm guessing our great grandmothers might have been making similar mittens for their families a century ago. Fisherman's Wool comes with a hefty 8 oz (465 yards) of yarn as well, so you'll even have some yarn left over to start another pair.
Wouldn't these make perfect crochet stocking stuffers for friends and family?
A Warning About Washing Wool
An important note about washing 100% wool--it can shrink! Just like any other wool garment, these crochet mittens will shrink if washed on hot.
I suggest hand washing them on cold and then laying them flat to dry so you don't end up with any mini munchkin mittens.
Acrylic Yarn Option
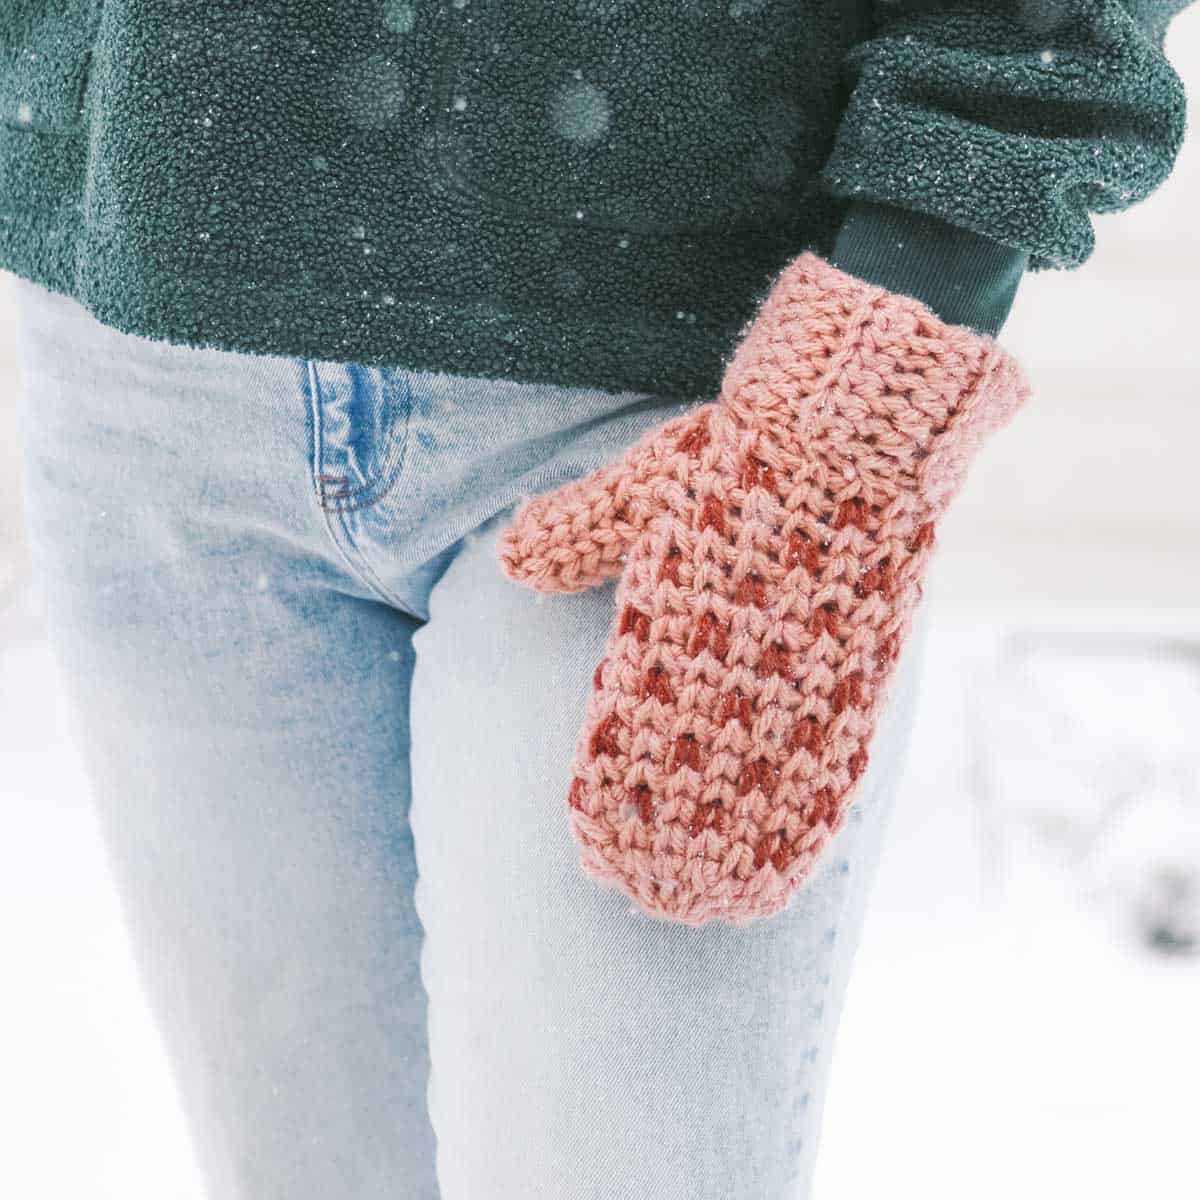
Instead of holding two strands of worsted weight yarn together, you can also crochet these mittens using one strand of a chunky weight yarn.
My favorite chunky weight yarn is Lion Brand Hue + Me. We used Hue + Me to make the pink and red mittens pictured here.
To recap:
If using worsted weight yarn (category 4), hold two strands together.
If using chunky weight yarn (category 5), use one strand.
How to Dip Dye Your Wool Mittens
If you make your mittens from 100% wool yarn, check out my video tutorial on using food coloring to dip dye them. It's magical!
(Note that this technique doesn't work when using acrylic blends.)
All-in-One Crochet Kit
If you don't live near amazing yarn stores or if you just like to get fun packages in the mail, the all-in-one kit is a perfect way to make your Morning Mittens and Everyday Beanie.
This bundle from Lion Brand includes all the Hue + Me yarn you'll need for both projects, plus bonus printable PDFs of the patterns (delivered digitally).
Print this Pattern
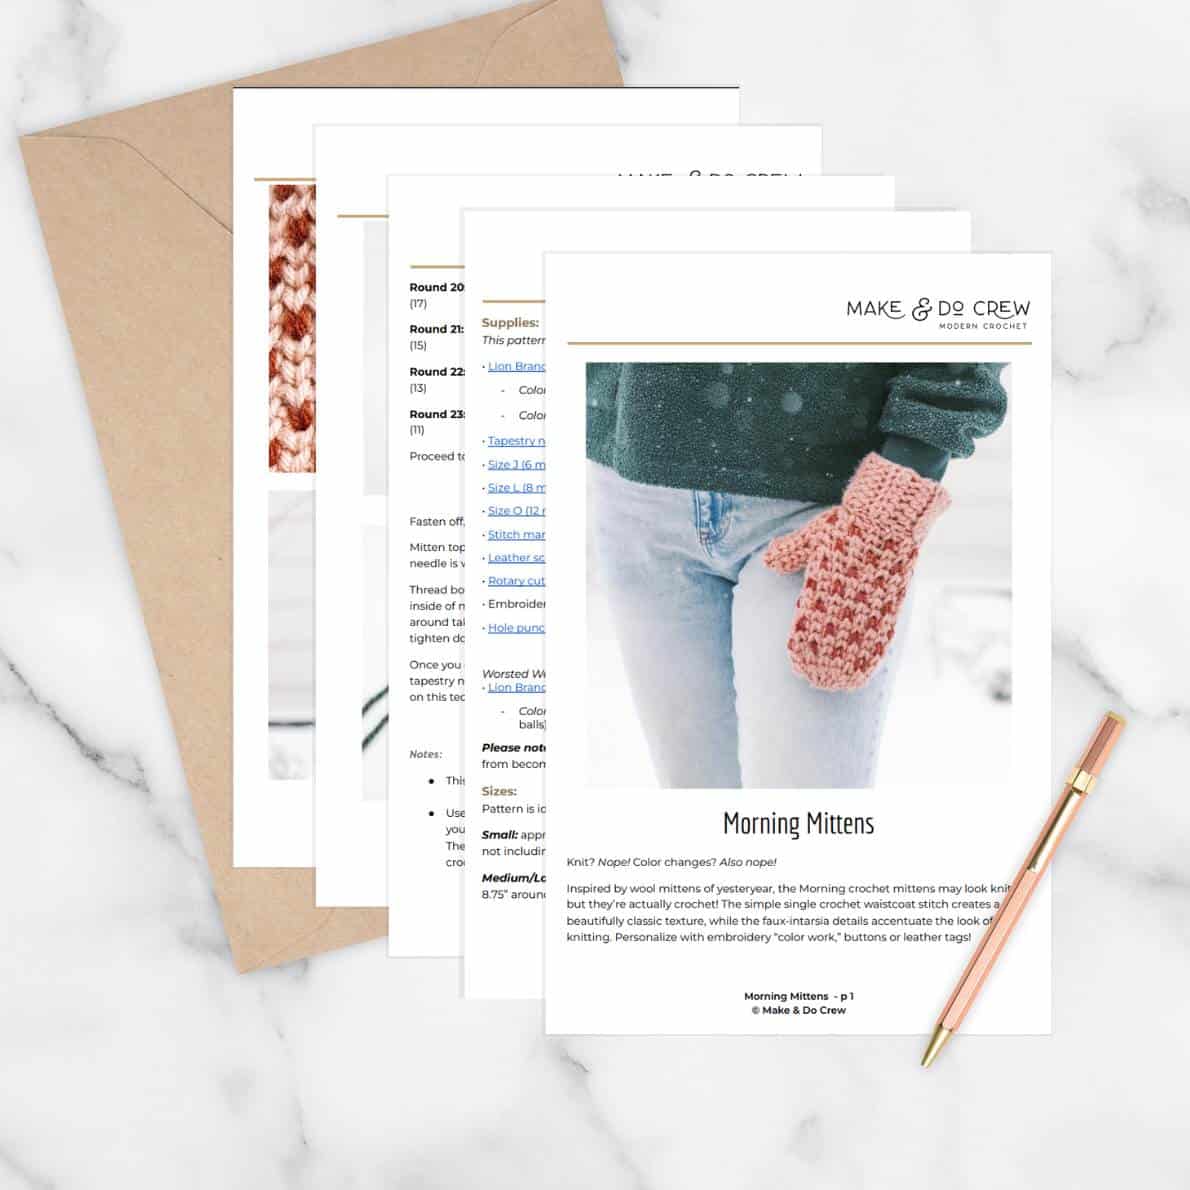
Prefer to crochet on the couch? Need a portable, printable pattern? You'll love the premium PDF! The instantly downloadable, ad-free file is formatted for easy printing and includes the complete pattern and all the photo tutorials.
More Free Crochet Patterns
Add a few of our favorite free crochet patterns to your project queue!


Morning Mittens - Free Pattern
Explanation:
Knit? Nope! Color changes? Also nope! Inspired by wool mittens of yesteryear, the Morning crochet mittens may look knit, but they’re actually crochet!
The simple single crochet waistcoat stitch creates a beautifully classic texture, while the faux-intarsia details accentuate the look of knitting. Personalize with embroidery “color work,” buttons or leather tags!
Supplies + Materials
Order an all-in-one kit from Lion Brand.
• Lion Brand Hue and Me (Weight: 5/Bulky - 137 yds, 4.4 oz/125 g)
- Color A: Rose Water (617-101AZ) - 2 skeins (approx 140 g)
- Color B: Spicy (617-134R) - 1 skein (approx 8 g)
• Size J (6 mm) crochet hook (for cuff, to make both sizes)
• Size L (8 mm) crochet hook (to make smaller size)
• Size O (12 mm) crochet hook (to make larger size)
• Stitch markers or safety pins
• Leather scraps (optional)
• Rotary cutter and mat or sharp scissors (optional)
• Embroidery floss (optional)
• Hole punch, leather punch or hammer and nail (optional)
Worsted Weight Wool Option:
• Lion Brand Fishermen’s Wool (Weight: 4/medium - 465 yds, 8 oz)
- Color: Natural (#098) - 1 skein (approx. 140 total grams divided into two equal balls)
Please note: 100% wool yarn can shrink if washed or blocked incorrectly. Keep your new mitts from becoming minis by hand washing with cold water and laying flat to dry.
Measurements
Pattern is identical for S and M/L. Sizing is based on hook size used.
Small: appropriate for younger teens or women with smaller hands (approx. 7” tall not including cuff and 8.25” around at widest point)
Medium/Large: appropriate for most women (approx. 8” tall not including cuff and 8.75” around at widest point)
Gauge
as measured on hand portion:
Size S: 5.5 sc x 6.5 rows = 2”
Size M/L: 5 sc x 6 rows = 2”
Abbreviations + Glossary (US Terms)
ch – chain
hdc – half double crochet
hdcblo - half double crochet through the back loop only
sc – single crochet
st(s) – stitch(es)
sl st – slip stitch
yo – yarn over
post – the vertical strands of yarn in a sc stich
RS – right side
WS – wrong side
Permissions + Copyright:
Please do not publish or share this pattern as your own. You may make items to sell with this pattern. In exchange, please link back this post. Do NOT use our photos as your own sales photos.
Overall Pattern Notes
- The pattern is written for one size. Follow notes within for appropriate hook size to make either S or M/L mittens.
- Important: To substitute worsted weight yarn such as Lion Brand Fisherman’s Wool, use two strands held together for entire pattern. Either work with outer strand and inner strand of skein or remove a “baby skein” from the inside of the larger skein and cut to create two separate balls.
Print This Pattern: purchase the ad-free, printable PDF
Mitten Cuff
Notes:
- The right and left cuffs are worked identically.
- Row 2 and beyond are worked into the back loop of the hdc stitch only (hdcblo).
- Ch 2 at beginning of each round does not count as a st.
Make 2.
Using smaller hook:
Foundation: Ch 17.
Row 1 (RS): Hdc in third ch, hdc in each hdc; turn. (15)
Rows 2 - 12: Ch 2, hdcblo in each hdc; turn. (15)
Fasten off, leaving 15” tail to seam cuff.
Want some company while you crochet?
Get support (and camaraderie!) in the Make & Do Crew community. Join for free here.
✨Unlock this free subscriber-exclusive pattern ✨
Follow these steps to view the full free pattern below
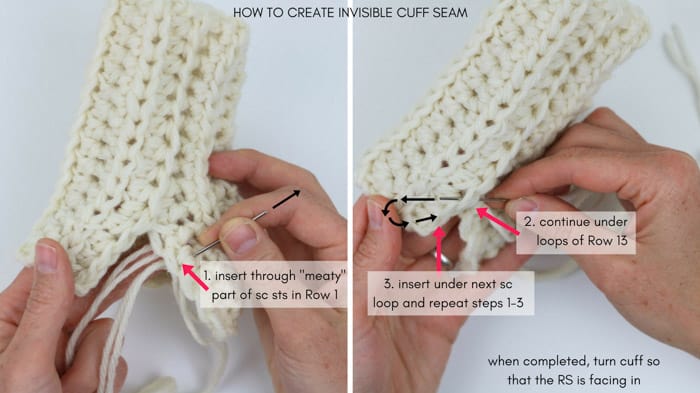
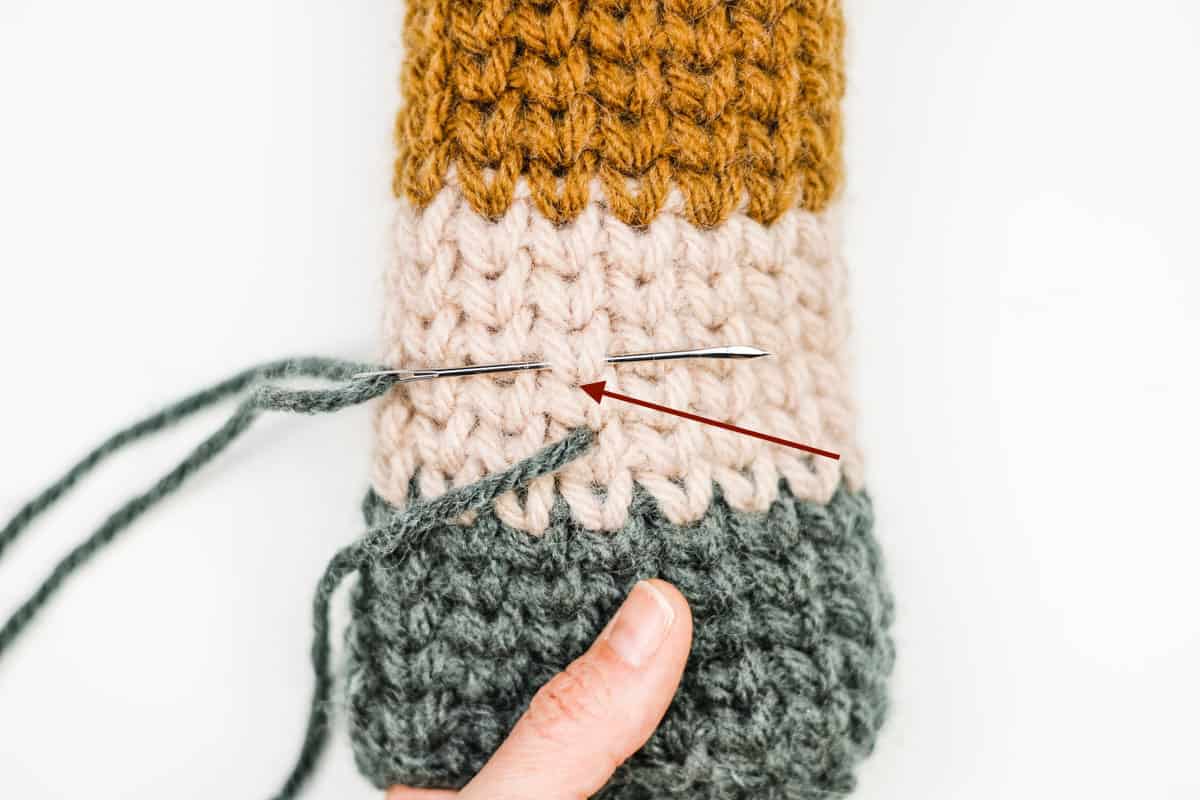
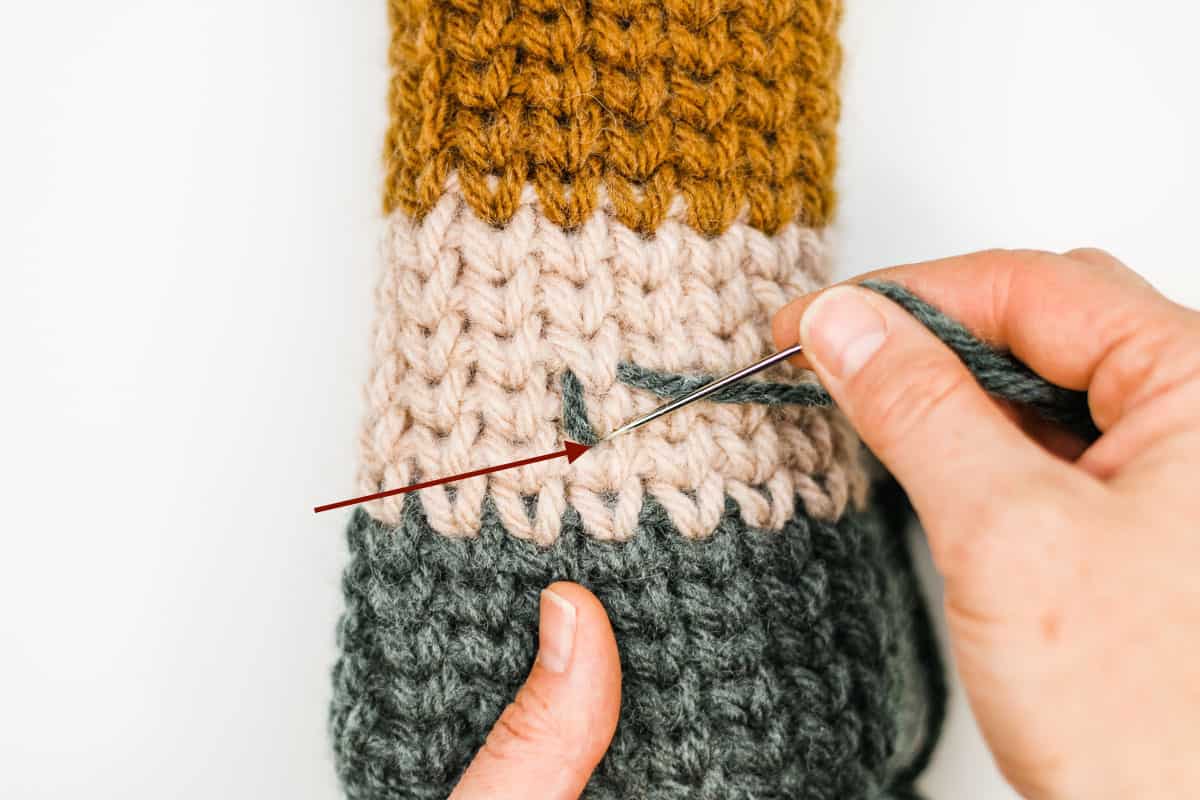
Seaming Cuff
With RS facing out, pin cuff into a loop by placing the initial chain row underneath Row 12. Using both strands of the cuff tail and a tapestry needle, work a basting stitch to join edges. Take care to create enough overlap that foundation chain doesn’t stretch and create large gaps.
Turn cuff inside out to proceed with mitten hand. Try cuff on at this point. If it feels particularly loose, rework it with a smaller hook. This is an important checkpoint because it will be hard to adjust after mitten hand is complete.
Mitten Hand
Notes:
- Follow notes throughout on how to work right and left hands. Where not noted, right and left hands are worked identically.
- Hands are crocheted in the round with each row beginning with a ch 1 and ending with a sl st to the first sc of round. Neither the ch 1 or sl st count as sts.
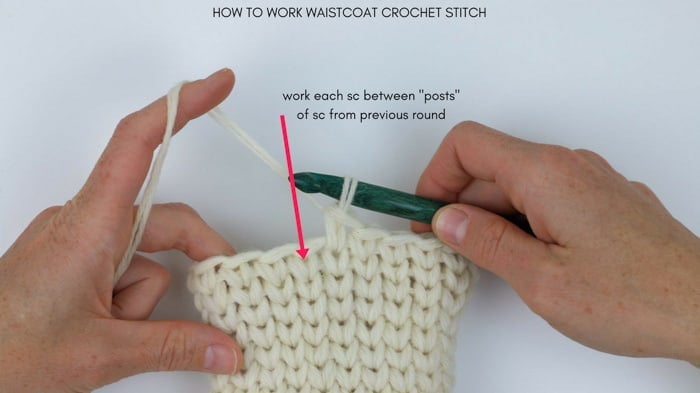
- Row 2 and beyond are worked into the middle of each sc stitch rather than the top loops. See tutorial below hook placement. Besides inserting your hook in a slightly different location, you will still be working regular sc stitches.
- Take care to keep stitches loose so that it’s easier to insert hook as described in photos below. As you work each sc, it’s helpful to raise your hook a bit after picking up your second loop to ensure the two posts remain loose enough for next round.
Size small: Use size L hook.
Size medium/large: Use size N hook.
Premium PDF
easier and faster with fewer mistakes.
- Complete pattern + photo tutorials
- Instant download
- Formatted for easy printing
Right & Left Mittens: attaching yarn
With WS of cuff seam facing you, attach yarn anywhere along either edge of cuff.
Right & Left Mittens: increasing for thumb
Round 1: Ch 1, work 14 sc evenly around, sl st to first sc to join. (14) Round 2: Ch 1, sc in next 6, 2 sc in each of next 2 sc, sc in next 6 sc, sl st to join. (16)
Wanna save this pattern?
Round 3: Ch 1, sc in next 7, 2 sc in each of next 2 sc, sc in next 7 sc, sl st to join. (18)
Round 4: Ch 1, sc in next 8, 2 sc in each of next 2 sc, sc in next 8 sc, sl st to join. (20)
Rounds 5-6: Ch 1, sc in each sc, sl st to join. (20)
Right mitten: creating thumb hole & hand
Round 7: Ch 1, sc in each of next 10 sc, sk 4 sc, loosely ch 3, sc in each of next 6 sc, sl st to join. (19)
Round 8: Ch 1, sc in each sc and ch, sl st to join. (19)
Weave in any remaining ends now as it will become difficult to do so later.
Rounds 9-19: Ch 1, sc in each sc, sl st to join. (19)
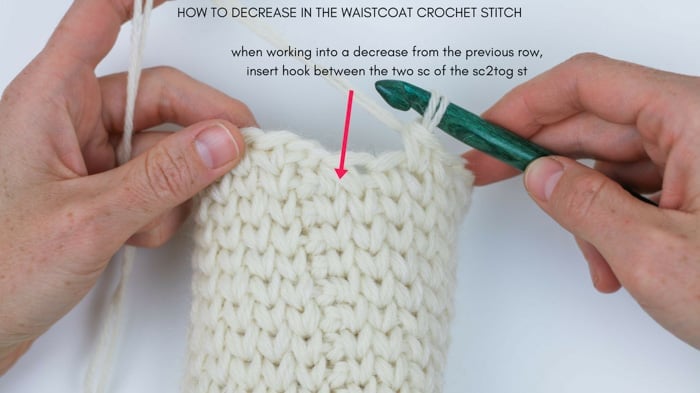
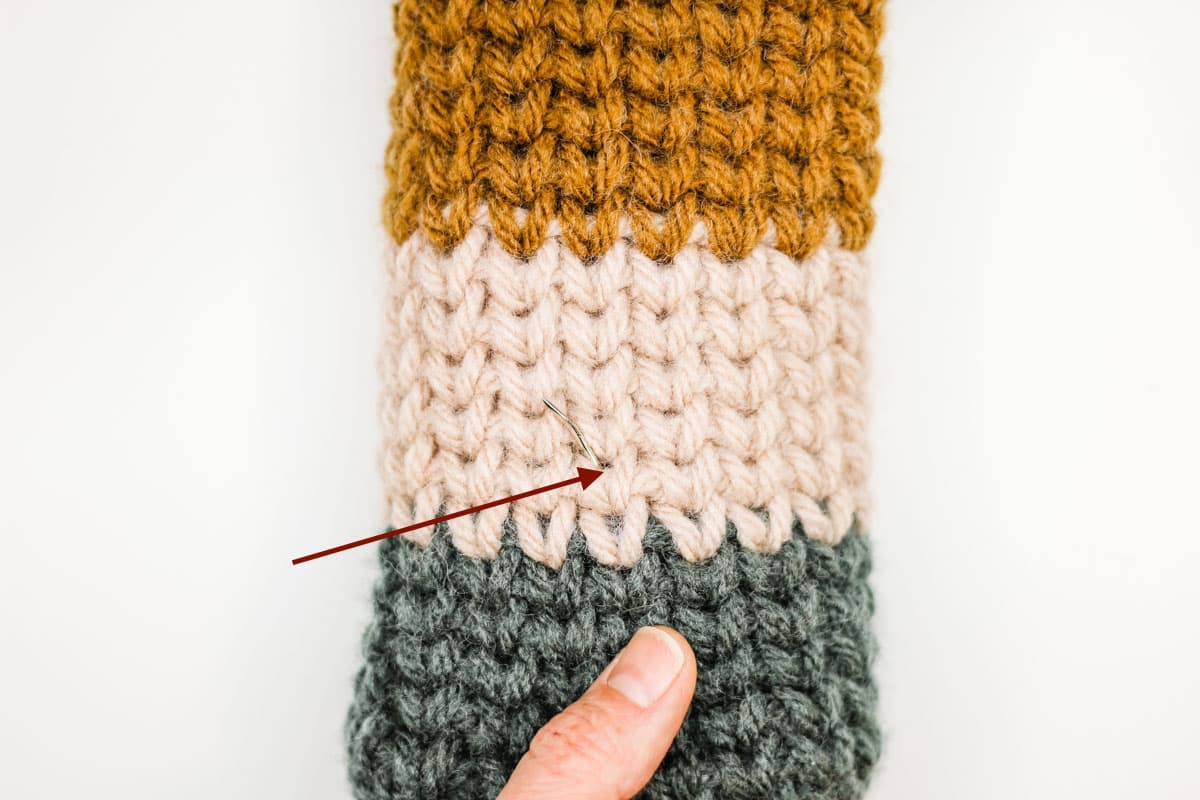
Round 20: Ch 1, sc in each of next 8 sc, sc2tog, sc in each of next 7, sc2tog, sl st to join. (17)
See photo tutorial below for where to work into decrease sts.
Round 21: Ch 1, sc in each of next 7 sc, sc2tog, sc in each of next 6, sc2tog, sl st to join. (15)
Round 22: Ch 1, sc in each of next 6 sc, sc2tog, sc in each of next 5, sc2tog, sl st to join. (13)
Round 23: Ch 1, sc in each of next 5 sc, sc2tog, sc in each of next 4, sc2tog, sl st to join. (11)
Proceed to instructions for closing the top.
Left mitten: creating thumb hole & hand
Round 7: Ch 1, sc in each of next 6 sc, sk 4 sc, loosely ch 3, sc in each of next 10 sc, sl st to join. (19)
Round 8: Ch 1, sc in each sc and ch, sl st to join. (19)
Weave in any remaining ends now as it will become difficult to do so later. Rounds 9-19: Ch 1, sc in each sc, sl st to join. (19)
See photo tutorial above for how to decrease (sc2tog) while working between posts of each sc stitch.
Round 20: Ch 1, sc in each of next 7 sc, sc2tog, sc in each of next 8, sc2tog, sl st to join. (17)
Round 21: Ch 1, sc in each of next 6 sc, sc2tog, sc in each of next 7, sc2tog, sl st to join. (15)
Round 22: Ch 1, sc in each of next 5 sc, sc2tog, sc in each of next 6, sc2tog, sl st to join. (13)
Round 23: Ch 1, sc in each of next 4 sc, sc2tog, sc in each of next 5, sc2tog, sl st to join. (11)
Proceed to instructions for closing the top.
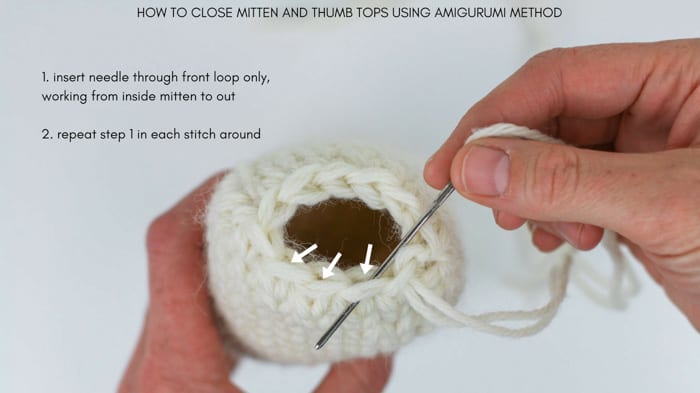
Right & Left mittens: closing top
Fasten off, leaving 15” tail to close top.
Mitten top is closed using a technique commonly used in amigurimi stuffed animals where the yarn needle is worked through only the front loops of each single crochet stitch. Here’s a helpful tutorial with more details on this method of closing a crochet tube.
Thread both strands of tail from mitten top onto tapestry needle. Insert needle from inside of mitten, under front loop of first sc, out toward you. Repeat each each sc around taking care to always work from inside mitten to out. Do not tighten down as you go.
Once you return back to first sc stitch, gently cinch circle together until it closes. Use tapestry needle to weave in remaining tail.
Our Latest Crochet Inspiration:
Here are a few more free crochet patterns and tutorials that are hot off the presses.


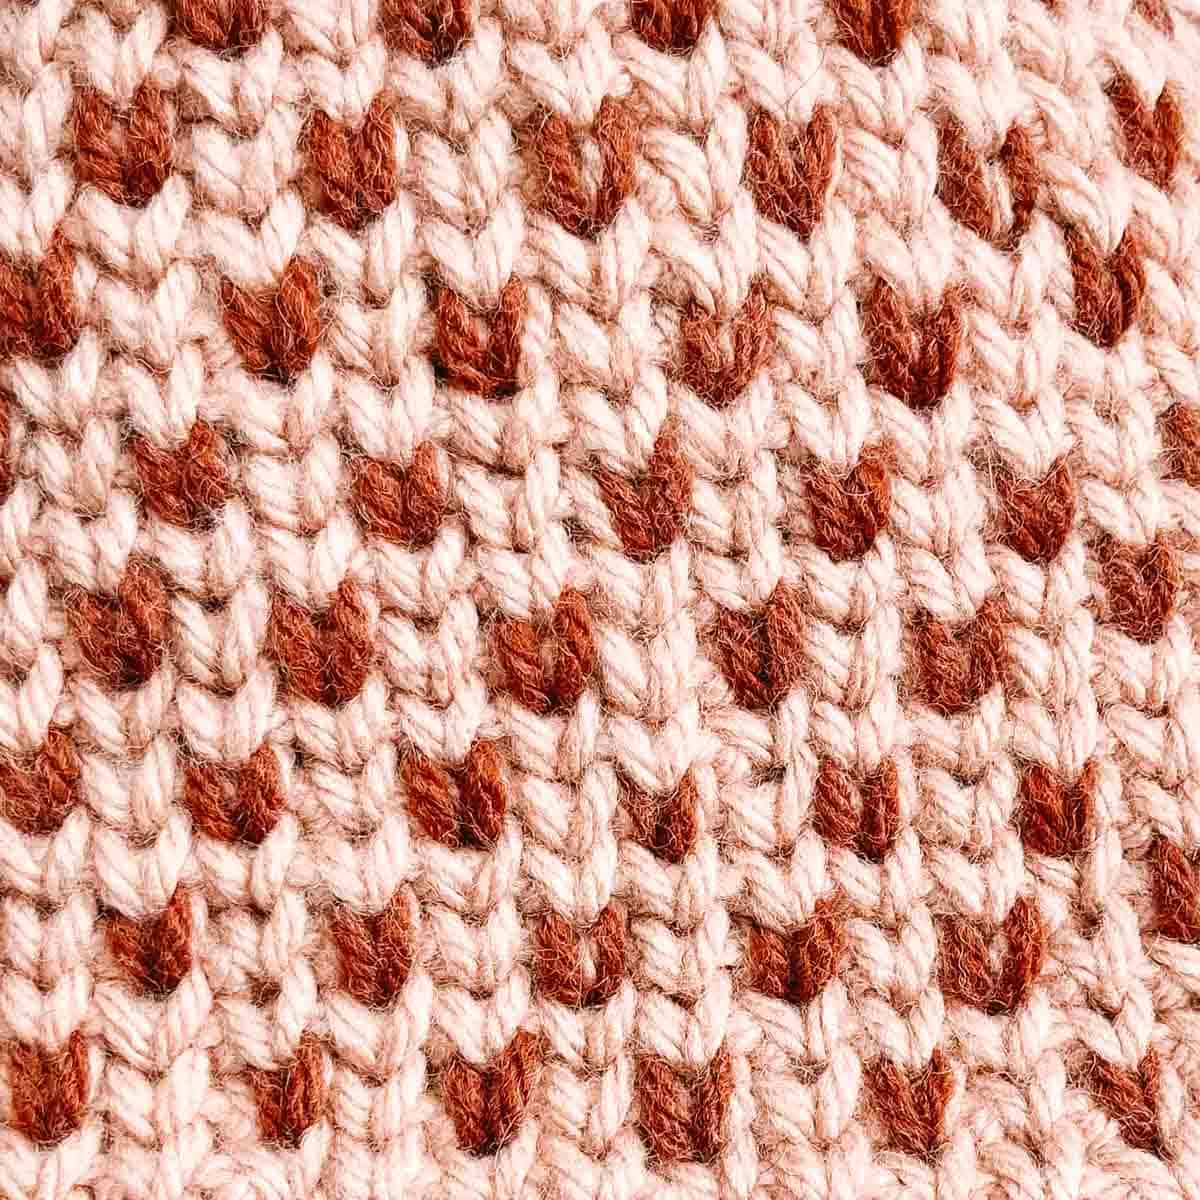
Adding “Intarsia” Hearts
Notes:
- This step is optional, but perfect to create a Valentine's Day crochet gift or rustic winter look.
- Using the duplicate stitch technique is an easy way to give an intarsia look to your beanie without the need to change colors as you crochet. The duplicate stitch is essentially basic embroidery on top of your finished crochet fabric.
- Work a duplicate stitch in every other stitch of round and every other round. This will create a staggered placement of duplicate stitches.
- Take care to keep the tension of your duplicate stitch yarn even as you carry it along the inside of the hat. This will ensure your hat has some stretch and doesn’t pucker anywhere.
- See photos below for step-by-step tutorial. Check out our article on how to cross stitch on crochet for extra tips.
Place first round of duplicate stitches in the second round of mitten above cuff. Using a tapestry needle threaded with a strand of Color B yarn:
Step 1: Insert needle from inside (WS) to outside (RS) through the bottom “V” point of the first stitch you would like to duplicate.
Step 2: Insert the needle under the bottom of the “V” point in the stitch above. Yarn should be outside at this point.
Step 3: Insert needle from outside (RS) to inside (WS) through the bottom of the “V” point you began in with Step 1. Yarn should be inside at this point.
Step 4: Sk next st.
Repeat Steps 1-4 around mitten hand, working a duplicate stitch in every other stitch.
Rounds 2-7: Repeat steps 1-4 around mitten, staggering first stitch of round between two stitches from previous round. Leave one row unworked between each round.
Fasten off and weave in end.
Thumb
Notes:
- See photo tutorial below for visual explanation of thumb.
- As in the mitten hand, all sc stitches are worked between posts of sc from previous round.
Right & Left mittens: creating thumb
Right-handed crocheters: Attach yarn at right “corner” of thumb where Rounds 6 and 7 meet. Work clockwise.
Left-handed crocheters: Attach yarn at left “corner” of thumb where Rounds 6 and 7 meet. Work counterclockwise.
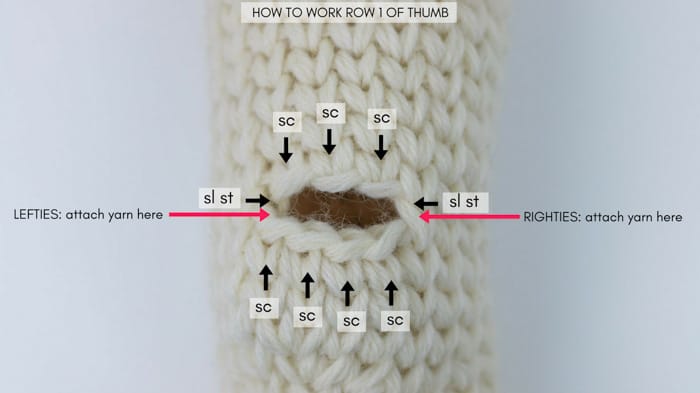
Round 1: Ch 1, sc in each of next 4 sc, sl st to “corner” between Rounds 6 and 7, sc in each of next 3, sl st to opposite “corner” between Rounds 6 and 7, sl st to join. (7)
Round 2: Ch 1, sc in each sc (do not work into sl sts), sl st to join. (7)
Rounds 3-8: Ch 1, sc in each sc, sl st to join. (7)
Fasten off leaving 12” tail.
Right & Left mittens: closing thumb
Work exactly as described for mitten top.
Obsessed with finding the best free crochet patterns?
Check out these collections of handpicked patterns to find your next project.

Leather Accents
To add optional leather accents, use a rotary cutter or scissors to create two .5” x 4” strips of leather. (Try a thrifted leather jacket, purse or wallet!)
Punch four holes in each corner of leather strips using either ⅛-1/16th inch hole punch, leather punch or nail and hammer.
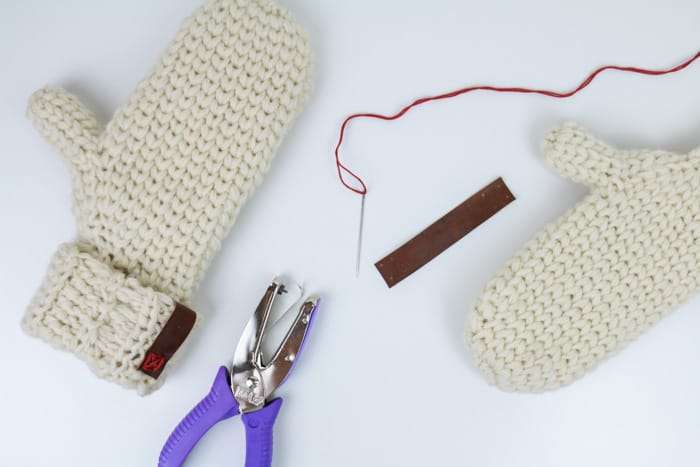
Fasten leather to mitten cuffs using embroidery thread.
Brew some coffee, pull on your new Morning Mittens and head outside to catch the sunrise!
More Free Fast + Easy Patterns
If you love (almost) instant gratification as much as we do, don't miss these fast crochet projects.
That was so fun! Now what?
Invitation to our Facebook group
Come discuss crochet that looks like knitting and lots of other projects and techniques in our Make & Do Crew Facebook group. Here thousands of helpful crocheters answer each other's questions and share their stitches. Join us!
More Inspiration
Sweet Everly B has some really cute crochet patterns using the waistcoat stitch that you should check out if you like crochet that looks like knitting.
And while I was adding my free crochet mitten pattern to Ravelry, I came across Carmen Jacob's Photography Mittens, which are also made using the waistcoat stitch. What's cool about her pattern is that it includes little slits for your thumb and index finger to sneak out of the mitten to operate a camera. Def check out the free pattern if, like me, you're often taking photos outside in the dead of winter!


Barbara says
Mine turned out great for a first try. I only had a Lion Brand wool/acrylic blend and they look great. Thanks for all of the great patterns you share with us. I would have never tried mittens without you!
Lori says
Hi Jess,
Do you by any chance have a video for these mittens? I'm still fairly new to crocheting and have never figured out how to make a nice mitten. These are the nicest I've come across.
Treba says
This stitch is so pretty, its my favorite. But, I dont understand how to join in the round and keep it straight, mine goes in a slant. Can you please explain how to keep it straight? Thank you.
Jess @ Make and Do Crew says
Hey Treba,
Mine slants a bit too. Since I was using wool, I found that if I spritzed it with water and then just squished it in the opposite direction, it basically straightened out. I think that slanting is a bit par for the course with this stitch, but I'll def update the post with additional tips if I learn how to avoid that. 🙂
Jess
Irene Malecki says
Why do your mittens look so bulky the Fishermans wool I have doesn't apperar as thick as yours
Jess @ Make and Do Crew says
I used two strands held together! 🙂