Practice basic skills as you learn how to crochet this beginner Tunisian crochet scarf pattern. Use any yarn you'd like and follow along with the step-by-step video tutorials for extra guidance.
Get the free pattern below or purchase the ad-free, printable PDF here.
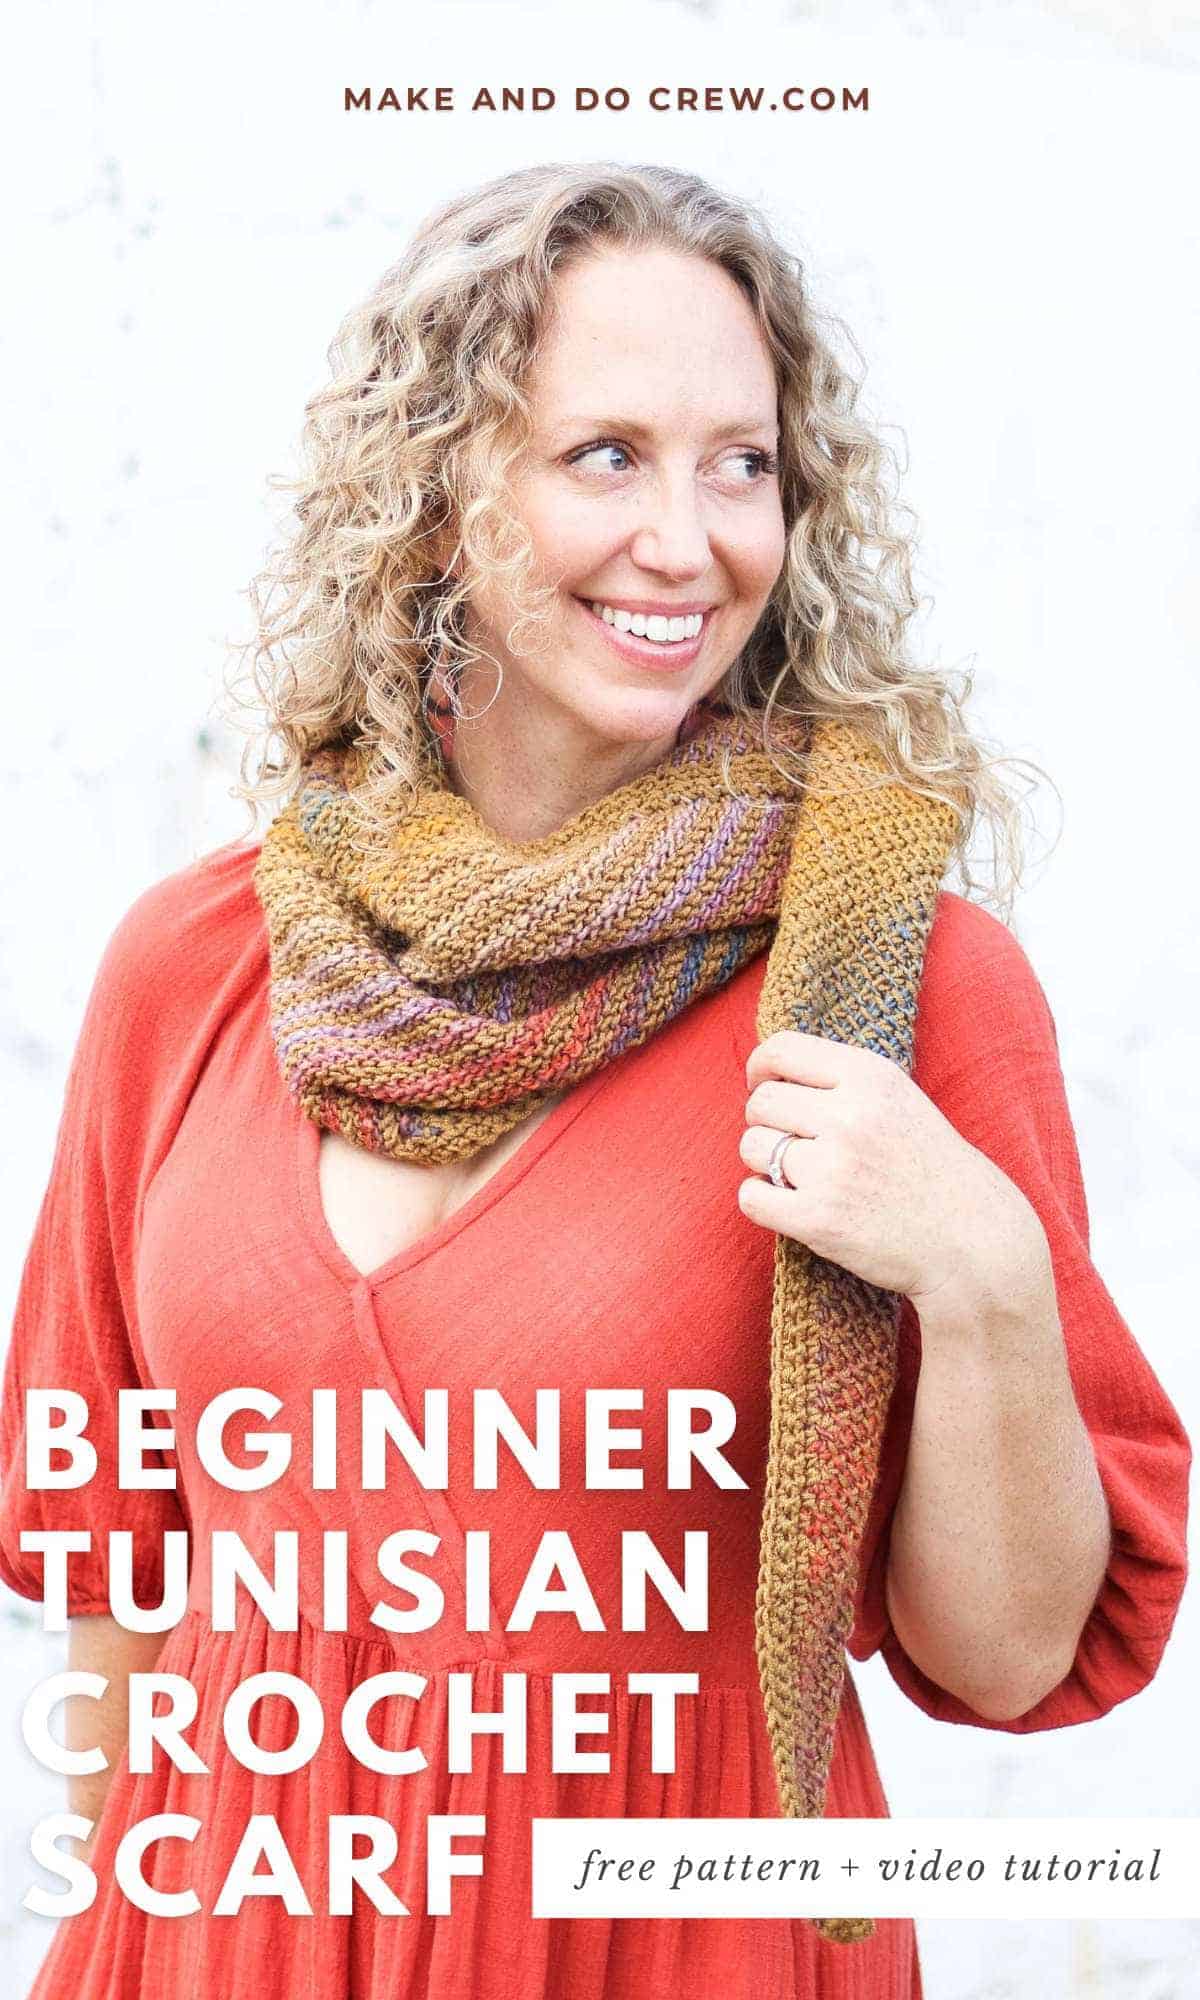
The BYOY Tunisian Scarf - Free Pattern
The BYOY (Bring Your Own Yarn) Scarf is all about flexibility and fun. Whether you’ve got one treasured skein or a pile of leftovers, this pattern works with whatever yarn you love
Add bold stripes, mix colors from your stash, or let a self-striping yarn do the work. The pattern adapts beautifully no matter your choice. You can make it a cozy wrap, a lightweight neckerchief, or anything in between.
With no strict rules or tricky details, you decide the size, style, and look. However you make it, you’ll end up with a scarf you love, because this project is nearly impossible to get wrong.
Skill Level
This is an advanced beginner Tunisian crochet scarf pattern. If you've learned the basics of how to Tunisian simple stitch, this project is perfect for practicing it and learning how to increase. You'll also learn how to change colors without fastening off to easily create a woven look.
Print this Pattern
Prefer to crochet without ads? You'll love the premium PDF! The instantly downloadable, ad-free file is formatted for easy printing and includes the complete pattern, additional photo tutorials and links to the video tutorials.
👉 Purchase the printable pattern PDF on Etsy
Choosing The Yarn for Your Scarf
This scrapbuster pattern really was designed to use any yarn of any weight you want.
If combining multiple colors in one scarf, I highly recommend choosing yarns that are all the same weight (thickness).
The amount of yarn needed varies based on many factors, including how big you make your scarf. You can assume an 80” wide scarf will require approximately 650-700yds of medium/worsted weight yarn.
All-in-One Crochet Kit
If you don't have stash yarn you want to use up, the all-in-one kit is a perfect way to make your BYOY Scarf. This bundle from Lion Brand includes all the Heartland yarn you'll need, plus a bonus printable PDF of the pattern (delivered digitally).
Choosing a Hook Size
To create the drapiest fabric and combat the inevitable curl that comes with Tunisian simple stitch, use a hook 2-4mm larger than the size recommended on your yarn label. For lightweight yarn, 2mm larger is likely sufficient.
For Thicker Yarn
For heavier yarn, try 4mm larger and increase hook size if the fabric is feeling too dense. For example, if a yarn label calls for a 6mm hook, make your scarf with a 9mm hook.
Determining the Cable Length
If you plan to make a larger scarf, you’ll need a Tunisian crochet hook that can accommodate the stitches. A 15-20” cable is likely sufficient.
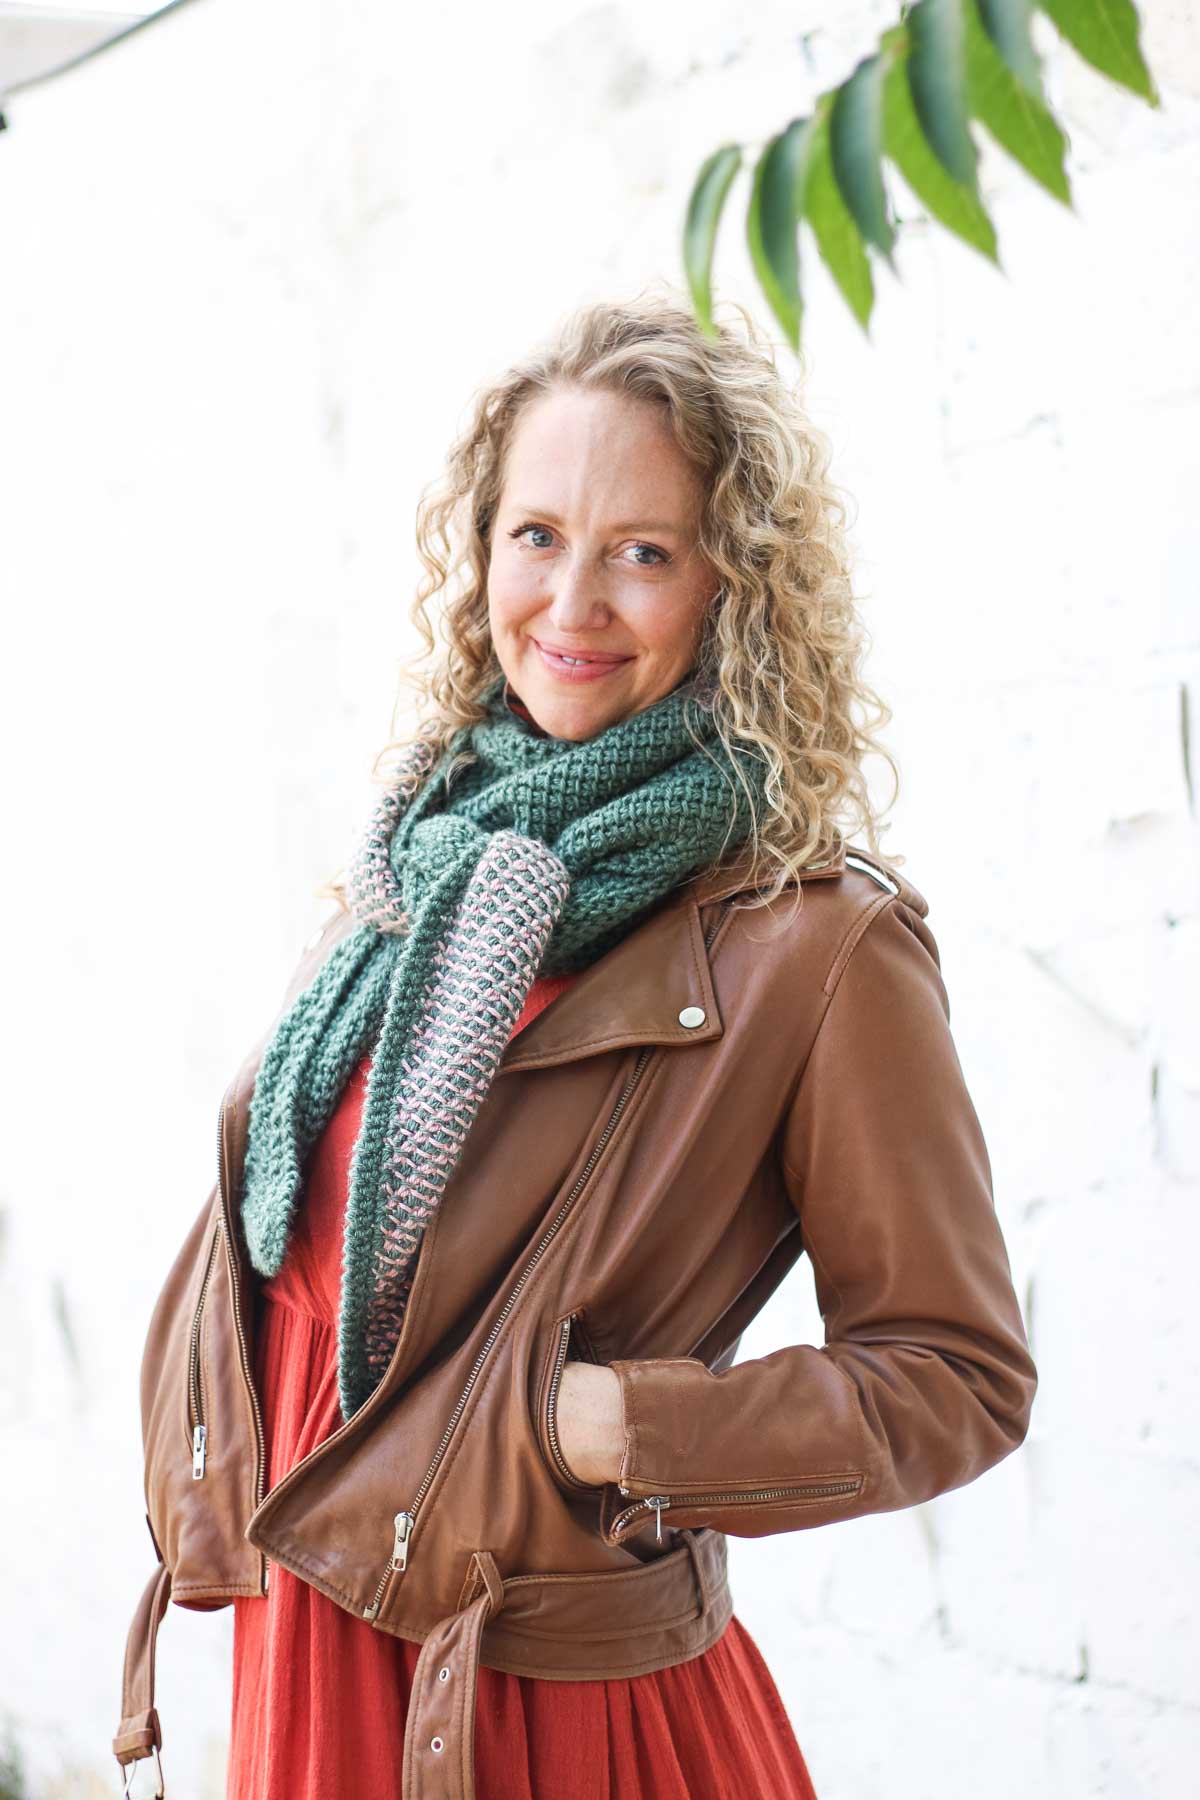
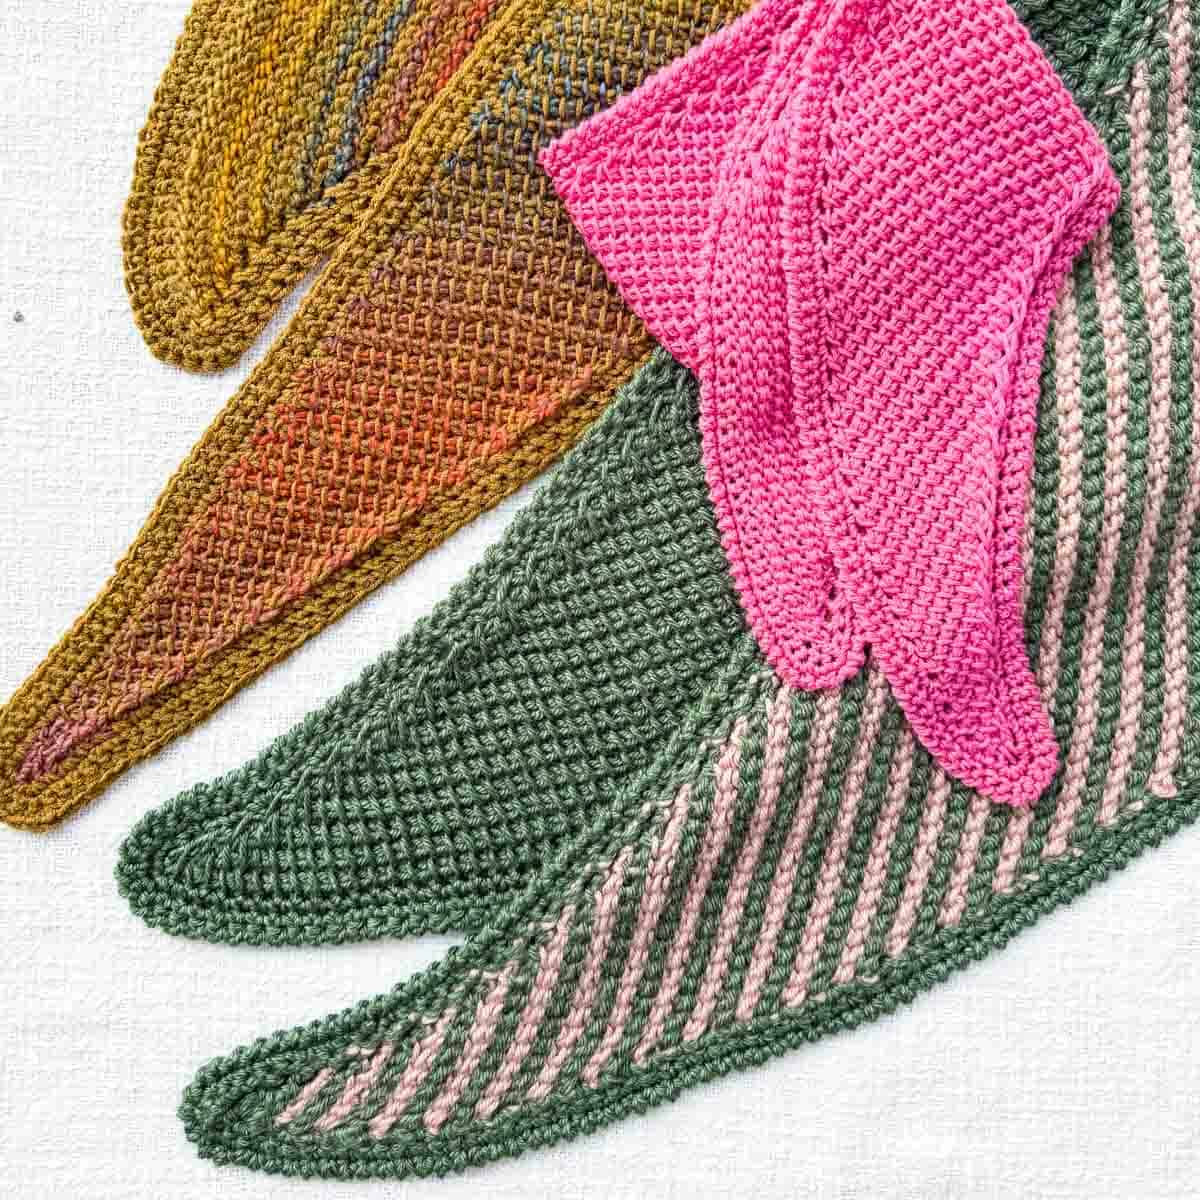
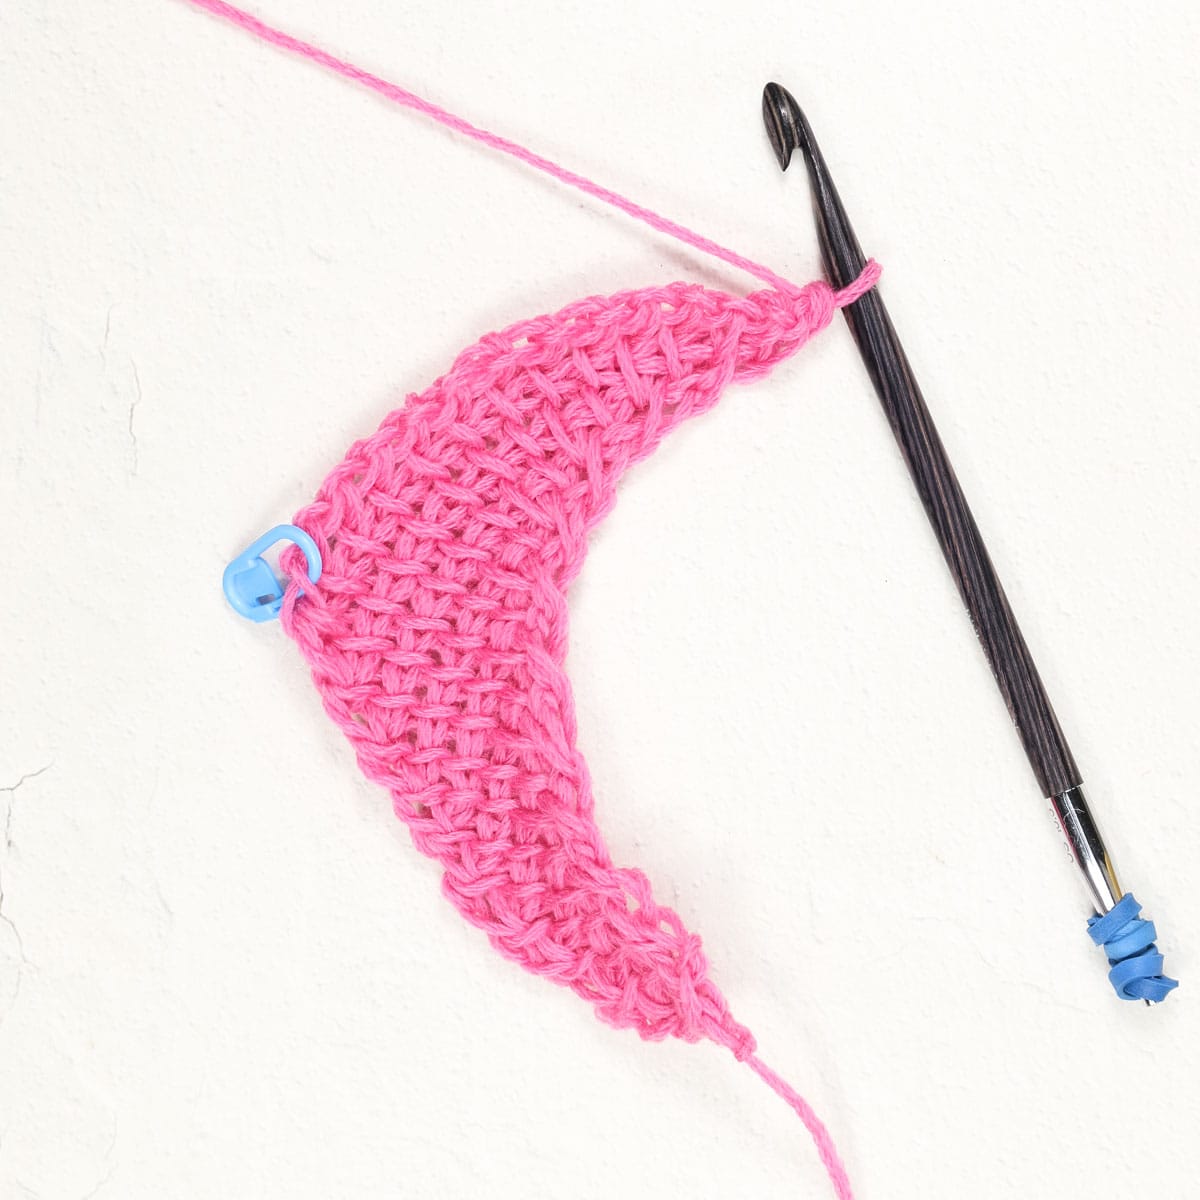
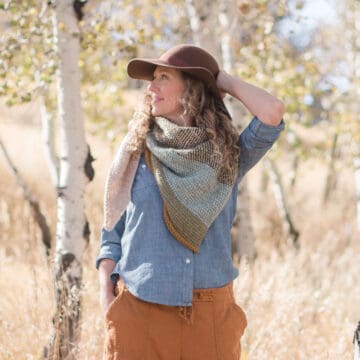
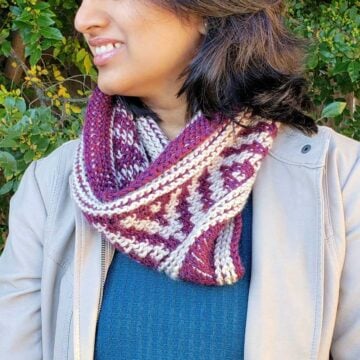
If you’re making a small neckerchief like the pink sample pictured, you can use a standard crochet hook with a rubber band around the handle to hold the stitches.
Yarn Used In the Scarves Pictured
Here are the yarn and hook sizes I used to create the Tunisian scarves you see in the photos. You can order an all-in-one kit from Lion Brand with the yarn and pattern if you'd like.
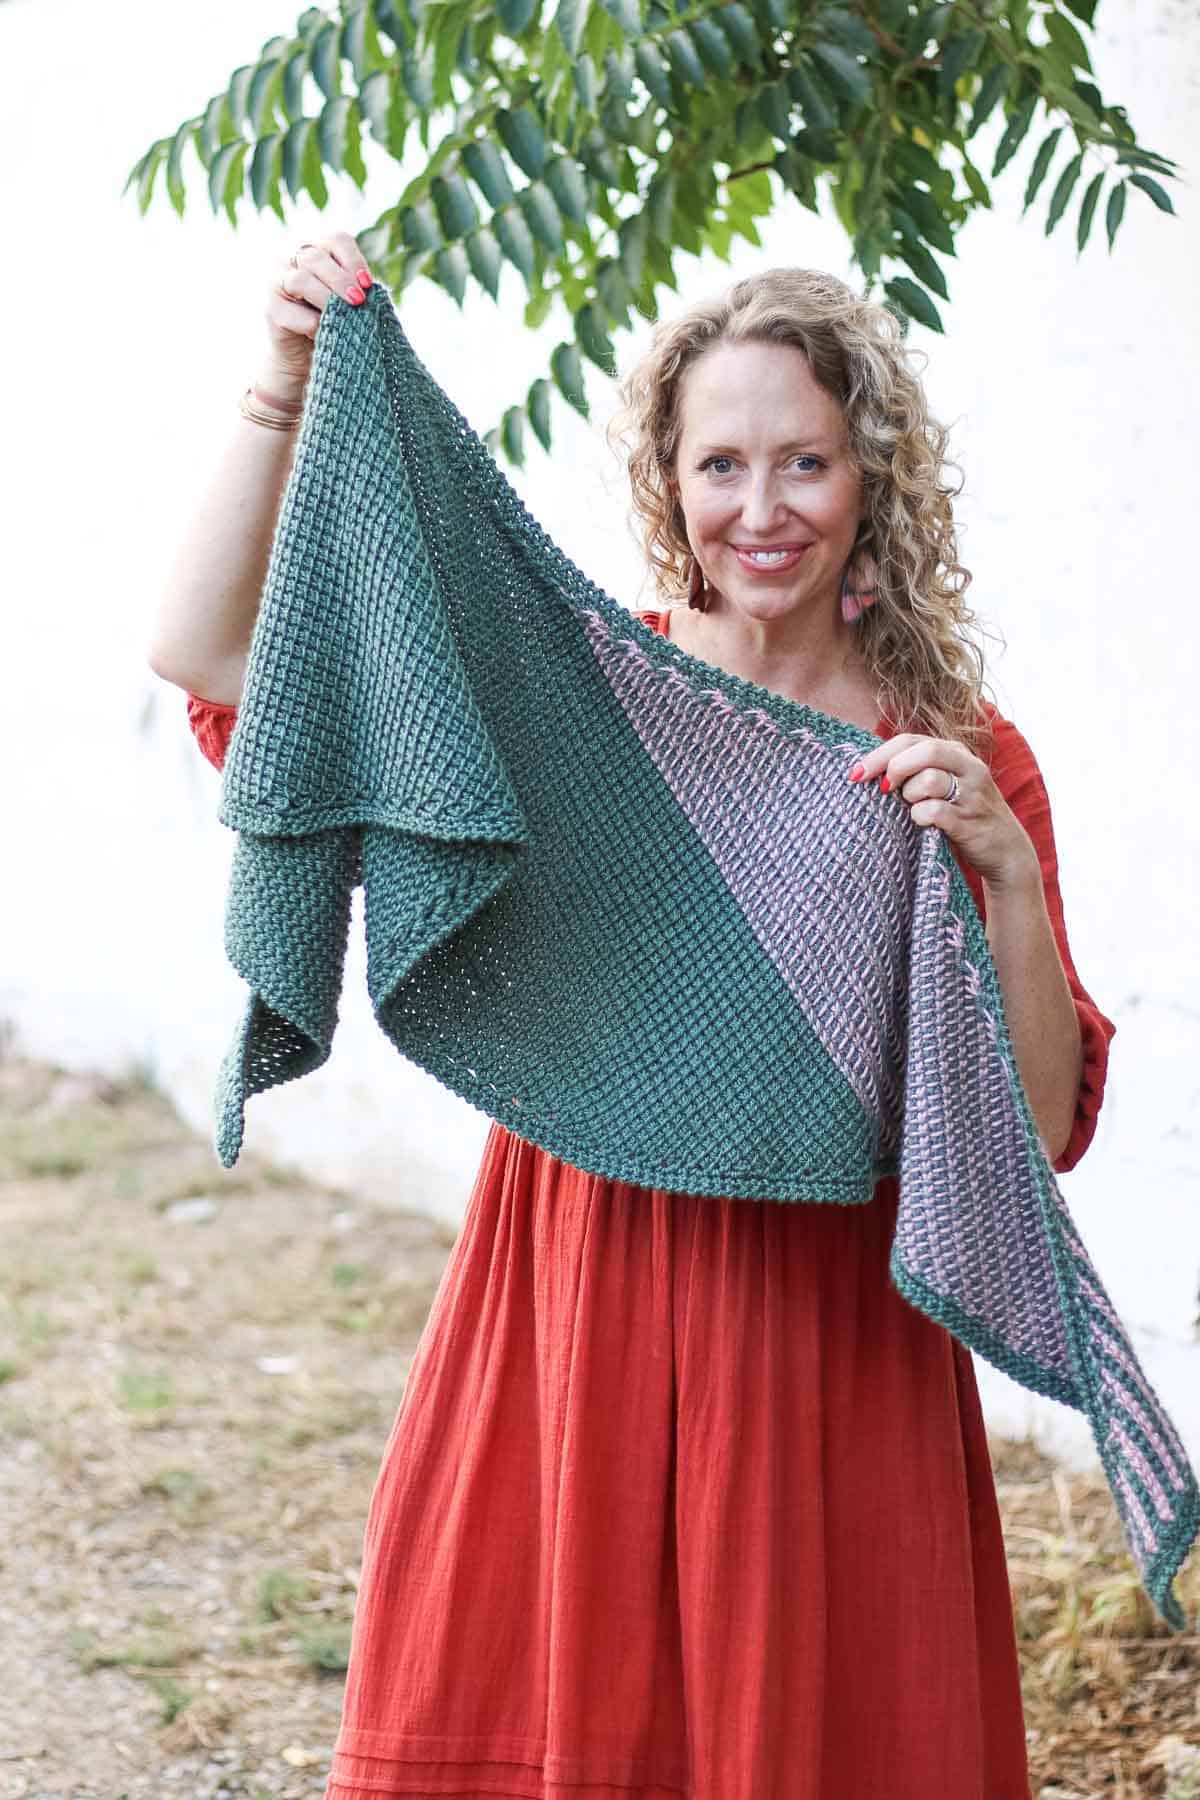
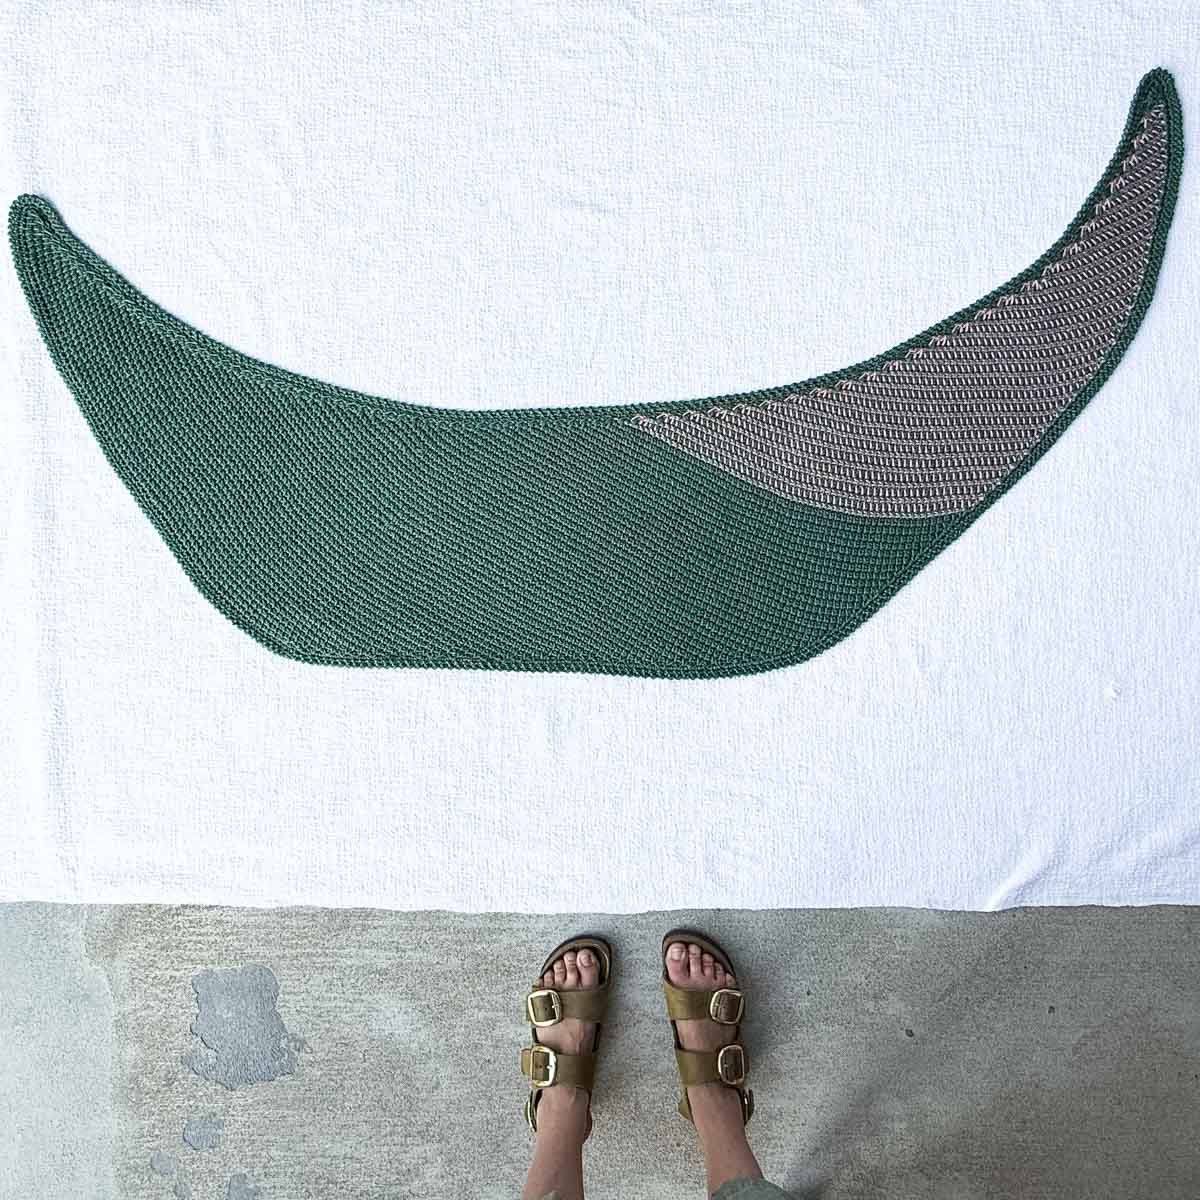
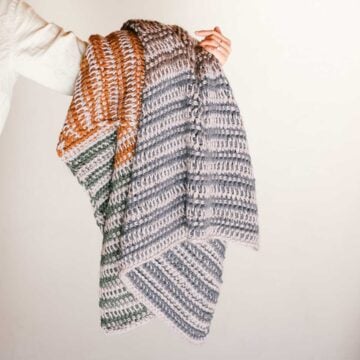
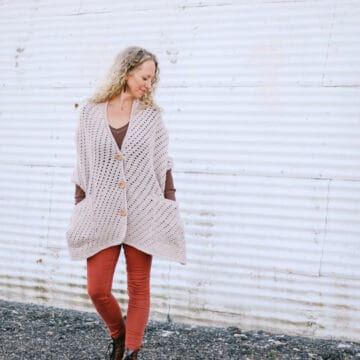
Green + Pink Version: Approximately 80 x 15”
• Lion Brand Heartland (Category 4/medium - 251yds, 5oz, 141g)
- Rocky Mountains (136-181E) – 2 skeins
- Capitol Reef (136-140Q) – 1 skein
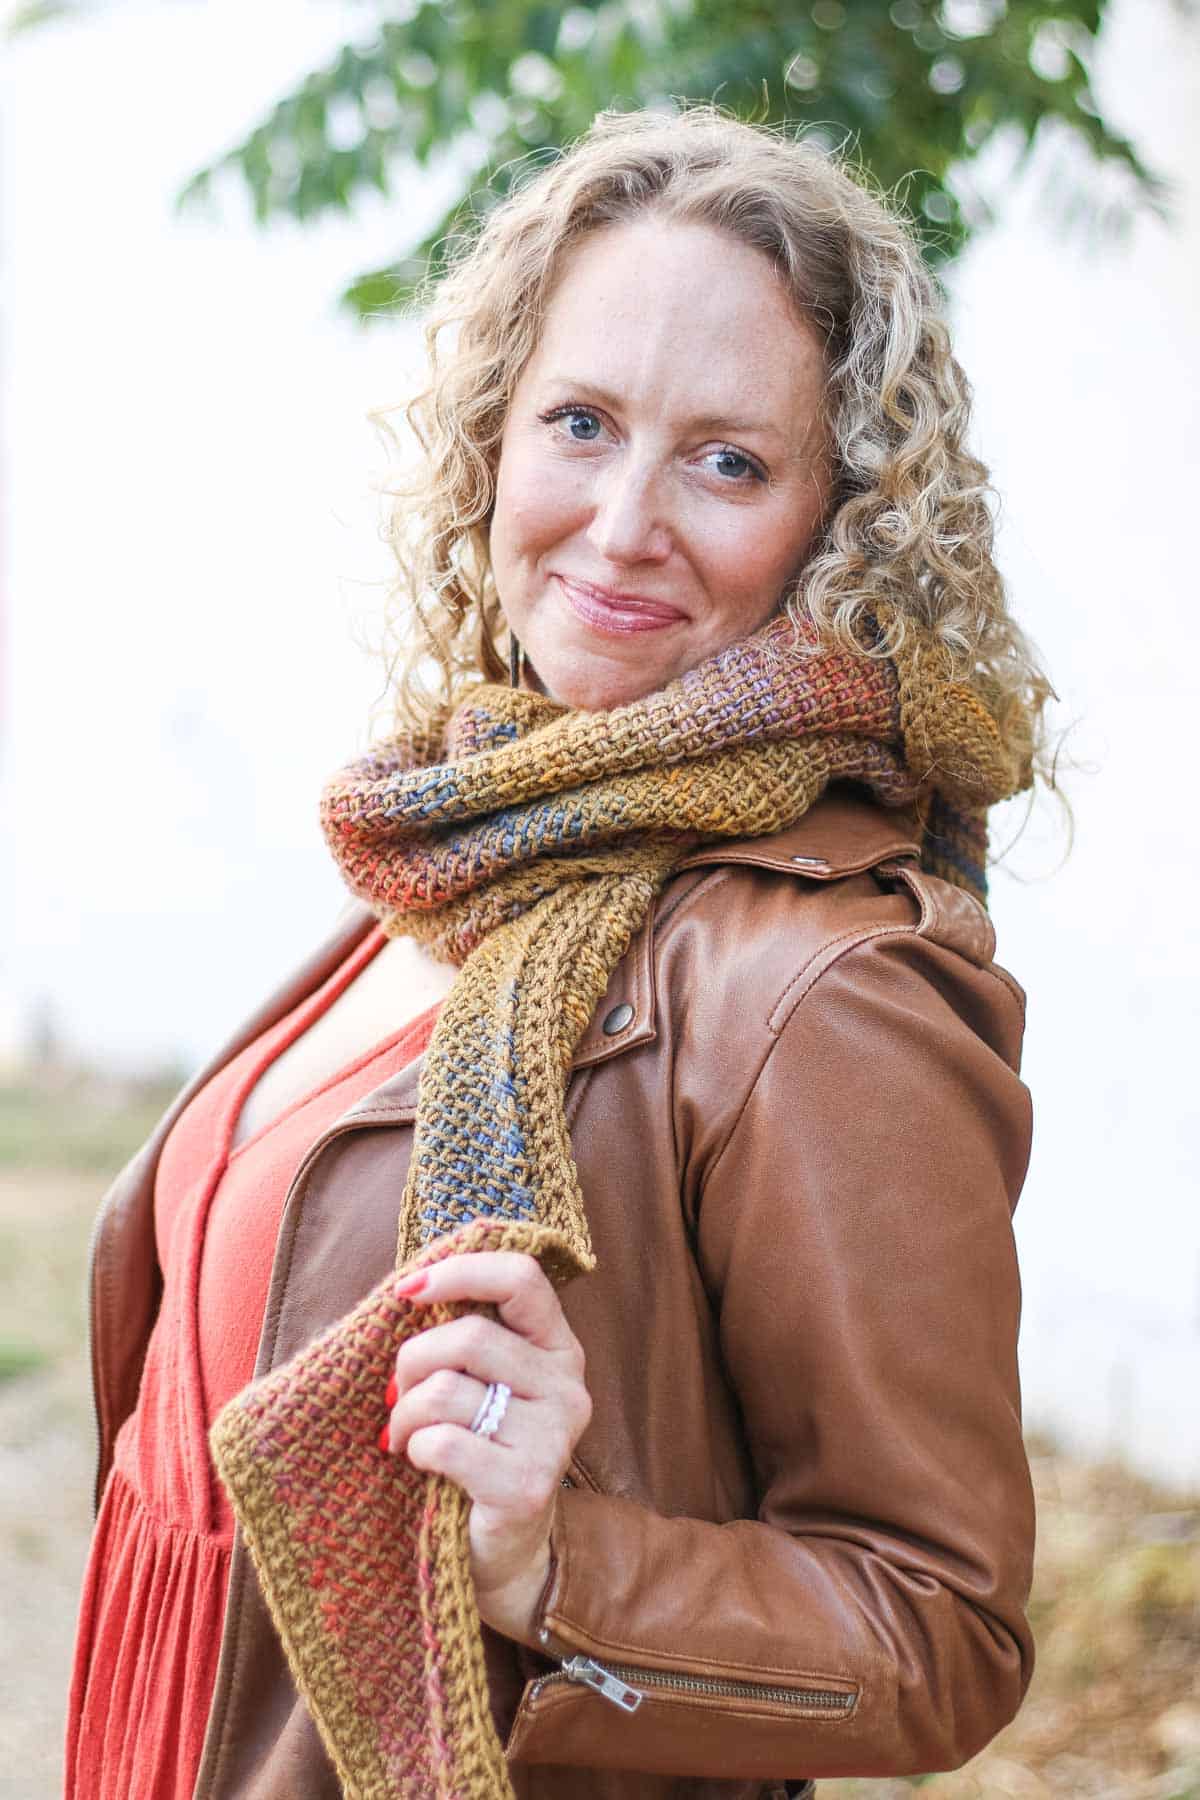
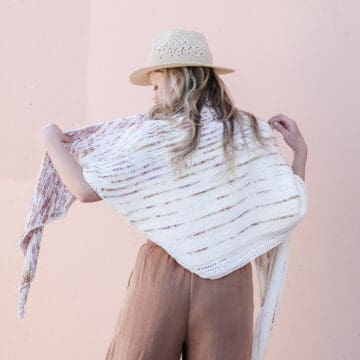
Self-Striping Mustard Version: Approximately 76 x 13.5”
• Lion Brand Color Theory (Category 4/ medium - 246 yds, 3.5 oz, 100g)
- Dijon (619-170AE) – 2 skeins
• Lion Brand Ferris Wheel (Weight 4/Medium – 270 yds, 3.0 oz, 85g)
- Buttercup (217-605H) – 2 skeins
Pink Neckerchief Version: Approximately 39 x 5.5”
• Hobbi Bella Coco Merino DK (Weight 3/ DK 246 yds, 1.76 oz, 50g)
- Raspberry – 1 skein

Additional Supplies
• Tapestry needle
• Tunisian crochet hook* in size 2-4mm larger than yarn label calls for
• Stitch markers
• Blocking Board
• Steamer or iron with steam functionality
• T-pins for blocking
Gauge
Variable based on yarn and hook used. Aim for yarn and hook combination that results in a fairly loose weave. (More details in the notes on choosing a hook above.)
Abbreviations + Glossary (US Terms)
ch – chain
rep – repeat
RS – right side
rsc – reverse single crochet
sc – single crochet
slst – slip stitch
st(s) – stitch(es)
Tss – Tunisian simple stitch
Tss2tog – Tunisian simple stitch two together (decrease)
WS – wrong side
yo – yarn over
M1 – make one. Insert hook between two stitches. Yo and draw up a loop (increase made). When working RetP, treat as a normal stitch.
Watch the BYOY Scarf Video Tutorials
• If you’re new to Tunisian crochet, watch an introductory tutorial that covers all the basics
• Watch a brief video tutorial on the color-changing technique used in this pattern
BYOY Scarf Video Part 1
In Part 1, you'll learn how to get your scarf started, how to give it a striped look and how to continue to increase until the depth you desire.
If you're entirely new to Tunisian crochet, check our our Tunisian crochet basics tutorial first.
Note: Please disable any ad-blockers in order to use the video players below.
If you're having trouble viewing this video, watch on Youtube instead.
BYOY Scarf Video Part 2
In Part 2, you'll learn how to add width to the scarf until you're happy with the size. Part 2 also covers two important methods for reducing the curl in Tunisian simple stitch, including adding a border around the scarf and blocking your finished project.
Print This Pattern: purchase the ad-free, printable PDF
Wanna save this pattern?
Get Help With Your Project
This pattern was one of our crochet alongs in our free crochet community. As a result, there are a lot of crocheters there who can help you if you're struggling to choose colors, figure out your increasing or just needing overall guidance on Tunisian crochet.
👉 Join our free private community (it's free!) to ask your questions and share your stitches.
Overall Pattern Notes
• Pattern is worked in Tunisian Simple Stitch (Tss). Row instructions are for the Forward Passes (FwP).
• Follow the Foundation Row and each Forward Pass with a Return Pass (RetP) worked as follows:
Ch 1, *yo, pull through two loops; rep from * until 1 loop remains on hook.
It can be helpful to place a stitch marker in the first chain 1 of each return pass. This makes the last stitch of the next forward pass easy to identify.
• Woven look is achieved by alternating colors for each return pass (RetP) and the next forward pass (FwP). Do not cut yarn after each color change. Instead, keep it attached to pick up on the next row.
• To keep this a beginner-level pattern, color changes are introduced after increases have been practiced. You may begin working the color-changing technique immediately (right after Row 1) if desired.
• Some curling is expected and will be controlled by adding a border and blocking your finished scarf. Using a larger hook size will also help decrease the fabric’s tendency to curl.
• I share more tips for planning the look of your scarf below the pattern instructions.
Premium PDF
easier and faster with fewer mistakes.
- Complete pattern + photo tutorials
- Instant download
- Formatted for easy printing
Scarf Part 1
Foundation (Row 1): Ch 3. Draw up a loop in second and third chs. (3 sts)
Row 2: M1 (between first and second stitches), Tss in second st, M1 (between second and third stitches), Tss in last (third) st. (5 sts)
From this point forward, each row of Part 1 begins with two increases and ends with one decrease. The stitch count should increase by one stitchper row.
Row 3: M1 (between first and second stitches), Tss in second st, M1 (between second and third stitches), Tss in third st, Tss2tog over last two sts. (6 sts)
Row 4: M1 (between first and second stitches), Tss in second st, M1 (between second and third stitches), Tss in third st and each st until two remain, Tss2tog over last two sts. (7 sts)
For a woven/striped look: When you feel confident about the stitch repeat, consider adding a second color beginning with any return pass. Alternate Color B for one return pass and the next forward pass, then switch to Color A for the following return pass and forward pass.
Check out this video tutorial on how to make your Tunisian crochet look woven for a visual demonstration.

To continue in Part 1: Repeat Row 4 until the scarf depth measures the desired “depth.” Scarf depth refers to the length from your chin toward your belly button; essentially, it is how tall the scarf is. To determine your scarf depth at any given point, measure from the increase edge to the corner on the decrease edge.

Crochet fewer rows for a shallower scarf or neckerchief. For a deeper scarf, crochet more rows. Don’t hesitate to hold your scarf up after finishing a return pass and assess the length from your chin.
(For reference, the larger green + pink scarf pictured has a depth of about 14”. The smaller pink neckerchief has a depth of about 5”.)
Want some company while you crochet?
Get support (and camaraderie!) in the Make & Do Crew community. Join for free here.
Scarf Part 2
Part 2 uses the same skills as Part 1, but each row begins with two increases and ends with two decreases. The stitch count should stay the same in each row.
It’s even more helpful to place a stitch marker in the first stitch of the return pass and move it up as you work. This makes it easier to identify the end of the row on the next forward pass.
Row 1: M1 (between first and second stitches), Tss in second st, M1 (between second and third stitches), Tss in third st and each st until four remain, Tss2tog over next two sts, Tss2tog over last two sts.
Repeat Row 1 until scarf measures desired length.
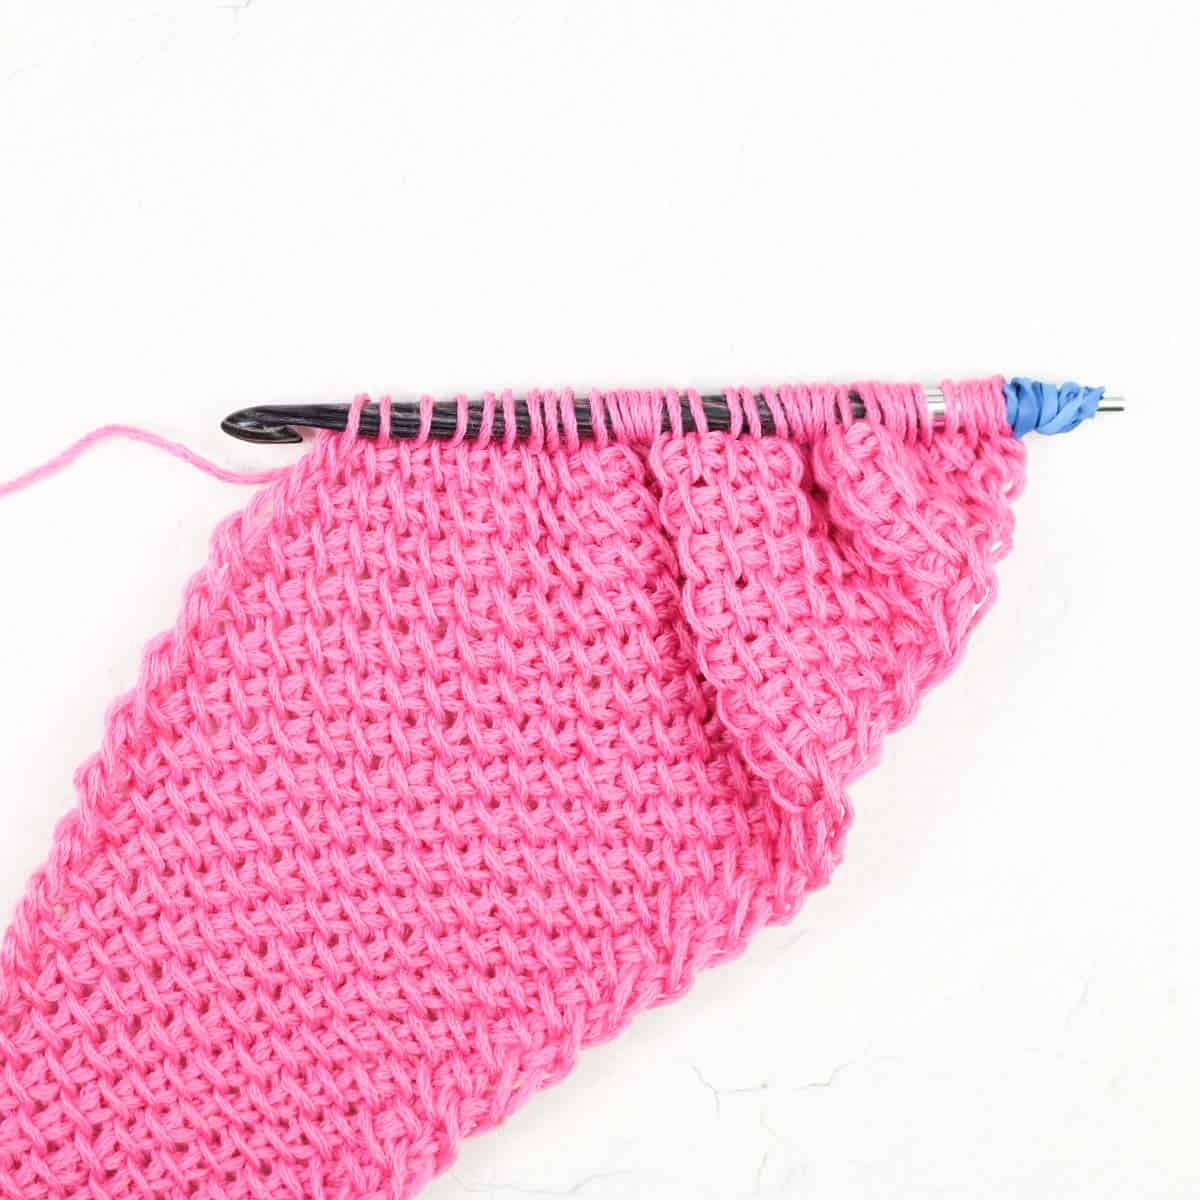
Finishing Row: Loosely Tslst in each bar across. Keep yarn attached for Border.

Border
Position scarf so RS is facing (the side that looks woven, not bumpy.) With smaller, standard hook and attached yarn:
Round 1 (RS): The frequency of single crochet in Round 1 is not important. Use the following instructions as a starting point, but adjust frequency as necessary so that round is flat and smooth.
Along edge of scarf with decreases: Ch 1, 2 sc in each row edge along decrease edge. Place 2 sc in each of 3 foundation chains to round the scarf corner…
Along edge of scarf with increases: *2 sc in first row edge, 1 sc in next row edge; rep from * along upper edge of scarf. Place 2 sc in two stitches closest to corner…
Along final bound off edge of scarf: sc in top of each bound off Tss. Slst to first sc of round to join; turn.
Round 2 (WS): Ch 1, sc in each sc around scarf, placing 2 sc in a few stitches at each corner, slst to first sc of round to join; turn.
If scarf is particularly curly, keep yarn attached and block your project at this point. If that doesn’t eliminate curl, consider working an additional round or two of single crochet as described in Round 2 before moving onto the final round.
Round 3 (final round RS): Ch 1, working in opposite direction you typically crochet, rsc in each sc around scarf, slst to first rsc of round to join. Fasten off.
Finishing
Weave in remaining ends: Follow the linked tutorial to learn more.
Blocking: Blocking is essential to control the curl of Tss. Use T-pins to secure scarf to blocking board. My preference is to do a thorough steam blocking using either a steamer or iron with steam setting. Focus on scarf edges and any areas that are particularly curly. Do not touch steamer or iron directly to yarn.
Let your scarf dry on the blocking board overnight.
Bring your own BYOY scarf whenever you’re headed out!
Permissions + Copyright:
Please do not publish or share this pattern as your own. You may make items to sell with this pattern. In exchange, please link back this post. Do NOT use our photos as your own sales photos.
Additional Tips for Planning Your Scarf
This is a versatile scarf “recipe” that can create endless looks, sizes, and variations.
Any scarf is reversible, and it can be helpful to consider how you want your front and back to look when choosing colors.
The front of Tunisian simple stitch creates a fairly flat fabric that looks woven when two colors are alternated. The backside is bumpy, similar to knit stockinette, and will be striped when two colors are alternated.
Some yarn and color experiments to consider:
- Combine one solid color and one self-striping yarn throughout. This creates a blended stripe look without a lot of color planning or decision-making—very relaxing! (See mustard yellow sample scarf featuring Color Theory + Ferris Wheel yarn.)
- Combine two solid colors throughout. This creates consistent, woven-looking fabric on the front and repeating stripes on the backside. The more contrast between the two yarns you use, the more lively your scarf will look (e.g., black and white). For a more subtle look, choose two yarns with less contrast.
- Use up scraps or mini skeins to create a varied look. In this case, you may choose to use one consistent color throughout and add an accent color to create stripes. For the most colorful look, don’t use one consistent yarn throughout and instead combine two new colors each time you change colors.
- Use two colors for a portion of the scarf and one color for the rest. This is how the green and pink sample achieves a woven/striped fabric on one third and solid green for the remainder.
More Free Tunisian Crochet Patterns
Now that you know how easy Tunisian can be, here are a few more patterns to sink your hook into.
That was so fun! Now what?
Invitation to our Private Community
Come discuss crocheting your first Tunisian crochet scarf and lots of other projects and techniques in our Make & Do Crew community. Here thousands of helpful crocheters answer each other's questions and share their stitches. Join us!


Leave a Reply