This easy Tunisian crochet cardigan is a magical, reversible make that will soon become your go-to sweater. And we’ve gotcha covered with tutorials on all the confident-beginner level skills. Find Part 1 of the free pattern below or purchase the complete ad-free, printable PDF here. Part 2 is here.
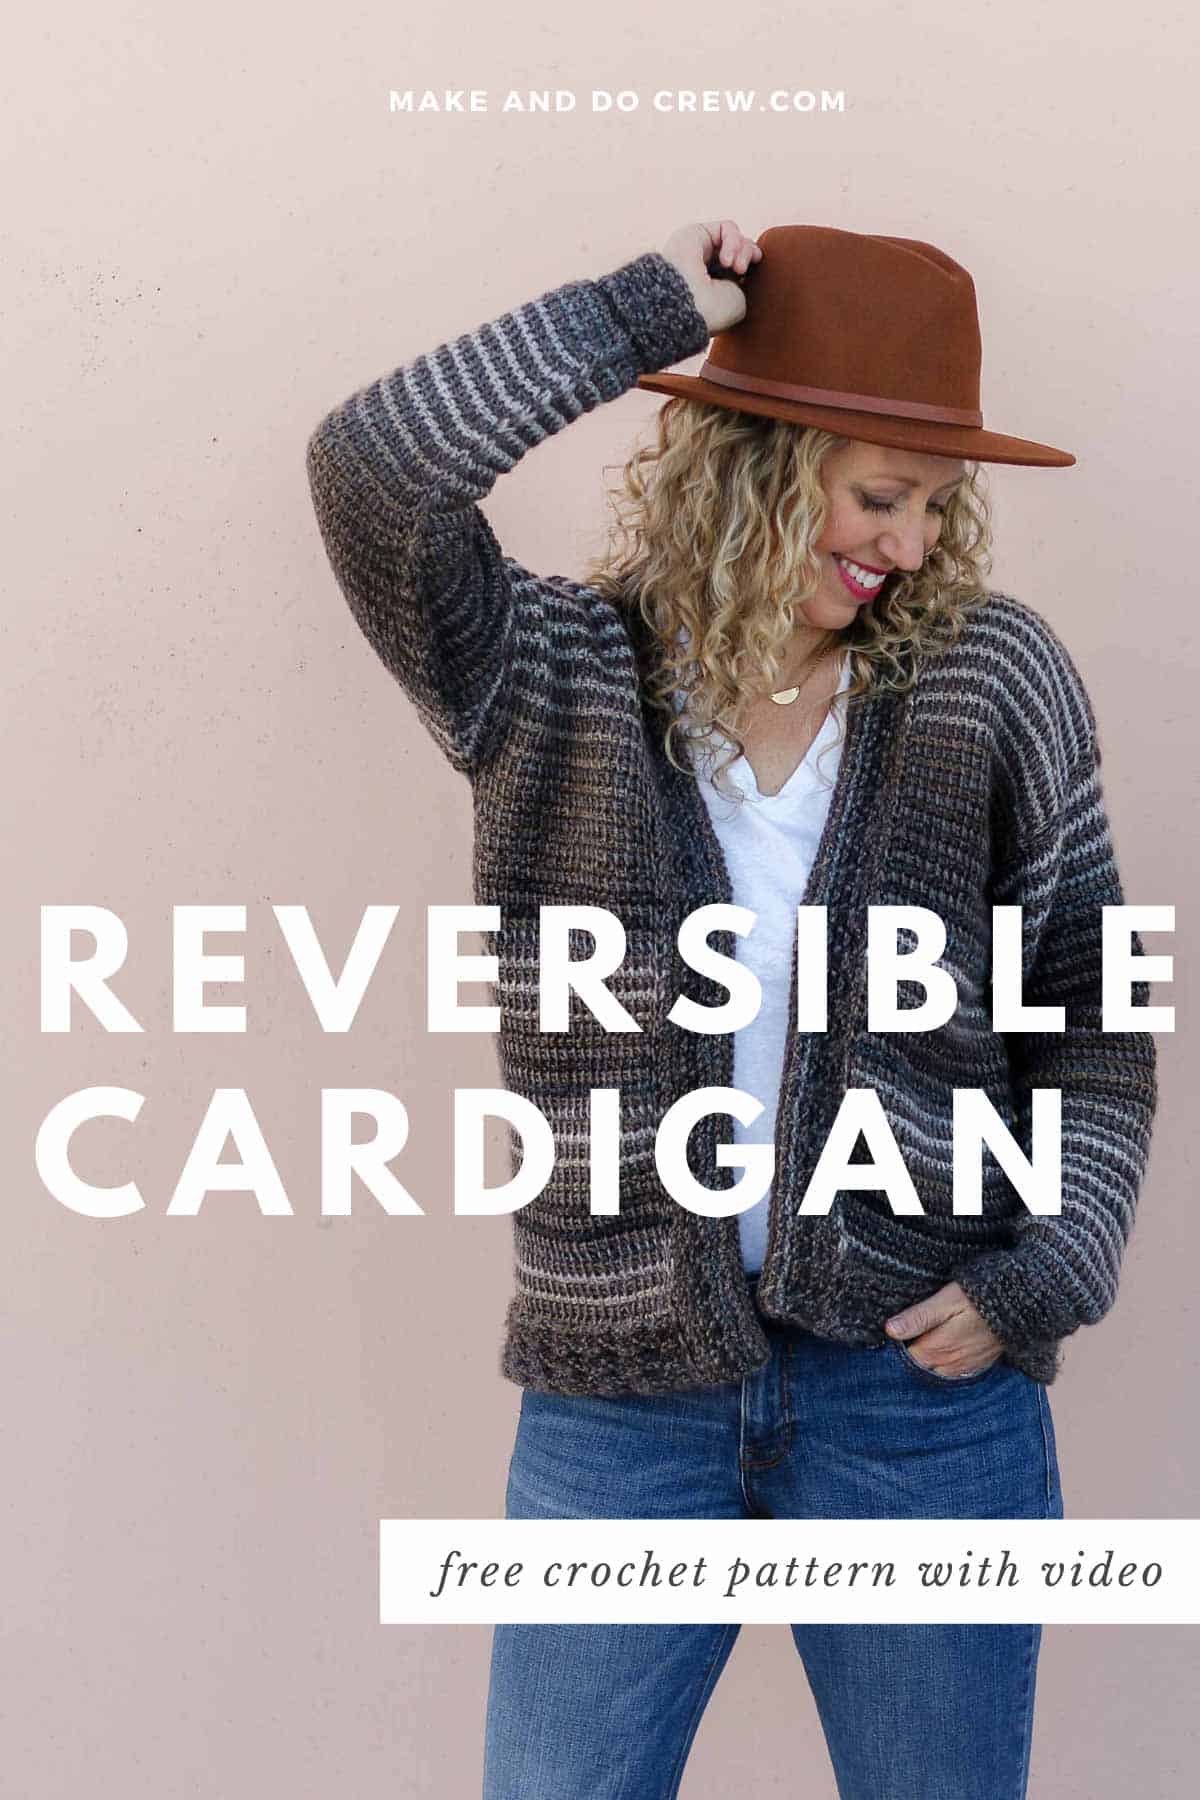
This easy Tunisian crochet cardigan free pattern is part of a collaboration with Lion Brand Yarns. This post contains affiliate links.
Is it striped? Is it solid? Is it knitting? Is it crochet? By using basic Tunisian crochet skills and two yarns, I’ll show you how to make a sweater that looks unlike anything else in your handmade wardrobe.
Keep reading for all the inspiration and yarn details or scroll down for the first section of the free Mercantile Cardigan pattern. You can find the second half of the free pattern and tutorial here!

How easy is this Tunisian crochet cardigan pattern really?
Crochet sweaters, especially cardigans, are by far my favorite thing to make. They’re functional, satisfying and often faster than a blanket.
But my life is kinda crazy these days. Three young kids. This consuming-and-super-fun business. There’s just a lot going on. And when I finally sit down with some yarn in my hands at 10 or 11:00 at night, I just want the project to feel un-complicated. Do you ever feel the same way?
This easy Tunisian crochet sweater pattern was honestly born out of a need to turn my brain off and set my hands to cruise control for a few minutes a day. I had a concept in mind for making a reversible sweater and I promised myself I would keep the pattern really simple. Both for your sake and mine. Ha.
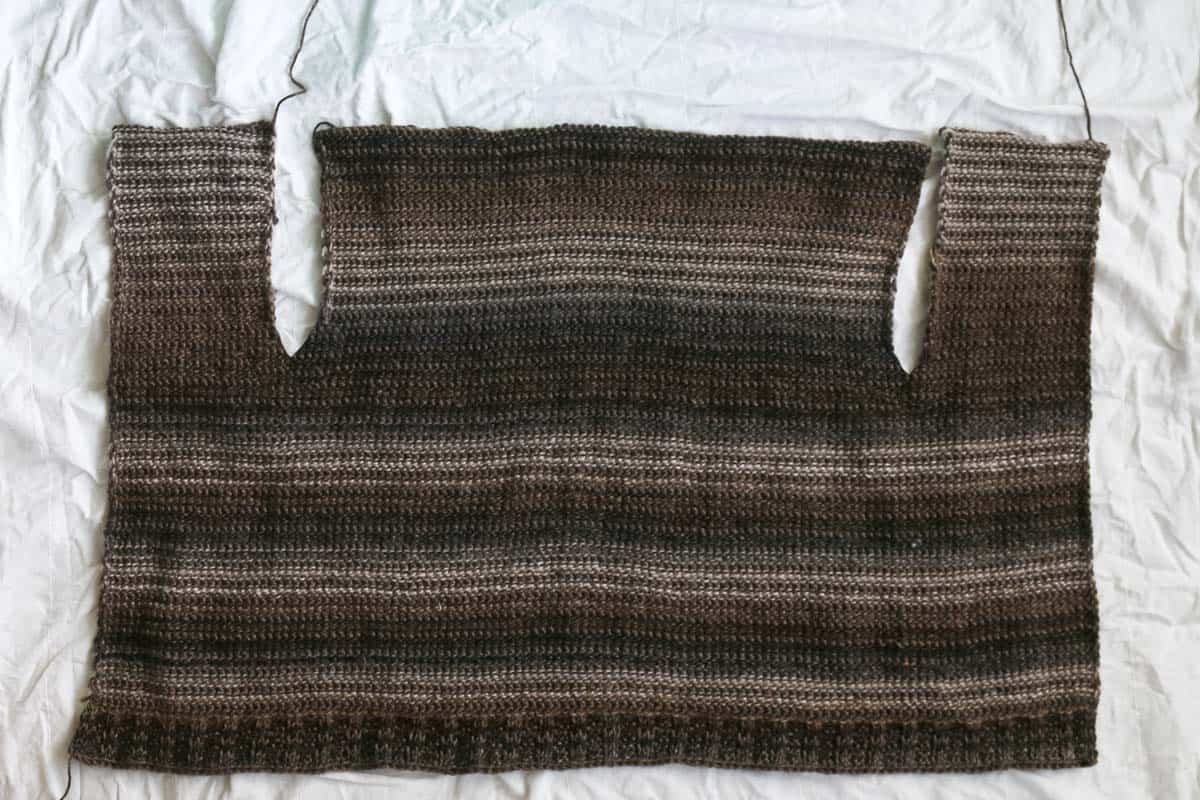
And it worked! There’s barely any seaming, minimal counting and some easy modifications to change the length of your cardi if you choose. This sweater basically makes itself.
Let’s embrace the simple life together! (At least for a couple crochet minutes a day.)
If you’re new to Tunisian crochet
If you hang around here often, you might already know that I’m a little Tunisian crochet obsessed. But I haven’t been at it very long. I taught myself Tunisian less than a year ago because I felt like I needed to breath new creativity into my design process.
So, all of that is to say, I’ve got your back if you’re just learning too. I put together a very in-depth introduction to Tunisian crochet that covers all the questions I had when starting (What’s hooks do I need?…Do I need to learn a thousand stitches to make something cool?…What if my project curls?) and includes a step-by-step video on the basics.
New to making cardigans? Don’t miss How to Crochet a Sweater for our best beginner tips
Crochet that looks like knitting
When I first learned how to Tunisian crochet, I was immediately struck by how beautiful the back side of the fabric can often be. I designed the Brushland Wrap to be reversible for this exact reason and used the “wrong side” of Tunisian simple stitch to create a teddy-bear like texture in the Sherpa Sweater.
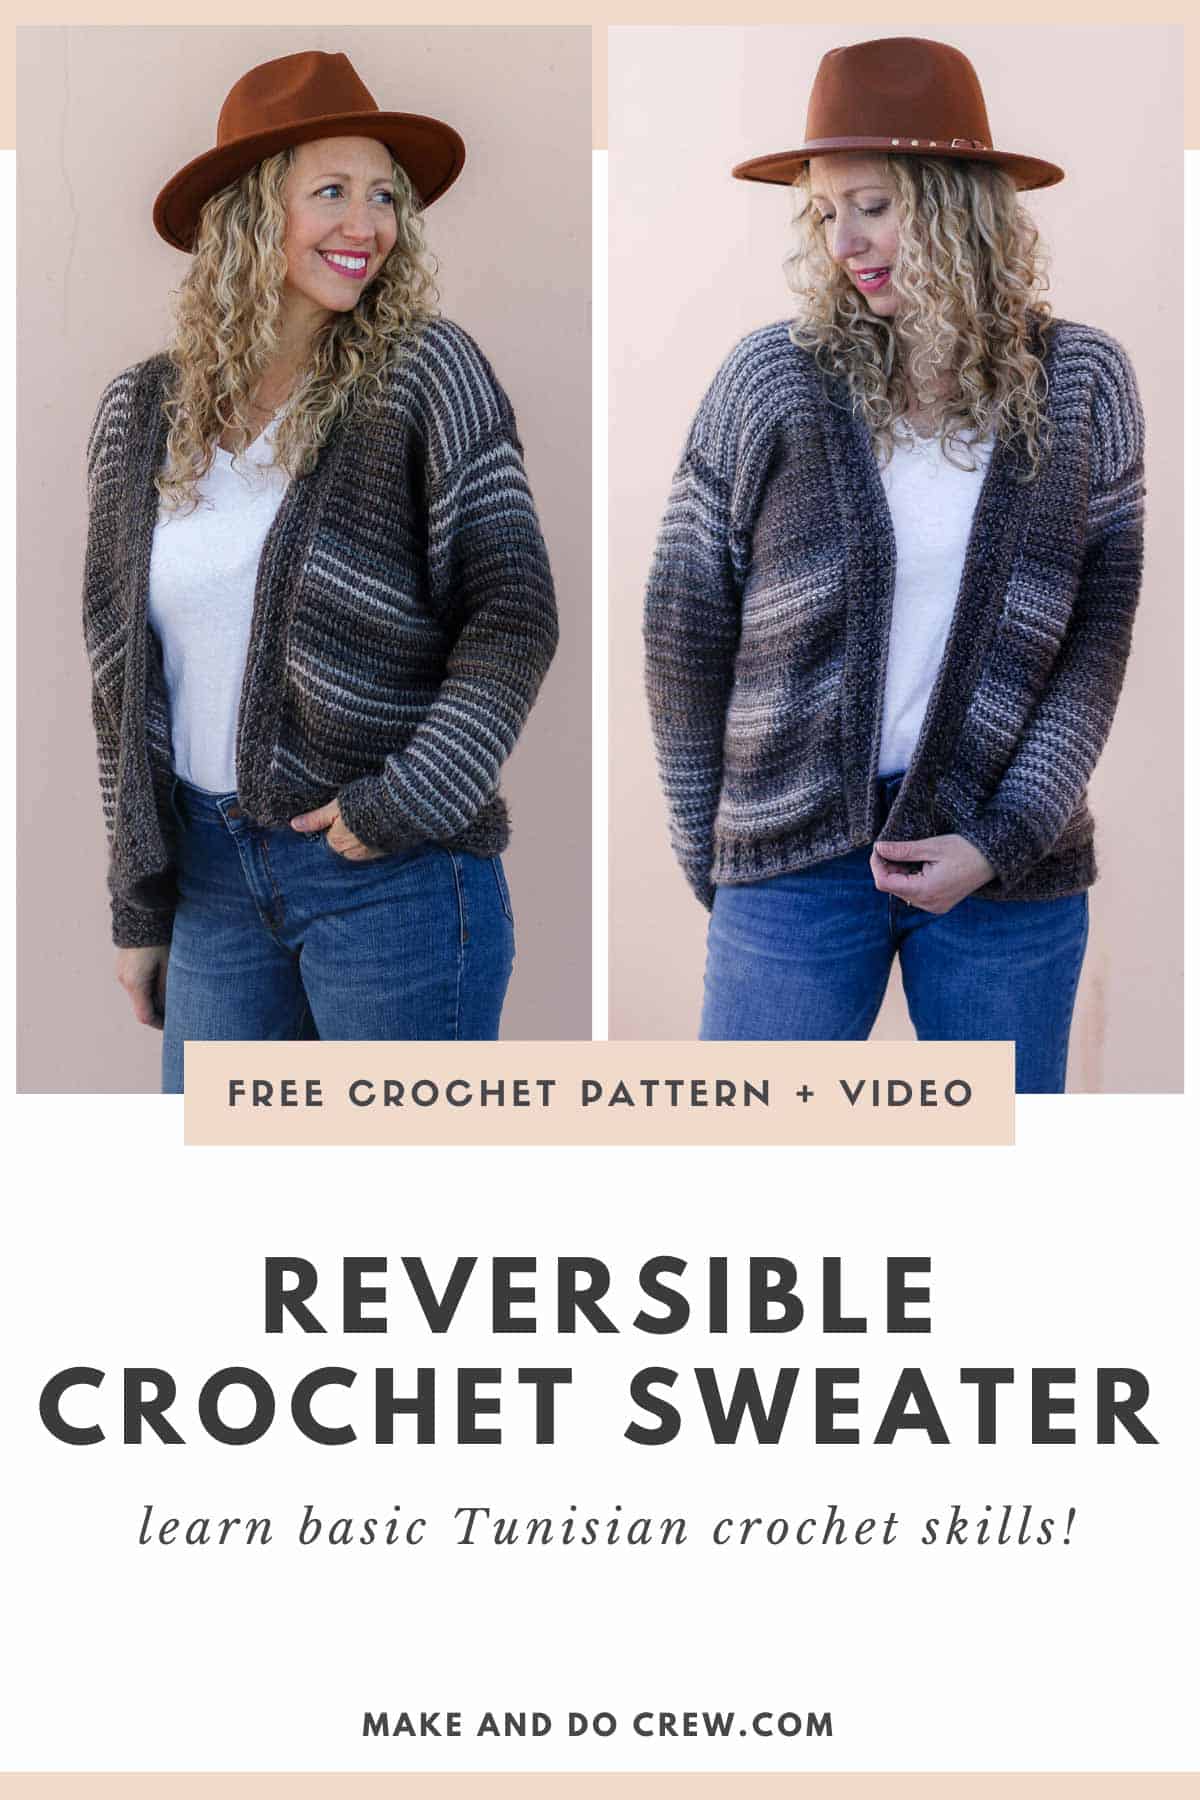
In the Mercantile Cardigan, the Tunisian simple stitch “front” side of the fabric has really nice woven texture that highlights the stripes. My favorite way to wear it though is with the backside facing out because it mimics the look of knit garter stitch. The smoothness of the wrong side doesn’t quite look crocheted and not quite knit and I love the creative possibilities of that grey area.
click to pin this pattern for later ⇨
No Curl to Worry About
It’s interesting to me how often I see people wondering how to stop their Tunisian crochet from curling. (It’s not that hard if you know a few tricks!)
This easy Tunisian crochet cardigan has no curling issues whatsoever though for two reasons. First, we use a large enough hook with the worsted weight yarn to keep the fabric relaxed and drapy. Secondly, the knit-look ribbing at the bottom of the sweater and sleeve cuffs prevents any curling from happening in the first place.
So, not to worry, you can crochet this cardigan with curl-free confidence!
Self-striping yarn made a little more subtle
I first laid hands on Lion Brand Ferris Wheel when I was wandering through the yarn aisle with my kids one day. The colors and textures of this line of yarn took relentless hold of my brain and would not let go until I dreamed up like five pattern ideas. (No joke, I had three WIPS going at once all using this magical yarn.)
I really enjoy how self-striping yarns keep me interested in a project and take the fear out of combining colors, but I don’t always care for how “busy” they can make a crochet project look.
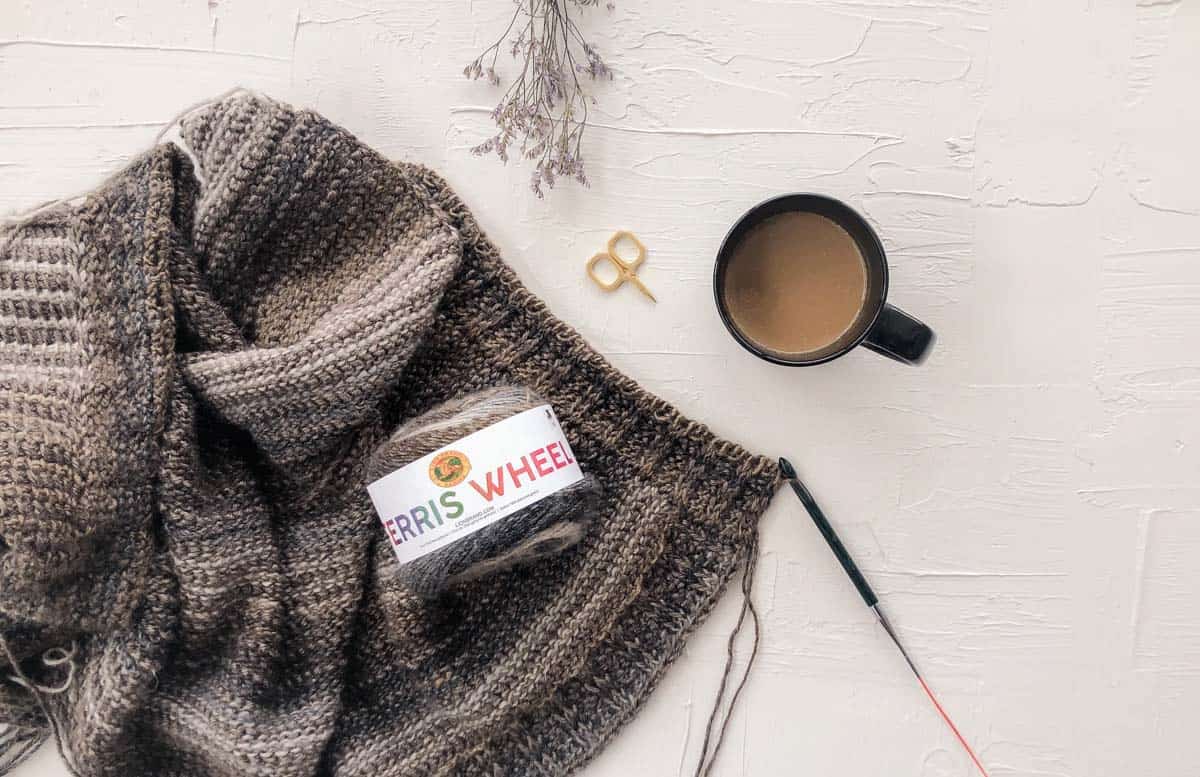
I knew I wanted this easy Tunisian crochet sweater to have a generally subdued effect, so I decided to combine Ferris Wheel with a Lion Brand staple–Heartland.
Because both yarns are very similar in weight, alternating rows of them looks like they were always meant to be together. The combination mutes the higher contrast Ferris Wheel while adding some visual interest to the Heartland. The Mercantile Cardigan is one of those projects that I know will just blend effortlessly into my wardrobe. I hope you feel the same way!
Download the complete printable pattern right away
I really wanted to make the Mercantile Cardigan doable for even beginner Tunisian-crocheters, so each step of the project is covered in either a photo or video tutorial. (Or both!) This means though that this is one meaty sweater tutorial!
Because this means there’s A LOT of helpful tutorial content to share, the free version of the pattern and tutorial is divided into two sections. If you’d like to have the complete pattern in one easily printable document, you can grab the inexpensive PDF here.
More Free Crochet Sweater Patterns
Crochet sweater patterns don’t need to be difficult. In fact, most of ours are made with very simple shapes. Dive into the wonderful world of crochet garments with cardigans, pullovers, ponchos, shrugs and more!
See more free crochet sweater patterns →
The Mercantile Cardigan
Easy Tunisian Crochet Sweater
Free Pattern – Part 1
Purchase the ad-free, printable PDF with the complete pattern here.
Save this pattern to your Ravelry here.
Pin it for later here.
Get part 2 of the free pattern here.
Explanation:
The Mercantile Cardigan is a mysterious make that will soon become your go-to sweater. Is it striped? Is it solid? Is it knitting? Is it crochet? By using basic Tunisian crochet skills and alternating two yarns, you’ll be able to make a sweater that looks unlike anything else in your handmade wardrobe.
While the “wrong side” of Tunisian simple stitch really shines in this simple silhouette, the sweater is actually reversible. Wear it with the regular front side of Tunisian simple stitch facing out for more distinct stripes or choose the backside of the fabric for a look that resembles knit garter stitch.
Pattern includes very little counting and minimal seaming. Chill out and make your new favorite cardigan today!
Supplies:
• A: Lion Brand Heartland (Weight: 4/medium – 251 yds, 5.0 oz)
– Mammoth Cave (#136-125) – 3 (3, 3, 3, 4, 4, 4, 5) skeins [approx. 290 (330, 380, 410, 460, 500, 550, 590) g)]
• B: Lion Brand Ferris Wheel (Weight: 4/medium – 270 yds, 3.0 oz)
– Morning Java (#217-609) – 4 (5, 5, 5, 6, 6, 7, 7) skeins [approx. 230 (260, 300, 330, 360, 400, 440, 470) g)]
• Tapestry needle
• Size K (6.5 mm) Tunisian crochet hook with 15 (15, 15, 20, 20, 20, 30, 30)” cord or longer
• Size L (8 mm) Tunisian crochet hook with 30” cord or longer
• Stitch markers or safety pins
Sizes:
* Find more detailed measurements for each size in the ad-free, printable PDF.
Size – Fits Actual Bust Measurement
S – 33″
M – 37″
L – 41″
1X – 45″
2X – 49″
3X – 53″
4X – 57″
5X – 61″
Sample pictured is a size M shown on a 5’9” model with a 40” bust.
Wanna save this pattern?
Gauge:
14 Tss = 4”
12 rows = 4”
Abbreviations and Glossary – US Terms
ch – chain
PM – place marker
rep – repeat
RetP – return pass
RS – right side
tks – Tunisian knit stitch
tps – Tunisian purl stitch
tslst – Tunisian slip stitch
tss – Tunisian simple stitch
st(s) – stitch(es)
WS – wrong side
yo – yarn over
Special Stitches:
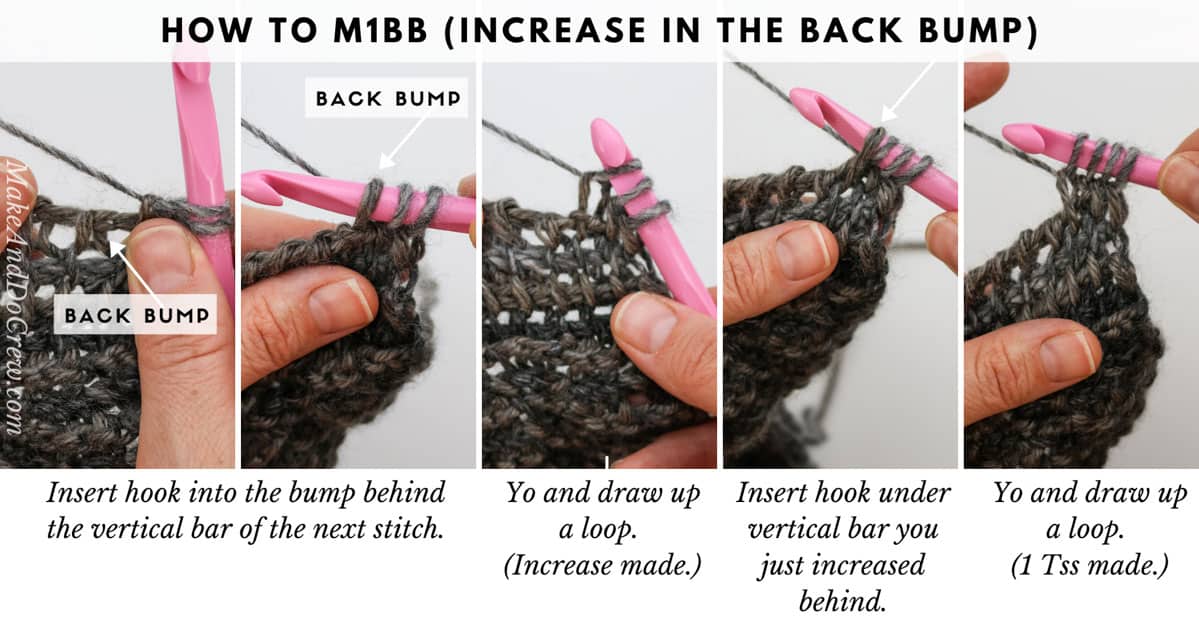
M1BB – increase in the back bump
Insert hook into the bump behind the vertical bar of the next stitch. Yo and draw up a loop. (Increase made.) Make next stitch according to pattern starting from the same vertical bar you just increased behind. See photo below.
Overall Pattern Notes:
• Row instructions are for the Forward Passes (FwP).
• Work a standard Return Pass (RetP) after each Forward Pass.
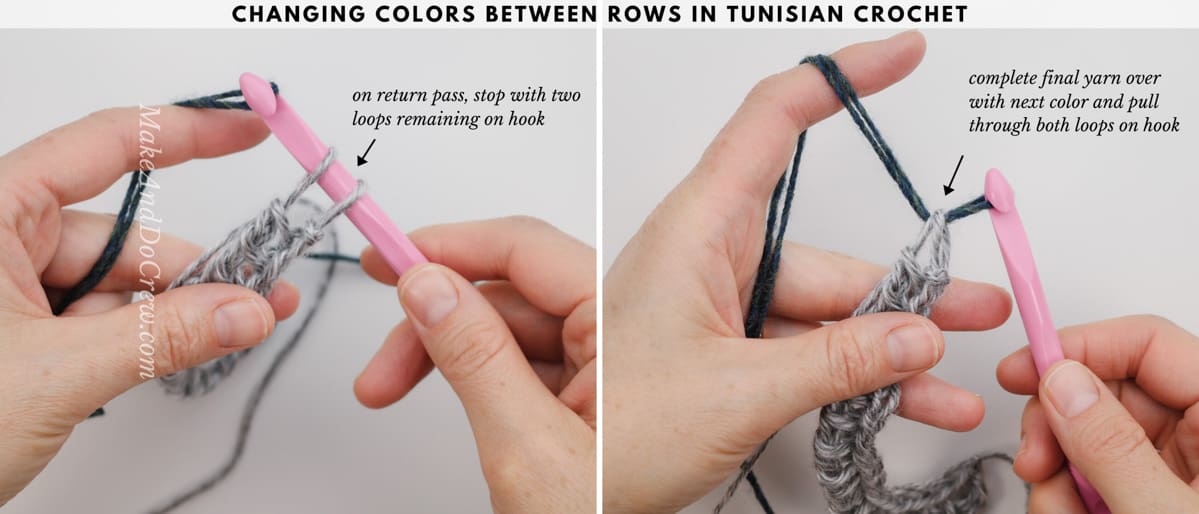
• Pattern is worked alternating rows of Color A and Color B. Keep both colors attached as you work. See photo below for more details on changing colors at the end of each row.
• My experience is that the ribbing looks cleaner and more defined with less contrast in the colors. Therefore, I chose to use a section of Color B that didn’t contrast significantly with Color A when working each section of ribbing. However, this choice is completely personal!
!! Gauge Check !!
Please don’t skip this step or you will risk your sweater not fitting as expected.
To check gauge, with color A and larger hook:
Foundation Row (Color A): Ch 20. Draw up a loop in second bump from hook and each bump to end of row. Change to Color B on last two loops of RetP. (20)
Row 1 (Color B): Tss in each st across. Change to Color A on last two loops of RetP.
Row 2 (Color A): Tss in each st across. Change to Color B on last two loops of RetP.
Rep Rows 1 and 2 for an additional 15 rows. Measure center four inches of swatch vertically and horizontally. Compare to pattern gauge listed above. If there are too many stitches in 4” horizontally, increase your hook size and re-swatch. If there aren’t enough stitches in 4” horizontally, decrease your hook size and re-swatch.
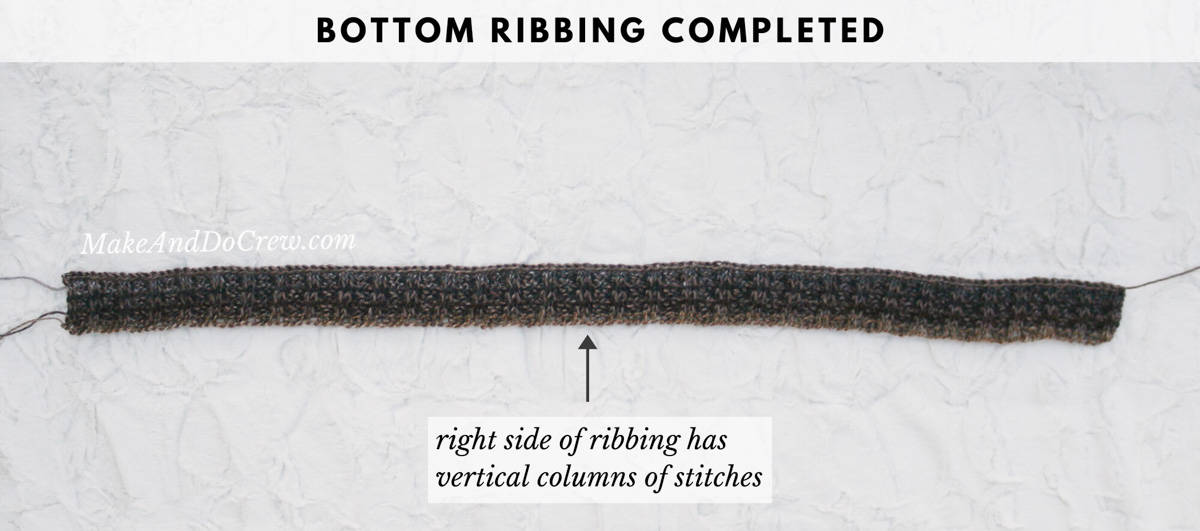
Bottom Ribbing
Notes:
• View a video tutorial and photo tutorial on how to crochet this Tunisian ribbing here.
With Color A and smaller hook:
Row 1 – Foundation (Color A): Ch 116 (130, 144, 158, 172, 186, 200, 214). Draw up a loop in second bump from hook and each bump to end of row. Change to Color B on last two loops of RetP. [116 (130, 144, 158, 172, 186, 200, 214) loops on hook]
Row 2 (Color B): Tks in next st, *tps in next 2 sts, tks in next 2 sts; rep from * to end of row. Change to Color A on last two loops of RetP.
Row 3 (Color A): Tks in next st, *tps in next 2 sts, tks in next 2 sts; rep from * to end of row. Change to Color B on last two loops of RetP.
Rep Rows 2-3 twice more. Rep Row 2 once more. Ribbing should now contain 8 rows.
Row 9 (Continuing with Color B): Tslst in each st across. Fasten off A and B.
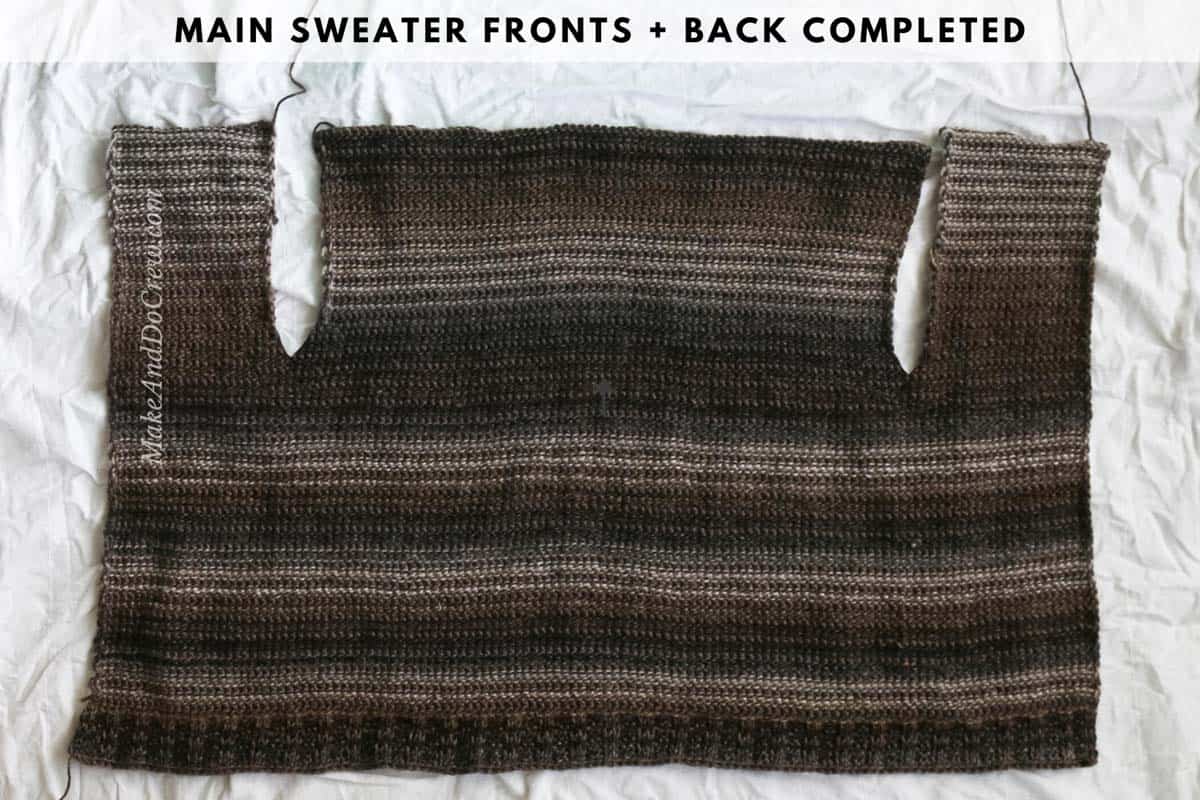
Main Sweater Fronts + Back
Notes:
• Row 1 is worked into the last row of Ribbing. It is important that the WS of the ribbing is facing you when Row 1 is worked. This is the traditional back side of Tunisian crochet.
• Loops for Row 1 are picked up along last row of Ribbing. See this photo photo and video tutorial on the Tunisian rib stitch for a step-by-step walk through of this step.
With WS of Ribbing facing you, attach Color A at upper right corner (left handed: upper left corner).
With Color A and larger hook:
✨Unlock this free subscriber-exclusive pattern ✨
Follow these steps to view the full free pattern below
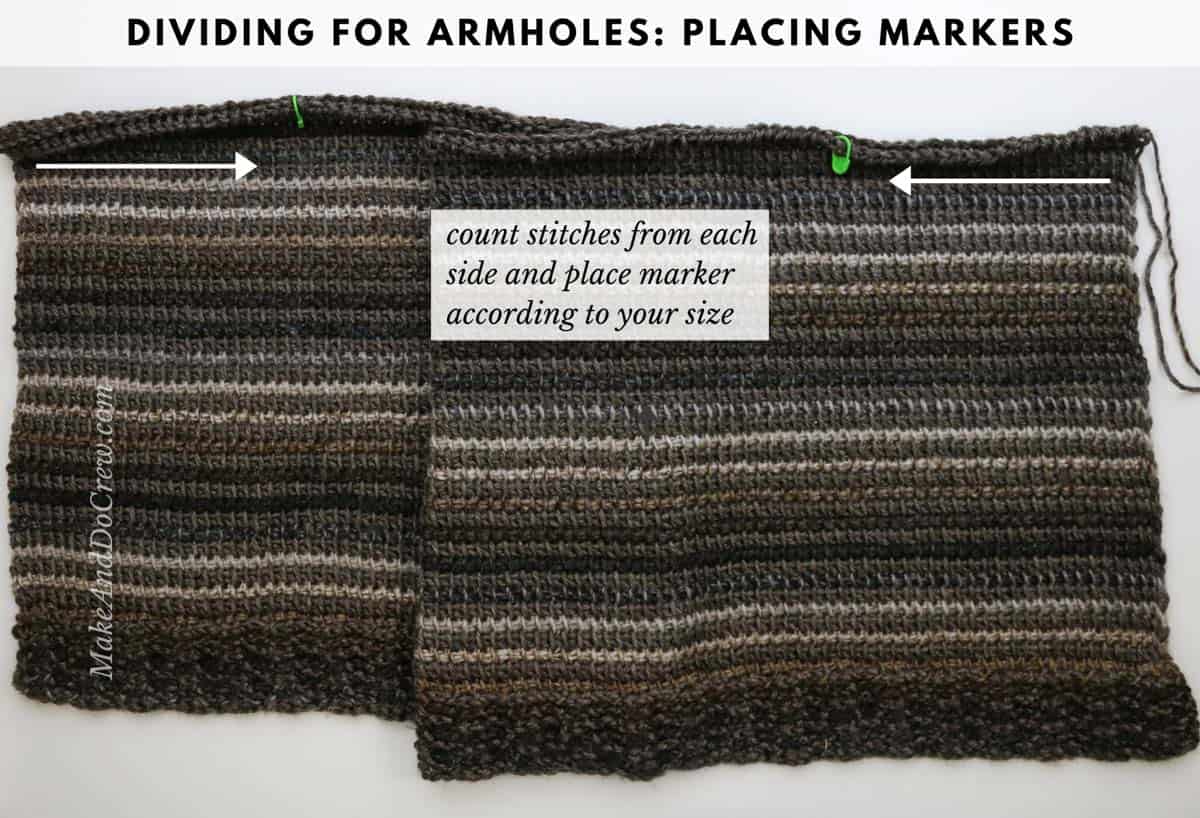
Back:
Attach Color A in first stitch to the left of first stitch marker (left-handed: to the right of first stitch marker).
Row 1 (Color A): Tss in each st to second marker. Change to Color B on last two loops of RetP.
Row 2 (Color B): Tss in each st to second marker. Change to Color A on last two loops of RetP.
Rep Rows 1-2 until piece measures 7 (7.5, 8, 8.25, 8.75, 9.25, 9.75, 10.25)” from beginning of armhole opening, making sure you have the same number of rows as the First Front. Fasten off leaving a long tail of Color A for seaming. Do not remove marker.
Second Front:
Optional: When attaching Color B in Row 2, take care to choose a color section of yarn that will mimic the gradations and upcoming colors in First Front.
Attach Color A in first stitch to the left of second stitch marker (left-handed: to the right of second stitch marker).
Row 1 (Color A): Tss in each st across. Change to Color B on last two loops of RetP.
Row 2 (Color B): Tss in each st across. Change to Color A on last two loops of RetP.
Rep Rows 1-2 until piece measures 7 (7.5, 8, 8.25, 8.75, 9.25, 9.75, 10.25)” from beginning of armhole opening, making sure you have the same number of rows as the First Front and Back. Fasten off leaving a long tail of Color A for seaming. Do not remove marker.
The Mercantile Cardigan Free Pattern Part 2
Woohoo! You’re sailing right through this Tunisian crochet sweater pattern! You can head to Part 2 of the free pattern to get started on the sleeves. If you’d like the whole pattern and tutorial in one place though, you can grab the ad-free, printable with the complete pattern here.
That was so fun! Now what?
Invitation to our Facebook group
Come discuss crocheting Tunisian cardigan patterns and lots of other crochet projects and techniques in our Make & Do Crew Facebook group. Here thousands of helpful crocheters answer each others questions and share their stitches. Come join us here.
Find Your Next Sweater Project
- Crochet Wrap Sweater Pattern – unique take on a raglan
- Beginner Raglan Sweater Pattern – ideal first top down pattern
- Lightweight Mesh Top – doubles as a beach coverup
- Hexagon Layering Cardigan – with bishop sleeves
- Granny Square Cardigan – modern take on a classic motif
- Seamless Crochet Poncho – a great first garment for beginners
- Basic V-Neck Pattern – classic styling
- High Low Jumper Pattern – finish in one weekend
More Free Patterns + Tutorials
Can’t get enough free crochet patterns!? Me either. You’ll definitely want to breeze through these collections to find your next project.
- 55+ Free Crochet Sweater and Cardigan Patterns – our most popular garments
- 40+ Free Crochet Blanket Patterns – baby blankets, throws + c2c graphgans
- 36+ Granny Square Patterns + tips for the perfect square
- 30+ Crochet Animal Patterns – adorable amigurumi stuffed animals
- Crochet Gift Ideas – easy patterns to make for others
- Fast Crochet Projects – start to finish in less than a day
Learn a New Skill
And when you’re ready to master a new skill, check out our detailed guides that include everything you need to know to level up your crochet game.
- How to Corner to Corner (C2C) Crochet for Beginners – with video tutorials to get you started
- How to Crochet a Beginner Hat – make an entire beanie in 1.5 hours!
- How to Crochet Amigurumi for Beginners – the ultimate guide to making your own toys and plushies
- How to Tunisian Crochet – learn with this video and a standard hook









Maro says
Hi Jess,
I just bought this pattern, can you please help me with the !! Gauge Check !!?
I’ve done the gauge 14 Tss =4″ and 12 rows =4″ using the 8mm hook, and it matches. Am I good to go will my size match the one in the pattern?
Thanks
Maro
Jess Coppom says
Hi! Yes, if it matches, then you’re good to go. It’s always okay to adjust your hook size to achieve the pattern gauge. 🙂
Jess
Ana says
Hi Jess, I am thinking about getting this pattern of your but I don’t understand what this means £2.82??? Can you let me know what it is in US $$. Thank you for your time. I love all your work.. Blessing Ana
Rose says
This is such a trendy design. You’re giving new life Tunisian crochet. Great work!
Colleen says
I have a question..I just happen to have a few balls of Ferris wheel, I. The colour buttercup..Could you tell me (if it was you), what colour of Heartland would you put with it? I am so bad at this stuff! Thankyou!