In this easy tutorial, learn how to crochet the Solomon's Knot stitch (aka the Lover's Knot, Hailstone Stitch and the Love Knot stitch.)
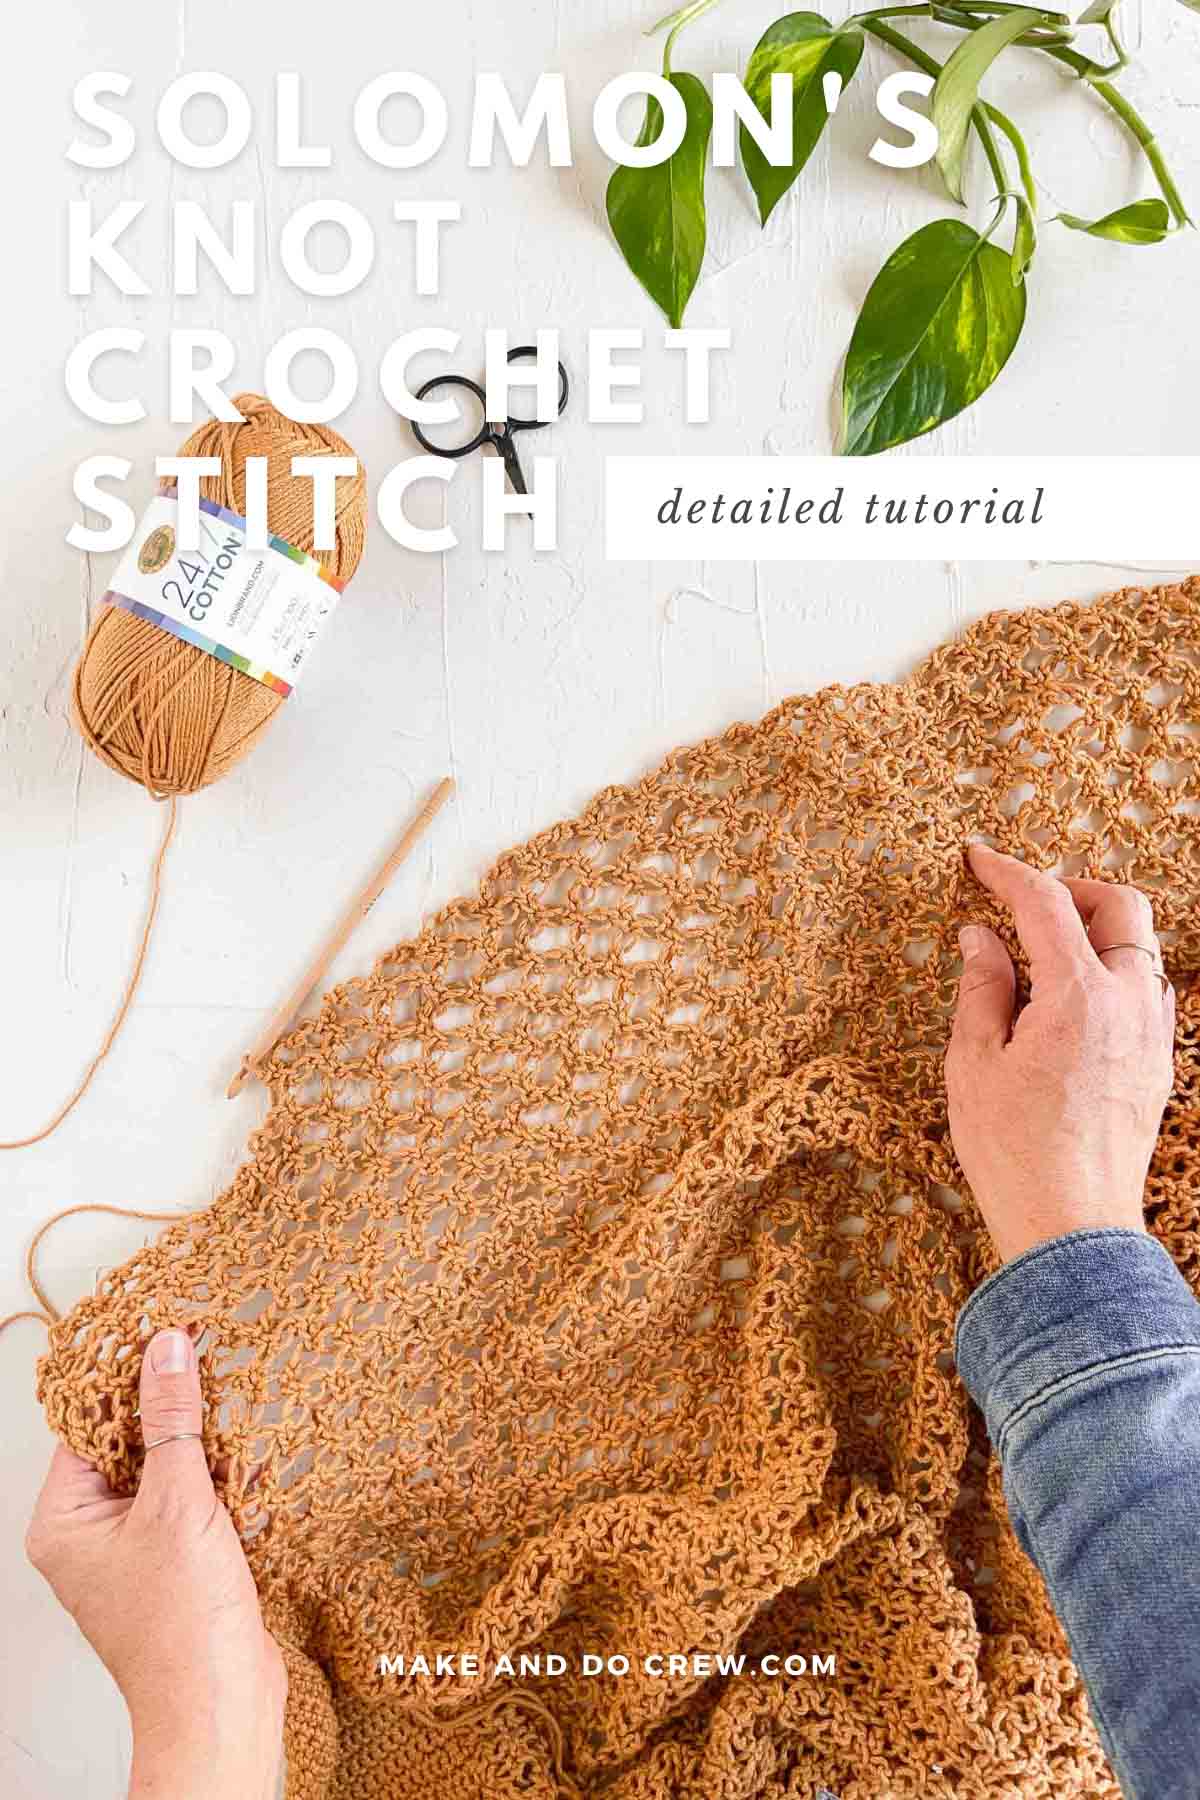
This Solomon's Knot crochet stitch tutorial is part of a collaboration with Lion Brand Yarns. This post contains affiliate links.
Jump to:
- What is Solomon’s Knot?
- Is the Solomon's Knot Stitch Sturdy?
- What To Make With the Solomon's Knot Stitch
- How To Crochet the Solomon's Knot Stitch
- Tips + Tricks (With Video)
- Solomon's Knot Written Instructions (With Photos)
- How Do I Count My Rows of the Solomon's Knot Stitch?
- Should I Block the Lover's Knot Crochet Stitch?
- Last Thoughts On Solomon's Knot Stitch
- Solomon's Knot Stitch FAQ
- That was so fun! Now what?
- Invitation to our Facebook group
- How to Crochet the Solomon's Knot Stitch
What is Solomon’s Knot?
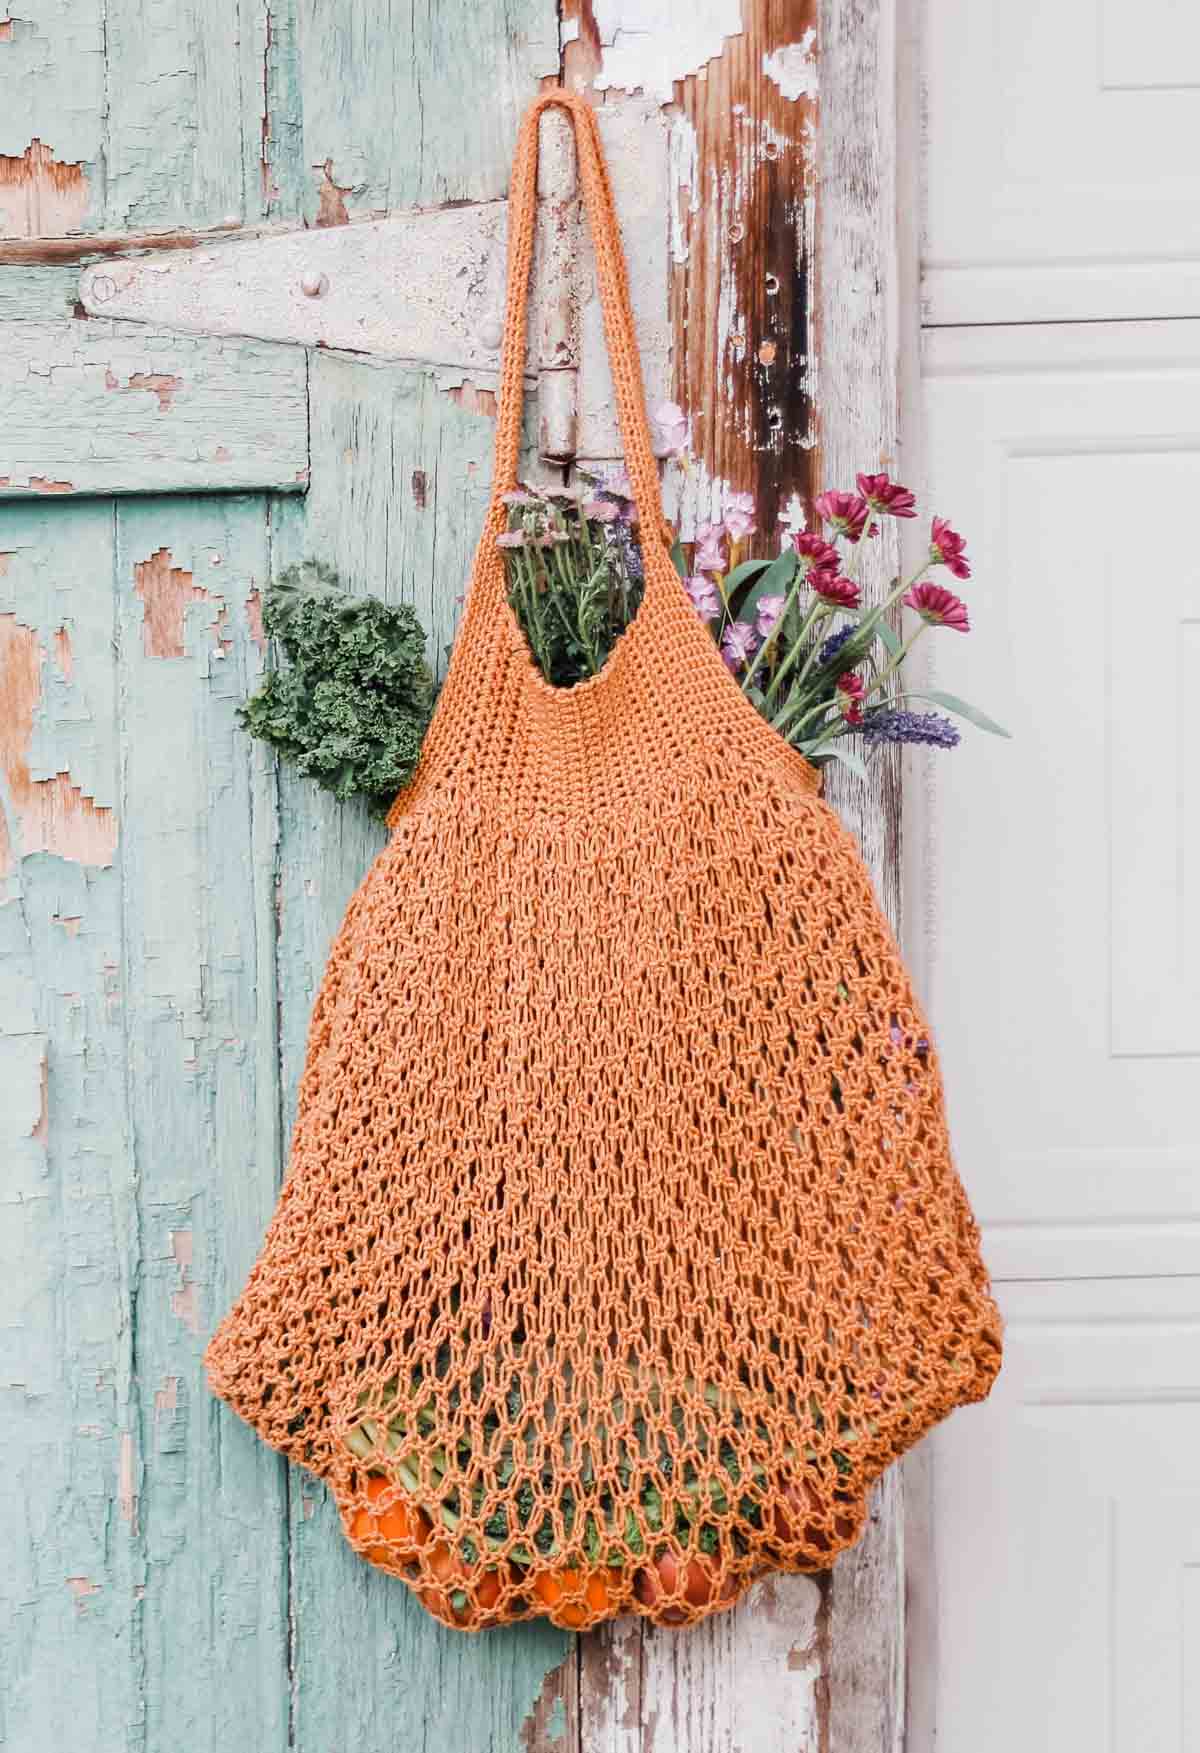
The Solomon's Knot stitch is a delicate-looking combination of chains and single crochet stitches. But don't let the lacey fabric fool you, the Solomon's Knot allows you to create sturdy crochet mesh stitches that maintain their shape. Because of this, it's a perfect foundation for our free Harvest Market Tote Bag pattern.
(Click here to pin the Harvest Market Tote so you can whip it up once you learn how to crochet the Solomon's Knot stitch!)
Is the Solomon's Knot Stitch Sturdy?
In this crochet knot stitch, extended chain stitch is "locked" in place with a single crochet and therefore, the stitches can't slip too far out of place. This gives the fabric an incredible capacity to bounce back into shape after being stretched out.
Related: 40+ Best Crochet Crochet Stitches for Blankets
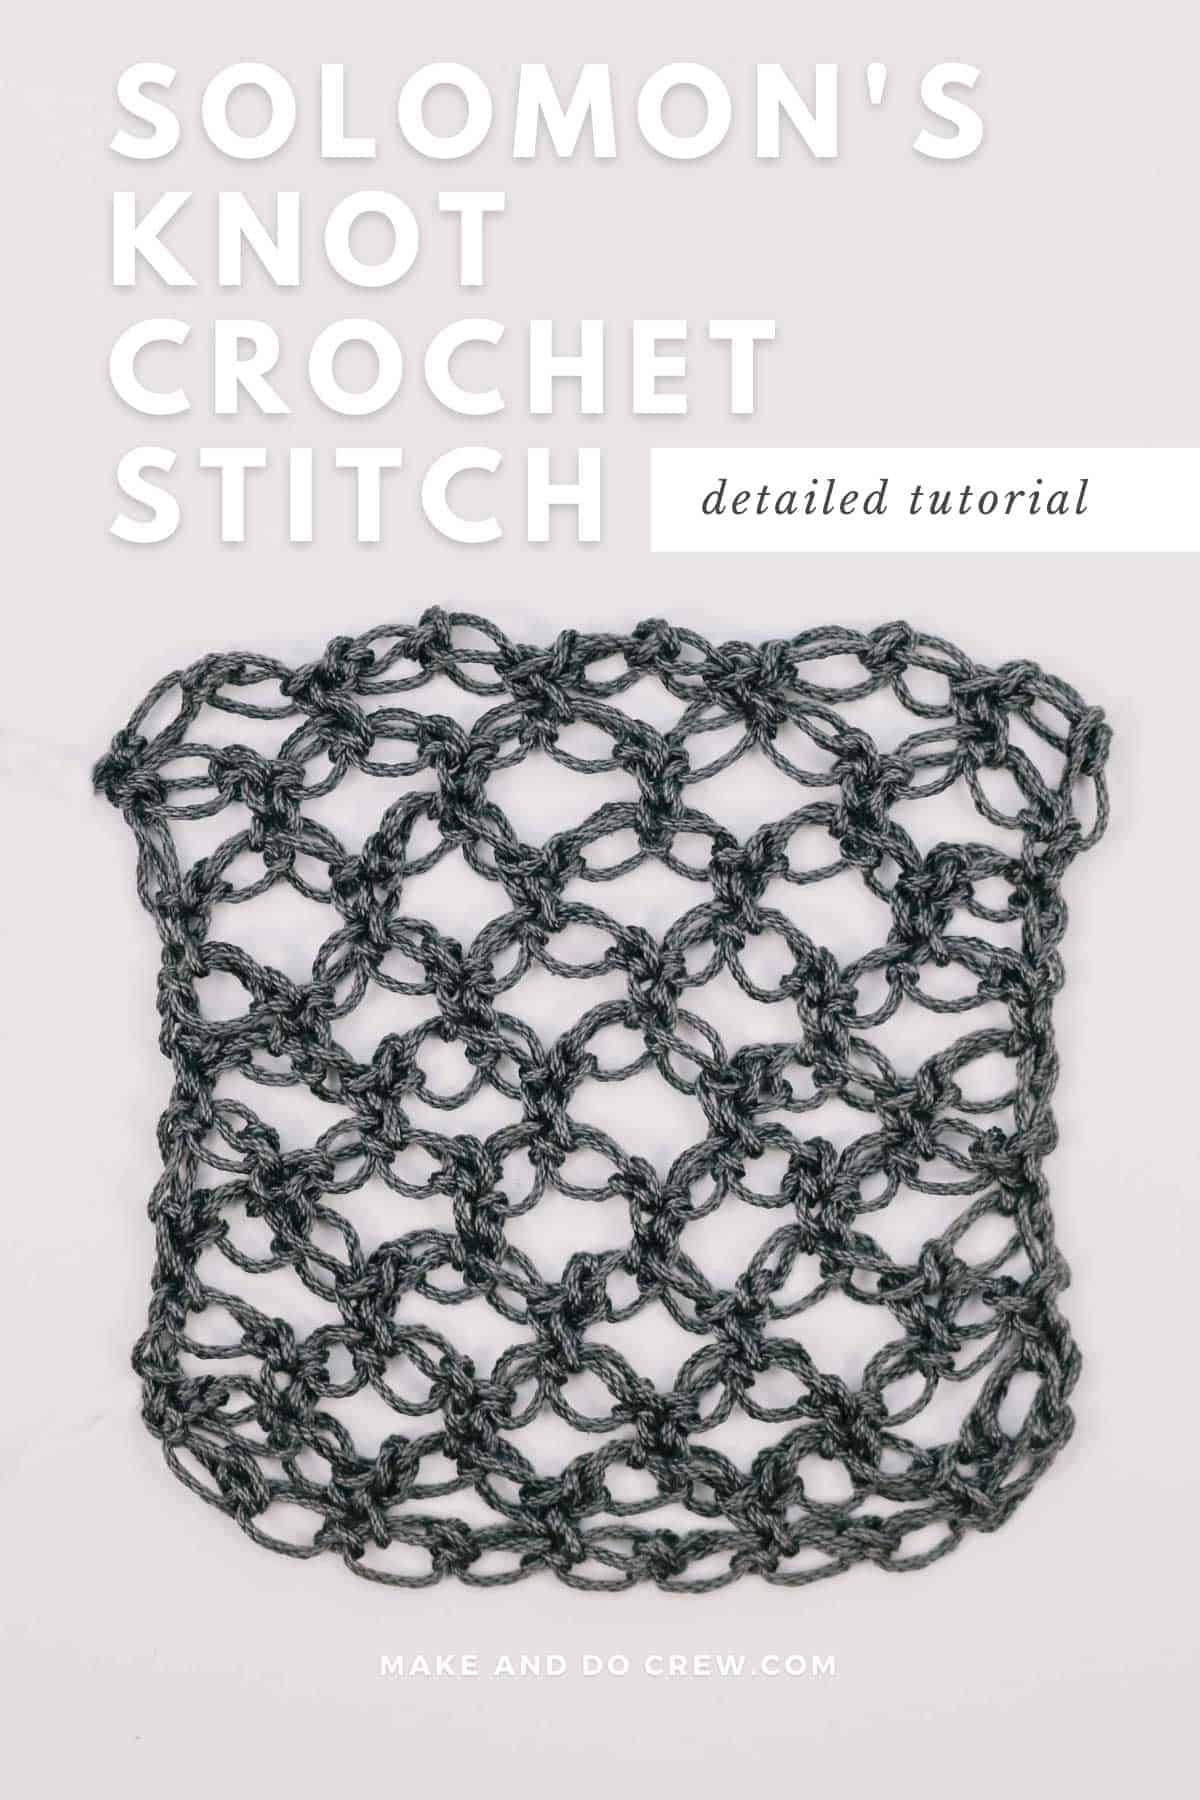
Pin it! Click to pin this tutorial for later ⇨
What To Make With the Solomon's Knot Stitch
The lacey, open look of the Solomon's Knot crochet stitch makes it perfect for lightweight shawls and scarves.
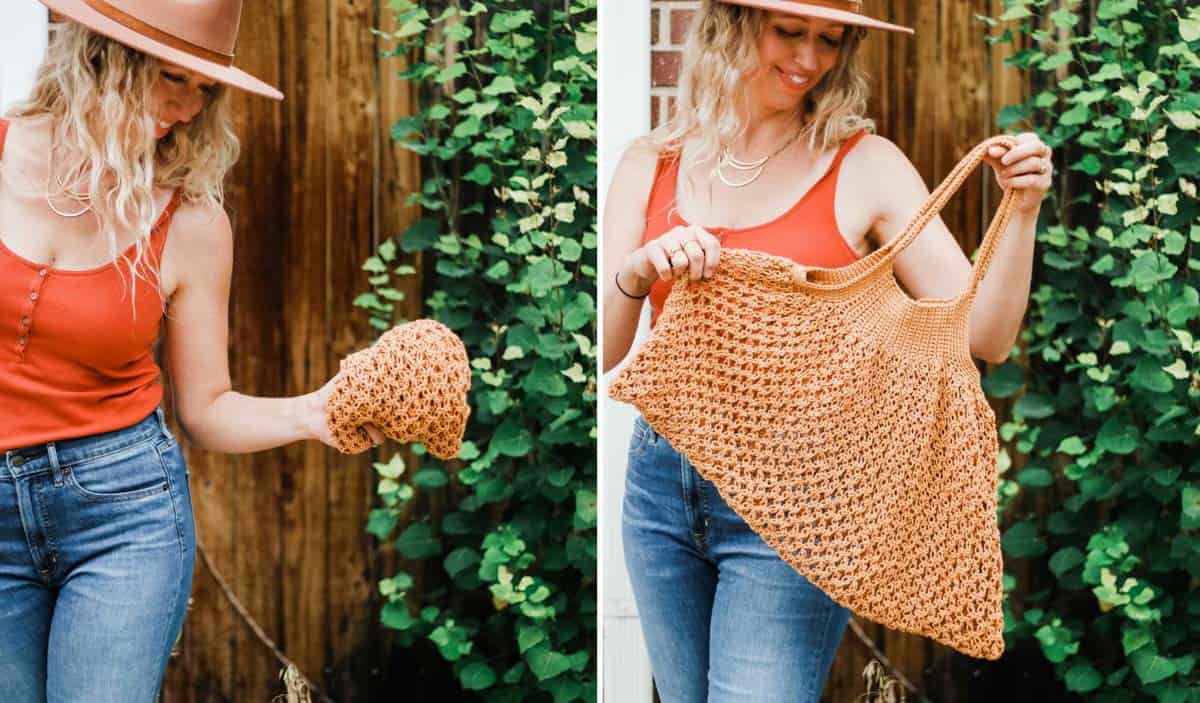
Because the stitches are lean and minimal, it also makes fantastic fabric for anything that needs to pack up small, while being able to expand when necessary. Try this mesh-like stitch in a grocery bag or a toy hammock pattern.
Make it! Click to get the free Harvest Market Tote pattern ⇨
More Crochet Stitch Tutorials
If you love learning unique crochet stitches, we've got you covered with plenty of new ideas to try.
- How to Crochet a Flower Granny Square - Daisy Tutorial
- How to Crochet: Easy Beginner's Guide
- 47+ Cool and Unique Crochet Stitches You Haven't Seen
- How to Single Crochet Stitch for Beginners (And Fix Mistakes)
How To Crochet the Solomon's Knot Stitch
Pin this tutorial for later here.
The Solomon's Knot crochet stitch differs from other stitches in that you don't begin with a foundation of exclusively chain stitches. Instead, Solomon's Knot stitches are created from the get-go.
Scroll down for the photo tutorial to see exactly how to get started or watch the brief video below to learn some extra tips and tricks.
Tips + Tricks (With Video)
Watch the 60 second video below to see the Solomon's Knot stitch in action and learn some tips and tricks for crocheting it smoothly.
(If you have an ad-blocker running, you'll need to disable it to view the video.)
Solomon's Knot Written Instructions (With Photos)
Now let's learn how to crochet the Solomon's knot stitch step-by-step.
Abbreviations (US Terms):
ch – chain
rep – repeat
RS – right side
sc – single crochet
sk – skip
st(s) – stitch(es)
WS – wrong side
SK – Solomon’s Knot: A lengthened chain stitch, locked in place with a single crochet stitch in the back loop of the chain.
How to Get Started
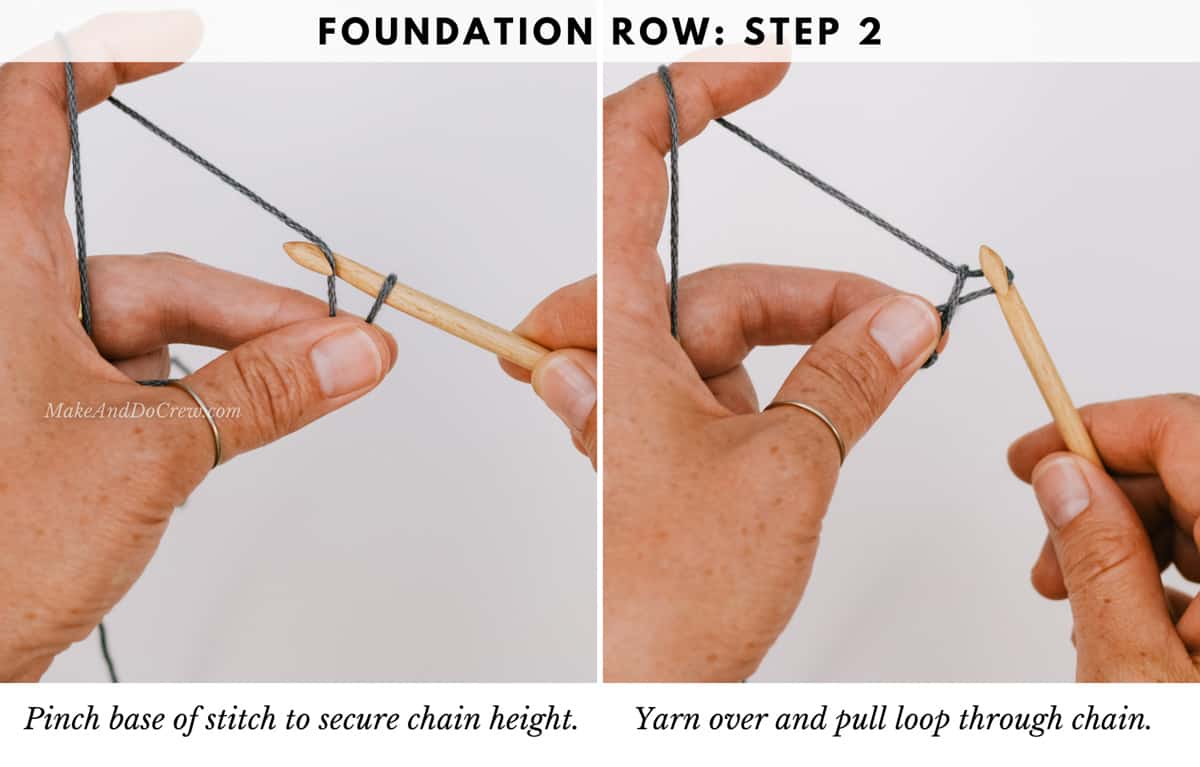
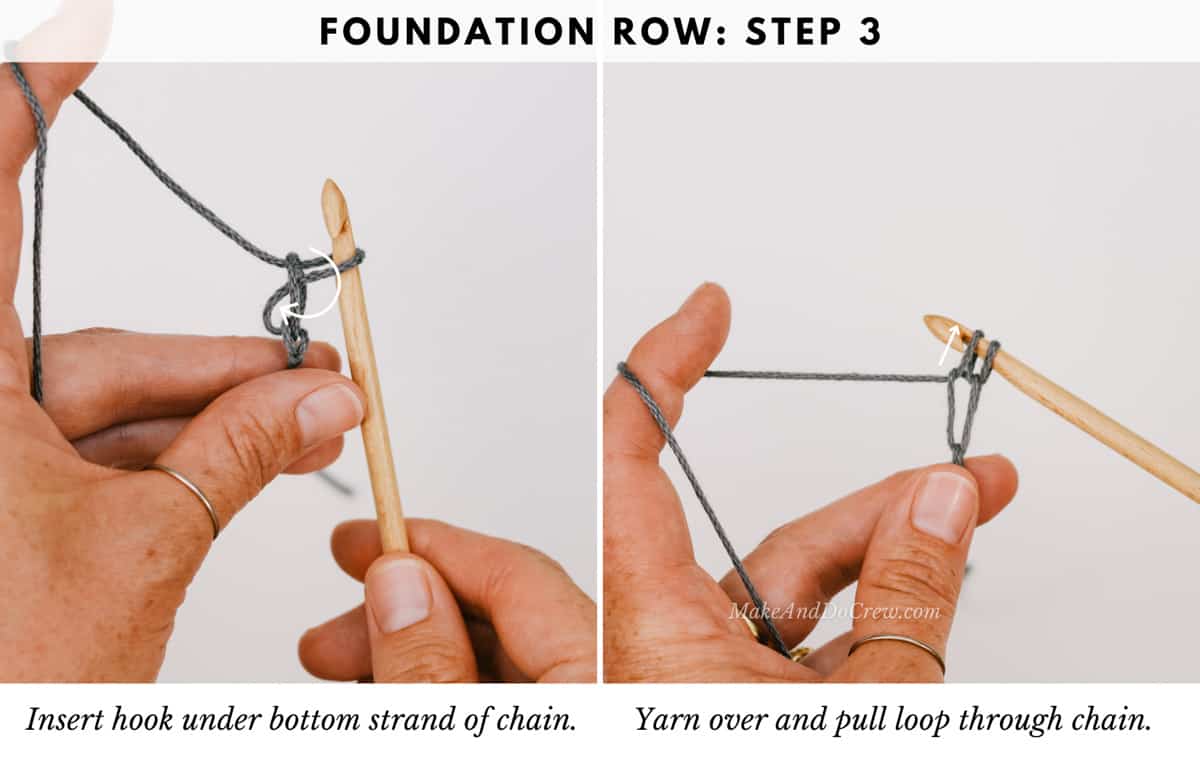
Foundation Row: Ch 2, sc in second ch from the hook, make SK until desired length is achieved; turn.
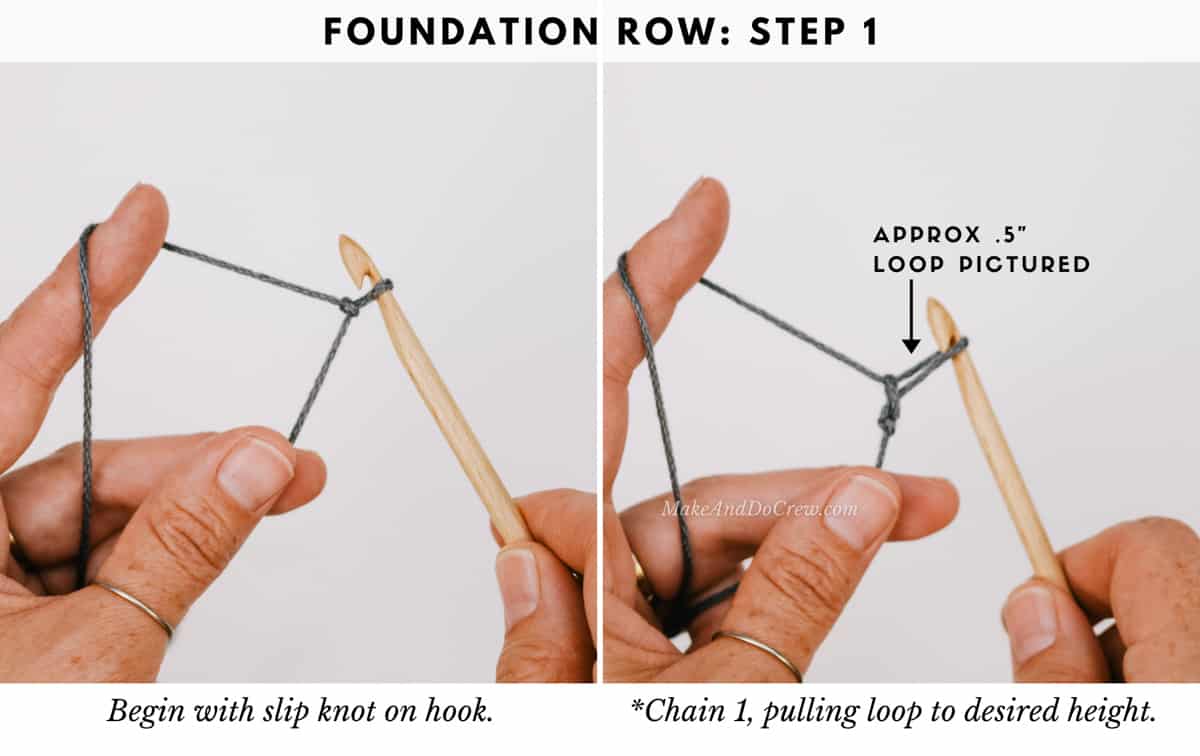
Most Solomon's Knot crochet patterns will tell you how high to pull your chain loops. In the Harvest Market Tote Bag, we pull them about a half an inch, which ends up being just enough space for your thumb to pinch and secure.
As you practice the Lover's Knot stitch, you'll find it easier to keep your chain heights consistent, improving your stitches' overall look.
Photo Tutorial
Follow along with the photo tutorial below to learn how to set up the foundation of the Solomon's knot.
Wanna save this pattern?

Continuing The Stitch
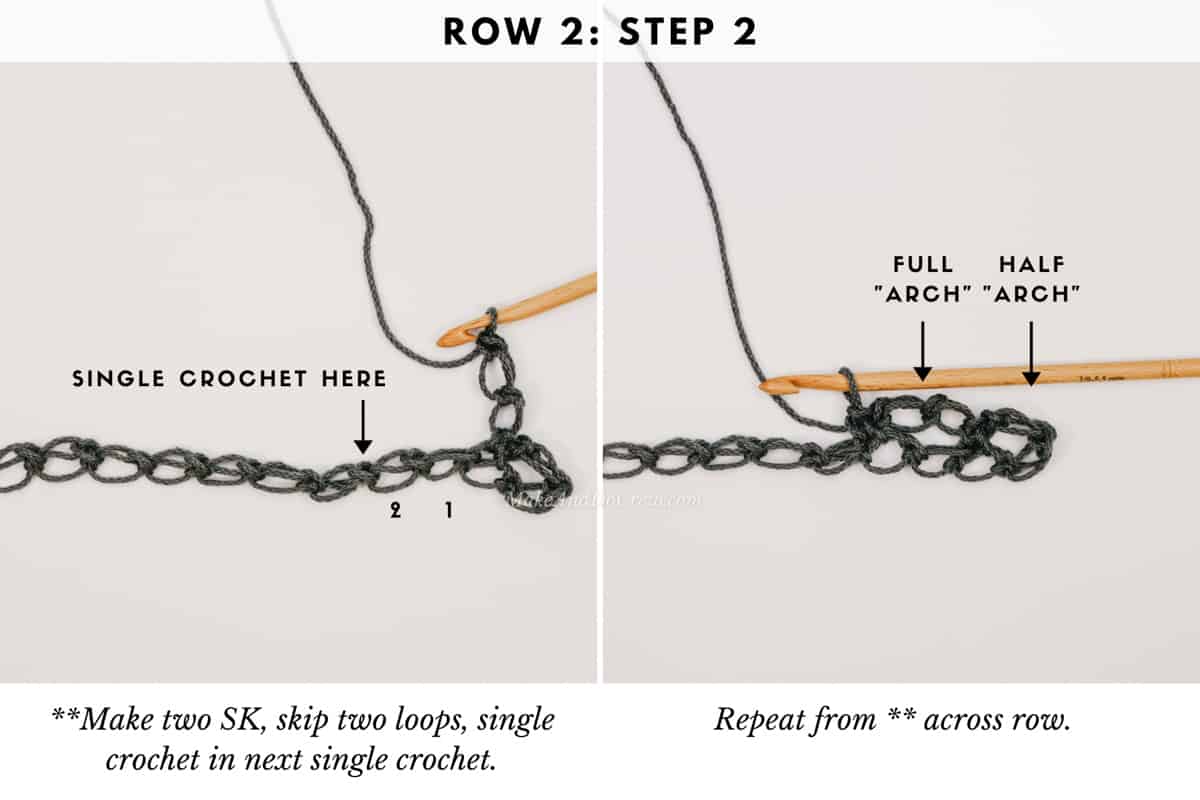
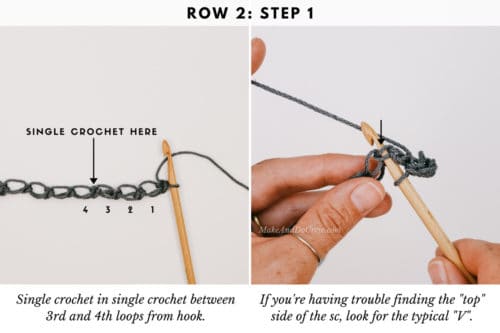
Row 2: Sc in sc between 3rd and 4th loops from hook, *2 SK, skip 2 loops, sc in next sc; rep from * to end of row; turn.
Row 2 is where the Solomon's Knot pattern will begin to develop. As with many crochet stitches, the Solomon's Knot stitch requires a little bit of set up in Row 2 before you hit cruise control in Row 3 and beyond.

The "half arch" pictured below is simply a result of the first arch needing to be cut short in order to keep the arches staggered in each row. This concept is only important at the beginning of each row.
Variations
Some Solomon's Knot (SK) crochet stitch methods use a different chain height and three Solomon's Knot stitches to begin a row.
I find it simpler to begin every row by creating two Solomon's Knot stitches at the same height as all my other SK stitches. This version is pictured below.
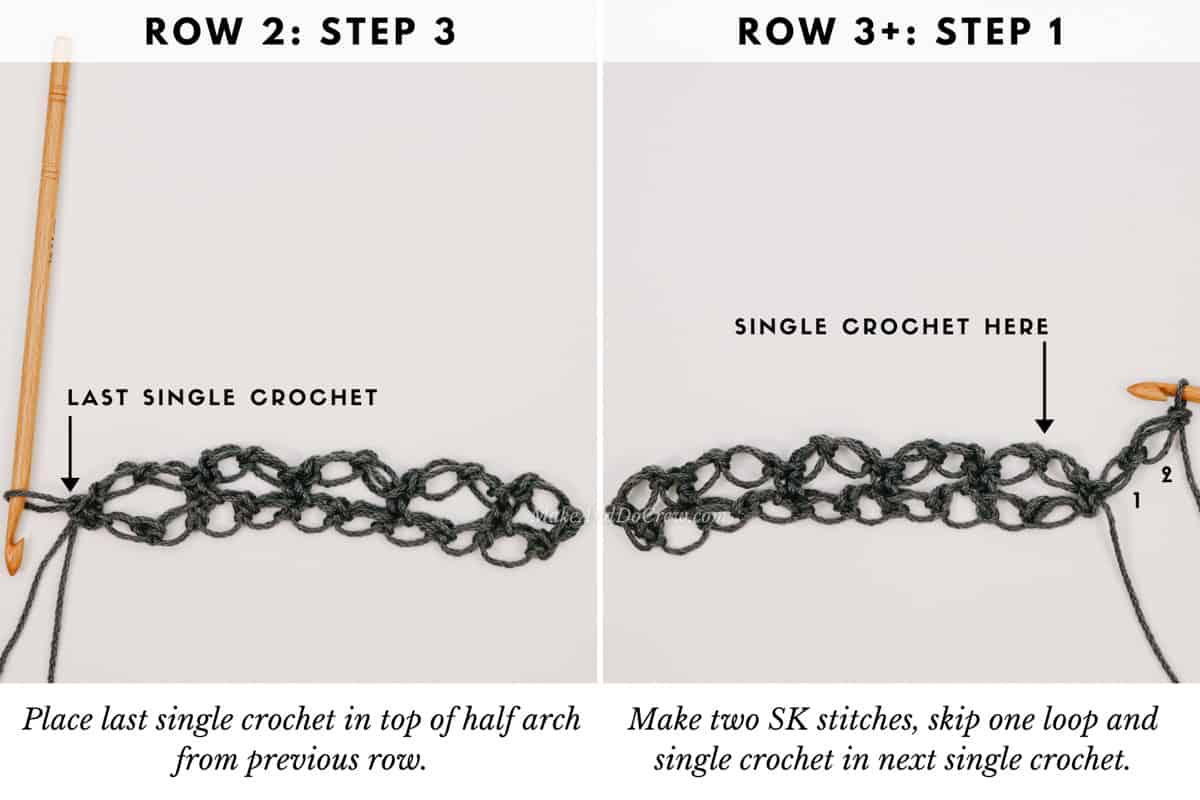
Now each set of two Solomon's Knot stitches are forming an arch above the anchoring single crochet from the previous row. The resulting effect looks like little diamond-shaped "windows" are being created.
Row Repeat
Row 3: 2 SK, sc in sc between 3rd and 4th loops from the hook, *2 SK, skip 2 loops, sc in next sc; rep from * to end of row placing last sc in top of half arch; turn.
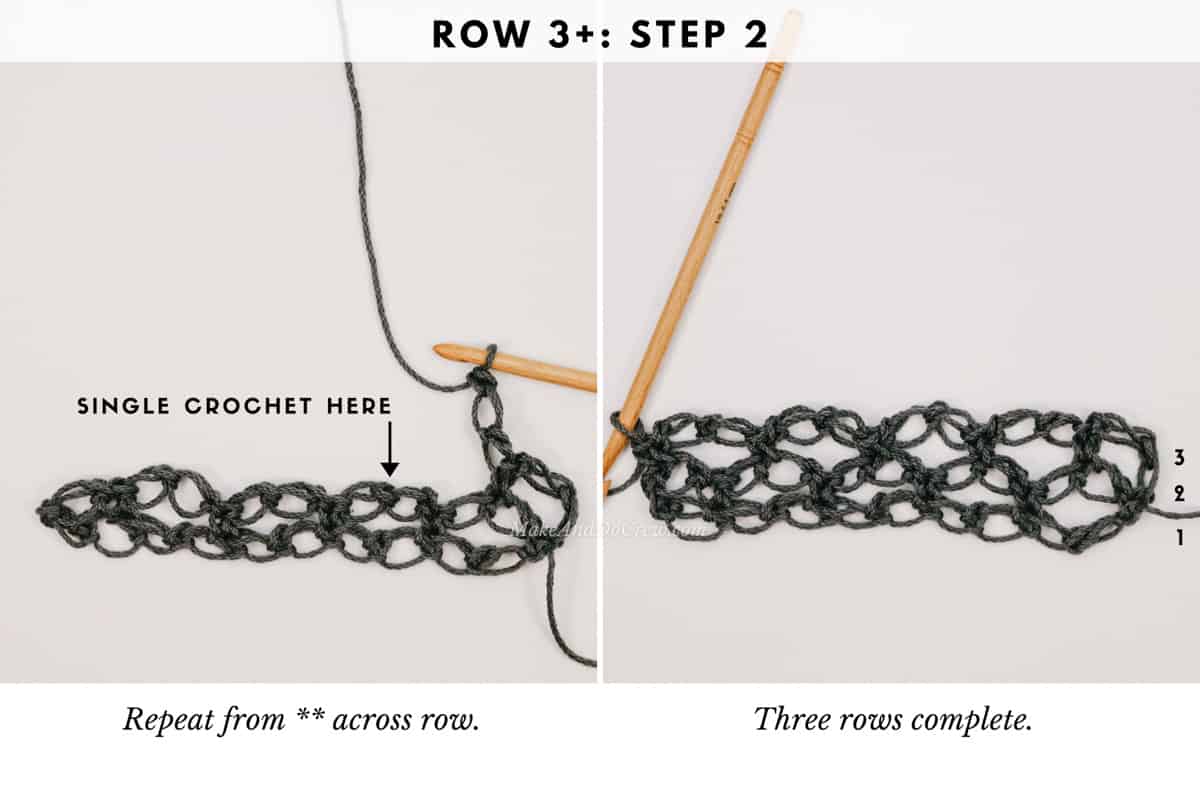
Repeat Row 3 until desired height is achieved.
How Do I Count My Rows of the Solomon's Knot Stitch?
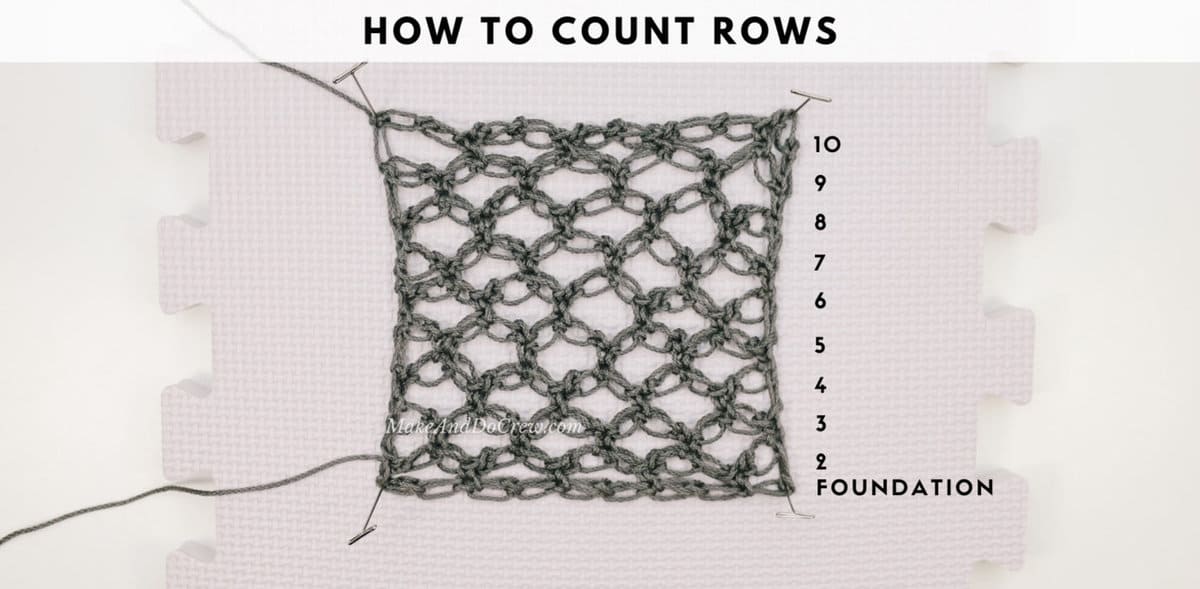
It can seem a little tricky to count how many rows of stitches you've crocheted because they seem to merge into a beautiful lace mosaic at some point.
I find that using my fingers to "walk" through the arches from the bottom of my piece to the top allows me to keep track of how many rows of arches I have stacked on top of each other.
Alternatively, pinning your work down to a blocking board can also help spread the mesh enough to count the number of rows.
Related: 27+ Best Crochet Hat Patterns for Winter
Should I Block the Lover's Knot Crochet Stitch?
Speaking of blocking, any mesh crochet stitch like this can benefit greatly by a little blocking. If some of your Solomon's Knot loops are a little larger than others, blocking is a good way to smooth out inconsistencies--think of it like "organizing" your stitches.
Learn all about how to finish your crochet projects in our beginner's guide to blocking.
Steam Blocking
To block your Lover's Knot crochet project, use T-pins to pin it down to a blocking mat (or even a towel put down on top of your carpet), then aim steam from an iron or steamer at the yarn without actually touching the yarn.
(This is important because too much heat can cause any synthetic component of your yarn to melt!)
Spray Blocking
Another option is to spritz water from a spray bottle on your yarn and let it dry overnight. In any case, it's a good idea to check the fiber contents of your yarn before choosing a blocking method.
Last Thoughts On Solomon's Knot Stitch
The Solomon's Knot is a unique, lacy stitch often under-utilized in modern patterns.
Once you've mastered the basic steps, you can create a range of designs by adjusting the height of your loops. Try it out a market tote bag, a meshy crochet top or even a swimsuit coverup.
Solomon's Knot Stitch FAQ
Still have questions about the Solomon's Knot crochet stitch crochet stitch Read on for answers.
Make 5 chain stitches, then turn and work a single crochet into your first single crochet stitch. Loosely chain 3 stitches, then work a single crochet into the center of your next Solomon's Knot set. Then repeat until you reach the end of your row.
To vary the look of Solomon's Knot crochet stitches, try using different stitches to join the knots together, like double crochet stitches. You can also adjust the length of your loops.
More Crochet Stitch Tutorials
Would you like to learn more unique crochet stitches that are far simpler than they look? You'll love these!
You must use the category name, not a URL, in the category field.See more crochet stitch tutorials →
That was so fun! Now what?
Invitation to our Facebook group
Come discuss using the Solomon knot stitch and lots of other projects and techniques in our Make & Do Crew Facebook group. Here thousands of helpful crocheters answer each other's questions and share their stitches. Come join us here.
How to Crochet the Solomon's Knot Stitch
Materials
Yarn
- Any yarn
Other Supplies
- Crochet hook
Abbreviations + Glossary (US Terms)
- ch – chain
- rep – repeat
- RS – right side
- sc – single crochet
- sk – skip
- st(s) – stitch(es)
- WS – wrong side
- SK – Solomon’s Knot: A lengthened chain stitch, locked in place with a single crochet stitch in the back loop of the chain.
Abbreviations and Glossary (US Terms):
Want some company while you crochet?
Get support (and camaraderie!) in the Make & Do Crochet Crew Facebook Group. Search “Make and Do Crochet Crew” on Facebook.com.
Permissions + Copyright
Please do not publish or share this pattern as your own. You may make items to sell with this pattern. In exchange, please link back to this page. Do NOT use my photos as your own sales photos.
Overall Pattern Notes
Instructions
Solomon's Knot Stitch Written Instructions
- Foundation Row: Ch 2, sc in second ch from the hook, make SK until desired length is achieved; turn.
- Row 2: Sc in sc between 3rd and 4th loops from hook, *2 SK, skip 2 loops, sc in next sc; rep from * to end of row; turn.
- Now each set of two Solomon's Knot stitches are forming an arch above the anchoring single crochet from the previous row.
- Row 3: 2 SK, sc in sc between 3rd and 4th loops from the hook, *2 SK, skip 2 loops, sc in next sc; rep from * to end of row placing last sc in top of half arch; turn.
- Repeat Row 3 until desired height is achieved.
Overall Pattern Notes
- Note: Some methods of the Solomon's Knot (SK) crochet stitch use a different chain height and three Solomon's Knot stitches to begin a row. I find it simpler to begin every row by creating two Solomon's Knot stitches at the same height as all my other SK stitches.
- Scroll up on the page for video instructions and a step-by-step photo tutorial.





Leave a Reply