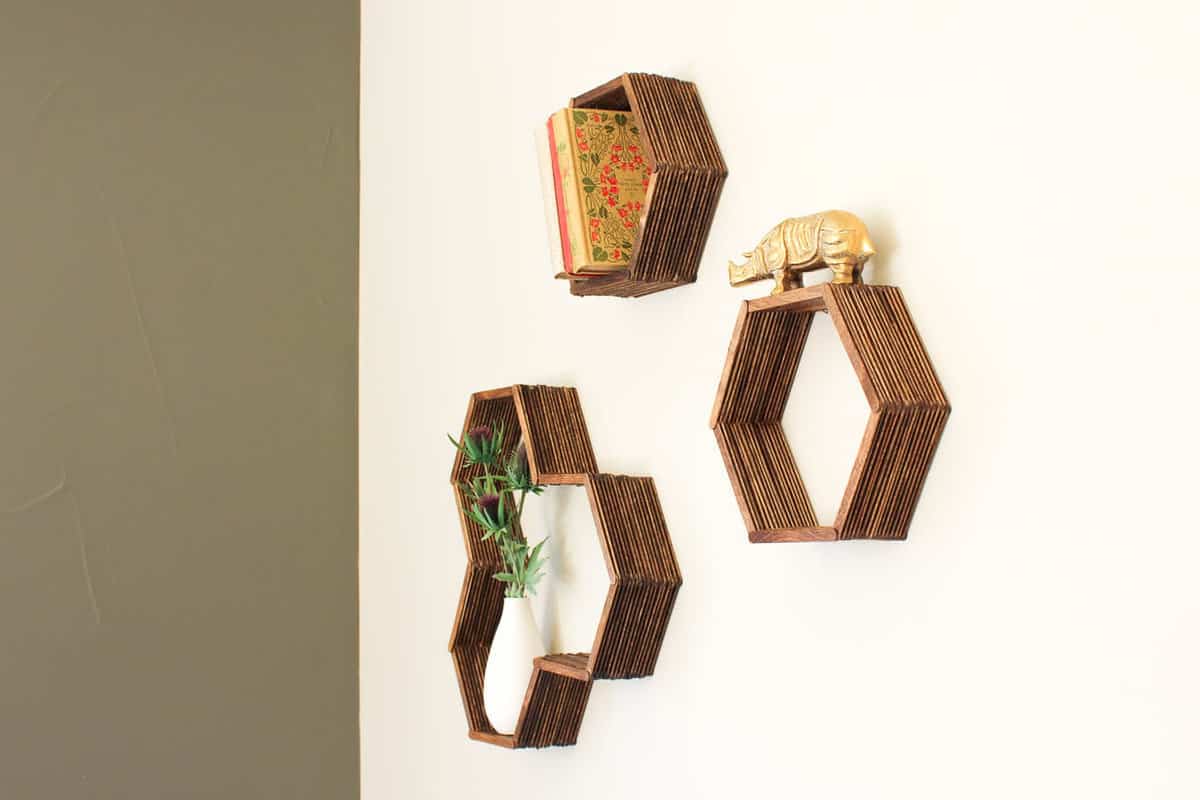
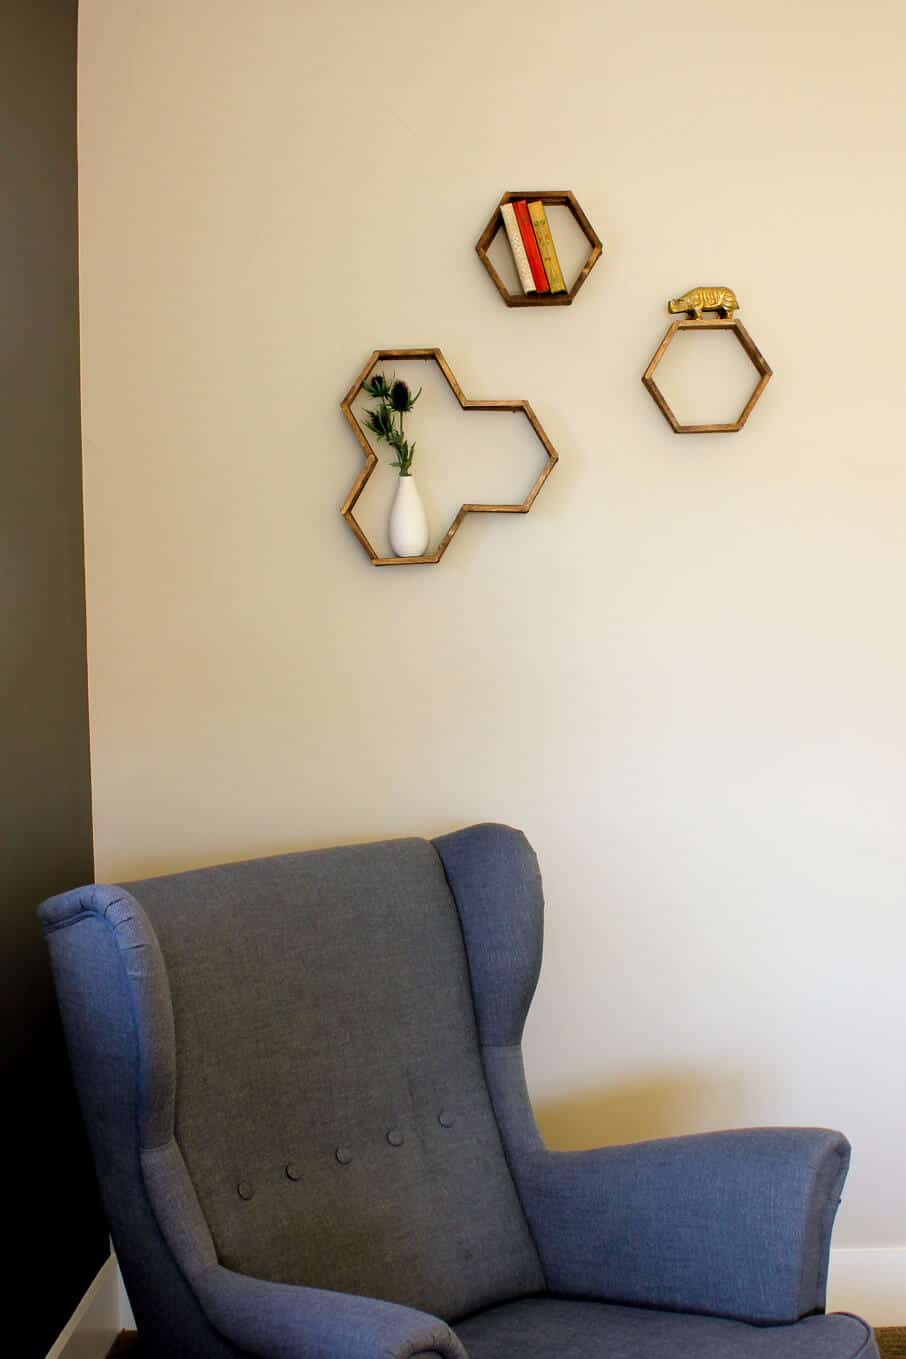
Last week, I explained how to make single hexagon shelves. I love how these add dimension and warmth to the wall. Plus, I can change out what is in the them throughout the year. The three part hexagon shelf is simply an extension of this same idea. To me, the combination of the larger shelf and the two smaller ones looks like a perfect little family on the wall.
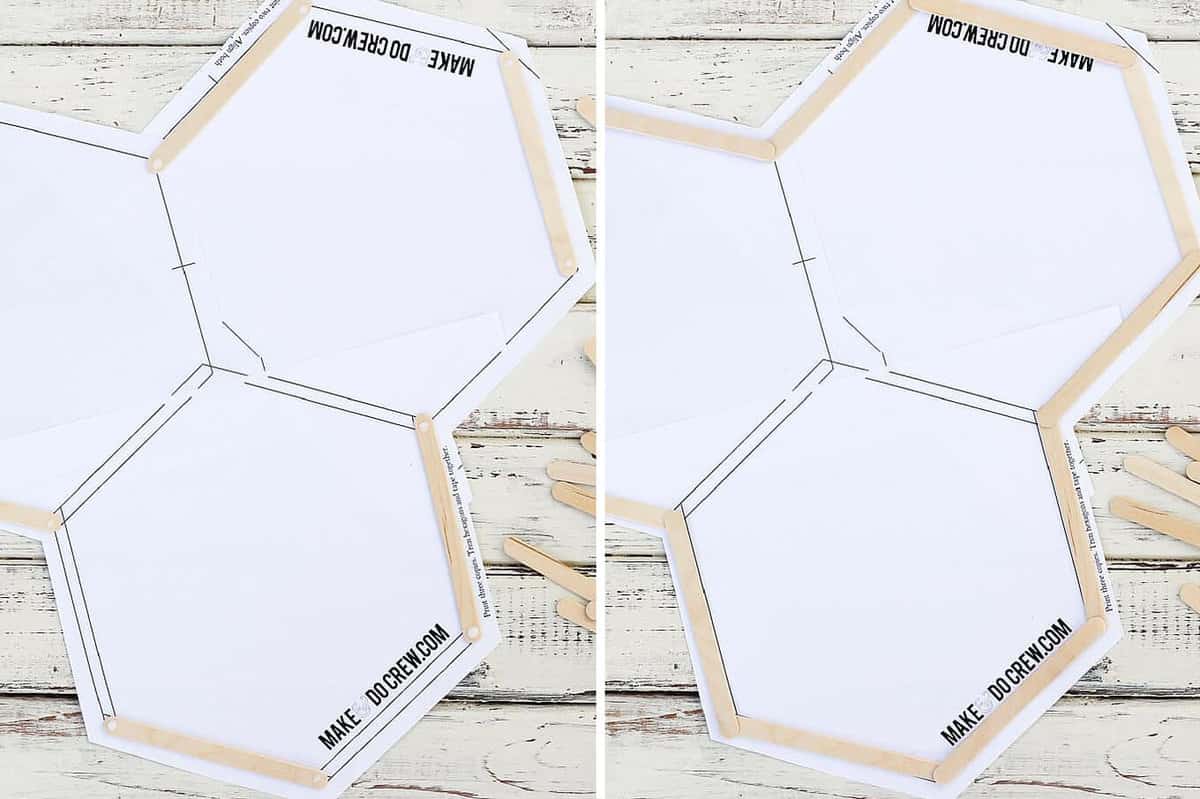
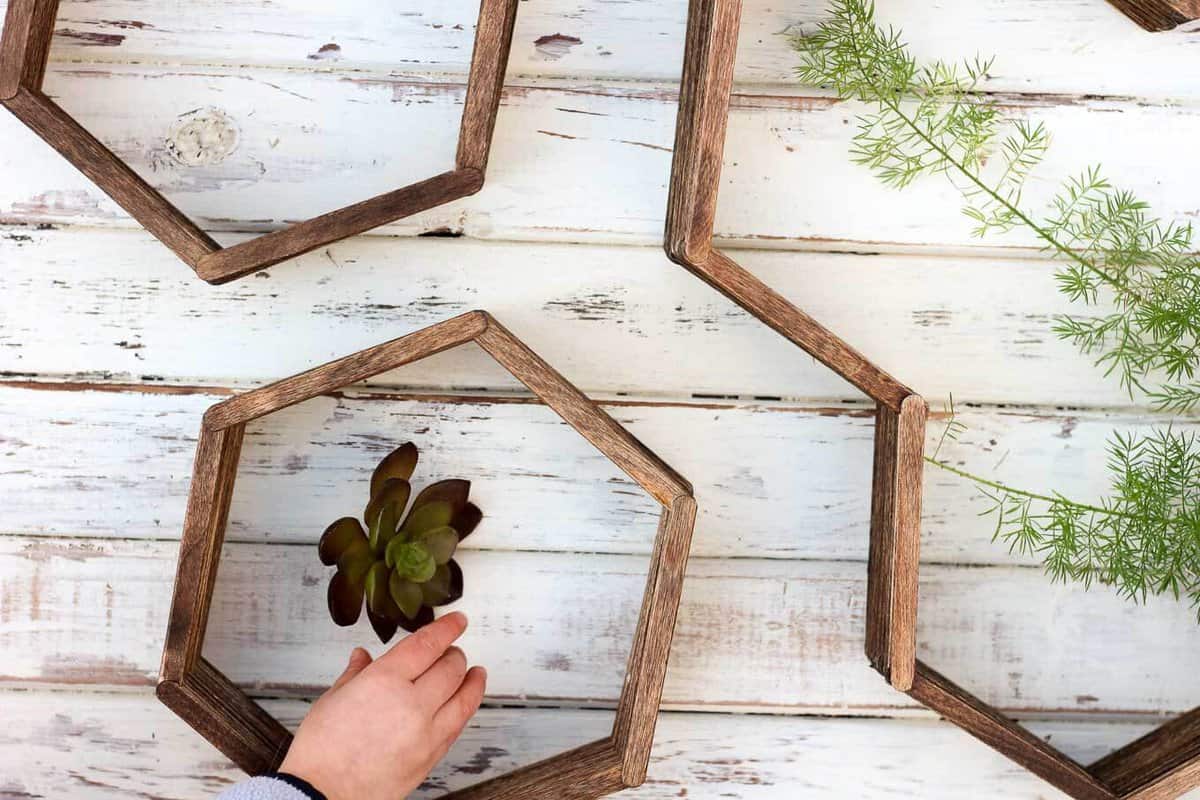
Like with the single hexagon shelf, I found that having a template for this larger one also made it easier to get the angles right with very little effort. These larger honeycomb shelves actually benefit from a template even more because there are more angles to manage.
Honeycomb Shelf Supplies
• popsicle sticks (I used about 200 for the larger honeycomb shelf and about 100 per each hexagon shelf. Hint: buy 1000 from Amazon for $8 like I did so you can honeycomb your whole house!)
• tacky glue • honeycomb shelf template (Optional, but helpful. Enter your email at the bottom of the post for instant access.)
• wood stain (I used Minwax English Chestnut)
• paintbrush
• 2 picture hangers (Optional–I didn’t use them.)
Instructions
1. If you’re using the template, print it, trim it and tape it together.
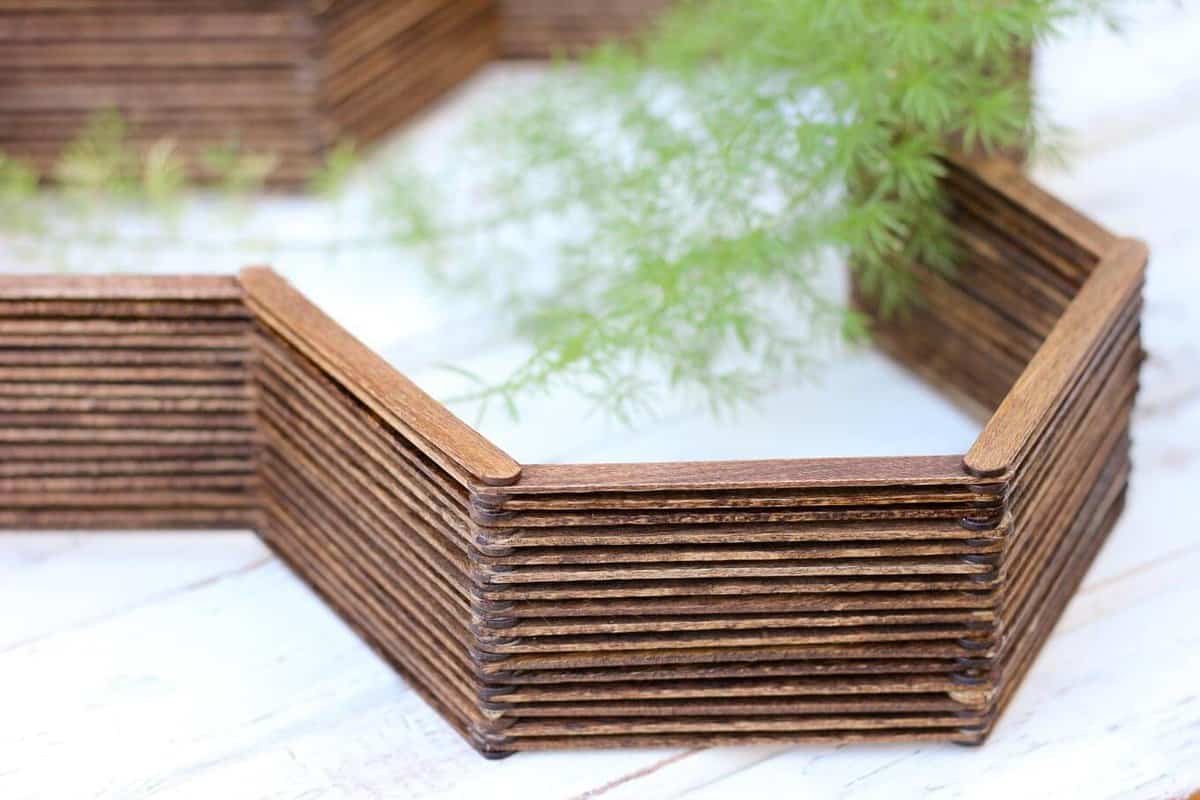
3. Add glue to more sticks and use them to make a second layer on top of the first, alternating every other hexagon side.
4. Continue like this until your honeycomb shelf is desired depth. I went about 16 popsicle sticks deep per side.
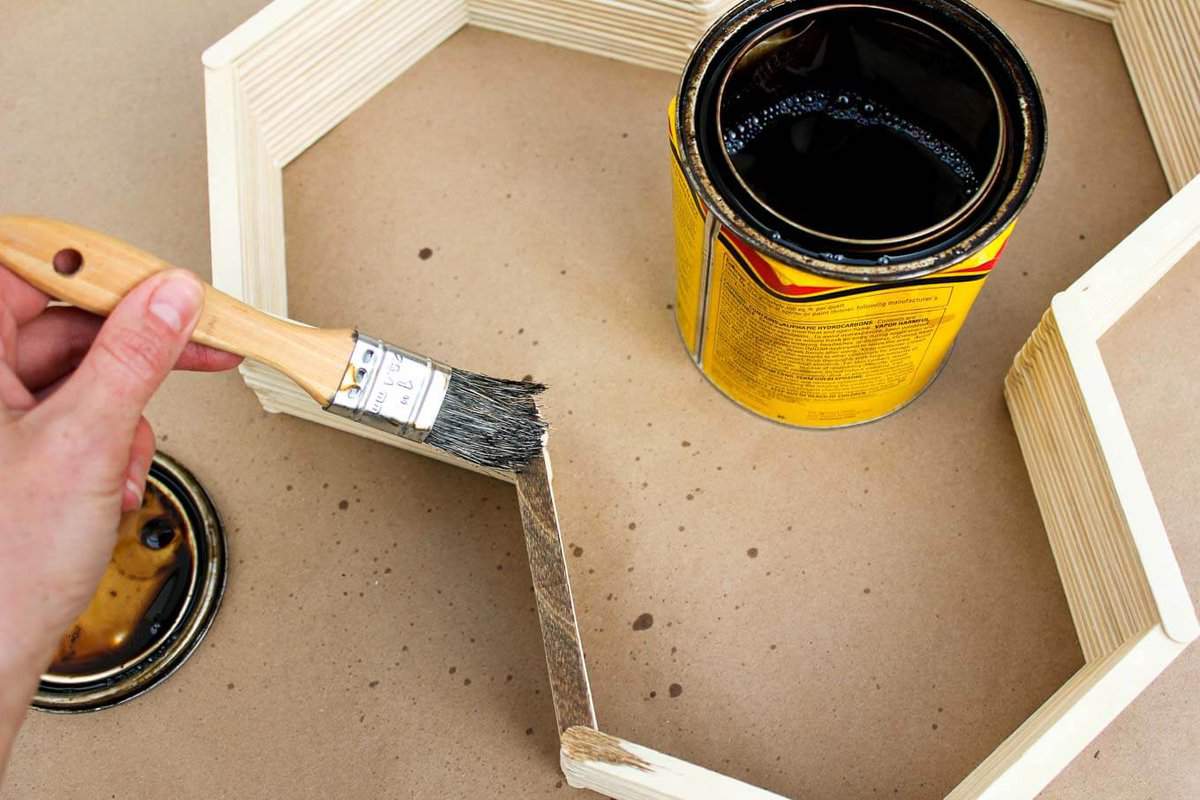
5. After the glue is dry, use a paintbrush to apply wood stain. Make sure to get stain in between each stick. Let the stain dry.
7. To make a set of friends for your new honeycomb shelf, check out my tutorial for DIY hexagon shelves.
8. Fill your new DIY shelves with your favorite miniature possessions. Less is more.
9. Sit back, admire and let your third grade self revel in the lowly popsicle stick’s full potential finally actualized.
If these honeycomb shelves get you in the mood to deck out your walls even further, check out these DIY wall art ideas:
Coffee Stirrer Wall Art
Easy Button Wall Art
Inspirational Art (With Quotes!)
Or if you just simply love hexagons like I do, you have to check out my knit Beekeeper’s Quilt–the craziest project I’ve ever made (and somehow actually FINISHED!! :))
And if you have 700 popsicle sticks left over because you ordered the 1000 pack from Amazon, like I did, here are a few other popsicle stick projects:
Geometric Heart DIY Wall Art
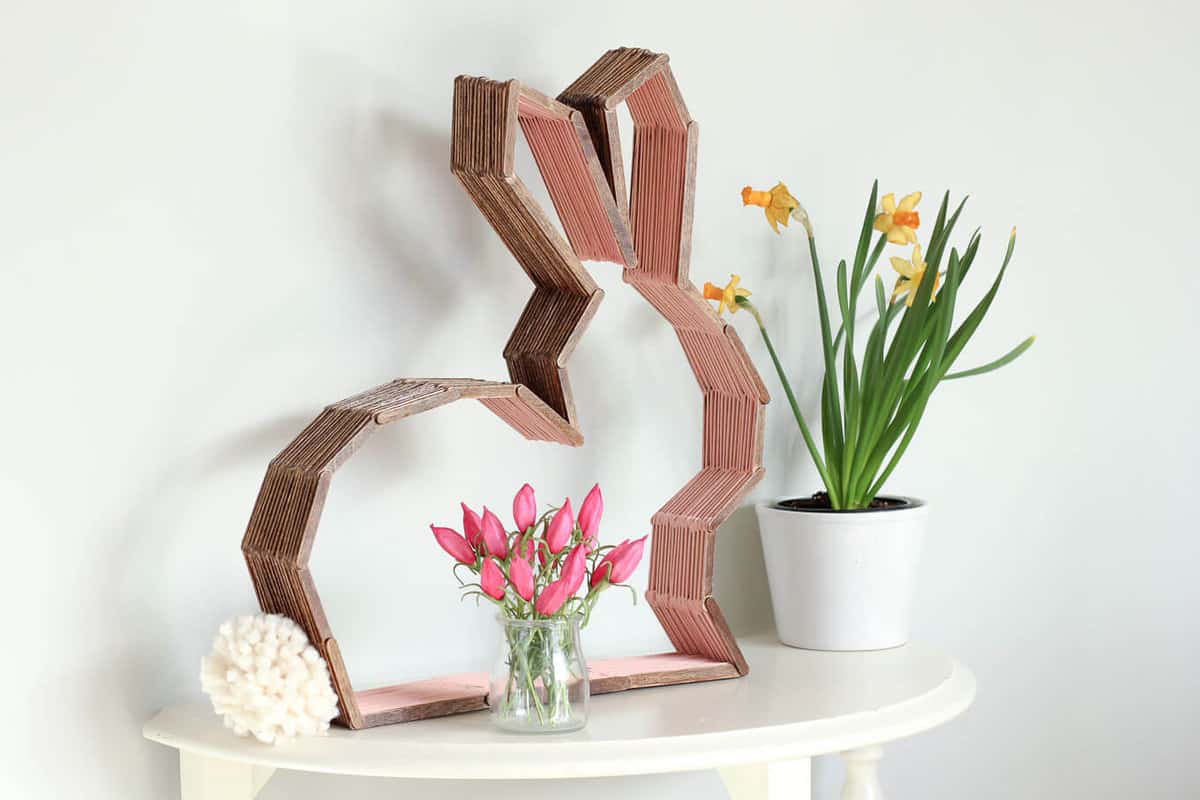
Modern Bunny Shelf (perfect for Easter or a nursery!)
Easy Hexagon Shelf
DIY Popsicle Stick Valentines (that double as art!)
Snazzy blog photos can make it look like some people are doing it all (effortlessly!) while others of us (me!) are barely holding it together. So whenever I can, I like to introduce a little reality check in the form of a very un-Pinterest-worthy detail from my perfectly imperfect real life. My hope is that it’s a helpful reminder all of us that NO ONE is nailing it all the time.
You know that moment when you’re decorating and, finally, you have everything just so?
And then a little hand reaches in…
As a mom of two small children, I am never alone. Not when I cook. Not when I sleep. Not when I pee. And most certainly, not when I photograph honeycomb shelves.
I find the constantness of motherhood to be one of the hardest parts. But on the hard days when I just want to run away to Target and pee next to strangers instead of my family, I remind myself that being a mom also means that I always have a very eager, hands-on photography assistant at the ready.
62 Comments
DIY Wall Art: Popsicle Stick Hexagon Shelf Part I - Make and Do Crew
January 9, 2016 at 11:05 am[…] After you make this shelf, check out Part II to make an expanded set of DIY honeycomb shelves that would make Don Draper […]
Angie @ Knick of Time
January 11, 2016 at 8:16 amWhat an awesome project – these look amazing!
Thanks for sharing them at Talk of the Town – I’m talking about it on Facebook here – https://www.facebook.com/KnickofTime/
Kate
January 15, 2016 at 8:53 pmThese look really cool! The only thing is that when I try to get access to the template, it directs me to another image. Is there any other way to access it?
Thanks!
Jess @ Make and Do Crew
January 15, 2016 at 10:27 pmAhhhh, boooo! I’m so sorry, Kate. Thanks for pointing that out to me. I’ve encountered that tech glitch before. It should be working for you now. Just enter your email in the subscribe box at the bottom of the post. You’ll get an email asking you to confirm your subscription and as soon as you do that, you’ll get another email with all The Vault access info. If you have any trouble at all, please let me know. I’m sorry about the inconvenience. I never want technology to stand in the way of crafting!
j
sharrel
January 28, 2016 at 2:51 pmWill you send a full size template of both hex selves.I have tried 20+ times to print them????
Jess @ Make and Do Crew
January 30, 2016 at 11:34 amHey Sharrel,
I’m so sorry you haven’t been able to print them. Did you subscribe and gain access to the password protected area? If you let me know where you’re getting hung up, I’d be happy to help you sort it out. We won’t let a printing snafu get in the way of your crafting!
j
sharrel
January 30, 2016 at 1:18 pmI did subscribe and I got as far as the password. I did not make up a password, so I did not know what to enter.
Jess @ Make and Do Crew
January 30, 2016 at 1:21 pmOkay great. The password is in the welcome email you received. (It’s the same for everyone. It’s also case sensitive, so type it just like you see it.)
Let me know if you run into any hiccups. Happy shelf building!
Jess
sharrel
January 30, 2016 at 3:33 pmI got it. Thank you
Jess @ Make and Do Crew
January 31, 2016 at 8:21 amGreat, Sharrel! I add patterns and templates often and now you’ll have access to all of them 🙂 I hope you enjoy the shelves!
j
Lori Sall
January 30, 2017 at 9:56 amI cannot print the templates for these either. It says that I need to download the PDF app and I do this and nothing, the templates aren’t there. I want to make the bunny and the shelves.
Jess @ Make and Do Crew
February 20, 2017 at 3:47 pmHey Lori,
You shouldn’t have to download any apps. You might have accidentally clicked on an ad that is about a “PDF installer.” (My ad company doesn’t allow these ads because of how deceptive they are, but sometimes some spammy companies sneak them through. I’m so sorry if that was the case.)
Once you’re in the Vault, you should be able to just click the “template” or “pattern” link below the photo of the project and the pdf will open in a new window for you to print or download it.
Hope that helps!
Jess
Ina
February 15, 2017 at 9:35 amHi Jess, I’m Ina from Germany and I Need your help, please. Mann thanks in advance. I trief to get the template, but I’not receiving the Email. I would love to work it out. Kind regards from Berlin.
Jess @ Make and Do Crew
February 18, 2017 at 10:22 pmHello from CO, USA! You should have received an email from me right after you subscribed. Perhaps check your spam or junk folders. If you still don’t see it, you can just enter your email address again and you won’t receive duplicate emails from me in the future.
Hope that helps!
Jess
DeBorah Beatty
January 18, 2016 at 9:52 amHow stable are these off the wall? And what kind of glue did you use, please. My mind is in a frenzy with what I can do with these as a display for my talisman dolls.
Jess @ Make and Do Crew
January 18, 2016 at 10:51 amHa, DeBorah, I completely understand the “frenzy” you speak of. My mind is often in the same state when I see a new idea. I’m so happy these shelves have inspired you. I think they’re actually fairly stable, assuming that no one is touching them much. It helps that they lie flat against the wall. And if you wanted extra stability, you could attach a toothed picture hanger to the back, which I didn’t do here. (Even so, that gold rhino is pretty stable up on his high perch 🙂
I used tacky glue for my shelves.
I’d love to see a photo if you decide to make these! Happy crafting!
j
DeBorah Beatty
January 18, 2016 at 2:35 pmWill do! I was thinking if they’re flimsy, to add a back. I want them to sit on a table or shelf in addition to hanging.
Thanks for the quick response.
Jess @ Make and Do Crew
January 18, 2016 at 10:46 pmHey DeBorah–I haven’t found them to be flimsy at all. Apparently popsicle sticks make for pretty good building materials! They sit pretty well on a flat surface too, especially if you can get the sticks lined up well. (The template helps with that.)
Enjoy!
j
peggy mcclelland
January 18, 2016 at 4:17 pmI really want to make this but I can’t get the template please tell me what to do. It keeps asking me for a password but all it let’s me do is my name and email. I don’t know what to do. [email protected]
Peggy mcclelland
Jess @ Make and Do Crew
January 18, 2016 at 10:53 pmHey Peggy!
I’m sorry you’re having trouble. Once you enter your name and email in any of the subscription boxes on the site, you should get a confirmation email (check your spam or promotions folders). Just click the link in that email to confirm that you did indeed intend to subscribe. You’ll then immediately receive an email with the password to access The Vault where the template (and lots of other freebies) is located. Any questions, please just let me know. I’m here to help!
Thanks for reading Make & Do Crew!
j
Geometric Heart DIY Wall Art - With Popsicle Sticks!
January 24, 2016 at 8:01 pm[…] a thaang for popsicle sticks. (If you do too, check out how to make a Hexagon Shelf and a set of Honeycomb Shelves with these little wooden […]
DIY Double-Sided Photography Background
January 28, 2016 at 8:23 am[…] like to see more shots of this photography background in action, check out these posts: DIY Honeycomb Shelves How To Make a Memory Jar (+ Printable Label!) Amigurumi Crochet Cupcake Pattern (With Birthday […]
Amanda Flint
February 17, 2016 at 6:07 pmI would put the big one in the middle and span the little ones out from it, making the sides only like 2 inches apart! These are amazing! Thanks for the tutorial!
Jess @ Make and Do Crew
February 17, 2016 at 9:12 pmHey Amanda,
That could be really cool! I love that you can change the look of them based on how closely you hang them to each other. I’d really love to make an entire wall of them. Hope you enjoy yours!
Happy shelf-making.
j
Nikole Fuqua
February 24, 2016 at 11:54 amThis is super adorable! I’ve been super obsessed with gold and copper paint lately and I think this project would look great with those colors!
Jess @ Make and Do Crew
February 24, 2016 at 3:59 pmYes! Me too, Nikole! I actually just painted some shelf stands copper and I love them. Send me a pic (or tag me on Instagram @makeanddocrew). I’d love to see where you take them.
Happy crafting!
jess
Amy
February 26, 2016 at 9:10 pmQuestion: Would Gorilla Wood Glue work for these?
Jess @ Make and Do Crew
February 28, 2016 at 2:39 pmHey Amy,
Totally! I think it would work great. I’ve actually made this with regular old school glue too and it worked fine. I think that because you’re gluing so many little surfaces, it’s actually really pretty strong by the end. Let me know if you have any other questions!
Happy shelf-making!
jess
alison
March 17, 2016 at 12:11 pmHi – I’ve subscribed and am trying to access the vault for both shelf templates, but when I go to it it asks me for my password? I’m not sure how to get in
Jess @ Make and Do Crew
March 22, 2016 at 9:01 pmHey Alison,
Thanks so much for reading Make and Do Crew! I’ll walk you through the steps to get your templates.
When you subscribed, you should have received an email asking you to confirm your subscription. Once you click that, you’ll receive another email that gives you the password to enter the Make & Do Crew Vault. (It’s the same password for everyone.)
Have you gotten that yet? If not, just check your spam folder for the confirmation email or do a search within your email for “Make and Do Crew.”
Let me know if this works for you. I’m here to help if not.
Happy crafting!
Jess
Kellie
March 19, 2016 at 4:43 pmHow did you hang these? Is there a way to hang them without putting holes in my wall?
Kellie
March 22, 2016 at 6:58 pmIs there a way to hang these without putting holes in the wall?
Jess @ Make and Do Crew
March 22, 2016 at 8:57 pmHey Kellie,
That’s a great question. I think in order to avoid holes in the wall, you might need some of those plastic hooks that attach to the wall with a bit of gummy, sticky stuff. That’s the only option I can think of. The shelves are really pretty light though, so you might be able to get them to hang on a couple of thumbtacks if you’re willing to put itsy bitsy holes in your wall.
Let me know if you find a good solution. I’d love to find a way around beating up my walls every time I come up with a new art project.
Jess
Dipti
March 28, 2016 at 1:29 amHow amazing and unique is this!! This is definitely one of the best DIYs for home decor I have seen yet. And the way it finally turns out to be is also so pretty. Totally sharing this one on all our social media platforms. Great job.
Cheers.
Jess @ Make and Do Crew
March 29, 2016 at 4:02 pmGosh, what a nice compliment, Dipti. These shelves really make me happy every time I see them hanging on the wall, so I’m so glad you can appreciate them too. And thank you so much for sharing the tutorial. I appreciate YOU for that!
Happy crafting!
Jess
Sheila
March 29, 2016 at 11:44 amAbout how long did it take for you to make the shelf, including glue dry time? I want to do this as a project for my church’s moms group but am worried the glue may take too long to dry and not leave enough time for staining.
Jess @ Make and Do Crew
March 29, 2016 at 4:00 pmHey Sheila,
That sounds so fun! Crafting with other women is so satisfying and rewarding, isn’t it? I would say you can build the shelf in less than an hour. I think the drying time will depend on what glue you use, but I’ve actually used regular old Elmer’s school glue before and it dried quite quickly. (Like the bottom of the shelf was totally dry by the time I was building the top.) Perhaps you want to try a sample one with the glue you plan to use and get a good estimate of total time required, but I’d guess the entire thing could be accomplished in around 1.5 hours.
I’d love to see a photo if you end up doing this project. Happy crafting!
Jess
Apple
April 26, 2016 at 3:50 pmHey there!
I’m trying to tape together the three hexagons, but they don’t line up exactly. Parts of them line up, but then the other lines don’t match.
When I printed them, I unchecked “fit to page”. Do you think that may have made a difference?
Thanks!
Jess @ Make and Do Crew
April 26, 2016 at 11:09 pmHey there, Apple. I’m sorry you’re having trouble taping them together. That sounds kinda annoying 🙂 I’ve taken a stab at making the template a little clearer and I’m hoping you can be my tester. I just emailed it to you. Would you mind letting me know if it’s easier to figure out now? And, I would def keep “fit to page” unchecked since you want the template to print full size so that it’s the exact size as the popsicle sticks. It’ll just be easier that way.
Thanks for your feedback!
jess
Eve
May 4, 2016 at 2:12 pmAbout how long does it take for the glue to dry before you can start staining?
Jess @ Make and Do Crew
May 5, 2016 at 3:21 pmHey Eve,
It depends on what type of glue you use. I’ve noticed that tacky glue dries a little quicker than something like regular Elmer’s glue. I’d say that you could safely stain your hex shelf about 45 minutes after you finish the last row. You’ll notice as you’re building it that the bottom layers will be basically dry before you reach the top.
Please let me know if you have any other questions! Happy hexagon-ing!
Jess
Lauren
May 7, 2016 at 11:53 amCan you stain the popsicle sticks first and then glue them? I’m afraid the stainer will get drippy and/or seems difficult to stain in between each one. I think i would like to stain them first but will the glue stick?
Jess @ Make and Do Crew
May 8, 2016 at 11:15 pmHey Lauren,
You could definitely stain the sticks first, it will be just a little more time consuming than if you do it once they’re all glued together. (Particularly because you might want to let one side dry before staining the other.) If you’re worried about drips, maybe just try a very small amount of stain to begin with. The whole process is very forgiving once the sticks are glued together because you can’t really see well in between the sticks. Most “mistakes” will just be hidden anyhow 🙂
Happy shelf making!
Jess
Brenda
May 10, 2016 at 3:47 amThank you for this 🙂 exactly what I was looking for!
Jess @ Make and Do Crew
May 17, 2016 at 9:23 pmAwesome, Brenda. I hope you enjoy making them!
jess
Marsha
May 13, 2016 at 1:05 pmHow do I download the template. I’ve tried using the link sent to my email but it keeps directing me to another page. I love this design, would love to make it.
Jess @ Make and Do Crew
May 17, 2016 at 9:18 pmHey Marsha,
The link in your email sends you to the Subscriber’s Vault. Just enter the password that I sent you in that same email and you’ll get access to the Vault where the template is located. (There’s a bunch of other exclusive patterns and templates in there as well.) Let me know if you have any trouble!
Happy crafting!
Jess
Tracy
May 14, 2016 at 11:55 amHi! I badly wanna do this but I can’t seem to access the templates of both honeycomb designs. But I already did subscribe but I still can’t get the template. Can you please help me and send me the template? Thanks. Xx T
Jess @ Make and Do Crew
May 14, 2016 at 1:46 pmHey Tracy!
I’m sorry you’re having trouble! When you subscribed, you should have immediatly gotten an email with the link to the Vault and the password for it. Did you receive that? If not, check your spam or promotions folder. If you can’t find that email, perhaps try subscribing again. Let me know if that doesn’t work for you and I’d be happy to help you further. I don’t want anything to stand in the way of your shelf making! 🙂
Jess
toosweetloni
July 15, 2016 at 7:11 pmThe projects look nice, but this website is really inconsistent. I can’t not even get access to the templates after multiple times of trying.
Jess @ Make and Do Crew
July 30, 2016 at 2:23 pmI’m sorry to hear that. If you’d like to tell me where you’re running into trouble, I’m happy to troubleshoot with you. Please email me at jess (at) makeanddocrew (dot) com.
Jess
Nicole
January 9, 2017 at 7:17 amHi! I loved your honeycomb and have already ordered popsicle sticks!
However, I’ve printed the template and it looks a bit small. The hexagon template shows a hexagon of approximately 20 cm. Is this right?
Thanks again!
Jess @ Make and Do Crew
January 9, 2017 at 12:08 pmHmm. Perhaps that’s about right. Each of the sides are about 4.5″ long (around 11 cm) so I guess the shelf might be about 20 cm tall? Does that makes sense?
Alex
March 13, 2017 at 8:29 amI would like the template !
Jess @ Make and Do Crew
March 14, 2017 at 2:54 pmHey Alex,
If you subscribe in the box above, you’ll receive an email with download instructions!
🙂 Jess
Morgan
March 21, 2017 at 4:24 pmI love that you offer the templates, but what size where your sticks? I can’t seem to line up any of them with my sticks that are 4 1/2in x 3/8 in. I’m making the single & honeycomb shelve.
Jess @ Make and Do Crew
March 24, 2017 at 4:54 pmHey Morgan,
That’s the size I used too, so you’re on the right track! 🙂 The outer edge of each stick should basically line up with the border of the template.
Hope that helps!
Jess
Pooja
March 27, 2017 at 12:21 amHi Dear,
i have made this but i am not able to hang it on my wall how i will hang this on wall can you please suggest me.
Thanks
Pooja
Debbie
October 27, 2017 at 8:35 amReally into octagonal right now and trying to visualize a gallery wall that includes pics, art, quotes…and now your cool little popsicle shelves. Any advise or inspiration would be great. Thanks for this great idea!
celine
December 5, 2017 at 7:18 amBonjour je souhaiterais recevoir le gabarit de l’étagère en nid d’abeille SVP!
Jamie
December 11, 2017 at 12:45 amHi there!
Thanks for sharing this awesome project!
I’d love to find out how thick the posicle sticks are that you used for both this project and the hexagon posicle project? And are the lengths of the popsicle sticks a standard size?
Thank you so much:)
Jess @ Make and Do Crew
December 11, 2017 at 9:58 pmHey Jamie,
I used very standard popsicle sticks, the same kind you can find at any craft store, Target, etc. 🙂
Happy shelf making!
Jess