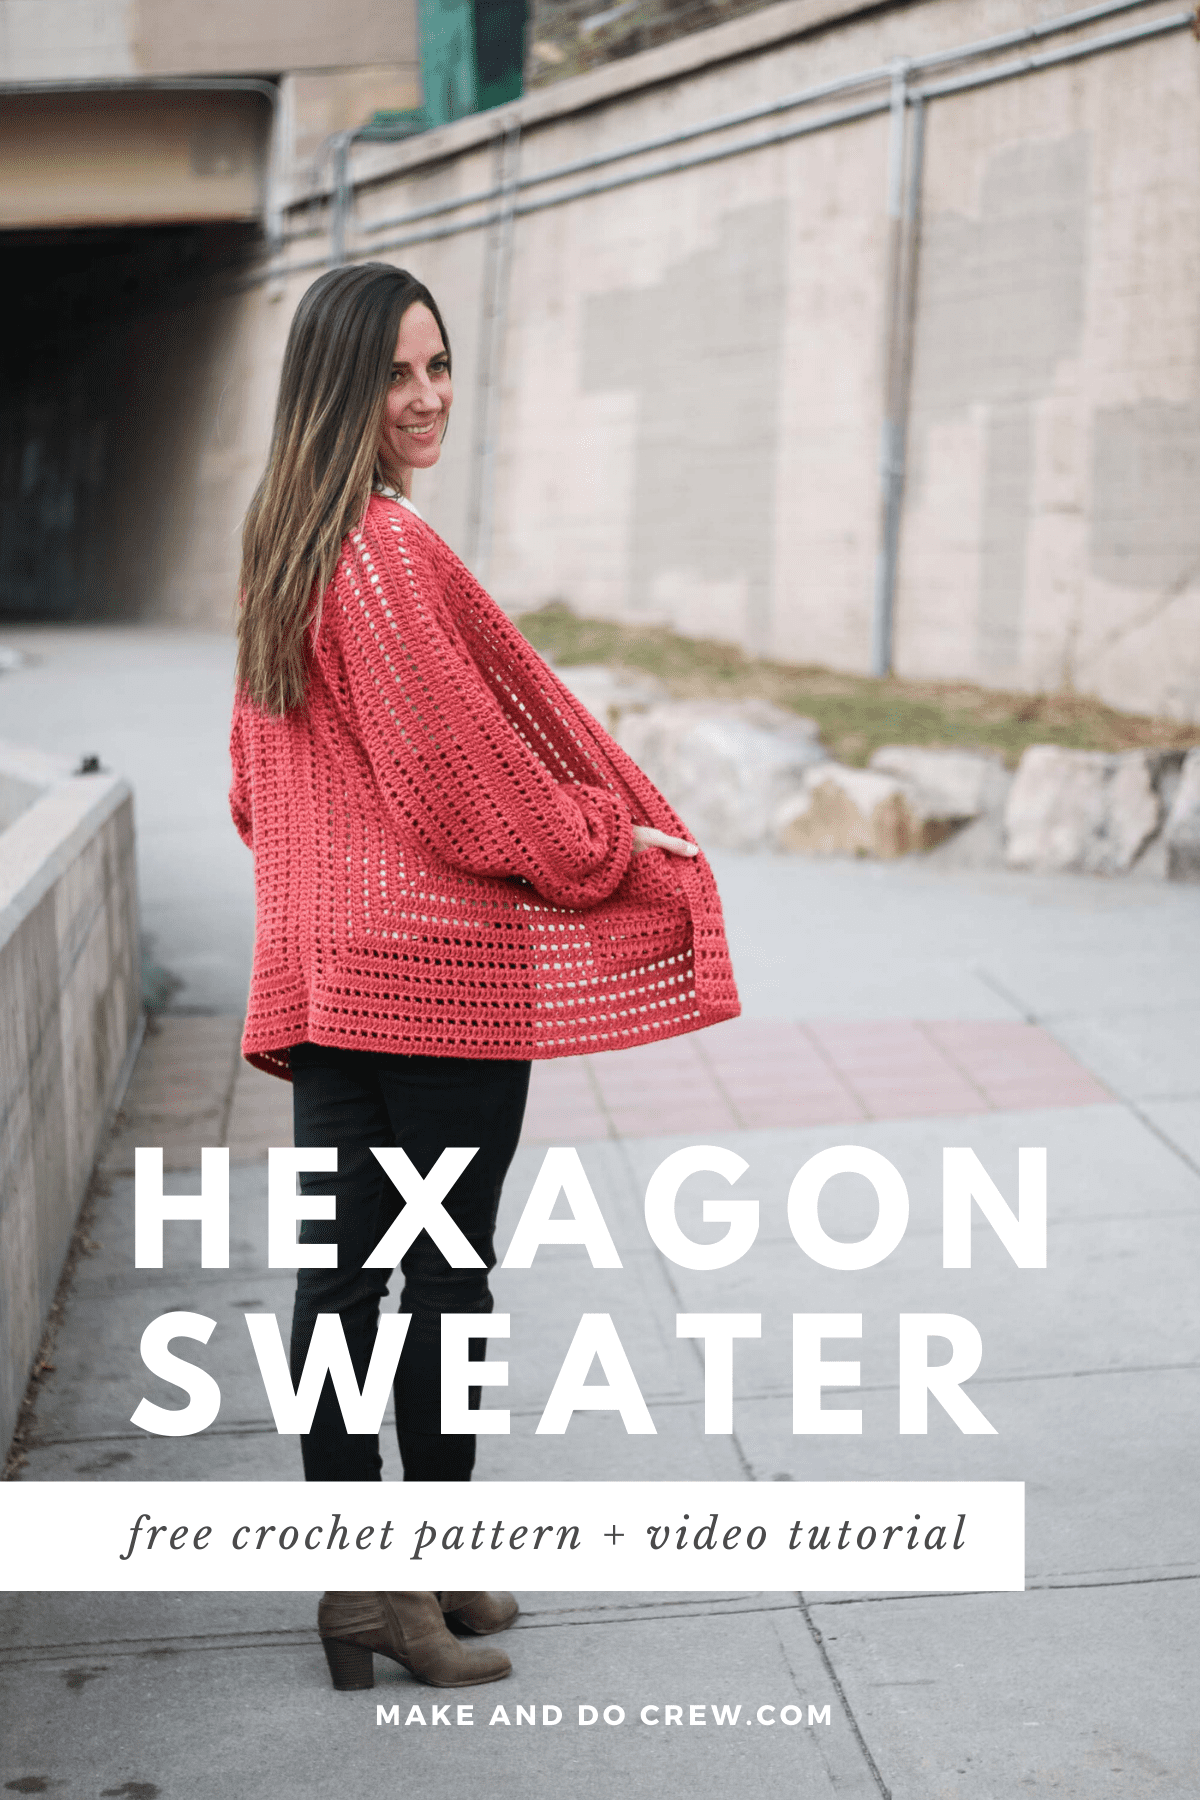
In Part 2 of this hexagon crochet cardigan pattern, we'll put everything together and complete our finishing touches. Get the free pattern below or purchase the ad-free, printable PDF with stitch chart here.
You can find Part 1 here and the video tutorial here.

This easy crochet cardigan pattern is part of a collaboration with Lion Brand Yarn. This post contains affiliate links.
Jump to:
You've given Part 1 of this simple crochet cardigan pattern such a warm reception, I can't wait to share Part 2 with you today!
In the second half of this pattern, we'll finish the sleeve extensions, seam the two hexagons together and add pockets.
Complete beginner? Check out our guide on How to Crochet for Beginners

A Quick Pattern Recap
Unless you're a master of geometry, you might find it hard to believe that this easy crochet cardigan pattern really is made from two simple hexagons. Crazy, huh?
Because the hexagons do much of the work, you don't have a lot of decreasing, sizing and seaming to worry about. You can even try on the hexagon as you work, which will keep you inspired when you get shiny yarn syndrome and want to start a new project. All of this makes this hexagon cardigan perfect for confident beginners or more advanced crocheters looking for a quick, satisfying project that's different from the norm.
And the yarn? Well, this color of Lion Brand Vanna's Style is just about the perfect shade of watermelon-meets-summer-sunset for your warm weather wardrobe. This color is simply perfection in person, but there are also a lot of fantastic colors in this line of yarn.
Finishing Up Your Simple Crochet Cardigan
In Part 2 of the Day Date Cardigan pattern, first we're going to extend one side of the hexagons to create longer sleeves. Similar to how the main hexagon was worked, the sleeve extension contains one decrease stitch to keep the sleeve from becoming massively wide.

Next (and definitely most exciting!) we'll seam both hexagons together to form the sweater. Lastly, we'll add a bit of length to the bottom of the sweater and pockets to the front. If you're happy with the length without the extra rows or if you want an even longer cardigan, this is a section of the pattern that's easily customizable.
REMINDER: You can find the complete step-by-step video tutorial for this pattern here!
Alright, ready to finish your beautiful new crochet sweater? Let's do it!
More Free Crochet Sweater Patterns
Crochet sweater patterns don't need to be difficult. In fact, most of ours are made with very simple shapes. Dive into the wonderful world of crochet garments with cardigans, pullovers, ponchos, shrugs and more!
More Free Crochet Shirts + Tops Patterns
Crochet garment patterns don't need to be difficult. In fact, most of ours are made with very simple shapes. Dive into the wonderful world of crochet tops, tanks, shirts, and more!
See more free crochet shirts + tops patterns →
Day Date Cardigan - Free Pattern Part 2
Explanation:
This oversized, lightweight cardigan comes together almost like a magic trick. Two simple hexagons transform into an on-trend sweater complete with cozy pockets and roomy bishop sleeves.
Because it’s built from two large hexagons, you can try it as you work, and avoid most of the shaping and seaming that comes with typical sweaters.
Supplies + Materials
Order an all-in-one kit from Lion Brand.
• Lion Brand Touch of Linen (Weight: 4/medium - 197 yds, 3.5 oz)
- Dijon (682/170H) – 8 (9, 9, 10, 10, 11) skeins [(approx. 800 (860, 890, 940, 1000, 1080) g)]
• Size J (6.00 mm) crochet hook or size needed to obtain gauge
Garment Sizes
The oversized nature of this sweater fits a variety of body types, but to achieve the fit of the sample pictured, choose the size that corresponds with your actual bust measurements.
If in doubt, size down, as the silhouette is quite loose and forgiving. See the schematic in printable pattern PDF for more detailed pattern measurements.
| Size | Bust Measurement | Back Width |
|---|---|---|
| XS/S | 30”-34” | 23.5” |
| M/L | 36”-40” | 27.75” |
| L/XL | 42”-46” | 29.75” |
| 2X/3X | 48”-52” | 32” |
| 4X/5X | 56”-60” | 34.25” |
| 6X/7X | 62”-66” | 38.5” |
Sample pictured is a M/L on a 5’9” model with a 38” bust.
Gauge
16 dc x 7.5 rows = 4”
Hexagon Extensions
Notes:
• Extra length is added to certain hexagon sides to extend the back, bottom and sleeves of the sweater. Right and left sides are worked differently, so please follow separate instructions for both.
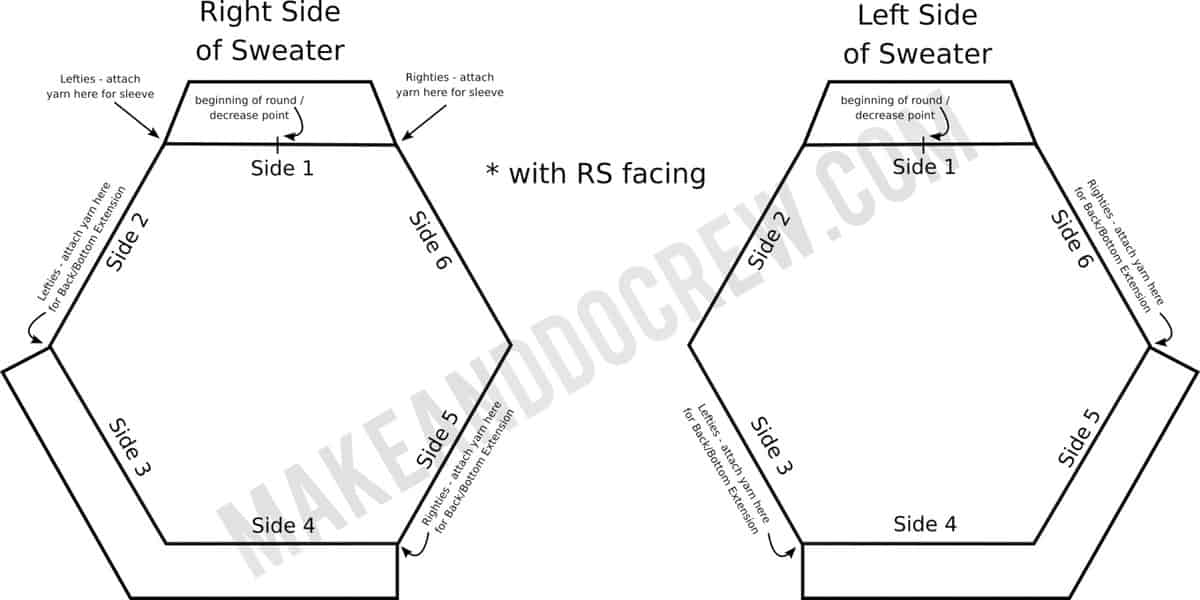
• A reminder: Pattern refers to different sides of the hexagon by number, which is illustrated in the chart below. Think of these side numbers as fixed to the orientation of looking at the right side of the hexagon.
For example, Side 3 is always Side 3, whether you flip the hexagon over or not. Side 3 does not become Side 5, just because the hexagon is flipped to the wrong side. If you’re feeling confused, lay hexagon out with RS facing and safety pin a paper “name tag” to each side so that you can easily identify them when you turn your hexagon over to the WS to begin attach yarn.
• Each extension is worked back and forth in rows.
• When working Row 1, check to make sure ch-1 sps line up with ch-1 spaces from last ch-1 sp row of hexagon.
Hexagon Extensions
Notes:
- Extra length is added to certain hexagon sides to extend the back, bottom and sleeves of the sweater. Right and left sides are worked differently, so please follow separate instructions for both.
- Each extension is worked back and forth in rows.
- When working Row 1, check to make sure ch-1 sps line up with ch-1 space from the last ch-1 sp row of hexagon.

Back and Bottom Extensions
Right Half of Sweater:
- Back extension is worked along Side 3. Bottom extension is worked along Side. See chart at end of pattern for more details.
- With WS facing, attach yarn in ch-2 corner sp at beginning of Side 4. (Lefties: With WS facing, attach yarn in ch-2 corner sp at beginning of Side 3.)
Important: Begin Row 1 with WS facing.
Row 1: Ch 4, dc in first dc of side, ch 1, sk 1 dc, dc in next dc, [ch 1, sk 1 dc, dc in next dc] to last dc of side, [ch 1, dc, ch 2, dc, ch 1] in corner sp; continue onto next side to work: dc in first dc of side, ch 1, sk 1 dc, dc in next dc, [ch 1, sk 1 dc, dc in next dc] to last dc of side, ch 1, dc in corner sp; turn. (41 (45, 49, 53, 57, 61) ch-1 sps per side)
Row 2: Ch 3, dc in each dc and ch-1 sp to end of side, [(2 dc, ch 2, 2 dc) in ch-2 sp corner, dc in each dc and ch-1 sp to end of second side; turn. (85 (93, 101, 109, 117, 125) dc per side)
Size XS/S:
Fasten off. Move on Left Half of Sweater.
Sizes (M/L, L/XL, 2X/3X, 4X/5X, 6X/7X) only:
Row 3: Ch 4, sk 2 dc, dc in next dc, [ch 1, sk 1 dc, dc in next dc] to last dc of side, [ch 1, dc, ch 2, dc, ch 1] in corner sp; continue onto next side to work: dc in first dc of side, ch 1, sk 1 dc, dc in next dc, [ch 1, sk 1 dc, dc in next dc] to last dc of side; turn. ((47, 51, 55,59, 63) ch-1 sps per side)
Row 4: Rep Row 2 ((97, 105, 113, 121, 129) dc per side)
Fasten off.
Obsessed with finding the best free crochet patterns?
Check out these collections of handpicked patterns to find your next project.
You must use the category name, not a URL, in the category field.Left Half of Sweater:
Notes:
- Back extension is worked along Side 5. Bottom extension is worked along Side 5. See chart at end of pattern for more details.
- With WS facing, attach yarn in ch-2 corner sp at beginning of Side 5. (Lefties:
With WS facing, attach yarn in ch-2 corner sp at beginning of Side 4.)
Important: Begin Row 1 with WS facing.
Row 1: Ch 4, dc in first dc of side, ch 1, sk 1 dc, dc in next dc, [ch 1, sk 1 dc, dc in next dc] to last dc of side, [ch 1, dc, ch 2, dc, ch 1] in corner sp; continue onto next side to work:dc in first dc of side, ch 1, sk 1 dc, dc in next dc, [ch 1, sk 1 dc, dc in next dc] to last dc of side, ch 1, dc in corner sp; turn. (41, (45, 49, 53, 57, 61) ch-1 sps per side)
Row 2: Ch 3, dc in each dc and ch-1 sp to end of side, [(2 dc , ch 2, 2 dc) in ch-2 sp corner, dc in each dc and ch-1 sp to end of second side; turn. (85, (93, 101, 109, 117, 125) dc per side)
Size XS/S:
Fasten off. Move on to Sleeve Extensions.
Sizes (M/L, L/XL, 2X/3X, 4X/5X, 6X/7X) only:
Row 3: Ch 4, sk 2 dc, dc in next dc, [ch 1, sk 1 dc, dc in next dc] to last dc of side, [ch 1, dc, ch 2, dc, ch 1] in corner sp; continue onto next side to work: dc in first dc of side, ch 1, sk 1 dc, dc in next dc, [ch 1, sk 1 dc, dc in next dc] to last dc of side; turn. ((47, 51, 55, 59, 63) ch-1 sps per side)
Row 4: Rep Row 2 ((97, 105, 113, 121, 129) dc per side)
Fasten off. Move on to Sleeve Extensions in Part 2 of the pattern.
Sleeve Extensions
Notes:
- Sleeve extensions are identical on both hexagons and are worked along Side 1.
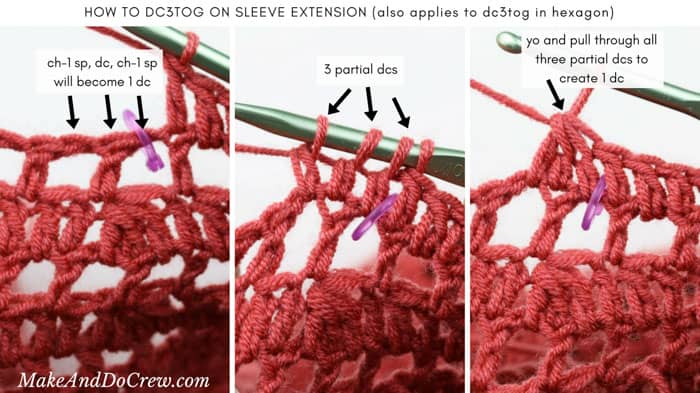
- As with main hexagon, a dc3tog decreasae will eliminate two sts from each even numbered row. The dc3tog is worked just as it was previously over a (ch-1 sp, dc, ch-1 sp). See photo below.
Wanna save this pattern?
With WS facing, attach yarn in ch-2 corner sp at beginning of Side 1. (Lefties: Also attach yarn in ch-2 corner sp at beginning of Side 1, which will be opposite of where Righties attach.) See chart on above for more details on where to attach yarn.
Place marker in top of dc3tog stitch from previous round. Move this marker to the new stitch as each row is worked.
Row 1: Ch 4, dc in first dc of side, ch 1, sk 1 dc, dc in next dc, [ch 1, sk 1 dc, dc in next dc] to last dc of side, ch 1, dc in corner sp; turn. (32 (35, 38, 41, 44, 47) ch-1 sps per side)
Row 2 dec: Ch 3, dc in each dc and ch-1 sp to marker, dc3tog over next [ch-1 sp, dc, ch-1 sp], PM in top of new dc, dc in each dc and ch-1 sp to end of side; turn. (63 (69, 75, 81, 87, 93) dc per side)
Row 3: Ch 4, sk first 2 dc, dc in next dc, ch 1, sk 1 dc, dc in next dc, [ch 1, sk 1 dc, dc in next dc] to last dc of side; turn. (31 (34, 37, 40, 43, 46) ch-1 sps per side)
Row 4 dec: Rep Row 2. (61 (67, 73, 79, 85, 91) dc per side)
Row 5: Rep Row 3. (30 (33, 36, 39, 42, 45) ch-1 sps per side)
Row 6 dec: Rep Row 2. (59 (65, 71, 77, 83, 89) dc per side)
Row 7: Rep Row 3. (29 (32, 35, 38, 41, 44) ch-1 sps per side)
Row 8 dec: Rep Row 2. (57 (63, 69, 75, 81, 87) dc per side)
Fasten off. Rep all instructions on second hexagon.
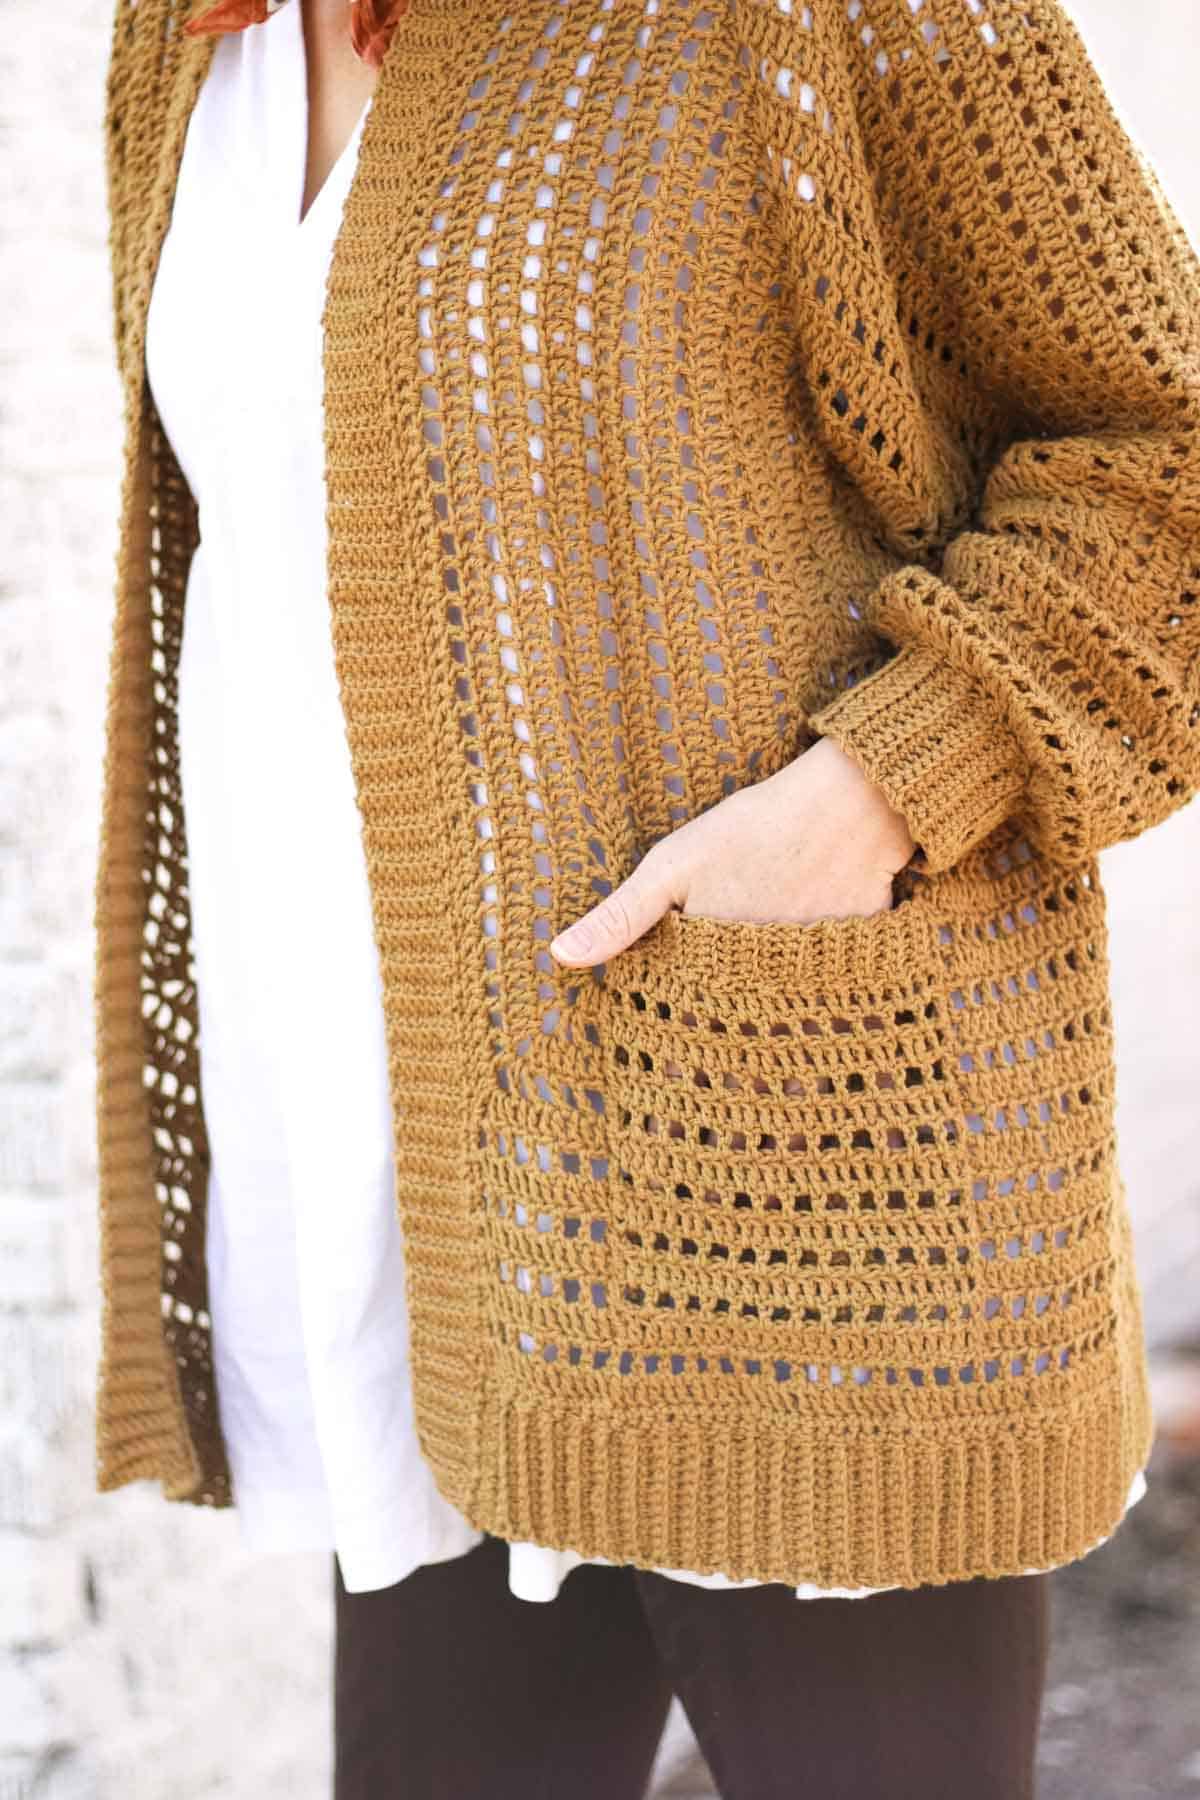
Pockets
Make 2.
Foundation Row: Ch 27 (all sizes).
Row 1 (RS): Dc in 4th ch from hook, dc in each ch to end of row; turn. (25 dc)
Row 2 (WS): Ch 4, sk 2 dc, dc in next dc, *ch 1, sk 1 dc, dc in next dc; rep from * to end of row. (12 ch-1 sps)
Row 3 (RS): Ch 3, sk first dc, dc in each dc and ch-1 sp to end of row; turn.
Rows 4, 6, 8, 10, 12 (WS): Rep Row 2.
Rows 5, 6, 7, 9, 11, 13 (RS): Rep Row 3.
Fasten off leaving a 24” tail.
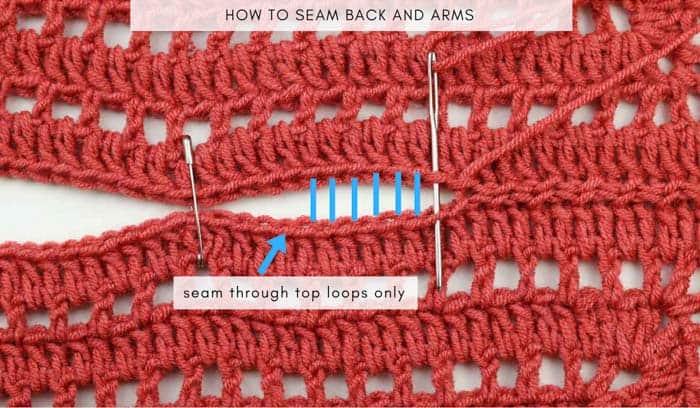
Joining Pieces
See photo below for visual explanation of seaming technique.
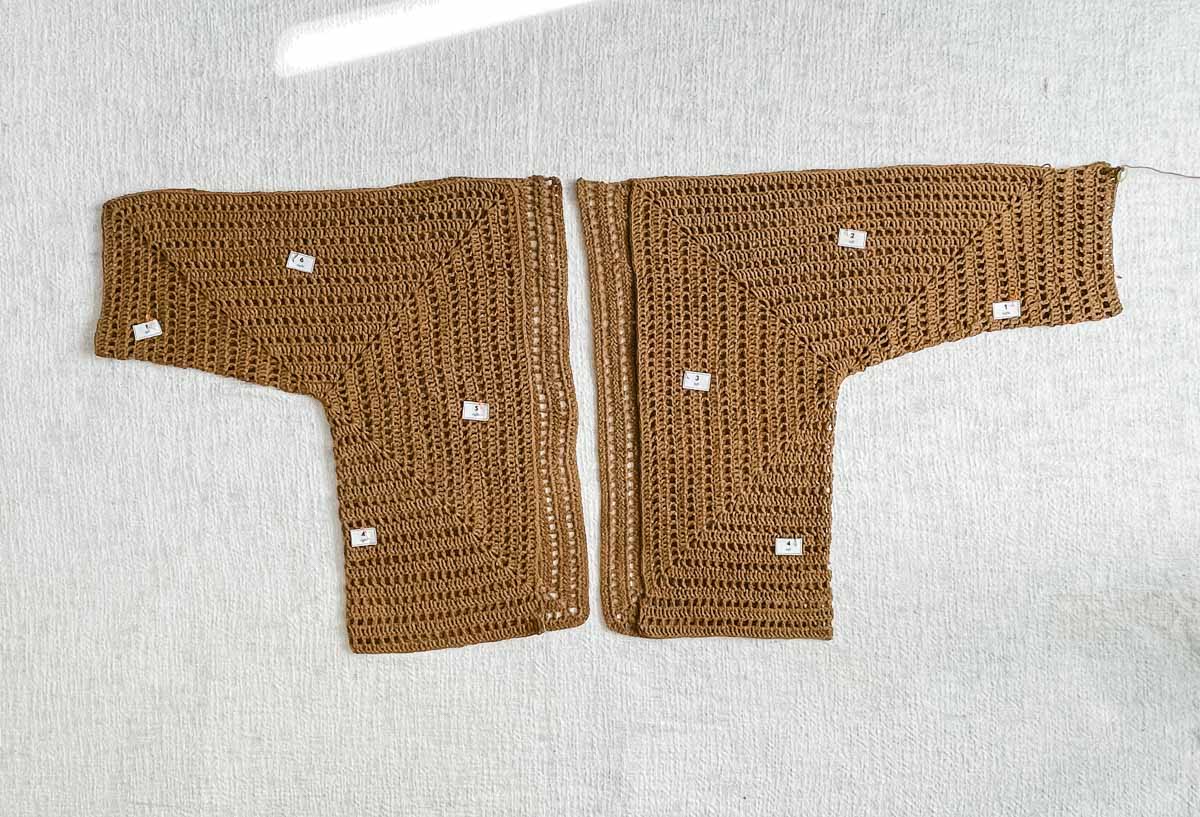
1.To pin each hexagon’s sleeve:
With RS facing out, bring both corners of side 1 together to form the wrist. Pin sides 2 and 6 together to form sleeve. Take care to keep stitches lined up. You may find it easiest to visually align the ch-1 sp “windows” on either side of the seam. Hexagons should now look like two mirrored “L” shapes. See photo below for more details on folding hexagon.
2.To pin back seam:
With RS facing out, line up both “L” shapes and pin so that once again, stitches are aligned.
3.Seaming:
Using a tapestry needle and single strand of MC yarn, begin seaming at the bottom of the back seam and work toward the neck using the mattress stitch. Fasten off and weave in end.
Next seam each sleeve, beginning at the wrist and working toward the neck. Fasten off and weave in ends.
Extra Bottom Extension
If you’d like extra to add optional extra length to cardigan bottom, work
additional reps of the following rows.
With WS facing, attach yarn in farthest right dc at cardigan bottom. (Lefties: Attach yarn in farthest left dc at cardigan bottom.)
Row 1 (WS): Ch 4, sk 2 dc, dc in next dc, * ch 1, sk 1 dc, dc in next dc; rep from * to end of row.
Row 2 (RS): Ch 3, sk first dc, dc in each dc and ch-1 sp to end of row; turn.
Rep Rows 1-2 one additional time or until desired length is reached. Do not fasten off.
Proceed to collar border.
Ribbing
Notes:
- Ribbing is worked in rows perpendicular to bottom sweater edge. Ribbing is
attached as it’s created by slip stitching to sweater bottom.
- Each single crochet is worked through the back loop only (blo) of the stitch in the previous row. On even rows only (those heading away from sweater), the last stitch of the row is worked through two loops, both the middle loop and the back loop.
- Pay attention to the RS/WS designation of row as it will help clarify which side of sweater is facing in each row.
- Ribbing will add approx 2.5” to overall length of sweater. If shorter ribbing is
desired, consider modifying Foundation Chain length to 6 ch. (This will create
a bottom ribbing of 5 sts tall.)
- When working collar Ribbing Set Up Row, work one sc in each sc and two sc in side of each dc.
Ribbing Along Bottom of Sweater
With attached yarn:
Ribbing Set Up Row (WS dec): Ch 1, sc in next 9 sts, *sc2tog, sc in next 9 sts, rep from to end of row; turn.
Foundation Row (RS): Ch 13.
Row 1 (WS): Sc in second ch from hook and in each ch to end of row, sl st in next two unworked sts of Set Up Row; turn. (12 sts)
Row 2 (RS): Scblo in each st to end of row; turn.
Row 3 (WS): Ch 1, scblo in each st to end of row, slst in next 2 unworked sts of Set Up Row; turn.
Rep Rows 2 and 3 around bottom edge of sweater ending with a Row 2. Fasten off.
Ribbing Along Collar
With RS facing attach yarn to bottom edge of right side as worn:
Ribbing Set Up Row (RS dec): Ch 1, sc in next 9 sts, *sc2tog, sc in next 9 sts, rep from to end of row; turn.
Foundation Row (WS): Ch 9.
Row 1 (RS): Sc in second ch from hook and in each ch to end of row, slst in next 2 unworked sts of Set Up Row; turn. (8 sts)
Row 2 (WS): Scblo in each st to end of row; turn.
Row 3 (RS): Ch 1, scblo in each st to end of row, slst in next 2 unworked sts of Set Up Row; turn.
Rep Rows 2 and 3 all the way up right front, across back and down left front ending with a Row 2. Fasten off.
Wrist Ribbing Around Sleeves
Turn cardigan so RS is facing out. Join yarn in ch 3 from beginning of last sleeve row, which is now located at the sleeve seam. Do not work a sc into this ch 3 st, instead, begin Round 1 in the next dc st.
Ribbing Set Up Round (RS dec): Ch 1, sc2tog around cuff, sl st to join to beginning of round. (28 (31, 34, 37, 40, 43 ) sc)
Foundation Row (WS): Ch 13.
Row 1 (RS): Sc in second ch from hook and in each ch to end of row, slst in next 3 unworked sc of set up round, turn.
Row 2 (WS): Ch 1, scblo in each sc to end of row; turn. (12 sts)
Row 3 (RS dec): Ch 1, scblo in each st to end of row, slst in next 3 unworked sts of Set Up Row; turn.
Rep Rows 2 and 3 around wrist ending with a Row 2. Fasten off leaving a 12” tail for seaming.
Seam cuff using mattress st.
Rep all steps on second sleeve.
Finishing
Referencing photo above as a placement guide, pin pocket to cardigan front with RS of pocket facing out. Place lower edge of pocket approximately 8 rows from lower front.
Using a tapestry needle and tail of pocket, whip stitch to join to cardigan front.
Rep with second pocket on opposite cardigan front.
Weave in all remaining ends and promptly sprint outside for a day date with your inner crochet artist!
More Free Crochet Sweater Patterns
Crochet sweater patterns don't need to be difficult. In fact, most of ours are made with very simple shapes. Dive into the wonderful world of crochet garments with cardigans, pullovers, ponchos, shrugs and more!


See more free crochet sweater patterns →
That was so fun! Now what?
Invitation to our Facebook group
Come discuss crocheting hexagon cardigans and lots of other projects and techniques in our Make & Do Crew Facebook group. Here thousands of helpful crocheters answer each other's questions and share their stitches. Join us!
That was so fun! Now what?
Invitation to our Facebook group
Come discuss crocheting hexagon cardigan patterns and lots of other projects and techniques in our Make & Do Crew Facebook group. Here thousands of helpful crocheters answer each others questions and share their stitches. Come join us here.
Find Your Next Sweater Project
- Mandala Cardigan with Hood - crochet your own rainbow
- Poncho With Pockets - slim cut + kangaroo pocket
- The Dwell Sweater - with plus sizes + video tutorials
- Beginner Cardigan - made from rectangles
- Pullover Yoke Sweater - nearly seamless
- Long Boho Cardigan Pattern - with fringe!
- Summer Crochet Cardigan Pattern - short sleeved topper
- Lightweight Cardigan - made from hexagons


Jackie says
Hi Jess, I am back again with a question on the sleeve extension. I have my 67 dc. When I complete my first row of the extension for my sleeve I wind up with 35 instead of 33 spaces. Then I row two I wind up with 69 dc instead of 65. I line up correctly so should I keep going or is my sleeve going to wind up too big. Not sure if I should do an couple of decrease to get it to the right count. I am so anxious to finish the sleeves and sew it up. Can you help me?
Thank you for any help you can give me.
Mary says
Hi. I've been working on the hexagon swester and ready to make extensions. But onlt see sleeve and bottom extention. Not sure how to do the side foe the front.
Laura Waterfield says
Lovely cardi.
Thank you for the instructions.
Laura
Jess says
You're welcome, Laura!