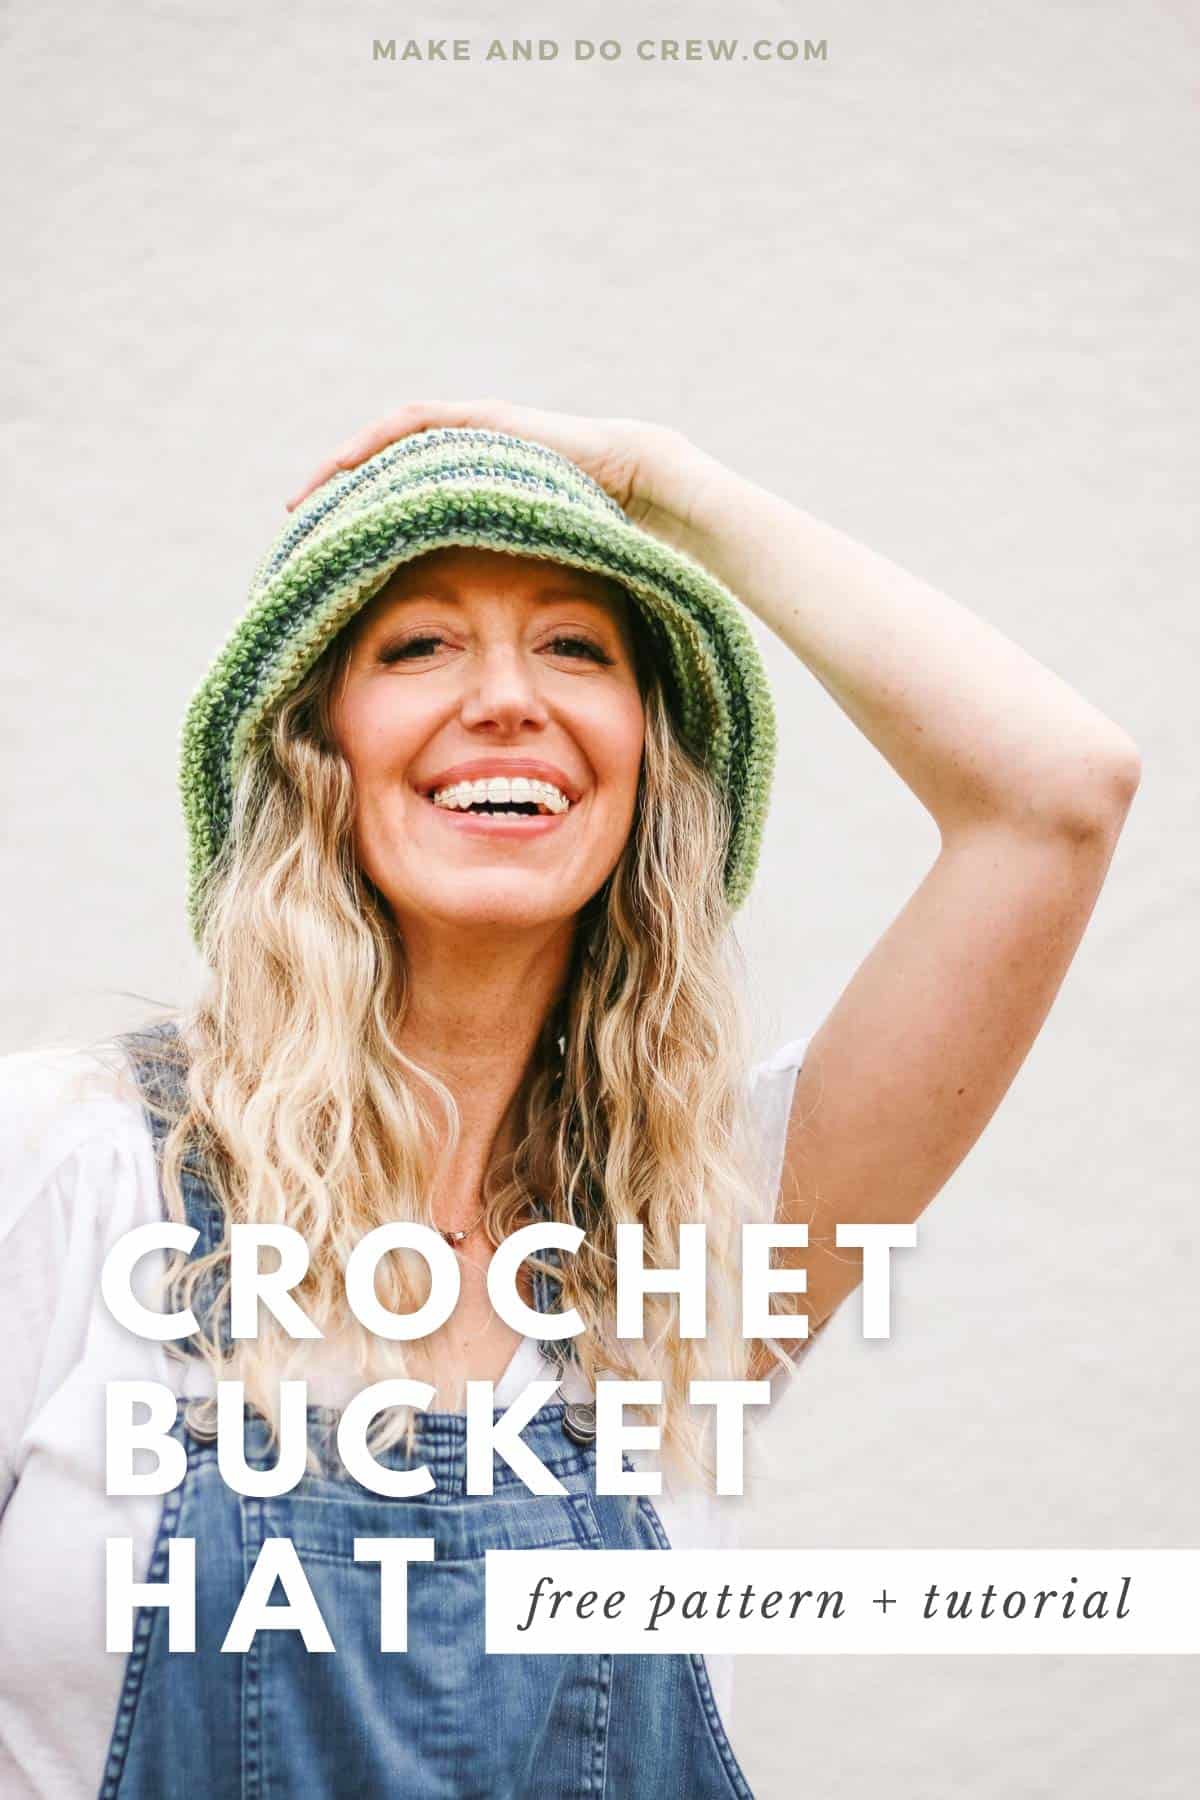
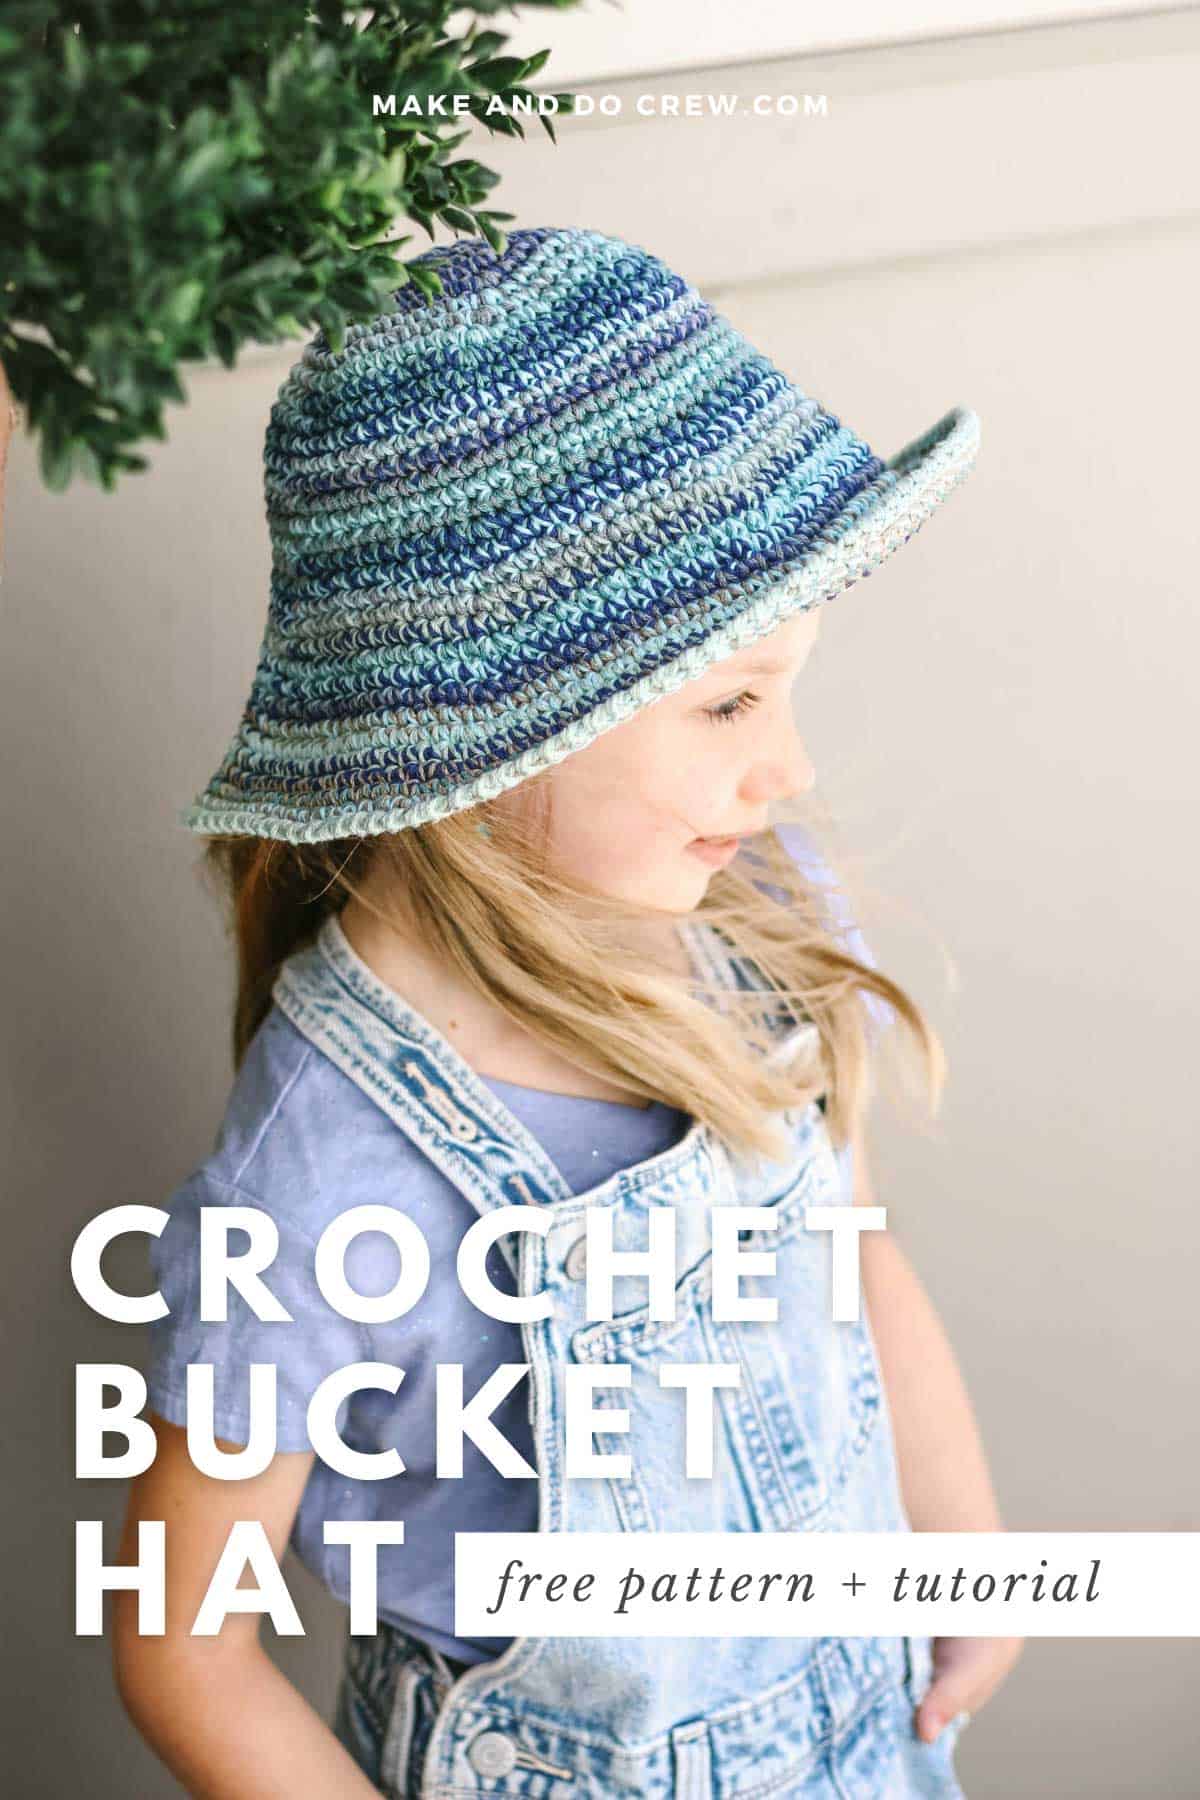
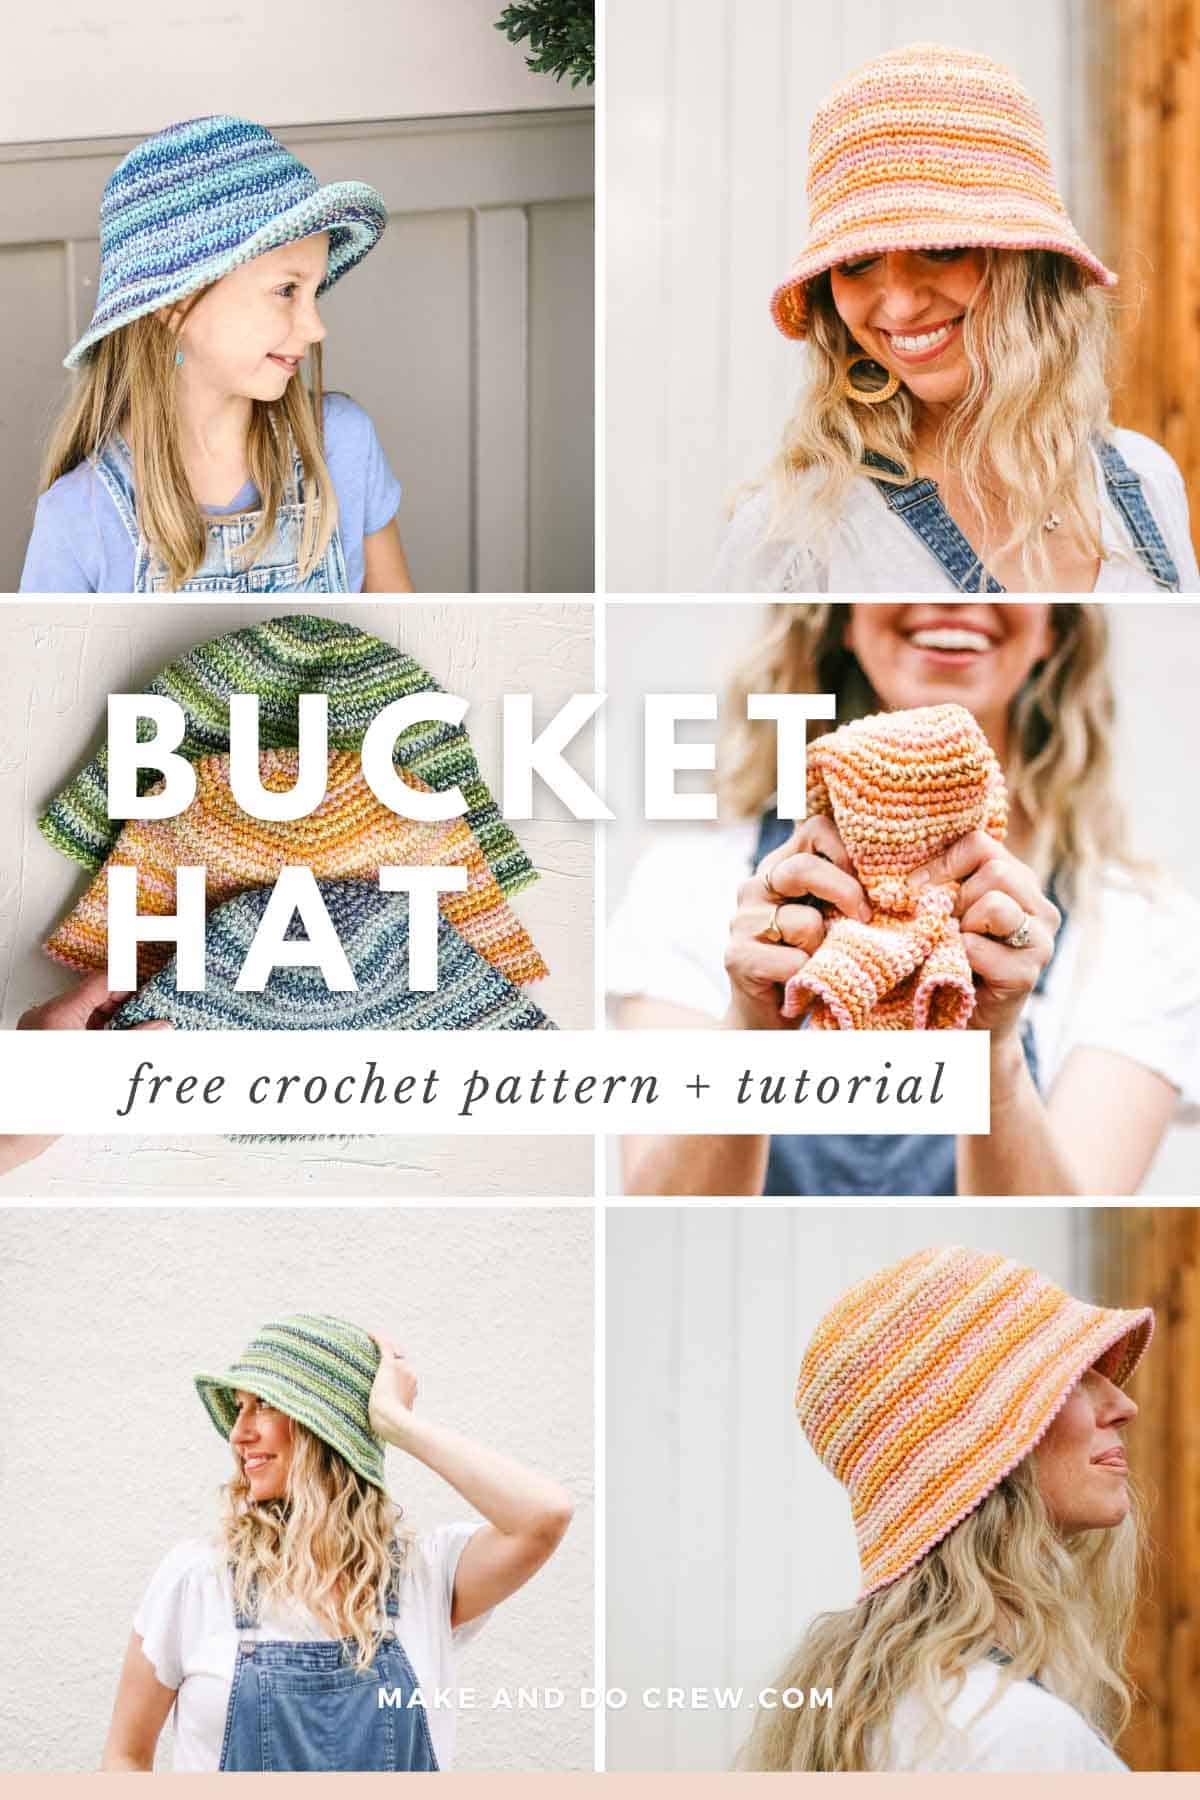
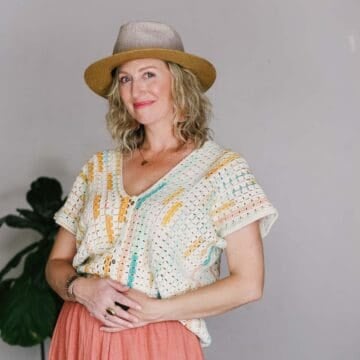
This easy crochet bucket hat is crafted from mercerized cotton yarn and single crochet stitches. Available in sizes for children and adults, everyone will find this hat moldable, comfy, and surprisingly structured.
The free pattern is below, or you can purchase the ad-free, printable PDF.
This free crochet pattern is part of a collaboration with Lion Brand Yarns. This post contains affiliate links.
Jump to:
- A Bucket Hat With Your Personal Touch
- How to Crochet a Bucket Hat
- Can a Beginner Crochet a Bucket Hat?
- Free Scrappy Crochet Bucket Hat Pattern
- How to Customize Your Hat
- Packable Hats for the Win
- That was so fun! Now what?
- Invitation to our Facebook group
- More Free Sun Hat Patterns
- The How to Crochet a Bucket Hat
A Bucket Hat With Your Personal Touch
This crochet bucket hat pattern is the perfect mindless-yet-creative project to stash in your purse this season. It's portable, packable, and makes a great DIY gift.
Add a little handmade sunshine to your noggin’ by using up all your colorful scraps, or choose a deliberate color scheme to crochet your next favorite accessory. Flip the brim for a cute peek-a-boo, or wear it down for maximum SPF.
Related: Skip the sunscreen and make more crochet sun hats to shade your face.
How to Crochet a Bucket Hat
There's no denying that bucket hats are having a fashion moment right now.
Designing an easy bucket hat pattern is really no different than an upside down basket (lol). I knew this could be the perfect beginner-friendly project to get jazzy with some creative looks and use up scraps.
Here are the simple steps to crocheting a bucket hat:
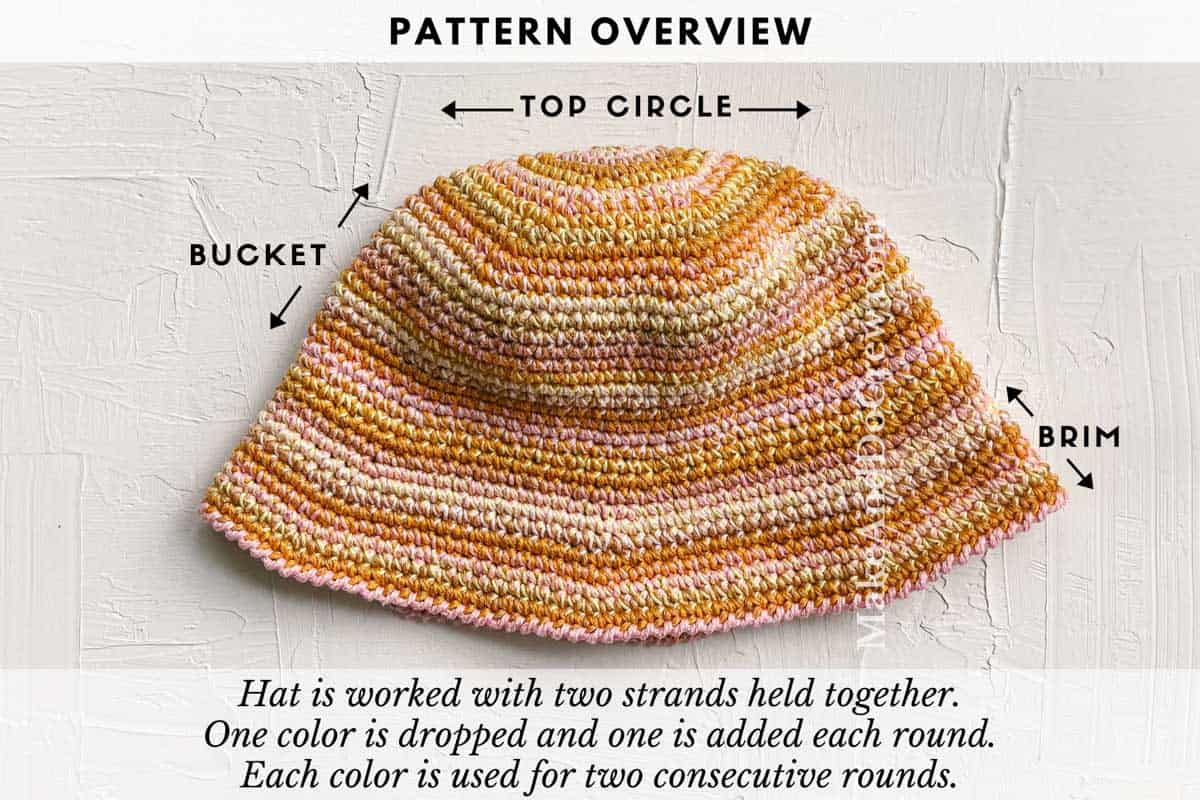
- Top: Crochet the circle top using single crochet stitches. This involves a series of simple increases each round.
- Bucket: Crochet the "bucket" portion of the hat, which is essentially just going round and round in single crochet without increasing.
- Brim: Add the brim by crocheting additional rounds with less frequent increases than the top. (This is what creates the classic slope of a bucket hat.)
The photo below shows how your bucket hat comes together with the top circle, bucket, and brim.
Related: 30+ Year-Round Free Crochet Dress Patterns
Can a Beginner Crochet a Bucket Hat?
Yes, a newbie can definitely make this crochet hat, since it's made from basic single crochet. However, I wouldn't suggest this as your very first project because it includes some counting and measuring.
Pro Tips for Beginners
Here's what I'd suggest to make this pattern extra beginner-friendly:
- Instead of switching colors every round, hold the same two strands of yarn together throughout the hat. This means you'll either crochet a solid-colored bucket hat (if you use two strands of the same color) or a marled bucket hat that looks consistent throughout (if you use two different color strands).
- Check your gauge! This is the single most important thing you can do to make sure your bucket hat fits. If you're new to checking gauge, don't worry, there are detailed instructions included in the pattern. (These stitches are intended to be worked tightly.)
- Skip the finishing border round. If reverse single crochet is a skill you're not ready to tackle yet, you can simply omit the last round of the pattern and your crocheted bucket hat will still look fantastic.
Related: Thinking ahead to winter? Here are some cold-weather hats to crochet.
Pin it! Click to pin this pattern for later ⇨
Free Scrappy Crochet Bucket Hat Pattern
Pattern Overview Video
See the Scrappy Bucket Hat in action in the brief video tutorial below. Watch how the pattern comes together as you prepare to crochet your own!
(If you have an ad-blocker running, you'll need to disable it to view the video.)
Supplies
Order an all-in-one kit from Lion Brand here.
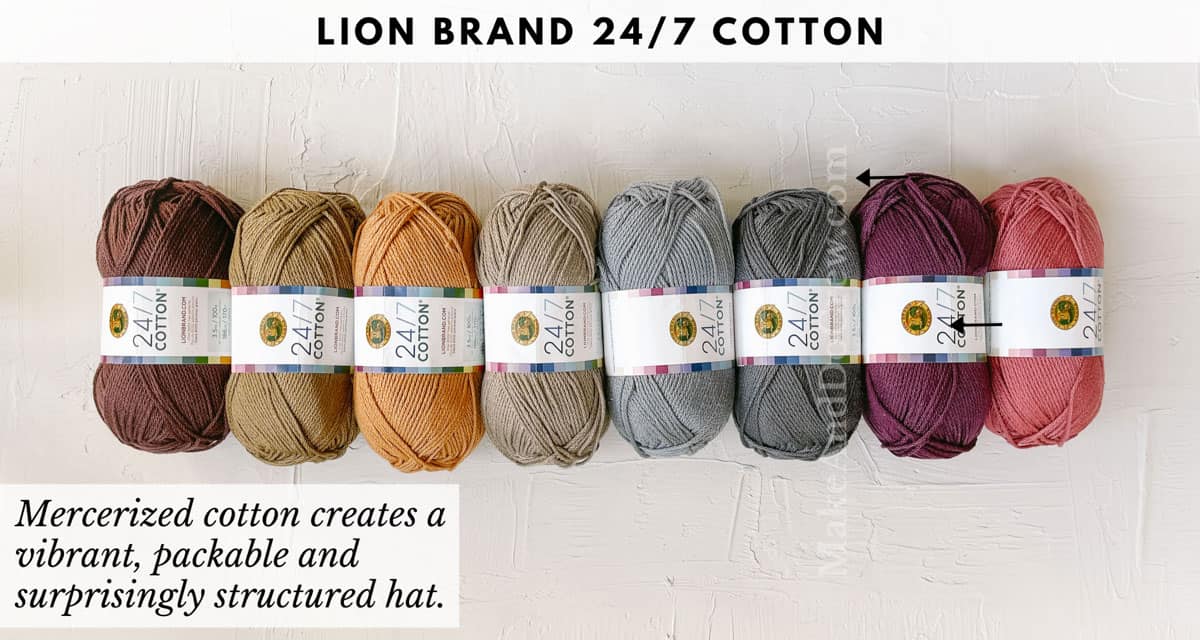
• Lion Brand 24/7 Cotton (Weight: 4/medium - 170 yds, 3.5 oz)
Colors used in samples*
| Pink/Yellow Hat | Green Hat | Blue Hat |
| Lemon [761-157D] | Dragonfly [761-177J] | Navy [761-110] |
| Goldenrod [761-158R] | Grass [761-172H] | Succulent [761-116E] |
| Amber [761-186G] | Lime [761-170J] | Mint [761-156] |
| Pink [761-101A] | Mint [761-156] | Jade [761-178C] |
| Pink Lemonade [761-103X] | Bayleaf [761-171V] | Aqua [761-102A] |
* Each sample uses five colors. Five balls of 24/7 Cotton is enough yarn to make two hats in any of the sizes listed below.
• Tapestry needle
• Size J (6.0 mm) crochet hook or size needed to obtain gauge
• Stitch markers in at least two colors
Best Yarn for Structure
For vibrant color options and a yarn that offers some structure for your bucket hat, Lion Brand 24/7 Cotton can't be beat. 24/7 Cotton is mercerized, which means it is both extra strong and the colors are more saturated.
It was the perfect fiber for this free bucket hat pattern! See all the colors of 24/7 Cotton here.
Yarn Substitutions
If Lion Brand 24/7 Cotton is not available near you, you can check YarnSub.com for similar suggestions. Please note that 24/7 Cotton is on the thinner side for a category 4 worsted weight yarn.
When subbing yarn, be sure to check your gauge and adjust your hook size if necessary.
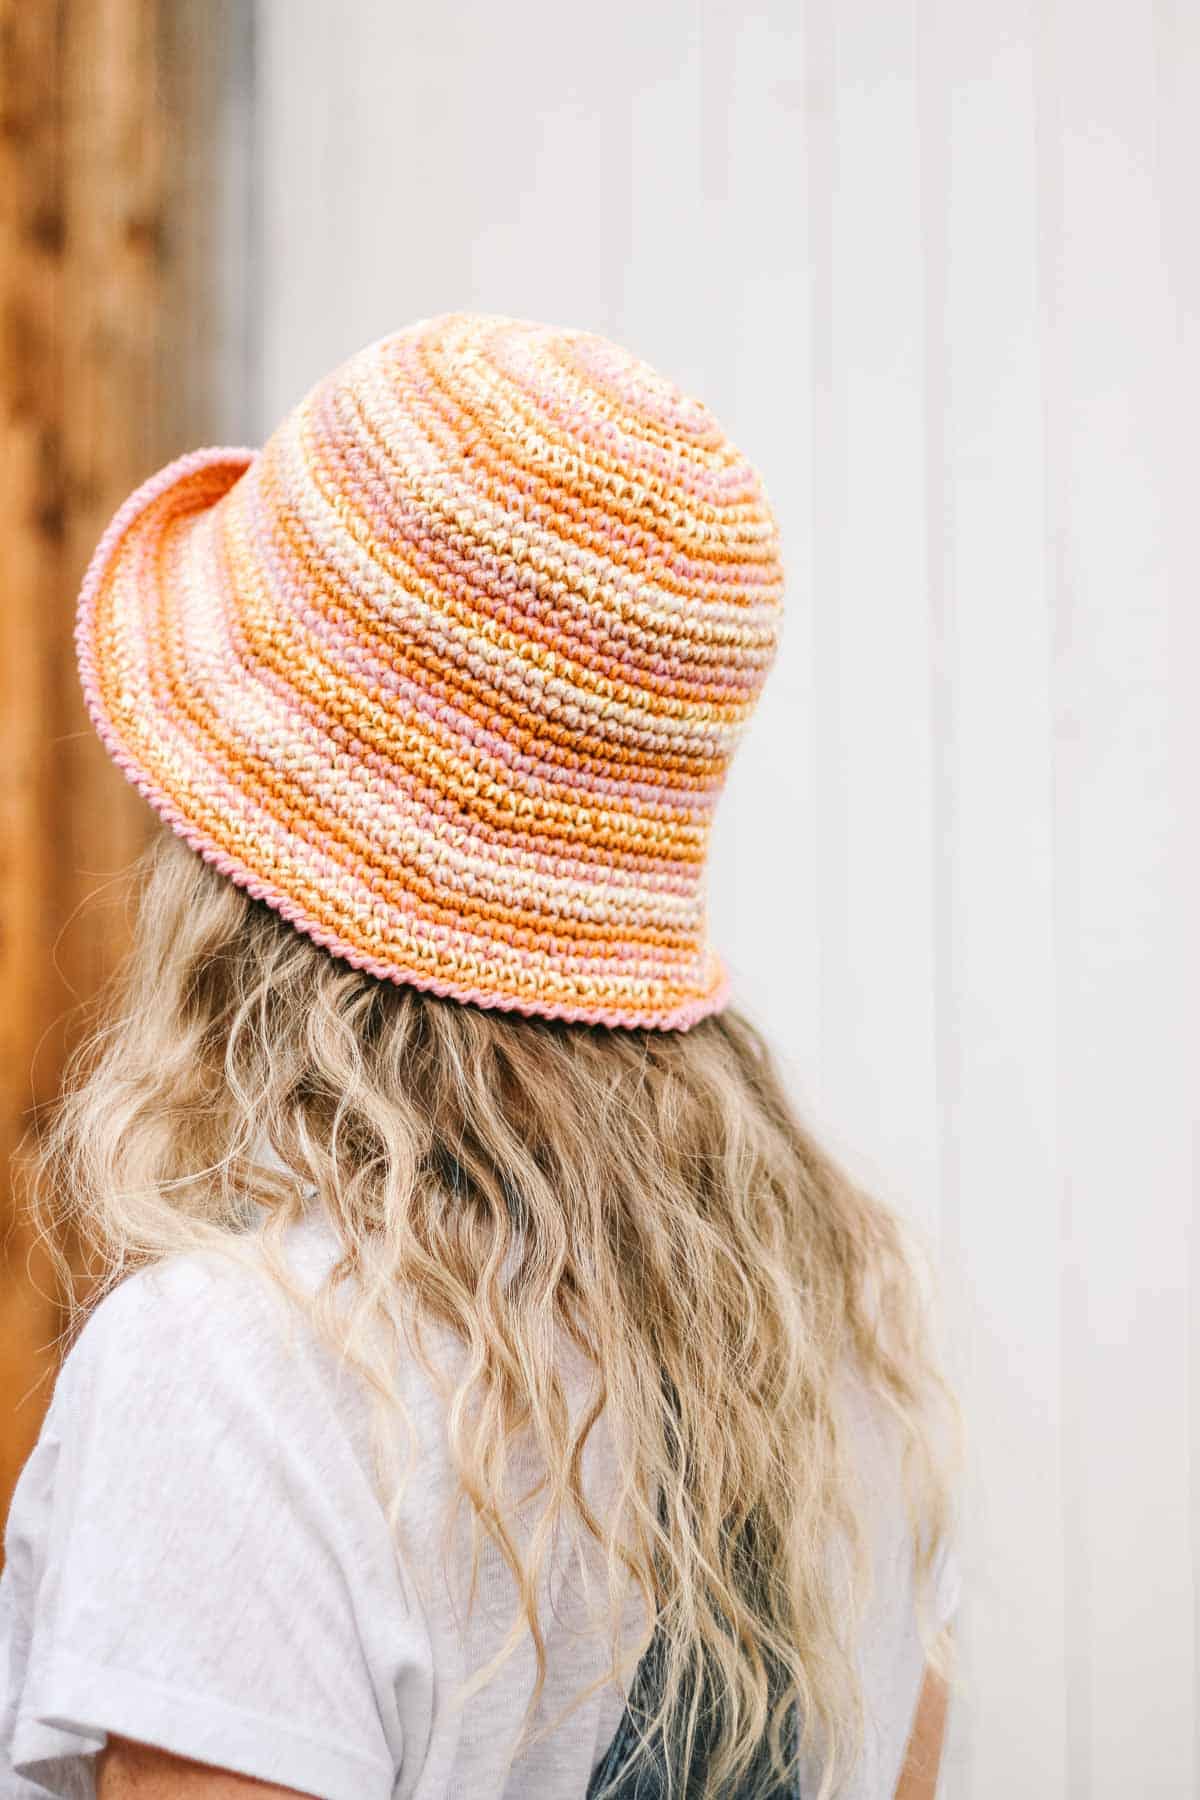
Explanation of Color Planning
This bucket hat pattern is crocheted holding two strands of Lion Brand 24/7 Cotton together throughout until the final round. Samples pictured use two different colors of yarn at all times, working in a random pattern where each color is used for two rounds in a row.
For example:
Round 1: A/B
Round 2: B/C
Round 3: C/D
Round 4: D/E and so on.
In sample hats, no particular pattern was followed besides the
each-color-is-used-for-two-consecutive-rounds rule, meaning that the stripes are not uniform or necessarily predictable.
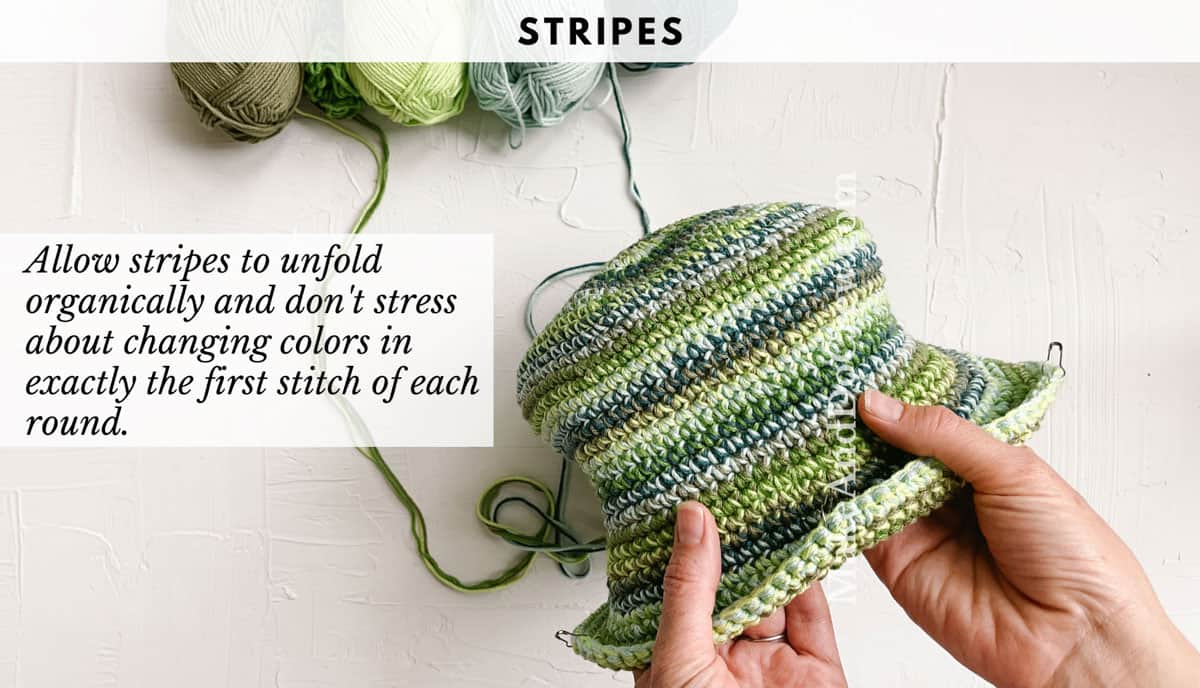
Overall, this hat is intended to be playful and organic in its color patterning. Don’t stress too much about planning your stripes and instead enjoy watching your art unfold!
The photo below shows how the stripes of your colorful bucket hat will come together as you let them develop naturally.
Tips for Minimizing the Yarn Tails
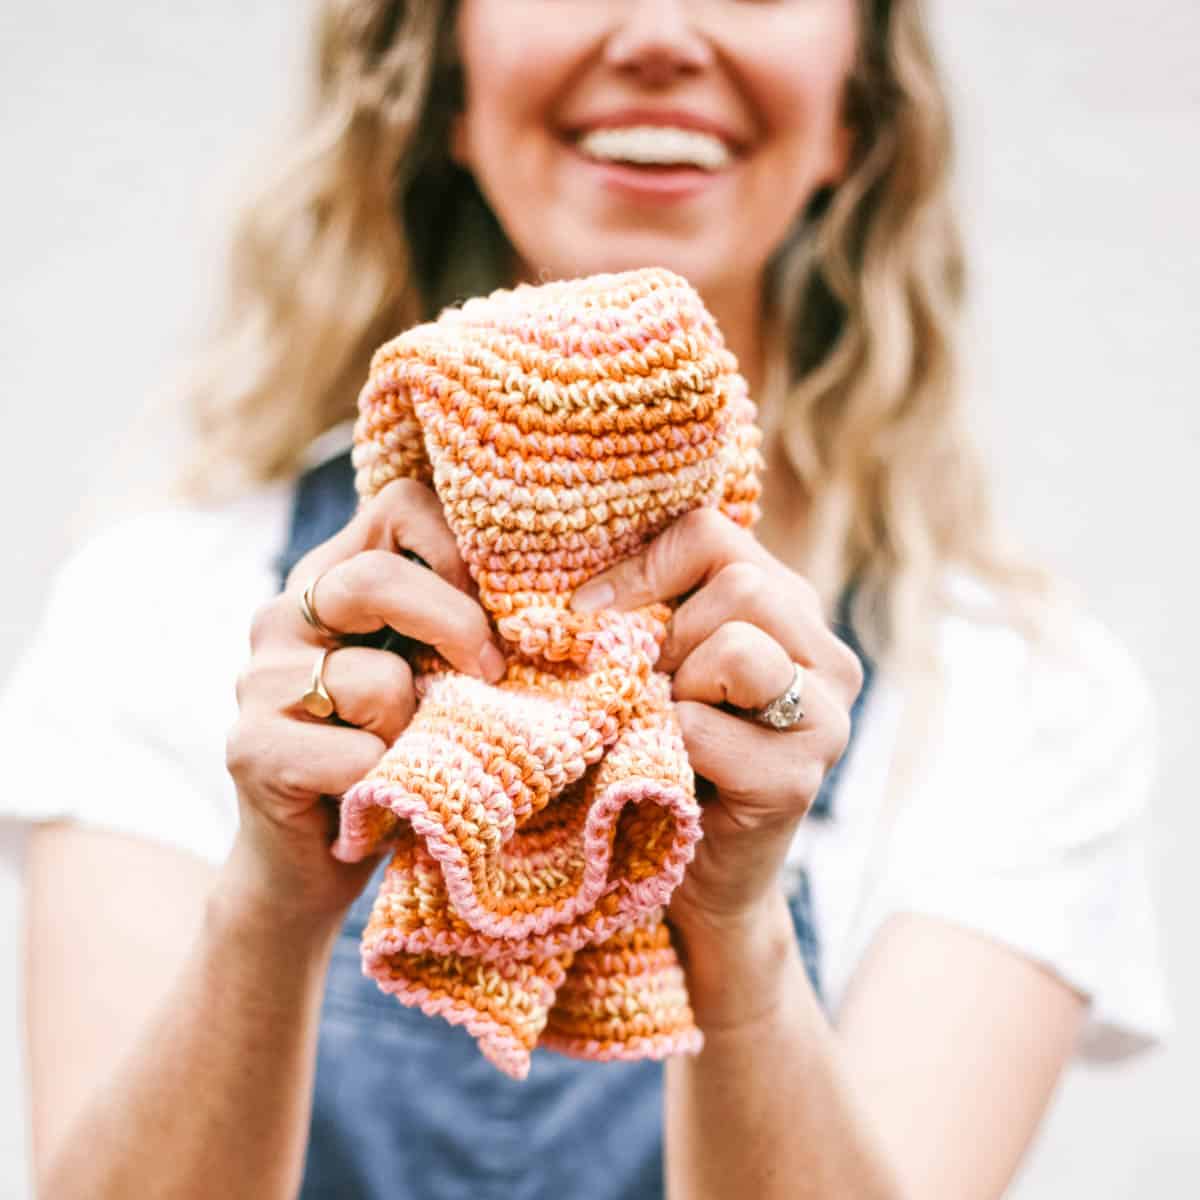
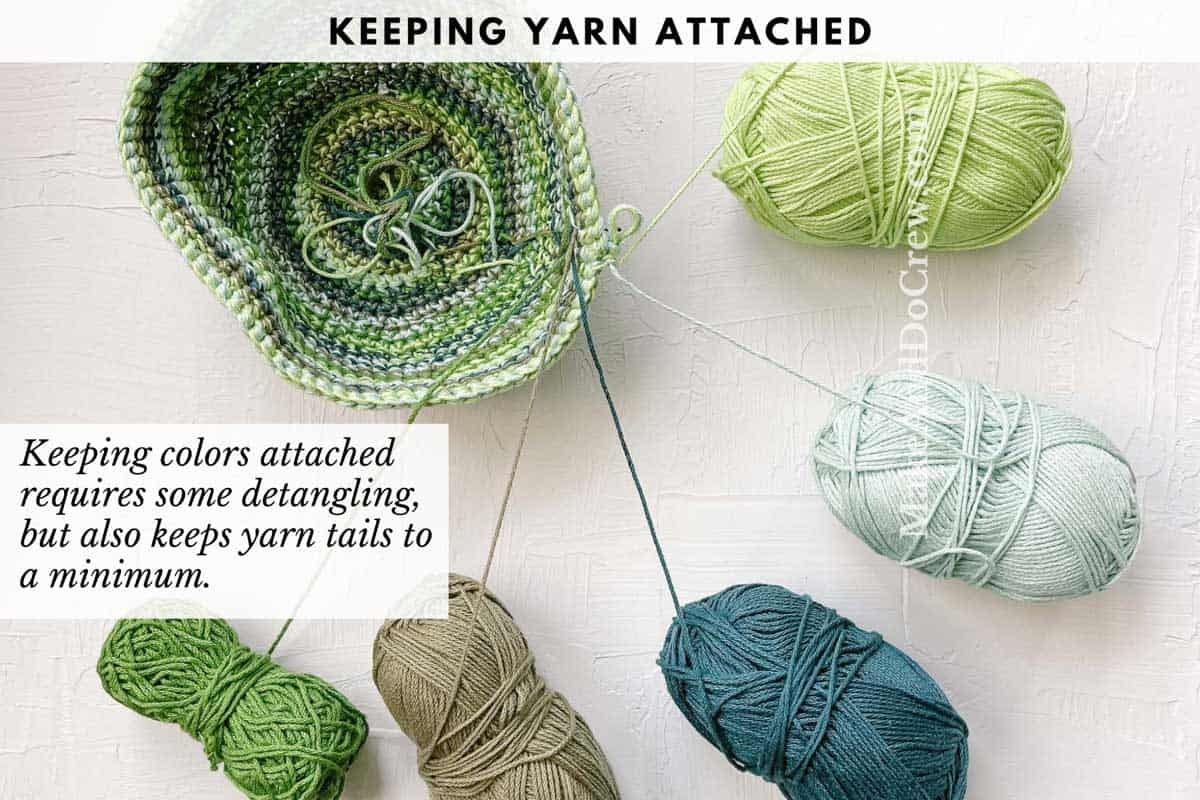
When you look at this bucket hat pattern in all its stripy, scrappy glory, I know what you're thinking – what about all the ends to weave in!?
Ha. I feel you, and I've gotcha covered. This scrappy look is achieved by keeping all the colors attached throughout and just picking them up inside the hat as needed. Yeah, it can be annoying to juggle multiple yarn balls, but it's also annoying to weave in a zillion ends, so pick your poison.
Really though, this pattern is really forgiving because no one will see the inside of your bucket hat. I encourage you to do whatever makes it easy and fun to crochet.
If keeping all colors attached is too cumbersome for you, cut yarn when rounds are complete and crochet over yarn tails.
The photo below shows how the yarn floats can be carried through the inside of your hat if you keep all the colors attached.

How to Print This Pattern
We know many people like to work from a paper copy of their crochet pattern. This is why we love offering our patterns in large-type, ad-free PDFs that are formatted for easy printing.
The Scrappy Bucket Hat printable PDF includes the complete pattern, all the photo tutorials, and none of the ads you'll find online.
Bucket Hat Crochet Kit
If you don't live near an amazing cotton yarn depot or if you just like to get fun packages in the mail, the all-in-one crochet kit is a perfect way to make your Scrappy Bucket Hat.
This bundle from Lion Brand includes all the 24/7 Cotton you'll need to crochet TWO hats, plus a free printable PDF of the pattern (delivered digitally).
Deliver it! Purchase the all-in-one crochet kit ⇨
Hat Sizes
When choosing a size, go by head actual head circumference as measured just above ears. This style looks better slightly oversized (rather than on the tighter side) so if between sizes, size up.
Checking the gauge as described in the pattern is essential to ensuring your hat fits as expected.
| Size | Fits Head Measurements | Brim Length | Amount of Yarn Needed |
| S (toddler) | 16-18” | 2.5 | 155g |
| M (child) | 18-20” | 2.5 | 175g |
| L (adult) | 20-22” | 3 | 220g |
| XL (larger adult) | 22-24” | 3 | 240g |
Gauge
Seven rounds of circle pattern should measure 3” across.
Gauge is difficult to swatch since the pattern is worked in the round, so instructions are given for measuring the gauge a few inches into the pattern.
Abbreviations and Glossary (US Terms)
ch – chain
PM – place marker
rep – repeat
RS – right side
rsc - reverse single crochet
RS - right side
sc – single crochet
slst – slip stitch
st(s) – stitch(es)
WS – wrong side
Helpful Resources + Tutorials
If you're new to learning how to crochet, check out these beginner guides that will level-up your skills.
- Crochet Supplies - what to buy and what you can skip
- Crochet Glossary - common terms, stitches, and abbreviations explained
- How to Read Crochet Patterns - tackle your next project with confidence
- How to Check Your Crochet Gauge - skipping this step is a common beginner mistake
- How to Weave in Your Ends - make this necessary evil less painful with these tips
- Blocking Your Crochet - why it matters and how to do it
Overall Pattern Notes:
• This pattern is worked in the round with the RS facing throughout. Rounds are spirals and therefore are not joined at the end of each.
• Stitches are intended to be worked tightly. If in doubt, use a smaller hook to achieve tighter tension. Circle is measured several rounds in to ensure gauge.
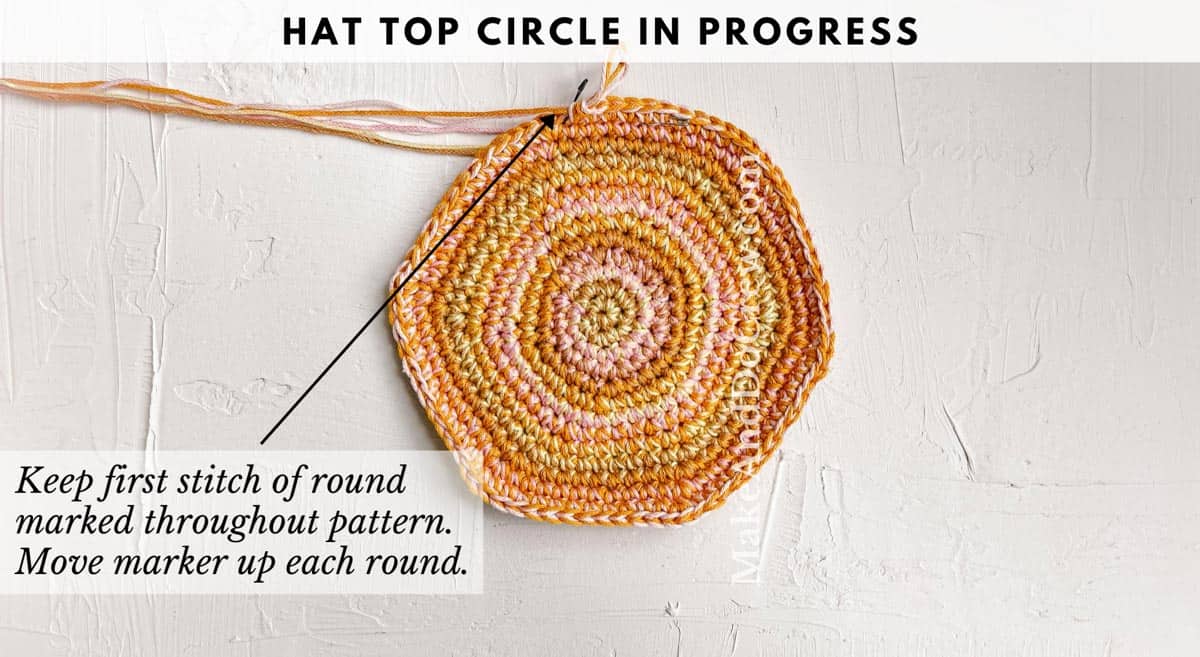
• Place marker in first stitch of round and move as each round is worked. This is critical in keeping track of the beginning/end of each round.
• Similarly, markers are used beginning in Round 6 to keep track of where increases are placed. Move markers up as each round is worked. Use a different color marker for the first stitch of round and the increases to differentiate.
• It’s not essential that color transitions take place in the first stitch of each round. In fact, varying their placement slightly helps create less of a visible join in the finished hat. Keep the transitions within 5-10 stitches of the beginning-of-round stitch marker though so that yarn floats don’t have to span too far.
The photo below shows how you can crochet a bucket hat with multiple colors of yarn attached throughout.
Wanna save this pattern?
Why you'll love this easy bucket hat!
Bucket Hat Top
ALL SIZES:
With two strands of yarn held together:
Preferred Foundation Round: Create a magic loop, ch 1 and work 6 sc within. (6)
Alternative Foundation Round: Ch 4, sl st to join into a loop. Ch 1, work 6 sc within
loop. (6)
Continuing in spiral:
Round 2: 2 sc in first st (PM in first sc made), 2 sc in each st. (12)
Move marker to first st of each round from here forward.
Round 3: [2 sc in next st, sc in next st] 6 times. (18)
Round 4: [2 sc in next st, sc in next 2 sts] 6 times. (24)
Round 5: [2 sc in next st, sc in next 3 sts] 6 times. (30)
Round 6: [2 sc in next st (PM in first sc made), sc in next 4 sts] 6 times. (36) Piece should now have 6 marked stitches. These indicate the stitches to increase in moving forward.
Round 7: [2 sc in marked st, sc in each st to next marker] 6 times. (42)
!! Gauge Check - Important !!
Take the time to measure your circle now so that your bucket hat fits later! Your circle should be 3” across. If it’s much larger than 3”, remake either with a smaller hook or working your stitches more tightly. If it’s smaller than 3”, remake either with a larger hook or working your stitches more loosely.
SMALL: Rep Round 7 twice. Piece should increase by 6 sts per round. Round 9 should contain 54 sts. Circle should measure 4.5” across.
MEDIUM: Rep Round 7 three more times. Piece should increase by 6 sts per round. Round 10 should contain 60 sts. Circle should measure 5” across.
LARGE: Rep Round 7 four more times. Piece should increase by 6 sts per round. Round 11 should contain 66 sts. Circle should measure 5.5” across.
EXTRA LARGE: Rep Round 7 five more times. Piece should increase by 6 sts per round. Round 12 should contain 72 sts. Circle should measure 6” across.
ALL SIZES Complete the final two Hat Top rounds:
Final Circle Round 1: Sc in each sc.
Final Circle Round 2: [2 sc in marked st, sc in each st to next marker] 6 times. 60 (66,
72, 78)
Remove all markers except the marker that indicates the beginning of the round. Place one additional marker of a different color anywhere in last round. This marker is helpful in indicating where Hat Top ends and Hat Bucket begins.
Hat Bucket Section
Notes:
• This section is worked without increasing. Keep first st marker in place and move up each round.
• “Work even” means to single crochet in each stitch without increasing.
SMALL: Work even for 8 rounds. When complete, Hat Bucket should measure approximately 2” from last Hat Top round.
MEDIUM: Work even for 9 rounds. When complete, Hat Bucket should measure approximately 2.25” from last Hat Top round.
LARGE: Work even for 11 rounds. When complete, Hat Bucket should measure approximately 2.75” from last Hat Top round.
EXTRA LARGE: Work even for 12 rounds. When complete, Hat Bucket should measure approximately 3” from last Hat Top round.
ALL SIZES: Place marker anywhere in last round. This marker indicates where Hat Bucket ends.
Brim
Notes:
• This section contains increases every other round. Once markers are in place, move them up as each round is worked.
• Make sure marker indicating first increase of round is a different color than all other marked increases so as to keep track of the beginning/end of each round.
• All sizes: For a longer brim, continue repeating Rounds 3 and 4, making sure to end with a Round 4.
• This video tutorial covers how to work the Finishing Round if reverse single
crochet is a new stitch to you.
SMALL:
Round 1: [2 sc in next st (PM in first sc made), sc in next 9 sts] 6 times. (66) Brim should now have 6 marked stitches.
Round 2: Sc in each st. (66)
Round 3: [2 sc in marked st, sc in each st to next marker] 6 times. (72)
Round 4: Sc in each st. (72)
Rep Rounds 3 and 4 three more times for a total of 10 brim rounds.
MEDIUM:
Round 1: [2 sc in next st (PM in first sc made), sc in next 10 sts] 6 times. (72) Brim should now have 6 marked stitches.
Round 2: Sc in each st. (72)
Round 3: [2 sc in marked st, sc in each st to next marker] 6 times. (78)
Round 4: Sc in each st. (78)
Rep Rounds 3 and 4 three more times for a total of 10 brim rounds.
LARGE:
Round 1: [2 sc in next st (PM in first sc made), sc in next 11 sts] 6 times. (78) Brim should now have 6 marked stitches.
Round 2: Sc in each st. (78)
Round 3: [2 sc in marked st, sc in each st to next marker] 6 times. (84)
Round 4: Sc in each st. (84)
Rep Rounds 3 and 4 four more times for a total of 12 brim rounds.
EXTRA LARGE:
Round 1: [2 sc in next st (PM in first sc made), sc in next 12 sts] 6 times. (84) Brim should now have 6 marked stitches.
Round 2: Sc in each st. (84)
Round 3: [2 sc in marked st, sc in each st to next marker] 6 times. (90)
Round 4: Sc in each st. (90)
Rep Rounds 3 and 4 four more times for a total of 12 brim rounds.
ALL SIZES:
When final round is complete, slst into next two stitches to create a tapering off effect.
Finishing Round: (This round is worked with RS facing still, but in opposite direction as all other rounds. View video tutorial linked above for extra help.) With only one single strand of yarn: Ch 1, rsc in each st; slst to first st of round to join.
Fasten off and weave in ends.
Pro Tip: When weaving in the tail from the Finishing Round, whip stitching a few times around the final slst of the round can help create the most seamless-looking brim edge.
Hit the trail, pool, or coffee shop and show the world how cute a crochet bucket can be!
How to Customize Your Hat
The aesthetic possibilities are really pretty endless with this bucket hat. This basic pattern is a perfect foundation to create your own unique vision, whether you choose a colorful stash-busting combination or a deliberate stripe scheme.
Suggestions
The pattern is divided into three main sections: Circle Top, Bucket and Brim. This makes it quite easy to plan a three-color color block design or customize each section on its own.
Some ideas for customizing your yarn bucket hat:
- Work the Top and Bucket sections in one main color. Crochet the brim using a contrasting color.
- Create an ombre bucket hat by using a different shade of the same color for each of the three hat sections.
- Use a main color throughout hat and alternate in stripes of a different color in each section of the hat.
Packable Hats for the Win
I love that these hats are super packable and scrunchable, but they retain their shape so well when worn.
This is the type of magical bucket hat that can spend a day at the bottom of your beach bag followed by a night stuffed in a crack in the couch and come back better than ever the next day.
If you need a packable hat that's also washable, durable AND soft, this bucket hat can't be beat.
That was so fun! Now what?
Invitation to our Facebook group
Come discuss bucket hat crochet patterns and lots of other fun projects and techniques in our Make & Do Crew Facebook group. Here thousands of helpful crocheters answer each others questions and share their stitches.
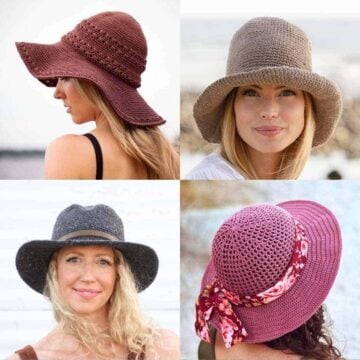
More Free Sun Hat Patterns
Here are a few free crochet sun hat patterns makers love and we think you will too!


The How to Crochet a Bucket Hat
Materials
Yarn
- Color: Lion Brand 24/7 Cotton Weight: 4/medium - 170 yds, 3.5 oz
Pink/Yellow Hat
- Lemon [761-157D]
- Goldenrod [761-158R]
- Amber [761-186G]
- Pink [761-101A]
- Pink Lemonade [761-103X]
Green Hat
- Dragonfly [761-177J]
- Grass [761-172H]
- Lime [761-170J]
- Mint [761-156]
- Bayleaf [761-171V]
Blue Hat
- Navy [761-110]
- Succulent [761-116E]
- Mint [761-156]
- Jade [761-178C]
- Aqua [761-102A]
Additional Supplies
- Tapestry needle
- Size J 6.0 mm crochet hook or size needed to obtain gauge
- Stitch markers in at least two colors
Abbreviations + Glossary (US Terms)
- ch – chain
- PM – place marker
- rep – repeat
- RS – right side
- rsc – reverse single crochet
- RS – right side
- sc – single crochet
- slst – slip stitch
- st(s) – stitch(es)
- WS – wrong side
Abbreviations and Glossary (US Terms):
Want some company while you crochet?
Get support (and camaraderie!) in the Make & Do Crochet Crew Facebook Group. Search “Make and Do Crochet Crew” on Facebook.com.
Permissions + Copyright
Please do not publish or share this pattern as your own. You may make items to sell with this pattern. In exchange, please link back to this page. Do NOT use my photos as your own sales photos.
Overall Pattern Notes
Instructions
Easy Crochet Bucket Hat Pattern Overview
- 1. Begin with a foundation round of a magic loop, chain one and work 6 single crochet within.
- 2. Chain four, slip stitch to join into a loop. Chain one, work 6 single crochet within loop. For the alternative foundation round.
- 3. Repeat Rounds 2-7 continuing in spiral.
- 4. Check gauge and work on the circle depending on the size of hat.
Hat Bucket
- 5. For small hat bucket, work even for 8 rounds. Modify Rounds depending on the size.
Hat Brim
- 6. For a longer brim, continue repeating Rounds 3 and 4. Make sure to end with Round 4.
- 7. Finishing round is worked with Right Side facing still but in opposite directions as all others.
Finishing
- 8. Fasten off and weave in ends.
- 9. Hit the trail, pool or coffee shop and show the world how cute a crochet bucket can be!
Overall Pattern Notes
- Entire bucket hat is worked in the round with the RS facing throughout. Rounds are spirals and therefore are not joined at the end of each.
- Stitches are intended to be worked tightly. If in doubt, use a smaller hook to achieve tighter tension. Circle is measured several rounds in to ensure gauge.
- Place marker in first stitch of round and move as each round is worked. This is critical in keeping track of the beginning/end of each round.
- It’s not essential that color transitions take place in the first stitch of each round. In fact, varying their placement slightly helps create less of a visible join in the finished hat. Keep the transitions within 5-10 stitches of the beginning-of-round stitch marker though so that yarn floats don’t have to span too far.


Leave a Reply