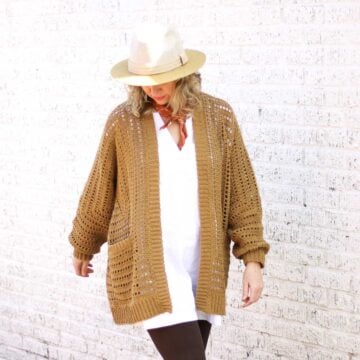
Luxuriously slinky yarn and richly textured stitches create a wardrobe staple that’ll make you look and feel fantastic. Get the free crochet cardigan pattern with plus sizes below, or purchase the ad-free, printable PDF here.
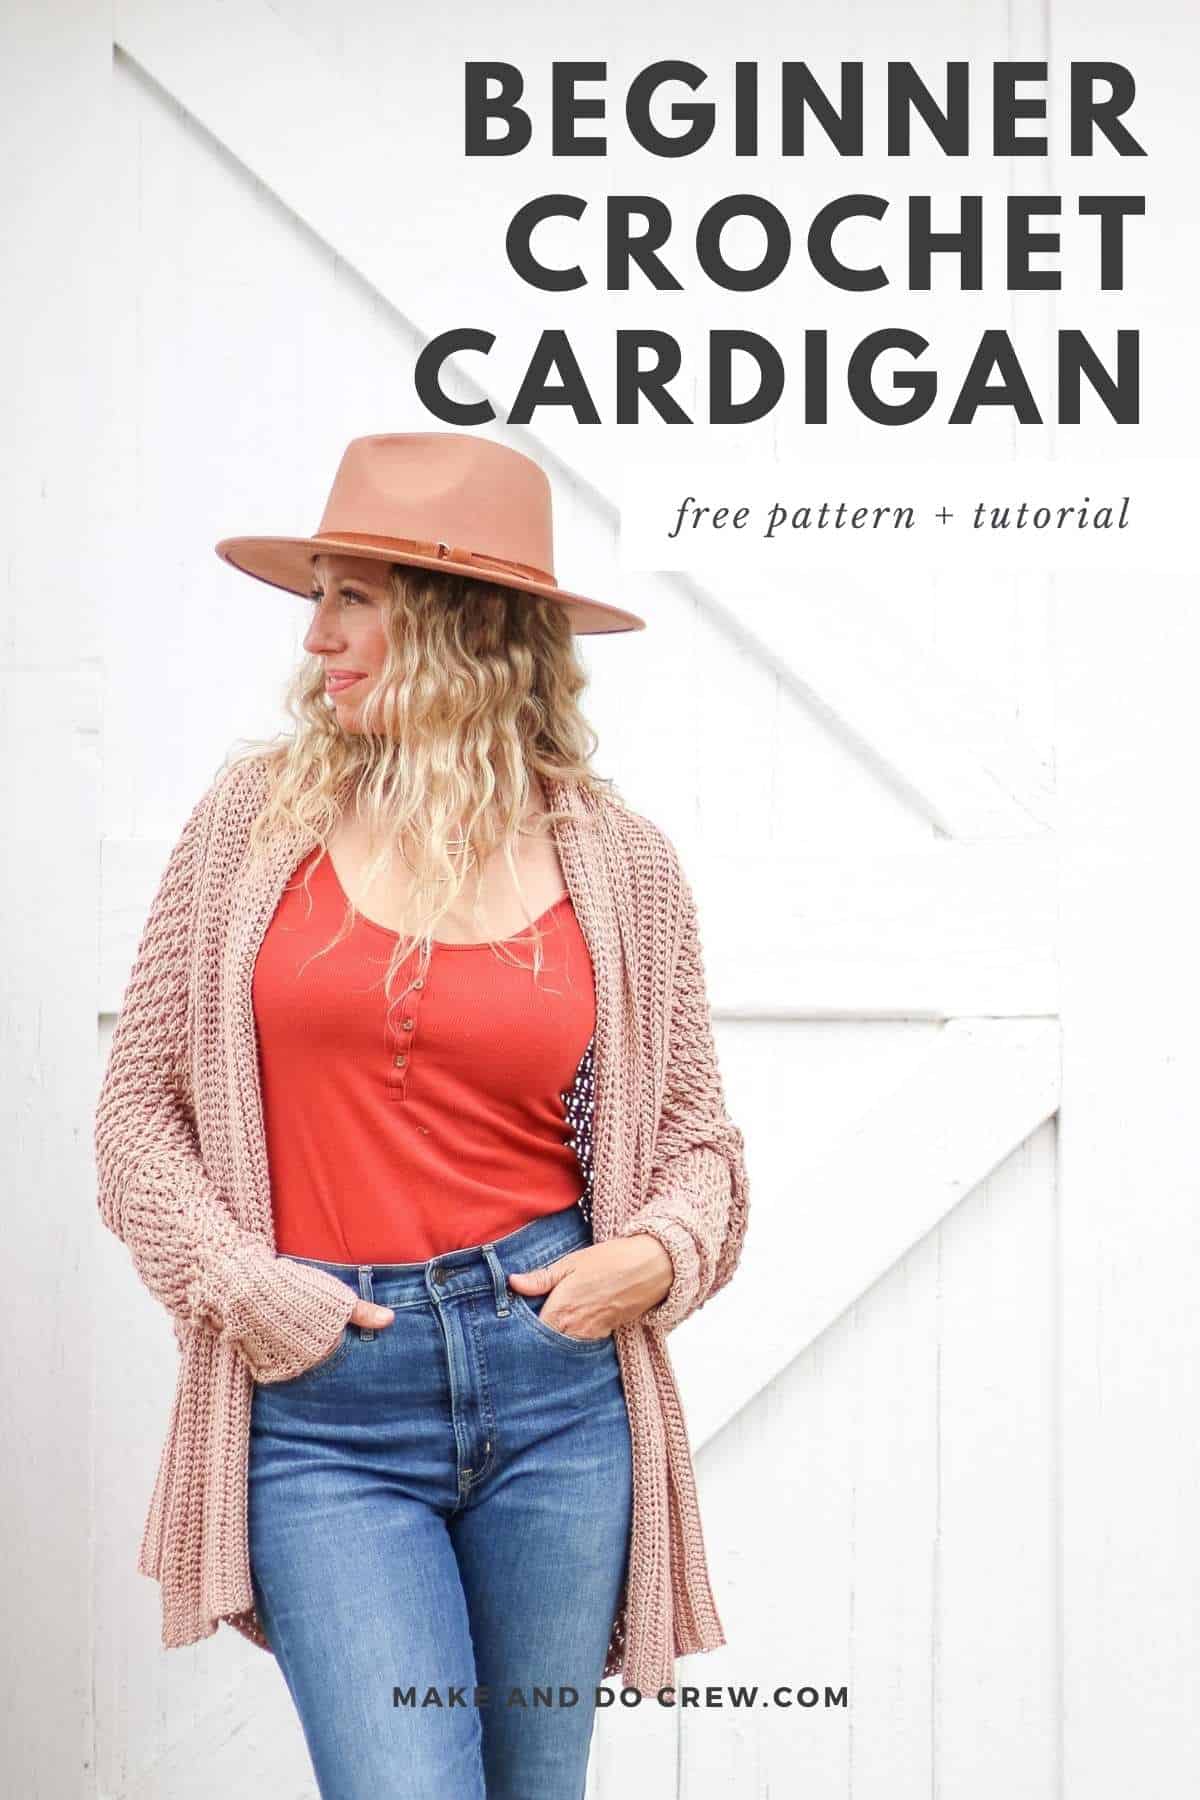
This plus-size crochet cardigan pattern pattern is part of a collaboration with Lion Brand Yarns. This post contains affiliate links.
Jump to:
Turn a Crochet Rectangle Into a Cardigan
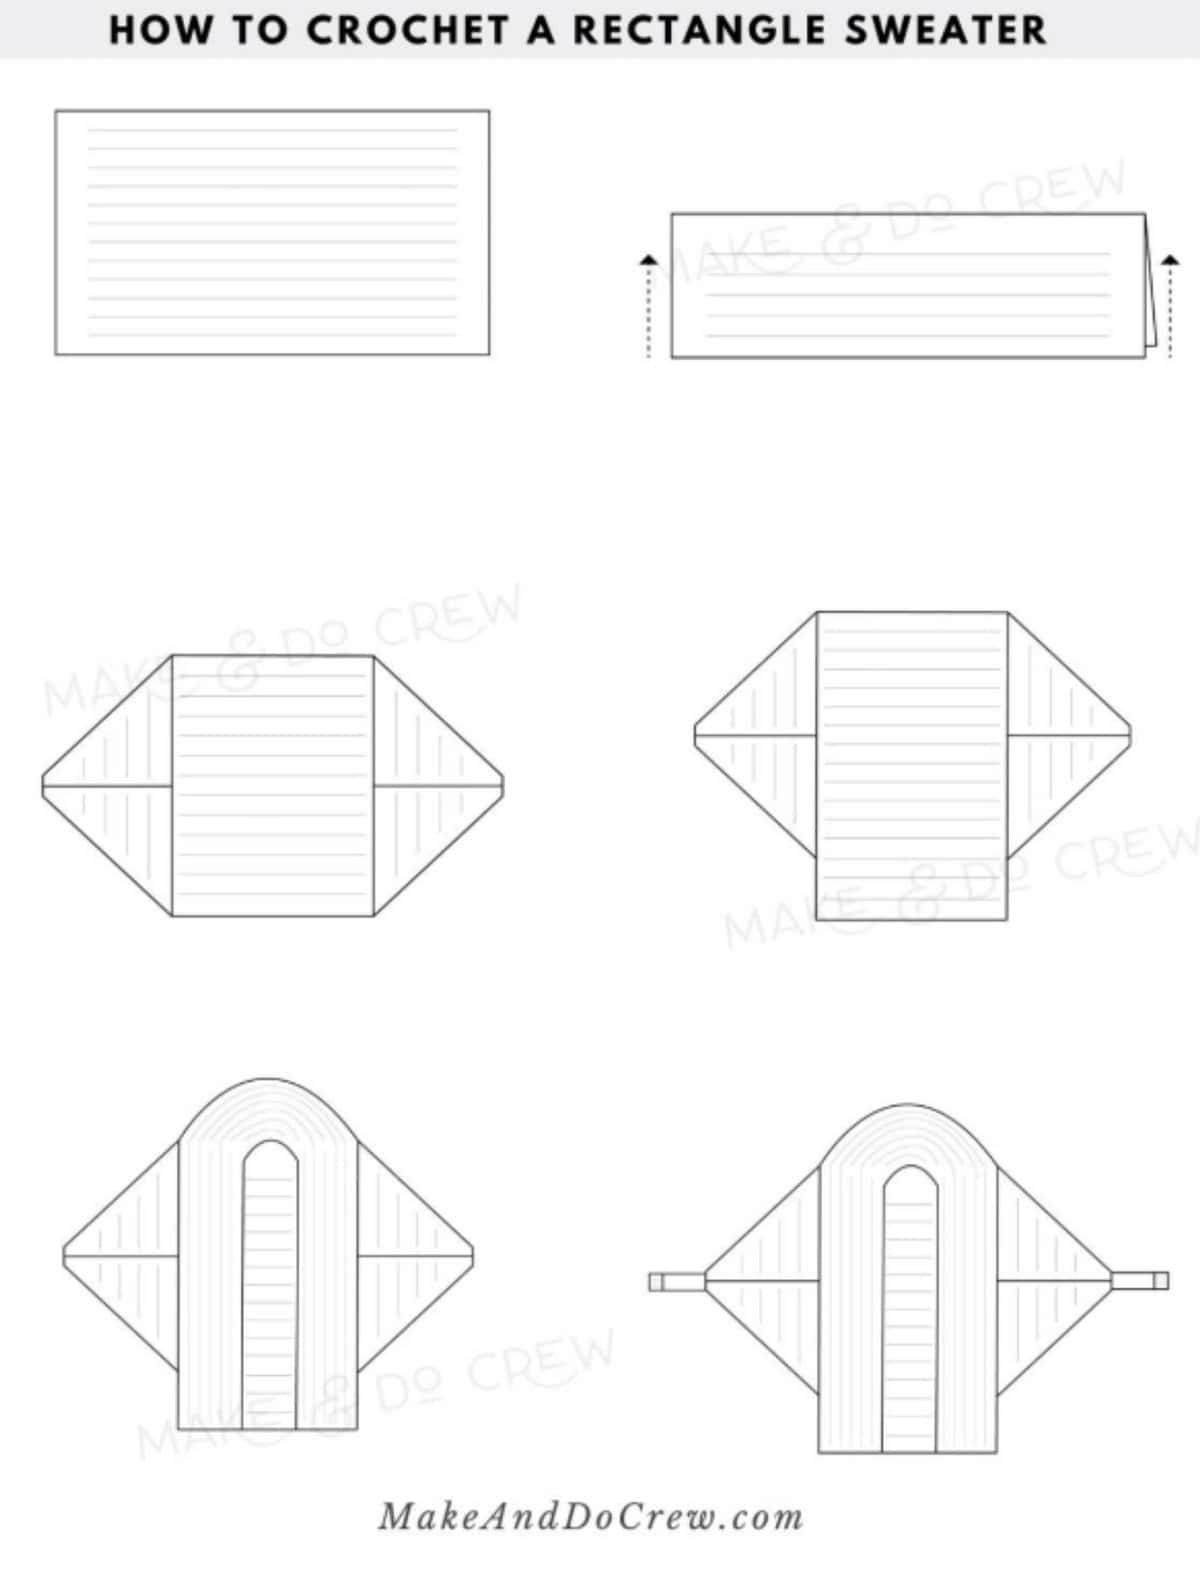
The construction of this dolman-sleeved cardigan couldn’t be easier thanks to a large crochet rectangle that forms the foundation for the entire pattern.
Once your rectangle is seamed into a sweater shrug, you’ll lengthen it with a “tush extension” and add a simple ribbed collar and mini sleeves.
This pattern is perfect if you want to jump into the world of crochet sweaters without taking on a bunch of counting, increasing or decreasing.
You’re going to love the elevated casual vibe of this drapey cocoon cardigan!
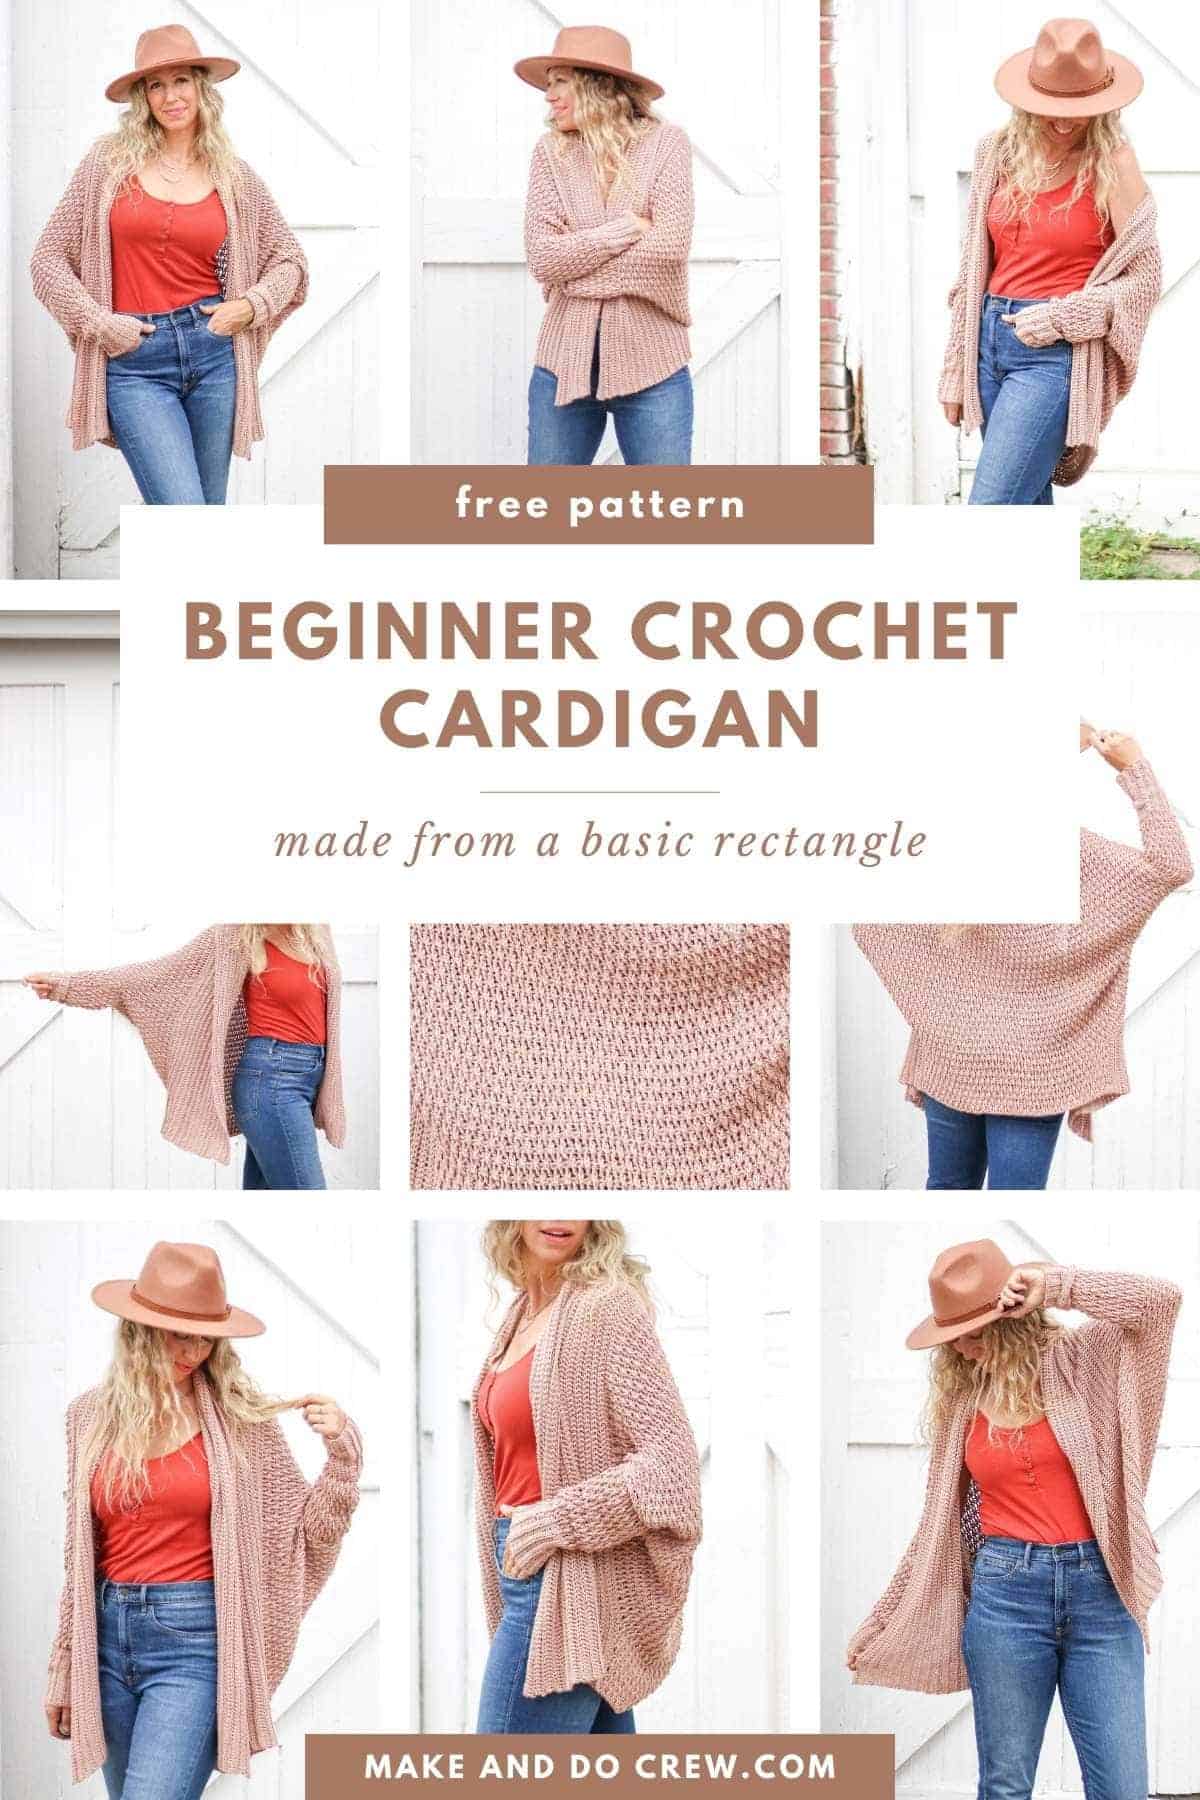
A Plus Size Crochet Cardigan for All Body Types
The oversized nature of this crochet cardigan will accommodate many body types.
While the free pattern below is written in sizes small through triple extra large, the style can comfortably fit up to a 4X or 5X if you're okay with less positive ease (looseness) in your sweater.
Check notes in the free pattern below to more helpful details on determining sizing.
Why you'll love crocheting this cardi!
Lightweight Sweater Yarn
To crochet this cardigan pattern, you'll need approximately 1900-2600 yards of a category 3 DK weight yarn such as Lion Brand Truboo, or similar. If you've never touched Truboo before, you're going to fall in love with the slinky, smooth feeling of this bamboo yarn.
I've found that Truboo yarn tends to "grow" a bit once crocheted, so it's important to follow the gauge swatch instructions and adjust your hook size if necessary.
Lion Brand Coboo is a good alternative if you don't have access to Truboo.
All-in-One Crochet Kit
If you don't live near amazing yarn stores or if you just like to get fun deliveries to your doorstep, the all-in-one kit is a perfect way to make your Linden Cardigan. This bundle from Lion Brand includes all the Truboo yarn you'll need, plus a bonus printable PDF of the pattern (delivered digitally).
Print this Pattern
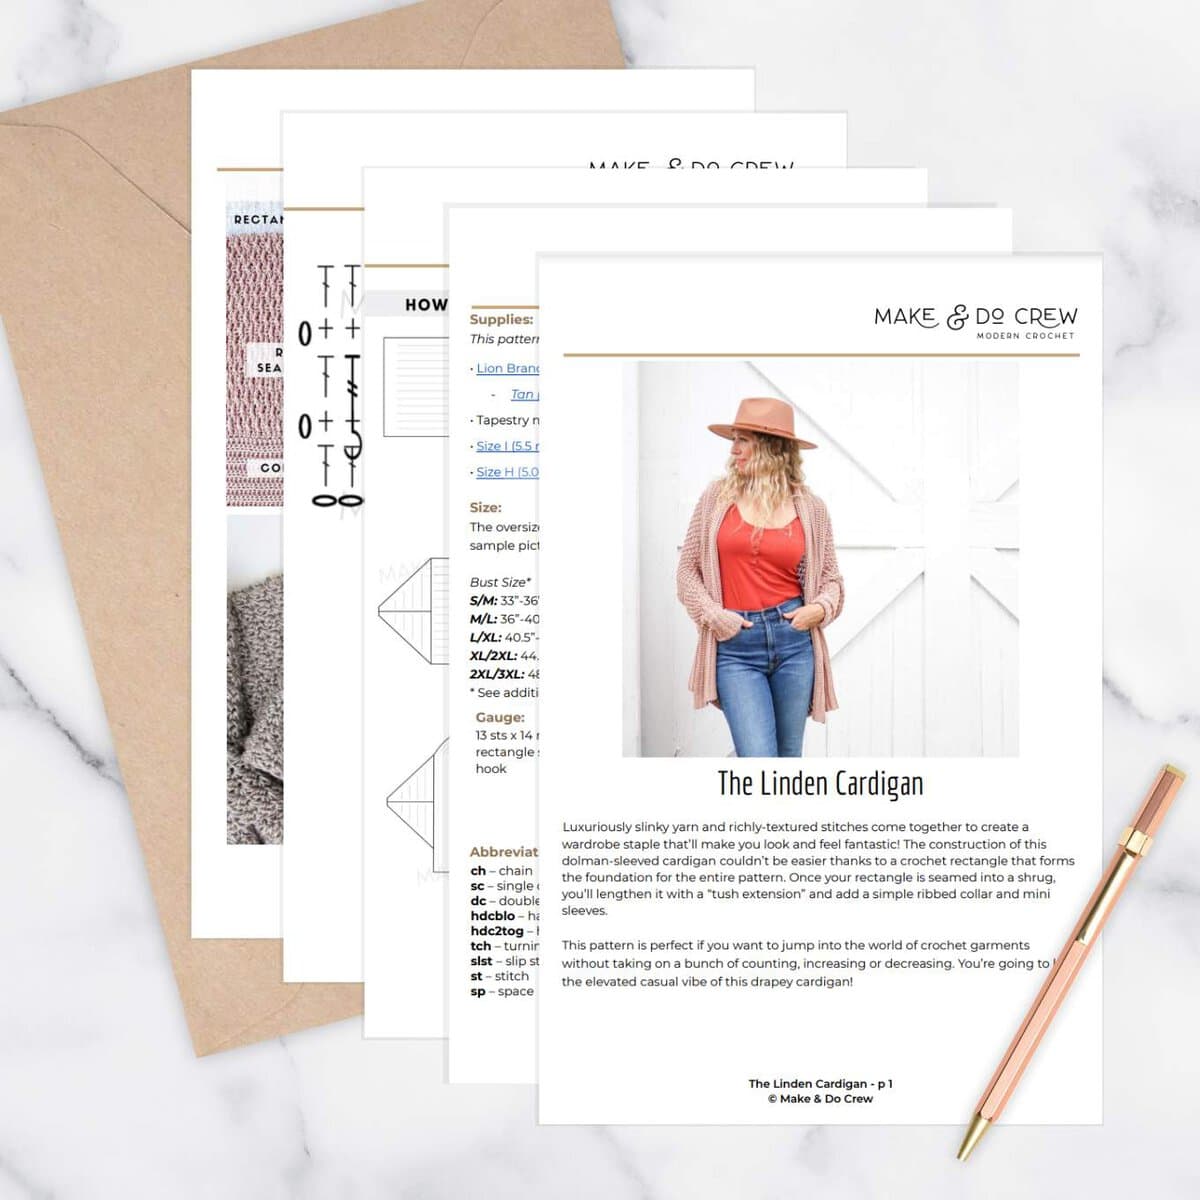
Prefer to crochet on the couch? Need a portable, printable pattern? You'll love the premium PDF! The instantly downloadable, ad-free file is formatted for easy printing.
It includes the complete crochet cardigan pattern in sizes small through 3xl, tutorial diagrams, a stitch chart, and several additional photos detailing how to make this simple sweater.
More Free Crochet Patterns With Plus Sizes
We really value sharing our crochet patterns with inclusive sizing. Whether you love making crochet tops, ponchos or beginner sweaters, we've got you covered with free crochet patterns that include plus sizes.
Add a few of our favorite free crochet patterns to your project queue!
Linden Cardigan - Free Pattern
Supplies + Materials
Order an all-in-one kit from Lion Brand.
• Lion Brand Truboo (Weight: 3/Light - 241 yds, 3.5 oz)

Don't spend hours for a "meh" result!
Tired of crocheting garments that don't fit? Learn our C.R.A.F.T. Framework to make sweaters that fit and feel amazing!
- Tan (#837-123) 8 (9, 9, 11, 11) skeins [approx. 736 (831, 893, 1010, 1075)g]
• Tapestry needle
Sizes and Measurements
The oversized nature of this sweater will accommodate many body types. The sample pictured is a M/L on a 5’9” model with a 38” bust. See additional details in Overall Pattern Notes to determine sizing.
Gauge
13 sts x 14 rows = 4” as worked in main rectangle stitch pattern using larger hook
| Pattern Size | Your Bust Measurement |
|---|---|
| Small/Medium | 33”-36” |
| Medium/Large | 36”-40.5” |
| Large/Extra Large | 40.5”-44.5” |
| Extra Large/Double XL | 44.5”-48.5” |
| Double XL/Triple XL | 48.5”-51” |
Abbreviations + Glossary
(US Terms)
ch – chain
sc – single crochet
dc – double crochet
hdcblo – half double crochet through the back loop only
hdc2tog – half double crochet two together
tch – turning chain
slst – slip stitch
st – stitch
sp – space
sk – skip
RS – right side
WS – wrong side
rep – repeat
Yo – yarn over
Special Stitches
FPtr (Front post treble): Yo twice, insert hook from front around stem of dc in the row below from right to left, then complete st as usual.
Skill Level
Intermediate: The skills required for this pattern are beginner-friendly, but the thinner yarn makes this project more ambitious than some of our easiest crochet cardigans.
Permissions + Copyright:
Please do not publish or share this pattern as your own. You may make items to sell with this pattern. In exchange, please link back this post. Do NOT use our photos as your own sales photos.
Overall Pattern Notes
- Pattern is written in size S/M with M/L, L/XL, XL/2XL and 2XL/3XL following in parentheses: S/M (M/L, L/XL, XL/2XL, 2XL/3XL). If working from the printable pattern, it can be helpful to highlight all the stitch counts related to your size before beginning.
- Ch 3 at beginning of row counts as one double crochet throughout.
- Because of the oversized style of the sweater, choosing a size is less about exact chest size and more about how loose you want your sweater to fit.
- Sweater can be easily modified to accommodate body type by adjusting measurements of the main rectangle. For example, if you’re tall and narrow, you may choose to follow the S/M rectangle width instructions and the M/L rectangle height instructions. If you’re shorter and curvier, you may choose to follow the L/XL rectangle width instructions and the S/M rectangle height instructions.
Print This Pattern: purchase the ad-free, printable PDF
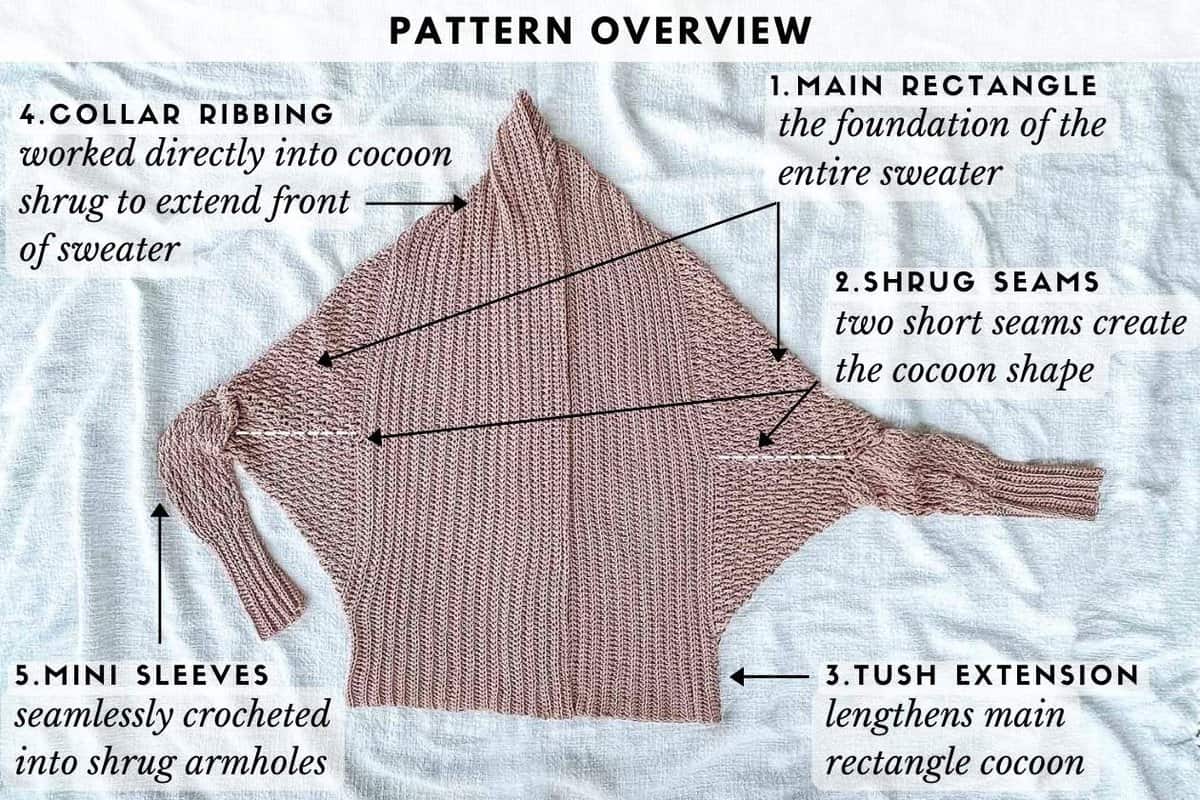
Rectangle Body of Sweater
Notes:
- To adjust the width of the sweater, chain a multiple of 2 + 1, plus 2 for the foundation chain (i.e. any odd number plus 2).
Using larger hook:
Foundation Row: Ch 115 (131, 147, 163, 179).
Row 1(RS): Dc in fourth ch from hook, dc in each ch to end of row; turn. [113 (129, 145, 161, 177) sts]
Row 2 (WS): Ch 1, sc in each st to end of row; turn. [113 (129, 145, 161, 177) sts]
Row 3 (RS): Ch 3, *FPtr in next dc 2 rows below, dc in next sc, rep from * to end of row; turn.
✨Unlock this free subscriber-exclusive pattern ✨
Follow these steps to view the full free pattern below
Premium PDF
easier and faster with fewer mistakes.
- Complete pattern + photo tutorials
- Instant download
- Formatted for easy printing
Want some company while you crochet?
Get support (and camaraderie!) in the Make & Do Crew community. Join for free here.
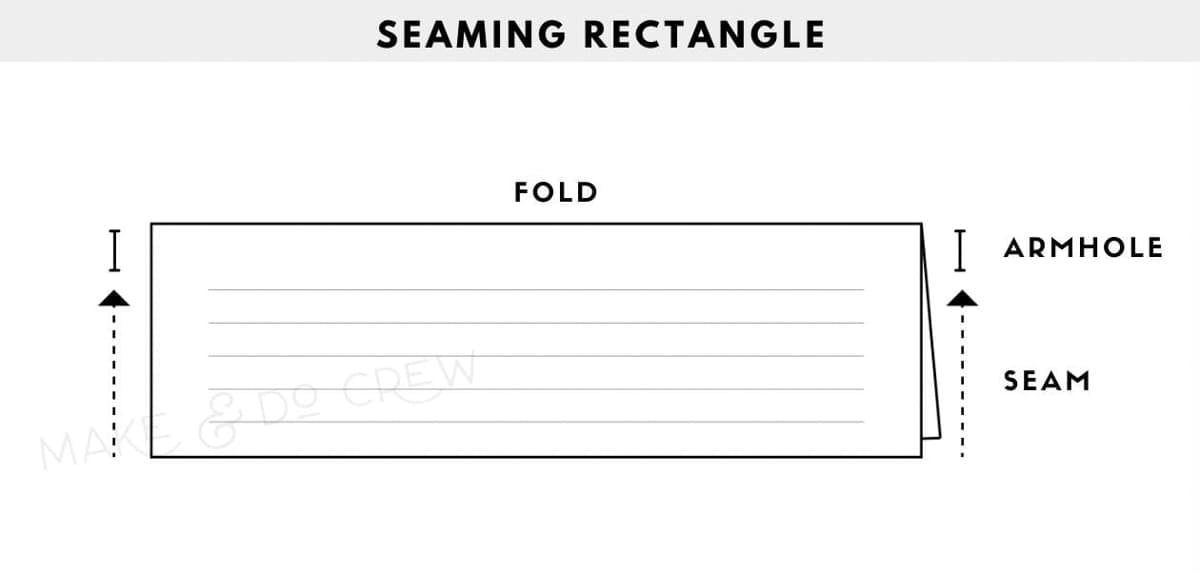
Seaming Rectangle
How to seam your crochet rectangle into a shrug:
Step 1: Lay rectangle flat so that WS is facing up. (Tail from foundation chain should be in bottom corner on same side as your dominant hand.)
Step 2: Fold rectangle in half so that foundation row and final row of the rectangle are touching. RS should now be facing out and the stripes of the rows of crocheting should be running horizontally. Pin in place along side seams using stitch markers or safety pins.
Step 3: Place a stitch marker 6 (6, 6, 8, 8)” in from the folded crease on each side. This distance will remain unsewn and form the armhole opening.
Step 4: Using a tapestry needle and a single strand of MC yarn, begin seaming the rectangle, working from the corners toward the folded crease. Take care to keep rows of crocheting lined up on either side of seam. Stop at the stitch marker. Repeat for second seam.
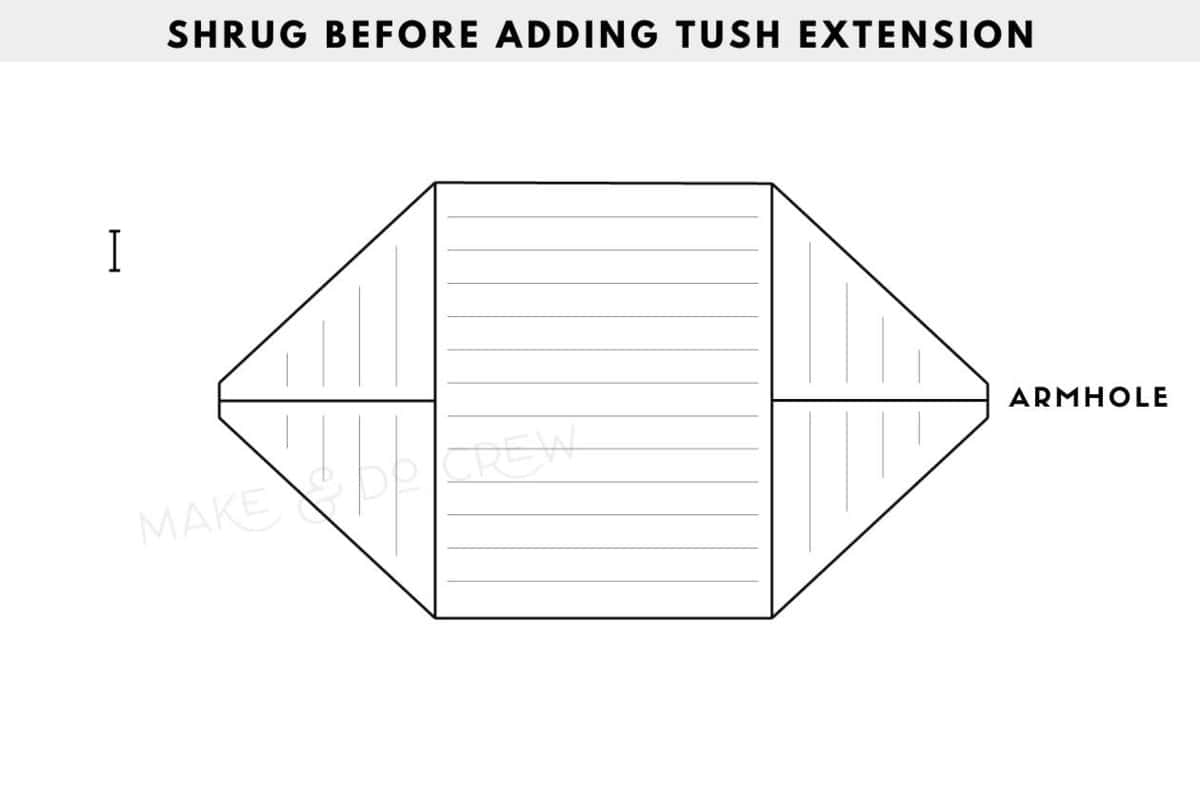
Step 5: Lay your new shrug-lette flat. The last row of the rectangle should be at the bottom and the foundation chain at the top.
Place a stitch marker in the single crochet stitch that falls at the intersection of the bottom of the shrug and the perpendicular collar edge. Repeat on second side and top two corners. (4 markers total)
Our Latest Crochet Inspiration:
Here are a few more free crochet patterns and tutorials that are hot off the presses.
Wanna save this pattern?
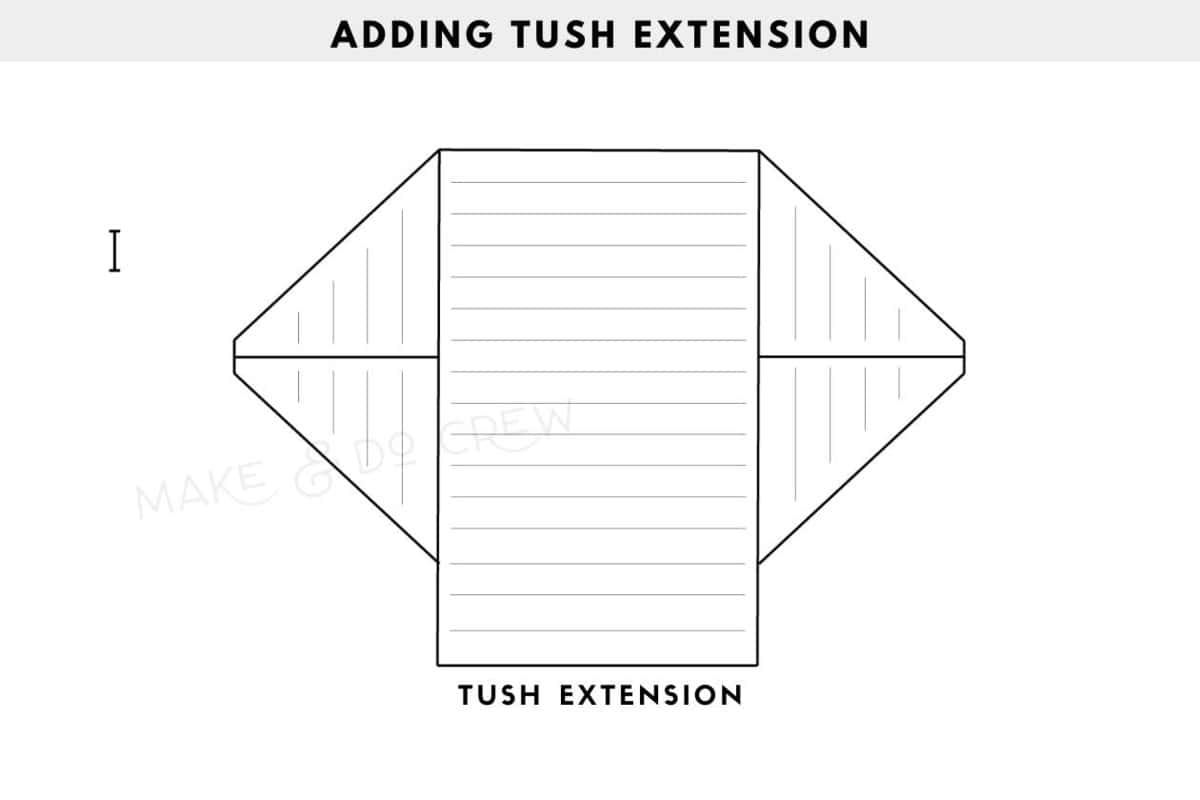
Tush Extension
Notes:
- This section begins by working into the bottom of the sweater between the stitch markers, which is the last row of the rectangle you worked before seaming.
- The tush extension is worked the same for all sizes, but if you’d prefer an extra long cardigan, you may work additional rows. End with a WS row.
Use larger hook. With RS of fabric facing you, attach yarn into the sc marked stitch on same side of the rectangle as your dominant hand (right maker for right-handed crocheters, left marker for left-handed crocheters).
Row 1 (RS): Ch 3, dc in next sc, *FPtr in next dc 2 rows below, dc in next sc, rep from * to end of row, dc in last sc; turn (67 sts)
Row 2 (WS): Ch 1, sc in each st to end of row; turn.
Row 3 (RS): Ch 3, *FPtr in next dc 2 rows below, dc in next sc, rep from * to end of row; turn.
Row 4 (WS): Rep Row 2.
Rep Row 1-4 three more times. For a total of 16 rows. Do not fasten off.
Obsessed with finding the best free crochet patterns?
Check out these collections of handpicked patterns to find your next project.
You must use the category name, not a URL, in the category field.Adding Ribbed Collar
Notes:
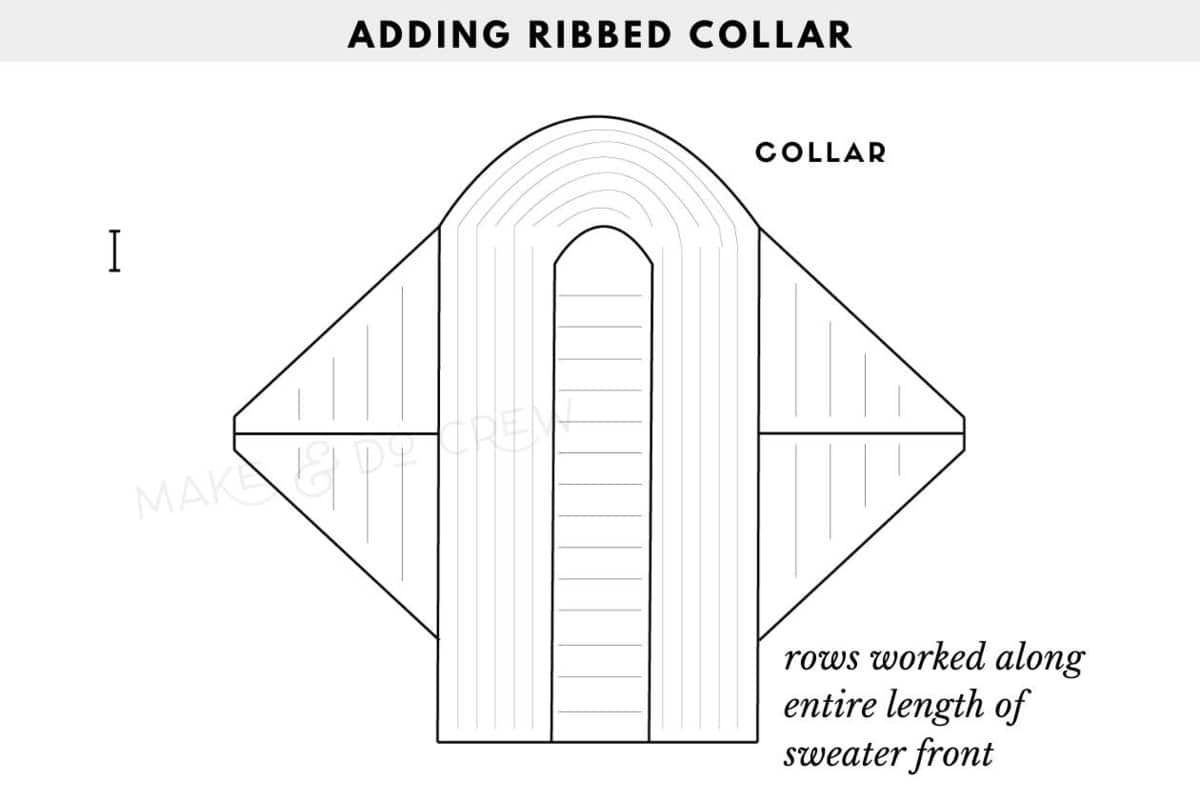
- Collar is worked along the edge of the shrug/tush extension back and forth in rows starting at the bottom front corner of the sweater, working around the back of the neck and returning to the bottom front corner on the other side.
- When working Row 1, be more concerned with evenly spacing the hdc stitches so that the resulting collar looks smooth rather than the total stitch count.
- Ch 2 at the beginning of each row does not count as a hdc.
Use larger hook. With RS of fabric facing you, continue using working yarn from tush extension.
Row 1 (RS): Ch 2, work hdc stitches evenly from bottom collar corner to opposite corner. To do this: hdc in each row of the tush extension, then hdc in each st along collar edge and again hdc in each row of the tush extension of the opposite side (be certain to work into final sc of last tush extension row as it can be hard to see); turn.
Row 2 (WS): Ch 1, *hdcblo in each hdc* until st remains before next marker, hdc2tog through the blo of next hdc and marked hdc, work between * and * to next marked st, hdc2tog over marked hdc and next hdc, rep between * and * to end; turn. Move markers up to hdc2tog.
Row 3 (RS): Ch 2, hdcblo in each hdc to end of row; turn. Move markers up to appropriate hdc.
Row 4 (WS): Ch 2, hdcblo in each hdc to end of row; turn. Move markers up to appropriate hdc.
Note: It’s not essential that the hdc2tog decreases on either side of the neck line up perfectly with the previous row. Estimating their location is fine.
Rep Rows 2-4 ten more times. Then repeat Rows 2-3 once more. There should be a total of 18 visible ribbing “bumps” or rows of “V’s” running along collar. Fasten off.
Sleeves
Notes:
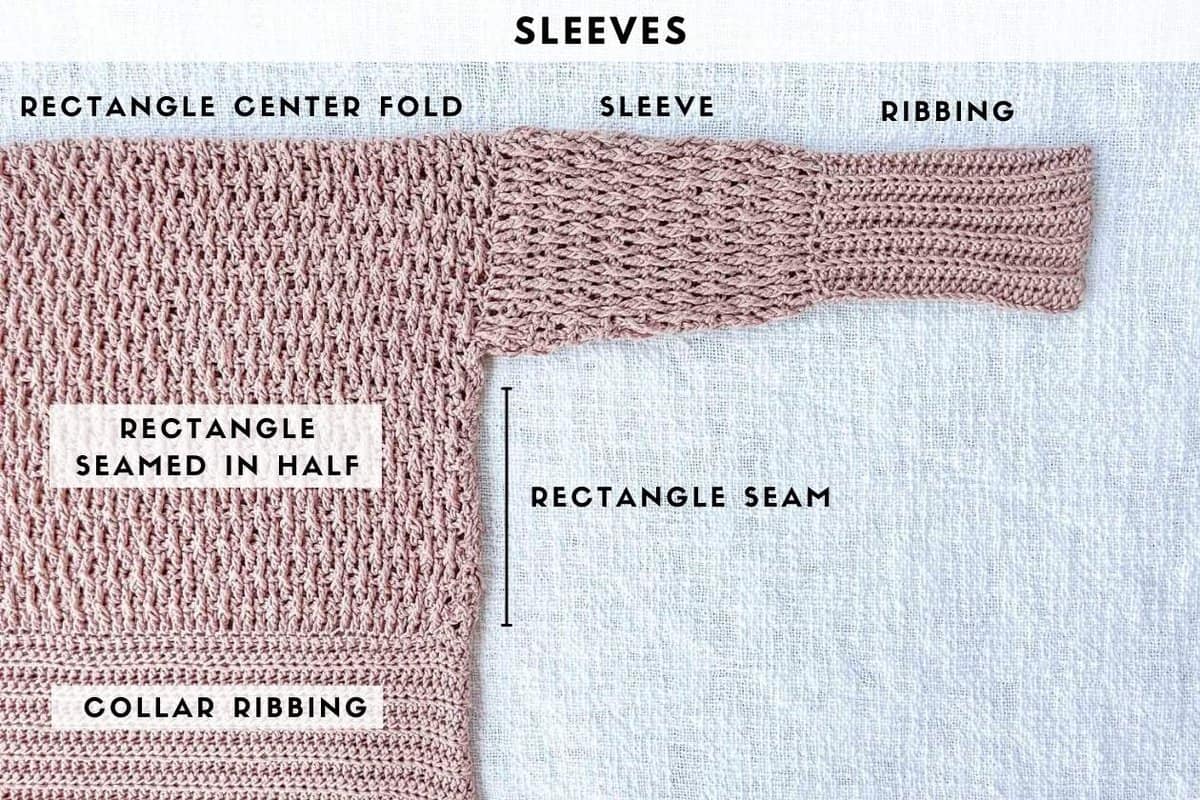
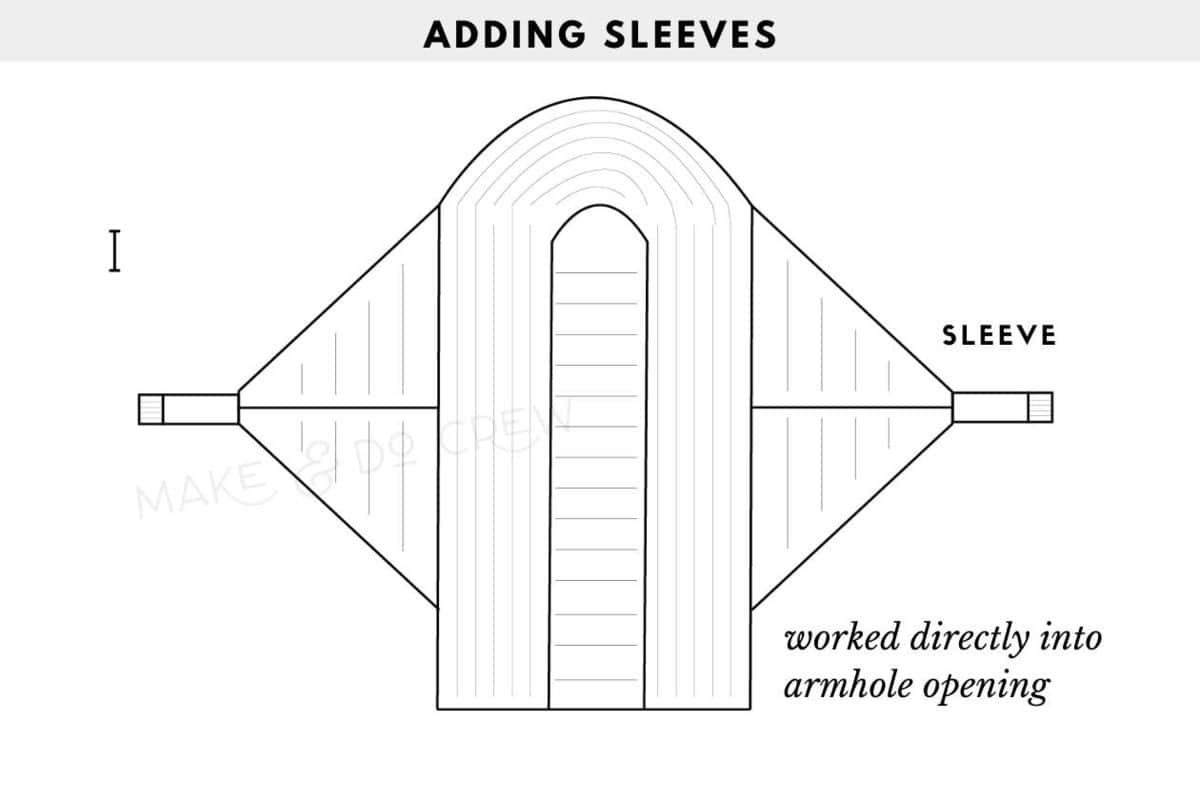
- Sleeves are made by picking up sts around armhole edge and worked in turned rounds.
- As in collar, ch 2 at beginning of row does not count as a stitch.
Make 2.
With larger hook and RS facing, attach yarn in st after seam at bottom of armhole.
Foundation Round: Ch 3, work 39 (39, 39, 51, 51) dc evenly around armhole opening, join with slst to top of ch 3; turn. (Generally, place 1 dc in each sc row, and 2 dc in each dc row around armhole the achieve the appropriate spacing.) [40 (40, 40, 52, 52) sts]
Round 2 (WS): Ch 1, sc in each dc to end of round, join with slst to first sc; turn. [40 (40, 40, 52, 52) sts]
Round 3 (RS): Ch 3, FPtr in next dc 2 rows below, *dc in next sc, FPtr in next dc 2 rows below, rep from * to end of round, join with slst to top of turning ch; turn.
Round 4 (WS): Rep Round 2.
Round 5 (RS): ch 3, dc in next sc, *FPtr in next dc 2 rows below, dc in next sc, rep from * to end of round, join with slst to top of tch; turn.
Round 6 (WS dec): Ch 1, sc2tog, sc in each st to last two sts of round, sc2tog, join with slst to first sc; turn. [38 (38, 38, 50, 50) sts]
Round 7 (RS): Ch 3, dc in next sc, *Fptr in next dc 2 rows below, dc in next sc, rep from * to end of round, join with slst to top of tch; turn.
Round 8 (WS dec): Rep Round 6. [36 (36, 36, 48, 48) sts]
Round 9 (RS): Ch 3, *FPtr in next dc 2 rows below, dc in next sc, rep from * to end of round, join with slst to top of tch; turn.
Repeat Rounds 6-9 three more times for a total of 21 rounds. [30 (30, 30, 42, 42) sts]
Sleeve Ribbing
- Cuff is worked in rows perpendicular to sleeve. Ribbing is attached as it’s crocheted by slip stitching to the sleeve.
- While the stitches used are different, the tutorial in this tutorial illustrates the basic concept of adding ribbing to a crochet edge.
- Ribbing does not have a right or wrong side.
With attached yarn and smaller hook:
Foundation Row: Ch 26.
Row 2: Hdc in 3rd ch from hook and in each ch to end of row, slst to first sleeve st where row began, slst in next 2 sts of sleeve; turn. (24 sts)
Row 3: Hdcblo in each st to end of row; turn. (24 sts)
Row 4: Ch 2, hdcblo in each st to end of row, slst slst to next unworked sleeve st, slst in next 2 sts of sleeve, turn.
Repeat Rows 2 and 3 8 (8, 8, 12, 12) more times for a total of 20 (20, 20, 28, 28) rows.
Fasten off leaving a 18” tail to seam cuff.
Use single strand tail from fastening off and a tapestry needle. Seam sleeve by sewing through the two vertical posts of each st in Row 1 and the two back loops of each hdc st of the last row. The purpose of seaming this way is to best hide the seam within the sleeve ribbing. Repeat on second sleeve.
Slip into your new Linden Cardigan and relish the satisfaction of creating your own clothing!
More Free Cardigan Patterns
Easy cardigans are our favorite items to crochet! Check out this popular hexagon cardigan pattern or one of our many other options below.
- 3 Day Chunky Crochet Cardigan Pattern + Video
- Nearly Seamless Crochet Cardigan - Easy Free Pattern
- Easy C2C Crochet Cardigan Pattern Made From Rectangles
- 20 Crochet Hexagon Cardigans + Sweaters for Beginners
- Modern Crochet Granny Square Cardigan - Free Pattern + Videos
- Child's Crochet Hexagon Cardigan Pattern With Toddler Sizes
That was so fun! Now what?
Invitation to our Facebook group
Come discuss the best crochet cardigan patterns with plus sizes and lots of other crochet projects and techniques in our Make & Do Crew Facebook group. Here thousands of helpful crocheters answer each other's questions and share their stitches. Join us!







Leave a Reply