This free crochet drawstring backpack pattern is simple, stylish, and sturdy. Make your own bucket bag with cotton yarn and single crochet and personalize the drawstring straps with leather, wooden beads or tassels!
The free crochet backpack pattern and photo tutorial is below or purchase the ad-free, printable PDF.

This crochet drawstring backpack pattern is part of a collaboration with Lion Brand Yarns. This post contains affiliate links.
Jump to:
Crochet Drawstring Backpack Pattern
If you can single crochet, you can make this surprisingly sturdy crochet bucket backpack. Use up all your cotton scraps or choose a solid color. Accessorize with beads, tassels or leather. Whatever you decide, your backpack is sure to hold all the essentials for your next voyage!
This pattern is worked with two strands of yarn held together throughout, but if you'd prefer a crochet mini backpack, you can simply use one strand of yarn instead.
Keep reading for more yarn and inspiration details or jump down to the free pattern.
Complete beginner? Check out our guide on How to Crochet for Beginners
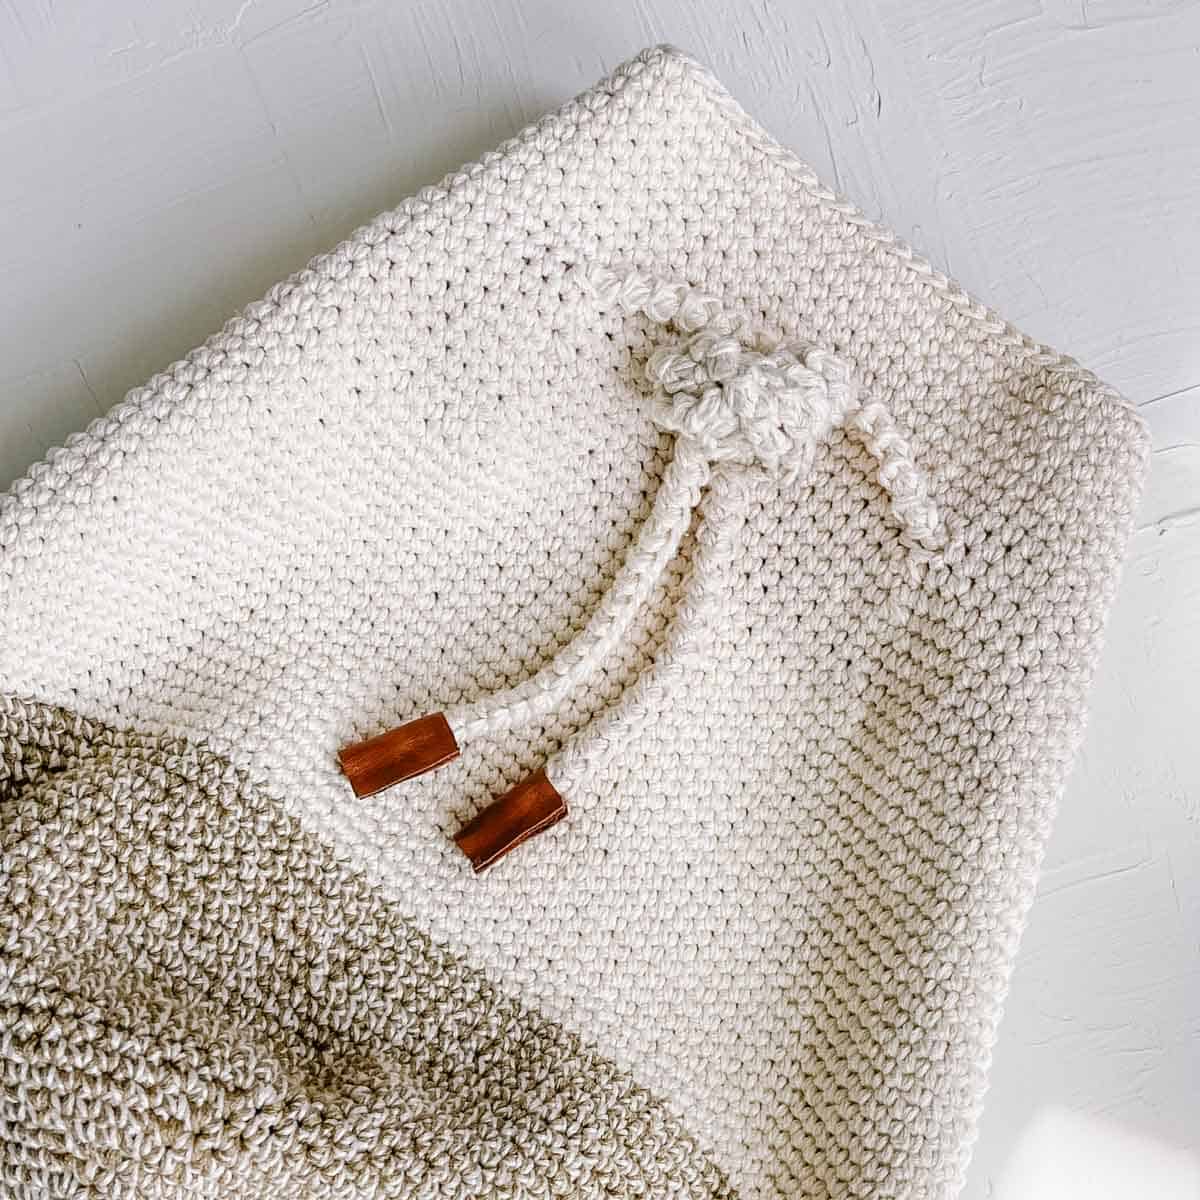
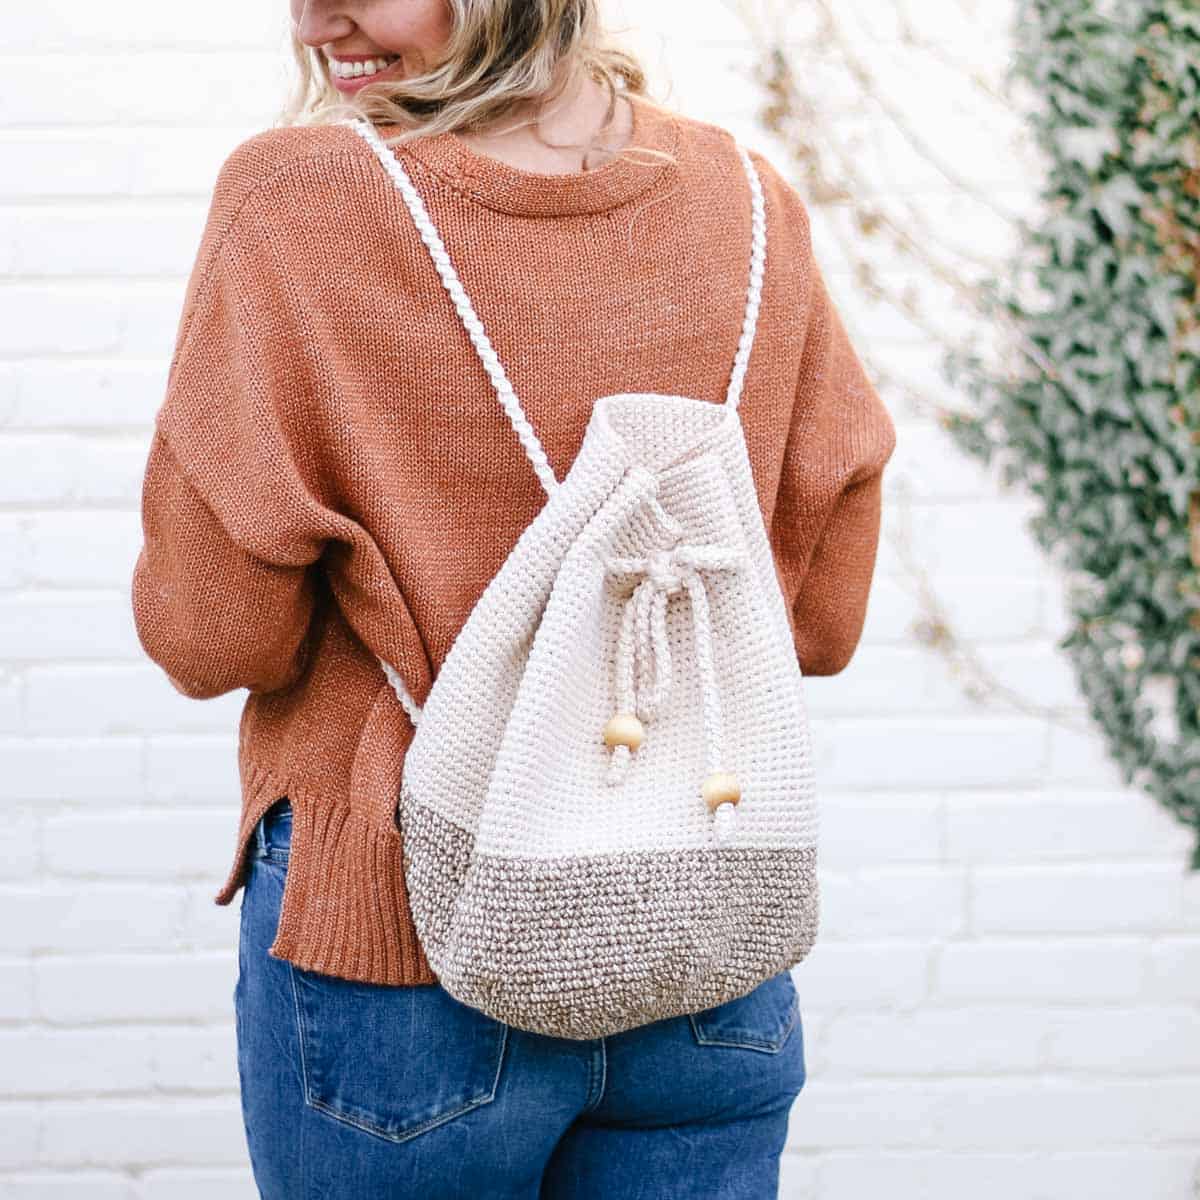
Crochet Skills You'll Practice
This is an easy level pattern that's appropriate for beginners with a little experience. The advanced beginner level skills you’ll practice include:
- Single crochet
- Meeting the pattern gauge
- Crocheting in the round
The drawstring straps use a unique method of making strong crochet cord and the included video tutorial will help you master this easy technique.
Why you'll love this crochet backpack!
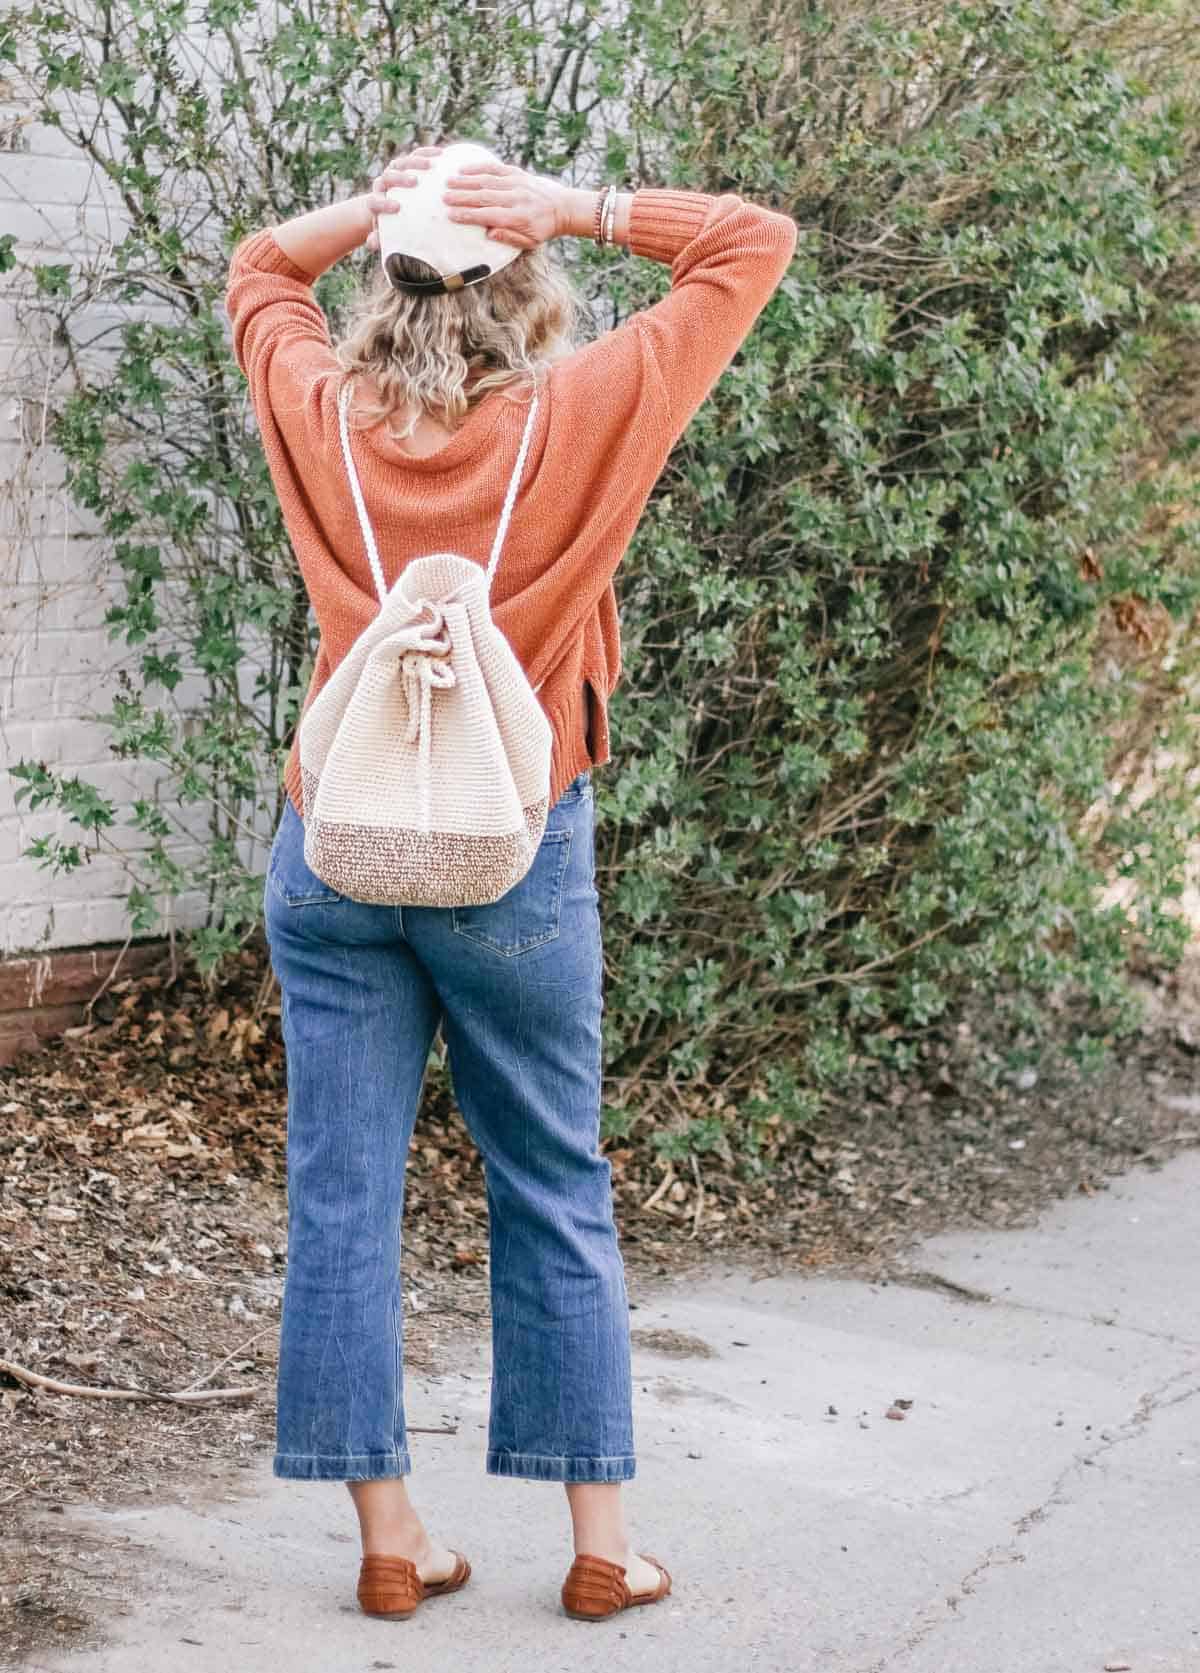
Sturdy Cotton Backpack Yarn
To crochet your drawstring backpack, you'll need approximately 1100 yards of Lion Brand 24/7 Cotton or similar yarn. 24/7 Cotton is one of my favorite cotton yarns because it's sturdy and strong, while still maintaining a lot of softness.
I love using 24/7 Cotton for anything I make that needs structure, such as bucket hats, crochet baskets, and of course, bags of all sorts.
Additional Supplies
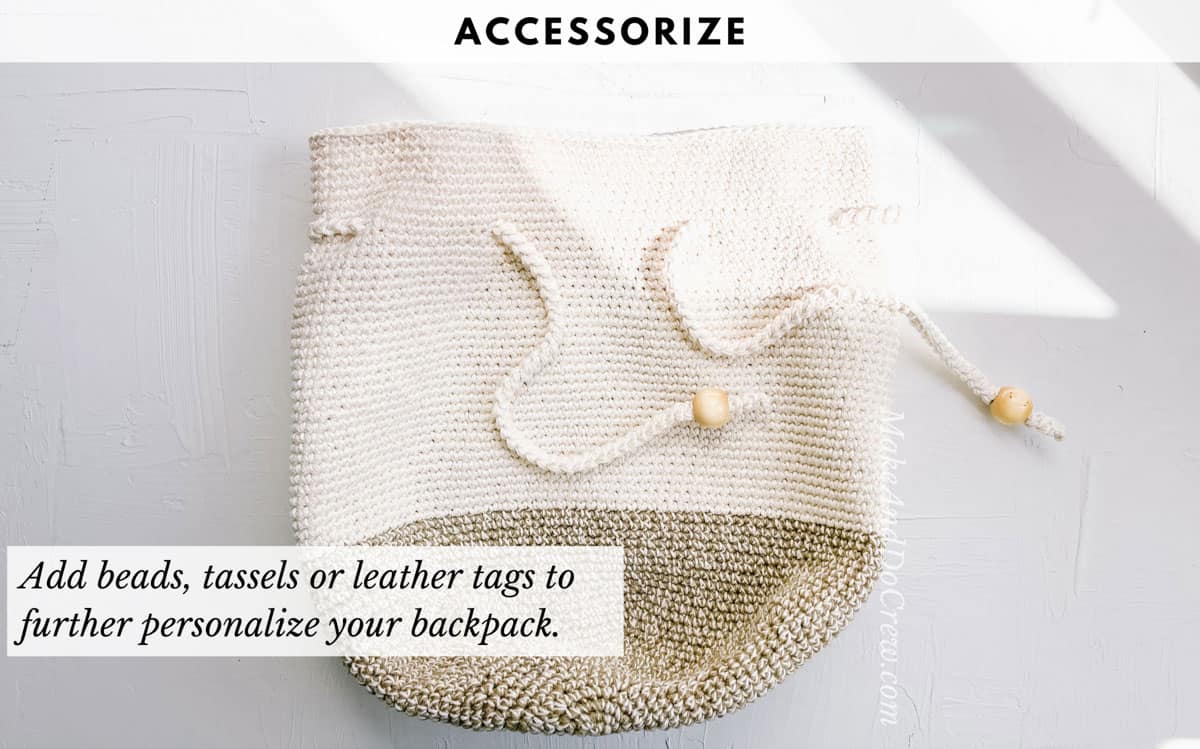
While you only need yarn and a crochet hook to make your bucket backpack, a few additional materials can really make it feel unique. Try adding beads, leather scraps, tassels or anything else you can think of to personalize your DIY bucket bag!
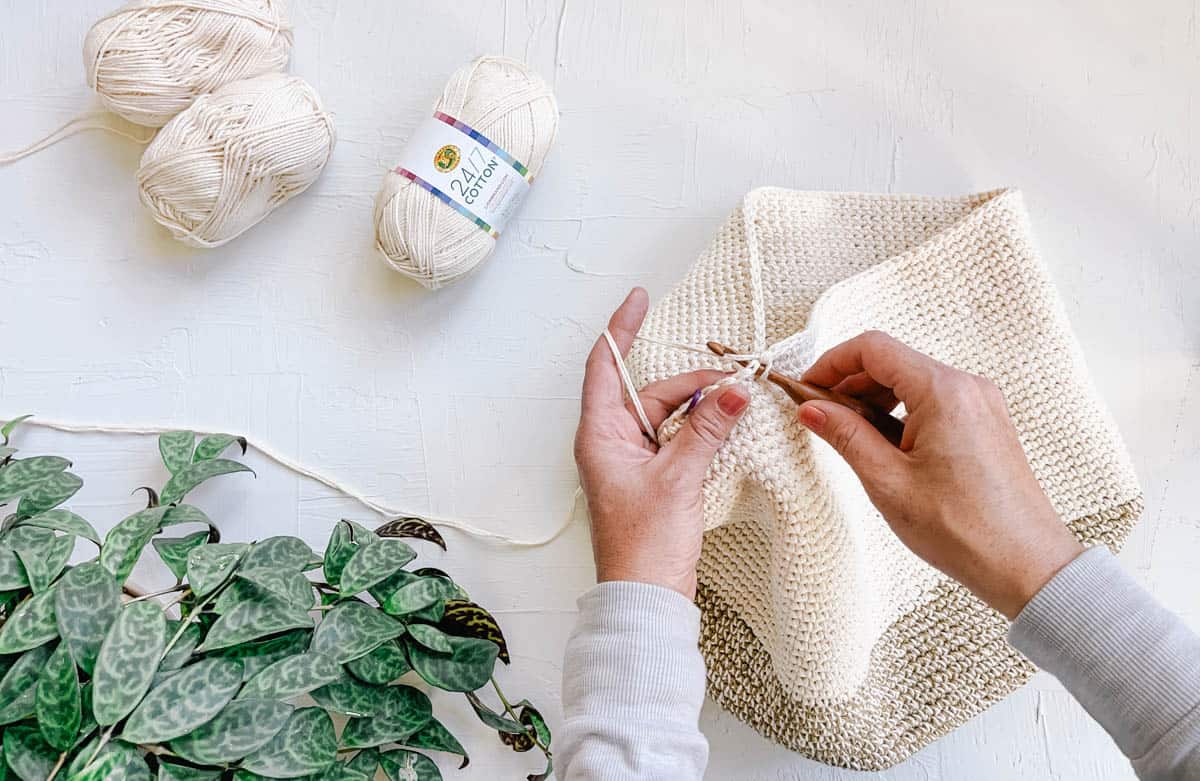
All-in-One Crochet Kit
If you don't live near amazing yarn stores or if you just like to get fun packages in the mail, the all-in-one kit is a perfect way to crochet your drawstring backpack.
This bundle from Lion Brand includes all the 24/7 Cotton you'll need, plus a bonus printable PDF of the pattern (delivered digitally).

Print this Pattern
Prefer to crochet on the couch? Need a portable, printable backpack pattern? You'll love the premium PDF! The instantly downloadable, ad-free file is formatted for easy printing and includes the complete crochet backpack pattern and all the photo tutorials.
More Free Crochet Patterns
Add a few of our favorite free crochet patterns to your project queue!
Voyager Drawstring Backpack - Free Pattern
Supplies + Materials
Order an all-in-one kit from Lion Brand.
• Lion Brand 24/7 Cotton (Weight: 4/Medium - 170 yds, 3.5 oz/100 g)
- A: Ecru (#761-098C) – 6 skeins (approx. 560g)
- B: Hay Bale (#761-173AA) – 1 skein (a full 100g)
• Size J (6.0 mm) crochet hook or size needed to obtain gauge
Measurements
When laying flat, backpack measures approximately 16.5” wide x 17” tall
Gauge
14.5 sc x 16 rounds = 4”
Abbreviations + Glossary (US Terms)
ch – chain
ch2sp – space created by 2 chains
rep – repeat
RS – right side
sc – single crochet
sc2tog - single crochet 2 together
sk – skip
slst – slip stitch
st(s) – stitch(es)
WS – wrong side
yo – yarn over
Skill Level
Advanced Beginner: In this crochet drawstring backpack pattern, we'll practice single crochet stitches, working in the round, and a Romanian cord technique to create sturdy straps.
Permissions + Copyright:
Please do not publish or share this pattern as your own. You may make items to sell with this pattern. In exchange, please link back this post. Do NOT use our photos as your own sales photos.
Overall Pattern Notes
- Pattern is worked in the round with the RS facing throughout. Rounds are spirals and therefore are not joined at the end of each.
- Stitches are intended to be worked tightly. If in doubt, use a smaller hook to achieve tighter tension. Circle is measured several rounds in to ensure gauge.
- Place marker in first stitch of round and move as each round is worked. This is critical in keeping track of the beginning/end of each round.
- Similarly, markers are used beginning in Round 6 to keep track of where increases are placed. Move markers up as each round is worked. Use a different color marker for the first stitch of round and the increases to differentiate.
Print This Pattern: purchase the ad-free, printable PDF
Backpack Bottom Circle
With one strand of Color A and one strand of Color B held together:
Preferred Foundation Round: Create a magic loop, ch 1 and work 6 sc within. (6)
Alternative Foundation Round: Ch 4, sl st to join into a loop. Ch 1, work 6 sc within loop. (6)
Continuing in spiral:
Round 2: 2 sc in first st (PM in first sc made), 2 sc in each st. (12)
Move marker to first st of each round from here forward.
✨Unlock this free subscriber-exclusive pattern ✨
Follow these steps to view the full free pattern below
Want some company while you crochet?
Get support (and camaraderie!) in the Make & Do Crew community. Join for free here.
Premium PDF
easier and faster with fewer mistakes.
- Complete pattern + photo tutorials
- Instant download
- Formatted for easy printing
Main Bucket Bag
Notes:
- This section is worked without increasing. Keep first marker in place and move up each round.
- “Work even” means to single crochet in each stitch without increasing.
Working Even:
Continuing in two colors: Work even for 11 rounds or until Color B is gone. Replace Color B with a second strand of Color A.
TIP: It doesn’t matter if transition from Color B to Color A happens mid-round as this can be hidden in the back of the bag later on.
Continue working even with two strands of Color A held together until there are 35 rounds in Bag Bucket section as counted from marker placed at the end of Bag Bottom.
Place one additional marker of a different color anywhere in last round. Again, this marker is helpful for counting purposes because it indicates where working even ends and decreasing begins.
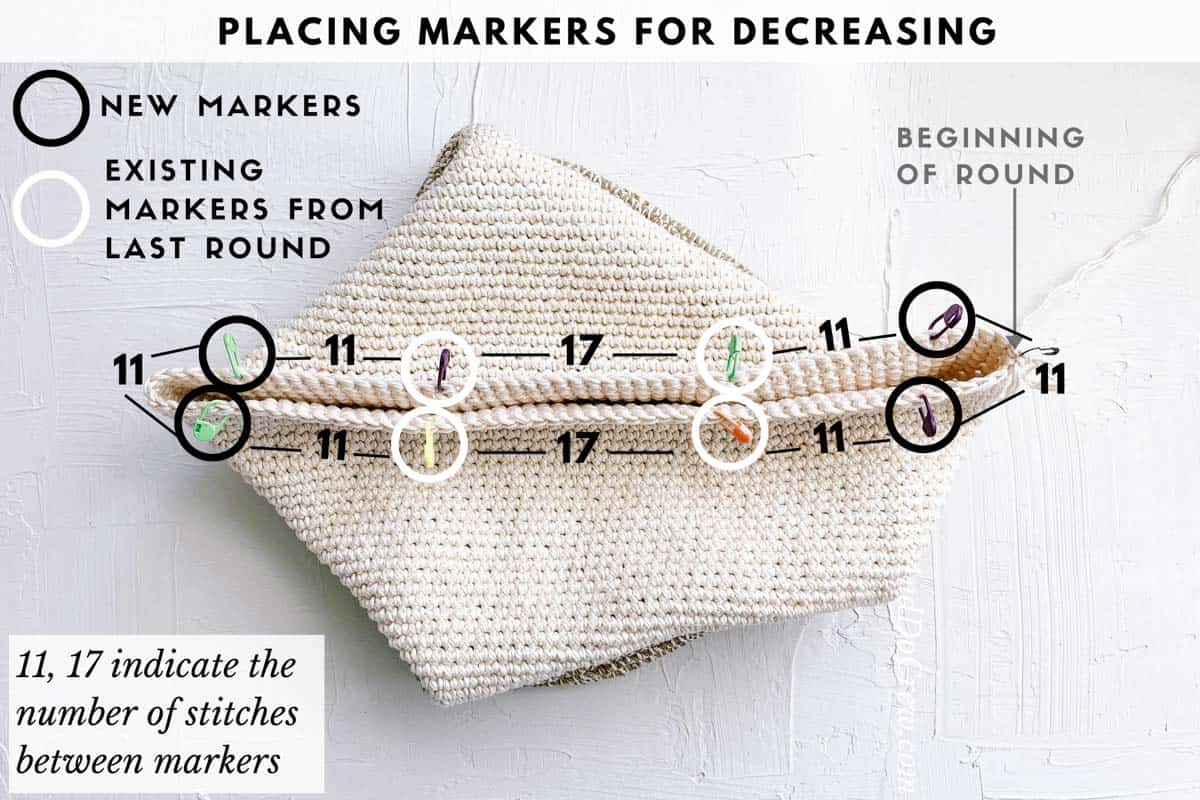
Decreasing:
Round 1 (dec): [Sc2tog (PM in sc made), sc in next 19 sts] 6 times. (120)
Wanna save this pattern?
Previous round should now have 6 marked stitches. These indicate the stitches to decrease in moving forward. Move markers up as each round is worked.
Rounds 2-4: Sc in each sc.
Round 5 (dec): Rep Round 1. (114)
Round 6: Rep Round 2. (114)
Round 7 (dec): Rep Round 1. (108)
Creating Drawstring Strap Holes:
Remove fourth marker and add four additional markers as shown in diagram on p9. These markers indicate where holes will be created for the straps. Important: Beginning/end stitch marker should remain in place, but note that a ch2 hole is not created in that position in Round 1.
Round 1: [Sc in each sc to marker, ch 2, sk next 2 sc] 8 times, sc in each sc to end of round. (8 ch2sps created)
Round 2: Sc in each sc around, placing 2 sc in each ch2sp. (108)
Rounds 3-10: Sc in each sc.
When final round is complete, slst into next two stitches to create a tapering off effect. Fasten off.
Our Latest Crochet Inspiration:
Here are a few more free crochet patterns and tutorials that are hot off the presses.
Drawstring Straps
Notes:
- Straps are quite sturdy and can be adjusted in length by tying the bag. For an even less stretchy strap, incorporate a strand of monofilament (fishing line) along with two strands of Color A.
- This cord requires you to continually turn your crocheting clockwise (left-handed crocheters: counter-clockwise). It may feel awkward at first, but it becomes quite quick. Check out this circle bag pattern for a video tutorial on the Romanian cord technique.
Make 2.
With two strands of Color A held together:
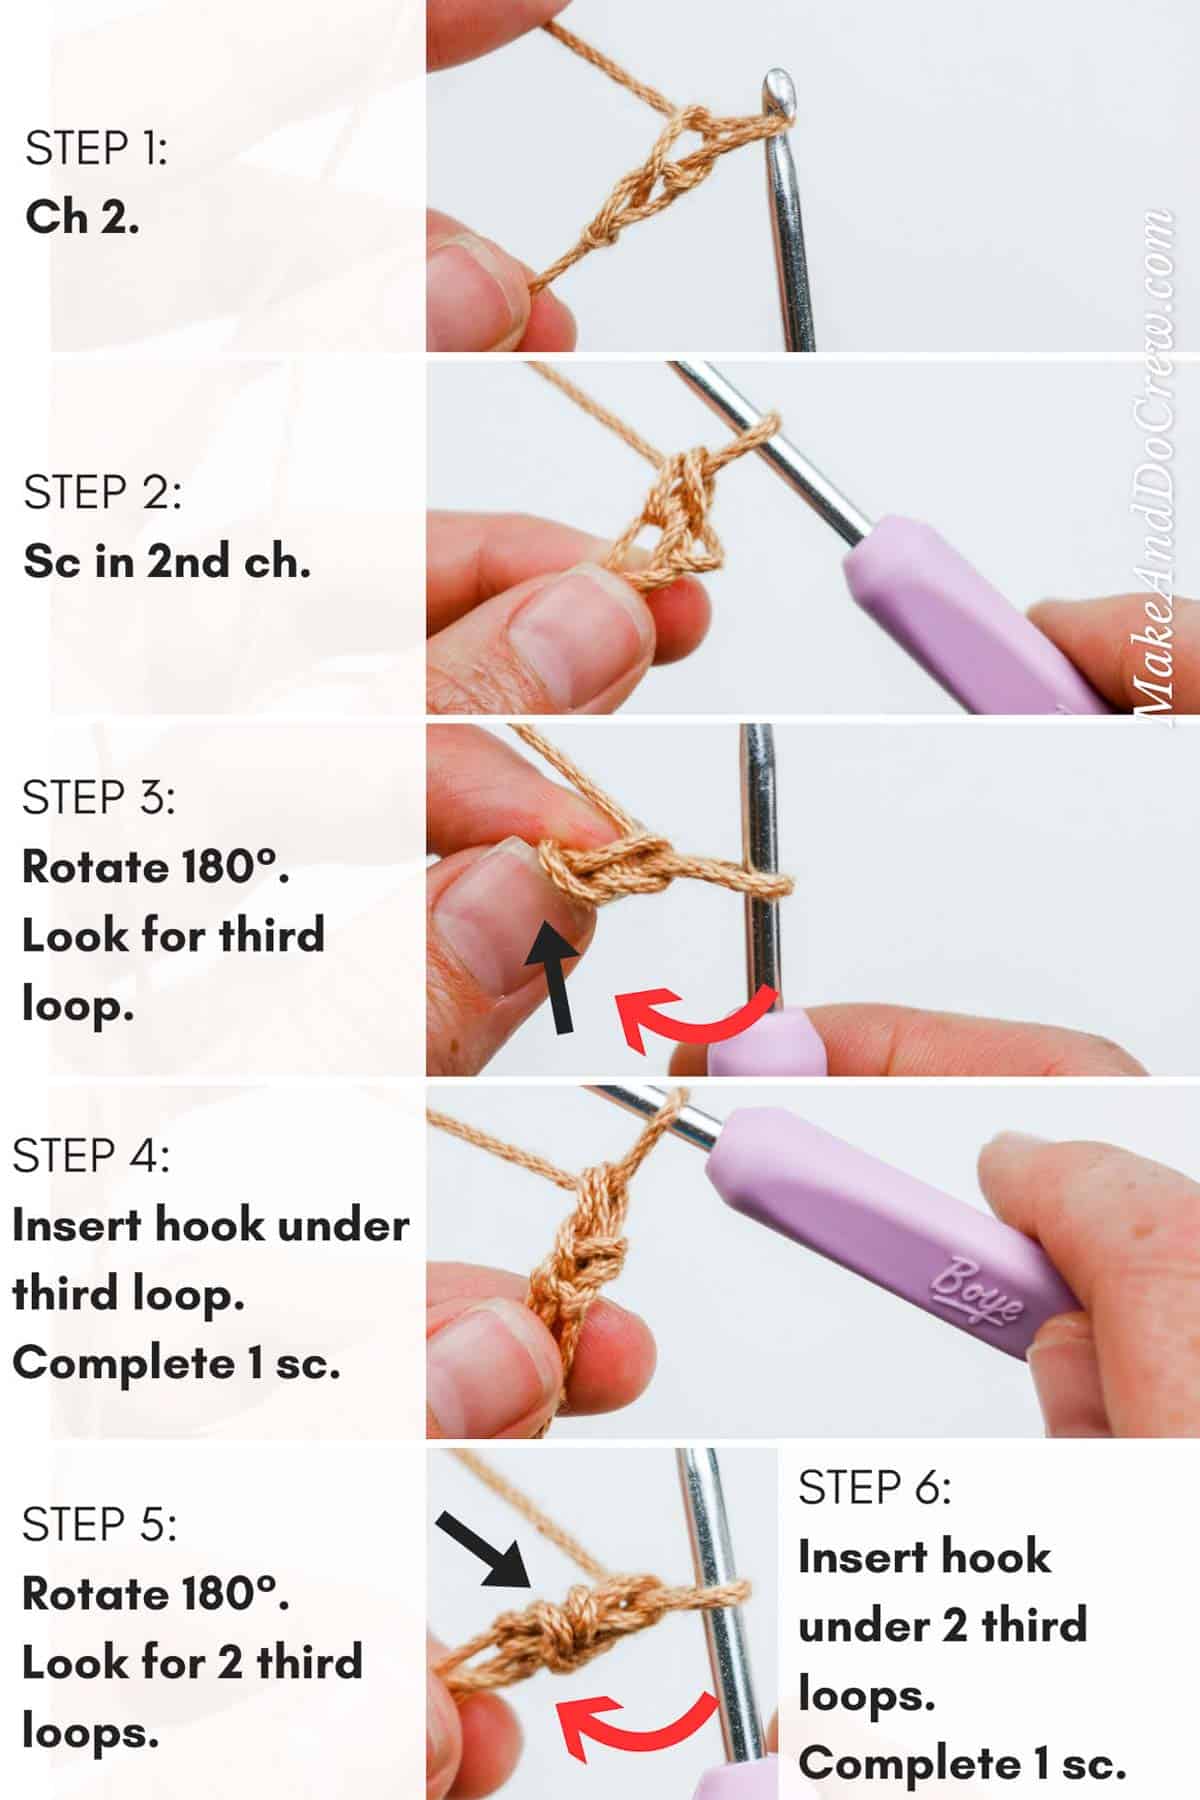
Foundation Row: Ch 2.
Row 1: Sc in second ch from hook; rotate stitch clockwise (left-handed crocheters: counter-clockwise.)
Row 2: Insert hook under loop at “back” of stitch where two “V”s point to. Work 1 sc under this loop; rotate stitch clockwise.
Row 3 and beyond: Insert hook under two loops at “back” of stitch where two “V”s point to. Work 1 sc under these loops; rotate stitch clockwise.
Rep Row 3 until strap measures 52” or as as long as you’d like. Strap is quite sturdy, but will stretch a bit once worn.
Attaching Straps:
Fasten off leaving a 12” tail at end of strap. Use tapestry needle to weave foundation tails. Leave fastening off tails out for now.
The two larger spans between strap holes will become the front and back of the bag. Choose which you’d prefer to be the back.
TIP: This is where you can choose to hide the color transition toward the back if desired.
In back of backpack, place two markers in last round of Bag Bottom in line with the strap holes above. Approximation is okay here. These markers should be between stitches and not in stitches, as straps will be inserted in the “space” between.
Obsessed with finding the best free crochet patterns?
Check out these collections of handpicked patterns to find your next project.
You must use the category name, not a URL, in the category field.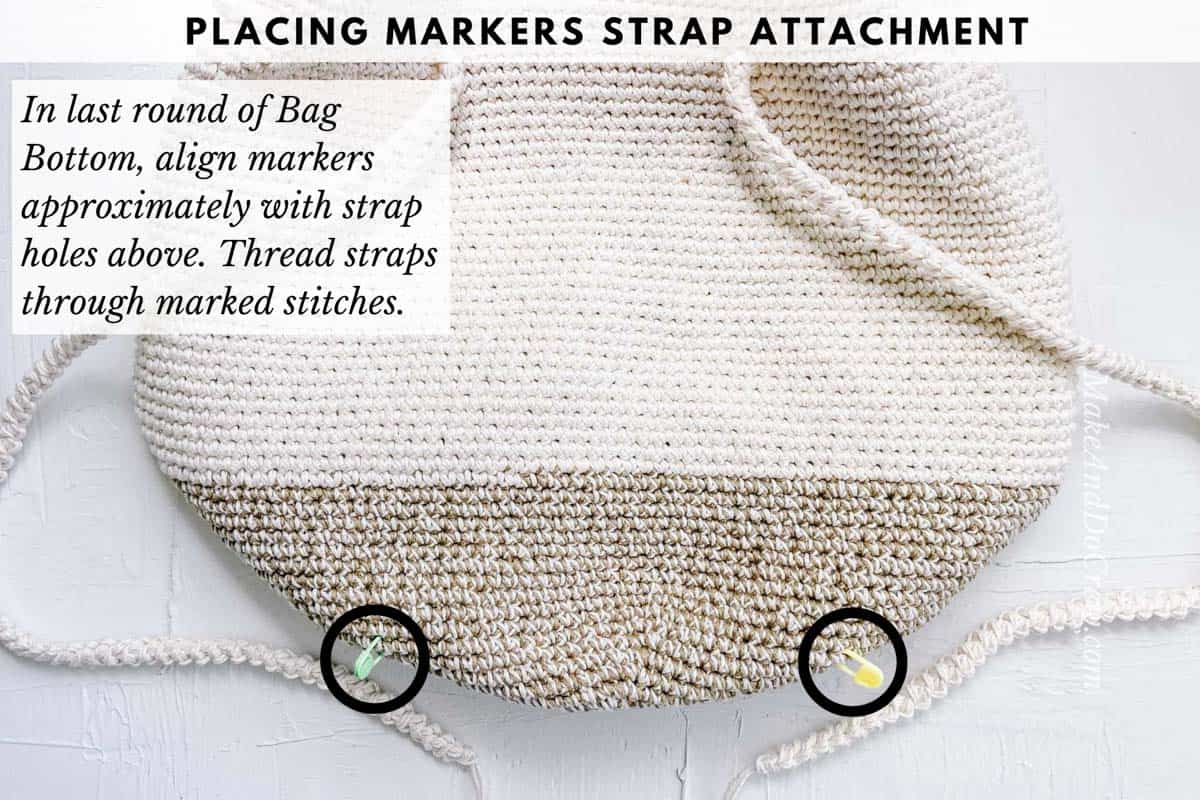
Insert end of strap with 12” fastening off tail into marked space. (Use a crochet hook to stretch out a space for the strap slightly, if necessary.) Repeat with second strap in second marked space. Flip bag inside out so both strap ends are accessible.
Tie leftover yarn tails together in several sturdy knots.
TIP: To avoid cord catching on items in backpack, use leftover yarn tails to tack cord down to bag with a few whip stitches during the process of weaving in the ends.
Use tapestry needle to weave all yarn tails into cords for an extra secure join.
Turn back RS out. Thread cords through remaining holes so they meet in the middle in backpack front.
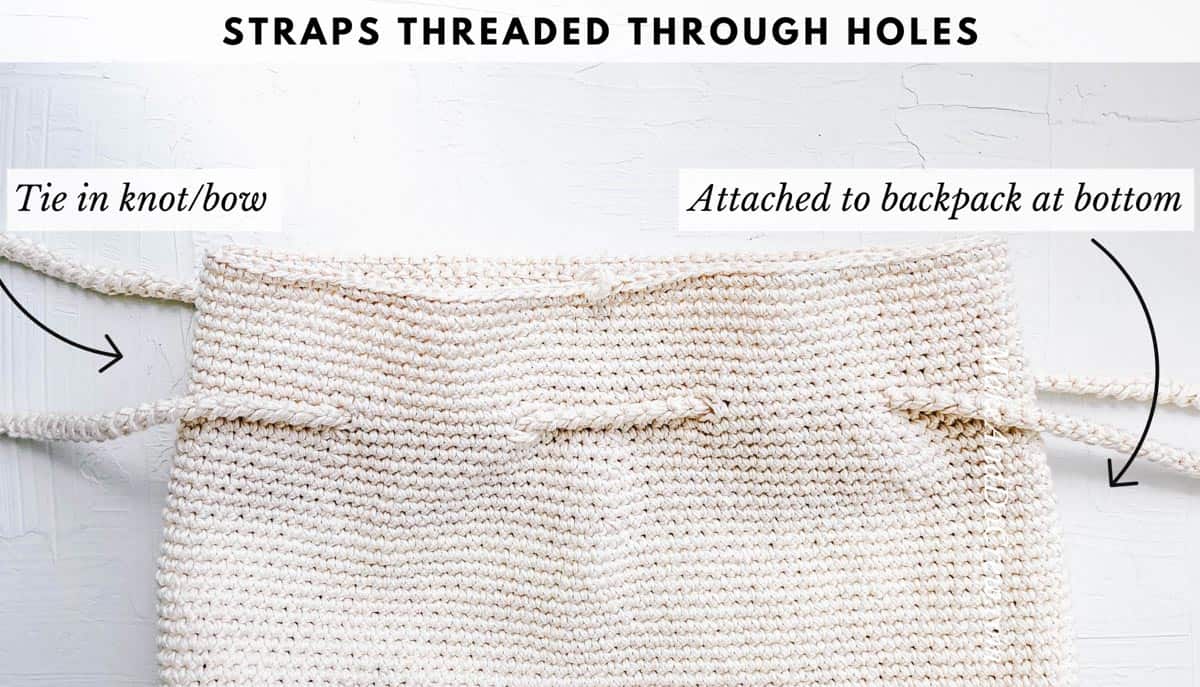
If desired, personalize with wooden beads, tassels or other accessories.
Optional Interior Pocket
If desired, use remainder of Color A yarn to crochet a small interior pocket to hold your essentials.
Foundation: Ch 21.
Row 1 (RS): Sk first ch, sc in each ch to end of row; turn. (20)
Row 2 (WS): Ch 1, sc in each sc; turn.
Rep Row 2 18 more times or until desired height is reached. Fasten off leaving a 24” tail.
With backpack inside out, pin pocket in place. Using a tapestry needle and leftover yarn tail, whip stitch pocket to backpack.
Load your new backpack with yarn, snacks or whatever fills your bucket (bag)!
More Free Bag Patterns
Stash your stuff in style with these free crochet bag, purse, and tote patterns.
That was so fun! Now what?
Learn a New Skill
When you're ready to master a new skill, check out our detailed guides that include everything you need to know to level up your crochet game.
- How to Corner to Corner (C2C) Crochet for Beginners - with video tutorials to get you started
- How to Crochet a Beginner Hat - make an entire beanie in 1.5 hours!
- How to Crochet Amigurumi for Beginners - the ultimate guide to making your own toys and plushies
- How to Tunisian Crochet - learn with this video and a standard hook
Invitation to our Facebook group
Come discuss crocheting backpacks and lots of other projects and techniques in our Make & Do Crew Facebook group. Here thousands of helpful crocheters answer each other's questions and share their stitches. Join us!








Leave a Reply