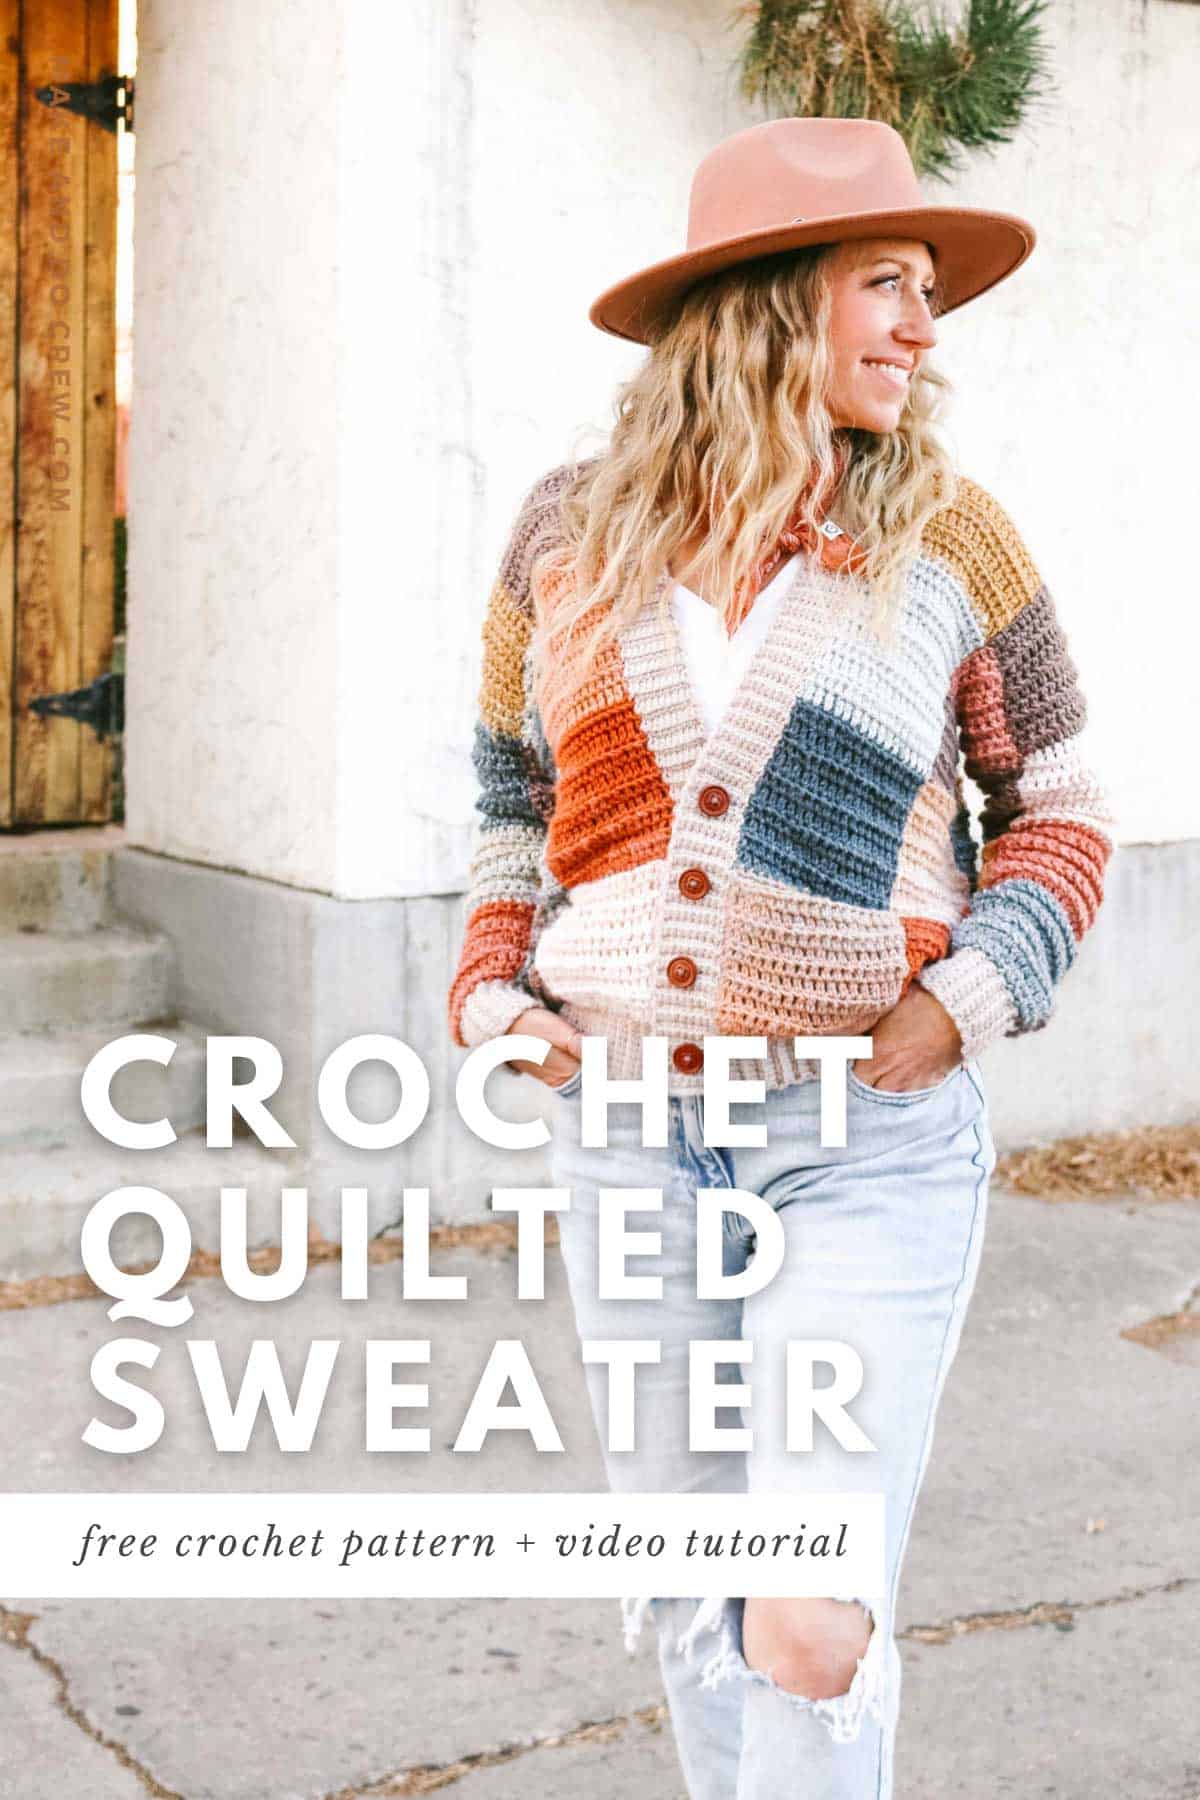
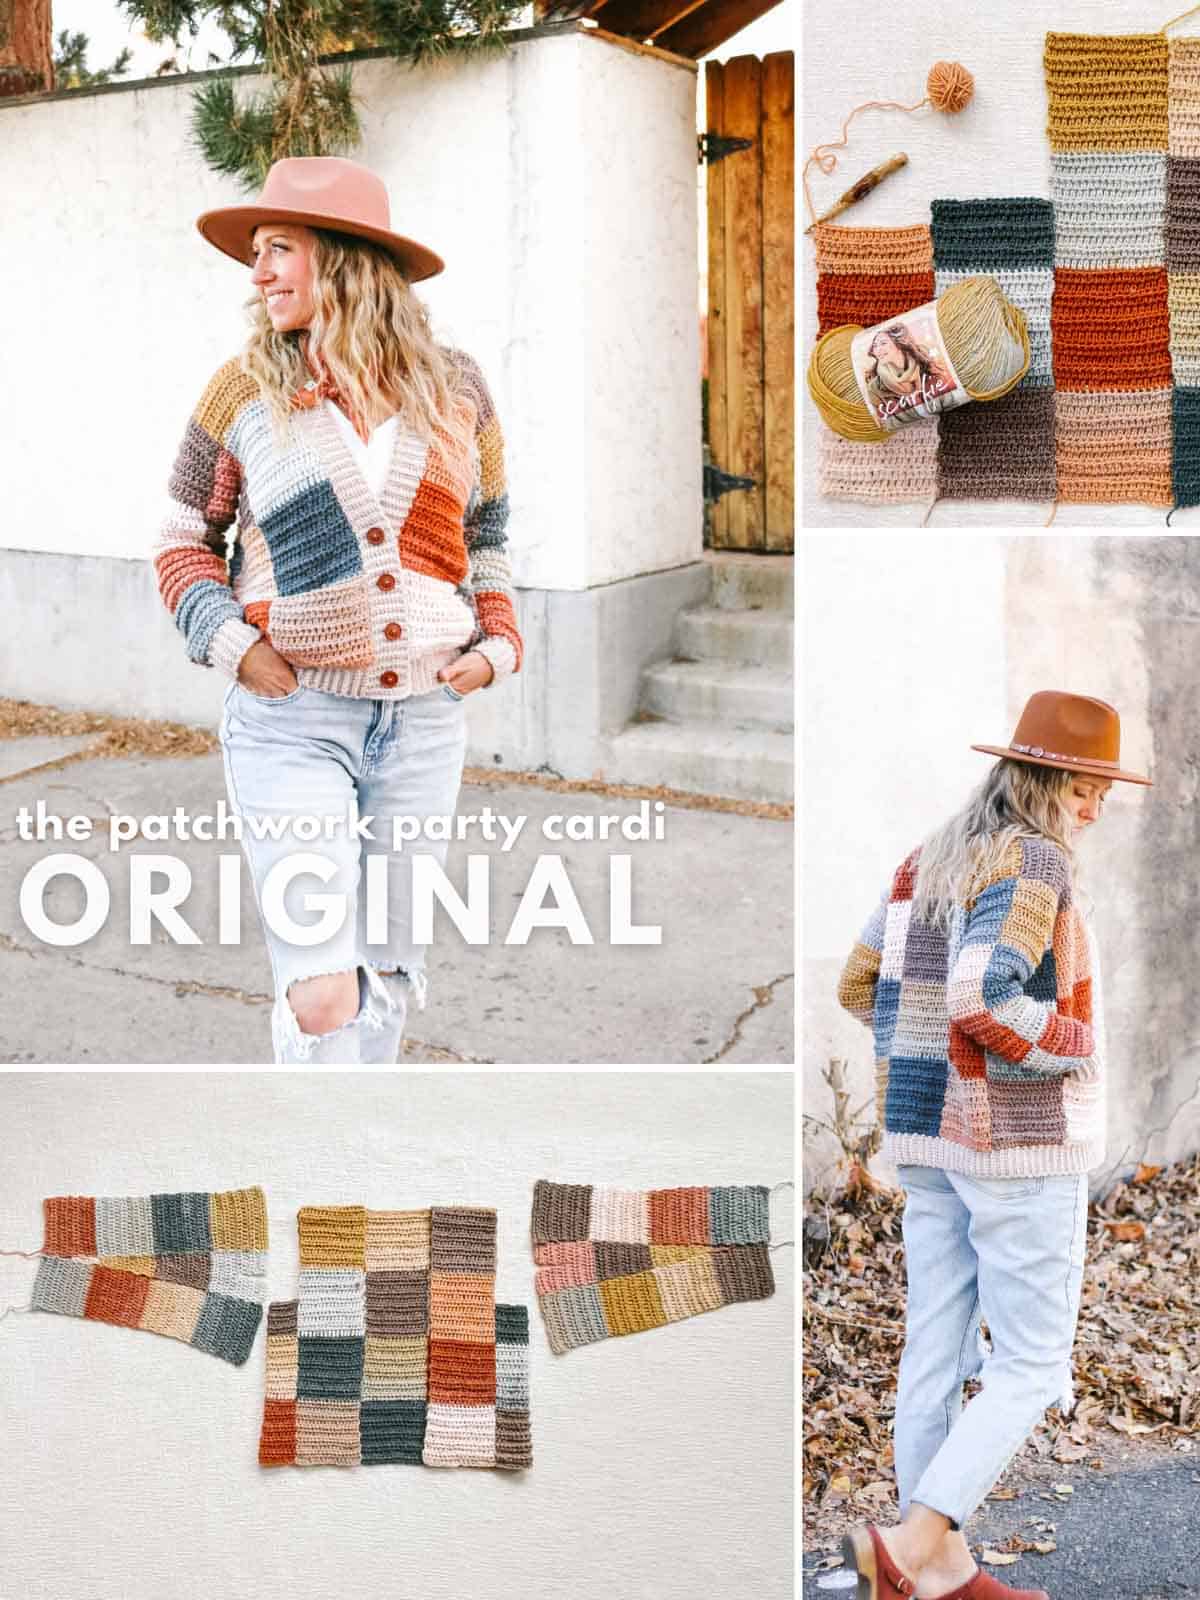
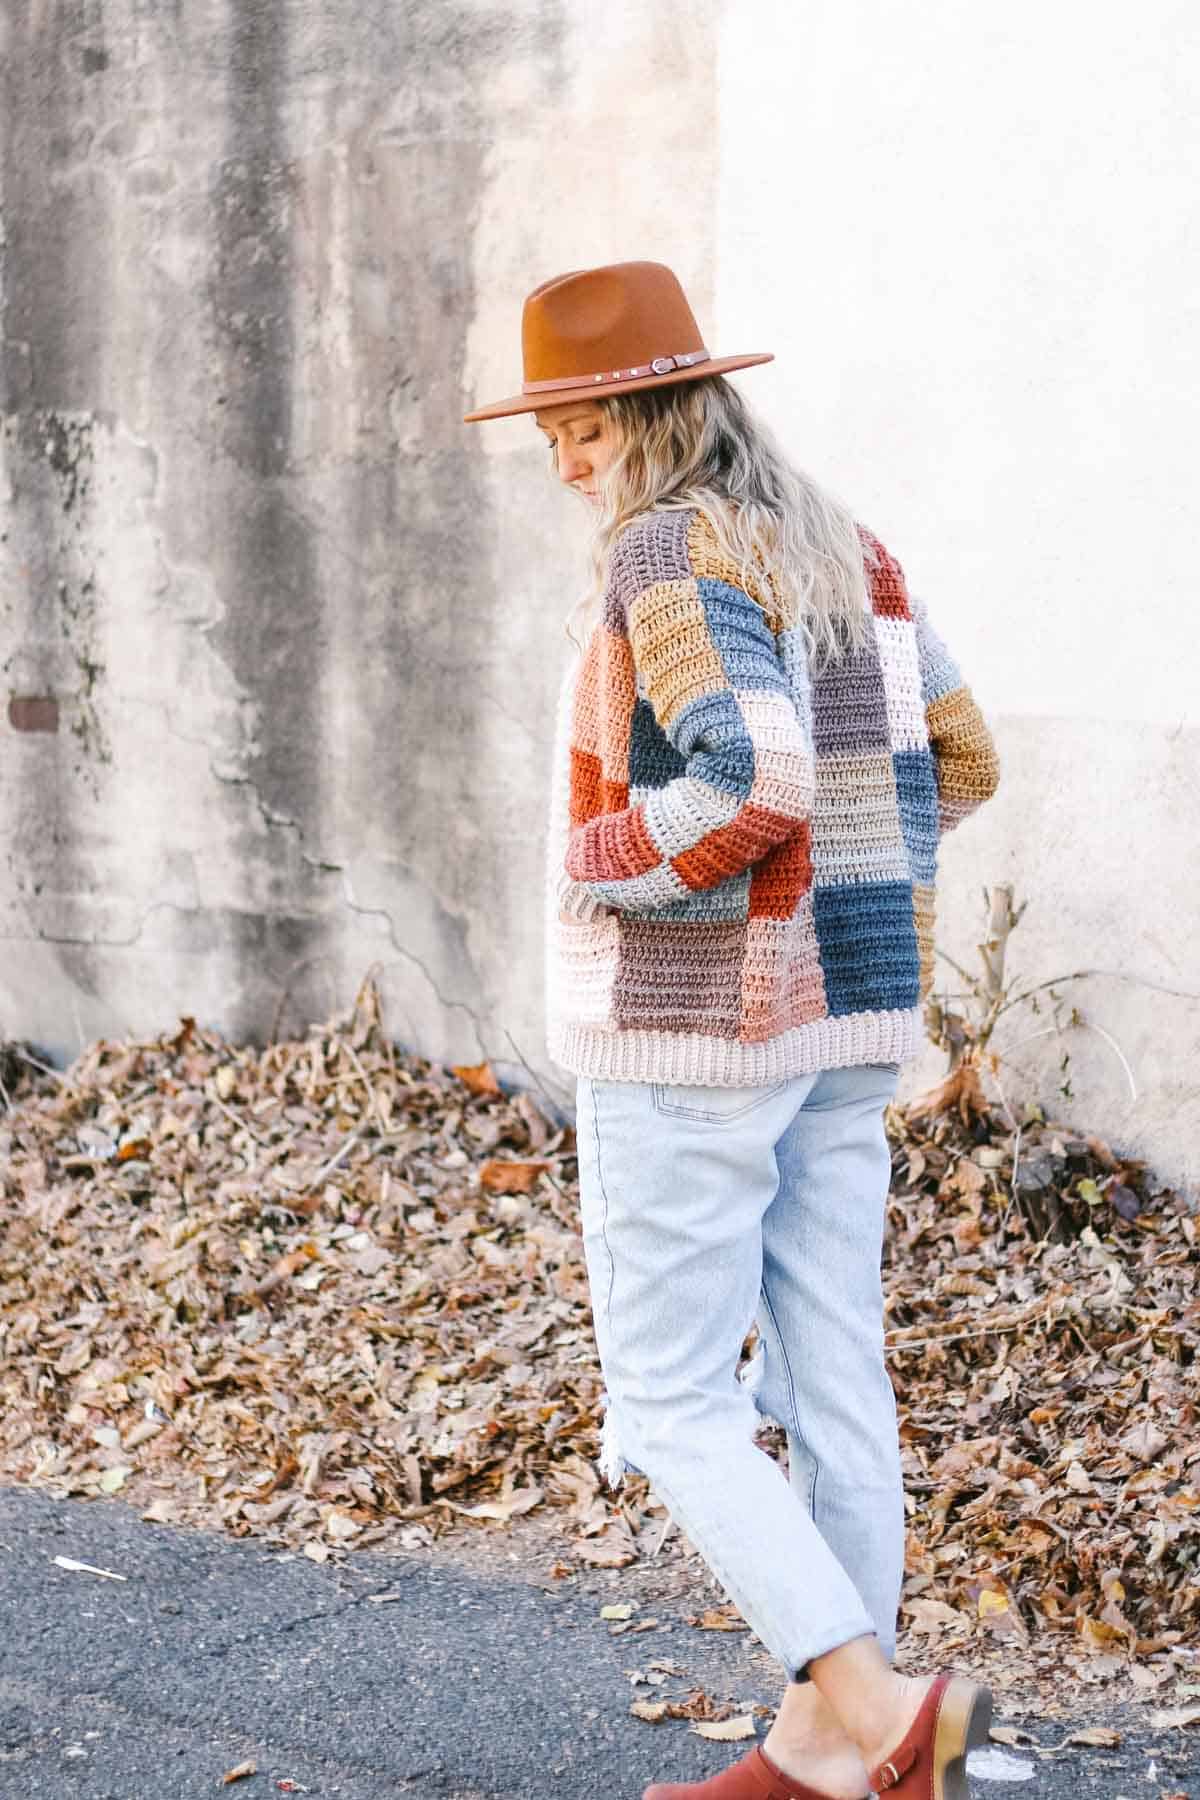
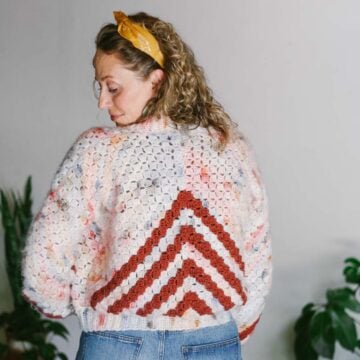
This crochet patchwork cardigan pattern cleverly minimizes seaming and creates fewer ends to weave in. The stitches and techniques are very simple, but the color planning will keep you entertained through the final stitch.
Get the free patchwork sweater pattern and video tutorial below, or purchase the ad-free, printable PDF.
This free patchwork crochet cardigan pattern is part of a collaboration with Lion Brand Yarns. This post contains affiliate links.
Jump to:
- Free Crochet Patchwork Cardigan Pattern
- Customize Your Perfect Patchwork Vision
- How to Crochet a Patchwork Cardigan - Video Overview
- A Checkerboard Shortcut: Multi-Color Yarn
- Tips for Choosing Yarn Colors
- The Patchwork Party Cardi Free Crochet Pattern
- That was so fun! Now what?
- Invitation to our Facebook group
Free Crochet Patchwork Cardigan Pattern
All things quilted are having a real moment. Have you seen Harry Styles' infamous cardigan!? Wow!
Now you can translate the nostalgic charm of quilting into modern, wearable crochet cardigan using just a few multi-color balls of yarn.
Customize Your Perfect Patchwork Vision
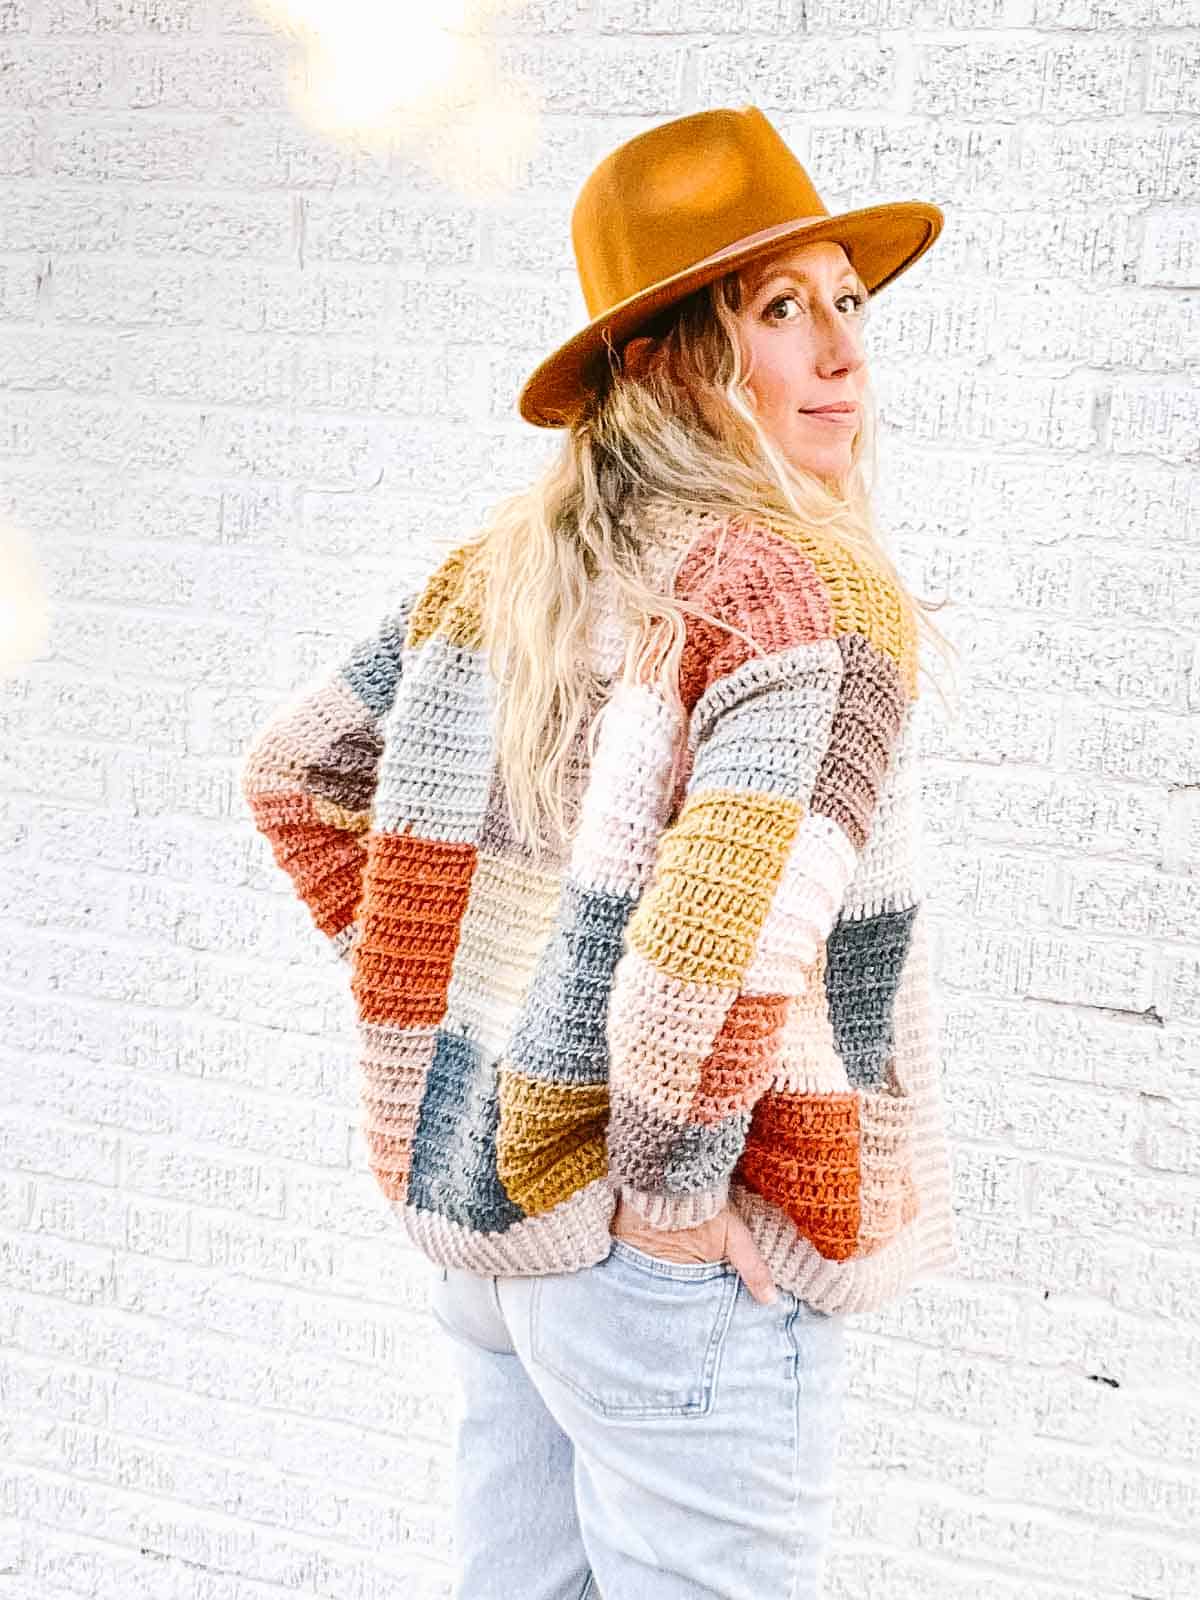
You’ll likely find the construction of this sweater different from anything you’ve seen before, but that doesn’t mean it’s complicated–quite the opposite, in fact!
With endless ways to customize, this is a pattern you can truly make your own. Add buttons, adjust the length, stick to neutrals, or make a rainbow–the pattern includes lots of suggestions on how to crochet exactly the sweater you'll love to wear!
How to Crochet a Patchwork Cardigan - Video Overview
See the Patchwork Party Cardi pattern in action in the brief video below. Watch how the project comes together as you prepare to crochet your own!
(If you have an ad-blocker running, you'll need to disable it to view the video.)
Related: If you love the patchwork look, but want to do less seaming and changing colors, check out our oversized cardigan version.
A Checkerboard Shortcut: Multi-Color Yarn
This patchwork crochet cardigan pattern uses two different yarns to create a sophisticated, polished quilted look. Read on for the exact amounts of each yarn you'll need for the main sweater yarn and ribbing yarn.

Main Sweater Body Yarn Details
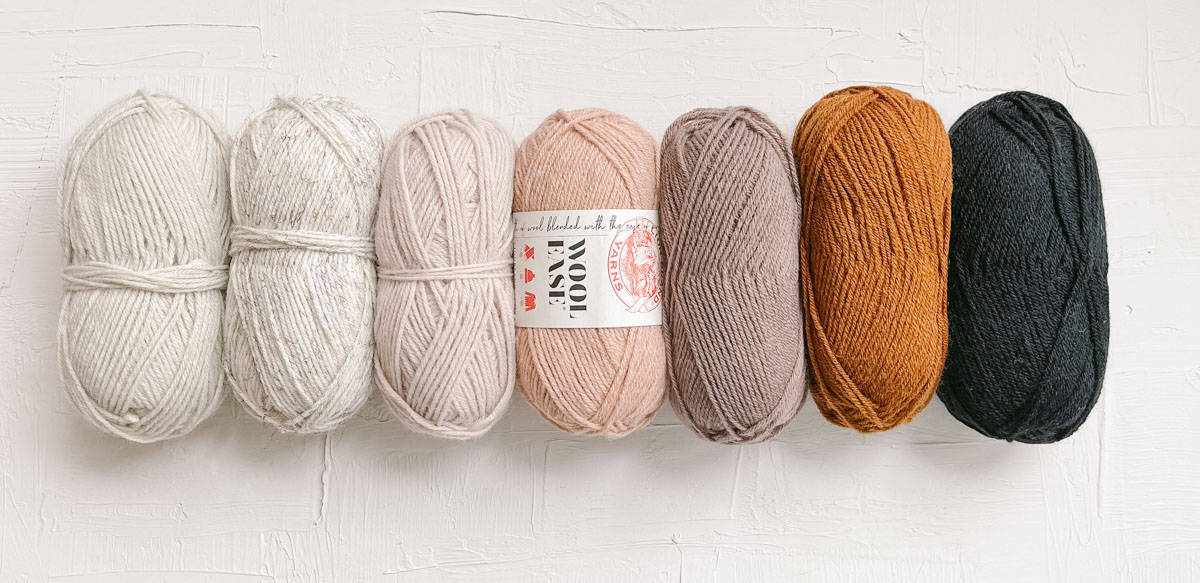
This crochet patchwork cardigan absolutely shines in Lion Brand Scarfie yarn. As a category 5 wool-acrylic blend, Scarfie works up quickly without being heavy thanks to its billowy halo.
Scarfie is so fun because as you crochet, you’ll see a unique self-striping ombré effect emerge, with gradual shading from one color to the next.
Each colorway has a gentle blending of a couple of colors which means you can let the yarn do it's thing to create a painterly patchwork effect or deliberately separate the colors as pictured in the sample.
If Lion Brand Scarfie is not available near you, you can check YarnSub.com for similar suggestions.
Ribbing Yarn Details
For the cardigan ribbing, we used Lion Brand Wool-Ease, a fan-favorite category 4 yarn. By using a solid color, we essentially "frame" the crochet patchwork and allow it to really shine in all it's beautiful, vintage-y glory!
For your ribbing, you'll want to choose a neutral that compliments the colors of the main sweater body. Luckily, Wool-Ease is available in a wide range of really nice neutrals.
In addition, the Lion Brand Basic Stitch line of yarn offers even more color variety and is a great ribbing substitute if you don't find what you need in Wool-Ease.
Use Your Scraps
If you have a lot of category 5 yarn in your stash, you can likely use it to create a scrap yarn crochet cardigan with the same patchwork effect.
Just be sure to follow the gauge swatch instructions in the pattern and adjust your hook size as necessary.
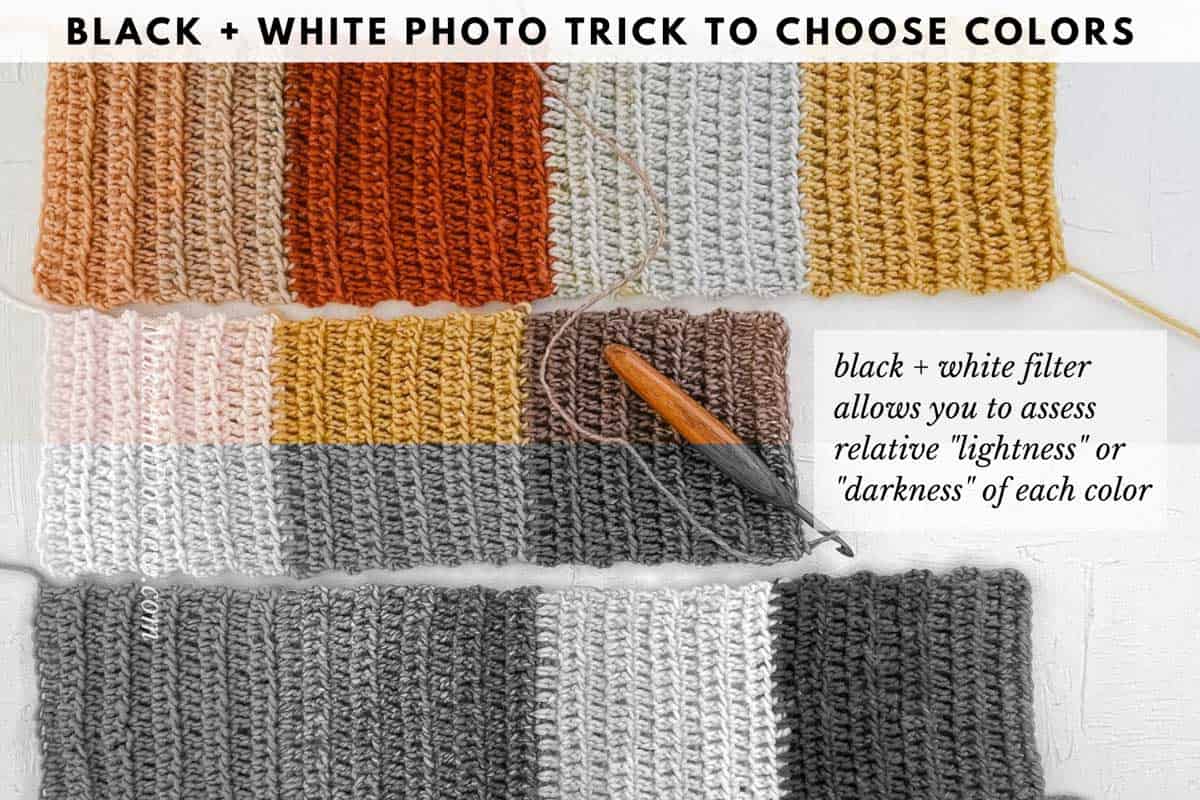
Tips for Choosing Yarn Colors
When choosing a variety of colors for your crochet patchwork cardigan, it can be helpful to mentally separate your yarn into “light” and “dark” categories, noting that many colorways of Scarfie include both a light and dark color with a span of midtones mixed in.
Generally, alternating between squares of lighter and darker colors in a checkerboard patchwork pattern will give your sweater a balanced look.
Not Sure if a Color is a Light or a Dark?
Here's how to assess the relative lightness or darkness of each yarn color.
- Snap a photo on your photo of your chosen yarns.
- Use your phone’s basic editing features to make the photo black and white.
- Look at the relative value of each color and decide where to place them to create enough contrast.
The Patchwork Party Cardi Free Crochet Pattern
Follow along with the free pattern below to make your own wearable patchwork masterpiece!
Skill Level: Advanced Beginner
The advanced beginner skills you'll practice while crocheting your patchwork cardigan include:
- Extended half double crochet stitch
- Creating join-as-you-go ribbing with single crochet
- Seaming strips together
- Creating buttonholes (optional)
Supplies and Materials:
Order an all-in-one kit from Lion Brand here.
Main Sweater Body:
• Lion Brand Scarfie (Weight: 5/bulky - 312 yds, 5.3 oz) - 5 (6, 6, 8, 8) total skeins*
Colors Pictured:
- Seafoam/Clay [826-237] – 1 ball (approx. 150g)
- Rust/Cameo [826-235] - 1 ball (approx. 150g)
- Ice/Gold [826-232] - 1 ball (approx. 150g)
- Mushroom/Blush [826-231] - 1 ball (approx. 150g)
- Mustard/Ice Pink [826-236] - 1 ball (approx. 150g)
- Steel Blue/Slate [826-234] - 1 ball (approx. 150g)
* Yarn amounts listed will result in leftover yarn at the end of the project. This is intentional to allow for flexible color planning. Should you want to purchase only enough yarn to crochet the sweater without manipulating the colors, you’ll need approximately 3 (4, 5, 6, 6) skeins [(approx. 433 (583, 750, 851, 900) g)].
For Ribbing:
• Lion Brand Wool-Ease (Weight: 4/medium - 197 yds, 3 oz) - 2 (2, 2, 3, 3) skeins
- Antler [620-021]
Additional Materials:
• Tapestry needle
• Size L (8.00 mm) crochet hook or size needed to obtain main body gauge
• Size J (6.00 mm) crochet hook for ribbing
• Stitch markers or safety pins
• Needle felting tool (optional, but very helpful to avoid weaving in ends)
• (4-5) 1” buttons (optional)
Crochet Kit:
If you'd rather not go through the hassle of sourcing the yarn yourself, gift yourself an all-in-one Patchwork Party Cardi kit from Lion Brand! You'll receive the digital pattern and all the yarn you need to crochet your own patchwork sweater!
Deliver it! Order a kit with all the yarn you'll need ⇨
Measurements:
Follow this patchwork cardigan size chart to choose which size will fit your body best. The sample sweater pictured is a S/M on a model with a 38” bust. For a looser, oversized fit, don’t be afraid to size up.

Don't spend hours for a "meh" result!
Tired of crocheting garments that don't fit? Learn our C.R.A.F.T. Framework to make sweaters that fit and feel amazing!
| Size | Fits Actual Bust | Sweater Length | # of Skeins of Scarfie for Main Body* | # of Skeins of Wool-Ease for Ribbing* |
| XS | 28-30” | 22” | 5 | 2 |
| S/M | 34-38” | 26” | 6 | 2 |
| L/1X | 42-46” | 32” | 6 | 2 |
| ⅔X | 50-54” | 32” | 8 | 3 |
| ⅘X | 58-62” | 32” | 8 | 3 |
* Yarn amounts listed will result in leftover yarn at the end of the project. This is intentional to allow for flexible color planning.
If you want to purchase only enough yarn to crochet the sweater without manipulating the yarn colors, you’ll need approximately 3 (4, 5, 6, 6) skeins [(approx. 433 (583, 750, 851, 900) g)].
How to Print this Pattern:
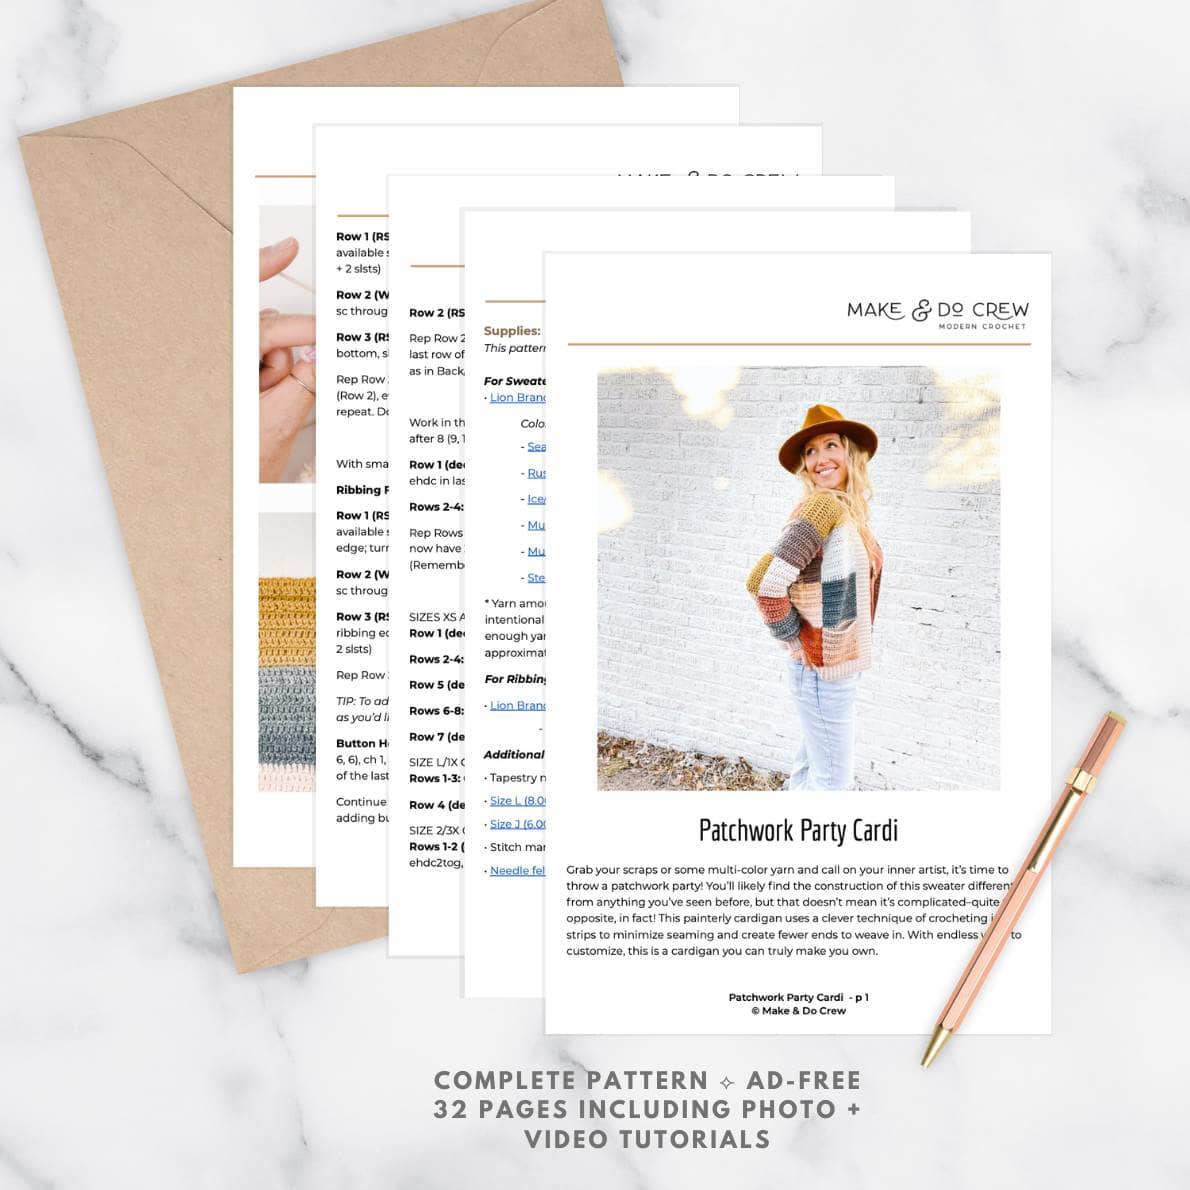
If you prefer to make your patchwork crochet cardigan from a printed pattern, you can purchase the ad-free, printable PDF pattern.
The PDF includes the full written pattern and detailed photo tutorial in one large type, easily printable document. You can find it in our shop or on Etsy or LoveCrafts.
Helpful Resources + Tutorials
If you're new to learning how to crochet, check out these beginner guides that will level-up your skills.
- Crochet Supplies - what to buy and what you can skip
- How to Read Crochet Patterns - tackle your next project with confidence
- How to Check Your Crochet Gauge - skipping this step is a common beginner mistake
- How to Weave in Your Ends - make this necessary evil less painful with these tips
- Blocking Your Crochet - why it matters and how to do it
Gauge:
12 ehdc x 6.5 rows = 4”
Abbreviations and Glossary (US Terms):
ch – chain
rep – repeat
RS – right side
sc – single crochet
scblo – single crochet through the back loop only
sk – skip
slst – slip stitch
slstblo – slip stitch through the back loop only
st(s) – stitch(es)
WS – wrong side
yo – yarn over
tch - turning chain
ehdc – extended half double crochet: yo, insert hook, yo, draw loop through, yo, draw through one loop on hook, yo, draw through all three loops on hook
ehdc2tog – extended half double crochet two together: yo, insert hook, yo, draw loop through, yo, draw through one loop on hook, yo, insert hook in next st, yo, draw loop through, yo, draw through one loop on hook, yo, draw through all five loops on hook
The Whole Pattern Summarized in a Chart:
You can crochet a patchwork cardigan even if you're just learning how to read patterns.
Watch the video tutorial below to learn the basic concepts involved in crocheting this sweater. Then, reference this chart that summarizes everything you need to know to crochet the main body of the cardigan.
| Size | Strip Width (# of chain sts) | Square Height (# of rows) | # of Full Length Strips To Make | # of Underarm Strips To Make |
| XS | 17 | 8 | 5 | 2 |
| S/M | 20 | 10 | 5 | 2 |
| L/1X | 23 | 12 | 5 | 2 |
| ⅔X | 21 | 12 | 6 | 2 |
| ⅘X | 23 | 12 | 6 | 2 |
Video Tutorial:
Follow along with this patchwork cardigan tutorial video to learn how to make and join your cardigan strips. If you’re still building your pattern-reading skills, this video will be immensely helpful in showing you the main concepts of The Patchwork Party Cardi.
NOTE: If you have an ad-blocker running, you’ll need to disable it to view the video tutorial below.
Overall Pattern Notes:
• Pattern is written for smallest size, with stitch counts for larger sizes following in parentheses: XS (S/M, L/1X, ⅔X, ⅘X). It can be helpful to highlight all numbers related to your size before beginning. When only one number is given, it pertains to all sizes.
• If you prefer a cropped crochet cardigan, you can eliminate one square of color from each strip to make a shorter sweater. In this case, each strip would include three patches of color.
• Ch 3 counts as 1 ehdc throughout.
• In last row of each colored square, complete final yarn over of last stitch using new color. View a brief tutorial here.
Print it! Purchase the printable, ad-free PDF pattern ⇨
Sweater Back:
You'll begin your patchwork cardigan by crocheting the strips that will form the back panel of the sweater.
Here are some things to note:
- When crocheting each strip, keep in mind tips from the “Planning Colors” notes above. If you'd like to minimize seaming, jump down to my suggestion on how to crochet all the strips at once.
- Each crochet square in the strip is 8 (10, 12, 12, 12) rows tall. To change colors for the next square, work the final yarn over of the last stitch of the row using new color. (It is helpful to crochet over these yarn tails as you work next row.) At the end of the fourth square, fasten off.
Instructions for One Full-Length Strip:
With any color and larger hook:
Foundation Row: Ch 17 (20, 23, 21, 23).
*Row 1 (RS): Ehdc in fourth ch from hook, ehdc each ch to end; turn. (15 (18, 21, 19, 21) sts)
Row 2 (WS): Ch 3, ehdc in each st to end; turn. (15 (18, 21, 19, 21) sts)
Rep Row 2 six (eight, ten, ten ten) more times to create a total of 8 (10, 12, 12, 12) rows.
In last row of colored square, complete final yarn over of last stitch using new color.**
Rep from * to ** three more times to create a total of 4 squares of color. Fasten off leaving a 40” tail.
Make 3 (3, 3, 4, 4) individual strips.
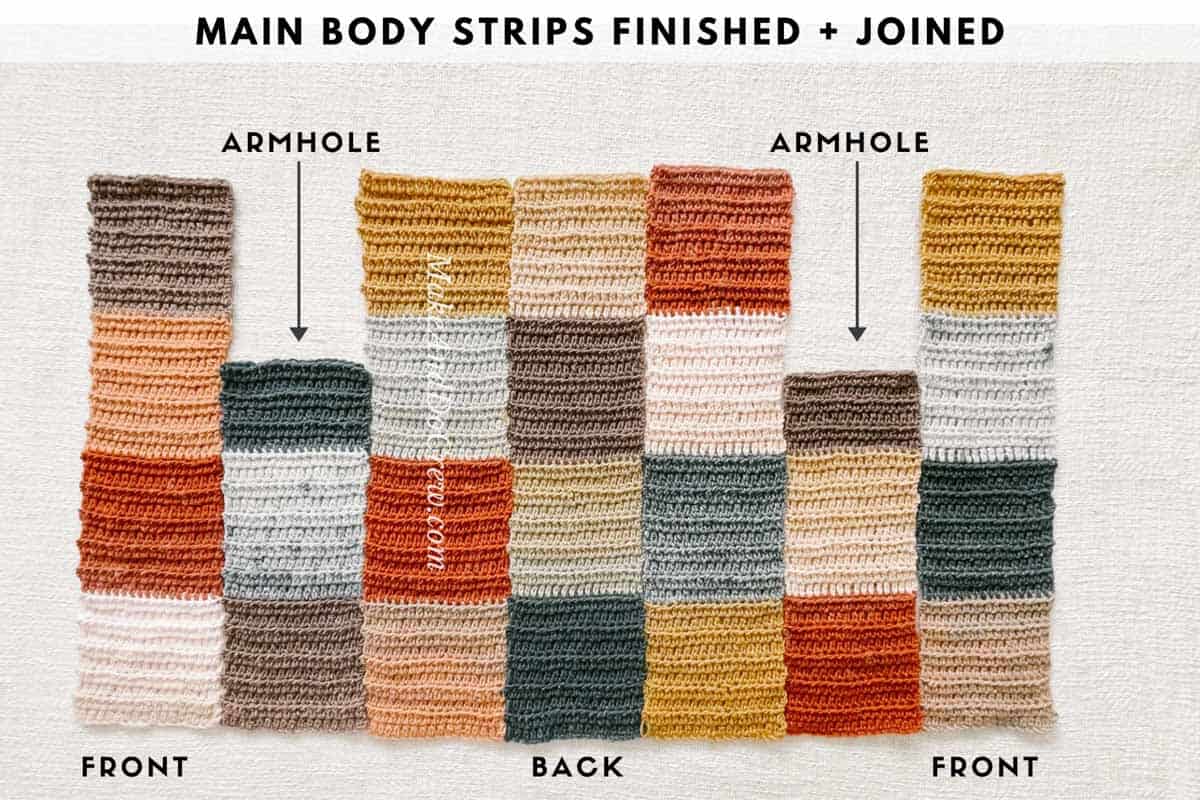
Joining Back Strips:
Lay strips out with WS facing up. Pin first two strips together with stitch markers, taking care to line up color transitions for a tidy patchwork effect.
Use a tapestry needle and leftover yarn tails where possible and work from final row at top of strip to foundation row at bottom. With first two strips beside each other, use a running stitch to join them together. At bottom of strips, weave in end and fasten off. Repeat joining process with remaining Back strips.
The photo below shows the main body of your free patchwork cardigan crochet pattern once the strips are finished and joined.
Print it! Purchase the printable, ad-free PDF pattern ⇨
Alternative Approach To Minimize Seaming:
The patchwork pattern is designed in strips to achieve a complicated colorwork look without juggling multiple balls of attached yarn at once. If you want to avoid seaming at all costs though, you may work all strips concurrently.
To do this, chain 47 (56, 65, 78, 86) and work in columns of color 15 (18, 21, 19, 21) sts wide. See this video tutorial for tips on switching colors mid row, but note that in the Patchwork Party Cardi, you do not carry your yarn under each column, but rather leave it attached to pick up on the next row.
Sweater Underarms:
A shorter strip is used on either side of the sweater to accommodate room for the sleeves. When crocheting each strip, reference existing strips in Back section to choose coordinating colors.
If you need a review on any of the skills necessary to crochet a strip, re-watch the video tutorial above.
Instructions for One Partial-Length Strip:
With any color and larger hook:
Foundation Row: Ch 17 (20, 23, 21, 23).
*Row 1 (RS): Ehdc in fourth ch from hook, ehdc each ch to end; turn. (15 (18, 21, 19, 21) sts)
Row 2 (WS): Ch 3, ehdc in each st to end; turn. (15 (18, 21, 19, 21) sts)
Rep Row 2 six (eight, ten, ten ten) more times to create a total of 8 (10, 12, 12, 12) rows.
In last row of colored square, complete final yarn over of last stitch using new color.**
Rep from * to ** one more time to create a total of 2 squares of color.
With next color, rep Row 2 four (six, ten, eight, six) more times. Fasten off leaving a 40” tail.
Make 2 individual strips.
Print it! Purchase the printable, ad-free PDF pattern ⇨
Cardigan Fronts:
Each sweater front panel is constructed from 1 full-length strip. When crocheting each strip, keep in mind tips from the “Planning Colors” notes in Part 1.
Instructions for One Full-Length Strip:
With any color and larger hook:
Foundation Row: Ch 17 (20, 23, 21, 23).
*Row 1 (RS): Ehdc in fourth ch from hook, ehdc each ch to end; turn. (15 (18, 21, 19, 21)
sts)
Row 2 (WS): Ch 3, ehdc in each st to end; turn. (15 (18, 21, 19, 21) sts)
Rep Row 2 six (eight, ten, ten ten) more times to create a total of 8 (10, 12, 12, 12) rows.
In last row of colored square, complete final yarn over of last stitch using new color.**
Rep from * to ** three more times to create a total of 4 squares of color. Fasten off leaving a 40” tail.
Make 2 individual strips.
Joining Front + Underarm Strips:
If you need a review on any of the skills necessary to join your strips, re-watch the patchwork cardigan video tutorial above.
Here are the steps of joining each crochet strip together to create the patchwork effect.
- Lay strips out with WS facing up. Back section should be in the center, with underarm strips on either side. Finally, front strips should be on the far right and left. (See photo above.)
- Pin two strips together with stitch markers, taking care to line up color transitions for a tidy patchwork effect.
- Use a tapestry needle and leftover yarn tails where possible and work from final row at top of strip to foundation row at bottom. Use a running stitch to join strips just as in Back section.
- At bottom of strips, weave in end and fasten off.
- Repeat joining process with remaining strips including set of Back strips.
- When finished, you should have 7 (7, 7, 8, 8) full/partial strips joined together.
Joining Shoulders:
Jump to video tutorial above this free pattern for a visual walkthrough of shoulder seaming.
How to join the cardigan back and front at the shoulders:
Wanna save this pattern?
- Fold Front strips to overlap Back strips so underarm strip is folded in half and WS of sweater is facing out.
- Use a tapestry needle and leftover yarn tails where possible to work a running stitch under “V” at top of all stitches.
- Take care to line up Front/Back strip stitches with each other, seaming one for one.
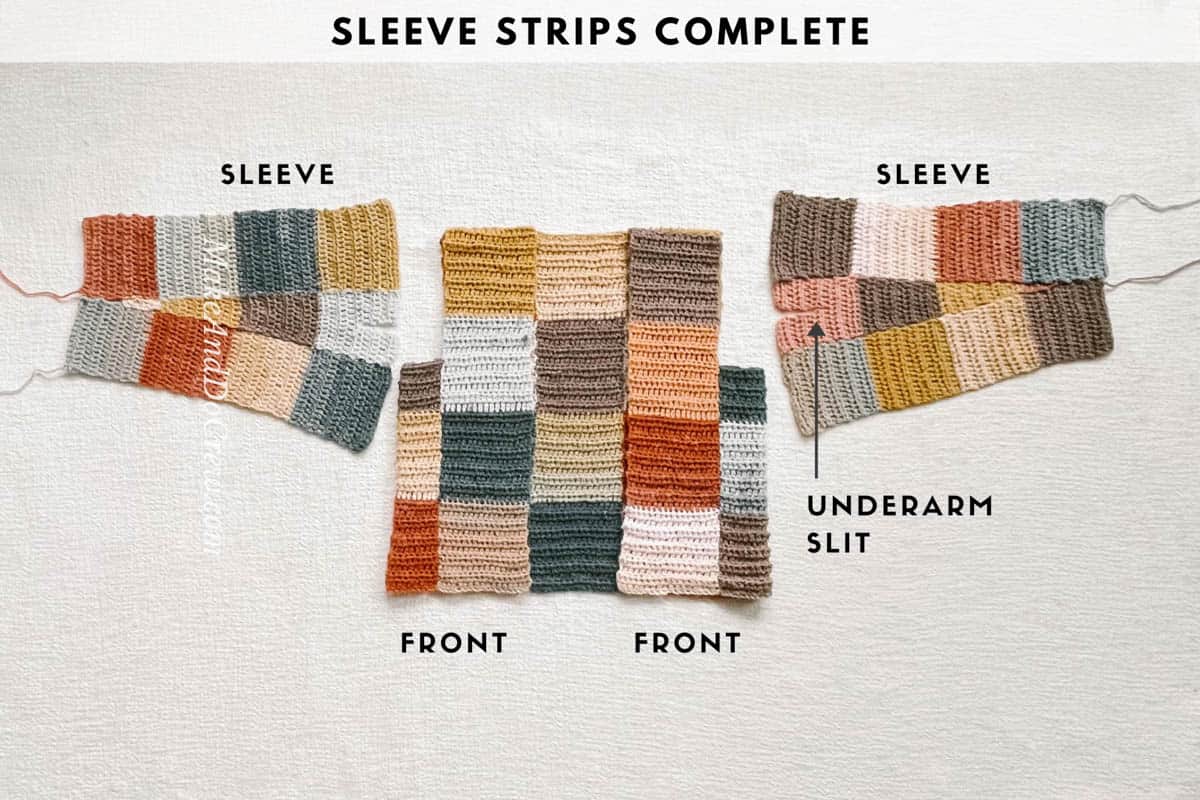
Sleeves:
Each sleeve is constructed from two full-length strips as well as one triangular strip for the underside of the sleeve. When crocheting each strip, keep in mind tips from the “Planning Colors” notes above.
The photo below shows the patchwork crochet sweater sleeves once the strips have been sewn together.
Instructions for One Full-Length Strip:
With any color and larger hook:
Foundation Row: Ch 17 (20, 23, 21, 23).
*Row 1 (RS): Ehdc in fourth ch from hook, ehdc each ch to end; turn. (15 (18, 21, 19, 21) sts)
Row 2 (WS):
SIZES XS AND ⅔X ONLY: Ch 3, ehdc in each st to end; turn. (15 (X, X, 19, X) sts)
ALL OTHER SIZES: Ch 3, ehdc in next st, ehdc2tog, ehdc in each st until 4 remain, ehdc2tog, ehdc in last 2 sts; turn. (X (16, 19, X, 19) sts)
Row 3 (RS):
SIZE L/1X ONLY: Ch 3, ehdc in next st, ehdc2tog, ehdc in each st until 4 remain, ehdc2tog, ehdc in last 2 sts; turn. (X (X, 17, X, X) sts)
ALL OTHER SIZES: Ch 3, ehdc in each st to end; turn. (15 (16, X, 19, 19) sts)
Row 4 (WS): Ch 3, ehdc in each st to end; turn. (15 (16, 17, 19, 19) sts)
Rep Row 4 four (five, seven, seven, seven) more times to create a total of 8 (9, 11, 11, 11) rows.
In last row of colored square, complete final yarn over of last stitch using new color.**
Rep from * to ** three (three, two, two, two) more times to create a total of 4 (4, 3, 3, 3) squares of color.
SIZES XS and S/M ONLY: Fasten off leaving a 40” tail.
SIZE L/1X ONLY: With next color, rep Row 4 five more times. Fasten off leaving a 40” tail.
SIZES ⅔X and ⅘X ONLY: With next color, rep Row 4 three more times. Then, rep the “ALL OTHER SIZES” instruction from Row 2, and rep Row 4 once more. You should finish with a stitch count of 17 in each of the last two rows.
TIP: As written, sleeves are quite long. To shorten them, eliminate 2-3 rows of the last color on each full-length strip.
Make 2 individual strips.
Instructions for Triangular Strip:
This strip begins with a slit in order to accomodate the sweater armholes.
Initial Slit to Accommodate Armhole:
Foundation Row: Ch 9 (9, 8, 13, 14).
Row 1 (RS): Ehdc in fourth ch from hook, ehdc each ch to end; turn. (7 (7, 6, 11, 12) sts)
Row 2 (WS): Ch 3, ehdc in each st to end; turn.
Rep Row 2 two (three, four, three, four) more times.* Fasten off.
Rep from * to ** once more to create a second mini strip. Do not fasten off.
Joining Pieces:
Row 1 is worked across top of both mini strips to join them together, beginning with the strip yarn is already attached to. Ensure RS (WS, RS, WS, RS) is facing up on both mini strips.
Row 1 (WS): Ch 3, ehdc in each st of mini strip #2, continue along to mini strip #1, ehdc in each st of mini strip #1; turn. (13 (13, 11, 21, 23) sts) (Note: Stitch count decreased by 1 because there is no ch 3 on mini strip #1.)
Continuing With Triangular Strip:
Row 2 (RS): Ch 3, ehdc in each st to end; turn. (13 (13, 11, 21, 23) sts)
Rep Row 2 two (two, three, four, three) more to create a total of 8 (9, 11, 11, 11) rows. In last row of colored square, complete final yarn over of last stitch using new color just as in Back/Front strips.
Decreasing Within Triangular Strip:
Work in the following pattern of regular and decrease rows, changing to a new color after 8 (9, 11, 11, 11) rows.
Row 1 (dec): Ch 3, ehdc in next st, ehdc2tog, ehdc in each st until 4 remain, ehdc2tog, ehdc in last 2 sts; turn. (11 (11, 9, 19, 21) sts)
Rows 2-4: Ch 3, ehdc in each st to end; turn. (11 (11, 9, 19, 21) sts)
Rep Rows 1-4 two (two, three, three, three) more times. The triangular strip should now have 20 (21, 27, 27, 27) rows total and last row should contain 7 (7, 3, 13, 15) sts. (Remember to switch colors every 8th (9th, 11th, 11th, 11th) row.)
Irregular Decreases:
SIZES XS AND S/M ONLY:
Row 1 (dec): Ch 3, ehdc in next st, ehdc2tog twice, ehdc in last st; turn. (5 sts)
Rows 2-4: Ch 3, ehdc in each st to end; turn. (5 sts)
Row 5 (dec): Ch 3, ehdc2tog twice; turn. (3 sts)
Rows 6-8: Ch 3, ehdc in each st to end; turn. (3 sts)
Row 7 (dec): Ch 3, sk first ehdc, ehdc in last st. (2 sts) Fasten off leaving a 30” tail.
SIZE L/1X ONLY:
Rows 1-3: Ch 3, ehdc in each st to end; turn. (3 sts)
Row 4 (dec): Ch 3, ehdc2tog; turn. (2 sts) Fasten off leaving a 30” tail.
SIZE ⅔X ONLY:
Rows 1-2 (dec): Ch 3, ehdc in next st, ehdc2tog, ehdc in each st until 3 sts remain, ehdc2tog, ehdc in last st; turn. (9 sts)
Row 3: Ch 3, ehdc in each st to end; turn. (9 sts)
Rows 4-6: Rep Rows 1-3. (5 sts)
Row 7 (dec): Ch 3, ehdc2tog twice; turn. (3 sts)
Row 8 (dec): Ch 3, sk first ehdc, ehdc in last st. (2 sts) Fasten off leaving a 30” tail.
SIZE ⅘X ONLY:
Rows 1-2 (dec): Ch 3, ehdc in next st, ehdc2tog, ehdc in each st until 3 sts rem, ehdc2tog, ehdc in last st; turn. (11 sts)
Row 3: Ch 3, ehdc in each st to end; turn. (11 sts)
Rows 4-6: Rep Rows 1-3. (7 sts)
Row 7 (dec): Ch 3, ehdc in next st, ehdc2tog twice, ehdc in last st; turn. (5 sts)
Row 8 (dec): Ch 3, ehdc2tog twice; turn. (3 sts)
Row 9 (dec): Ch 3, sk first ehdc, ehdc in last st. (2 sts) Fasten off leaving a 30” tail.
Joining Sleeves:
All joining can be done with a tapestry needle and leftover yarn tails where possible. Only add a new strand of seaming yarn if no tails are available.
This seaming uses the same running stitch joining technique as the Main Sweater Body. (See video tutorial above for a refresher.)
Joining Sleeve Strips:
Here's how to join the sleeve strips to create a patchwork effect:
- Lay strips out with WS facing up. Triangular strip should be in the center, with full length strips on either side. (See photo.)
- Pin strips together with stitch markers, taking care to line up color transitions for a tidy patchwork effect.
- Use a tapestry needle and leftover yarn tails where possible, join strips using a running stitch.
Attaching Sleeves to Sweater:
Turn sweater WS out. With WS of sleeve facing out, pin sleeve in place. Take care to line up all color intersections around armhole as pictured at end of pattern.
First join all main armhole edges to sleeve using a running stitch. Next, join sleeve indent to shorter underarm strip.
Seaming Sleeves Closed:
With WS still facing out, use a running stitch to join entire length of sleeve.
Ribbing:
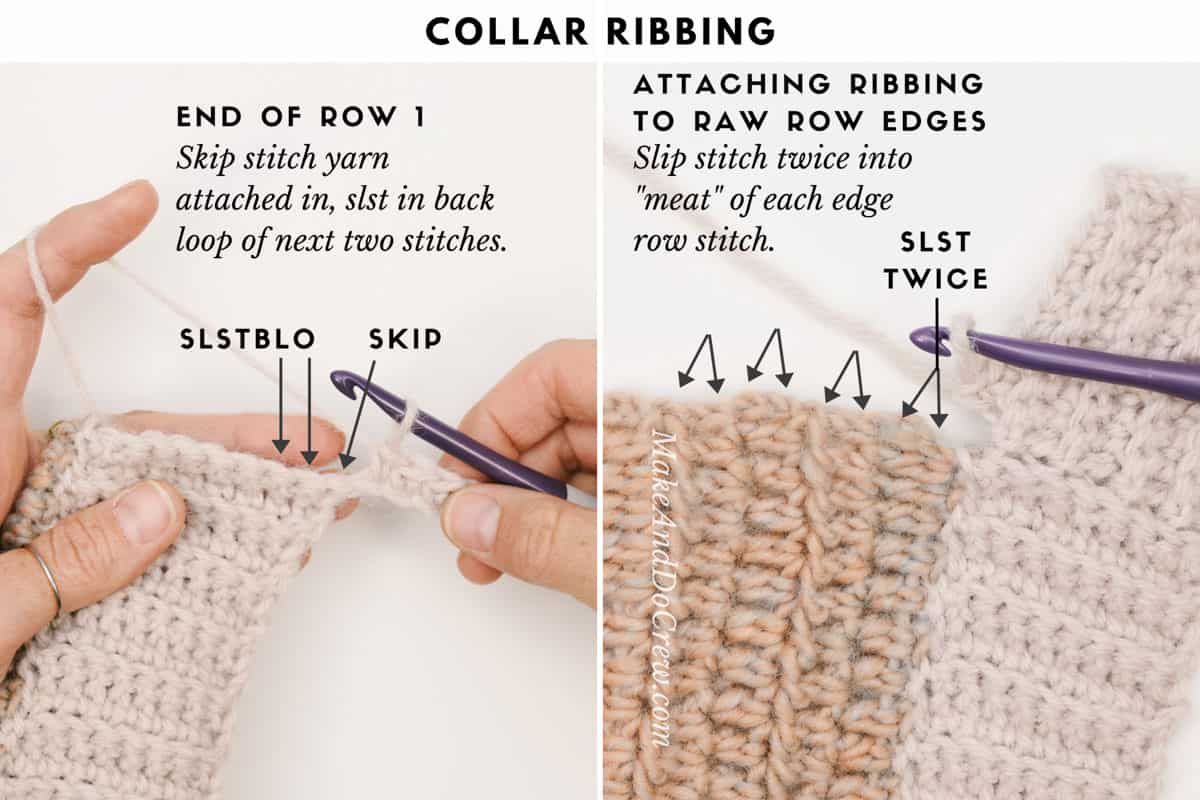
The ribbing is worked perpendicular to sweater edge and attached as it’s crocheted. See this ribbing tutorial if this concept is new to you.
It is easy to miss a stitch here or there with this ribbing technique so it can be helpful to count your stitches periodically as you go.
The tutorial photo below shows the bottom ribbing on your sweater.
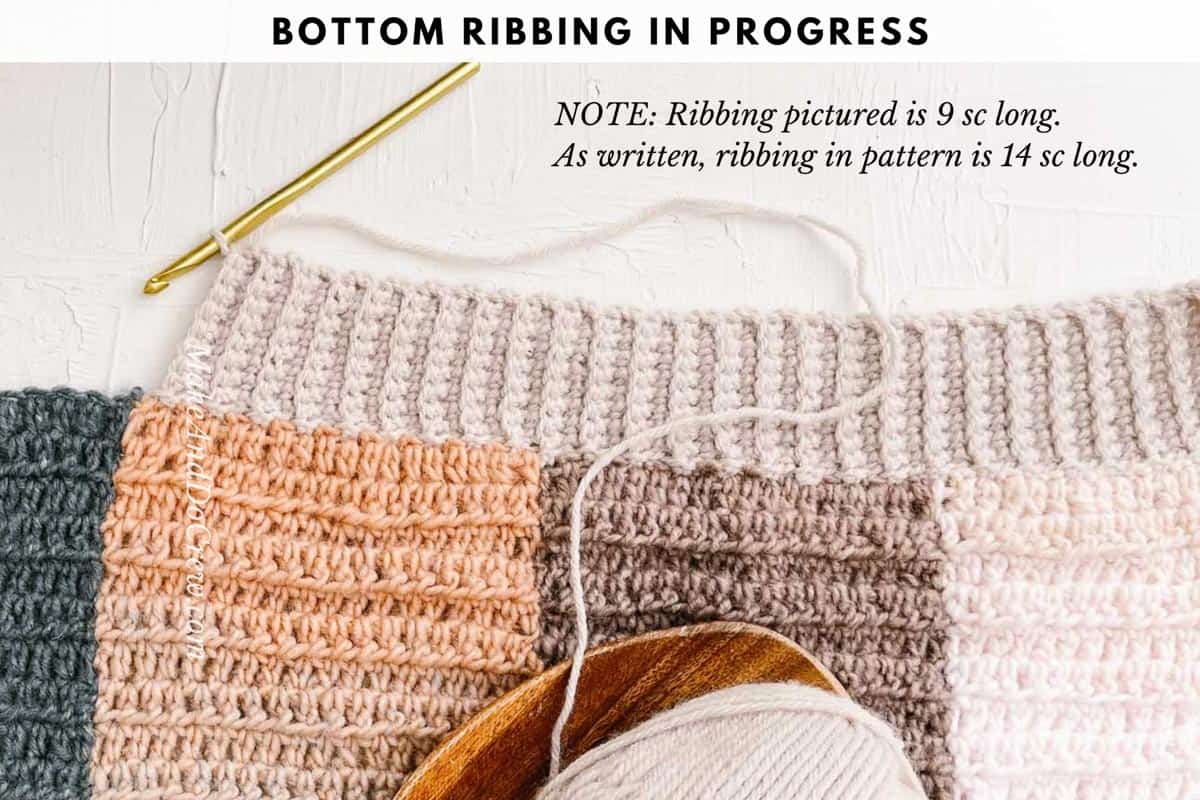
Bottom Ribbing Band:
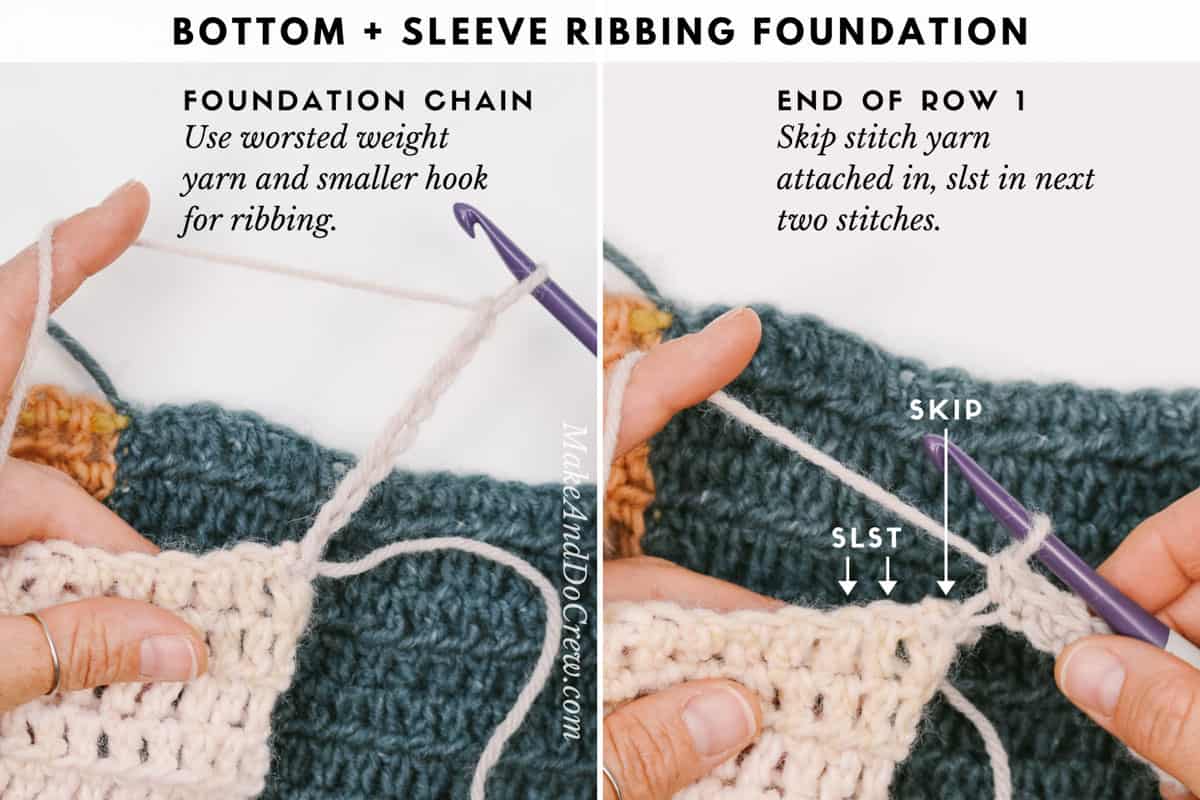
Attach Ribbing Yarn to bottom left corner of sweater front as worn. (Left-handed: attach yarn to bottom right corner of sweater front as worn.)
With smaller hook:
Ribbing Foundation: Ch 10.
Row 1 (RS): Sc in second ch from hook and each ch to end of row, slst to next available st of sweater bottom, slst into next available st of sweater bottom; turn. (9 sc 2 slsts)
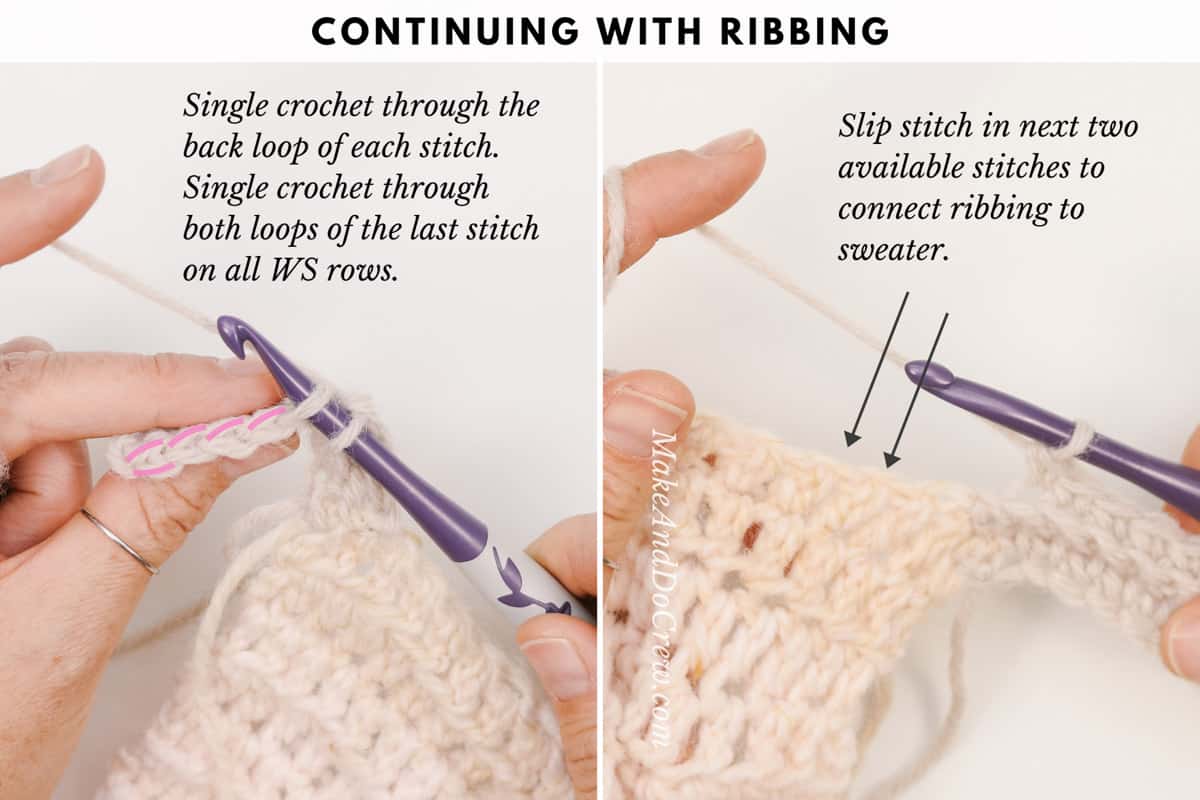
Row 2 (WS): (Do not ch 1), sk slsts along bottom edge, scblo in each st until 1 remains, sc through both loops of the last st; turn. (9 sc)
Row 3 (RS): Ch 1, scblo in each sc to end of row, slst to next available st of sweater bottom, slst into next available st of sweater bottom; turn. (9 sc + 2 slsts)
Rep Row 2 and 3 until end of sweater bottom edge. Take care to end with a WS row (Row 2), even if it means only working 1 slst along sweater bottom edge for the last repeat. Do not fasten off.
Collar Ribbing Band:
With smaller hook and attached yarn:
Ribbing Foundation: Ch 10 (10, 10, 14, 14).
Row 1 (RS): Sc in second ch from hook and each ch to end of row, slstblo to next available st of bottom ribbing edge, slstblo into next available st of bottom ribbing edge; turn. (9 (9, 9, 13, 13) sc + 2 slsts)
Row 2 (WS): (Do not ch 1), sk slsts along bottom edge, scblo in each st until 1 remains, sc through both loops of the last st; turn. (9 (9, 9, 13, 13) sc)
Row 3 (RS): Ch 1, scblo in each sc to end of row, slstblo to next available st of bottom ribbing edge, slst into next available st of bottom ribbing edge turn. (9 (9, 9, 13, 13) sc + 2 slsts)
Rep Row 2 and 3 until end of bottom ribbing edge, ending with a WS row.
TIP: To add button holes, work the following row every tenth row for as many buttons as you’d like to include.
Button Hole Row (WS): (Do not ch 1), sk slsts along ribbing edge, scblo in next 4 (4, 4, 6, 6), ch 1, sk next st, scblo in each remaining st until 1 remains, sc through both loops of the last st; turn. (8 (8, 8, 12, 12) sc + 1 ch-1 button hole)
The photo below shows the collar ribbing at the neckline of your patchwork sweater.
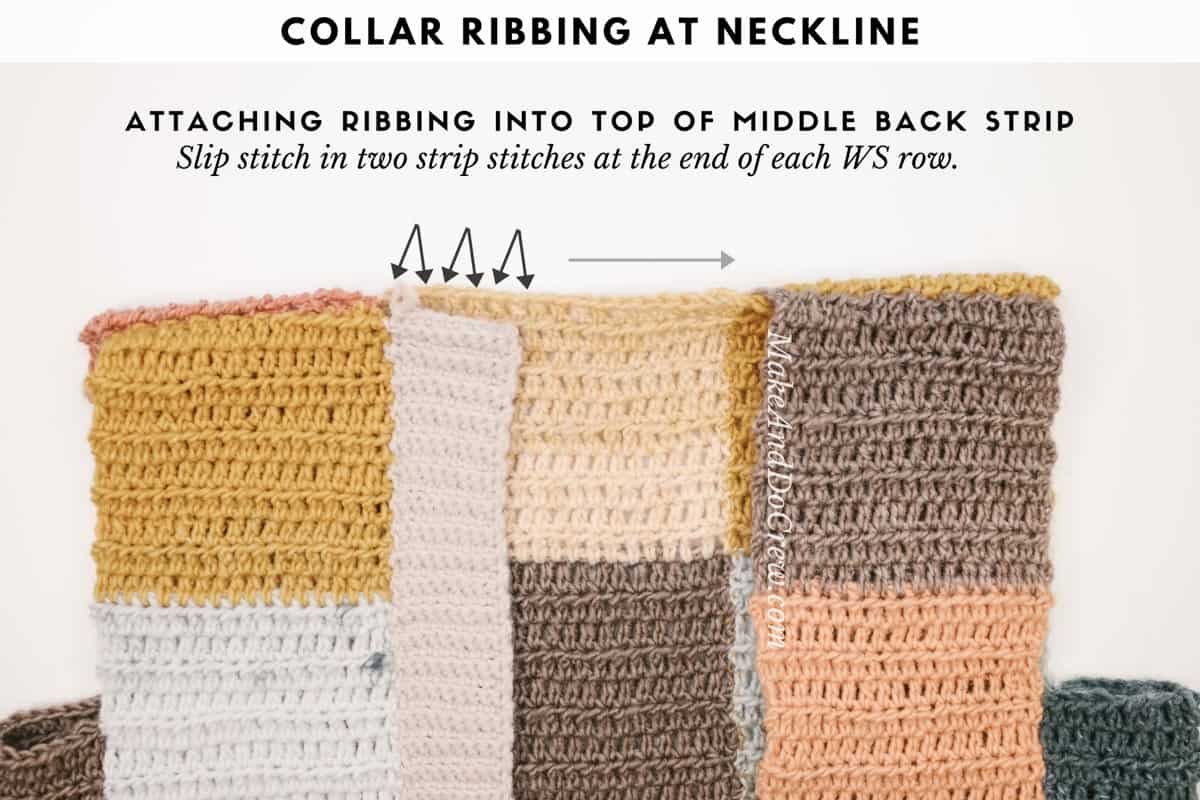
Continue in pattern of Row 2 and 3 around entire sweater fronts and neckline, adding button hole rows if desired.
When working the raw row edges along sweater fronts, place both slip stitches of each Row 3 into one raw row edge. (Therefore each main body sweater row will have a Row 2 and 3 line up with it.)
Whether slip stitching into an ehdc and tch raw row edge, slip stitch through the “meat” of the raw row edge stitch so as to securely anchor ribbing.
At bottom of ribbing on opposite side, end with a WS row. Fasten off.
Sleeve Ribbing Cuff:
With RS of sleeve facing, attach Ribbing Yarn to right corner of wrist edge of sleeve. (Left-handed: attach yarn to left corner of wrist edge of sleeve.) If sleeve is already seamed into a tube, attach yarn in any stitch along wrist edge.
With smaller hook:
Ribbing Foundation: Ch 10.
Row 1 (RS): Sc in second ch from hook and each ch to end of row, slst to next available st of sleeve edge, slst into next available st of sleeve edge; turn. (9 sc + 2 slsts)
Row 2 (WS): (Do not ch 1), sk slsts along sleeve edge, scblo in each st until 1 remains, sc through both loops of the last st; turn. (9 sc)
Row 3 (RS): Ch 1, scblo in each sc to end of row, slst to next available st of sleeve edge, slst into next available st of sleeve edge; turn. (9 sc + 2 slsts)
Rep Row 2 and 3 until end of wrist edge. Take care to end with a RS row (Row 3), even if it means only working 1 slst along sweater bottom edge for the last repeat. Fasten off. Repeat on second sleeve.
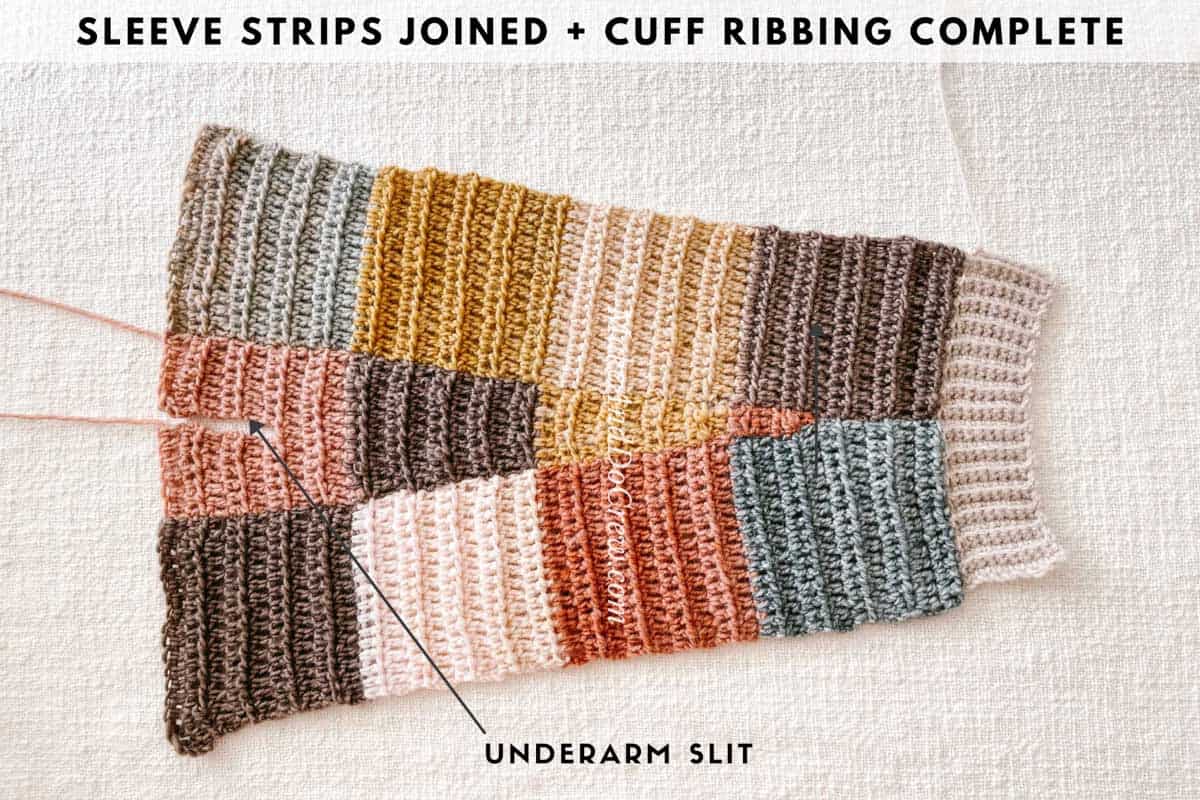
The photo below shows the sleeve of your crochet cardigan once the sleeve strips have been joined and the cuff ribbing has been added.
Pockets:
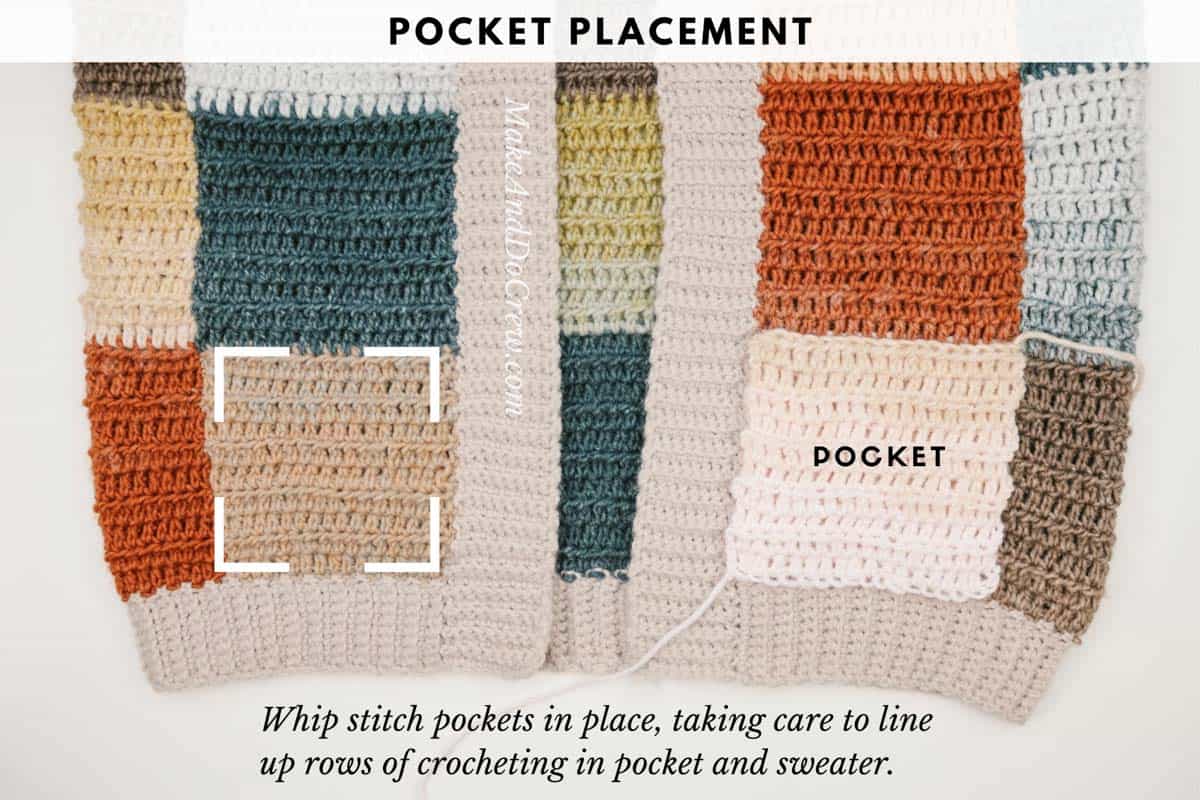
See the pocket placement photo below and choose colors based on what will look good with the patchwork of the sweater fronts.
This very likely could mean using the same color of the existing squares that will be covered by the pockets. Remember, you can also use your gauge swatch as one of the pockets!
Here's how to make a pocket:
With larger hook:
Foundation Row: Ch 17 (20, 23, 21, 23).
Row 1 (RS): Ehdc in fourth ch from hook, ehdc each ch to end; turn. (15 (18, 21, 19, 21) sts)
Row 2 (WS): Ch 3, ehdc in each st to end; turn. (15 (18, 21, 19, 21) sts)
Rep Row 2 six (eight, ten, ten ten) more times to create a total of 8 (10, 12, 12, 12) rows.
Fasten off leaving a 30” tail.
Make 2 pockets total.
Patchwork Finishing Steps:
All joining can be done with a tapestry needle and leftover yarn tails where possible. Only add a new strand of seaming yarn if no tails are available.
Seaming Sleeves Cuffs Closed:
With WS still facing out, use a running stitch to join entire length of sleeve, including cuff ribbing.
Attaching Pockets:
With RS of sweater facing out, pin pockets in place ensuring crochet stitches are upright and pocket foundation row is at bottom of sweater. (See photo above.) Whip stitch pockets in place.
Attaching Buttons (Optional):
Using a scrap of yarn in same color as buttons, sew buttons in place on collar ribbing opposite button holes. It can be helpful to count ridges of ribbing between each button to ensure buttons are placed exactly opposite buttonholes. (See photos above in blog post for general button placement.)
Blocking:
To block your project, lay your sweater out flat. Using a steamer or iron held at least 5” away, aim steam at sweater taking care not to touch yarn directly. Focus mostly on any seams that need a little convincing to lay flat.
Throw yourself a patchwork party–you just crocheted your own cardi!
More Free Crochet Sweater Patterns
Crochet sweater patterns don't need to be difficult. In fact, most of ours are made with very simple shapes. Dive into the wonderful world of crochet garments with cardigans, pullovers, ponchos, shrugs and more!


See more free crochet sweater patterns →
That was so fun! Now what?
Invitation to our Facebook group
Come discuss crocheting patchwork cardigans and lots of other projects and techniques in our Make & Do Crew Facebook group. Here thousands of helpful crocheters answer each others questions and share their stitches. Come join us here.


Leave a Reply