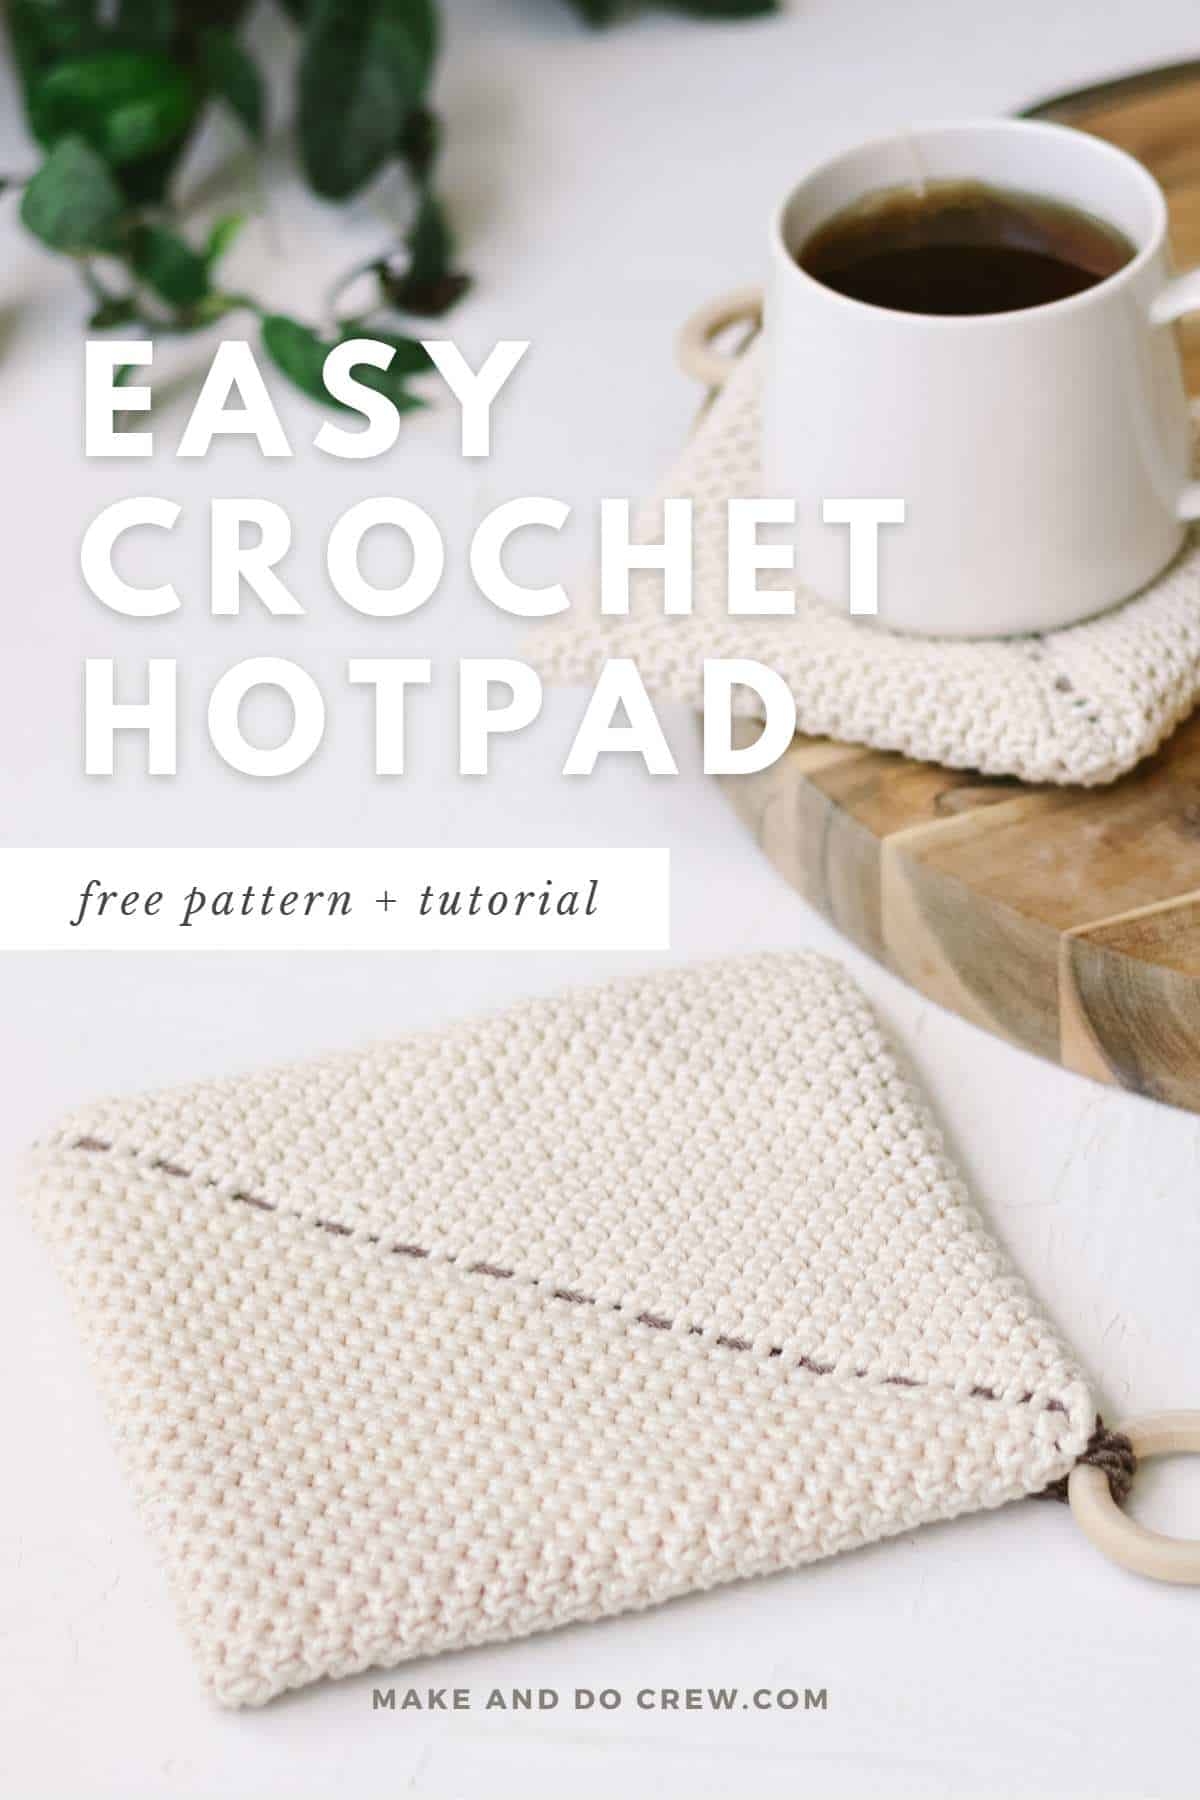
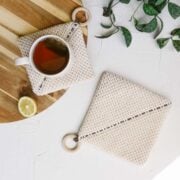
This free crochet potholder pattern uses the dense thermal stitch to create a double thick hot pad that's stylish and extremely protective.
Get the free hot pad pattern and tutorial below, or purchase the ad-free PDF for easy printing.
This crochet potholder pattern is part of a collaboration with Lion Brand Yarns. This post contains affiliate links.
Jump to:
- The Best Thick Crochet Potholder Pattern
- How to Crochet a Potholder
- About the Thermal Stitch
- Supplies + Materials
- Best Cotton Yarn for Potholders
- Free Pattern - Casita Double Thick Potholder
- Kitchen Pot Holder Pattern Variations
- Crochet Potholder FAQs
- Invitation to our Facebook group
- How to Crochet a Potholder For Beginners - A Summary
The Best Thick Crochet Potholder Pattern
We've all used darling vintage hot pads that went on to burn the heck out of our hands, right? That ends today!
Since there are so many tutorials for crocheting potholders, I wanted this design to be the thickest and most protective of all. By making two layers of one of the densest crochet stitches, this is the best potholder for protecting your hands from hot dishes.
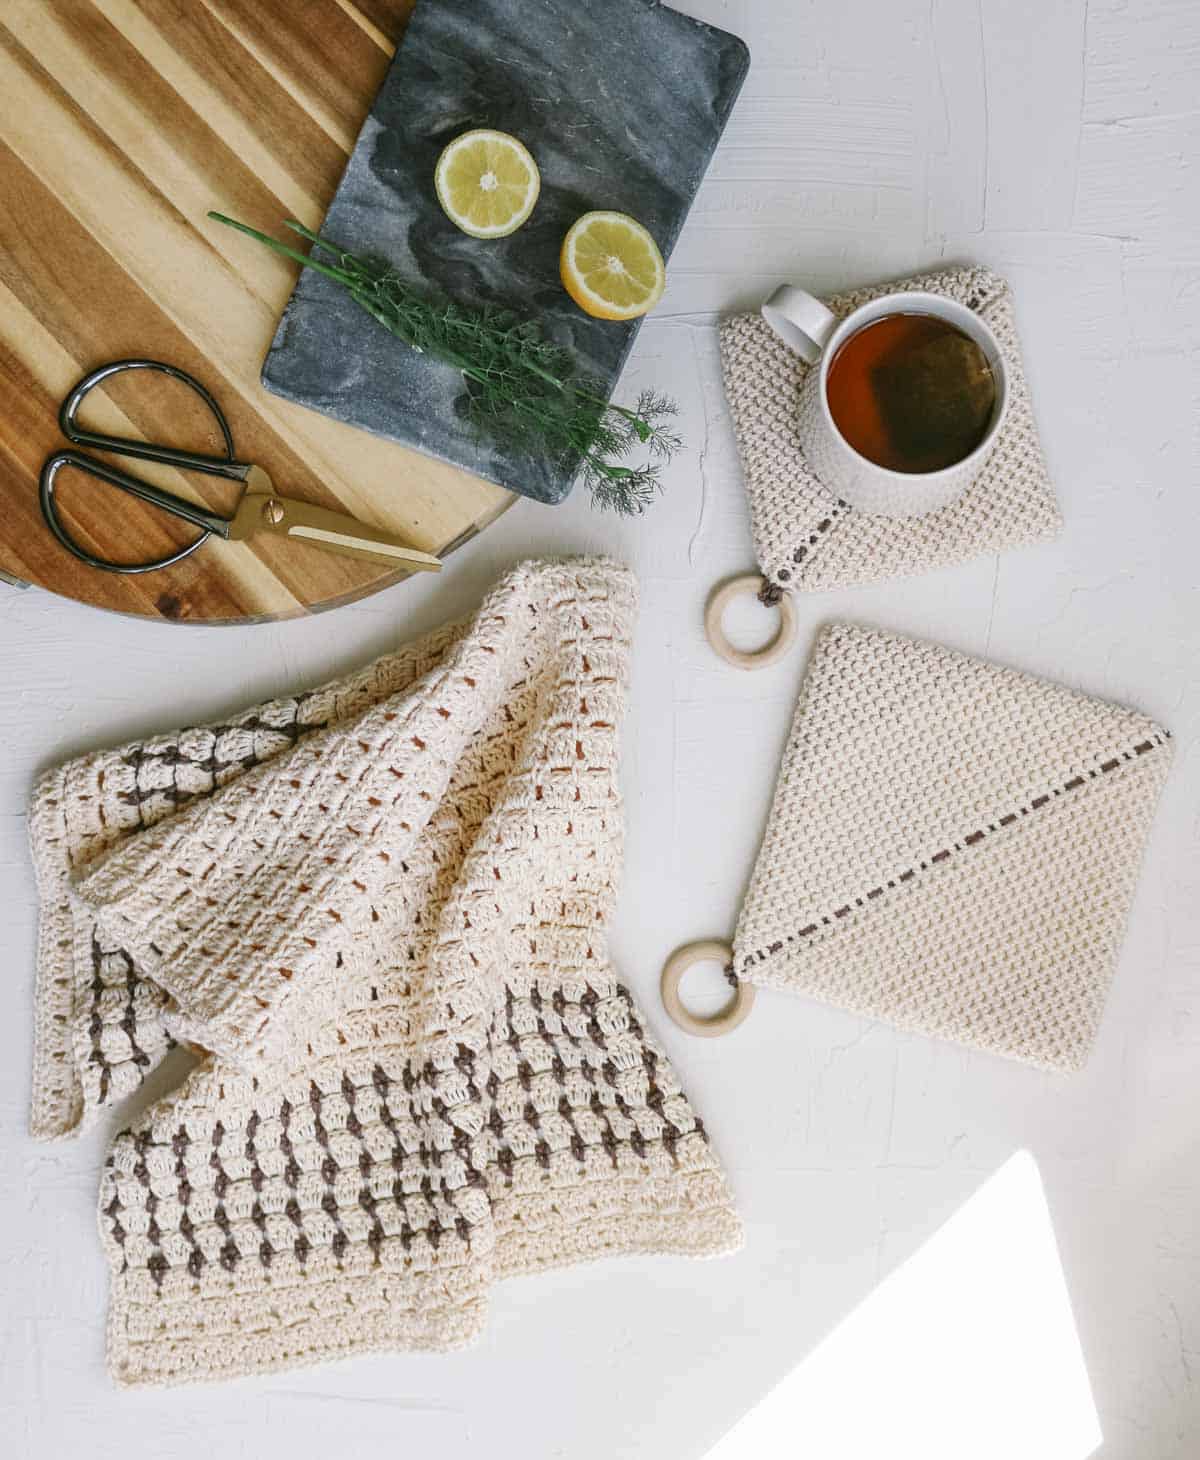
The Perfect Kitchen Set
Pair a couple of beginner potholders with the Casita Hand Towel for a giftable kitchen set!
Keep reading for more yarn and inspiration details or jump down to the free pattern.
Diagonal Potholder Design
The beauty of this easy pattern is in its construction.
The diagonal potholder is crocheted in the round to form an "envelope." This pocket eventually folds in on itself, which may seem like a mistake, but it's actually intentional. Folding on the diagonal is what creates the two layers of protective fabric.
You might have seen this approach called a "magic potholder" before, and it really does live up to the name.
Why you’ll love this hot pad!
How to Crochet a Potholder
The photo tutorial below shows how you can whip up a square hot pad in just four easy steps.
Step 1. You'll begin by working into both sides of a crochet chain.
Step 2. Continuing in rounds of thermal stitch crochet, the sides of the pocket will grow taller.
Step 3. When the pocket height matches the width, you'll know you have the right dimensions for a square potholder.
Step 4. Press the pocket flat at the diagonal. Seam the opening using the mattress or whip stitch, and you'll have a thick crochet potholder that doubles as cute kitchen decor.
Pattern Overview Video
Prefer to watch and listen instead of reading? In the video below, I explain what you need to know before crocheting your own beginner potholder. Check it out to get the inside scoop on the pattern instructions.
(If you have an ad-blocker running, you'll need to disable it to view the video.)
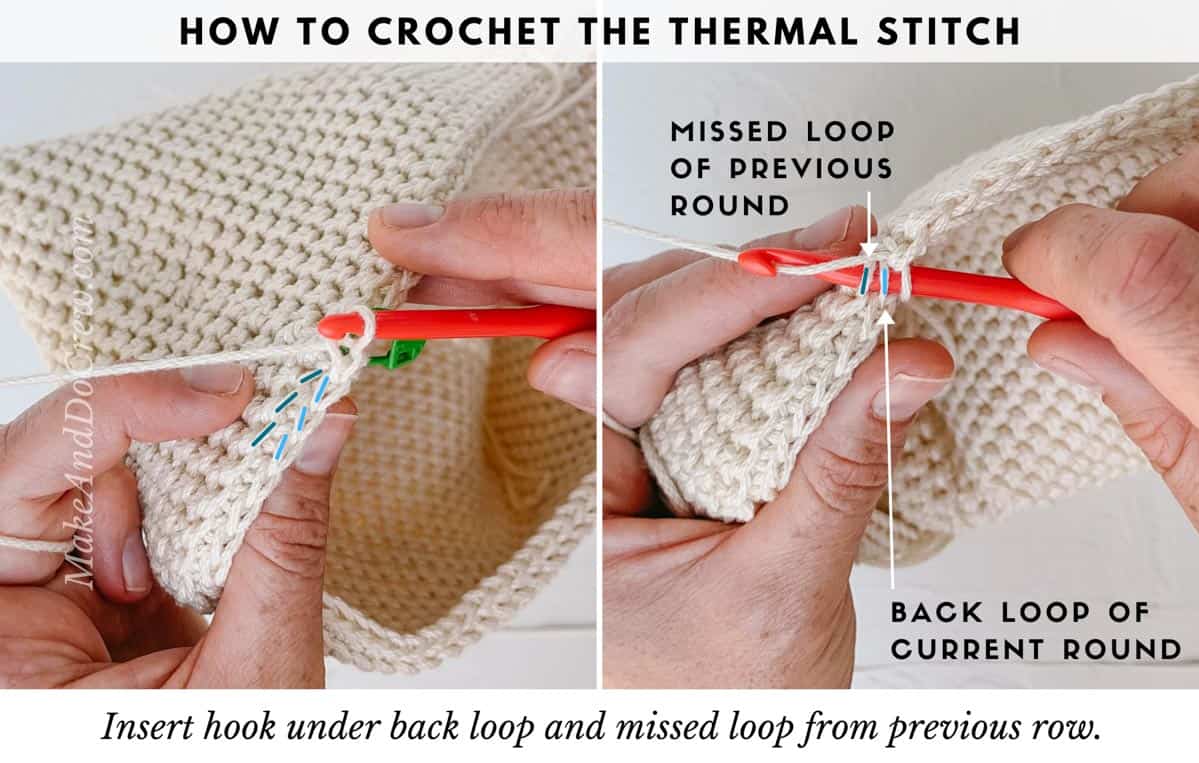
About the Thermal Stitch
The thermal stitch is a magical variation on single crochet.
To crochet the thermal stitch, you work under the back loop of the current round as well as the unworked loop of the previous round. With each stitch, you're creating another layer of thickness on top of the existing stitches.
The result is rich in texture and perfect for double-thick crochet potholders.
Supplies + Materials
These simple crochet hot pads can be created with very few supplies. Here's what you'll need:
Optional Extras
There are easy ways to make your potholder look even more polished. Here are a few to try:
• Strand of Yarn in Contrasting Color: If you'd like to add accent stitches across the diagonal, you'll need a few yards of another cotton yarn.
• Wooden Ring: This loop alternative adds a nice modern touch. Another option is to use a scrap of leather and metal grommet, as I did in this crochet trivet pattern.
Best Cotton Yarn for Potholders
Cotton yarn is the best yarn for crochet potholders. One of my favorite cotton yarns for crochet bags and kitchen items is Lion Brand 24/7 Cotton. This yarn is a smooth, mercerized cotton that's sturdy, yet easy to work with.
Your potholder will look fresh and crisp even after many trips through the washing machine, thanks to the tight weave and saturated colors of 24/7 Cotton.
Yarn Substitutions
You might wonder if you can substitute acrylic yarn to crochet a potholder. Unfortunately, no. Acrylic and acrylic-blends will melt when they come in contact with hot pots and pans.
Substitute another worsted-weight cotton yarn, such as Lion Brand Pima Cotton, instead.
RELATED: How to Shop Your Stash: The Best Patterns for Using the Yarn You Have
All-in-One Crochet Kit
If you don't live near amazing yarn stores or if you like to get fun packages in the mail, the all-in-one kit is a perfect way to make your Casita potholder.
This bundle from Lion Brand includes all the 24/7 Cotton yarn you'll need for this pattern and the Casita Hand Towel, plus bonus printable PDFs of the patterns (delivered digitally).
Free Pattern - Casita Double Thick Potholder
Pattern Supplies
Order an all-in-one kit from Lion Brand here.
• Lion Brand 24/7 Cotton (Weight: 4/Medium - 170 yds, 3.5 oz/100 g)
- A: Ecru (761-098C) – 2 skeins (approx. 170 g) to make one large (108 g) and one small (62 g) potholder
- B: Cafe Au Lait (761-126AA) – 1 partial skein (approx. 7 g)
• Size H (5.0 mm) crochet hook or size needed to obtain gauge
• Stitch marker or safety pin
• (1) 55mm wooden ring per potholder (optional)
• T-pins (optional)
• Steamer or iron with steam function (optional)
• Blocking board (optional)
Crochet Hook Sizing Suggestions
In this crochet potholder pattern, keeping your stitches tight is essential. Why? We're aiming for the thickest potholder possible, and gaps between your stitches could result in burns from hot pans.
While meeting the pattern gauge isn't crucial, you should adjust your hook size if your hot pad stitches are too open (size down) or impossibly tight (size up).
Measurements
Deluxe (large): 7 x 7”
Dainty (small): 5.25 x 5.25”
See notes below to customize size.
Gauge
18 thermal single crochet = 4”
32 rounds = 4”
Abbreviations + Glossary
(US Terms)
ch – chain
PM – place marker
rep – repeat
RS – right side
sc – single crochet
scblo – single crochet through back loop only
sk – skip
slst – slip stitch
st(s) – stitch(es)
tch – turning chain
WS – wrong side
Special Stitches
thermal sc – thermal single crochet - Insert hook under back loop AND missed loop from previous round. Complete single crochet as usual. See the video tutorial below.
Print this Pattern
Prefer to crochet on the couch? Need a portable, printable pattern? You'll love the premium PDF! The instantly downloadable, ad-free file is formatted for easy printing and includes the complete Casita Pot Holder pattern and all the photo tutorials.
Skill Level:
Advanced Beginner
Techniques You'll Practice:
This free crochet potholder pattern is an excellent opportunity to practice:
• the thermal crochet stitch
• working in the round
• basic seaming
Beginner Tips for Crocheting a Potholder
Because you're working into both sides of the chain, the first few rounds of this easy crochet potholder pattern can be a little fiddly. Don't let this stop you from continuing.
Working the thermal stitch will become easier once you're about an inch into the pattern.
Thermal Stitch Photo + Video Tutorial
If you're a visual learner, learn how to crochet the thermal stitch step-by-step in the photo or video tutorial below.
Overall Pattern Notes
- Stitches are intended to be worked tightly to create the densest, most protective fabric. This thermal stitch potholder gets easier and faster to work further away from foundation chain.
- Pot holder is worked in turned rounds. This means you’ll end each round with a slip stitch to the first single crochet of the round, then turn and work the next round in the opposite direction.
Wanna save this pattern?
- Fabric is reversible. There is no right or wrong side. RS/WS designations are given for pattern clarity only.
- Pot holder is written in two sizes: Dainty and Deluxe. Stitch counts for Dainty size are given first, followed by stitch counts for Deluxe size in parenthesis. (Example: Ch 35 (42).)
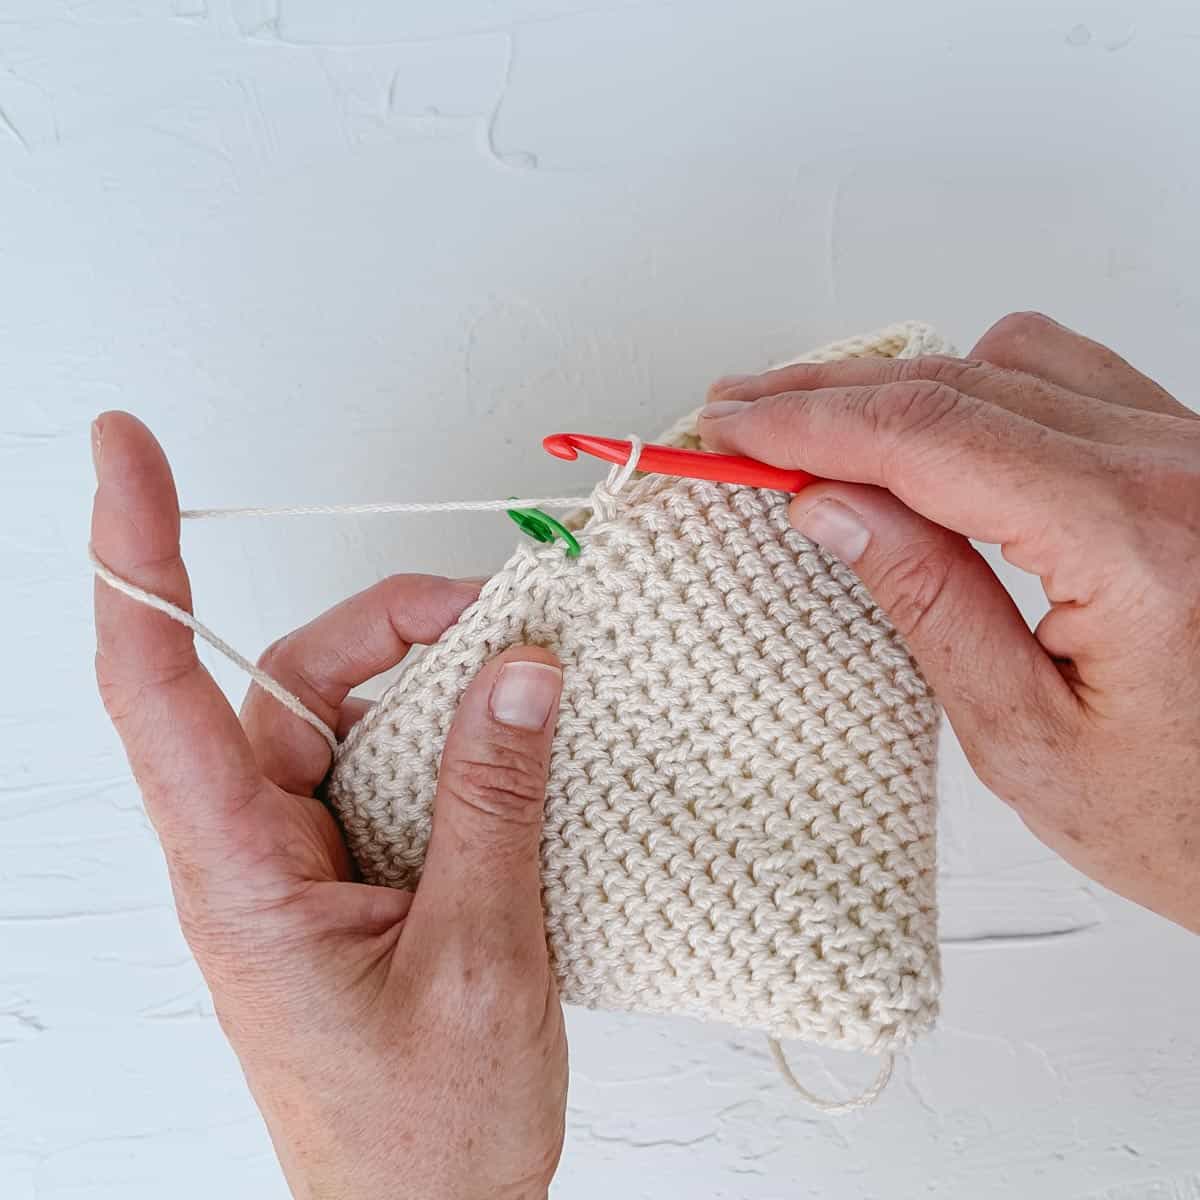
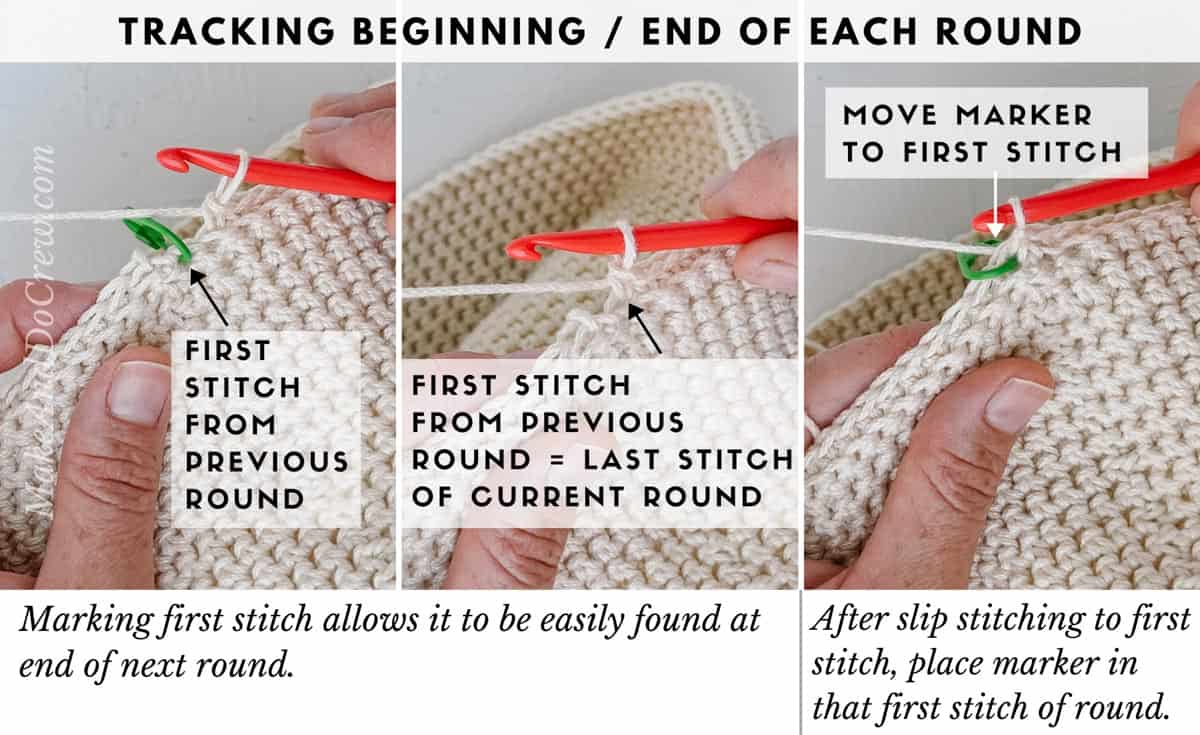
- A stitch marker is placed in first stitch of the round that was just completed and moved up with each round. This makes it clearer where the round ends and avoids accidentally working into the slip stitch from the previous round.
- All instructions are intended to use Color A unless specifically noted.
The photos below show how to keep track of the beginning and end of a round when crocheting your hot pad.
Crochet Thick Pot Holder Foundation
Notes:
- To modify crocheted potholder size, increase or decrease the number of foundation chains. Keep in mind that the number of foundation chains translates to the diagonal measurement of the potholder. For reference, the diagonal measurements of the sample sizes are as follows: Deluxe: 9”, Dainty: 7”
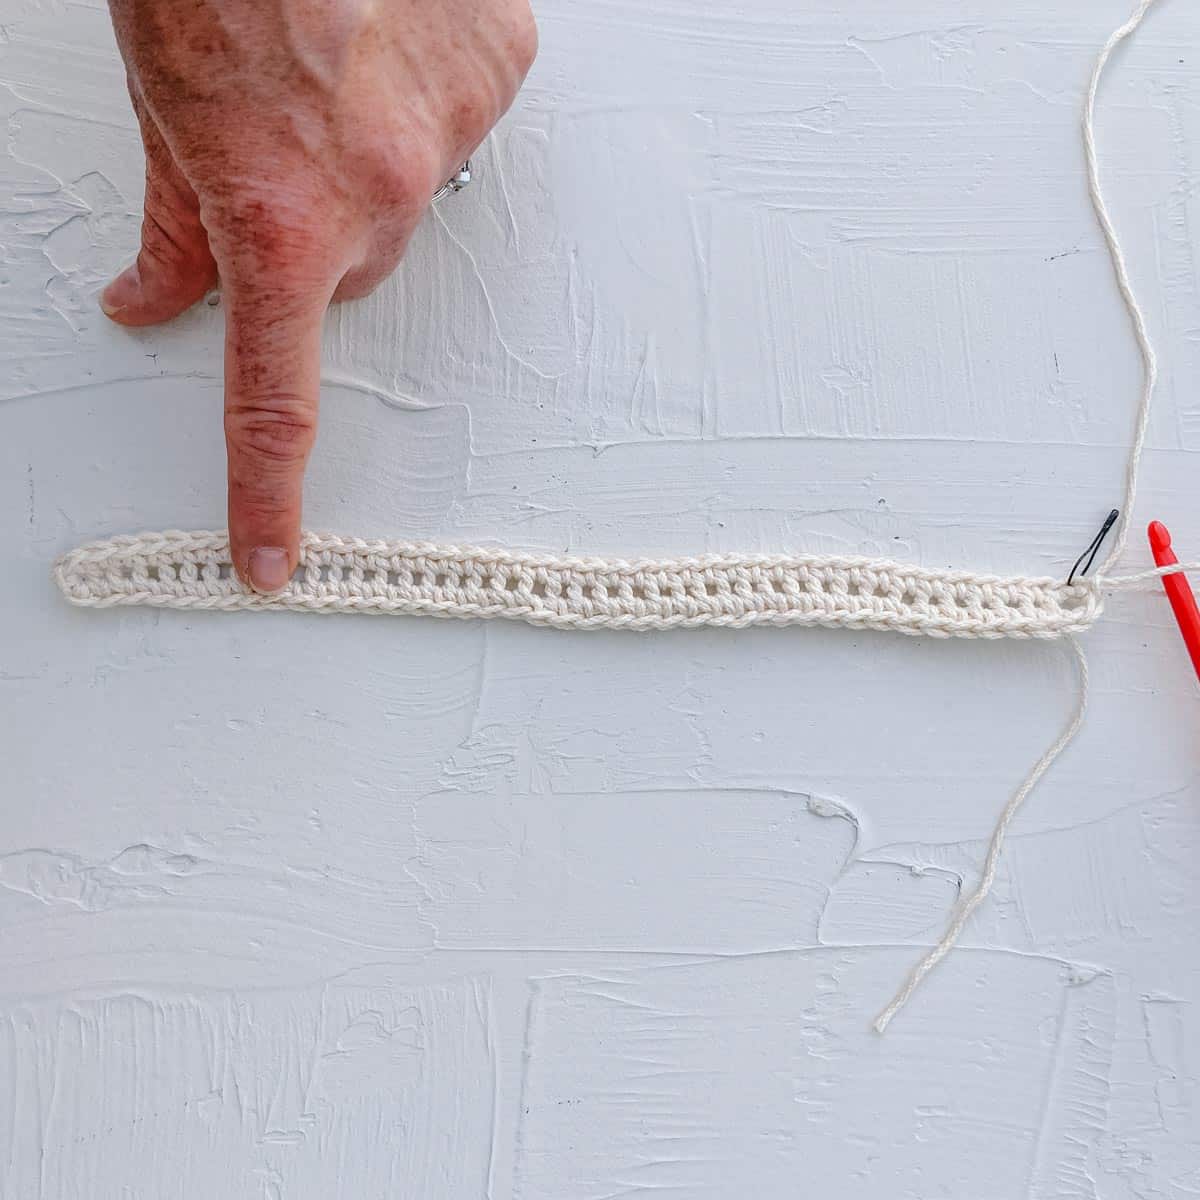
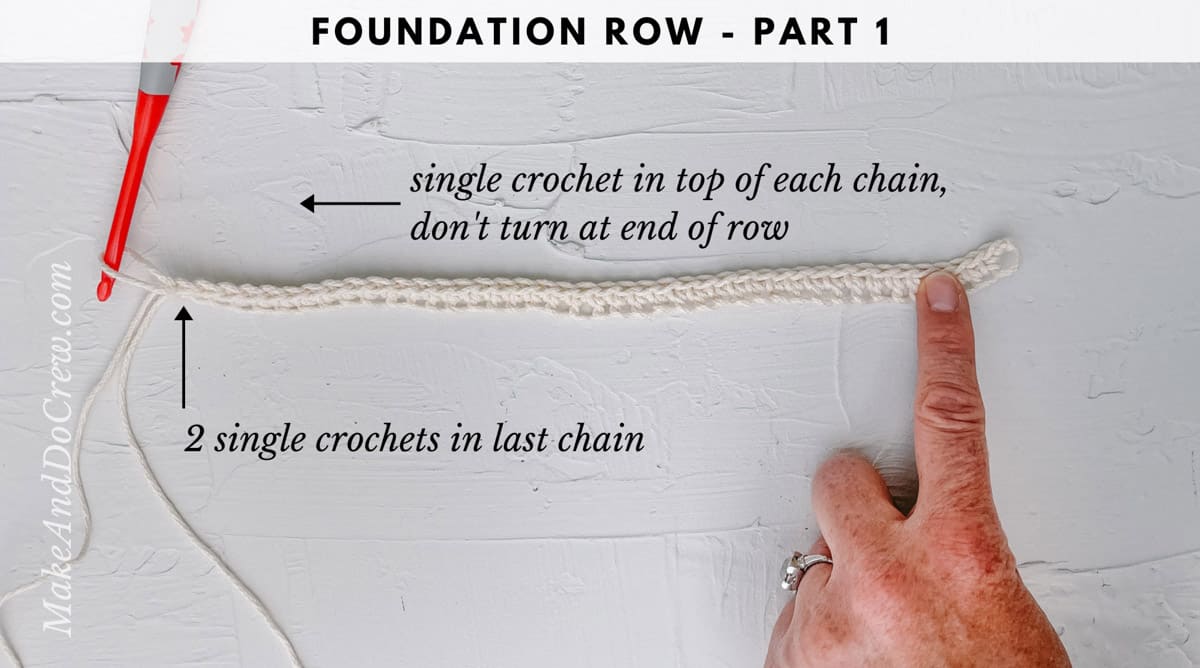
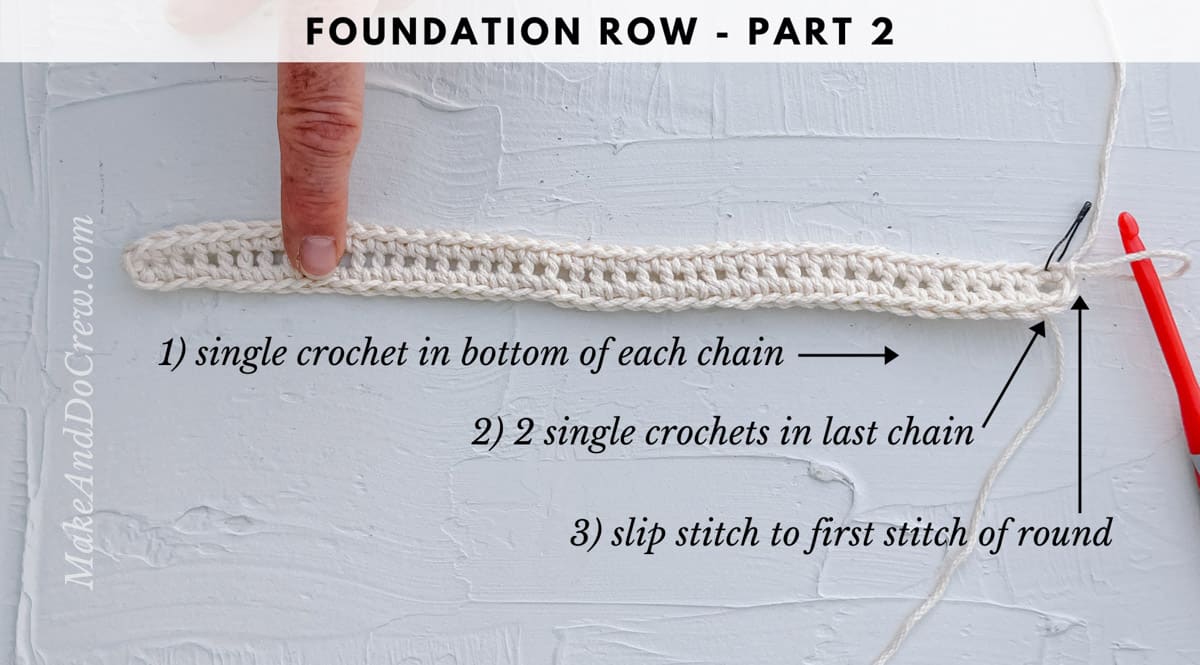
- Round 1 is worked the around the entire foundation chain to create single crochet stitches on both the top and bottom of it.
Foundation: Ch 35 (42).
Round 1 (RS): Sc into top of second ch from the hook and each ch to end of row, place a second sc in last ch and continue around to bottom of chain, sc in bottom of each chain to end of row, place a second sc in last ch, slst to first sc of round to join. PM in first stitch of round. Turn. (70 sc, (84 sc))
The photo below shows how to create the foundation chain for your potholder.
The photo below shows how to complete the second part of the foundation row.
Continuing In The Round
Round 2 (WS): Ch 1, scblo in each sc around taking care to work into final (marked) stitch of round, slst to first sc to join. Move marker to first stitch of Round 2. Turn.
✨Unlock this free subscriber-exclusive pattern ✨
Follow these steps to view the full free pattern below
Round 3 (RS): Ch 1, scblo in each sc around taking care to work into final (marked) stitch of round, slst to first sc to join. Move marker to first stitch of Round 3. Turn.
Round 4 (WS): Ch 1, thermal sc in each sc around taking care to work into final (marked) stitch of round, slst to first sc to join. Move marker to first stitch of round. Turn.
Repeat Round 4, turning at the end of each round, until piece can be folded to meet in the middle. Middle join should run perpendicular to foundation chain. See photo tutorial below for how to fold piece.
The photo below shows how you'll complete the first few rounds of crocheting a potholder.
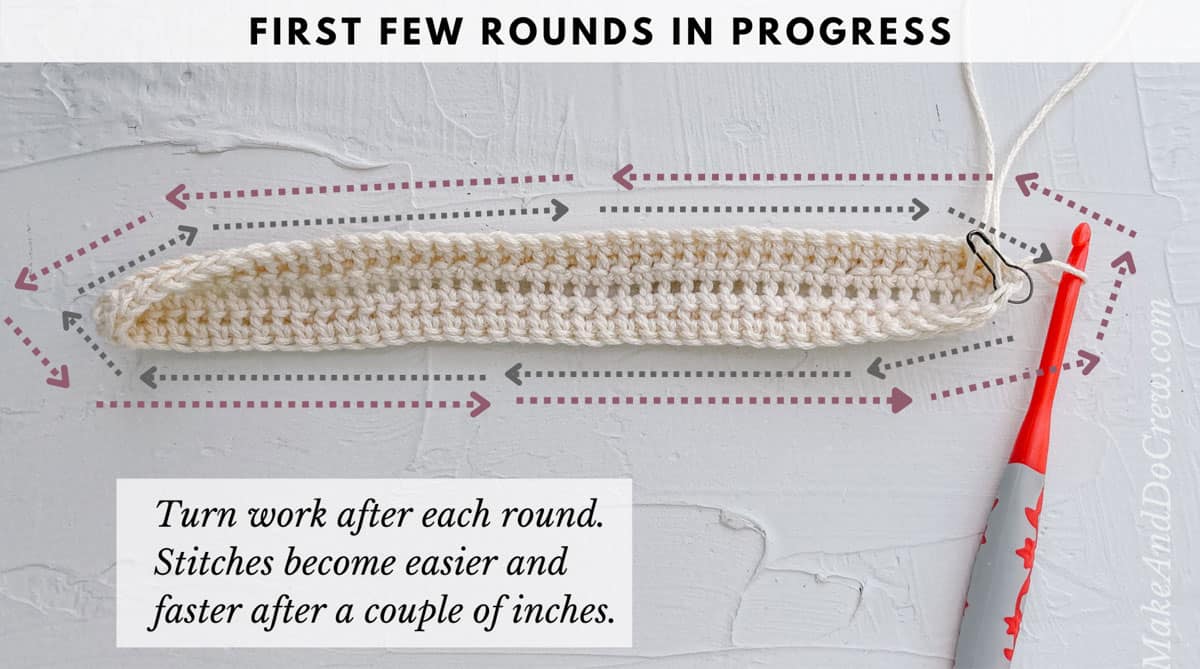
TIP: The exact number of potholder rounds will vary depending on your gauge, so it’s best to check by folding piece periodically. It doesn’t matter if you end with a RS or WS round.
Once correct height is reached, fasten off.
Premium PDF
easier and faster with fewer mistakes.
- Complete pattern + photo tutorials
- Instant download
- Formatted for easy printing
Adding Accent Stitching
With Color B yarn doubled over, use tapestry needle to knot yarn inside potholder near foundation chain. Then sew accent color through gaps in foundation chain as desired. When stitching is complete, tie knot inside potholder, but do not fasten off.
The photo below shows how to add accent stitching to your hot pad.

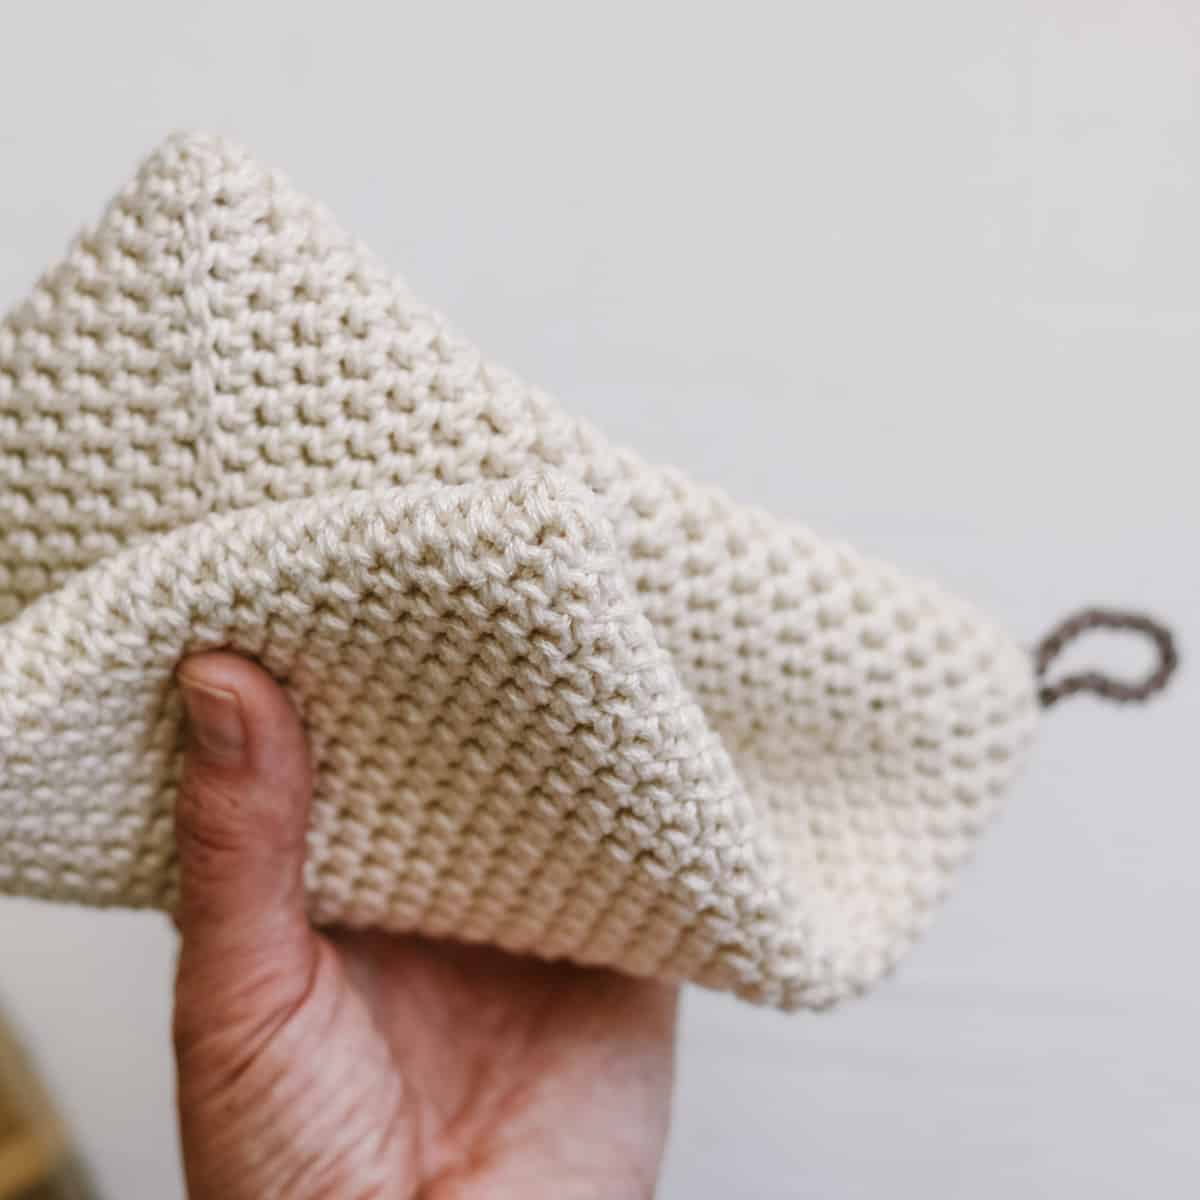
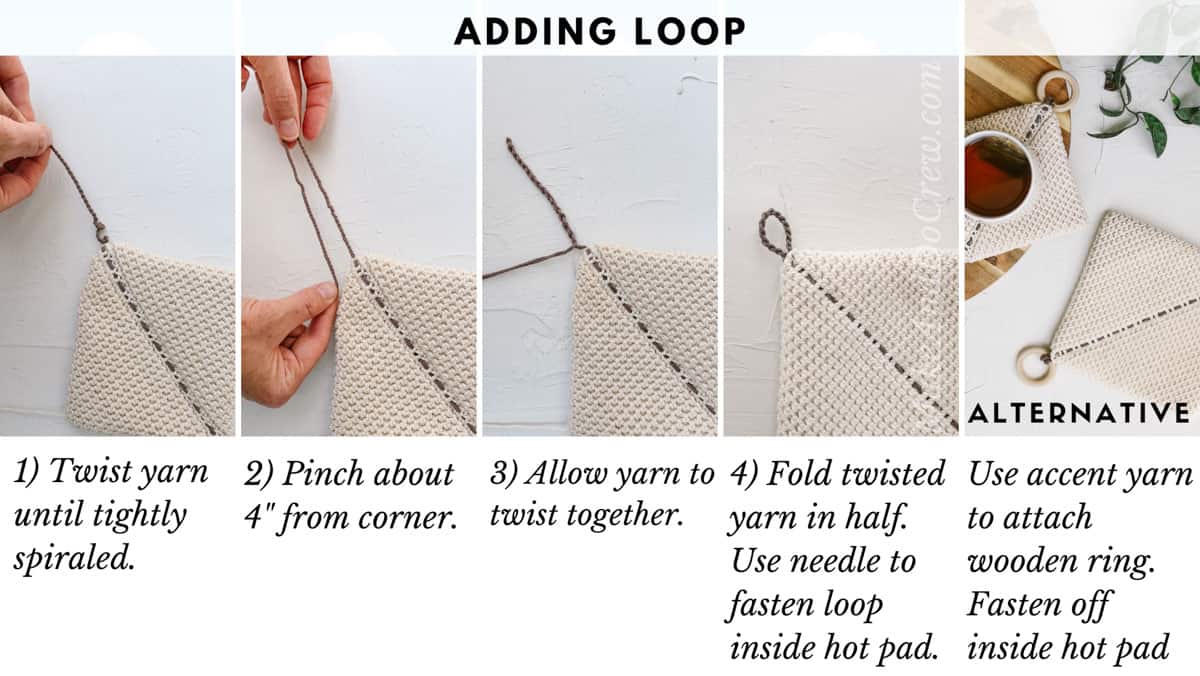
Adding Hanging Loop to Potholder
With Yarn:
Twist several inches of attached Color B yarn until it begins to spiral. Pinch yarn 4” from potholder and fold over so yarn twists to itself. Use attached tapestry needle to fasten down twisted strand into a loop and tie off inside potholder.
With Wood:
Use attached Color B yarn to whip stitch wooden ring to potholder corner. Tie off yarn inside crochet hot pad.
Here's a photo tutorial on how to add a hanging loop to the potholder.
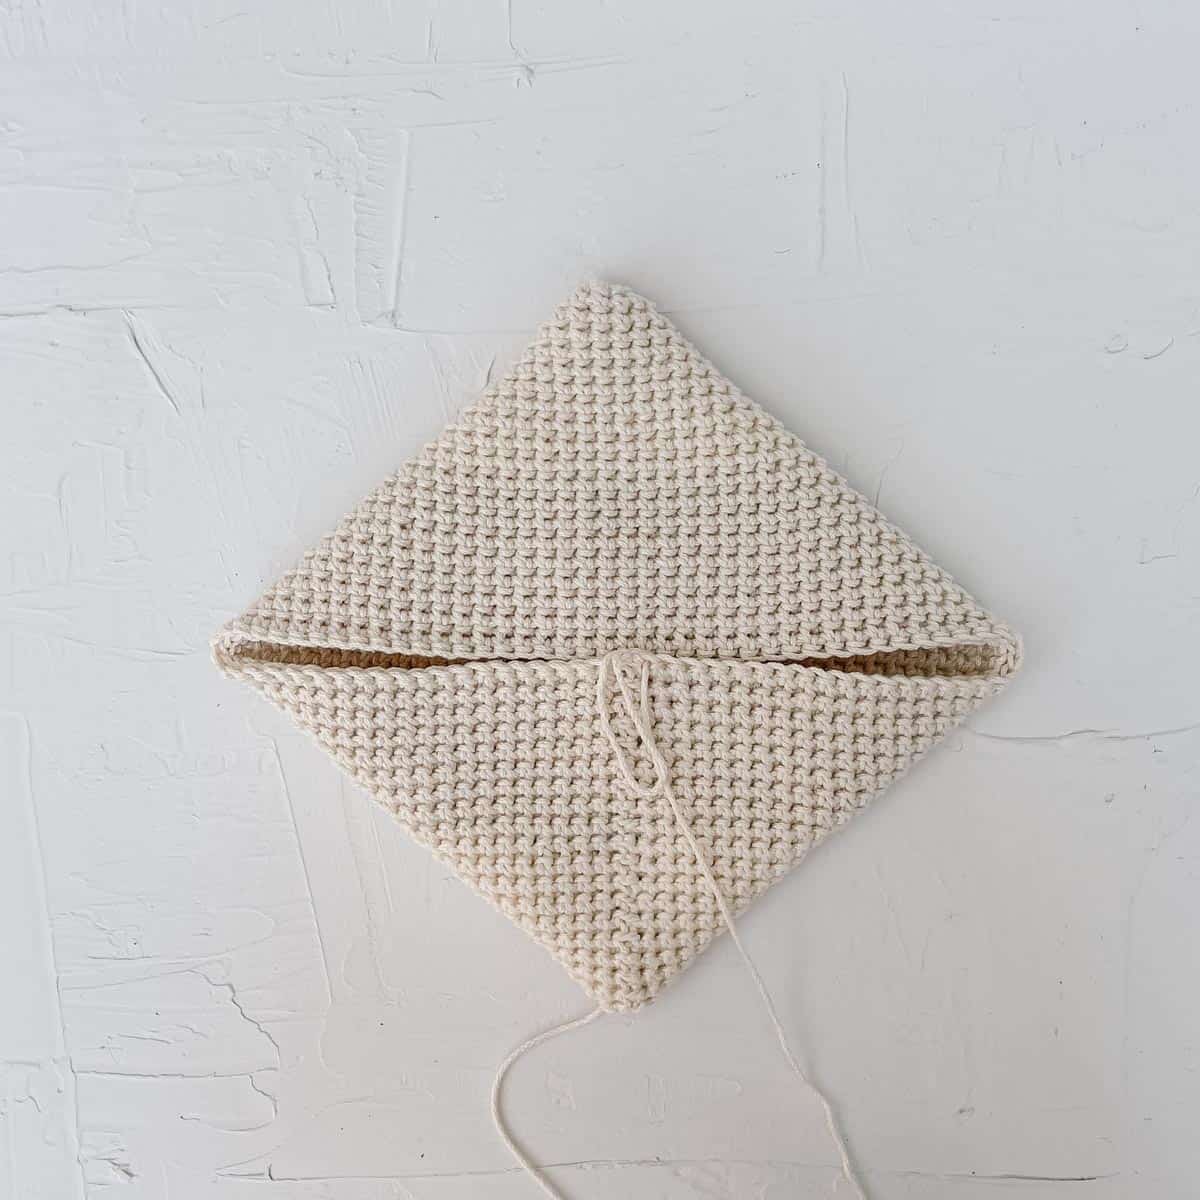
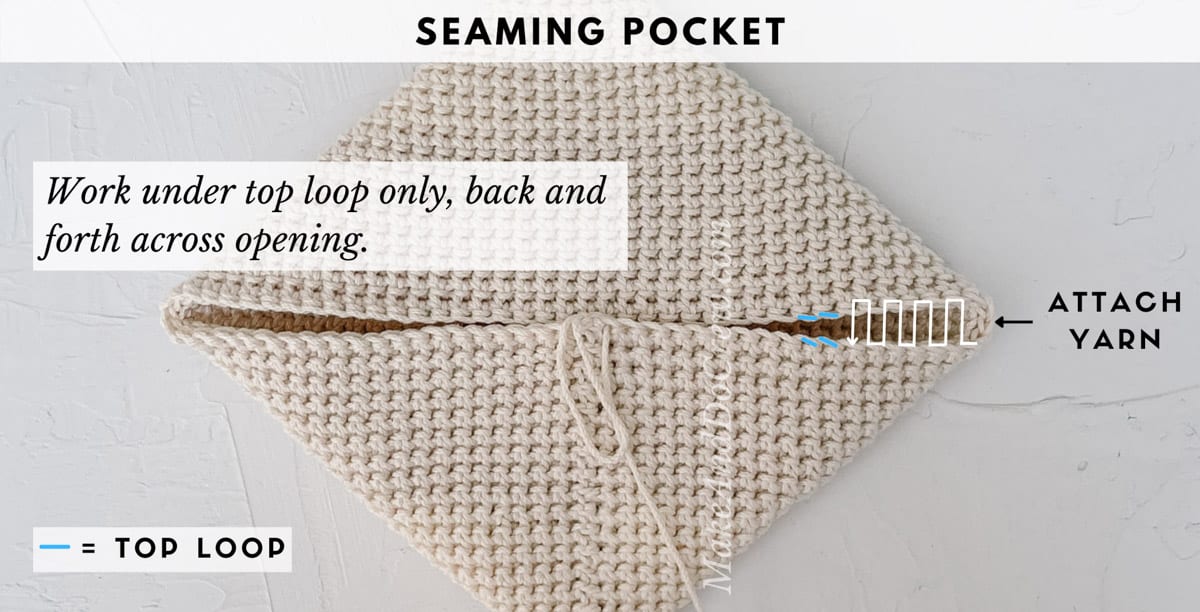
Seaming Into a Square
Fold piece so foundation chain is perpendicular to “pocket” opening. Attach a single strand of Color A with a tapestry needle to corner crease. Zig-zag stitch opening together, working into top loop (the loop closest to you) on each side of crease. Tie off and hide tail inside potholder.
The photos below show how to fold the hotpad into a square.
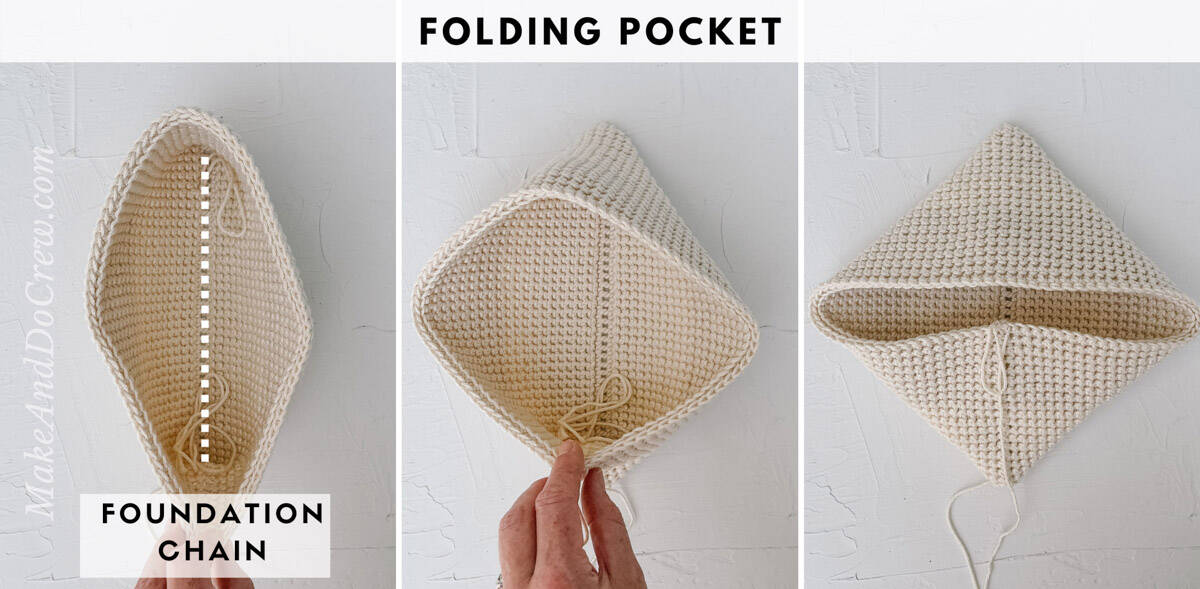
Once the piece is folded into a square, it is ready to be seamed. Here's how to seam your hotpad.
Blocking
If desired, pin hot pad to blocking board using T-pins. Steam block by hovering a steamer or iron with steam functionality over hot pad. Let dry and set overnight.
Grab the hottest thing you can find and hold on tight!
Kitchen Pot Holder Pattern Variations
It's quite easy to modify this pattern to suit your needs. Here are a few ideas.
• The loop for hanging your hot pad is a fun opportunity for customization. Try using a leather shoelace, a felted scrap of wool yarn, or a wooden ring.
• Make a larger or smaller hot pad by adjusting the number of foundation chains. The key is to continue in rounds until the pocket height is the same length as the foundation chain. (As in, the pocket is a perfect square.)
• For a fast potholder that's not quite as thick, you can use double crochet stitches instead of single crochet when working the thermal stitch. Here's a video tutorial showing the double crochet thermal stitch.
• A handmade pot-holder paired with an edible item makes a thoughtful housewarming gift. Bake a batch of ginger cookies or make a dry soup-in-a-jar mix to gift along with your hot pad.
Crochet Potholder FAQs
The thermal stitch is one of the best crochet stitches for potholders, hotpads, and trivets. The thermal stitch is a variation of single crochet that makes thick, tightly woven fabric that's extremely warm.
The best way to crochet thick potholders is to choose a dense insulating stitch like the thermal stitch. Follow a double-thick pattern to create a square potholder that has two layers of protective crochet fabric.
Pair a set with a sweet treat for the perfect handmade housewarming gift.
Potholders are very quick to crochet. You'll use a simple variation of single crochet, which means you'll avoid having to learn any tricky stitches.
More Free Patterns For Your Home
Congrats! Give yourself a high five next time you safely pull that steaming pan of asparagus from the oven in style with your new crocheted pot holder. Ready to find your next project? We've got plenty more modern crochet patterns for you to enjoy.
That was so fun! Now what?
Invitation to our Facebook group
Come discuss crocheting potholder patterns and lots of other projects and techniques in our Make & Do Crew Facebook group. Here thousands of helpful crocheters answer each other's questions and share their stitches. Join us!
How to Crochet a Potholder For Beginners - A Summary
Materials
Yarn
- Color: Lion Brand 24/7 Cotton Weight: 4/Medium - 170 yds, 3.5 oz/100 g
- A: Ecru 761-098C – 2 skeins (approx. 170 g) to make one large (108 g) and one small (62 g) potholder
- B: Cafe Au Lait 761-126AA – 1 partial skein (approx. 7 g)
Additional Supplies
- Tapestry needle
- Size H 5.0 mm crochet hook or size needed to obtain gauge
- Stitch marker or safety pin
- 1 55mm wooden ring per potholder (optional)
- T-pins (optional)
- Steamer or iron with steam function (optional)
- Blocking board (optional)
Abbreviations + Glossary (US Terms)
- ch – chain
- PM – place marker
- rep – repeat
- RS – right side
- sc – single crochet
- scblo – single crochet through back loop only
- sk – skip
- slst – slip stitch
- st(s) – stitch(es)
- tch – turning chain
- WS – wrong side
Abbreviations and Glossary (US Terms):
Want some company while you crochet?
Get support (and camaraderie!) in the Make & Do Crochet Crew Facebook Group. Search “Make and Do Crochet Crew” on Facebook.com.
Permissions + Copyright
Please do not publish or share this pattern as your own. You may make items to sell with this pattern. In exchange, please link back to this page. Do NOT use my photos as your own sales photos.
Overall Pattern Notes
Instructions
Easy Crochet Potholder - Pattern Overview
- Step 1: Chain 35 stitches for a smaller square potholder or 42 chains for a larger hot pad.
- Step 2: You'll begin by working into both sides of a crochet chain with single crochet (sc) stitches.
- Step 3: Continue in spiral rounds of thermal stitch. The sides of the pocket will grow taller.
- Step 4: When the height of the pocket matches the width, you'll know you have the right dimensions to create a square potholder.
- Step 5: Add optional decorative stitching by using a tapestry needle and contrasting color of yarn to weave through the small gaps in the foundation chain.
- Step 6: Create a loop to hang your hot pad by twisting a yarn strand as outlined in the pot holder tutorial above. For a modern alternative, use a small wooden ring.
- Step 7: Press the pocket flat at the diagonal. Seam the opening using the mattress or whip stitch.
- Step 8: Grab the hottest thing you can find and hold on tight!
Leave a Reply