
Yesterday I told you all about my friend McCall's snaptastic 365 photo project. I love it because every single day she delivers some new little inspiring tid bit of beauty. I'm amazed by the endless creativity she brings to the project.
McCall's mad skillz don't stop with photography though, she's also one of the craftiest chics I know. Check out the post about her rad holiday decorations here. Today she's going to show us how to make pretty much the coolest felted sweater mittens EVER out of, you guessed it, old wool sweaters.
(And if you can't get enough sweater recycling like me, make some DIY sweater legwarmer/boot toppers next!)
Take it away, Caller!
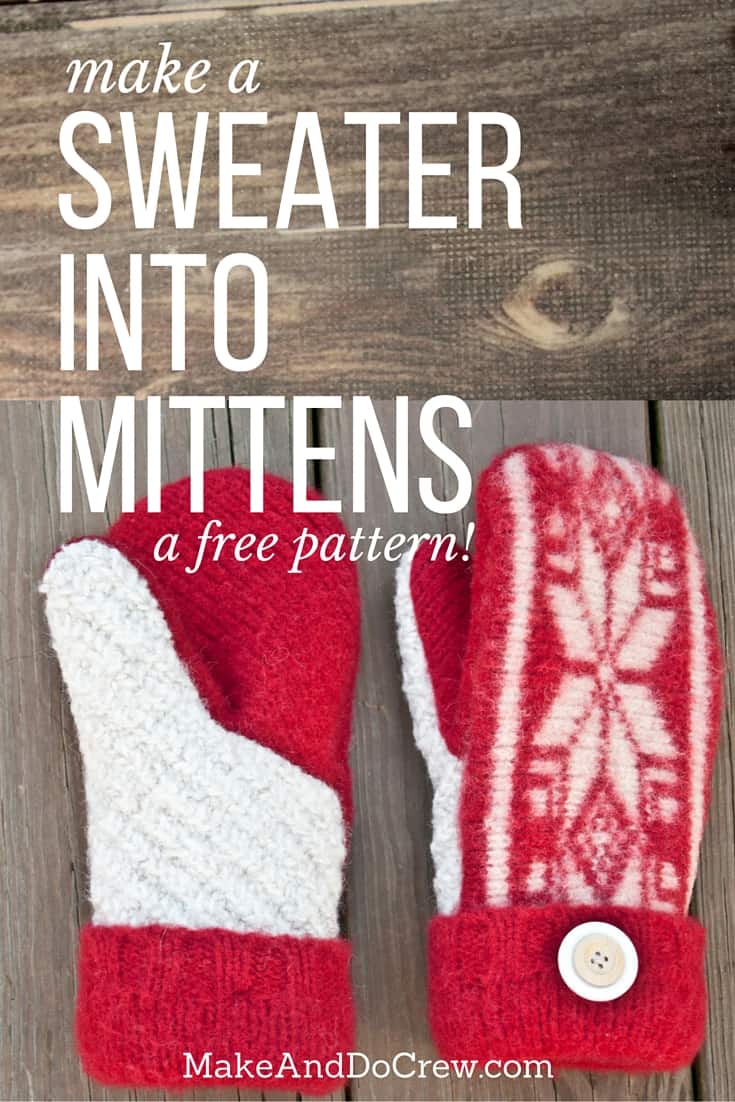
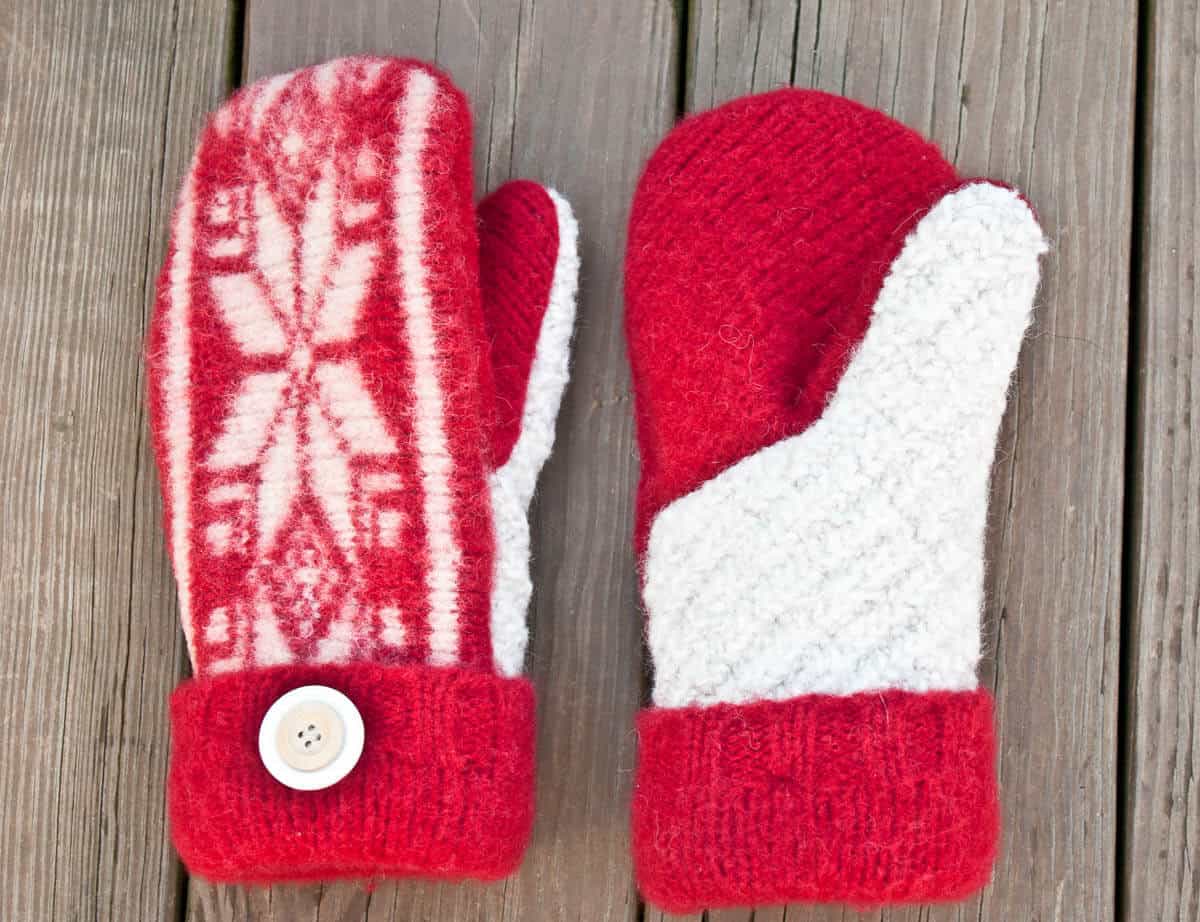
Hello M&DC fans! I am flattered to be guest-blogging on this fabulous site (Jess- thanks for letting me "drop by"!) This felted sweater mitten project was inspired during a closet clean out session I was having one afternoon and, as I usually do while being productive, I found a distraction - "Hey check out this old 100% wool sweater I found down here that I have not worn in like 3 years! Let's shrink it!" The red snowflake pattern screamed mittens to me, so away I went, leaving my closet spilling out all over the place. These mittens are a breeze to whip up and if you have a stash of old sweaters, they're also basically free! Happy Mitting!
Most hooks make your hands work too hard.
Ours are designed to take effort off your hands. The next batch opens soon, in limited numbers. The last two batches sold out within hours.
Plus a free hand care guide, sent today.
Something went wrong. Please check your email address and try again.
Woohoo! You're on the early access list. 🙌Your hand care guide is on its way to your inbox.
See the hooks first →“The best designed crochet hook I have used in 55 years of crocheting.” Mary M.
Felted Sweater Mittens Supplies
-felted sweater mitten pattern (Simply enter your email in the box at the bottom of this tutorial to gain instant access to this mitten pattern, plus all our other past and future freebies!)
-a 100% wool sweater
-a t-shirt (or similar soft fabric for lining)
-sewing machine (or your ambitious hands!)
-pins
-1-2 yards of wool yarn and a large darning needle
Instructions
1. Clean out your closet and find one or more old wool sweaters and an old T-shirt (or something soft to use as lining).
2. Felt old wool sweater(s) by putting each in a separate pillowcase and washing them in the washing machine on HOT. (Yes, exactly what you're usually trying not to do.) Felting isn't an exact science, so check them frequently. Get more details about how to felt sweaters here.
3. Cut 4.5 inches off both sweater sleeves for the cuffs. Set these aside for later.
Note: Your felted sleeves need to be about the same width as the mitten template, if your sleeves shrunk too much, you can use the bottom hem of the sweater by cutting a rectangle about 4.5 inches x 10 inches and sewing the short ends together to make a tube with a 10 inch circumference and 4.5 inch height.
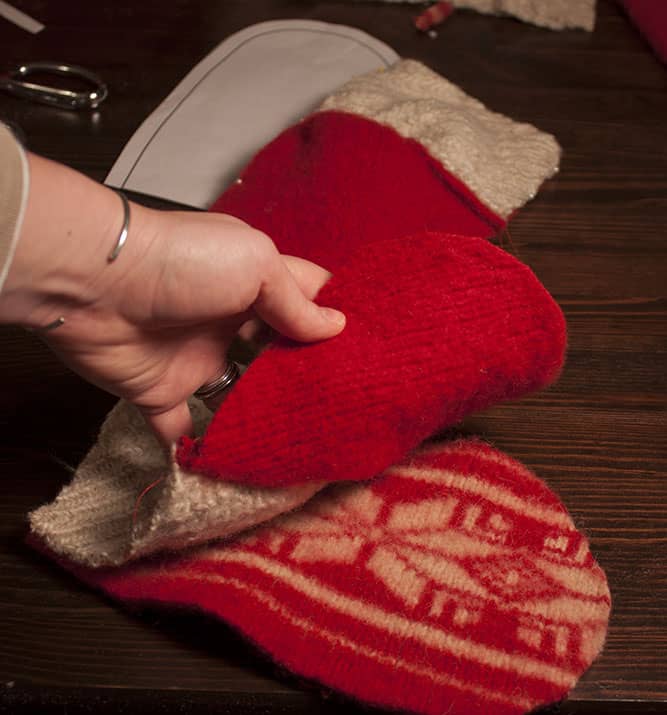
4. Print out the felted sweater mitten pattern and cut it on the outermost line. (Later you'll trim to the inside line and use the resulting pattern for the inside of the mitts.)
5. Pin template pieces to felted sweater(s) and cut out each piece, cutting 2 of the mitten backs.
6. Starting with the two palm pieces for either the right or left mitten, line up the thumbs with the right sides together (wrong sides on the outside). Starting on straight edge, pin around the edge of the thumb and down the side.
7. In order to mark how far down the side to pin, it is helpful to match up the palm pieces with the top piece. Line up the base and the top curve of the mitten and pinch the outside edge of thumb together until all excess the height of the palm piece matches the height of the mitten back.
8. Sew from marked point, around the thumb to the other edge of mitten, with ¼ inch seam allowance.
Wanna save this pattern?
9. Match up palm piece with mitten back, right sides together.
10. Line up and pin the edges. (It can be helpful to pin the thumbs out of the way, too!) Sew the edges with ¼ inch seam allowance.
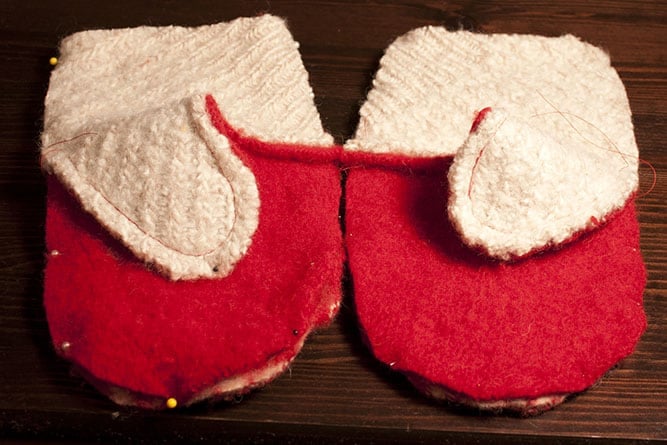
11. Repeat steps 6-10 for the opposite hand mitten. Turn mittens right-side out.

11. Trim off the outer ½ inch of the paper templates you used for the outside, leaving just the lining portion.
12. Cut each template piece out of the lining fabric.13. Follow steps 6-10 with the lining fabric.
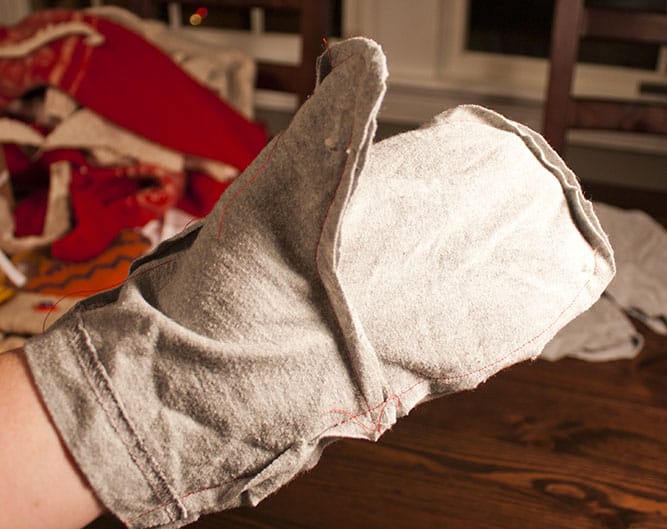
14. Put the lining on your hand (still right-side in) and slide the outside of the mitten over the lining. Wiggle your thumb and fingers to adjust the lining and tack into place.
15. Trim the mitten liner so it's the same length as the outer mitten.16. Take the 4.5 inch long tube from the sleeve and turn it inside out. Slide the raw end (the end that you cut) about an inch into the mitten, inside both the lining and the sweater layer.
17. With a piece of yarn and darning needle, starting at one of the side seams, sew through all three layers, leaving a tail of yarn where you started. Sew around the mitten base two times, securely fastening the cuff to the inside of the mitten.
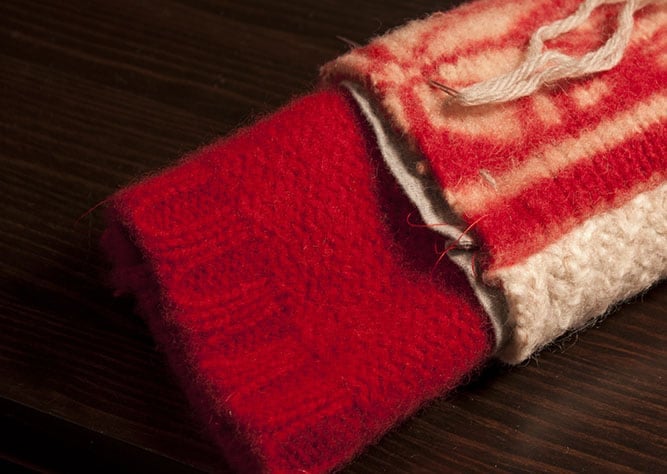
18. On the third time around, when you get to the inside of the wrist, flip the cuff up and around the outside of the mitten. Sew through all four layers in order to tack the cuff into place.
19. Continue to sew, only the inside three layers (not going all of the way through the outside cuff layer) until you get to the back of the wrist. Sew all of the way through all four layers, tacking the cuff in place and add a button or two if desired.
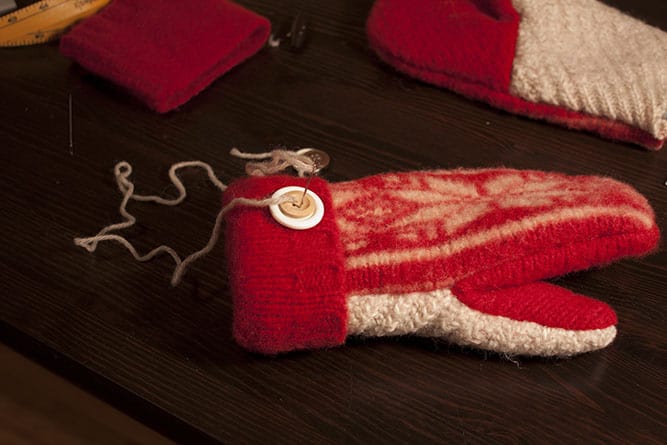
20. Continue to sew only the inside three layers around back to the seam where you left a tail of yarn. Tie off the yarn and trim short. Tuck tails into the cuff.
21. Sip hot chocolate and enjoy the winter!
And if you’re into adorable kids’ winter-wear, you might also like these free patterns:
Aspen Socialite Crochet Headband
Frosty the Snowman Hat
Just Like Mommy Knit Cowl
Santa's Helper Crochet Elf Hat (With Ears!)
RELATED: Our Complete Guide to Temperature Blankets
Diana Silva says
Beautiful, yummy looking sample pair on the instructional! I wish those were mine! Thank you for sharing. I will try to look up the pattern. I should probably know a lot more about how to maneuver around a computer. Seems I can't even use the excuse that I am a gramma anymore...what with all the commercials about people older than myself jumping outta planes and beginning new careers and stuff!!! Ugh...
Make and Do Girl says
Ha! I'm not sure I'll ever be one of those people jumping out of planes. Let me know if you have technical difficulties because I'd be happy to email you the pattern if you can't download it.
j
Mollie123 says
I made these last night and they turned out beautiful.
I was wondering if you would wash these again if they will shrink anymore..
Your're pattern is great.
Thanks again,
Make and Do Girl says
Mollie,
Awesome! So glad they turned out well for you. I'd love to see a picture! I think it's completely safe to wash them as long as you don't use super hot water. The hot water is what made the sweater shrink in the first place, so to be sure to avoid more skrinkage, just use cool water and wash them on delicate or by hand.
Stay warm!
j
Brianne says
Hi! I was hoping to make these as a last minute Christmas gift. But, had a question...when printing the pattern...do I print it as it comes up or do I shrink the percent? I guess it just seems kind of big, but I don't know.
Thank you so much and happy holidays!
Make and Do Girl says
Brianne,
Print it at 100% (as is) and you should be good to go. It does look pretty big, but once all the layers are sewn together the mittens will be less gigantic.
Good luck!
j
Mollie123 says
:Hi, I love the patteren for the mittens. Made some and they turned out beautifull..
I wonder how these will wash, being they have wool in them..Will they shrink
anymore ?
Thanks,
Make and Do Girl says
Hey Mollie,
Glad you're happy with your mitts! I'd love to see a picture.
Hot water is what made the sweater shrink in the first place, so to be sure to avoid more skrinkage, just use cool water and wash them on delicate or by hand.
j
Carrie says
I love this tutorial!! I've tried three others and this is the easiest! It is also more accurate! Thanks for a great pattern! lOTS more to make Christmas is only two weeks away! : )
Make and Do Girl says
Carrie,
So glad you found the tutorial helpful! Good luck with your Christmas crafting.
j
Anne Foley says
I am interested in getting the pattern for the mittens. I had a copy and they destoryed in a flood.
Diane Lindstrom says
My girls are excited to sew these cute mittens! We are looking for ways to make this Christmas really special for our family and we are seeking ways to keep the true meaning of Christmas real and alive for others. These mittens will be great to make and give away!
Barb Mutter says
Great instructions, can't wait to try them. Could I also get a copy of the instructions emailed. Thanks so much.
Charlotte says
I can't print the tutorial either, can you e-mail it to me ?
Kathy Rosenow says
I have tried printing your guest tutorial and the pattern for the felted wool mittens without success. Is it not possible to print them anymore? Thank you.
Make and Do Girl says
Hey Kathy, I'm so sorry you're having trouble downloading the patten. Seems like it's finicky with my Firefox, but it works in Safari. Maybe give it a try in another browser? I'll also email it to you just in case. Good luck!
Vicki Sheskey says
I love these mittens. I have a pair I bought at a craft show. I would like to share with my quilt guild and have a class. Always looking for something new. Thanks so much!! Vicki
Make and Do Girl says
Hey Vicki,
I originally got a pair as a gift and I love them! It's especially fun to know you made them yourself though. They're a great fun project that whips up pretty quickly. Stay warm!
Tamara says
I made a pair of these for my 5-yr-old last night and they turned out fabulous! I just printed the pattern at 60%. The only adjustment was that the thumbs were too long, so I had to shorten them; and I also extended the wrists rather than making the cuff, so that she could keep her wrists warm between hands and coat sleeves. These were more work than I expected (you made it look so easy!), and my sewing machine did not like the thick fabric, but in the end, I sure have a beautiful pair of gloves now! Thank you so much for the amazing tutorial!
Make and Do Girl says
Tamera,
That's awesome! I love that you made some pint-sized mittens! She's one lucky kid!
Lauren says
Love it! I could see making oven mitts this way, too.
daphne says
Thank you for the well written tutorial. I can't wait to make some, I have lots of old wool sweater pieces left over from other projects. I'm able to print the pattern but unfortunately can't print the tutorial. can you please email it to me? Thank you,
Jess @ Make and Do Crew says
Hey Daphne,
I'm sorry, I don't have a printable tutorial at this time because I earn money from my free patterns by having people visit the site. (Through advertising.) Thanks for your support and understanding!
Jess
Cindy says
love, love, love this mitten project...I can access the tutorial, but cannot print out the pattern, help!