Yesterday I told you all about my friend McCall's snaptastic 365 photo project. I love it because every single day she delivers some new little inspiring tid bit of beauty. I'm amazed by the endless creativity she brings to the project.
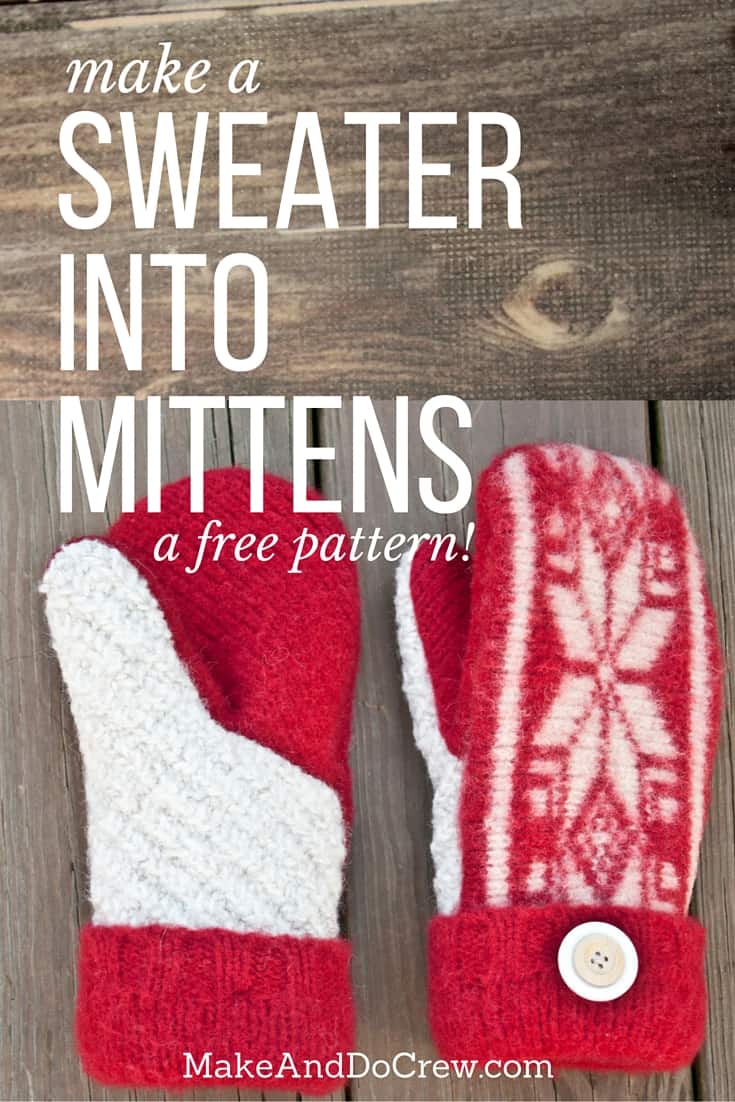
McCall's mad skillz don't stop with photography though, she's also one of the craftiest chics I know. Check out the post about her rad holiday decorations here. Today she's going to show us how to make pretty much the coolest felted sweater mittens EVER out of, you guessed it, old wool sweaters.
(And if you can't get enough sweater recycling like me, make some DIY sweater legwarmer/boot toppers next!)
Take it away, Caller!
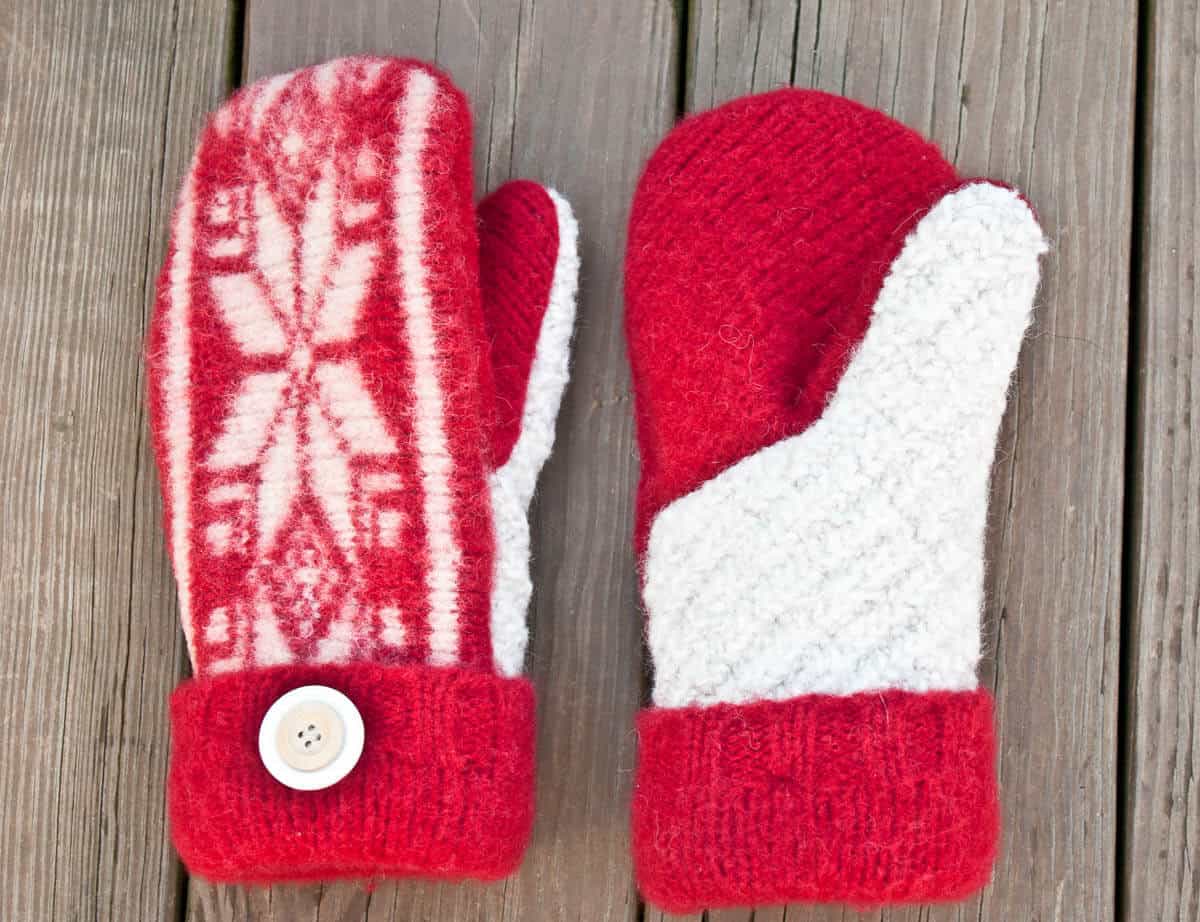
Hello M&DC fans! I am flattered to be guest-blogging on this fabulous site (Jess- thanks for letting me "drop by"!) This felted sweater mitten project was inspired during a closet clean out session I was having one afternoon and, as I usually do while being productive, I found a distraction - "Hey check out this old 100% wool sweater I found down here that I have not worn in like 3 years! Let's shrink it!" The red snowflake pattern screamed mittens to me, so away I went, leaving my closet spilling out all over the place. These mittens are a breeze to whip up and if you have a stash of old sweaters, they're also basically free! Happy Mitting!
Felted Sweater Mittens Supplies
-felted sweater mitten pattern (Simply enter your email in the box at the bottom of this tutorial to gain instant access to this mitten pattern, plus all our other past and future freebies!)
-a 100% wool sweater
-a t-shirt (or similar soft fabric for lining)
-sewing machine (or your ambitious hands!)
-pins
-1-2 yards of wool yarn and a large darning needle
Instructions
1. Clean out your closet and find one or more old wool sweaters and an old T-shirt (or something soft to use as lining).
2. Felt old wool sweater(s) by putting each in a separate pillowcase and washing them in the washing machine on HOT. (Yes, exactly what you're usually trying not to do.) Felting isn't an exact science, so check them frequently. Get more details about how to felt sweaters here.
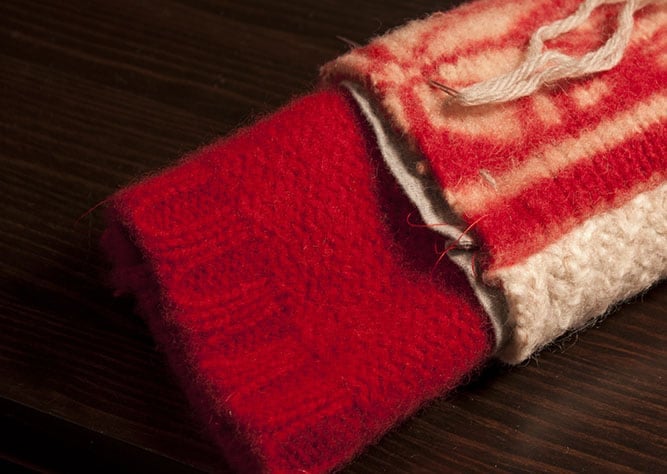
3. Cut 4.5 inches off both sweater sleeves for the cuffs. Set these aside for later.
Note: Your felted sleeves need to be about the same width as the mitten template, if your sleeves shrunk too much, you can use the bottom hem of the sweater by cutting a rectangle about 4.5 inches x 10 inches and sewing the short ends together to make a tube with a 10 inch circumference and 4.5 inch height.
4. Print out the felted sweater mitten pattern and cut it on the outermost line. (Later you'll trim to the inside line and use the resulting pattern for the inside of the mitts.)
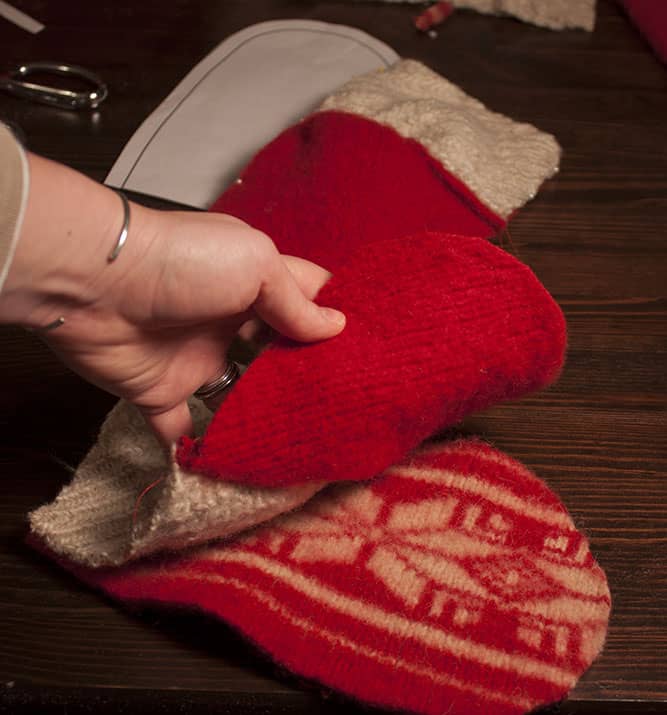
5. Pin template pieces to felted sweater(s) and cut out each piece, cutting 2 of the mitten backs.
6. Starting with the two palm pieces for either the right or left mitten, line up the thumbs with the right sides together (wrong sides on the outside). Starting on straight edge, pin around the edge of the thumb and down the side.
7. In order to mark how far down the side to pin, it is helpful to match up the palm pieces with the top piece. Line up the base and the top curve of the mitten and pinch the outside edge of thumb together until all excess the height of the palm piece matches the height of the mitten back.
8. Sew from marked point, around the thumb to the other edge of mitten, with ¼ inch seam allowance.
Wanna save this pattern?
9. Match up palm piece with mitten back, right sides together.
10. Line up and pin the edges. (It can be helpful to pin the thumbs out of the way, too!) Sew the edges with ¼ inch seam allowance.
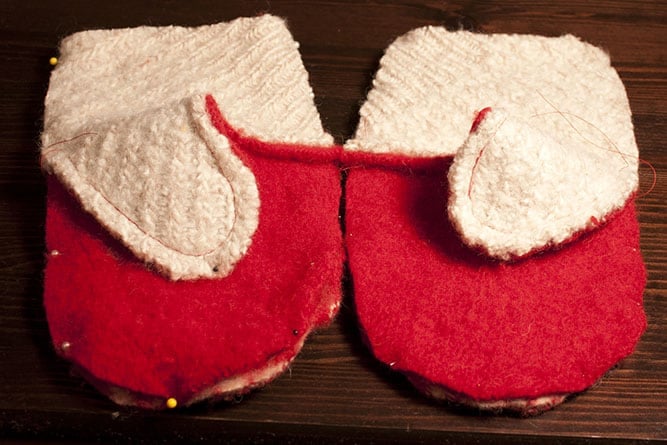
11. Repeat steps 6-10 for the opposite hand mitten. Turn mittens right-side out.

11. Trim off the outer ½ inch of the paper templates you used for the outside, leaving just the lining portion.
12. Cut each template piece out of the lining fabric.13. Follow steps 6-10 with the lining fabric.
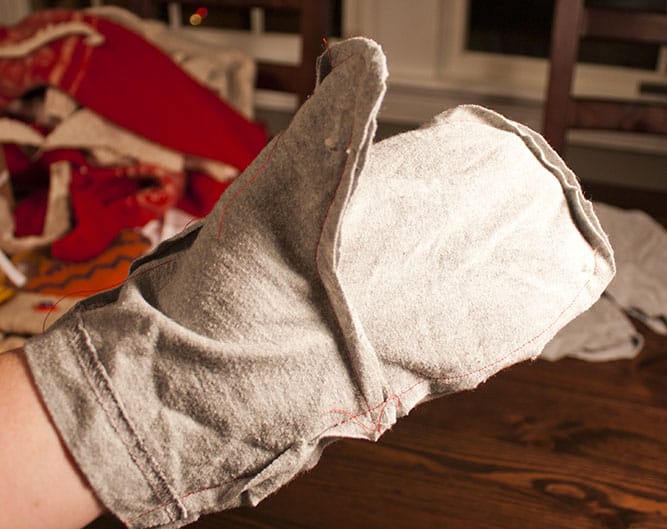
14. Put the lining on your hand (still right-side in) and slide the outside of the mitten over the lining. Wiggle your thumb and fingers to adjust the lining and tack into place.
15. Trim the mitten liner so it's the same length as the outer mitten.16. Take the 4.5 inch long tube from the sleeve and turn it inside out. Slide the raw end (the end that you cut) about an inch into the mitten, inside both the lining and the sweater layer.
17. With a piece of yarn and darning needle, starting at one of the side seams, sew through all three layers, leaving a tail of yarn where you started. Sew around the mitten base two times, securely fastening the cuff to the inside of the mitten.
18. On the third time around, when you get to the inside of the wrist, flip the cuff up and around the outside of the mitten. Sew through all four layers in order to tack the cuff into place.
19. Continue to sew, only the inside three layers (not going all of the way through the outside cuff layer) until you get to the back of the wrist. Sew all of the way through all four layers, tacking the cuff in place and add a button or two if desired.
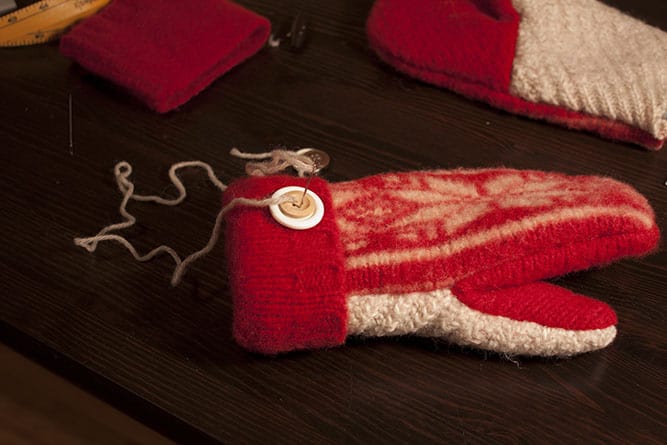
20. Continue to sew only the inside three layers around back to the seam where you left a tail of yarn. Tie off the yarn and trim short. Tuck tails into the cuff.
21. Sip hot chocolate and enjoy the winter!
And if you’re into adorable kids’ winter-wear, you might also like these free patterns:
Aspen Socialite Crochet Headband
Frosty the Snowman Hat
Just Like Mommy Knit Cowl
Santa's Helper Crochet Elf Hat (With Ears!)
RELATED: Our Complete Guide to Temperature Blankets
Marilynn says
Please e-mail me the pattern for these mittens. I just love them.
Make and Do Girl says
Hey Marilynn,
Just emailed you the pattern.
Enjoy!
j
Nancy Melotte says
I have tried without success to download the pattern. Could you please email it to me with the instructions? I would be so grateful. Thank You, Nancy T. Melotte
Patricia says
Can you please email me the pattern pieces for the mittens? Thank you in advance : )
Make and Do Girl says
You got it.
Happy mittening!
j
janice bibler says
please email me pattern for these mittens bought a pair and just love them.
Make and Do Girl says
Sent it your way.
Enjoy.
j
Anne says
Best tutorial on the web for making felted mittens.
Been making these since receiving a free pattern from Hancock Fabrics years ago called "Twice as Warm Mittens and using polar fleece.
Wasn't until a year ago my brother wanted me to rescue and recycle a favorite wool sweater. The idea of felting and using my original pattern came up.
Your alternative to the polar fleece lining by using a lighter knit is a great idea. Although the fleece is warm, it's a little too bulky, since the original pattern used it for the outside mitten and lining.
Just thought I share the alternative polar fleece version because wool sweaters may not be as readily available as fleece.
The original pattern came with a children's size and remain my grandchildren's favorites, especially when playing outdoors in the cold Wisconsin winter. Their hands are always warm and dry.
You are to be commended and your tutorial and is a fine example of how to write one.
sherlynn doyle says
i have been looking for the mitten pattern seen my sister had a pair in 1999 and we have never found it would you be willing to send the pattern to me thank you
Make and Do Girl says
Done and done.
Happy crafting!
j
cate says
Love the pattern & your eye for design. Please email the pattern. Thank you. Renee Pray, when I have that problem, it usually indicates 'time for new needle'. Try that.
cate
Make and Do Girl says
Thanks Cate! Just sent it your way.
Happy crafting!
j
Kay campbell says
just printed out the paper pattern and all ready to cut material. Im making a fleece pair, bought a couple fleece vests that I think will work great,,, however i did notice that the palm top and bottom dont fit evenly, the palm top got an angled line from the side to the thumb and the other piece is more straight,,, are they suppose to lie together straight when you are placing th e pieces to sew or do you have to angle and sew and fit them as you sew,,,
Mary Sue OBrien says
I cannot find the pattern to download it. Any suggestions. Thanks.
Make and Do Girl says
Mary Sue,
Try opening this page different internet browser (like Safari or Internet Explorer). Adobe's Firefox plug-in is buggy so the PDF unfortunately isn't viewable in Firefox.
Happy crafting!
j
Mary Sue OBrien says
I cannot find the actual pattern to download. It could be my computer. Can you email me a copy? Thank you so much. Love your site.
Make and Do Girl says
Mary,
Try opening this page different internet browser (like Safari or Internet Explorer). Adobe's Firefox plug-in is buggy so the PDF unfortunately isn't viewable in Firefox. I'll also email you the pattern.
Happy crafting!
j
Renee Pray says
I have all the stuff cut out pinned and ready to go, BUT when I try to sew on my machine it keeps getting snagged up and won't stitch. Do you need a certain thread or specific needle on the machine? I tried adjusting the tension as well, 6 times of unhooking the bound up thread on my machine and I decided to send you an email. Any suggestions, I'm not ready to give up yet. I even thought of hand stitching them, but a machine would hold better (I think).
Thanks
Renee
Make and Do Girl says
Argh! I hate adjusting thread tension! I'm sorry you're having so much trouble getting the sweater mittens sewn. Unfortunately, I'm not sure exactly what would help. We didn't use a specific needle or thread, although depending on what needle is currently in your machine, you may want to adjust to something a little more heavy duty since the mitten sandwich is pretty thick. One other thought--if your machine has the ability to put the feed dogs down (they're the little grippy parts that feed the fabric through and they're right below the presser foot), you might try that. It would mean that you'd have to feed the fabric through yourself, but it might help keep everything from getting bunched. If none of this works, I think a hand sewn pair of mittens would be extra special. Best of luck!
j
raejean hansen says
Could I please get a copy of the instructions emailed too? Thank you!
Make and Do Girl says
Hey Raejean,
I just sent it to you. Hope you enjoy!
j