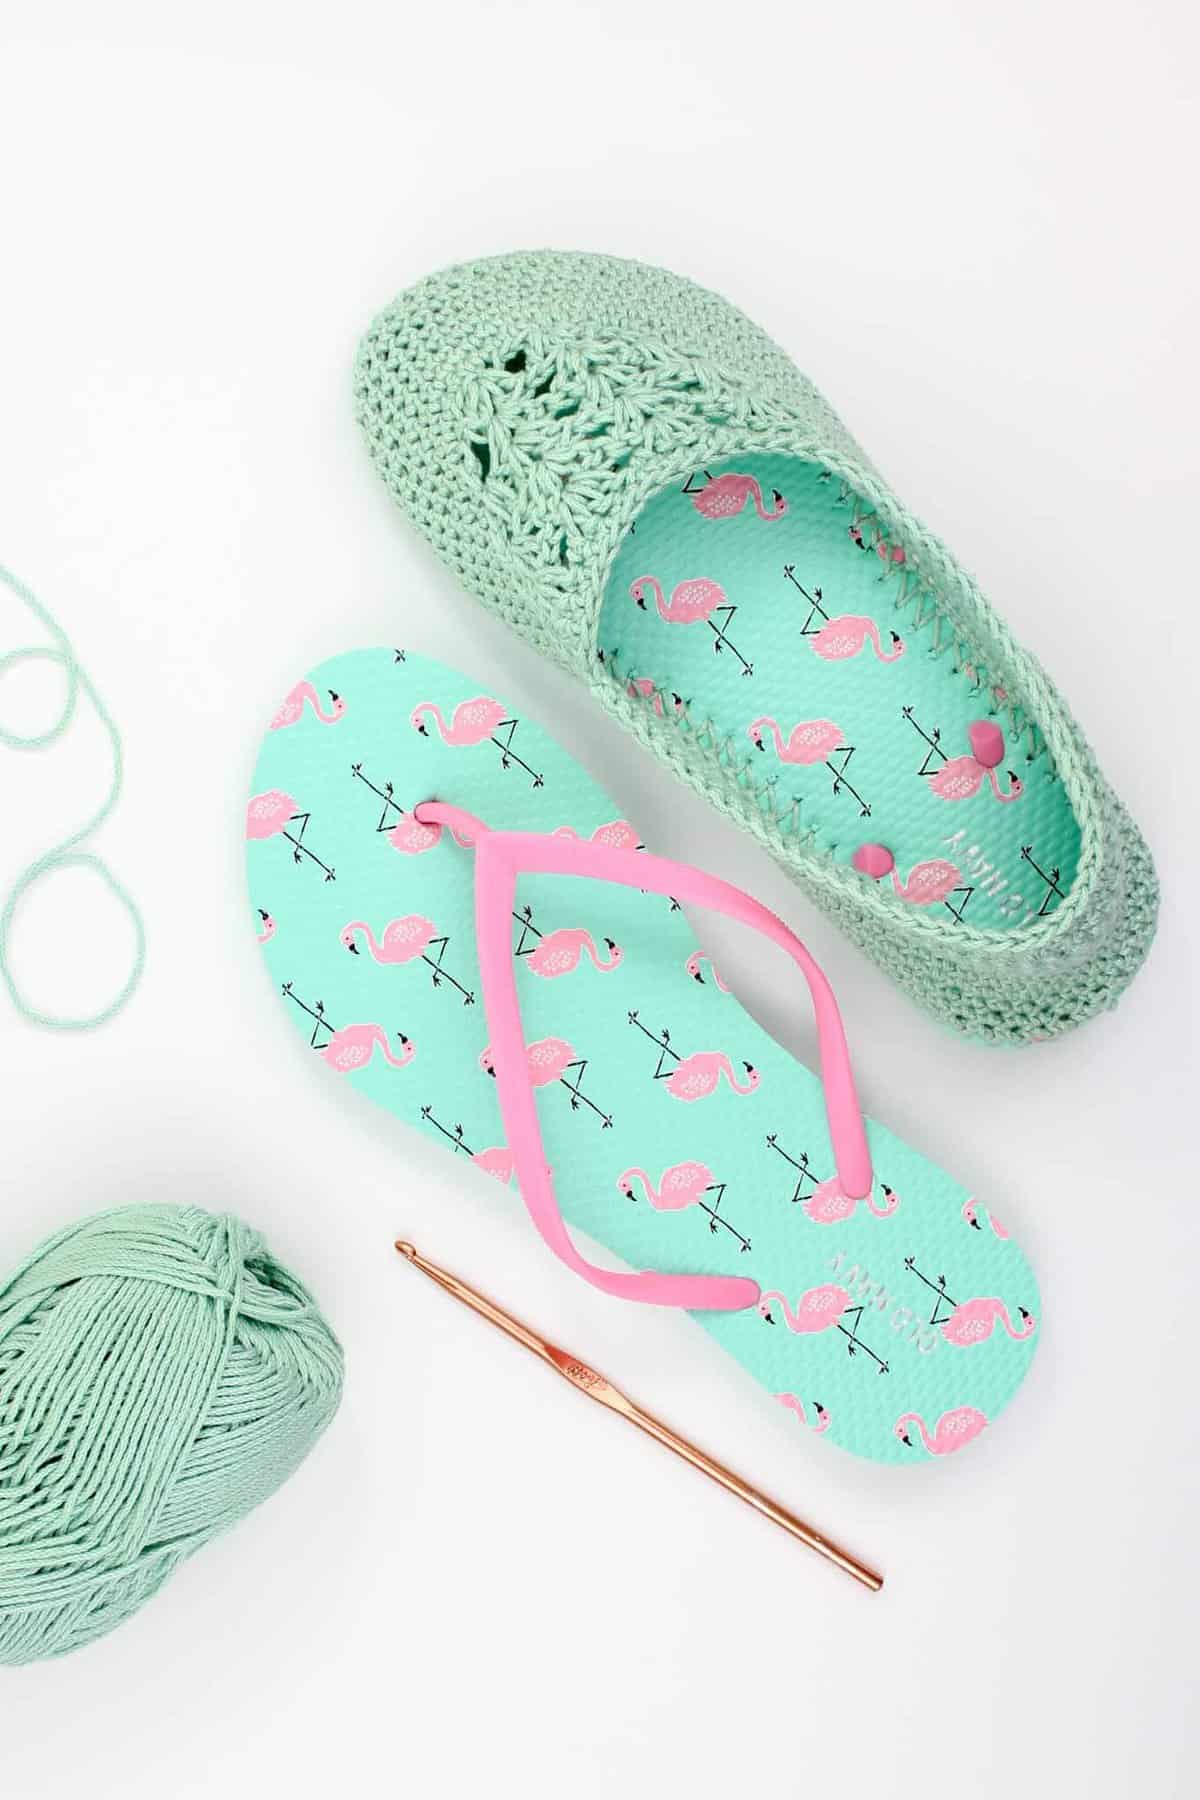
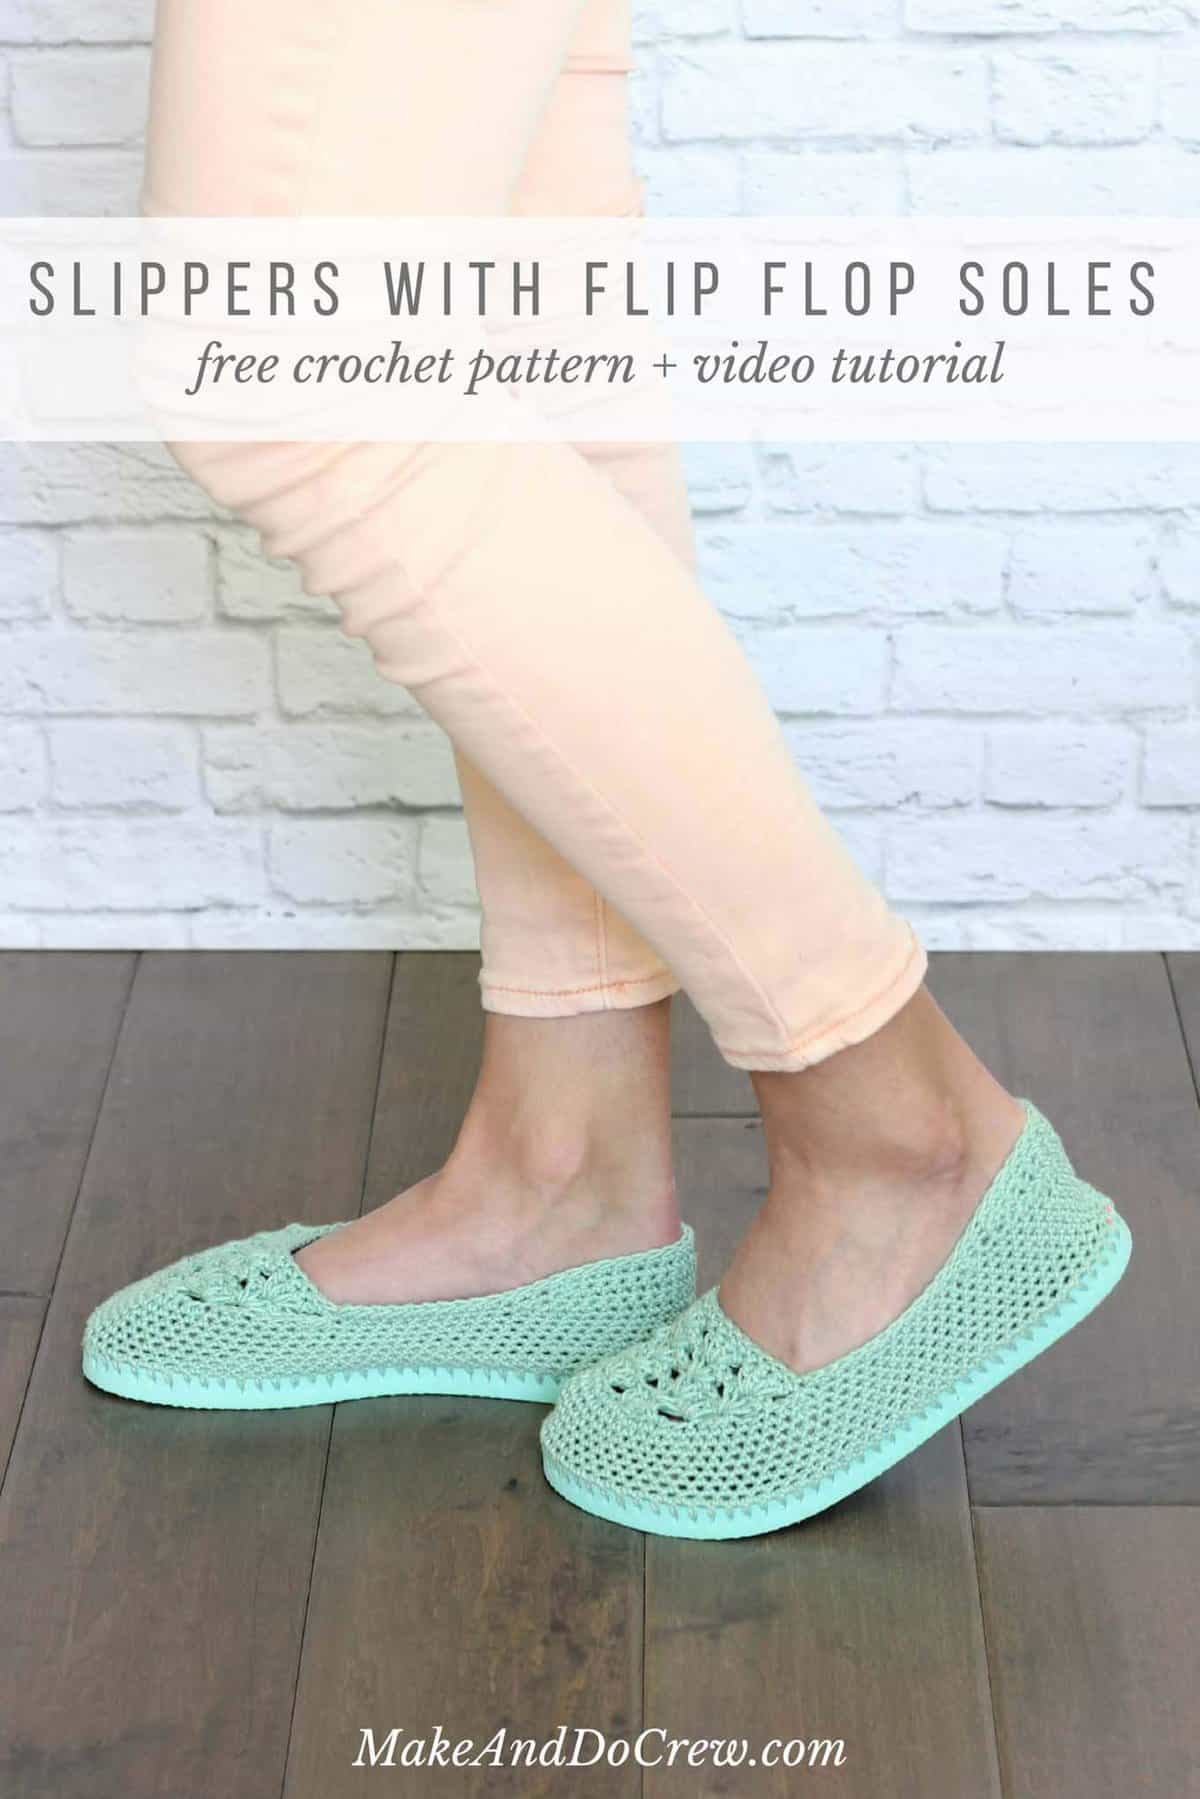
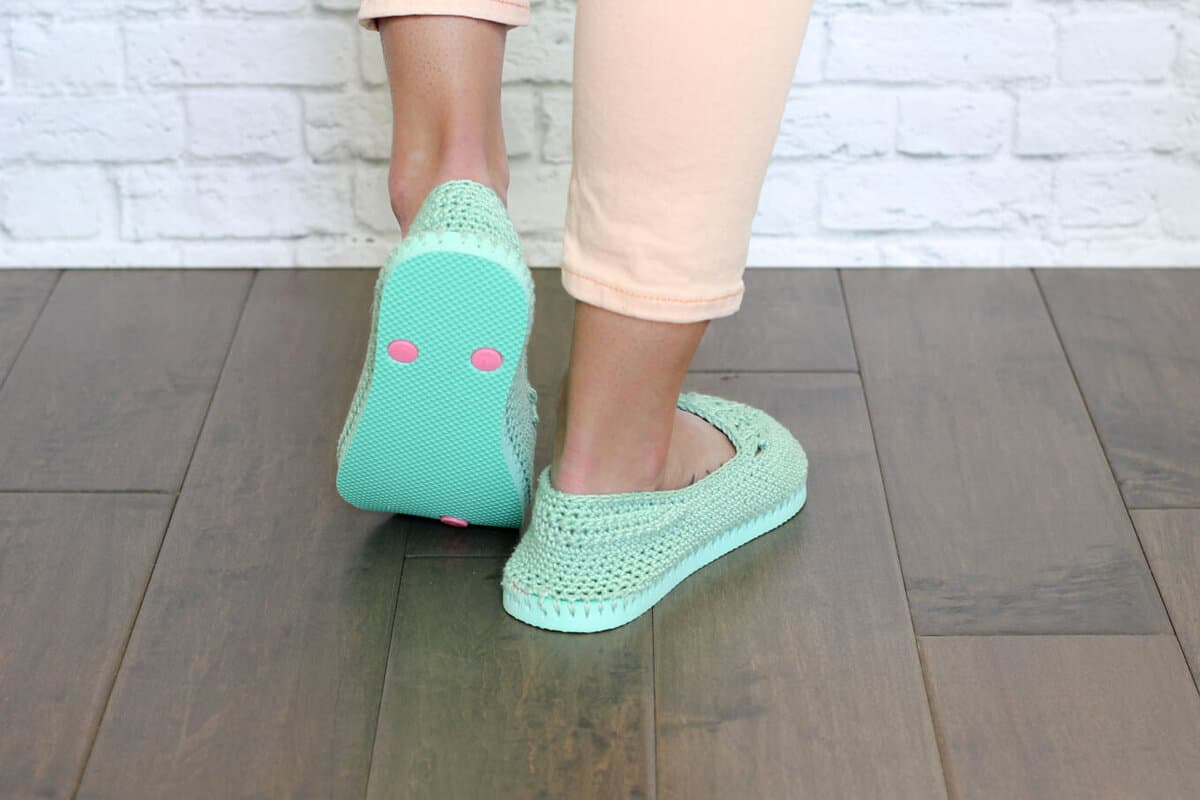
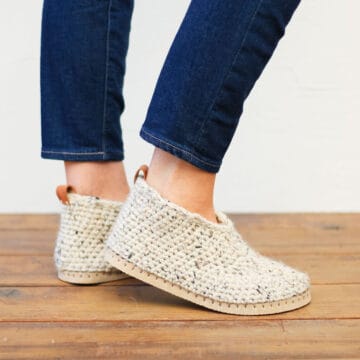
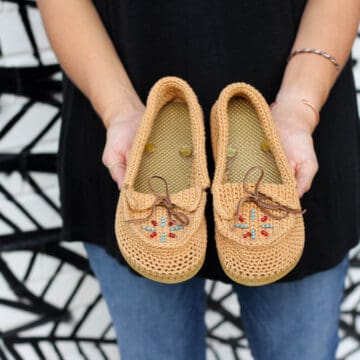
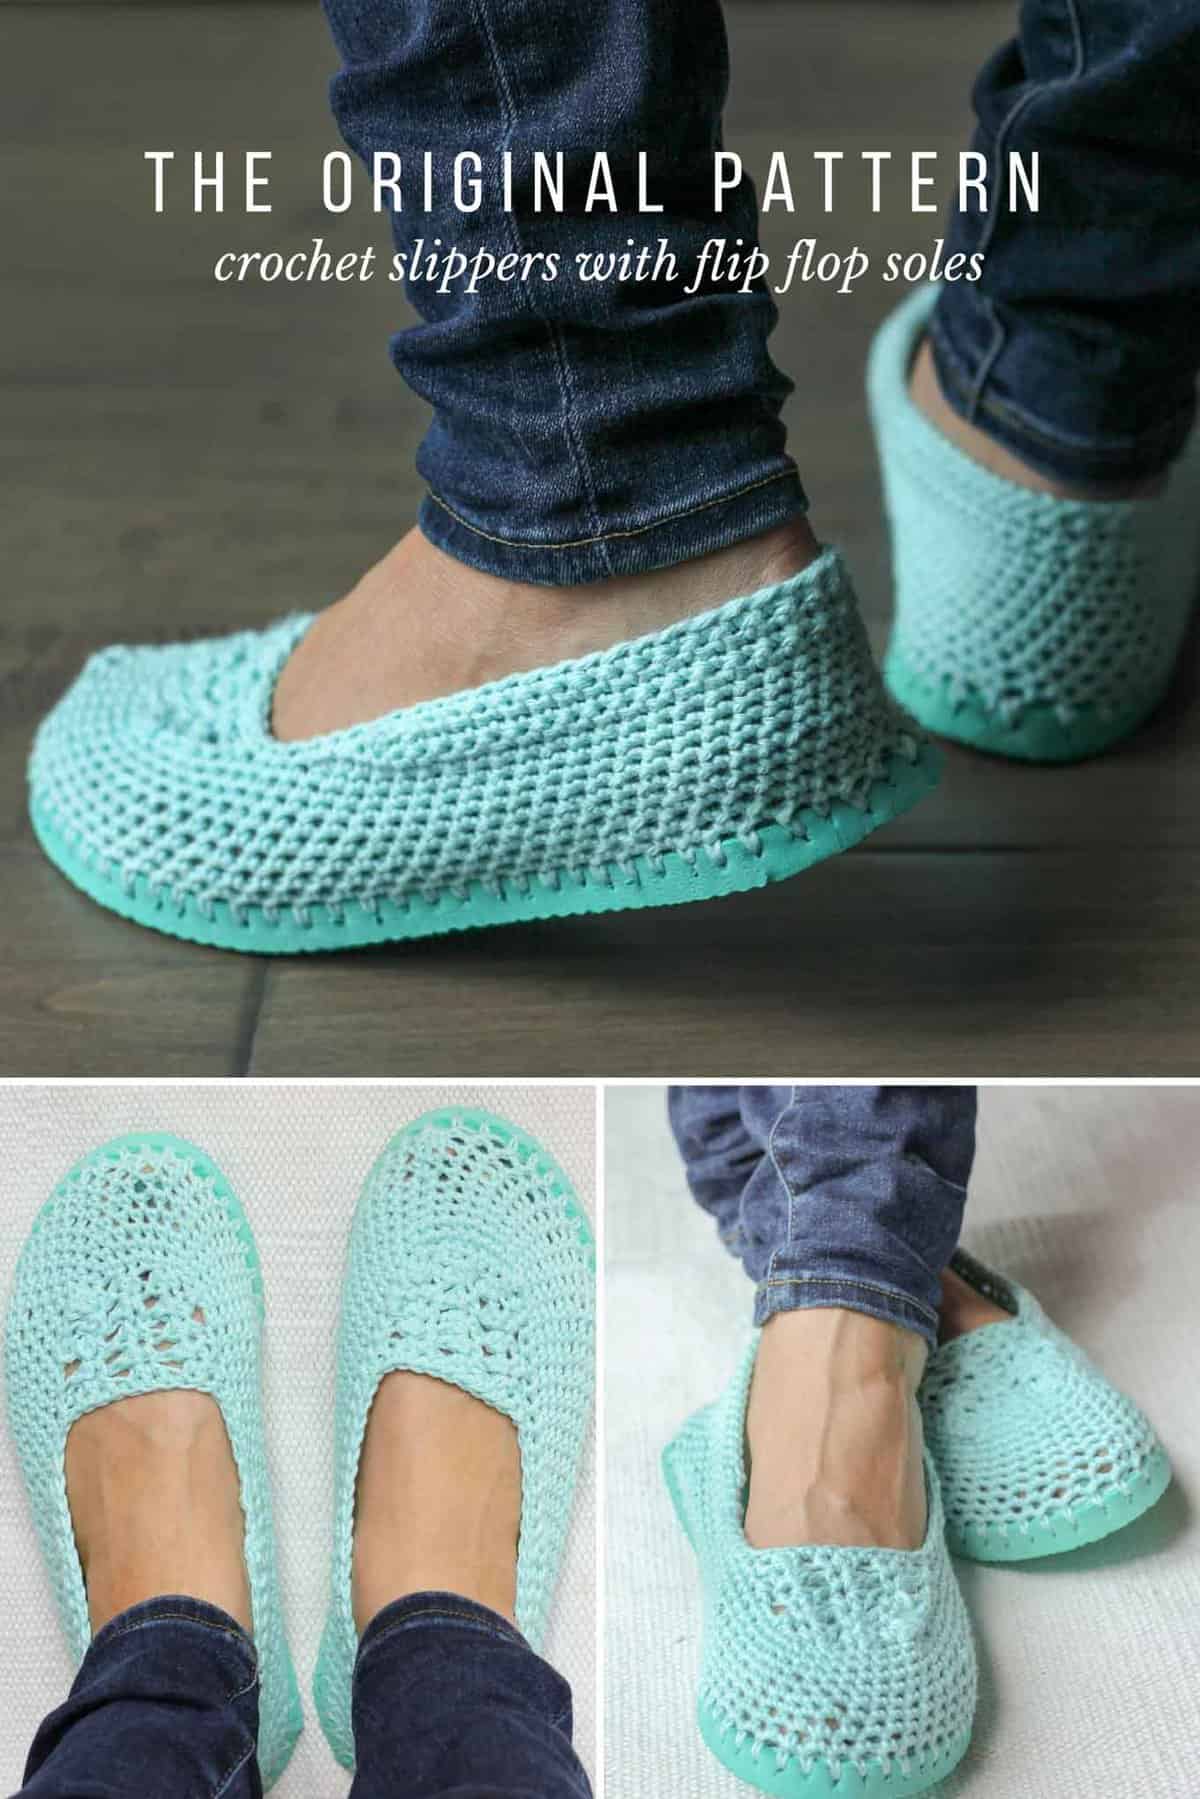
Cotton yarn and a rubber sole make this free crochet slippers with flip flop soles pattern perfect for wearing around the house (or even outside!) View the entire free pattern and video tutorial below or purchase the printable, ad-free pdf with hole poking guide here.
This free crochet slippers with flip flop soles pattern is a collaboration with Lion Brand Yarn. This post contains affiliate links.
UPDATE: This pattern has been super popular since I published the original version last May. Many of you have requested a video tutorial for these crochet slippers with flip flop soles, so today I’m really happy to have a totally revised and updated version of the pattern that includes a step-by-step video tutorial.
In this version, I’ve updated the toe top section of the pattern, re-written some details for clarity AND added a printable ruler to the ad-free PDF of the pattern to guide your hole poking. (If you just want the original crochet slippers with flip flop soles pattern though, don’t fret, you can still find it for free here!)
Many readers have asked how these crochet slippers with flip flop soles hold up over time. I’ve answered that question (with photos!) and many more in my FAQs about crocheting on flip flops.
Without further ado, here’s the original blog post with the updated free crochet slippers with flip flop soles pattern and new video tutorial below. And if you’re interested, you can find all the free flip flop crochet patterns I’ve shared since making this first pair, right here.
Guys, I’m so excited to share this pattern. I hope you love making crocheted slippers with a legit, flip flop sole as much as I did. When I originally stumbled across these crocheted boots made by Croche Da Alessandra, the idea for some flip-flop-based summer slippers wedged in my brain and refused to shake loose until I just made the things.
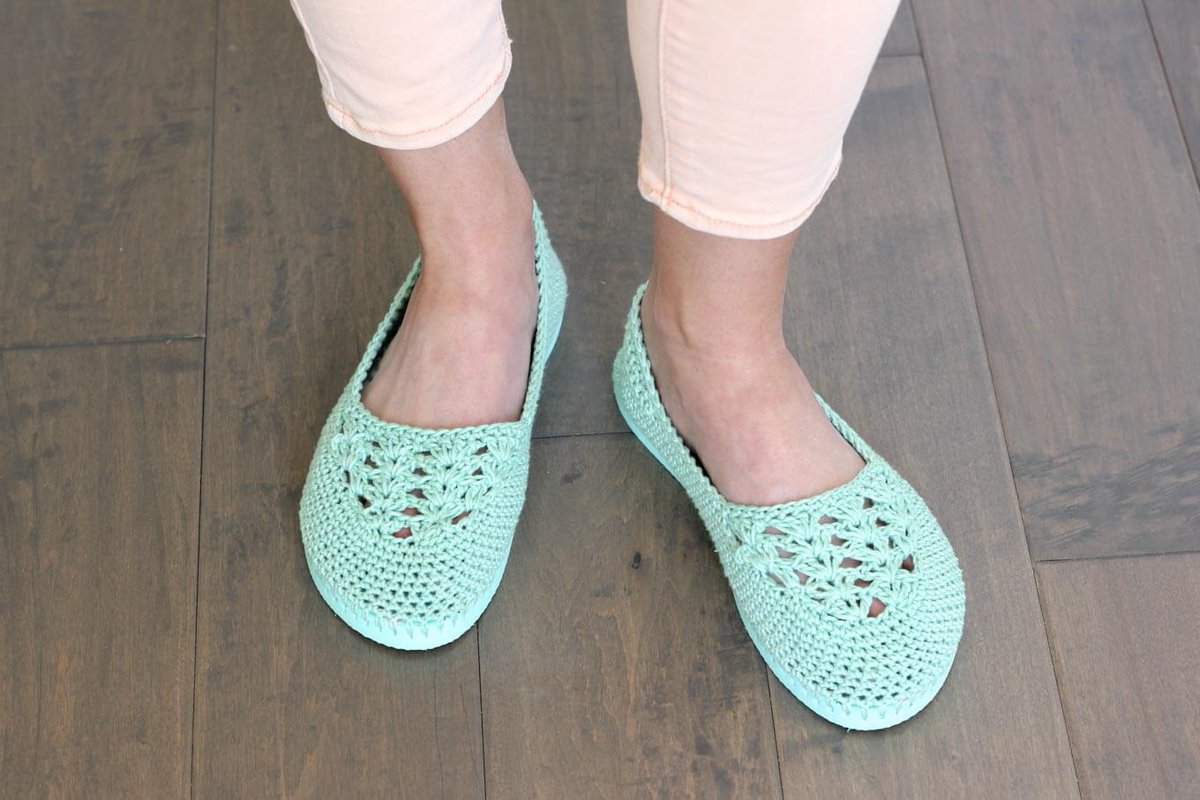
Until about a week ago, I’ve been wearing some felted knit slippers my mom made me. They’re AMAZING. But now that it’s officially spring, they’re becoming a little less practical with each tick of the thermometer.
So if, like me, you prefer to keep your feet covered when you’re shuffling around the house, but you find warm weather to be less than slipper-compatible, these are for you! (And if you’re the free-wheeling type that prefers not to have your toes covered at all during the summer months, check out all my other free crochet patterns instead.)
These crocheted slippers with flip flop soles let in a lovely breeze with each step, thanks to the slightly open weave and breathable Lion Brand 24/7 Cotton yarn. The flip flop (or “thong” if you live in certain parts of the world) sole makes these a little more substantial than regular crocheted slippers and perfectly grippy to scoot around your house.
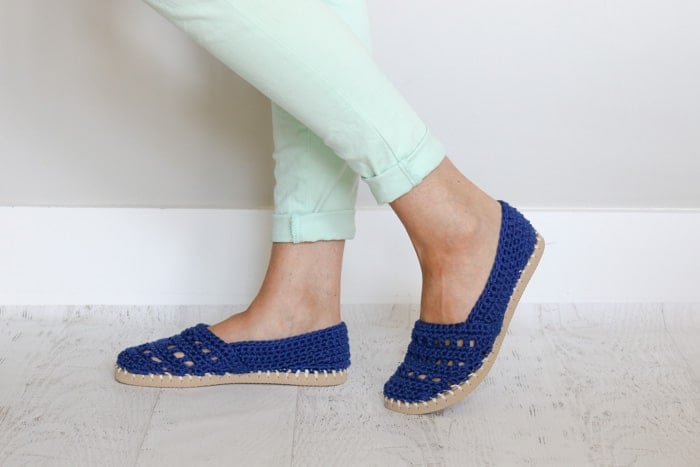
These even work well as crocheted shoes to wear outside. They might just be the most comfortable pair of shoes you’ve ever worn. (And don’t they look a bit like Toms?)
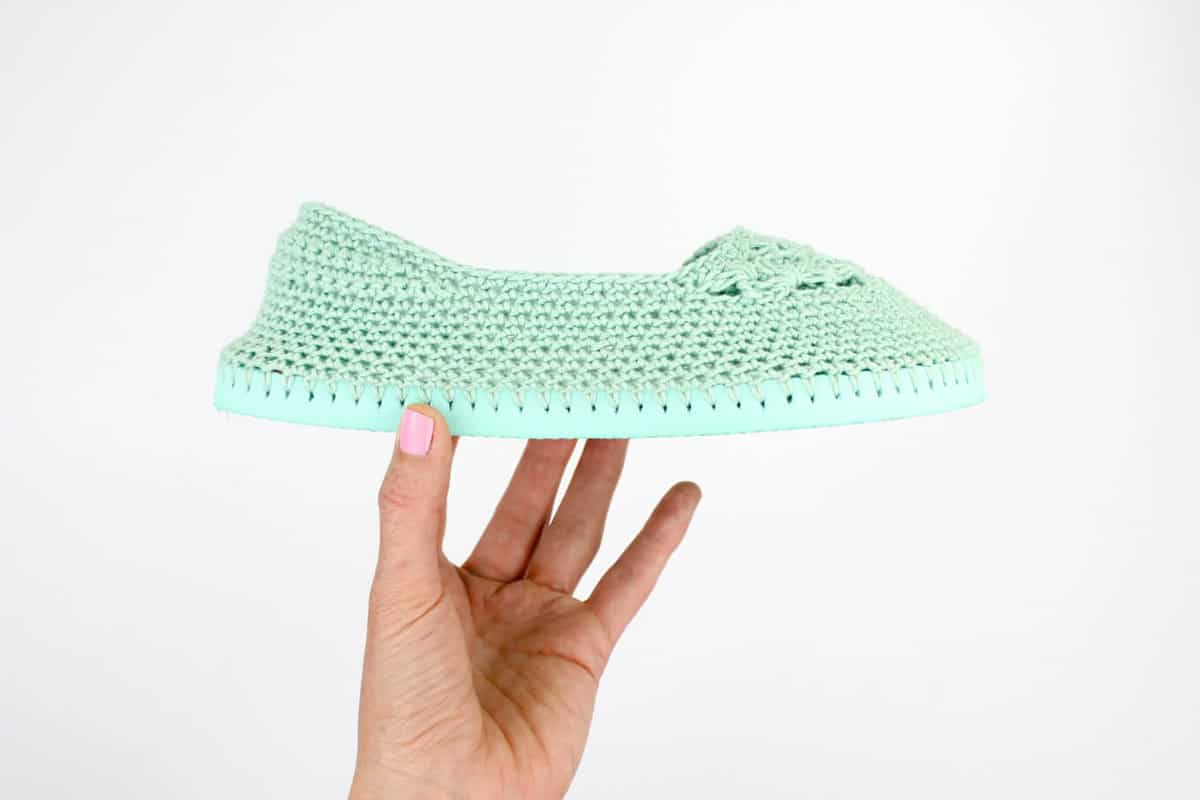
The ad-free PDF now includes a printable ruler to help guide your hole poking. This little bonus is super helpful in achieving the gauge and ensuring that you don’t have too many or too few stitches around your flip flop sole. (Regardless of the size you’re making–isn’t that magic?!) You can purchase the PDF of this pattern with the ruler here on LoveCrafts.com or here on Etsy.
Thanks to Lion Brand Yarn for sponsoring this post and enabling more free patterns on Make and Do Crew!
Please do not publish or share this pattern as your own. You may make items to sell with this pattern. In exchange, please link back to this post. DoNOT use my photos as your own sales photos. You can read my policies here. Now let’s make something awesome!
SUMMER CROCHET SLIPPERS WITH FLIP FLOP SOLES – FREE PATTERN
Sizes: This pattern works well for women’s sizes 6-10, but you can easily add or eliminate a row to the top section to make it longer or shorter for other sizes.
Abbreviations (US Terms): ch – chain cluster – 4 dc in one stitch half cluster – 2 dc in one st dc – double crochet sk – skip sl st – slip stitch sc – single crochet st(s) – stitch(es)
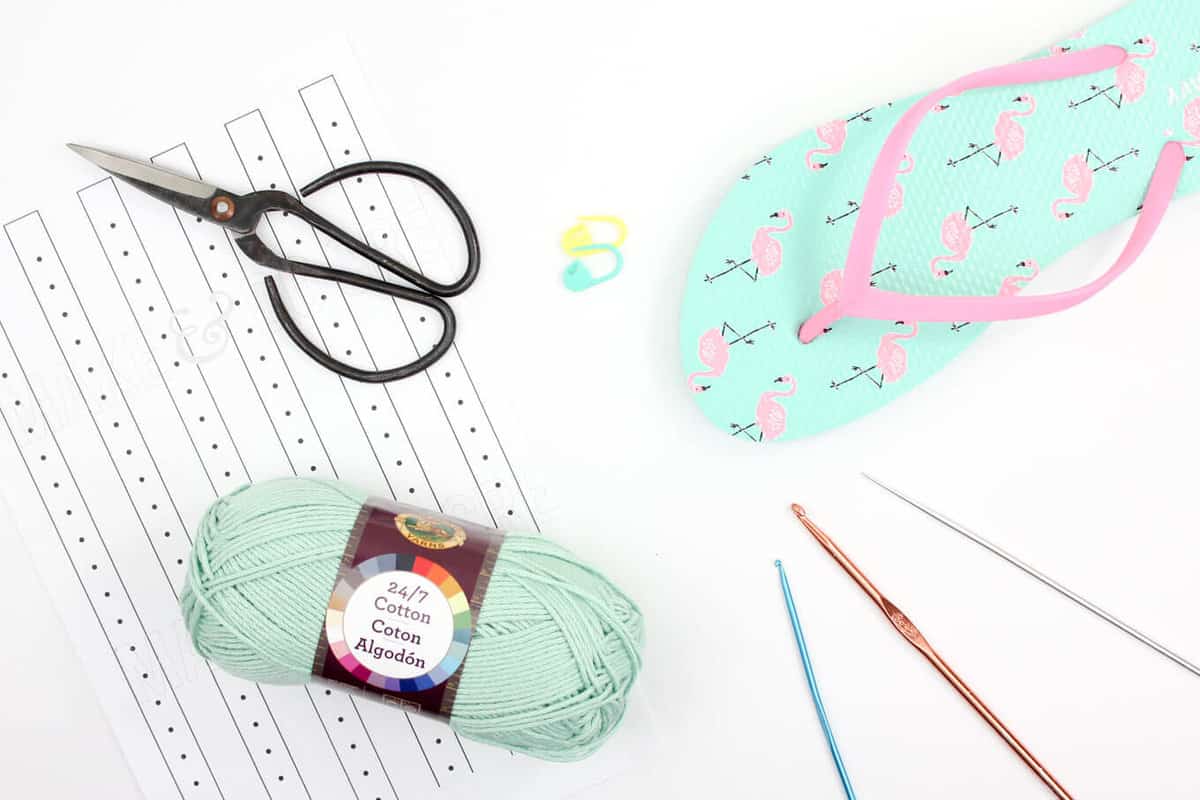
Supplies: So you can spend more time making shoes and less time shopping, this pattern contains affiliate links at no extra cost to you. • Lion Brand 24/7 Cotton – 1 skein (186 yards) Color: Mint • Tapestry needle • Size B [2.25 mm] crochet hook or size needed to fit through flip flop holes • Size G [4.0 mm] crochet hook • 1-2 printed copies of the “ruler” at end of the printable pattern or a measuring tape • 1 pair of flip flops(One size smaller than you wear normally. See pattern notes.) • Sharp tool to poke holes (I use this clay tool. You can also try a skewer, thin drill bit or awl.) • Sharp scissors • Stitch markers • Strong glue such as E6000 to glue strap plugs to sole (optional)
Gauge: 7.5 sc = 2” 12 rows = 2”
Notes: • Transforming flip flops into slippers isn’t an exact science! Keep an open mind and don’t be afraid to customize the shoes to your liking. Check out this Flip Flop FAQs post for answers to commonly asked questions.
• You’ll likely want to size down when buying your flip flops. Look for a flop flop that offers about .25″ of sole around your foot (more like the fit of a normal shoe). In the pattern sizing, the shoe sizes mentioned describe the shoe size you normally wear and not the sized-down size of your flip flops.
• The flip flops in the sample are from Old Navy–they have a great selection of colors. Find $1 flip flops on Amazon or at Walmart. Dollar Tree’s $1 flip flops tend to be a bit too flimsy, but can work if you are careful. And LionBrand.com now offers flip flops so you can get your yarn and soles in one place!
• Left and right shoes are identical.
• Similar to some ballet flats, your slippers should curl in a bit. That’s what gets them to shape to your feet without a lot of increasing or decreasing. They will stretch out slightly with wear.
• The slipper sides and heel are worked in a spiral, so you will not ch 1 at the beginning of each round.
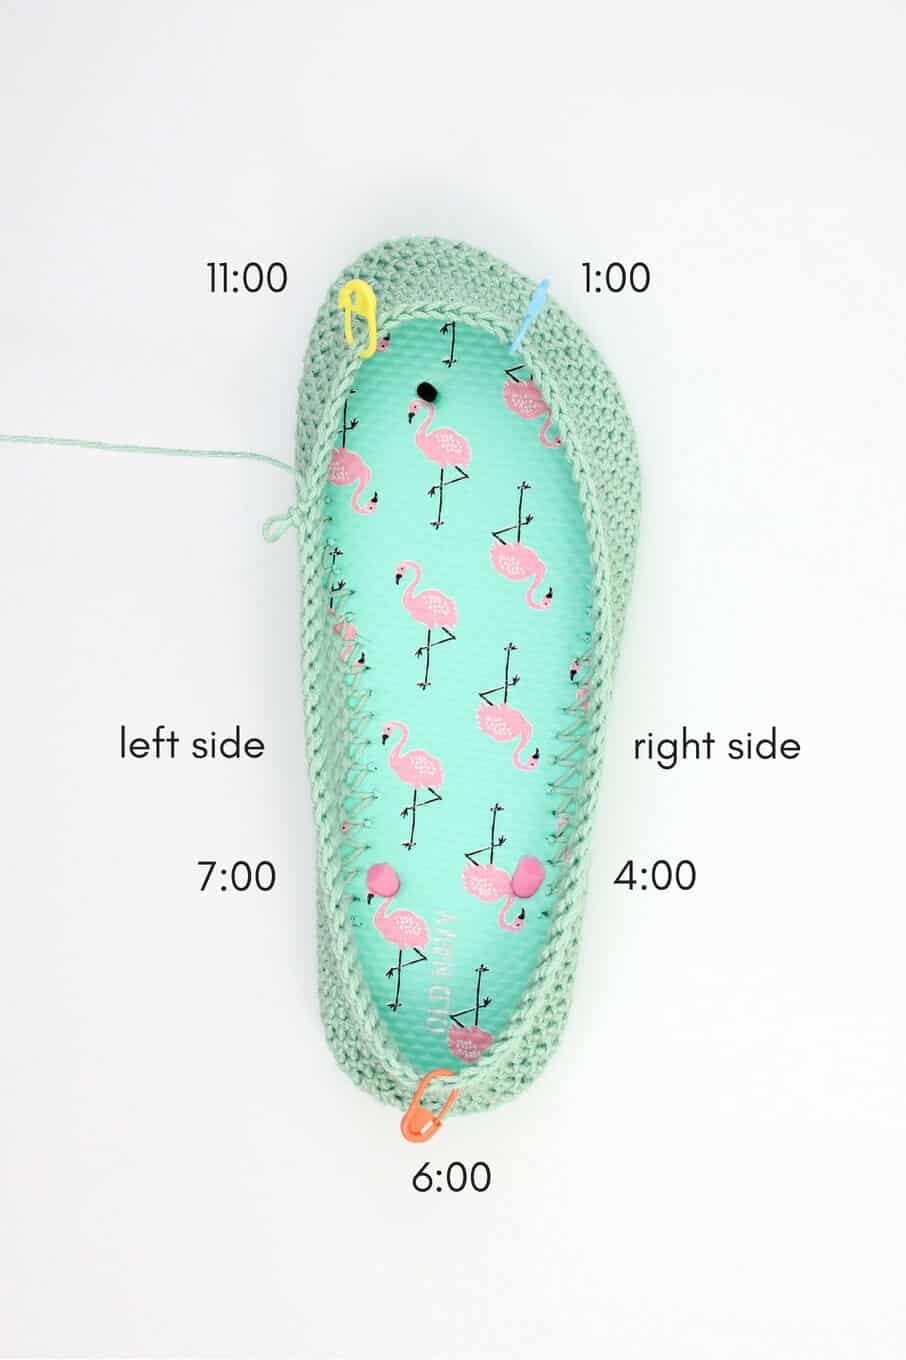
• Pattern explains locations on the flip flop as if it’s a clock where the top of the toe is 12:00 and the heel is 6:00.
SLIPPER SIDES AND HEEL
Notes: • The shoes are crocheted tightly, similar to amigurumi. Make a deliberate effort to keep your stitches tighter than normal. Check your gauge if you’re unsure.
• Be sure to poke the same number of holes in the second flip flop as in the first.
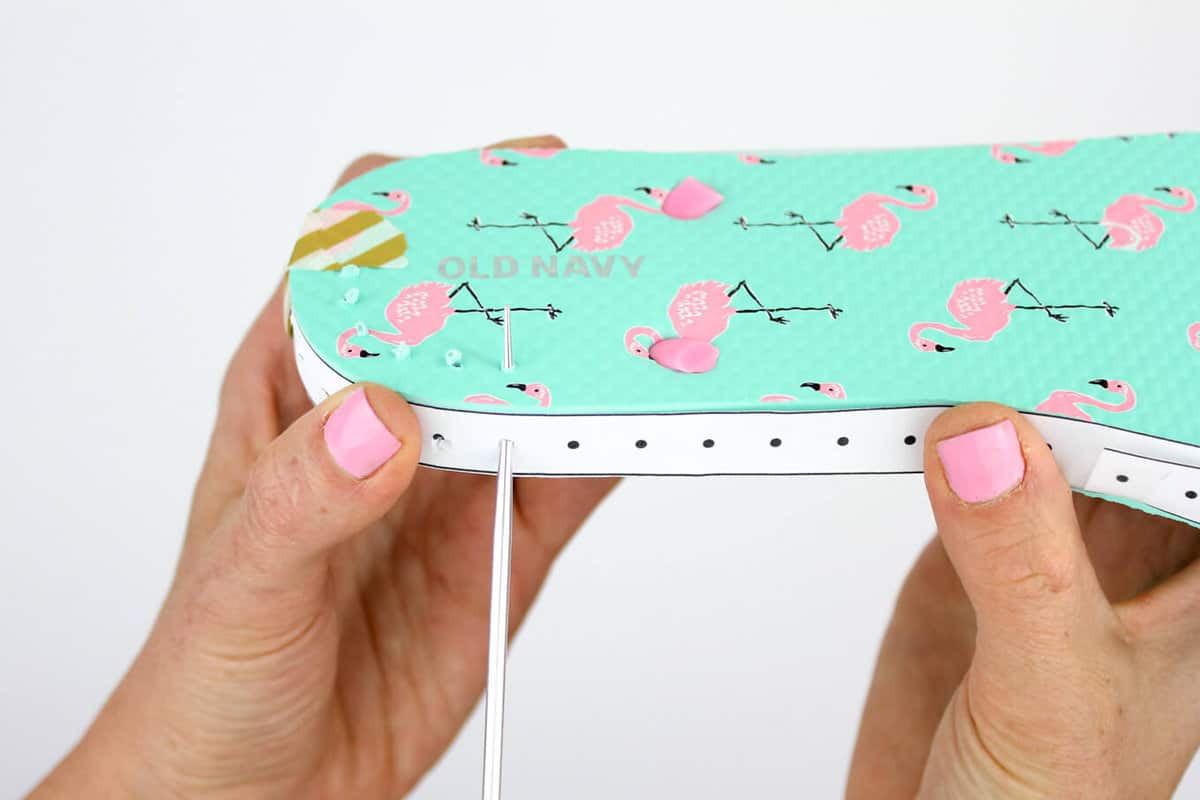
To begin: Trim straps off flip flops by cutting the mid-foot straps at an extreme angle so you can keep them in place without feeling them inside the shoe. (See photo above with the hole poking ruler.) Save the rubber plug from the strap between your toes to glue in later.
If you’re using the printable ruler, trim and tape the pieces together and tape ruler around flip flop sole. With your sharp instrument, poke holes in each dot on the ruler. (See photo above the pattern.) Alternatively, use a measuring tape to poke holes slightly more than .25″ apart around the sole. Pierce the hole at an angle from about the middle of the way down the sole to approximately .25” into the top of the sole. Reference the video tutorial for help.
Tie slip knot around smaller hook. Insert hook at back of heel (6:00 position) from the top of the flip flop toward the bottom of the sole, grabbing the yarn and pulling through to the top of the flip flop and through the slip knot to attach the yarn to the flip flop. Crochet over the tail of this yarn as you work Round 1.
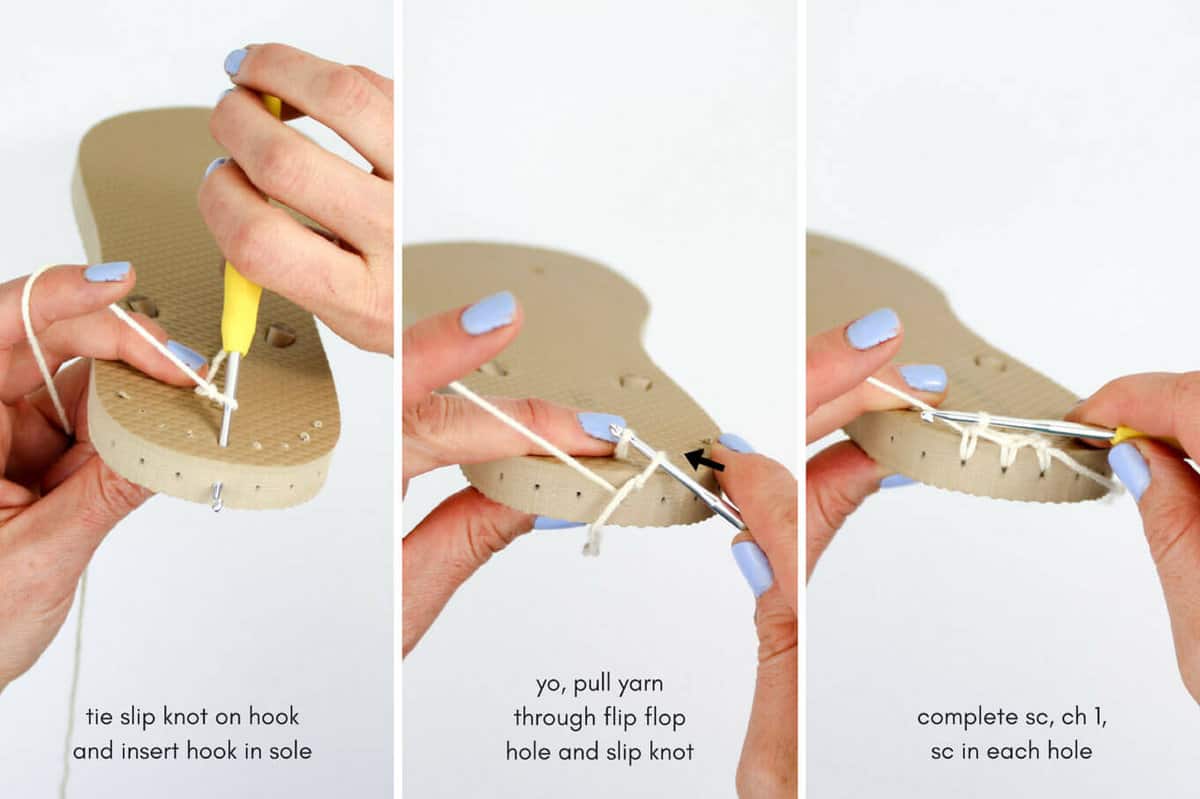
Round 1: Continuing with smaller hook, sc in each hole around sole, join with a sl st to first sc. Do not turn. Place marker in first st of round and move it up as you work each round (or just keep track of which sole hole you began in).
Rounds 2-9: With larger hook, sc in each sc around sole. Do not turn.
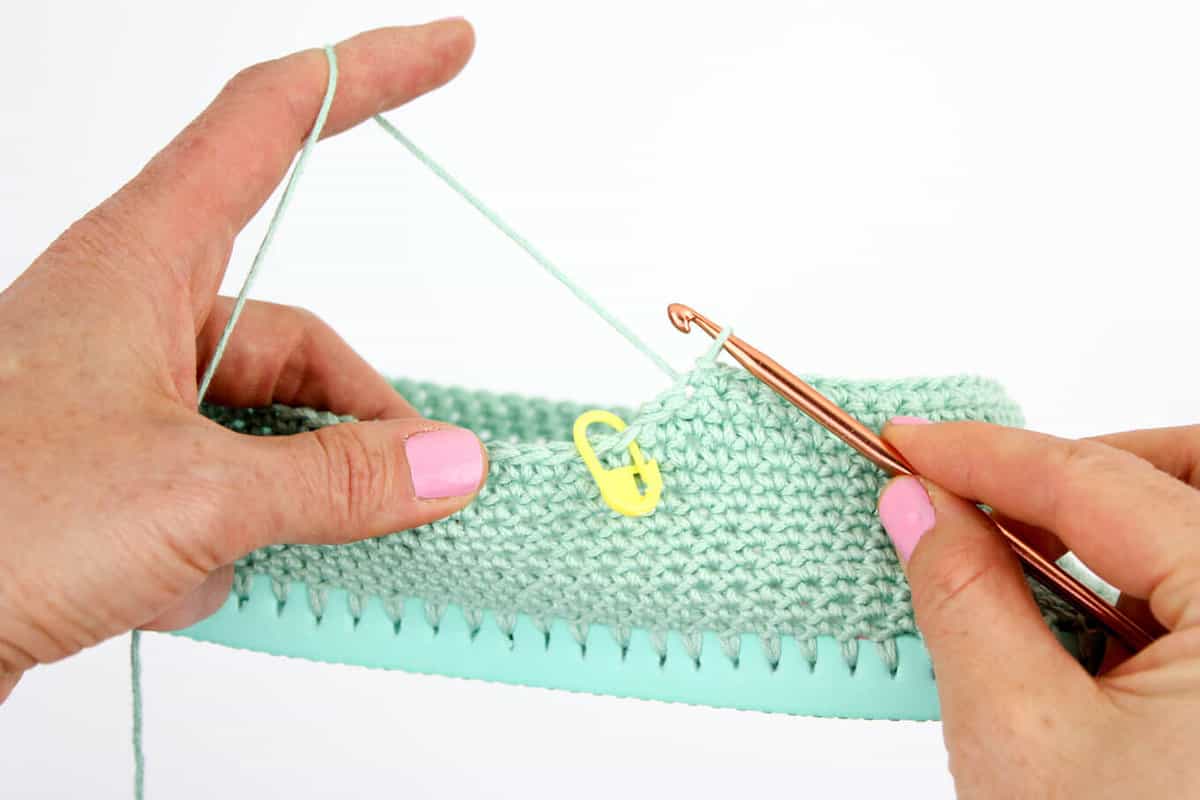
Remove marker. Place stitch markers at 4:00 and 7:00 positions.This is where the back heel “lip” of your slipper will taper to.
Do not turn work, continue with the rest of row 9.
Row 9 cont: Sc in each sc until 1 st remains before next marked st, sl st in next sc, turn. (See photo below.)
To make heel taper appear smoother, keep working yarn toward the inside of shoe when starting Rows 10-13. (See 8:25 mark of video tutorial for example.)
Row 10: Ch 1, sk first sl st, sl st in next sc, sc in each sc until 1 st remains before next marked st, sl st in next sc, turn.
Rows 11-12: Ch 1, sk first sl st, sl st in next sc, sc in each sc until 3 stitches remain before next marked st, sl st in next sc, turn.
Row 13: Ch 1, sk first sl st, sl st in next sc, sc in each sc to back of the heel, sl st in next sc. Fasten off.
Do not weave in end. You’ll work over this tail later.
SLIPPER TOP
Notes:
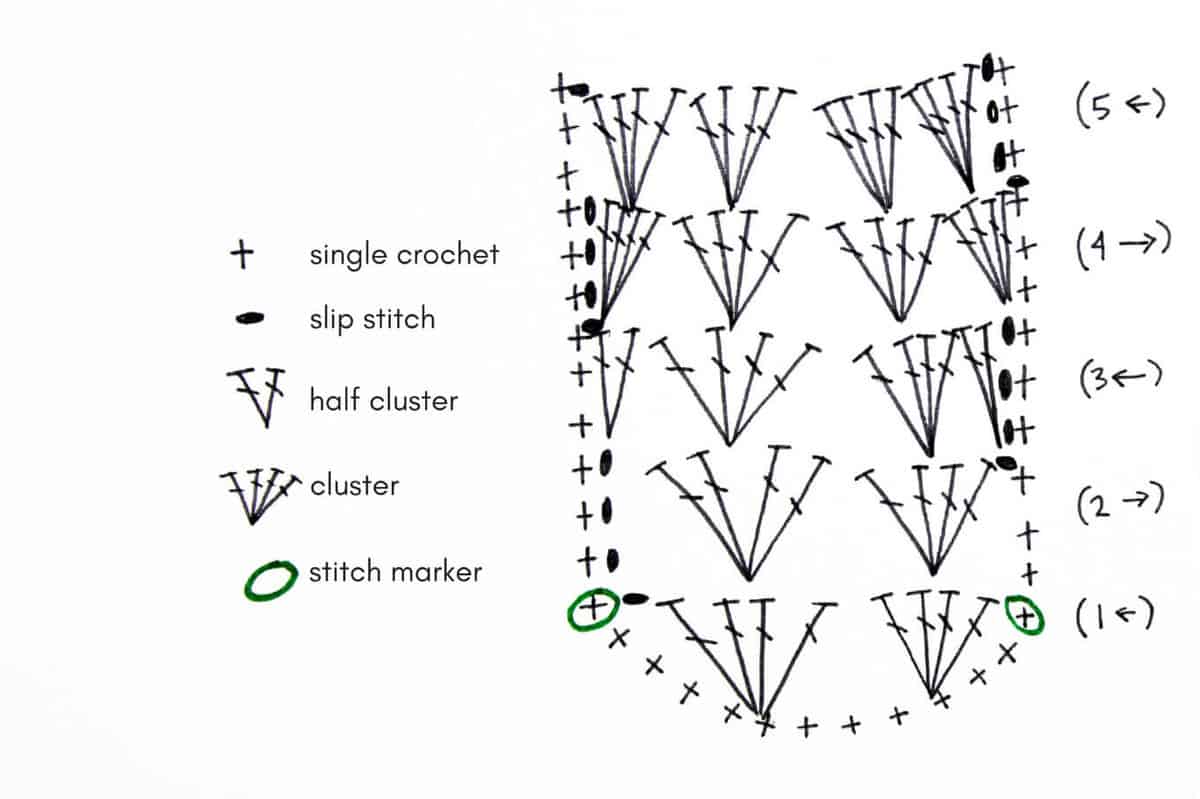
• Cluster = 4 dc in one st
• Half Cluster = 2 dc in one st
• In rows 2-5, the clusters are worked between the two middle dc of the cluster in the previous row.
• Reference video tutorial or chart above for visual explanation.
Find the approximate midpoint of the front of the slipper. Place stitch markers at the 1:00 and 11:00 positions with 11 sc between them. (See “clock” photo at top of pattern.)
Join yarn in 11:00 marked st. (Left handed crocheters, join in 1:00 marked st and reverse mentions of “right” and “left.”) Weave in the tail from attaching yarn now before this section is worked.
Row 1:With the toe facing toward you, (sk 3 sc, cluster in next sc) 2 times, skip 3 sc, sl st in next marked st, sl st in next 3 sc of Rnd 9 (up left edge of slipper), turn. (2 clusters) (See photo below.)
Row 2: Cluster in center of each of next 2 clusters, skip 2 sc in Rnd 9, sl st in next sc of Rnd 9 to join, sl st in next 3 sc (up right edge of slipper), turn. (2 clusters)
Row 3: Half cluster in sl st where Row 2 joined Rnd 9, cluster in center of each of next 2 clusters, half cluster in last sl st of Row 1, skip 2 sc in Rnd 9, sl st in next sc of Rnd 9 to join, sl st in next 3 sc (up left edge of slipper), turn. (2 clusters and 2 half clusters)
Row 4: Cluster in sl st where Row 3 joined Rnd 9, cluster in center of each of next 2 clusters, cluster in last sl st of Row 2, skip 2 sc in Rnd 9, sl st in next sc of Rnd 9 to join, sl st in next 3 sc (up right edge of slipper), turn. (4 clusters)
Row 5: Cluster in center of each of next 4 clusters, skip 2 sc in Rnd 9, sl st in next sc of Rnd 9 to join, do not turn. (4 clusters)
Round 6: Sc in each st around entire shoe, do not turn. (See photo J.) (Crochet over yarn tail at heel as you work.)
Round 7: Sc in each sc around heel stopping once you reach the slipper top section, sl st 1 into edge of top.
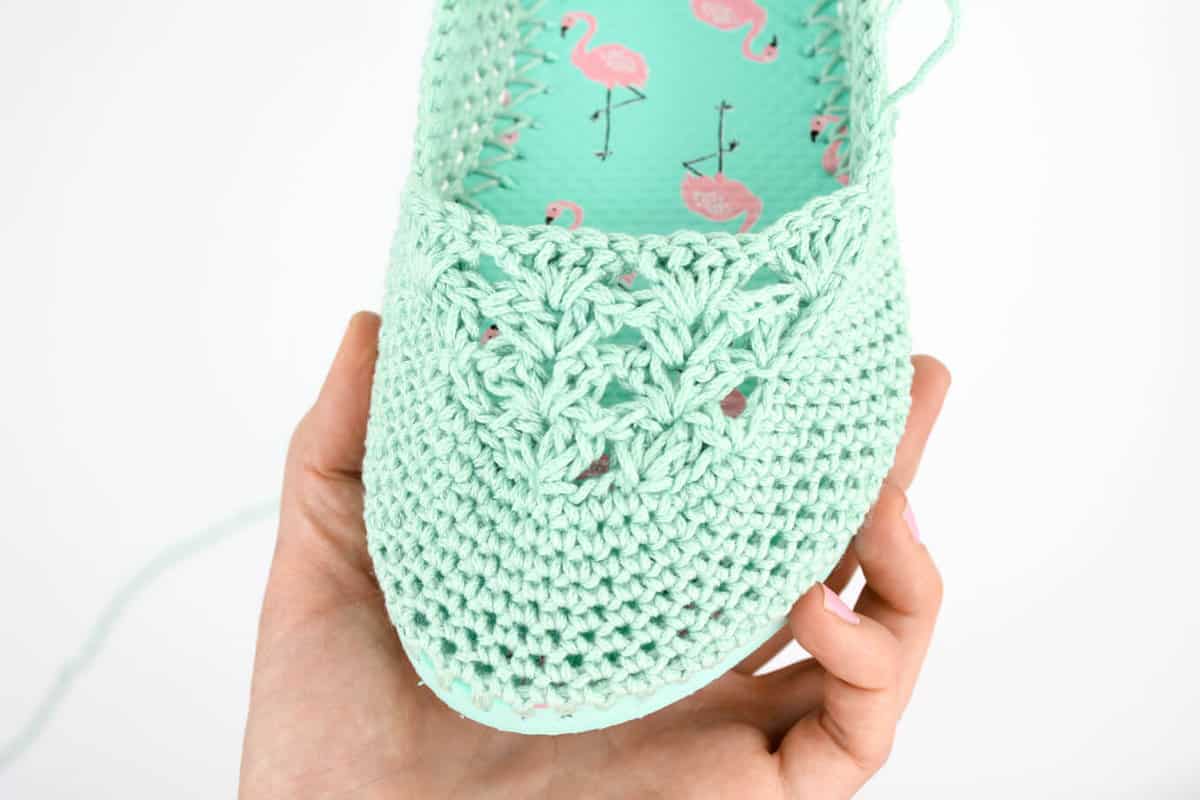
Fasten off and weave in end. Repeat pattern with second flip flop sole. Tap your toes together, smile and run around your house because you just made your own crochet slippers with flip flop soles!
I love to see your finished projects! Tag me on Instagram (@MakeAndDoCrew) and use #makeanddocrew to show me your stitches.
Now that your toes are comfy, you might enjoy these free crochet patterns:
Hello there ???? I love this pattern, but I’m concerned that the yarn would just rip through the holes. The foam that the flip-flop soles are made out of seems so flimsy. Did you have any problems with that? Thank you!
That’s a great question! And you’re right to be concerned because depending on the firmness of the foam, I think that could potentially happen. The flip flops pictured in this tutorial are from Dollar Tree and they are a little flimsy. That’s why I didn’t recommend them in the post actually. Walmart has far sturdier ones that also cost $1, so that’s what I’m going to use for future patterns. Even so, the yarn hasn’t ripped through the flimsy flip flops even though I’ve been wearing these slippers quite a bit.
Another thing to do just to ensure this doesn’t happen though is to keep your holes from being punched too close to the edge and then being sure to use a small crochet hook for the first row so that you’re not stretching the holes a lot with a big hook. Then once you have the foundation row, you can switch to a more appropriately sized hook.
Hi…I have made these…the cotton yarn tens to stretch out also…I got my flipflops from old Navy ..3.00 well worth it. Considering your time and effort in making these beauties…good luck.. oh watch for ads old Navy puts them on sale once a year for a dollar. Get buy. When my stretch I wash them and they shrink up again . Lol
Would using a yarn needle and threading the yarn in a spiral around the flipflop (through pre-poked holes) and starting the crochet in the yarn rather than trying to crochet through the holes also work? I know it would look different, but it might be easier to start that way, especially if you’re worried about fitting a hook through the hole, and there would be less wear and tear since you’d only be pushing the needle through one way.
I used a skinny spiral skewer for making holes and then used an E crochet hook for the first row and switched to a H hook for the rest. I also left the 3 plugs in the soles and super glued them in place so your foot doesn’t get moisture.
Having trouble with Slipper Top row 1. I joined with a sl st. It says to sk 1 sc from marked st and begin in next sc. Do I sc here then ch 2 and sl st back into the beginning marked st at in the right?
Tammy
May 29, 2016 at 12:54 am
Just wondering if maybe gluing a piece of felt to flip flop to help from tearing the hole while wearing/ crocheting it.
Mary K.
May 29, 2016 at 11:41 am
I still don’t see where to download the pattern, unless you mean to print from the webpages (including all the ads). I filled in the section to put me on your e-mail list. When I was sent back to your website/blog and searched flip-flop slippers it sent me back to this page. How can we get a PDF?
I’m wondering if maybe you saw the shortened version of this tutorial and not the longer 20 minute one. 🙂 If you scroll up a bit, right above the free pattern, you can see a video player that will play the longer, in depth tutorial. I’m guessing that will be more of what you need.
click to PRINT with your mouse and then select only pgs 10-13, NOT all pgs.
Christy
July 2, 2016 at 7:37 am
If you click on the “read more” area under the picture it takes you to the pattern. You will just have to scroll down a little to see it. I’m making these now!
Linda
May 27, 2016 at 11:02 pm
How can I get this pattern? My senior group would love to make some for our fund raising.
I really appreciate when you purchase my printable pattern PDFs instead of printing the blog post because the small fee for the pdf helps me cover the expenses from the site. (When you don’t visit the site because you have a printed pattern, I don’t earn any ad revenue and therefore have a hard time creating more free patterns for the blog.)
Thanks for understanding!
Jess
Greta
May 28, 2016 at 4:13 am
Tap the see more and the rest of the article will show up with the pattern.
How wonderful that your son has learned how to crochet. It’s one of my favorite ways to relax and settle myself at the end of a day. I don’t currently have a book, I’m sorry. I usually prefer people to share the links to my patterns instead of printing them, but please feel free to print this page to give to him if that would be helpful.
Maybe you can gather a bunch of different patterns/articles/pics of stitches and take them to like staples or OfficeMax and have them bind it like for a presentation booklet and then send to him with some yarn…..then you can make it personal and find some cool stuff that you know he would like…..I think my heart would swell if someone sent me that!!!! 🙂 then send him yarn/pattern of something YOU would like so he can make it for you….. My ma is my favorite person to torture with my projects!! ?
Nat, that sounds like a really wonderful idea, but in the Texas Criminal Justice system, this would not be allowed. Any publications have to be shipped directly from a book store. I imagine this is the same with all prison systems. Otherwise, contraband could easily be slipped into the prisons, and God knows they don’t need anything else getting in there. I would suggest that going to a bookstore, finding a crochet book that’s easy to follow with easy to make patterns, and have the bookstore send the book to him in the prison. They do it all the time. I’ve done it myself. Good luck, and happy crocheting.
Aubrey
May 27, 2016 at 9:29 am
Thanks for the reply. I am definitely going to put this on my list of projects!
What if you poked the holes straight down through the flip flop and then gorilla glued an extra sole to the bottom? They might be more sturdy and you could actually walk around outside with them…if you wanted to.
Surprisingly, I can’t even feel the stitching. I think it’s because the the yarn is actually quite flush with the flip flop sole. I find them super comfortable 🙂
Christine
May 28, 2016 at 10:10 am
Any chance you might do a YouTube video showing how to make these?! I’m having trouble starting them. You’re so pretty, you need to make a video:)
I’m also having trouble following the directions. When you say 3 stiches before the marker to you mean before as in towards the toe or towards the heel?? I’ve made 1 slipper after two false starts and it is very loose and sloppy. I have a very small foot so I’m going to try to downsize the hook and see what happens.
For rows “9 cont” and onward, you’re only working in the back half of the slipper. So you stop 3 stitches short of the marker, toward the heel. This essentially creates a tapered edge so that the back heel section rises gradually. If you look at a few of the photos shot from the side, you might see what I mean.
As for how loose it is, you might want to try having fewer holes in your sole overall. If you don’t want to/can’t re-poke them, you could always decrease a some stitches as you crochet around the first few rows. For reference, my size 9 pair have 69 holes around each sole. I think using a smaller hook is a great idea too.
Georgia
May 29, 2016 at 2:31 am
Could you use a yarn needle and sew a row of stitches around the sole so you aren’t punching a crochet hook through?
iThese are what I have been looking for 2 yrs. I don’t know how to Crochet, but I will find someone who does. Do you make them for sale ??? I have an Artery Disease that make my feet swell . thanks so much to my friend as she sent me here. And thank You for sharing !!!
What are you having trouble with specifically? I’d love to help if I had a little more detail. I’ve also answered several questions about the toe section in previous comments, so you might like to have a look at those answers to see if they’re helpful to you at all. 🙂
I’m also confused about the toe section. After row 5 do I continue all the way around? Then what’s the other “row 5” that comes after the fasten off step in round 6? It says something about hdc in 3rd SC from hook, but I supposedly just fastened off
That is true. I’m sorry if my wording was unclear. I was linking to those so that people who don’t have access to stores with flip flops (like in the winter) saw they could still get them online. I’ve had great luck with Walmart’s $.98 flip flops though. The foam is pretty sturdy.
I couldn’t find any place to post my question so here it is: my crochet needles are very old and all have numbers instead of letters, what numbers could match up to the hooks you recommend? Thank you, Nancy
That’s a great question. I have some that have a number and a letter on them and with those, these sizes I think you’d want to use a 1 for the smaller hook and a 6 or 7 for the larger. I found this chart and it might be helpful for you in the future 🙂
I don’t actually make them to sell, but some Esty sellers do. If you scroll through the comments, you can see a few people offering their services.
🙂
Karen
July 13, 2016 at 8:32 am
I msde some similsr but used my own pattern after the foundation row. I only had 1 hole break through, then just was more careful when pushinh hook through the sole. Mine turned out great! I even entered them into our County Fair and received a Blue Ribbon! (Used WalMart flip flops $.97 & pattern was a Mary Jane dedign).
You could always use a little glue in the holes to help hold them in place, and to fill the holes made when cutting away the straps. ( hot glue, / guerrilla glue) . Aside from the flimsy sole- supposedly, I think they are fine for out side in the summer on a dry day…running errands…especially if made like moccasins!
Yes totally! I actually just shared a moccasin pattern in which I glued the little rubber circles from the straps back into the holes in the rubber soles. It worked great.
Thank you for the pattern, I have made twelve now and will be making more (Christmas gifts). But like a dummy I threw away the straps and round plugs, do you have any suggestions on what can be used to cover/plug up the holes?
Hmm. That’s a good question. If you have one extra set of flip flops, perhaps you could just cut small circles from the sole and use them to plug the holes on the other pairs? (I’d glue them in.) 12 pairs is SO impressive! I’d love to see a pic if you’d like to share one.:)
For slippers, you can just leave them open and you won’t really notice they’re there. If you’d like to plug them though, you can just glue the piece from the flip flop strap that used to be in the hole right back in its former home. 🙂
Hi Jess- I spent today preparing the flip flop soles and discovered something that works really well to mark the Kohls on the flip-flop soles. I made a paper copy of the top of the flip-flops sole. I marked a line on the paper copy 1/4 inch in from all edges and I marked each hole 5/16 inches apart. Then I punched out each hole with a hole punch. I then put the paper copy on the top of the flip-flop sole and held it in place of a couple of straight pins. ( do not mark the top of your souls with an ink pen or a marking pen ) I then used a Straight Pin to push into the center of each hole around ( turn the top of the pin around in a circle a few times – this makes it much easier to see each mark on the flip-flop sole). You can use a BEAD REAMER To push through all of your marks on your flip-flops sole. It makes precise holes any circumference you would like and allows you to see very clearly where you are pushing through the top over onto the side of the sole. Hope these two tips help to make your project go faster.
The pattern is above this comment area, within the article. (It’s maybe a bit hard to notice because there are a lot of photos involved too.) I’m sorry, I don’t have it contained in a way that’s easily email-able at this moment.
Judy, the pattern is under the first pictures. Look for the box that says “read more”. Most articles on websites do this. Just scroll up again to the original post and click “read more.” Once you’ve done this- the pattern will always show.
Designer, I love this pattern and love HL store. ❤️ Thanks for posting I will be sure to include your links.
You could also run a bead of hot glue over the holes on the inside of the shoe after you are done crocheting. It would strengthen that edge, I think. Thanks. Great idea.
On the flimsy flip flops I used an Awl and it is better to punch the hole straight through from top to bottom. I didn’t have any tears after doing this. I had already gone through the side and two out of the first four stitches tore. I was able to salvage the flip flops. The next pair I made were slightly heavier flip flops. I used an Awl to punch the holes and the smallest crochet Hook I have is a D/3 or 3.25mm so I made the holes 1 cm apart instead of the 1/4 inch and went through the side as low as I could go and 1 cm from the edge of the top of the flip flop. I didn’t have any tears on those. I was making a size 10 slipper.
None of the stitches are actually touching the floor. They’re all on the top half of the flip flop sole. I’ve been wearing mine for about a month everyday and they’re holding up really well. 🙂
Haha–I can see how that could happen, Wanda. 🙂 Good think flip flops are generally pretty cheap to replace.
Happy crocheting!
Jess
Liz
June 2, 2016 at 3:36 pm
I think they are way too cute to be relegated to slippers and think they’ll work great with sundresses or beach wear. I’m concerned about the flip flop tearing. Has that been a problem for you or others who’ve tried this pattern? Are there any recommendations on the thickness or density for the sole?
I haven’t had any trouble with them tearing in the month or so I’ve been wearing them at home (A LOT ;)). I’ve found that Walmart flip flops are a great density. The Dollar Tree ones are too flimsy and the Michael’s ones tend to fall apart a bit more (although they’re working okay.)
Ok. Update. I am getting the hang of it. 3 tips: First, go slowly on that first row through the sole. Second, keep the hook facing down as you pull the hook up through the sole. If the hook faces the side, it tears easily. Third, crochet loosely on this first row.
Got mine made … But had trouble keeping them on.. Had to run some yarn in around the top to tighten them.. I also made a small pair and I got the second one upside down so then had two right feet… Mine are finished and I love them ..
I might also recommend using a wax thread and a heavy needle to stitch all the way through the sole about 1/4 inch in. I forget what the stitch is called but loop the thread back through the previous stitch with every pass through the sole so that there is a continuous line of thread on both the top and bottom. Then start the pattern as written, using the wax thread as your foundation row. That would also make it better for outdoor wear. It’s what I intend to try.
I’m sorry to hear you’re having trouble. The free pattern is right above this comment area within the blog post. The paid printable pattern can be found here.
(And if you’re the free-wheeling type that prefers not to have your toes covered at all during the summer months, check out all my other free crochet patterns instead.)
I tried clicking on the link referred to here, but was not able to find any other patterns for those of us who don’t like our toes covered. Can you please help? Thanks!
You can find all my other free crochet patterns right here! (Or you can alway access them by clicking on “crochet + knitting” in the menu at the top of the page. 🙂
Hope you find something that can keep your toes happy. 🙂
Cheryl! Thanks so much for your hawk eyes! You’re totally right. Row 14 should be called row 13. There is no row 14. I’ve updated the pattern. Thanks again for your proofreading!
Hi! What a cute house shoe and fantastic summer pattern!! These are pretty darn cute for out of the house as well. I need to wear an arch support insole around the house (hardwood and baby chasing can destroy me before breakfast!) and I’ve struggled to find a slipper pattern that would support such an addition. Do you think these guys would? It seems like the sturdy nature of the sole would be better than just felted slippers, but I’m wondering if the crochet is enough to keep them in place. Any thoughts?
I think an arch support would probably do fine in these, as long as it wasn’t a tall orthotic or something. As you’re working the slippers, you can try them on with your arch support and see if you need to add a couple extra rows to the back to make sure that the back of your heel is adequately covered and so they won’t fall off. Hope that makes sense! Can’t wait to see what you make!
I would make them a size bigger & use an insole maybe?? I too have arch problems & suffer after wearing flat flops & sandals!!But dang it it’s summer & these are just too stinking cute!! I can’t crochet but my sister can!!! I can’t wait to get mine!!!
I wonder how it would work if you glued an insole onto the flip flop before putting in the holes and use them as a support for the flip flop to make a sturdier base as most have a cloth top
discount stores also have some adheasive that can be used to glue “sport insoles” down, so the “flip flop feel” remains but with extra support it in a yellow tube with purple accents, not sure the name but its like a souped up rubber cement (its non irritating once it has dried and can be used for a number of tasks. i even used it to repair vinyl tiling in my kitchen lol) …. . but i know the feeling about flat feet and hardwood. i go barefootin’ as much as possible – but being prior military somedays my feet just can’t do it.
Love these slippers. I have a couple of questions. I’ve worked the first nine rows and the slippers are already very tall (2 2/3 “). Does this sound correct? Your stitches look to be more like a sl instead of a sc. Any guesses to what I’m doing wrong?
That’s a great question. Without looking at them, there are a few things that might contribute to a larger gauge. My guess is that your sole holes might be a little closer together than mine, and therefore your stitches aren’t quite as stretched out as mine. Mine almost flattened a bit, and thus do look a little like a slip stitch. The great thing about this pattern though is that the number of rows doesn’t really matter, it’s more the general height up your foot that you should focus on. Just try them on and stop the rounds when the sides and back are almost as tall as you’d like, knowing that you’ll add a couple of rows just in the back near the heel.
Does that make sense? Feel free to ask more questions if not! I’m happy to help however I can!
Kim – I am no professional or pattern writer, but I have knitted for about 57 years and also do “some” crocheting. I am only guessing, but I think maybe if you are able to do the 1st row, to get the yarn IN the foam, that you could then change to DP knitting needles and pick up stitches with the knitting needles, all the way around, continuing to knit until they are the size you want, following the same shaping, etc of the pattern for the heel and then picking up stitches at the top to do that too. Adjust gauge to get what you want with whatever size needles you prefer to use. You may need 5 or 6 needles to get around the sole. If you don’t have enough of one size, alternate two consecutive sizes as you go around. The needles will move around the slipper, one section at a time, so it won’t be noticeable anyway. If you are not able to do the 1st row with sc , if you know how to embroider, you could try using a blanket st around the sole to get the yarn started and continue with the pattern as above. As I said, this is just a guess. I am not an expert, by any means, and I have not tried this yet as I just found the pattern, but my brain goes in different directions than it would be expected to, and I come up with some crazy ideas. Some work. Some don’t. Happy kn itting.
Perhaps Anne Smith is using. larger hook than you used and different yarn gauge. And that is why her sides are so high. Can you tell us what size hook and gauge yarn you used please? Also, a photo to show how you started in the back would be helpful. Thanks so much.
As the first 9 rows are in the round, do the rows start getting smaller? Your photo makes them look like they cinch inward, closing in over the foot. Or do the rows go straight up?
I’m anxious to try.. I’m traveling and wish I could find a Pinterest logo to store this link. Am I missing it somewhere? I always need rubber soled slippers. Thank you
I’m hoping you figured this out, but if not, you can always pin my posts by clicking on the Pinterest logo at the very top of the post (right underneath the title). Thanks for sharing my patterns on Pinterest!
Yay! I hope you enjoy making your own pair, Gerry. Let me know if you have any questions. And feel free to send me a pic of the finished project! I’d love to see what you make.
Can you mail me a written pattern for those adorable slippers? I will be “on the road” all summer in our camper and don’t have a printer with me. My mailing address is Lois Babcock, 1176 State Road 82, Wisconsin Dells, Wi. 53965. Thank you so much.
LOVE these! I have very hard to fit feet so If I could figure out how to make these I could finally have perfectly fitting house shoes. Flip flops/thongs are normally street shoes, so, what, do you think it would take to make these street shoes? a different yarn? spraying something on the cotton thread? I think these would be darling and comfortable for us Red Hat Society sisters to wear.
The pattern is right above this comment area, in the area with the text and photos of the slippers. It’s just written out within the photos. Let me know if you don’t understand what I mean and I’ll guide you further.
Hello. I LOVE these. sad thing is I don’t know how to Crochet. and not sure my hands would let me if I did. I was wondering however there is a elderly lady in our church that makes crocheted dish cloths with dish towels with a matching crocheted end for hanging that she gives out for birthday gifts, anniversary gifts exct. I was wondering can I print this off and give it to her for something a little different to work on for her family? If so, can you please tell me HOW to print it? Thank you.
I’m so sorry to hear about your knee! A new crochet project is certainly in order! I hope you enjoy this one. They work up pretty fast, so you might want to get two pair of flip flops so you don’t run out of things to crochet 😉
I’m sorry, I don’t have a printer-friendly pattern yet. Since the pattern is pretty short, you could always copy and paste the text into Microsoft Word or something similar to print it out.
you could use print friendly, assuming of course you are following the designers wish that you don’t share the pattern and only print it for yourself. http://www.printfriendly.com/
I want to try these for my granddaughters. Do you use the size flip flop true to a persons shoe size seeing that your are going in a little from the edge of the actual edge. Than j s for any help you can give me
Great question. I’d say you could err on the smaller side. I actually bought my flip flops in the size I’d normally wear, but then I trimmed a bit of rubber off the back before I started crocheting because I had the feeling that they’d end up too big. Does that help?
I bet your granddaughters will love them! My daughter is anxiously awaiting a pair.
Hi there, I absolutely love this idea and I wondered if you could also adapt this pattern for knitting? I would love to make these slippers but I don’t crochet 🙁
I’ll add it to the list 🙂 I’d like to make a simple video about how to crochet these, which might help you if you’re interested in learning. Feel free to subscribe in the white, pink and green box above this comment area to get notified once I make the video.
If you could make a small video on how to get the yarn started on the slipper that would be awesome. I’m a visual learner and a beginner at crochet so I can’t picture or understand how to start the yarn on the flip flop and the top part of the slipper where the top of the foot by the toes looks a little difficult to understand in the directions. Seeing it done first hand in a step by step video would be very helpful, maybe even post to You Tube or something?
I would love to try to make these they are so cute.
I’m sure hoping to start soon, but I haven’t done any yet. I’m going to have to muster up my on-camera courage and give them a shot though because I think it would be really fun. Feel free to subscribe in the white, pink and green box above this comment area and I’ll let you know once I’ve started making them.
Awesome shoes I use to crochet but lost my central vision 18 months ago Thinking might be difficult for me to make now Going to visit family 1400 miles one way ( and we will be doing it round trip)at end of july Since I will be riding in car for would love these I love the color you chose Wish I could find these already made in pink and turqoise Is there anywhere that sells these all ready made? If so do you know the cost? Thank you for your time, help and information Have a safe and fantastic week end
I do not have them already made but can get them out in 2-3 days depending on how many orders I have in progress. I also have a men’s boat shoe version. Go check out my shop —> https://www.etsy.com/listing/385009596/slipper-flops-lightweight-crochet?ref=shop_home_active_4 Here is a $5 off of a $30 plus purchase coupon for you to use as well —> 5OFF304U I look forward to making you a pair. -Mindy with LovingLea Created
Hi from New Zealand. I am going to try making these for myself and grand=daughter etc. Seem easy. May then get hubby to glue extra flip flop on bottom as I seem to end up outside in things like these
Hi Jess! Love these and am working on a pair now! One question though, when you get to the slipper top it says: attach the yarn at the right marker. sk 1 sc from the marked stitch and begin in next sc, ch 2. When we sk 1 sc is that to the right or left of the right marker when the toe is facing you? I didn’t know if at this point we starting toward the left marker or to the right of the right marker. I am thinking right otherwise when you continue you will be going backwards to the marker but wanted to check. I can’t wait to finish these (making a navy and black pair to wear to work)! Thanks so much!
These are great! I have wide feet which is one of the reasons I love flip-flops: my big feet just hang over the edges! Would I need to adjust the pattern at all, especially in the toe area? How do you think I should go about that?!
These stretch a bit over time, especially if you use cotton yarn, so you might be able to use the pattern as is. You could also try just poking your holes slightly closer together (like .25″ apart) so that you end up with a few more stitches than someone else might. I think this would allow your feet a little extra wiggle room.
All of your patterns are amazing. Will be doing flip flop slippers and cherry blossom plants this weekend. I showed the picture around the office and half a dozen folks want both of them! Thank you so much for the free patterns and wonderful pictures!
I would be interested to see how the top part stretches as you walk, since it would be anchored differently by the sole than if the whole thing were crochet. Especially using cotton yarn.
Great question. I’ve been wearing mine everyday for a couple of weeks and I can report that the entire slipper has stretched a bit. (Which was good because I made it intentionally tight to begin with.) One reader had a good suggestion to wash them if the cotton stretches to get it to shrink up again. Feel free to report back on your experiences too!
Hi Jess, Love this pattern. Will defently be making these. I notice that there isn’t a row 13. Did I just miss it? Is 12 and 13 the same? Thanks for your great ideas. Nancy
Hi Jess, A fiend of mine that does not crocheted shared this pattern and sent it to me and I’m getting a lot of likes from it. I like it a lot. I will have a go at it. I’ve been crocheting for over 50 yrs and I have enjoyed every bit. I will share your pattern and send you a photo of my finished product when I’m done. Thank you so much for sharing your beautiful work. Carmen
Thank you so much for your kind words. How wonderful that you’ve been crocheting for so long. How old were you when you learned? My mom taught me when I was 8-years-old, and I agree, I’ve loved it ever since. Can’t wait to see your finished slippers!
Hello I have made the slipper and I’m struggling with the toe part when I get through doing the hdc in the row and it said slip stitch to the row above I get confused and end up with a tongue like result..the next step is to just single crochet around the rest of the slipper and tie off
I know–this part is a bit difficult to explain, Nancy 🙂 Let’s see if I can say it a different way. Basically by “the row above,” I mean that you need to attach it to the edge of the side section of the slipper. So as you work the top pattern, you’ll run into a side and at that point you need to sl st to connect it. You don’t want to sl st into the edge stitch immediatly above the previous row though, so you’re skipping one edge stitch and then connecting into the edge stitch above it. Does that make any sense? Perhaps this explanation combined with a look at some of the photos above will help. Let me know!
I am having the same issue as Nancy. I am not sure what I am doing wrong. I have ripped it out 3 times now and still getting the same result. :/ Will keep trying.
But I do have a question about the TOP of the the slipper. Is it suppose to lay flat on the top of your foot? Mine keeps rounding upwards above the top of my foot.
You might try using a slightly smaller hook if the top is bulging a little. Also, you could try them on and see if it’s visible once it’s on your foot. I find the top part to be pretty forgiving once your foot is stretching it out a bit.
Thanks so much for pattern! I have a few friends wanting these, but i think they want them for outdoor shoes. Any advise i can give them to stretch their life as long as possible? Also any advise for me while making?? Thank you!
Another reader had a great suggestion if they stretch out (as cotton tends to do). She said you can wash them to get the yarn to tighten up again. Also, you might be able to experiment with using two strands held together to make them a bit sturdier. I’d just do the first row with one strand so that you don’t stretch the rubber holes out too much and then transition to two strands. If you try this, let me know how it works out!
(Also, if your gift recipients won’t be walking much, I think these slippers could work fine as shoes for general hanging out. If they are going to be walking a lot, I’d experiment with thicker yarn or two strands.)
I just wanted to let you know my husband use a very littledrillto drill the holes all around it it work out beautiful.Really enjoying trying these slippersnice Christmas presents
What a great idea! I bet that’s the perfect size. Thanks for taking the time to share what worked for you. I bet these will be awesome Christmas gifts!
Boo! I’m sorry the link didn’t work, Amanda. Here they are on Amazon. (I also updated the link above–thanks for letting me know!) I’ve been loving these and now they’re even cheaper than when I bought them. Gotta love when that happens.
Hi. I would like to incorporate initials into the top front part. I’ve never crocheted anything with initials before. Can you give me some guidance please?
So darn cute! I’ve just taken up crocheting and these look do-able! 😀 Thank you so much for sharing. (Maybe a few friends might even get some b-day gifts on time?! lol)
Both my sister and daughter want these. I have quite a few flip flops that I can’t wear anymore, so I guess I will try to make these. Great way to re-use unusable items. Thanks!
Thank you for the pattern. I’m making them now. The only thing I might suggest is to put the amount of stitches you should have at the end of each round and row.
I love these but have a (big) problem… I don’t know how to crochet! ? Do you have an online tutorial or is there one you would recommend? I would love to learn with my 8 year old daughter and possibly make these together. Thanks!
Mooglyblog.com has some great video tutorials. And Craftsy.com has good classes for sale that would be a great place to start. I learned when I was 8! I think it would be a wonderful thing for you two to do together. 🙂
In my records, I don’t see a purchase from anyone with your email address. Did you use your peii.org address when you tried to buy it? If you’d like to try again, please do so and I’ll be happy to refund you if somehow you end up getting charged twice.
Hmm. That’s strange. Well, I’m glad you got what you needed. Thanks for troubleshooting it.
Happy crocheting!
Jess
Tanya Moon
May 28, 2016 at 9:43 am
Don’t laugh if this isn’t possible! But, I’m wondering if it would be possible to use small rivets, or maybe washers over each hole to keep the thread from pulling through? This is my next experimental “to do” item! Thank you very much for the pattern!
I have read all your instructions and it looks a super pattern would it be OK to seal the stitches round the edge with a clear silicone to strengthen them when wearing caz.
Hi, I have a pattern question. On the top side on the first row. Row 1: With the toe facing toward you, attach the yarn at the right marker. sk 1 sc from the marked stitch and begin in next sc, ch 2, sl st into sc where marker is, 2 hdc in same sc you begin in (cluster made), sk 2 sc, 3 hdc in next sc, sk 2 sc, 3 hdc, sk 2 sc, sl st into marked sc, sl st in next sc (up the left edge of the slipper), turn.
sk 1 sc from the marked stitch and begin in next sc, ch 2, sl st into sc where marker is, 2 hdc in same sc you begin in (cluster made). ^ this doesn’t make any sense to me and I tried doing it without thinking and it didn’t turn out right, was all bulky instead of flat. Could you please clarify this for me 🙂 Thanks!
I love this pattern but I’m finding it a bit awkward to crochet with the flip flop in the way. I’m crocheting with the inside facing me. Don’t know why I started it like this. Would it make any difference if the outside was facing me–would it curve to the inside just the same? Probably a silly question but I’m more of a knitter and not that experienced in crocheting. Thanks for the pattern.
I know what you mean. It’s a bit clunky for the first few rows. I faced the inside toward me as well. It does get a bit easier after the first few rows. I think the clunkiness is just one of the hazards of crocheting around a piece of rubber. 🙂
Thank you for the quick reply. Just wondered if I was doing it right. You’re right, I did find it easier as I went along. My granddaughter found this pattern and just had to have them. She’s anxiously waiting! Thanks very much for sharing. Have a wonderful day!
Just a thought for those concerned about ripping the foam, maybe leave the flipflop as is, without cutting off the straps? Maybe that would give more support and less stress on the crochet work?
Thanks so much for the pattern! I use this great site: http://www.printfriendly.com/ It allows me to copy the URL of your pattern into their site and then it creates a PDF file and/or I can then print the pages!
I do have a question! lol What brand of cotton yarn did you make yours out of? They are so cute! Thanks and God bless!
I’m with Nancy…I do not understand the toe part and I am also ending up with a tongue looking result. Also did you decrease at all from row 2-9. Mine are very loose and bigger than the sole. Yours looks like it gets smaller toward the top.
Thanks so much Jess for this amazing pattern. I live in Australia and it is winter here. When my husband showed me the pattern on face book I straight away thought of my 3 daughters for Christmas presents. They love their thongs like a lot of Aussies do and I thought they would love these slippers. This is going to be my Winter project then they will be ready for our summer. I will send you a photo of the girls with them on once their finished. Thanks again all the way from Oz. Cheers Lee
Hello from the USA, Leanne! I would LOVE to see a photo of your finished slippers! I think your daughters will appreciate them too. My mom just made a pair for herself as well 🙂
I’m not seeing the link for the pattern to make the crochet flip flop slippers? I read through the whole page…what did I miss? Is there any way you could email it to me through the email I provide?
I know you probably already said but, what kind of yarn do you use? Because if I were to go out into the rain to go get the mail I don’t want the yarn to fall apart.
Thank you so much for sharing this pattern. I haven’t had any problems until I started the top part. I keep going through how to attach the yarn to the toe and then after at the skipping a stitch and chaining two and then going back into beginning stitch has me confused . . . Do you attach and then skip a stitch, SC, chain two, and then slip stitch to starting stitch?
I want to make several different colored Slippers, but I am having problems printing out your pattern for the Slippers With Flip Flops. Could you please help in telling me a better way to doing it, without having to print out all of those pages,, and not just the instructions. Thanks ahead of time.
Hi, I’ve made it to the top of the slipper and am having a very hard time with the intrauctions with the pattern. I’ve placed my markers 10 stitches apart but I cannot figure out how to get it going. I’d appreciate some help. Thank you!!!
A few people had questions about this section. I found it pretty hard to explain when writing the pattern, so I’m glad you’re all asking clarifying questions 🙂 I’ve updated that part of the pattern with more detail. Have a look and see if it helps! (Also looking at the photo directly below the first row of the toe might help too.)
Hello. Thank you so much for the free slipper pattern!! I’ve had many coworkers tag me in this pattern 🙂 I have started one slipper and I’m having trouble with round 1 of the slipper top. I’m not understanding where to begin my first stitch.
I’m going to add a few more photos in the next couple of days, but in the meantime I added more written explanation in that section of the pattern. Check it out and see if it helps clarify things a bit. 🙂
I saw these and immediately wanted to make them but I had one small problem. I’d never crocheted before! I went to the store and bought all of the supplies and after practicing sc over and over in a rectangle I decided to give these a shot. I did well (although getting through the flip flop soles initially proved to be quite the challenge) up until I got to the toe area. I watched several videos on how to half double crochet but for some reason I just couldn’t quite understand what to do when connecting the first stitch to the side of the toe area. No matter, I made something up (after watching several other videos) and my first shoe came together! Fits pretty well, although it does not look as slim as yours, definitely a bit bulkier in the sides, and the toe area is pretty different but not unattractive. If you could get a video of your technique up, it would really help me as well as other beginners I’m sure. If you are shy, most videos I’ve seen don’t even show faces, just hands set up in front of a camera. Really all I need on video is the toe section. The rest was pretty easy, even for a beginner! Everyone should give this a try!
Holy moly, Shelley! This was your first project!?! I am totally blown away! Good for you for tackling it! I’m seriously so impressed. Even for us more experienced crocheters, the first couple rows around the flip flop is a little awkward so you’re not alone there. I really hope to make a video soon. I think it could help a lot of people.
Congrats on mastering a new skill! What are you going to try making next!?
Yes, so you’ll work row 9 all around the slipper, returning to the point where you originally tied your yarn on. Then you’ll pause, add the stitch markers, and then continue crocheting in the same direction without turning your work to complete the rest of row 9 (to the stitch marker).
Then you’ll turn and head back toward the heel and eventually the stitch marker on the other side.
Yes, BJ, I’ll add a few extra photos as soon as I can 🙂 In the meantime, I’ve added a bit more written description in that section of the pattern that might help you get going.
Hi! Oh I LOVE these little slippers! I was so excited when I first saw this pattern and couldn’t wait to start making my first pair! They are just the cutest….they look so summery! Thank you soooo very much for sharing your wonderful pattern! I’m presently in the process of crocheting my first one and so far things are coming out good. I’m now beginning to start the toe area and I have a question…. I’m so sorry I’m so dense with this but I’m having a little trouble understanding the beginning of Row 1 instructions. Could you please clarify/explain this area (below) a little more if possible?
Where the instructions say “Row 1: With the toe facing toward you, attach the yarn at the right marker. sk 1 sc from the marked stitch and begin in next sc, ch 2, sl st into sc where marker is,….” (I understand from this point on).
I understand I’m to attach the yarn in the same stitch that has the right marker in it. Then I’m to skip 1 sc (moving left towards center of toe area), then chain into the next sc (?), chain 2…..and it’s at this point where I’m confused. Instruction says to slip stitch into the sc where marker is. So it appears I will be moving to the right again?
I thank you so much for any help you can me give with this! I can’t wait to finish my first pair!
This part of the pattern was really tricky for me to explain, so thanks for asking a great clarifying question. I’m sure others are wondering the same thing. I’ve updated the pattern with a bit more detail above. Here’s what it says:
Row 1: With the toe facing toward you, attach the yarn at the right marker. sk 1 sc from the marked stitch and sl st into next sc (left of the marker), ch 2, sl st back into sc where right marker is, 2 hdc in same sc you began in (cluster made), sk 2 sc, 3 hdc in next sc, sk 2 sc, 3 hdc, sk 2 sc, sl st into marked sc, sl st in next sc (up the left edge of the slipper), turn.
So in plain English: Essentially, you’re attaching the yarn in the same stitch the marker is in. Then skipping a stitch (toward the left), slip stitching into that stitch and then chaining 2. You’ll attach those chained stitches with a slip stitch back into the same right side marked stitch you began in. So yes, you work to the right again temporarily to attach the cluster and then head toward the left like you’d normally crochet a row.
I hope that makes a little more sense? Looking at the photo right below this section of the pattern (that shoes the toe and the stitch markers might be helpful too.)
Wow – thank you for writing back so quickly! I understand your instructions perfectly….you couldn’t have explained any better! I so appreciate all the time you took in explaining this step in further detail….thanks so much Jess! Annie
Could you please clarify row 1 of the toe? I read it as: to attach at the marker, then skip, then go back to the marker, without working anything into the stircg you skipped to? Is it actually attach to the right OF the marker?
It could be easy, but it’s confusing the heck out of me.
This part of the pattern was really tricky for me to explain, so thanks for asking a great clarifying question. I’m sure others are wondering the same thing. I’ve updated the pattern with a bit more detail above. Here’s what it says:
Row 1: With the toe facing toward you, attach the yarn at the right marker. sk 1 sc from the marked stitch and sl st into next sc (left of the marker), ch 2, sl st back into sc where right marker is, 2 hdc in same sc you began in (cluster made), sk 2 sc, 3 hdc in next sc, sk 2 sc, 3 hdc, sk 2 sc, sl st into marked sc, sl st in next sc (up the left edge of the slipper), turn.
So in plain English: Essentially, you’re attaching the yarn in the same stitch the marker is in. Then skipping a stitch (toward the left), slip stitching into that stitch and then chaining 2. You’ll attach those chained stitches with a slip stitch back into the same right side marked stitch you began in.
I hope that makes a little more sense? Looking at the photo right below this section of the pattern (that shoes the toe and the stitch markers might be helpful too.)
I am currently working one a pair for a friend after making a first practice pair for myself. I love them! Thank you so much for sharing the pattern and all of the helpful information! 😀
This is such a wonderful idea and I followed your pattern to a T I am an expert crocheter and often make my own patterns myself. This pattern poorly written making it pretty hard to follow but I continued anyways to see what would happen. It did not at all turn out like the ones pictured. I suggest having someone you know that can crochet well try out the pattern and see if it happens to them too. Then you could revise it so it doesn’t happen to others.
I’m sorry to hear you struggled with it. I have had many readers send me photos of their finished slippers so I know that the pattern is working for some. I do understand though that there is a lot of variability in the size of flip flops used, the number of holes poked, the tightness of someone’s stitches, all of which will influence the final outcome of the pattern. I really enjoy crocheting and am constantly working on my pattern writing skills. If you’d like to email me with the sections you found confusing, I’d be happy to take a look at clarifying the pattern. MakeAndDoCrew (at) gmail (dot) com
Hi Jess, Thank you so much for sharing your pattern with everyone. It was an awesome thing to do. It was the answer to a prayer for me, as I needed something like this for vacation, but can not wear thong shoes or any sandal that goes between the toes. I am attempting this pattern because I do like the idea you had, however, as I crochet, my shoes are not pulling in like yours. They seem to be more boatlike as I do the rows. Am I doing something wrong or is this going to correct itself, or do i need to start skipping some stitches? My shoe size is obviously larger than yours, so I am wondering how to adjust the crochet to make the shoe fit closer.
So happy you came across my pattern before you go on vacation. I have made a couple pairs of these now, and from what I can tell, it sounds like your holes might be a little closer together than mine, which is creating more stitches total, which is keeping the crocheting from tightening up like in my photos. I think your idea to do a simple decrease (sc-dec) in a few places around the toe and heel would correct this. Here’s a good photo tutorial about how to do a sc-decrease in case you need any help. Hope that makes sense!
OMG!!! Thank you so much!!! It is so nice of you to respond to all of these inquiries, each of them different. What you said is exactly correct, my stitches do look like more, so I am on my way to decreasing.I will let you know how this turned out.Thanks again!!
Thanks so much, Grace! Feel free to subscribe in the box above this comment area and I’ll send you my once weekly digest of the patterns I posted from that week.
I’ve completed the shoe and starting the top. I have the 2 markers in place. I’m having trouble with Row 1. You say:
With the toe facing toward you, (1) attach the yarn at the right marker. (2) sk 1 sc from the marked stitch and begin in next sc, (3) ch 2, sl st into sc where marker is, 2 hdc in same sc you begin in (cluster made), sk 2 sc, 3 hdc in next sc, sk 2 sc, 3 hdc, sk 2 sc, sl st into marked sc, sl st in next sc (up the left edge of the slipper), turn.
OKay, I attach yarn to the same stitch the marker is in (1). Then, (2) I’m skipping one stitch and beginning in the next stitch (you mean the 2nd stitch from the marker). Then chain 2 (3) and slip stitch into where the marker is. **This is where I”m having trouble. I thought I was supposed to start on the 2nd stitch from the marker?
Thanks for this pattern, I am very excited to try. One idea to make them sturdier if you are worried about ripping through the sole. You could put the holes straight through the sole instead of on an angle, then for the first row use that plastic thread (like that lanyard material) then after the first row switch to the cotton. (I might try it both ways to see which is better)
A clarifying question. which way do you crochet around the sole, or which side faces out? Are you going clockwise – so the right side is facing out, or counter clockwise – so the right side ends up on the inside of the slipper. Thanks very much.
To make these “outdoor” slippers I would use 2 of the thinner Dollar Tree flip flops. Remove thong from both pair. Crochet your slippers using one pair, then glue the extra soles onto the bottom of your slippers. I don’t know if hot glue will hold up for this. I would use something like Liquid Nails or Contact Cement. If you made a pair like this you could also make your holes from top to bottom instead of at an angle. The crochet thread would be less likely to rip the rubber. It would also protect the thread from wear when you glue the other sole to the bottom. Just a thought…
I’m putting together a video and hope to have it up soon. In the meantime, I hope that the photos above can help you figure out where the stitch markers belong. If you mimic the photos closely as far as placement, you should be in good shape.
Thanks for the clarification on row 1. It did help and still look forward to more pictures (and even a video someday).
FYI: This seemed to work pretty good for me. To make my holes I used a large needle and ‘sewed’ around the shoe; then crocheted into those stitches. It was very easy to ‘sew’ sideways into the foam. (just a little variation). Thanks again for this great pattern.
Hello! I made the mistake of poking too many holes (90 for a size 10 flip flop) and enduring is far too loose. I realize I’ll have to start the stitching over again, but would you recommend I just skip over holes in the sandle or do the forest row using all holes and decreasing my stiches in subsequent rows? How that was a clearly worded question.
I think either could work, Lindsey. If you can evenly skip holes, I’d just do that, but if not, I think doing some sc-dec around the toe and heel might work too. The good thing is that I think you’ll be able to tell pretty quickly if whatever you try is working because you can just try it on your foot 🙂
For those of you who are not able to crochet, I have the go ahead to plug my Etsy shop on this wonderful pattern made by Make And Do Crew. Thank you Jess! I put a picture of my second pair on Pinterest and got to meet this wonderful lady in virtual world. We have many color options in stock. Go to our shop LovingLea Created at https://www.etsy.com/shop/LovingLeaCreated and check the Lightweight slippers with the Flip Flop sole out! You can also request a custom order if we do not have a color that interests you in stock.
Is there a video link or YouTube video showing at the very least the highlights and some tutorial? I’m self taught and can’t really read patterns well, and rely on YouTube videos as I crochet. It would be greatly appreciated.
I just made my first pair and was wanting to make one for my 5 year old granddaughter and was wondering if I still do theb9 rows or would I use less for her?
So I used heavy thread and poked too many holes so I had to decrease the first 2 rows… I love them. I used a braided cord of the same yarn to make them fit better. They are so cute and comfy!!
Next time I will use the correct materials. Thank you for sharing this pattern!!
You’re right. All comments get moderated. The response to this pattern has been huge and I’ve been going through them as quickly as I can get to them while still caring for my family. Thanks for your patience.
I made a pair with the holes 1/4″ apart like you suggested and they had no ‘curl’ to them so I did a few decrease rows and that worked, sort of. Do you think that holes 1/2″ apart are too far? I love the idea and have had many people as me to meek these for them. Thanks for the pattern!
So I haven’t seen this addressed and noticed it wasn’t fixed in the photos: what do you do about the holes the plastic thongs you cut out left behind? Did you plug them with something? I know some people who reuse that bottom round part by cutting it down and glue it in place then cover it on the inside with moleskin. I was just curious if there was a different way. I wouldn’t want to be walking around and catch one of those holes on the bottom on something and have it tear after all that hard work.
Yes, you could definitely glue the plugs back into the bottom. Since these are meant to be house slippers and not worn outside, I just left the holes open. (More ventilation for summer time ;))
Hi Jess, fabulous crochet pattern. I’m crocheting the same size 9 as you (Australian though) so might be slightly different. I’ve shaped the heel and are ready to commence the toe, however the height isn’t enough based upon your pattern. My question is could I just continue some more rounds to get the correct height, even though I’ve already shaped the heel? Kind regards, Danielle
Hello from the USA, Danielle! Yes, I think you could. It would just mean that your top section would come a little higher up on your foot (toward your ankle). It would be pretty minor though.
I have crocheted for years, and found this extremely frustrating. I made one slipper, and it was huge. I ripped it out, used a smaller needle and again it was too big. (My holes are 1/4″ apart like you said.) The third time I decreased one or more times in almost every row. Too big. This time, I’m again decreasing and eliminated 2 rows completely. If it doesn’t fit now, I’m throwing the whole project away. I think you need help writing patterns.
Or, you could try the other things mentioned in the pattern. Namely, getting flip flops a size down from your usual size and trying the holes 1/3″ apart (pattern does say 1/4″ to 1/3″).
My first try with a regular size flip flop and holes 1/4″ was waaaaay too big and no “curl”. I sized down and made the holes 5/16″ apart, and they’re turning out fabuloso.
I have just started mine and I just have a quick question…when doing the first row, you say to insert the needle from top to bottom. Is this crocheted with the wrong side out…? I just want to be sure I am starting right since its crocheted in the round. So as I placed my first row, I went around the sole in a counterclockwise direction. I hope this makes sense.
Why won’t anyone answer my question? I made one pair of these and now I want to make a pair for my granddaughter but she is five years old. Would 9 rows not be too big for her? Any suggestions? Thank you for the great pattern! I love it!
Thanks for your patience. The response to this pattern has been pretty awesome and I haven’t been able to respond to everyone’s questions and comments as quickly as I’d like. I just posted a pattern for toddler-sized boat shoe slipper in which the heel is crocheted in the same way as this pattern. You might like to check out the dimensions of that to get an idea of what would work for a kid. Also, you could always have her mother or father measure that part of her foot to get an idea of how high you need to make it.
Hi, Working on crocheting a pair now. I have a question about round 9 should I do the enitire row sc then put the markers in or put the markers in before row 9. I keep getting one side higher and not sure what my issue is. These are super cute!
Put the markers in once you’ve worked the first part of row 9. So follow exactly the steps of the pattern by (row 9) sc to the heel point you began the slipper at. Then place the markers. Then (row 9 cont.) keep sc in the same direction you were already going until you reach the first marker and follow the directions for the end of row 9.
Thank you so much for sharing this pattern. I am trying to make these, but am having difficulty with the top (toe) part as a lot of others have. But I think my BIGGEST issue is this part:
“Find the approximate midpoint of the front of the slipper. Place stitch markers 10 stitches apart at the toe.”
Do I need to count 10 SC from the center on the R and L or do I count just 10 SC altogether like, 5 on the R and 5 on the L.
I am having some issues with the first row for the slipper top where it says “sl st back into sc where right marker is”. So I’m essentially working to the right and not to the left? I’m having a hard time getting my yarn to want to do this without becoming a mess. Please help! Thank you.
Yes, you’re working back to the right for just one stitch to anchor the right side of your cluster to the edge of the slipper side. Does that make sense? Once it’s anchored, you work to the left just like normal crochet.
Yes that does help. And then you do the 2 hdc where you did the first sl st correct? I might be getting more confused than I need to because when I do this, I don’t have 2 stitches to skip before doing a sl st in the marker on the left side.
This is where I am having difficulty, as well. I just can’t figure out how the instructions are supposed to fit in a 10 stitch area. For each “sk 2 sc”, if I skip one and sc into the 2nd stitch each time, I still end up with 11 spots, sl st into stitch 12 to the left before turning. If I skip the 2 and sc into a third stitch, I end up with the last sl st 15 stitches to the left. I am not used to following patterns, though, so I may be reading something wrong?
So, the sk 2 sc should be skipping two single crochets. So you’ll be putting the next stitch that’s called for (a hdc, I assume) in the third stitch over. (There will be two empty stitches in between.) Does that make sense? Good for you for giving pattern reading a shot! 🙂
Jess
Val Lee
June 8, 2016 at 12:39 am
Thank you so much for sharing this gorgeous pattern. I’m a learner crocheter and have two daughters egging me on to to give these a bash as they love them..so today this is my mission.. thanks again. 🙂
I’m having a hard time with Row 9. I had started the heel portion of the pattern only to see that one side of the heel is higher than the other. I pulled out all the way to just before Row 9.
Per the pattern, I began Row 1 on the heel. I am just about ready to start Row 9 and I’m at the heel where I originally joined my yarn. Do I start Row 9, place the first stitch marker once I pass where it is supposed to go and continue all the way around to where I joined the yarn (placing 2nd stitch marker where necessary) and then continue around to the 1st marker? If that’s the case, one side will be higher by an additional row. I’m making these slippers for my sister-in-law and I am hoping you can clarify.
When you get to the back of the heel (row 9), you’ll place your stitch markers and then continue on in the same direction to the first stitch marker (so just a few inches down the side of the slipper). This is called “row 9 cont.” in the pattern. Once you finish row 9, you’ll turn your work and head back around the heel in the other direction. Doing it this way should result in both sides being the same height.
I have a different problem, I have small feet and wear like a size 5 shoe. Any ideas on how to make these smaller? Any help would be greatly appreciated.
Check out the “notes” section above for a few ideas! I think doing the pattern as is but maybe skipping the final row in the “top” section would work fine.
Check out this link. It is for a child. But I found that you don’t really need a pattern for each different size. As long as you keep the holes no more than 1/4″ apart, the rest will just flow through. June adjust the 2/3 length where you put the loops and also adjust the length of the tongue by increasing the chain length. . For the men’s, I also made the tongue wider. You can either add more increases or add more rows where there is no increases. https://makeanddocrew.com/crochet-toddler-boat-shoe-slippers-flip-flop-soles/
I hope I explained clearly and not confused anyone more!
Finished my first flip flop slipper. I’m making a pair for my daughter who is 6’2″ so has long feet of size 12. It took a couple of times of creating and taking apart but, I think I got it. Thanks. Liz
HI…I have went through all the comments to get help with row 9, but your answers are somewhat different for all three. Can you please explain it clearly for me? Thank you so much
In row 9, your single crocheting until you get to the back of the heel where you started. At that point, you pause, put stitch markers in the appropriate places and then continue sc in the same direction you were working (called row 9 cont in the pattern) until you get to the stitch marker, where you complete the end of row 9 cont. At that point, you turn the slipper and head back in the other direction (row 10) toward the heel and eventually the other stitch marker.
I’m confused as to why my SC looks so much different then yours on these shoes. I’ve been crocheting for 30 years, so I know what a sc should look like and mine is not as loose as yours.
Less holes around the sole and crochet *tightly*. That’s what gave mine that sort of see-through holey look like the pattern photos.
My first try I placed the holes 1/4″ apart and just used [my] regular tension, and it was coming out a clunky mess. Second try I went 5/16″ apart and really tightened up my tension. (Except for that first row of sc’s into the actual flip flop. I left that loose-ish.)
I love this pattern. I started making a yellow pair with white sole and found that there was too much sole left at the back of the heel, I guess that is why you said to buy a size smaller. I got the first one made and noticed this and the pattern worked out exactly how you said it would. I just need to buy smaller flip flops. But the possibilities. I have scads of cotton peaches and cream in all different colours. I can make summer shoes to go with every outfit I wear, how cool is that. I do use a flip flop that has a harder sole, so it should last longer, but if it only lasts for one season…..just make another pair. I bought two pairs of similar shoes in Florida in January and just love them, was planning on buying more, I paid $50 a pair, now I can just make my own……love love love these. Thanks so much Jess for posting this pattern
What a wonderful story, Angie! I was thinking the same thing when I started to notice mine getting a little dirty. At first I was bummed, and then I just thought–it’s just another crochet opportunity to make a new project! 🙂
How awesome that you can make your own shoes now for a couple bucks using supplies you already own. That is the best!
I haven’t yet, but I have some men’s flip flops in my craft room that are just waiting to be transformed! If you’d like to subscribe in the box on the sidebar or above this comment area, I’ll send an email once I’ve published the free pattern for them.
I have another question about the toe part. I understand the instructions but the issue is the stitches. So if I am placing the markers 10 stitches apart, and the fist cluster is the…….
“attach the yarn at the right marker, sk 1 sc from the marked stitch and sl st into next sc (left of the marker) , ch 2, sl st back into sc where right marker is, 2 hdc in same sc you began in (cluster made)”
Then the next 2 clusters are made by skipping 2 sc and making 3 hdc in the 3rd stitch, is that correct? If so you can’t skip 2 more sc at the end to sl st into the left marker, that will go past the left marker?
The first actual stitch (in the form of the ch 2) is going in one st to the left of the marker, which I don’t think was very clear how I had it written. Thanks for pointing that out. I’ve revised it up above, but here is it sort of “drawn” out as best I can with my keyboard. I hope this helps 🙂
Thank you so much for the feedback, Robin! I am so happy to hear that! I always aim to be as clear as possible, but I really appreciate readers like you who point out where I can improve a pattern.
Please I want patterns of these flip flops? I havr osteoarthritis in the feet and think this will do wobders to my feet. I can’t crochet but am willing to learn.
The pattern is above this comment area within the body of the post. If you’d like a printable version, you can buy it for $2.50 here.
There are a few people making these on a commission basis and selling them as well if you don’t care to learn to make them yourself. (Although you might really enjoy it! 🙂
Much discussion and so many love these slippers. That’s enough to make a lot of us sit up and try this pattern. This is probably the #BestIdeaEver! Thank you for designing these.
I am having some trouble understanding the pattern. I have tried making one pair and they do not look like your photos. I must be doing something wrong. Are you going to make an instructional video? That would help me out on making these wonderful slippers.
Yes! I’m hoping to have the video up very soon. I know some people have found that when their holes are a little too close together, the slippers don’t curve inward like in the photos. If this is what you’re running into, you might try doing some decreases early on in your rows so that you have fewer total stitches.
If you’d like to subscribe in the box above, I’ll send an email when the video is finished. Otherwise, just keep checking back 🙂
It might be worth checking your spam and junk folders as it def should arrive in less than 10 mins. I responded to your email though, so please let me know if you didn’t get what you need. Thanks for your patience!
Hi, I have made a pair of these slippers, love them. I did make a few changes as I wanted to use a different type of yarn and a varigated yarn. Ok, couldn’t figure out how to post a picture of them on this site. Tried to go to [email protected], keeps bringing me back to this site, so don’t know how to get you a picture of the slippers. I did post them on Facebook!! Thanks so very much, love this idea. Plan on making a pair for my Great niece and nephew for a trip we are taking. Thought they would be great for them to wear in the rental van. That way their shoes (never know if it is rainy, muddy, etc) will be placed on a rug we will be taking for that purpose.
I’m so glad your slippers turned out! I’d love to see a picture! Feel free to email me at Jess (at) make and do crew (dot) com (no spaces and using the @ and . signs).
Your great niece and nephew are so lucky to have you making things for them.
They are to make the back heel part a bit taller so that it doesn’t slide off the back of your foot. So for the row called “9 cont” and on, you will just be working in the back half of the slipper. Then you’ll fasten off and move on to the toe part.
I am in the process of making these slippers. 20+ years ago I made some house slippers only at the time I went from top to bottom and of course the yarn frayed with wearing so they didn’t last long. I then make some use the side to top hole method and they lasted for quite a while. I only had acrylic yarn to work with and not crochet at that time so I think using cotton now will greatly improve the slippers. I purchased some from Dollar Trees because they had some beautiful printed patterns that I thought would help enhance the slipper when finished. Big mistake. On the right flip flop I had 3 holes pull right through the rubber and on the left 2 holes pulled through. Because I remember from years ago that I needed to be very careful on spacing the holes, not to be too close to the edge of the flip flop and not to pull the yarn too tight when attaching the foundation row—I was very careful yet I ended up with some soles in each slipper. Since these are for me and are the first I am making, it will be fine but I will not be using Dollar Trees flip flops again and it such a shame because they had such a wonderful array of colors to choose from plus I purchased several pair. But they were only $1 so I am ok to give away or not to use them.
I would like to add a note about the printing issue which seems to be a question posed quite often in the comments and I see on Facebook. I think it is great to offer a pdf and at a reasonable cost. Afterall, you are giving this pattern away free. If anyone has researched as I have done to make slippers using flip flops both online plus watching many YouTube videos,, at the local craft stores, in my crochet 4 crochet circles I go to weekly, and on Facebook crochet group sites one would greatly appreciate your efforts. But I am a bit computer savvy and I usually do a cut and paste into MicroSoft Word creating a document cutting out all the junk/advertising and that way I can resize photos to my size and make some print larger for my eyesight. My computer guru saw me doing this and went out online and added a “pdf” print driver for my HP printer. It is actually called “pdf995” and I have to hit the print popup option so I can choose this, or one of my 2 printers, or my Dymo labelmaker. By using this pdf995 print option it will take out all the junk/advertising. and cut down my “cut and paste” work giving me more time to crochet. You do still get some stuff that you may not want but instead of being lots of pages this reduces the document down to a reasonable size. When considering how much ink you use to print this can be very economical. I remember an online pattern if printed would have been 36 pages but using the pdf print program it was 4 pages. Again, that saves on printing, wear and tear of the printer, ink and paper costs.
I do not know if you are using Ravelry but if you aren’t you might want to use it. Any member can add photos and comments on projects which I find very very helpful. This also gives me ideas of what colors of yarn or what kind of yarn to use on a project.
Thank you kindly for sharing your pattern with the world.
After getting the slipper made, I am quite confused how you worked the “toe” portion. Mine looks nothing even close to yours, and the directions are quite confusing. When I attempt the first few stitches of the first row of the toe, it almost gets all knotted and unworkable. Do you have a picture tutorial or video tutorial of this portion?
I’m sorry to hear you’re having trouble. Perhaps it would be helpful to check out the photos above that reference the toe section. I’ve also replied to many comments with further clarification on that section that might help answer your specific question. You might like to check those out in the comments section. Otherwise, if you’d like to let me know exactly where you’re having trouble, I’d be happy to try to help. 🙂
I did compare mine to the pictures, and as I stated, mine look nothing like yours. I did attempt to look in the comments, but as there are so MANY of them, I gave up trying to find any that helped figure it out. At this point, I will try something different and come up with my own finish. If I can do that, I will share that with you, so that others who are having trouble with the toe portion have another choice for the finish.
This is the second pair I’ve made love doing them. Your are right the flip flop from Walmart are better to do these on. The second pair I made on from Family Dollar.
I replied to your other comment (and sent you the pattern directly), but I’m noticing the email addresses you used for your comments are slightly different. If you don’t receive the pattern from me, please just send me an email and I’ll make sure you get the pattern! My email address is jess (at) makeanddocrew (dot) com.
That’s no good, Karen! Did you happen to check your spam or junk folder? Sometimes it ends up there. It would be from a company called “Gumroad” which is who delivers the patterns for me. Either way, I’m going to email it to you directly to the email address you used for this comment. Thanks for your patience!
I love your shoe pattern! My holes were pretty messy, so I thought I’d try a different join to the shoe. Here’s what I came up with–when I posted it to my crochet FB group they were so curious that I made a quick video showing how.
This is awesome! I love the look of that clean line on the sole and your video is so helpful for anyone wanting to try it that way. Thanks so much for sharing!
No video yet? I’m having the hardest time with the toe.
Susan
July 19, 2016 at 8:03 pm
I’m having trouble with the toe, I got the spacing of markers 10 stitches apart what I’m having trouble with is no matter which side I’m attaching yarn to the marker stitch the instructions says to sk 1 sc from marker stitch and begin in next sc ch 2 in the notes it’s states to the left, that is where my confusion is I’m thinking it’s to the right then back to marker stitch. I don’t know just having trouble with toe.
Sorry for the delay. Regardless of which foot you’re working on, attach the yarn on the right side of the toe (with the slipper facing you–see the photo) and then skip one stitch to the left to do the first stitch of the row. Then you’ll go back to the right for the next stitch, just to secure it into the marked stitch, from there, you’ll work the rest of the row heading left, just like you would a norma crochet row (assuming you’re right handed.)
Hope that helps. Studying the photos of the toe section might help, although you might have already done that 🙂
Hello, I am currently making these. Where did you start attaching your yarn for your first stitch? I started in the middle back of the heel. And as I’m reading ahead to row 9. I would have already done half of the heel lip before needing to turn and go back to other stitch marker and it would be uneven in rows on each half of one shoe. Is there a way around this..or would it be ok as is?
I attached in the back just like you’re talking about. You’re right that there’s an additional half row (row 9 cont), but it’s compensated for on the very last row when you work from the other side and stop at the mid-back where you started. Hope that helps!
Ugh I have tried and tried and tried to do the top of the toe and I am completely lost! I am sure it has something to do with the fact this is my first crochet project. But I have tried and tried and tried. I have read comment, and looked at the pictures. Anyone that can help I would greatly appreciate it!!
Hello! I’m a little confused- you know how it says “Row 2-9” at that part? And then it says, “Row 9 cont.” Well, I was wondering, for row 9 do you crochet all the way around and then stop at the markers on your next round, or do you stop at the markers on the first part of row 9? Sorry if this sounds confusing, please explain!
I totally understand why this part is a little tricky to figure out. If the heel closest to you, you’ll work row 9 from the right side to toward the back of the heel. Then when you reach the heel, you’ll continue in the same direction past the back of the heel to the stitch marker on the other side (left) where you’ll work that last section called “Row 9 cont”. Does that make sense? Feel free to ask more questions if not!
My daughter’s recommendation: fill in holes on bottom of sole with flex shot. It should keep any stuff from getting in the slipper through the bottom… Starting the project now, I will update with any info about whether her recommendation will last or even work.. (she’s 11)
That’s a really interesting idea! I had to look up Flex Shot to see what it was. It seems like your daughter might be onto something! Please do let us know how it turns out if you try it. I know a lot of other people are interested in plugging the holes in their flip flops too.
Unfortunately, I don’t currently have a knit version. My mom has ambitously tried to tackle it a few times and we can’t figure out how to make the needles cooperate with the rubber sole 🙁 I do have an Modern Crochet 101 course you can take for 99 cents with this link if you’d like to learn! http://skl.sh/2aaucCf
I’m actually working on a video for a similar pair of shoes/slippers with flip flop soles that I hope to share in the next week or two. It might be a great way for you to make a pair. 🙂
If you’d like to be notified when I post it, just subscribe in the box to the right toward the top of the page or below the post and I’ll send out a note with a link to the video.
They are REALLY comfy! 🙂 Super lightweight and soft. A few of my readers that are Etsy sellers will take commissions for these slippers if you’d like a pair. Just scroll through the comments and you’ll see where they’ve offered their services to others. 🙂
I regret purchasing this pattern. I am not new to crochet and the top of the toes look NOTHING like the pictures. Is there EVER going to be a video. Don’t spend the money on the printed pattern. It is NO better than the free version.
I’m sorry to hear you’re having trouble. My intention was never to imply that the pdf was “better” in any way. It’s just a way for people to have an ad-free, easily printable version if they’d like it. It’s the same content as the website. I’d be happy to refund your $2.50 if you’d like to tell me what email address you used to purchase it. (You can email me at Jess (at) makeanddocrew (dot) come if you don’t want to post your email address here.)
This would be a great use of my flip flops that have stretched out but the soles are still great. I am pretty fussy about how slippery some are so I tend to feel the bottom always before I buy! I have done the split too many times with the slippery ones when I was younger and now that I am at the “break my hip age” I am careful that they have good soles.
Lol, Janet, “break my hip age” cracked me up. These are some of the most comfortable slippers I’ve found. They are soft and SO lightweight. Of all the flip flops I’ve tried to convert into slippers, the 98 cent ones at Walmart seem to be some of the best, so even if you decide to splurge on a new pair to make slippers, it won’t cost you a lot. 🙂
These slippers are so cute! Do you know anyone that has a similar pattern for knitting? I would love to make these (and those adorable toddler boat shoes) but I have a lot of trouble with crochet.
My mom has been experimenting with a knitted version, but so far, we’re having a lot of trouble getting those darn needles to bend enough to fit the shape of the flip flop. 🙂 Even with double pointed needles, it’s proven tricky. My mom is pretty persistant though, so she might just figure it out. If so, I will def post a pattern. In the mean time, if you’re interested in practicing crochet, I have a Modern Crochet 101 class you can take for 99 cents with this link: http://skl.sh/2aaucCf As knitter, you might find crochet easier than you think because so much of the struggle is just knowing how to hold the yarn (which you practice a lot with knitting).
I don’t make them to sell myself, but a few of my readers who are Etsy sellers do. If you scroll through the comments, you’ll see a couple of crocheters offering their services. Hope that helps! 🙂
I’m sorry you’re having trouble. It is sent from a company called “Gumroad” and can sometimes take 5-10 mins to arrive. If you search your email and don’t see it, please send me an email and I’ll send it off to you directly 🙂
I read the notes when I was in the yarn store. I had already bought the flip-flops in my usual size. They are humongous and look nothing like yours but are cute anyway. Thanks for sharing the pattern! BTW: I have two more pair but I made my hub go back and exchange the flip-flops for the smaller size. Hope they get done before a cruise next week!!
Oh fun–a cruise! Yeah, for my first pair I ended up just cutting the back of the flip flops off to shorten them. They just fit differently as slippers than they do with the strap between your toes. Have a wonderful trip!!
Hi Jess, Thank you so much for the pattern, the flip flops have been really fun to make, the only part i am having trouble with is the slipper top, Im not really understanding Row 1 and of course haven’t gotten any further yet, do you have a video showing how to do it please? Thank you
I’m hoping to make a video soon, Christina! Taking a close look at some of the photos of the top or reading the “in plain English” section might help, but I’m also happy to walk you through it if you have specific questions as you go.
The videos are extremely time intensive and I haven’t gotten to recreating these slippers to film a video yet. I’m sorry! I did just finish a new flip flop shoe pattern though that includes a thorough video tutorial if you’d like to have a look. 🙂
I just found this on Facebook – it’s brilliant! One thing that REALLY caught my eye, however (oddly enough) was your social sharing widget. Do you mind sharing what plugin you use? My blog is currently a bit of a cluster when it comes to social sharing, and I’m really struggling. When I pinned your generous crochet tutorial, I noticed that your social share lets you choose a custom Pinterest image and description – exactly what I need. I’d be most appreciative if you’d share which one you are using so I may emulate it. Thank you so much for sharing your crochet experience, as well as your beautiful blog! I look forward to connecting.
Haha–I had asked another blogger this same thing when I saw it on her site. It’s called Social Warfare and I like it a log. It’s about $25/year, but I think it’s well worth it for that Pinterest functionality alone. Here’s my aff link if you’d like to use it: https://warfareplugins.com/?ref=338
I look forward to connecting too! Congrats on your new book!
I’m so sorry you’ve been waiting. I’m quite behind on comments as my daughter just started school. You can always email me for a quicker response. The pattern should have come from “Gumroad.” In case you don’t find it when you search your email though, I’ll email it to you directly.
I don’t crochet but my daughter does. I love this idea and can’t wait to show her. I found your site when someone shared this on Facebook. Can’t wait to explore more on your site.
Hey Stacy–welcome! I hope you can convince your daughter to make you a pair. They’re super comfy! If you ever want to learn yourself, you can take my Modern Crochet 101 course for 99 cents with my instructor referral link: http://skl.sh/2aaucCf
I’m poking holes in my flipflops right now :)) and it’s kinda fun ,although I really wasn’t looking forward to this step:)) I can’t wait to finish making them so I can wear them right away. Thanks so much for the tutorial/pattern.
I have been trying to find a good crochet slipper pattern and I was really excited to make these… buuuuuut they don’t stay on, one step and they flop of the back of my foot. totally bummeb 🙁 🙁
Hmm. Great question! Mine have stretched a little bit in the last 6 months of wear, but not to a degree that has had a big impact. I think you could def use some elastic yarn, or just use a smaller size hook when working the last round of the pattern. You could also work a few single crochet decreases around the heel to tighten it up on the last row of the pattern if you feel like they’re a little too loose on your feet.
Also, I think most of my minor stretching is just due to using cotton yarn. If you used wool or acrylic, I’m guessing there’d be even less stretching.
I don’t have a video tutorial yet, but I’ll be filming one in the next few months. If you’d like to subscribe to my email newsletter, I’ll definitely send a note when the video tutorial is published!
I think I found a solution to the flip flop problem. I am making hi-top slipper sneakers and I purchased a pair of rawhide soles w/the stitch holds already punched.. I sewed them between the crochet sole and the bottom of the flip flops. Seem to work ok so far.
You can just leave them open if you plan to wear your shoes around the house as slippers or you can glue the plugs from the straps back in if you want to wear the shoes outside. 🙂
I have a simple question, you wouldn’t by any chance, have this pattern in French, not the video but the pattern, otherwise I will have to translate it for my non speaking English friend, like I did for your Boots with flipflop pattern.
I’m so sorry, I don’t right now. If you do translate it and would like to share your translation, I’d be thrilled to post it as a PDF on the blog for other French-speakers to benefit from. 🙂
I have translated the gray boots, I can send it but I need an email so I can do so. I am going to translate the turquoise sandal flip flop too and I will send it too if you want.
Jess, these are awesome ! I tried out my old flipflops first in case I couldn’t do it. Your tutorial was so easy to follow that I could make changes to modify what I liked while following along. I didn’t expect that my first pair would look so great and be so fun. I don’t know how to show you my pics except on Ravelry, my Rav ID is TammyBlondon I hope you check out my pics. I was able to change the top of the foot and I love it. thanks for saying how the flipflops size up, it makes a big difference. I want to make these for my grandkids and adult boat shoes for myself as well as the heavy slippers. I go outside in my slippers a lot in the summer so these are perfect. I can see lots of these for gifts in my future 😉
Tammy! I love your flip flop slippers! Gosh, they turned out fantastic for your first pair! And I was blown away by the prolific amount of beautiful knitting and crochet you’ve shared on Ravelry. Holy cow! Seriously. What an inspiration!
Please please please please make a video of this, I know you have a lot of other projects to do, but I want to crochet these and I’m an absolute beginner and I don’t understand the lingo very well. Trying to read the instructions makes me overwhelmed and frustrated but I enjoy your other tutorial videos. Please make one for these! I want to make slippers for people. I even had an idea to make some and donate them. I don’t know, because the more I think about it the more I think people would benefit more from crocheted boots, but I want to make sure they are male-friendly too so men who need warm shoes can enjoy them thoroughly. Do you have any gender neutral or male design boots with a video I could try? I’m disabled and have some free time and I thought maybe I could take up a hobby I could donate to those who need at the end of each year. Anyway those are my ideas, thank you for all you do!
Finished my second pair of these today (first one was for a child) – these are mine – I don’t see a place to post a photo, so I’ll add the link to my Facebook page where I posted them.
Do you think these would work with a felt sole? Do you think they would curl up with a felt sole and cotton yarn? I want to make a summer slipper with cotton yarn but do not want a flip flop sole. I do not want a cotton yarn sole either because I find that they do not last long enough. I have wood floors and they get chilly even in the summer.These slippers are so cute! I was thinking of cutting out a felt sole and using a blanket stitch around to crochet the slipper onto.
I’d say it’s 1.5-1.75″. Basically you want it just slightly below where a shoe would hit the back of your heel. Then you work the last few rows to build a little “lip” to keep your heel from slipping out.
They tend to each differ a bit because the hole spacing is based on the gauge, which is dictated by which yarn is used. So generally, no. But the ruler for the Coachella Boots and my new Seaside Slip-Ons pattern is the same. 🙂
My sister has extremely narrow feet, so I’ve actually been thinking about this. If you poked your holes just a little wider apart, or did some decreases (sc2tog) near the toe in the first couple rounds, you’d end up with fewer stitches overall and I wonder if that would help “synch” them on your feet better. Does that suggestion seem like something that might work for your feet? I’m interested to know because I’m sure other narrow-footed readers have a similar question. 🙂
hi make & do crew… I love what you do I’ve made quite a number of flip flop moccasins through your tutorials and they are so durable and also fit so well. love you
I’m so happy to hear that, Annabell! When I made my first pair, I really was curious how they’d hold up. I’ve had the same experience as you–they’re incredibly durable! It’s really nice how long they last after you put your time and creativity into making them. 🙂
I’ve purchased and downloaded the PDF pattern for these flip flop slippers. I think they are perfect for the cottage!
I decided to make the first pair as a gift for my small footed friend (size 5). I decided to do only 8 rows because of the size, however, I’ve clearly made a mistake somewhere because it currently looks like a block; the sides go directly up. I’m using the right hook size and an acrylic worsted weight yarn. I don’t tend to have an issue with tension.
I think this may be for two reasons, 1) I’ve too many holes, too close together and 2) I’m not stitching tight enough. I’m not sure if the hole template printed out to the proper size . After watching your tutorial video, I see the holes should be just over 1/4″ apart. Is that right? From your experience, have you been able to estimate how many holes/stitches around in the average slipper (say size 7)?
Do you have any other tips to resolve my problem?
Thanks, Shanna
P.S. I was trying to find the answer in the comment section of your blog but there are so many comments there. Is there a way for you to clear some of the comments?
It sounds like you’re on the right track with your troubleshooting. I’m guessing that one issue might be that the yarn you substituted could be a bit thicker than the 24/7 Cotton I used. 24/7 Cotton tends to be more like a light worsted or DK weight. So to use your yarn, I’d suggest poking your holes a bit further apart, like maybe 1/3 of an inch. Like you were thinking, this will result in fewer overall stitches and then you’ll have a slipper that curves in a bit just like mine does in the video.
Yes, I include the ruler as a bonus for those who purchase the PDF, but you can make the slippers without it by using a measuring tape. The printable ruler just takes the guesswork out of it!
Hi Jess! I am making my first pair of slippers but can’t get the video to continue. Do you have any suggestions? I’m so glad I purchased two of your patterns!
Well, that’s no good! Are you still having trouble now? The beginning is working for me. It might be helpful to just try it in a different internet browser. If that doesn’t work, please let me know! I want you to be able to watch the videos–that’s why I make them! 🙂
I’m obsessed with these slippers!! I am however disappointed with the finished project, The first one was way to loose, so for the other slipper I changed the hook size as recommended in the FAQ section, this one too seems to loose. So I rip the first one to rework it with yet a smaller hook, again better but still doesn’t seem right. I did have to use a substitute yarn but it is 100% cotton I’m not sure if this could be my problem? I am an average crocheter but can follow a pattern. I hope you can give me some pointers on how to fix these so they can be worn.
I think the substitute yarn may be what’s making them looser. Is it a worsted weight cotton? The 24/7 Cotton in the pattern is listed as worsted, but I really think it’s more like a DK weight. My suggestion would be to poke the holes a bit further apart so that you have fewer stitches going around overall. If you happened to purchase the pattern PDF, I include a printable ruler in it for both the 24/7 Cotton as well as one that will work well with most other (slightly heavier) worsted weight cottons.
Thank you for your reply, I will have to order some 24/7 yarn. In the area where I live the major stores do not carry this yarn. I thought the cotton would be good enough, I did purchase the PDF but both of the rulers are marked differently but look exactly the same distance apart, Would it work if I just punched every other hole? Maybe I can try it and see what happens. I was just hoping to be wearing them already, darn my boney feet.
513 Comments
Aubrey
May 22, 2016 at 11:19 amHello there ???? I love this pattern, but I’m concerned that the yarn would just rip through the holes. The foam that the flip-flop soles are made out of seems so flimsy. Did you have any problems with that? Thank you!
Jess @ Make and Do Crew
May 23, 2016 at 10:14 pmHey Aubrey,
That’s a great question! And you’re right to be concerned because depending on the firmness of the foam, I think that could potentially happen. The flip flops pictured in this tutorial are from Dollar Tree and they are a little flimsy. That’s why I didn’t recommend them in the post actually. Walmart has far sturdier ones that also cost $1, so that’s what I’m going to use for future patterns. Even so, the yarn hasn’t ripped through the flimsy flip flops even though I’ve been wearing these slippers quite a bit.
Another thing to do just to ensure this doesn’t happen though is to keep your holes from being punched too close to the edge and then being sure to use a small crochet hook for the first row so that you’re not stretching the holes a lot with a big hook. Then once you have the foundation row, you can switch to a more appropriately sized hook.
Hope that helps! Happy crocheting!
jess
Haydee
May 26, 2016 at 2:57 pmHi…I have made these…the cotton yarn tens to stretch out also…I got my flipflops from old Navy ..3.00 well worth it. Considering your time and effort in making these beauties…good luck.. oh watch for ads old Navy puts them on sale once a year for a dollar. Get buy. When my stretch I wash them and they shrink up again . Lol
Angie
May 26, 2016 at 4:02 pmWould using a yarn needle and threading the yarn in a spiral around the flipflop (through pre-poked holes) and starting the crochet in the yarn rather than trying to crochet through the holes also work? I know it would look different, but it might be easier to start that way, especially if you’re worried about fitting a hook through the hole, and there would be less wear and tear since you’d only be pushing the needle through one way.
SANDRA
July 3, 2016 at 8:01 pmI made mine just as u suggested and it seems to work also.
Irene
July 7, 2016 at 5:12 amWould it be more sturdy if you used a light weight “paracord” type cord for the foundation rows and then attached crochet cotton to that?
Kathy
August 27, 2016 at 3:13 pmWhat would you charge me to make a few pairs of these?
Stephie Jeffries
March 24, 2017 at 2:40 pmIf you are still interested in these, I would be more than happy to make you some.
Sandy M.
September 29, 2016 at 12:33 pmVery good suggestion. Also using liquid stitch to fill the holes, let dry completely will help stabilize the shoe.
Marge
October 19, 2016 at 6:46 amI used a skinny spiral skewer for making holes and then used an E crochet hook for the first row and switched to a H hook for the rest.
I also left the 3 plugs in the soles and super glued them in place so your foot doesn’t get moisture.
Arlene Rogers wilhite
October 29, 2016 at 2:03 amI was thinking the same thng; to put a round of yarn around first then ataching the needle to the second round.. etc…
Gale
May 26, 2016 at 10:35 pmHow do I get the pattern? Interested in making some.
Jess @ Make and Do Crew
May 26, 2016 at 11:09 pmHey Gale!
The pattern is right above this comment area, in the area with the text and photos of the slippers. Let me know if you don’t understand what I mean.
Happy crocheting!
Jess
Kimberly
May 28, 2016 at 6:30 pmHaving trouble with Slipper Top row 1. I joined with a sl st. It says to sk 1 sc from marked st and begin in next sc. Do I sc here then ch 2 and sl st back into the beginning marked st at in the right?
Tammy
May 29, 2016 at 12:54 amJust wondering if maybe gluing a piece of felt to flip flop to help from tearing the hole while wearing/ crocheting it.
Mary K.
May 29, 2016 at 11:41 amI still don’t see where to download the pattern, unless you mean to print from the webpages (including all the ads). I filled in the section to put me on your e-mail list. When I was sent back to your website/blog and searched flip-flop slippers it sent me back to this page. How can we get a PDF?
Jess @ Make and Do Crew
June 11, 2016 at 9:14 pmHey Mary,
I’ve put together a printable pdf and you can purchase it by clicking on the link at the top of the post.
Thanks for your support!
Jess
Mary Petzoldt
May 29, 2016 at 3:46 pmI can’t get the pattern, I guess I don’t understand
Diane Baker
May 31, 2016 at 6:13 pmI cannt find it anywhere. I tried to just print this blog, but ended up with 51 pages! Help!!
Jess @ Make and Do Crew
June 11, 2016 at 9:10 pmBy popular demand, I’ve added a printable PDF download you can purchase from the link at the top of this post 🙂
Carmen
January 14, 2017 at 9:18 amI love your pattern but I have trouble reading patterns. Would you have a schematic of the roundsaround the sole?
kazeem aminat
July 30, 2017 at 10:19 amgood day.is it possible to get a slower and better detailed video of this tutorial. would appreciate if thats possible.
Jess @ Make and Do Crew
August 3, 2017 at 4:52 pmHey Kazeen,
I’m wondering if maybe you saw the shortened version of this tutorial and not the longer 20 minute one. 🙂 If you scroll up a bit, right above the free pattern, you can see a video player that will play the longer, in depth tutorial. I’m guessing that will be more of what you need.
Happy crocheting!
Jess
Tammy
May 27, 2016 at 5:58 amI would love th a pattern also. Thanks.
Darlene
June 12, 2016 at 2:17 pmclick to PRINT with your mouse and then select only pgs 10-13, NOT all pgs.
Christy
July 2, 2016 at 7:37 amIf you click on the “read more” area under the picture it takes you to the pattern. You will just have to scroll down a little to see it. I’m making these now!
Linda
May 27, 2016 at 11:02 pmHow can I get this pattern? My senior group would love to make some for our fund raising.
Susy Mayberry
March 13, 2017 at 7:34 pmIf you want the PDF file, it’s $2.50 but I just printed the pattern from here
https://makeanddocrew.com/free-crochet-slippers-pattern-flip-flops-sole/
The PDF file is here
https://www.lovecrochet.com/us/catalog/product/view/id/174667?country=US
Jess @ Make and Do Crew
March 14, 2017 at 2:50 pmThanks for offering help Susy!
I really appreciate when you purchase my printable pattern PDFs instead of printing the blog post because the small fee for the pdf helps me cover the expenses from the site. (When you don’t visit the site because you have a printed pattern, I don’t earn any ad revenue and therefore have a hard time creating more free patterns for the blog.)
Thanks for understanding!
Jess
Greta
May 28, 2016 at 4:13 amTap the see more and the rest of the article will show up with the pattern.
Penny lee
May 28, 2016 at 2:16 pmNeed slipper pattern
Lynn
June 2, 2016 at 8:32 amMe to can’t find it. Please show me. I’m very interested in making a pair.
Lynn
June 2, 2016 at 8:34 amIt didn’t go with the other. But where’s the pattern?
cheri
September 24, 2016 at 11:22 amif you use an app like clean print you can print from this page and delete what you don’t want and add what you do.
Janice
January 1, 2017 at 8:26 amYou can screen shot the pattern. Email the pictures to yourself. Position on a document and print them.
Jess @ Make and Do Crew
January 18, 2017 at 9:00 pmOr you can support the blog and buy my inexpensive, ad-free printable PDF right here. It’s formatted for printing or mobile viewing. 🙂
Jacinta
May 27, 2016 at 6:51 amIs there a book ? I would like to send my son one as he is incarcerated and he has learned to crochet.
Jess @ Make and Do Crew
May 27, 2016 at 10:49 pmHey Jacinta,
How wonderful that your son has learned how to crochet. It’s one of my favorite ways to relax and settle myself at the end of a day. I don’t currently have a book, I’m sorry. I usually prefer people to share the links to my patterns instead of printing them, but please feel free to print this page to give to him if that would be helpful.
Jess
Nat
May 29, 2016 at 8:44 amMaybe you can gather a bunch of different patterns/articles/pics of stitches and take them to like staples or OfficeMax and have them bind it like for a presentation booklet and then send to him with some yarn…..then you can make it personal and find some cool stuff that you know he would like…..I think my heart would swell if someone sent me that!!!! 🙂 then send him yarn/pattern of something YOU would like so he can make it for you….. My ma is my favorite person to torture with my projects!! ?
Margaret
September 3, 2016 at 8:27 amNat, that sounds like a really wonderful idea, but in the Texas Criminal Justice system, this would not be allowed. Any publications have to be shipped directly from a book store. I imagine this is the same with all prison systems. Otherwise, contraband could easily be slipped into the prisons, and God knows they don’t need anything else getting in there. I would suggest that going to a bookstore, finding a crochet book that’s easy to follow with easy to make patterns, and have the bookstore send the book to him in the prison. They do it all the time. I’ve done it myself. Good luck, and happy crocheting.
Aubrey
May 27, 2016 at 9:29 amThanks for the reply. I am definitely going to put this on my list of projects!
thea
May 28, 2016 at 8:17 amwhy not crochet the slipper and put removable soles in them like you do shoes they will wash easier? I am trying that.
Jenni
May 28, 2016 at 8:55 amWhat if you poked the holes straight down through the flip flop and then gorilla glued an extra sole to the bottom? They might be more sturdy and you could actually walk around outside with them…if you wanted to.
At any rate…they are really fun!
toni ramski
September 1, 2016 at 10:19 ammight feel uncomfortable to walk on that stitching?? but an interesting option i guess..
Jess @ Make and Do Crew
September 1, 2016 at 2:50 pmHey Toni,
Surprisingly, I can’t even feel the stitching. I think it’s because the the yarn is actually quite flush with the flip flop sole. I find them super comfortable 🙂
Christine
May 28, 2016 at 10:10 amAny chance you might do a YouTube video showing how to make these?! I’m having trouble starting them. You’re so pretty, you need to make a video:)
Rosanne Segovia
June 17, 2016 at 1:51 pmI agree. I am having some trouble understanding the instructions. I would love to see the youtube video.
Janet Petrak
July 5, 2016 at 1:56 pmI’m also having trouble following the directions. When you say 3 stiches before the marker to you mean before as in towards the toe or towards the heel?? I’ve made 1 slipper after two false starts and it is very loose and sloppy. I have a very small foot so I’m going to try to downsize the hook and see what happens.
Jess @ Make and Do Crew
July 5, 2016 at 9:06 pmFor rows “9 cont” and onward, you’re only working in the back half of the slipper. So you stop 3 stitches short of the marker, toward the heel. This essentially creates a tapered edge so that the back heel section rises gradually. If you look at a few of the photos shot from the side, you might see what I mean.
As for how loose it is, you might want to try having fewer holes in your sole overall. If you don’t want to/can’t re-poke them, you could always decrease a some stitches as you crochet around the first few rows. For reference, my size 9 pair have 69 holes around each sole. I think using a smaller hook is a great idea too.
Georgia
May 29, 2016 at 2:31 amCould you use a yarn needle and sew a row of stitches around the sole so you aren’t punching a crochet hook through?
Jess @ Make and Do Crew
June 11, 2016 at 9:18 pmYes! I think that would probably work great. Nice idea, Georgia!
Serena
May 29, 2016 at 6:16 amLover youtube crochet flip flops
Kathy
May 29, 2016 at 7:53 amWould a dab of super glue or hot glue in the holes help strengthen the flip flop? I might give that a try! These are so cute!!
Barbara
June 14, 2016 at 9:53 pmUsing most glues on the foam soles will only melt the soles, creating a bigger problem. Maybe rubber cement would work without melting the foam soles.
Yvette
July 9, 2016 at 12:01 amI just glued the little round parts back in mine with some Tacky Craft glue.
Holly
May 31, 2016 at 8:34 pmCan you make a video on how to start the first row????? I can’t figure out it out from the way you explained it, thanks
Kathy
May 31, 2016 at 9:47 pmHello, i got to row 9 and not understanding the rest. Is everything a slip stich in rows 10-12
MamaNorton
June 1, 2016 at 7:59 amWould it help to put super glue on the soles ?
Donna
June 1, 2016 at 8:25 amiThese are what I have been looking for 2 yrs. I don’t know how to Crochet, but I will find someone who does. Do you make them for sale ??? I have an Artery Disease that make my feet swell .
thanks so much to my friend as she sent me here. And thank You for sharing !!!
Mindy
June 23, 2016 at 1:38 pmI make them for sale along with a men’s boat shoe version. Go check out my shop —> https://www.etsy.com/listing/385009596/slipper-flops-lightweight-crochet?ref=shop_home_active_4
Here is a $5 off of a $30 plus purchase coupon for you to use as well —> 5OFF304U
I look forward to making you a pair. -Mindy with LovingLea Created
Veda
June 2, 2016 at 6:50 pmWhy not use glue around the soles once they are crocheted. Would that work
TJ
June 2, 2016 at 8:13 pmI wonder if dropping a bit of hot glue into each hole to secure would help?
Alice Munneke
June 13, 2016 at 8:39 pmHi Jess, I m having truble with the toe. Don’t understand the toe part of the pattern. Need help PLEASE!!
Jess @ Make and Do Crew
June 14, 2016 at 3:34 pmHey Alice,
What are you having trouble with specifically? I’d love to help if I had a little more detail. I’ve also answered several questions about the toe section in previous comments, so you might like to have a look at those answers to see if they’re helpful to you at all. 🙂
Jess
Beth
November 29, 2016 at 5:34 pmI’m also confused about the toe section. After row 5 do I continue all the way around? Then what’s the other “row 5” that comes after the fasten off step in round 6? It says something about hdc in 3rd SC from hook, but I supposedly just fastened off
Jess @ Make and Do Crew
November 29, 2016 at 10:11 pmHey Beth!
After row 5, yes you continue around in the same direction working around the entire ankle until you get back to where you started.
The additional row 5 was a typo! I just did some updates on this pattern and forgot to delete that. Thanks so much for pointing it out!
Jess
Cynthia
June 22, 2016 at 6:47 amI have used craft glue, putting a drop in all the holes top and bottom. I am hoping that will help. I just made them but really want to make more.
Jess @ Make and Do Crew
June 22, 2016 at 9:34 pmCool! Let us know how that works out, Cynthia. I save the “plugs” from the current pair I’m working on to try the same thing.
Cynthia
June 22, 2016 at 6:53 amOn the link you provided to amazon, only the yellow flip flops are $1.00, all other colors are $3.99
Jess @ Make and Do Crew
June 22, 2016 at 9:33 pmHey Cynthia,
That is true. I’m sorry if my wording was unclear. I was linking to those so that people who don’t have access to stores with flip flops (like in the winter) saw they could still get them online. I’ve had great luck with Walmart’s $.98 flip flops though. The foam is pretty sturdy.
Happy crocheting!
Jess
Nancy Kelly
June 25, 2016 at 5:58 pmI couldn’t find any place to post my question so here it is: my crochet needles are very old and all have numbers instead of letters, what numbers could match up to the hooks you recommend? Thank you, Nancy
Jess @ Make and Do Crew
June 26, 2016 at 2:23 pmHey Nancy,
That’s a great question. I have some that have a number and a letter on them and with those, these sizes I think you’d want to use a 1 for the smaller hook and a 6 or 7 for the larger. I found this chart and it might be helpful for you in the future 🙂
Happy crocheting!
Jess
Melanie
December 31, 2016 at 6:45 amHey I was wondering if you make and sell these? If so how much?
Jess @ Make and Do Crew
January 3, 2017 at 8:59 pmHi Melanie,
I don’t actually make them to sell, but some Esty sellers do. If you scroll through the comments, you can see a few people offering their services.
🙂
Karen
July 13, 2016 at 8:32 amI msde some similsr but used my own pattern after the foundation row. I only had 1 hole break through, then just was more careful when pushinh hook through the sole. Mine turned out great! I even entered them into our County Fair and received a Blue Ribbon! (Used WalMart flip flops $.97 & pattern was a Mary Jane dedign).
Jess @ Make and Do Crew
July 13, 2016 at 3:02 pmWow! Congrats, Karen! That is so awesome!
Nana
September 25, 2016 at 3:16 amYou could always use a little glue in the holes to help hold them in place, and to fill the holes made when cutting away the straps. ( hot glue, / guerrilla glue) . Aside from the flimsy sole- supposedly, I think they are fine for out side in the summer on a dry day…running errands…especially if made like moccasins!
Jess @ Make and Do Crew
September 27, 2016 at 8:22 pmYes totally! I actually just shared a moccasin pattern in which I glued the little rubber circles from the straps back into the holes in the rubber soles. It worked great.
Susan
November 1, 2016 at 7:52 amThank you for the pattern, I have made twelve now and will be making more (Christmas gifts). But like a dummy I threw away the straps and round plugs, do you have any suggestions on what can be used to cover/plug up the holes?
Jess @ Make and Do Crew
November 3, 2016 at 2:50 pmHmm. That’s a good question. If you have one extra set of flip flops, perhaps you could just cut small circles from the sole and use them to plug the holes on the other pairs? (I’d glue them in.) 12 pairs is SO impressive! I’d love to see a pic if you’d like to share one.:)
alice parrow
October 4, 2016 at 8:55 pmwhat do you do with the holes where you cut the straps off plz let me not ty [email protected]
Jess @ Make and Do Crew
October 6, 2016 at 12:01 amFor slippers, you can just leave them open and you won’t really notice they’re there. If you’d like to plug them though, you can just glue the piece from the flip flop strap that used to be in the hole right back in its former home. 🙂
Andrea Bates
January 14, 2017 at 5:05 pmHi Jess-
I spent today preparing the flip flop soles and discovered something that works really well to mark the Kohls on the flip-flop soles.
I made a paper copy of the top of the flip-flops sole. I marked a line on the paper copy 1/4 inch in from all edges and I marked each hole 5/16 inches apart. Then I punched out each hole with a hole punch. I then put the paper copy on the top of the flip-flop sole and held it in place of a couple of straight pins. ( do not mark the top of your souls with an ink pen or a marking pen )
I then used a Straight Pin to push into the center of each hole around ( turn the top of the pin around in a circle a few times – this makes it much easier to see each mark on the flip-flop sole).
You can use a BEAD REAMER To push through all of your marks on your flip-flops sole. It makes precise holes any circumference you would like and allows you to see very clearly where you are pushing through the top over onto the side of the sole.
Hope these two tips help to make your project go faster.
Jess @ Make and Do Crew
January 18, 2017 at 9:55 pmThis is such a great idea, Andrea! Thank you for sharing! I might have to incorporate this idea into the next tutorial. It’s really smart!
And I had never heard of a bead reamer. I just had to look it up. I can see how it would work perfectly for this.
Thanks so much for sharing your creativity with us!
Jess
Aubrey
May 27, 2016 at 9:34 amThank you so much for your reply. I am definitely can put these on my to do list!
Judy beard
May 27, 2016 at 8:21 pmWill someone please send me this pattern to my email it’s [email protected]
Jess @ Make and Do Crew
May 27, 2016 at 10:26 pmHey Judy,
The pattern is above this comment area, within the article. (It’s maybe a bit hard to notice because there are a lot of photos involved too.) I’m sorry, I don’t have it contained in a way that’s easily email-able at this moment.
Happy crocheting!
Jess
Maria
June 5, 2016 at 2:04 pmPlease click under the first photos where it says “read more”
Eline
May 31, 2016 at 1:20 amWhat i did, is copy the pattern to a word document. Then i suppose is ready to email..
Maria
May 31, 2016 at 4:13 amJudy, the pattern is under the first pictures. Look for the box that says “read more”. Most articles on websites do this. Just scroll up again to the original post and click “read more.” Once you’ve done this- the pattern will always show.
Designer, I love this pattern and love HL store. ❤️ Thanks for posting I will be sure to include your links.
Linda
May 30, 2016 at 7:12 amCould someone send the pattern to my email? [email protected] thanks
Maria
May 31, 2016 at 4:14 amRead my reply above
Norma
June 4, 2016 at 7:16 amCan’t find the pattern for crocheted slippers on foam. Please send.
lynn
May 30, 2016 at 5:40 pmYou could also run a bead of hot glue over the holes on the inside of the shoe after you are done crocheting. It would strengthen that edge, I think. Thanks. Great idea.
BONITA RANKEY
May 30, 2016 at 6:21 pmRUN A THIN BEAD OF HOT GLUE AROUND THE FIRST ROUND OF STITCHES. THAT SHOULD HOLE EVERYTHING.
Mindy Lea
June 1, 2016 at 11:28 pmOn the flimsy flip flops I used an Awl and it is better to punch the hole straight through from top to bottom. I didn’t have any tears after doing this. I had already gone through the side and two out of the first four stitches tore. I was able to salvage the flip flops.
The next pair I made were slightly heavier flip flops. I used an Awl to punch the holes and the smallest crochet Hook I have is a D/3 or 3.25mm so I made the holes 1 cm apart instead of the 1/4 inch and went through the side as low as I could go and 1 cm from the edge of the top of the flip flop. I didn’t have any tears on those. I was making a size 10 slipper.
Debbie
June 11, 2016 at 9:04 amBut won’t this method weaken the exposed stitches to rapid wear, being that they are on the floor?
Jess @ Make and Do Crew
June 11, 2016 at 8:59 pmHey Debbie,
None of the stitches are actually touching the floor. They’re all on the top half of the flip flop sole. I’ve been wearing mine for about a month everyday and they’re holding up really well. 🙂
Happy crocheting!
Jess
Wanda
July 1, 2016 at 6:38 pmMy first slipper I poked the holes bottom to top… Opps should of watched the video..learnt to Poke holes from the side to the top
Jess @ Make and Do Crew
July 3, 2016 at 1:09 pmHaha–I can see how that could happen, Wanda. 🙂 Good think flip flops are generally pretty cheap to replace.
Happy crocheting!
Jess
Liz
June 2, 2016 at 3:36 pmI think they are way too cute to be relegated to slippers and think they’ll work great with sundresses or beach wear. I’m concerned about the flip flop tearing. Has that been a problem for you or others who’ve tried this pattern? Are there any recommendations on the thickness or density for the sole?
Jess @ Make and Do Crew
June 10, 2016 at 4:37 pmI haven’t had any trouble with them tearing in the month or so I’ve been wearing them at home (A LOT ;)). I’ve found that Walmart flip flops are a great density. The Dollar Tree ones are too flimsy and the Michael’s ones tend to fall apart a bit more (although they’re working okay.)
Hope that helps!
jess
Wanda
July 1, 2016 at 6:35 pmI wore mine to the pool.. The store..
Lhdelane
June 8, 2016 at 2:01 pmI was so excited to get started on these, but 3 of the first 4 stitches ripped right through. So disappointed!
Lhdelane
June 8, 2016 at 2:23 pmOk. Update. I am getting the hang of it. 3 tips: First, go slowly on that first row through the sole. Second, keep the hook facing down as you pull the hook up through the sole. If the hook faces the side, it tears easily. Third, crochet loosely on this first row.
Jess @ Make and Do Crew
June 10, 2016 at 4:18 pmThanks for sharing your tips, Lhdelane! It helps everyone! 🙂
Wanda
July 1, 2016 at 6:34 pmGot mine made … But had trouble keeping them on.. Had to run some yarn in around the top to tighten them.. I also made a small pair and I got the second one upside down so then had two right feet… Mine are finished and I love them ..
Shoshana
October 11, 2016 at 1:17 pmI might also recommend using a wax thread and a heavy needle to stitch all the way through the sole about 1/4 inch in. I forget what the stitch is called but loop the thread back through the previous stitch with every pass through the sole so that there is a continuous line of thread on both the top and bottom. Then start the pattern as written, using the wax thread as your foundation row. That would also make it better for outdoor wear. It’s what I intend to try.
retta
January 17, 2017 at 6:33 amcan not get pattern
Jess @ Make and Do Crew
January 18, 2017 at 9:44 pmI’m sorry to hear you’re having trouble. The free pattern is right above this comment area within the blog post. The paid printable pattern can be found here.
Joyce hipps
May 22, 2016 at 12:35 pmI have been looking all spring for these patterns .thank you so much.
Jess @ Make and Do Crew
May 25, 2016 at 12:12 amYay! I hope you enjoy them, Joyce. I’ve been loving shuffling around the house in mine. 🙂
Happy crocheting!
Jess
Tina
May 27, 2016 at 11:32 pmIf you made them with a cotton yarn they would make great pool shoes just an idea
Momma
May 22, 2016 at 12:52 pmI can’t wait to make some of these! My felted wool slippers are getting too hot!
Jess @ Make and Do Crew
May 23, 2016 at 10:09 pmI know! Mine too, Momma! I have some flip flops and yarn to make you some. They’re just in my queue behind a few other projects. 😉
Elsie
May 31, 2016 at 9:14 amYou mention the following in your article:
(And if you’re the free-wheeling type that prefers not to have your toes covered at all during the summer months, check out all my other free crochet patterns instead.)
I tried clicking on the link referred to here, but was not able to find any other patterns for those of us who don’t like our toes covered. Can you please help? Thanks!
LadyKajun
Jess @ Make and Do Crew
May 31, 2016 at 4:46 pmHey Elsie,
You can find all my other free crochet patterns right here! (Or you can alway access them by clicking on “crochet + knitting” in the menu at the top of the page. 🙂
Hope you find something that can keep your toes happy. 🙂
Jess
Cheryl
May 23, 2016 at 9:54 amVery cute and comfy looking slippers! Am I missing something though? What happened to row 13?
Jess @ Make and Do Crew
May 23, 2016 at 3:56 pmCheryl! Thanks so much for your hawk eyes! You’re totally right. Row 14 should be called row 13. There is no row 14. I’ve updated the pattern. Thanks again for your proofreading!
Happy crocheting!
Jess
PaiPai's Mom
May 24, 2016 at 11:08 amHi! What a cute house shoe and fantastic summer pattern!! These are pretty darn cute for out of the house as well. I need to wear an arch support insole around the house (hardwood and baby chasing can destroy me before breakfast!) and I’ve struggled to find a slipper pattern that would support such an addition. Do you think these guys would? It seems like the sturdy nature of the sole would be better than just felted slippers, but I’m wondering if the crochet is enough to keep them in place. Any thoughts?
Jess @ Make and Do Crew
May 25, 2016 at 4:46 pmHey!
I think an arch support would probably do fine in these, as long as it wasn’t a tall orthotic or something. As you’re working the slippers, you can try them on with your arch support and see if you need to add a couple extra rows to the back to make sure that the back of your heel is adequately covered and so they won’t fall off. Hope that makes sense! Can’t wait to see what you make!
xo
Pam
May 26, 2016 at 10:33 pmI would make them a size bigger & use an insole maybe?? I too have arch problems & suffer after wearing flat flops & sandals!!But dang it it’s summer & these are just too stinking cute!! I can’t crochet but my sister can!!! I can’t wait to get mine!!!
Jess @ Make and Do Crew
May 26, 2016 at 11:09 pmSisters are the best for outsourcing the projects you don’t know how to do 🙂
Patsy
May 28, 2016 at 11:07 amI wonder how it would work if you glued an insole onto the flip flop before putting in the holes and use them as a support for the flip flop to make a sturdier base as most have a cloth top
choctaw soldier
May 27, 2016 at 7:06 pmdiscount stores also have some adheasive that can be used to glue “sport insoles” down, so the “flip flop feel” remains but with extra support it in a yellow tube with purple accents, not sure the name but its like a souped up rubber cement (its non irritating once it has dried and can be used for a number of tasks. i even used it to repair vinyl tiling in my kitchen lol) …. . but i know the feeling about flat feet and hardwood. i go barefootin’ as much as possible – but being prior military somedays my feet just can’t do it.
Anne Smith
May 24, 2016 at 7:00 pmLove these slippers. I have a couple of questions. I’ve worked the first nine rows and the slippers are already very tall (2 2/3 “). Does this sound correct? Your stitches look to be more like a sl instead of a sc. Any guesses to what I’m doing wrong?
Thanks
Jess @ Make and Do Crew
May 25, 2016 at 12:11 amHey Anne!
That’s a great question. Without looking at them, there are a few things that might contribute to a larger gauge. My guess is that your sole holes might be a little closer together than mine, and therefore your stitches aren’t quite as stretched out as mine. Mine almost flattened a bit, and thus do look a little like a slip stitch. The great thing about this pattern though is that the number of rows doesn’t really matter, it’s more the general height up your foot that you should focus on. Just try them on and stop the rounds when the sides and back are almost as tall as you’d like, knowing that you’ll add a couple of rows just in the back near the heel.
Does that make sense? Feel free to ask more questions if not! I’m happy to help however I can!
Happy crocheting!
Jess
Kim Klashinsky
May 26, 2016 at 9:25 pmHi there!
I absolutely love this idea but I don’t crochet, is it possible to adapt this pattern for knitting???
Thanks 🙂
Kim
Judy
May 27, 2016 at 8:46 amI was also wondering the same thing or if someone could make for me and I would pay them
Mindy
June 23, 2016 at 1:46 pmI make them for sale along with a men’s boat shoe version. Go check out my shop —> https://www.etsy.com/listing/385009596/slipper-flops-lightweight-crochet?ref=shop_home_active_4
Here is a $5 off of a $30 plus purchase coupon for you to use as well —> 5OFF304U
I look forward to making you a pair. -Mindy with LovingLea Created
Julie
May 30, 2016 at 11:15 amKim – I am no professional or pattern writer, but I have knitted for about 57 years and also do “some” crocheting. I am only guessing, but I think maybe if you are able to do the 1st row, to get the yarn IN the foam, that you could then change to DP knitting needles and pick up stitches with the knitting needles, all the way around, continuing to knit until they are the size you want, following the same shaping, etc of the pattern for the heel and then picking up stitches at the top to do that too. Adjust gauge to get what you want with whatever size needles you prefer to use. You may need 5 or 6 needles to get around the sole. If you don’t have enough of one size, alternate two consecutive sizes as you go around. The needles will move around the slipper, one section at a time, so it won’t be noticeable anyway. If you are not able to do the 1st row with sc , if you know how to embroider, you could try using a blanket st around the sole to get the yarn started and continue with the pattern as above. As I said, this is just a guess. I am not an expert, by any means, and I have not tried this yet as I just found the pattern, but my brain goes in different directions than it would be expected to, and I come up with some crazy ideas. Some work. Some don’t. Happy kn itting.
Deshika
May 26, 2016 at 11:19 pmHello my name is deshika I would like to make those slippers ,but I just can’t crochet.
Susan
May 28, 2016 at 2:14 pmPerhaps Anne Smith is using. larger hook than you used and different yarn gauge. And that is why her sides are so high. Can you tell us what size hook and gauge yarn you used please? Also, a photo to show how you started in the back would be helpful. Thanks so much.
susie
June 8, 2016 at 9:31 pmAs the first 9 rows are in the round, do the rows start getting smaller? Your photo makes them look like they cinch inward, closing in over the foot. Or do the rows go straight up?
pinkpolarbear
June 11, 2016 at 7:22 pmAre you in the UK by chance? If so, then your sc is actually our double and would be much taller as a consequence.
Lorna D Miser
May 25, 2016 at 9:09 amSuper cute and clever! I’m impressed!
Jess @ Make and Do Crew
May 25, 2016 at 4:46 pmThanks so much for your kind words, Lorna. I appreciate your comment. 🙂
Happy crocheting!
Jess
Par
May 29, 2016 at 7:24 amI’m anxious to try.. I’m traveling and wish I could find a Pinterest logo to store this link. Am I missing it somewhere? I always need rubber soled slippers. Thank you
Jess @ Make and Do Crew
June 11, 2016 at 9:16 pmHey Par,
I’m hoping you figured this out, but if not, you can always pin my posts by clicking on the Pinterest logo at the very top of the post (right underneath the title). Thanks for sharing my patterns on Pinterest!
Jess
gerry
May 25, 2016 at 12:00 pmThank you for sharing this pattern. I can’t wait to try it !
Jess @ Make and Do Crew
May 25, 2016 at 4:47 pmYay! I hope you enjoy making your own pair, Gerry. Let me know if you have any questions. And feel free to send me a pic of the finished project! I’d love to see what you make.
Happy crocheting!
Jess
barb
May 26, 2016 at 12:31 pmthis is awesome,,, making some large ones for my diabetic hubby that has BIG feet ( size 15),, thank you so much for this,,
Melissa
May 26, 2016 at 4:40 pmThank you thank you for this pattern. I’m super excited to make me a pair.
Linda
May 26, 2016 at 6:40 pmI would like a knitted pattern for these flip flops does anyone have one
milissa
May 26, 2016 at 6:52 pmI love all your patterns. thank you so very much so sharing them with us. Have a safe weekend
Herb and Lois Babcock
May 26, 2016 at 6:59 pmCan you mail me a written pattern for those adorable slippers? I will be “on the road” all summer in our camper and don’t have a printer with me. My mailing address is Lois Babcock, 1176 State Road 82, Wisconsin Dells, Wi. 53965. Thank you so much.
Dawn M. Roulx 5 Island Rd. Warren,N.H. 03279
May 26, 2016 at 7:04 pmHi could I get the pattern from you on how to make the flip flops.where do you get the pattern,if not from you.please and thank -you.
Kimberly Hill
May 26, 2016 at 7:48 pmLOVE these! I have very hard to fit feet so If I could figure out how to make these I could finally have perfectly fitting house shoes. Flip flops/thongs are normally street shoes, so, what, do you think it would take to make these street shoes? a different yarn? spraying something on the cotton thread? I think these would be darling and comfortable for us Red Hat Society sisters to wear.
Tracie Carter
May 26, 2016 at 8:06 pmHi there
Just wondering where can I get the pattern for these I would like to have a go at making them.
Thank you
Tracie
Jess @ Make and Do Crew
May 26, 2016 at 11:19 pmHey Tracie!
The pattern is right above this comment area, in the area with the text and photos of the slippers. It’s just written out within the photos. Let me know if you don’t understand what I mean and I’ll guide you further.
Happy crocheting!
Jess
Maria
June 5, 2016 at 2:08 pmPlease click under the first photos where it says “read more”
Gladys Walker
May 26, 2016 at 8:13 pmHello.
I LOVE these. sad thing is I don’t know how to Crochet. and not sure my hands would let me if I did. I was wondering however there is a elderly lady in our church that makes crocheted dish cloths with dish towels with a matching crocheted end for hanging that she gives out for birthday gifts, anniversary gifts exct. I was wondering can I print this off and give it to her for something a little different to work on for her family? If so, can you please tell me HOW to print it?
Thank you.
Brittany
May 26, 2016 at 8:49 pmAwesomness. Thank you I needed a project to work on while I sit here on my butt recovering from knee surgery!!!
Jess @ Make and Do Crew
May 26, 2016 at 11:18 pmHey Brittany,
I’m so sorry to hear about your knee! A new crochet project is certainly in order! I hope you enjoy this one. They work up pretty fast, so you might want to get two pair of flip flops so you don’t run out of things to crochet 😉
Speedy recovery to you!
Jess
Tina
May 26, 2016 at 8:51 pmIs there a print friendly pattern somewhere?
Jess @ Make and Do Crew
May 26, 2016 at 11:16 pmHey Tina,
I’m sorry, I don’t have a printer-friendly pattern yet. Since the pattern is pretty short, you could always copy and paste the text into Microsoft Word or something similar to print it out.
Happy crocheting!
Jess
Darlene
May 30, 2016 at 9:53 amyou could use print friendly, assuming of course you are following the designers wish that you don’t share the pattern and only print it for yourself.
http://www.printfriendly.com/
Mag
May 26, 2016 at 9:01 pmCan you make me a pair?
Jess @ Make and Do Crew
May 26, 2016 at 11:17 pmHey Maggie,
I wish I could! But my little daughter who is anxiously awaiting hers would probably get mad if I skipped over her 😉
Mindy
June 23, 2016 at 1:50 pmI make them for sale along with a men’s boat shoe version. Go check out my shop —> https://www.etsy.com/listing/385009596/slipper-flops-lightweight-crochet?ref=shop_home_active_4
Here is a $5 off of a $30 plus purchase coupon for you to use as well —> 5OFF304U
I look forward to making you a pair. -Mindy with LovingLea Created
Kim Klashinsky
May 26, 2016 at 9:20 pmHi there!
I absolutely love this idea but I don’t crochet, is it possible to adapt this pattern for knitting???
Thanks 🙂
Kim
Sharon salituro
May 28, 2016 at 1:16 pmI also would like to know if there is a pattern for knitting
Lynda
May 26, 2016 at 9:25 pmI want to try these for my granddaughters. Do you use the size flip flop true to a persons shoe size seeing that your are going in a little from the edge of the actual edge. Than j s for any help you can give me
Jess @ Make and Do Crew
May 26, 2016 at 11:15 pmHey Lynda,
Great question. I’d say you could err on the smaller side. I actually bought my flip flops in the size I’d normally wear, but then I trimmed a bit of rubber off the back before I started crocheting because I had the feeling that they’d end up too big. Does that help?
I bet your granddaughters will love them! My daughter is anxiously awaiting a pair.
Happy crocheting!
Jess
Kim
May 26, 2016 at 9:31 pmHi there,
I absolutely love this idea and I wondered if you could also adapt this pattern for knitting? I would love to make these slippers but I don’t crochet 🙁
Thanks 🙂
Kim
Jess @ Make and Do Crew
May 26, 2016 at 11:13 pmHey Kim,
I’ll add it to the list 🙂 I’d like to make a simple video about how to crochet these, which might help you if you’re interested in learning. Feel free to subscribe in the white, pink and green box above this comment area to get notified once I make the video.
Happy knitting!
Jess
Dawn K.
June 3, 2016 at 1:26 amIf you could make a small video on how to get the yarn started on the slipper that would be awesome. I’m a visual learner and a beginner at crochet so I can’t picture or understand how to start the yarn on the flip flop and the top part of the slipper where the top of the foot by the toes looks a little difficult to understand in the directions. Seeing it done first hand in a step by step video would be very helpful, maybe even post to You Tube or something?
I would love to try to make these they are so cute.
Jess @ Make and Do Crew
June 10, 2016 at 4:34 pmI am working on video, Dawn 🙂 Thanks for the feedback! I’ve added some additional photos up above. Perhaps they’ll help in the mean time?
Momma
May 29, 2016 at 11:40 amTo all the knitters out there, I will work on trying to make an adaptation?
June hartz
May 26, 2016 at 9:46 pmDo u do u tube tutorials
Jess @ Make and Do Crew
May 26, 2016 at 11:11 pmHey June,
I’m sure hoping to start soon, but I haven’t done any yet. I’m going to have to muster up my on-camera courage and give them a shot though because I think it would be really fun. Feel free to subscribe in the white, pink and green box above this comment area and I’ll let you know once I’ve started making them.
Happy crocheting!
jess
Angela
May 26, 2016 at 10:18 pmThank you for the pattern for my new alippers
Jess @ Make and Do Crew
May 26, 2016 at 11:10 pmMy pleasure, Angela! I hope your little footsies enjoy them.
Happy crocheting!
jess
Rhonda
May 26, 2016 at 11:15 pmI clicked on the reference to the inexpensive hooks, but it showed a blank page. Where can I get info on the hooks you used?
Jess @ Make and Do Crew
June 11, 2016 at 9:38 pmI’m sorry Rhonda, I’m not sure what happened there. Thanks for letting me know. Here’s the link: http://amzn.to/1tpm6ze
Lisa E.
May 27, 2016 at 12:04 amI love this pattern…thank you so much for sharing.
Tammy Kennedy
May 27, 2016 at 12:08 amAwesome shoes
I use to crochet but lost my central vision 18 months ago
Thinking might be difficult for me to make now
Going to visit family 1400 miles one way ( and we will be doing it round trip)at end of july
Since I will be riding in car for would love these
I love the color you chose
Wish I could find these already made in pink and turqoise
Is there anywhere that sells these all ready made?
If so do you know the cost?
Thank you for your time, help and information
Have a safe and fantastic week end
Mindy
June 23, 2016 at 1:54 pmI do not have them already made but can get them out in 2-3 days depending on how many orders I have in progress. I also have a men’s boat shoe version. Go check out my shop —> https://www.etsy.com/listing/385009596/slipper-flops-lightweight-crochet?ref=shop_home_active_4
Here is a $5 off of a $30 plus purchase coupon for you to use as well —> 5OFF304U
I look forward to making you a pair. -Mindy with LovingLea Created
Bonnie
May 27, 2016 at 2:32 amI want a pair but I dont know howto crocheting… Will somebody make me a pair
I will pay u I wear a size plot hank u
Mindy
June 23, 2016 at 1:52 pmI make them for sale along with a men’s boat shoe version. Go check out my shop —> https://www.etsy.com/listing/385009596/slipper-flops-lightweight-crochet?ref=shop_home_active_4
Here is a $5 off of a $30 plus purchase coupon for you to use as well —> 5OFF304U
I look forward to making you a pair. -Mindy with LovingLea Created
Joy
May 27, 2016 at 3:08 amHi from New Zealand. I am going to try making these for myself and grand=daughter etc. Seem easy. May then get hubby to glue extra flip flop on bottom as I seem to end up outside in things like these
Theresa
May 27, 2016 at 4:21 amIs there anyway that you could do a YouTube video of this. Us visual people are handicapped without seeing it done. (Smile). Thanks!!!
Jess @ Make and Do Crew
June 11, 2016 at 9:32 pmI’m putting together a video and hope to have it posted soon 🙂
Debbie
May 27, 2016 at 5:24 amHi Jess! Love these and am working on a pair now! One question though, when you get to the slipper top it says: attach the yarn at the right marker. sk 1 sc from the marked stitch and begin in next sc, ch 2. When we sk 1 sc is that to the right or left of the right marker when the toe is facing you? I didn’t know if at this point we starting toward the left marker or to the right of the right marker. I am thinking right otherwise when you continue you will be going backwards to the marker but wanted to check. I can’t wait to finish these (making a navy and black pair to wear to work)! Thanks so much!
Laura
May 27, 2016 at 6:42 amThese are great! I have wide feet which is one of the reasons I love flip-flops: my big feet just hang over the edges! Would I need to adjust the pattern at all, especially in the toe area? How do you think I should go about that?!
Jess @ Make and Do Crew
June 11, 2016 at 9:30 pmHey Laura,
These stretch a bit over time, especially if you use cotton yarn, so you might be able to use the pattern as is. You could also try just poking your holes slightly closer together (like .25″ apart) so that you end up with a few more stitches than someone else might. I think this would allow your feet a little extra wiggle room.
Happy crocheting!
Jess
Deb C.
May 27, 2016 at 6:46 amAll of your patterns are amazing. Will be doing flip flop slippers and cherry blossom plants this weekend. I showed the picture around the office and half a dozen folks want both of them! Thank you so much for the free patterns and wonderful pictures!
Jess @ Make and Do Crew
June 11, 2016 at 9:31 pmThank you so much, Deb. Your kind words mean so much! 🙂
Betsy Fruhling
May 27, 2016 at 7:39 amAre these crocheted in the round or do you have to slip stitch to the first stitch and chain up for the next row?
Jess @ Make and Do Crew
May 27, 2016 at 10:45 pmGreat question, Betsy. Crocheted in the round. No need to chain up, etc. I will add that note to the pattern. Thanks for asking a good question!
Happy crocheting!
Jess
Theresa
May 27, 2016 at 9:08 amDefinitely going to try this!!!
Dawn.
May 27, 2016 at 9:30 amI really miss my grandma she used to crochet, it’s been along time since I’ve done any but love these and going to try.
Jess @ Make and Do Crew
May 27, 2016 at 10:39 pmWhat a wonderful way to commune with your grandma’s memory, Dawn. I hope you enjoy the process.
Jess
Liza
May 27, 2016 at 9:36 amI would be interested to see how the top part stretches as you walk, since it would be anchored differently by the sole than if the whole thing were crochet. Especially using cotton yarn.
Jess @ Make and Do Crew
May 27, 2016 at 10:38 pmHey Liza,
Great question. I’ve been wearing mine everyday for a couple of weeks and I can report that the entire slipper has stretched a bit. (Which was good because I made it intentionally tight to begin with.) One reader had a good suggestion to wash them if the cotton stretches to get it to shrink up again. Feel free to report back on your experiences too!
Happy crocheting!
Jess
Debbi
May 27, 2016 at 9:40 amJess, you are a creative crochet genius. I can’t wait to try your pattern. Thank you so much for sharing!
Jess @ Make and Do Crew
May 27, 2016 at 10:37 pmHaha. Debbie, you’re so sweet. I’m simply a crocheter who happened to have some flip flops and a sharp object nearby one day 🙂
Linda
May 27, 2016 at 10:16 amIf you fill the three holes on each sole (where you removed the straps) with a silicone caulk material the soles will be waterproof for outdoor wear.
Jess @ Make and Do Crew
May 27, 2016 at 10:35 pmOh yeah! That’s a great idea! Thanks so much for the suggestion, Linda.
Jeri
June 17, 2016 at 6:28 amWhen I removed the “thong”
I cut off the round discs and gorilla glued them into the holes.
Nancy
May 27, 2016 at 10:25 amHi Jess,
Love this pattern. Will defently be making these. I notice that there isn’t a row 13. Did I just miss it? Is 12 and 13 the same? Thanks for your great ideas.
Nancy
Jess @ Make and Do Crew
May 27, 2016 at 10:35 pmMy mistake Nancy! Thanks for pointing it out. It’s fixed now. (There’s no row 14, I just accidentally called named row 13 incorrectly.)
Happy crocheting!
Jess
Carmen
May 27, 2016 at 10:27 amHi Jess, A fiend of mine that does not crocheted shared this pattern and sent it to me and I’m getting a lot of likes from it. I like it a lot. I will have a go at it. I’ve been crocheting for over 50 yrs and I have enjoyed every bit. I will share your pattern and send you a photo of my finished product when I’m done. Thank you so much for sharing your beautiful work.
Carmen
Jess @ Make and Do Crew
May 27, 2016 at 10:34 pmHey Carmen,
Thank you so much for your kind words. How wonderful that you’ve been crocheting for so long. How old were you when you learned? My mom taught me when I was 8-years-old, and I agree, I’ve loved it ever since. Can’t wait to see your finished slippers!
Jess
Nancy
May 27, 2016 at 6:41 pmHello I have made the slipper and I’m struggling with the toe part when I get through doing the hdc in the row and it said slip stitch to the row above I get confused and end up with a tongue like result..the next step is to just single crochet around the rest of the slipper and tie off
Jess @ Make and Do Crew
May 27, 2016 at 10:32 pmI know–this part is a bit difficult to explain, Nancy 🙂 Let’s see if I can say it a different way. Basically by “the row above,” I mean that you need to attach it to the edge of the side section of the slipper. So as you work the top pattern, you’ll run into a side and at that point you need to sl st to connect it. You don’t want to sl st into the edge stitch immediatly above the previous row though, so you’re skipping one edge stitch and then connecting into the edge stitch above it. Does that make any sense? Perhaps this explanation combined with a look at some of the photos above will help. Let me know!
Happy crocheting!
Jess
Robin Howell
June 5, 2016 at 5:48 pmI am having the same issue as Nancy. I am not sure what I am doing wrong. I have ripped it out 3 times now and still getting the same result. :/ Will keep trying.
But I do have a question about the TOP of the the slipper. Is it suppose to lay flat on the top of your foot? Mine keeps rounding upwards above the top of my foot.
Jess @ Make and Do Crew
June 10, 2016 at 4:25 pmYou might try using a slightly smaller hook if the top is bulging a little. Also, you could try them on and see if it’s visible once it’s on your foot. I find the top part to be pretty forgiving once your foot is stretching it out a bit.
Hope that helps!
Jess
Lorissa
May 27, 2016 at 6:47 pmThanks so much for pattern!
I have a few friends wanting these, but i think they want them for outdoor shoes. Any advise i can give them to stretch their life as long as possible? Also any advise for me while making??
Thank you!
Jess @ Make and Do Crew
May 27, 2016 at 10:30 pmHey Lorissa,
Another reader had a great suggestion if they stretch out (as cotton tends to do). She said you can wash them to get the yarn to tighten up again. Also, you might be able to experiment with using two strands held together to make them a bit sturdier. I’d just do the first row with one strand so that you don’t stretch the rubber holes out too much and then transition to two strands. If you try this, let me know how it works out!
(Also, if your gift recipients won’t be walking much, I think these slippers could work fine as shoes for general hanging out. If they are going to be walking a lot, I’d experiment with thicker yarn or two strands.)
Hope that helps!
jess
Ellen Relyea
May 27, 2016 at 8:24 pmI just wanted to let you know my husband use a very littledrillto drill the holes all around it it work out beautiful.Really enjoying trying these slippersnice Christmas presents
Jess @ Make and Do Crew
May 27, 2016 at 10:25 pmEllen,
What a great idea! I bet that’s the perfect size. Thanks for taking the time to share what worked for you. I bet these will be awesome Christmas gifts!
Happy crocheting!
Jess
Ellen Relyea
May 27, 2016 at 8:31 pmits 1/8 drill bit
Amanda
May 27, 2016 at 8:40 pmHi Jess,
Would you mind giving me the link you had for the B /2.5 mm hook, it won’t load for me and I’m curious of the set you are referring.
Thanks!
-Amanda
Jess @ Make and Do Crew
May 27, 2016 at 10:23 pmBoo! I’m sorry the link didn’t work, Amanda. Here they are on Amazon. (I also updated the link above–thanks for letting me know!) I’ve been loving these and now they’re even cheaper than when I bought them. Gotta love when that happens.
Happy crocheting!
Jess
Trish
May 28, 2016 at 8:29 amThanks for this slipper pattern-they look really cute. Am going to try and crochet a pair next week
jodi
May 27, 2016 at 8:43 pmReally like the thongs do u have printed patterns?
Jess @ Make and Do Crew
June 11, 2016 at 9:29 pmI just created a printable pdf because so many people requested it. You can purchase it for $2.50 by clicking on the link at the top of the post 🙂
Mary
May 27, 2016 at 8:47 pmHi. I would like to incorporate initials into the top front part. I’ve never crocheted anything with initials before. Can you give me some guidance please?
Linda
May 27, 2016 at 10:15 pmSo darn cute! I’ve just taken up crocheting and these look do-able! 😀 Thank you so much for sharing. (Maybe a few friends might even get some b-day gifts on time?! lol)
Robin
May 27, 2016 at 10:55 pmBoth my sister and daughter want these. I have quite a few flip flops that I can’t wear anymore, so I guess I will try to make these. Great way to re-use unusable items. Thanks!
Joan Hinesley
May 27, 2016 at 11:00 pmThank you for the pattern. I’m making them now. The only thing I might suggest is to put the amount of stitches you should have at the end of each round and row.
Dolene Whitener
May 27, 2016 at 11:02 pmI can’t seem to open the page for directions to this! Please help!
Tanya
May 27, 2016 at 11:23 pmThis is awesome! I have got to learn how to crochet or figure out how to adapt this to knitting. Great idea!!
Virge
May 28, 2016 at 7:18 amIs there a “Pattern only” link so it can be printed?
Marci
May 28, 2016 at 7:32 amI love these but have a (big) problem… I don’t know how to crochet! ? Do you have an online tutorial or is there one you would recommend? I would love to learn with my 8 year old daughter and possibly make these together. Thanks!
Jess @ Make and Do Crew
June 11, 2016 at 9:27 pmHey Marci,
Mooglyblog.com has some great video tutorials. And Craftsy.com has good classes for sale that would be a great place to start. I learned when I was 8! I think it would be a wonderful thing for you two to do together. 🙂
Donna
May 28, 2016 at 9:32 amI make slippers using Yoga Mats that I get at 2nd hand stores. I trace the foot size on the mat, cut it out, punch out the holes with a heavy duty punch and crochet away. http://myideasbloom.blogspot.com/search?updated-max=2012-06-15T08:48:00-07:00&max-results=7
Donna
May 28, 2016 at 9:34 amYou have to scroll down a bit to find the slippers on the link. Sorry, I thought it would bring up just the slippers.
Jess @ Make and Do Crew
June 11, 2016 at 9:25 pmWhat an awesome idea, Donna!
Sandra
May 28, 2016 at 9:32 amI signed up for your emails . My first email sent me to a page that needs a password. Where do I find the pastword at?
Jess @ Make and Do Crew
June 11, 2016 at 9:24 pmHey Sandra,
The password is in the email that you received with the link. It’s the same password for everyone 🙂
Janet
July 5, 2016 at 4:50 pmI tried to buy the pattern with PayPal and I’m not sure if it went through. The payment page turned inside out afterwards….
Jess @ Make and Do Crew
July 5, 2016 at 9:01 pmHey Janet,
In my records, I don’t see a purchase from anyone with your email address. Did you use your peii.org address when you tried to buy it? If you’d like to try again, please do so and I’ll be happy to refund you if somehow you end up getting charged twice.
Happy crocheting!
Jess
Janet Petrak
July 8, 2016 at 11:25 amI tried twice more. You payment method didn’t work with PayPal. With a credit card I was able to finally get the pattern. Thanks!
Jess @ Make and Do Crew
July 13, 2016 at 3:17 pmHmm. That’s strange. Well, I’m glad you got what you needed. Thanks for troubleshooting it.
Happy crocheting!
Jess
Tanya Moon
May 28, 2016 at 9:43 amDon’t laugh if this isn’t possible! But, I’m wondering if it would be possible to use small rivets, or maybe washers over each hole to keep the thread from pulling through? This is my next experimental “to do” item! Thank you very much for the pattern!
caz
May 28, 2016 at 10:38 amI have read all your instructions and it looks a super pattern would it be OK to seal the stitches round the edge with a clear silicone to strengthen them when wearing caz.
Arlene chubb
May 28, 2016 at 11:48 amQuestion for you, are you single clothing on the outside of the slipper or on the inside going around?
Crystal
May 28, 2016 at 11:49 amHi, I have a pattern question. On the top side on the first row.
Row 1: With the toe facing toward you, attach the yarn at the right marker. sk 1 sc from the marked stitch and begin in next sc, ch 2, sl st into sc where marker is, 2 hdc in same sc you begin in (cluster made), sk 2 sc, 3 hdc in next sc, sk 2 sc, 3 hdc, sk 2 sc, sl st into marked sc, sl st in next sc (up the left edge of the slipper), turn.
sk 1 sc from the marked stitch and begin in next sc, ch 2, sl st into sc where marker is, 2 hdc in same sc you begin in (cluster made).
^ this doesn’t make any sense to me and I tried doing it without thinking and it didn’t turn out right, was all bulky instead of flat. Could you please clarify this for me 🙂
Thanks!
Rita Roland
May 28, 2016 at 11:56 amThanks so much for sharing your patterns. I am going to try to make the slippers.
Crystal
May 28, 2016 at 12:13 pmHi!
How can I contact you, commenting here doesn’t seem to work, and I could really use some guidance on a part of your pattern.
Thanks!
Vishruti
May 28, 2016 at 12:20 pmI love these. Can someone please please make them for me. I will pay
Mindy
June 23, 2016 at 1:59 pmI make them for sale along with a men’s boat shoe version. Go check out my shop —> https://www.etsy.com/listing/385009596/slipper-flops-lightweight-crochet?ref=shop_home_active_4
Here is a $5 off of a $30 plus purchase coupon for you to use as well —> 5OFF304U
I look forward to making you a pair. -Mindy with LovingLea Created
Karen
May 28, 2016 at 12:56 pmI absolutely love these! Have you thought about making them to sell?
Mindy
June 23, 2016 at 2:01 pmI make them for sale along with a men’s boat shoe version. Go check out my shop —> https://www.etsy.com/listing/385009596/slipper-flops-lightweight-crochet?ref=shop_home_active_4
Here is a $5 off of a $30 plus purchase coupon for you to use as well —> 5OFF304U
I look forward to making you a pair. -Mindy with LovingLea Created
Doris
May 28, 2016 at 1:29 pmHi
I was wondering if plastic bags could be used instead of yarn?
The plastic would last for quite awhile.
Just a thought.
Eleanor
May 28, 2016 at 2:35 pmI love this pattern but I’m finding it a bit awkward to crochet with the flip flop in the way. I’m crocheting with the inside facing me. Don’t know why I started it like this. Would it make any difference if the outside was facing me–would it curve to the inside just the same? Probably a silly question but I’m more of a knitter and not that experienced in crocheting. Thanks for the pattern.
Jess @ Make and Do Crew
May 28, 2016 at 9:58 pmHey Eleanor,
I know what you mean. It’s a bit clunky for the first few rows. I faced the inside toward me as well. It does get a bit easier after the first few rows. I think the clunkiness is just one of the hazards of crocheting around a piece of rubber. 🙂
Happy crocheting!
jess
Eleanor
May 29, 2016 at 5:37 amThank you for the quick reply. Just wondered if I was doing it right. You’re right, I did find it easier as I went along. My granddaughter found this pattern and just had to have them. She’s anxiously waiting! Thanks very much for sharing. Have a wonderful day!
Karen
May 31, 2016 at 1:38 amI found if I crocheted the first row from the outside to the inside it made crocheting much easier. (Opposite of the photo showing poking the holes.)
Gail
May 28, 2016 at 3:54 pmJust a thought for those concerned about ripping the foam, maybe leave the flipflop as is, without cutting off the straps? Maybe that would give more support and less stress on the crochet work?
Getta
May 28, 2016 at 6:21 pmI love these and can’t wait to make my first pair!
Jess @ Make and Do Crew
June 11, 2016 at 9:22 pmAwesome! Hope you enjoy, Getta!
Pam
May 28, 2016 at 6:59 pmThanks so much for the pattern! I use this great site: http://www.printfriendly.com/ It allows me to copy the URL of your pattern into their site and then it creates a PDF file and/or I can then print the pages!
I do have a question! lol What brand of cotton yarn did you make yours out of? They are so cute!
Thanks and God bless!
Barb
May 28, 2016 at 7:44 pmMy daughter and I want to make these but we can’t open the pattern, even clicking on link doesn’t work.
Gloria
May 28, 2016 at 8:54 pmI’m with Nancy…I do not understand the toe part and I am also ending up with a tongue looking result. Also did you decrease at all from row 2-9. Mine are very loose and bigger than the sole. Yours looks like it gets smaller toward the top.
Leanne Stephenson
May 28, 2016 at 9:03 pmThanks so much Jess for this amazing pattern. I live in Australia and it is winter here. When my husband showed me the pattern on face book I straight away thought of my 3 daughters for Christmas presents. They love their thongs like a lot of Aussies do and I thought they would love these slippers. This is going to be my Winter project then they will be ready for our summer.
I will send you a photo of the girls with them on once their finished. Thanks again all the way from Oz.
Cheers Lee
Jess @ Make and Do Crew
June 11, 2016 at 9:21 pmHello from the USA, Leanne! I would LOVE to see a photo of your finished slippers! I think your daughters will appreciate them too. My mom just made a pair for herself as well 🙂
Beth
May 28, 2016 at 9:27 pmI’m not seeing the link for the pattern to make the crochet flip flop slippers? I read through the whole page…what did I miss? Is there any way you could email it to me through the email I provide?
Please and thank you,
Beth
Rene
May 28, 2016 at 9:41 pmHi, Jess wonderful pattern. Iam having a little problem starting off the pattern with the first sc. can you help with a visual. Thank you!
Jess @ Make and Do Crew
June 11, 2016 at 9:20 pmHey Rene,
I added some extra photos above that I hope will help you. 🙂
Rosie
May 28, 2016 at 9:51 pmI know you probably already said but, what kind of yarn do you use? Because if I were to go out into the rain to go get the mail I don’t want the yarn to fall apart.
Jess @ Make and Do Crew
June 11, 2016 at 9:19 pmI used worsted weight cotton called “I love this cotton.” It’s from Hobby Lobby. I think any worsted weight yarn would do though.
Happy crocheting!
Jess
Beth
May 28, 2016 at 10:43 pmWhat do plug the holes up with?
Rita Diehl
May 28, 2016 at 11:27 pmthank u ,I crochet knit , quilt ,so Iwill be trying these patterns
Brenda
May 29, 2016 at 1:31 amDo you have to make the cluster?
Jolanbde van de Beld
May 29, 2016 at 5:51 amThank you for this gorgeous pattern! I love it!
Greetz from The Netherlands!
Jolande
Jolande van de Beld
May 29, 2016 at 5:53 amSorry, my name was not correct. It is Jolande (without the b in between, lol!)
Nicole
May 29, 2016 at 1:57 pmThank you so much for sharing this pattern. I haven’t had any problems until I started the top part. I keep going through how to attach the yarn to the toe and then after at the skipping a stitch and chaining two and then going back into beginning stitch has me confused . . .
Do you attach and then skip a stitch, SC, chain two, and then slip stitch to starting stitch?
Peggy Wright
May 29, 2016 at 5:47 pmsorry, there is no pattern instructions above the comments. Can you please send it to me?
Rachel
May 29, 2016 at 7:28 pmThese look so cute !! Thanks for this pattern!! I can’t wait to make these !!☺️?????
Jess @ Make and Do Crew
June 11, 2016 at 9:12 pmYay, Rachel! I’ve had so much fun making them. I hope you do too!
Jess
Cheryl Ward
May 29, 2016 at 9:28 pmI want to make several different colored Slippers, but I am having problems printing out your pattern for the Slippers With Flip Flops. Could you please help in telling me a better way to doing it, without having to print out all of those pages,, and not just the instructions.
Thanks ahead of time.
Stephanie
May 29, 2016 at 9:29 pmHi, I’ve made it to the top of the slipper and am having a very hard time with the intrauctions with the pattern. I’ve placed my markers 10 stitches apart but I cannot figure out how to get it going. I’d appreciate some help. Thank you!!!
Jess @ Make and Do Crew
May 31, 2016 at 12:31 amHey Stephanie,
A few people had questions about this section. I found it pretty hard to explain when writing the pattern, so I’m glad you’re all asking clarifying questions 🙂 I’ve updated that part of the pattern with more detail. Have a look and see if it helps! (Also looking at the photo directly below the first row of the toe might help too.)
Thanks!
Jess
Carly Lipps
May 29, 2016 at 9:46 pmDo you sell preordered ones? I’d love 2 pairs, one for my mom and myself.
Mindy
June 23, 2016 at 2:03 pmI make them for sale along with a men’s boat shoe version. Go check out my shop —> https://www.etsy.com/listing/385009596/slipper-flops-lightweight-crochet?ref=shop_home_active_4
Here is a $5 off of a $30 plus purchase coupon for you to use as well —> 5OFF304U
I look forward to making you a pair. -Mindy with LovingLea Created
Linda Kruger
May 30, 2016 at 3:03 amI am knitting slippers for the grand children. My son send me the link for the flipflop slippers. Is he trying to tell me something??
Julia Edwards
May 30, 2016 at 7:33 amHow do I print this pattern?
Melissa
May 30, 2016 at 10:35 amHello. Thank you so much for the free slipper pattern!! I’ve had many coworkers tag me in this pattern 🙂 I have started one slipper and I’m having trouble with round 1 of the slipper top. I’m not understanding where to begin my first stitch.
Jess @ Make and Do Crew
May 31, 2016 at 12:28 amHey Melissa,
I’m going to add a few more photos in the next couple of days, but in the meantime I added more written explanation in that section of the pattern. Check it out and see if it helps clarify things a bit. 🙂
Jess
Shelley
May 30, 2016 at 11:05 amI saw these and immediately wanted to make them but I had one small problem. I’d never crocheted before! I went to the store and bought all of the supplies and after practicing sc over and over in a rectangle I decided to give these a shot. I did well (although getting through the flip flop soles initially proved to be quite the challenge) up until I got to the toe area. I watched several videos on how to half double crochet but for some reason I just couldn’t quite understand what to do when connecting the first stitch to the side of the toe area. No matter, I made something up (after watching several other videos) and my first shoe came together! Fits pretty well, although it does not look as slim as yours, definitely a bit bulkier in the sides, and the toe area is pretty different but not unattractive. If you could get a video of your technique up, it would really help me as well as other beginners I’m sure. If you are shy, most videos I’ve seen don’t even show faces, just hands set up in front of a camera. Really all I need on video is the toe section. The rest was pretty easy, even for a beginner! Everyone should give this a try!
Jess @ Make and Do Crew
May 31, 2016 at 12:27 amHoly moly, Shelley! This was your first project!?! I am totally blown away! Good for you for tackling it! I’m seriously so impressed. Even for us more experienced crocheters, the first couple rows around the flip flop is a little awkward so you’re not alone there. I really hope to make a video soon. I think it could help a lot of people.
Congrats on mastering a new skill! What are you going to try making next!?
Jess
Kristine
June 3, 2016 at 8:29 pmA video would be wonderful!!!!!
Doddie Guthrie Greenhill
May 30, 2016 at 12:32 pmI having trouble understanding the following:
Rows 2-9: With larger hook, cont in sc around the sole. (Crochet in the round. You don’t need to sl st and ch 1 at the end of each row.)
Place two stitch markers in the middle of the sole. This is where the back “lip” of your slipper will taper off to.
Row 9 cont: sc to 1 stitch before first marker, sl st, turn.
Does this mean I complete Row 9 and 1/2 before starting row 10:
Jess @ Make and Do Crew
May 31, 2016 at 12:24 amHey Doddie,
Yes, so you’ll work row 9 all around the slipper, returning to the point where you originally tied your yarn on. Then you’ll pause, add the stitch markers, and then continue crocheting in the same direction without turning your work to complete the rest of row 9 (to the stitch marker).
Then you’ll turn and head back toward the heel and eventually the stitch marker on the other side.
Does that make sense? 🙂
BJ
May 30, 2016 at 3:44 pmam having trouble with the very first row. can you do a video or picture of how to do it??? thanks
Jess @ Make and Do Crew
May 31, 2016 at 12:22 amYes, BJ, I’ll add a few extra photos as soon as I can 🙂 In the meantime, I’ve added a bit more written description in that section of the pattern that might help you get going.
Thanks for the suggestion to add more photos!
Jess
Annie
May 30, 2016 at 5:01 pmHi!
Oh I LOVE these little slippers! I was so excited when I first saw this pattern and couldn’t wait to start making my first pair! They are just the cutest….they look so summery! Thank you soooo very much for sharing your wonderful pattern!
I’m presently in the process of crocheting my first one and so far things are coming out good. I’m now beginning to start the toe area and I have a question…. I’m so sorry I’m so dense with this but I’m having a little trouble understanding the beginning of Row 1 instructions. Could you please clarify/explain this area (below) a little more if possible?
Where the instructions say “Row 1: With the toe facing toward you, attach the yarn at the right marker. sk 1 sc from the marked stitch and begin in next sc, ch 2, sl st into sc where marker is,….” (I understand from this point on).
I understand I’m to attach the yarn in the same stitch that has the right marker in it. Then I’m to skip 1 sc (moving left towards center of toe area), then chain into the next sc (?), chain 2…..and it’s at this point where I’m confused. Instruction says to slip stitch into the sc where marker is. So it appears I will be moving to the right again?
I thank you so much for any help you can me give with this! I can’t wait to finish my first pair!
Jess @ Make and Do Crew
May 31, 2016 at 12:21 amHey Annie!
This part of the pattern was really tricky for me to explain, so thanks for asking a great clarifying question. I’m sure others are wondering the same thing. I’ve updated the pattern with a bit more detail above. Here’s what it says:
Row 1: With the toe facing toward you, attach the yarn at the right marker. sk 1 sc from the marked stitch and sl st into next sc (left of the marker), ch 2, sl st back into sc where right marker is, 2 hdc in same sc you began in (cluster made), sk 2 sc, 3 hdc in next sc, sk 2 sc, 3 hdc, sk 2 sc, sl st into marked sc, sl st in next sc (up the left edge of the slipper), turn.
So in plain English: Essentially, you’re attaching the yarn in the same stitch the marker is in. Then skipping a stitch (toward the left), slip stitching into that stitch and then chaining 2. You’ll attach those chained stitches with a slip stitch back into the same right side marked stitch you began in. So yes, you work to the right again temporarily to attach the cluster and then head toward the left like you’d normally crochet a row.
I hope that makes a little more sense? Looking at the photo right below this section of the pattern (that shoes the toe and the stitch markers might be helpful too.)
Happy crocheting ?
Annie
May 31, 2016 at 1:54 amHi Jess!
Wow – thank you for writing back so quickly! I understand your instructions perfectly….you couldn’t have explained any better! I so appreciate all the time you took in explaining this step in further detail….thanks so much Jess!
Annie
Jess @ Make and Do Crew
May 31, 2016 at 4:50 pmYay! Thanks for letting me know, Annie!
Emily
May 30, 2016 at 6:51 pmCould you please clarify row 1 of the toe? I read it as: to attach at the marker, then skip, then go back to the marker, without working anything into the stircg you skipped to? Is it actually attach to the right OF the marker?
It could be easy, but it’s confusing the heck out of me.
Any help would be appreciated.
Jess @ Make and Do Crew
May 31, 2016 at 12:19 amEmily–
This part of the pattern was really tricky for me to explain, so thanks for asking a great clarifying question. I’m sure others are wondering the same thing. I’ve updated the pattern with a bit more detail above. Here’s what it says:
Row 1: With the toe facing toward you, attach the yarn at the right marker. sk 1 sc from the marked stitch and sl st into next sc (left of the marker), ch 2, sl st back into sc where right marker is, 2 hdc in same sc you began in (cluster made), sk 2 sc, 3 hdc in next sc, sk 2 sc, 3 hdc, sk 2 sc, sl st into marked sc, sl st in next sc (up the left edge of the slipper), turn.
So in plain English: Essentially, you’re attaching the yarn in the same stitch the marker is in. Then skipping a stitch (toward the left), slip stitching into that stitch and then chaining 2. You’ll attach those chained stitches with a slip stitch back into the same right side marked stitch you began in.
I hope that makes a little more sense? Looking at the photo right below this section of the pattern (that shoes the toe and the stitch markers might be helpful too.)
Happy crocheting 🙂
Jess
Kathy B.
May 30, 2016 at 9:12 pmLove this pattern. Very creative use for flip flops. Thank you for sharing th is pattern.
Rebecca Woods
May 30, 2016 at 9:49 pmI am currently working one a pair for a friend after making a first practice pair for myself. I love them! Thank you so much for sharing the pattern and all of the helpful information! 😀
Jess @ Make and Do Crew
May 31, 2016 at 12:08 amAwesome, Rebecca. What a lucky friend you have! I appreciate your kind words.
Happy crocheting!
Jess
Tashina
May 30, 2016 at 11:23 pmThis is such a wonderful idea and I followed your pattern to a T I am an expert crocheter and often make my own patterns myself. This pattern poorly written making it pretty hard to follow but I continued anyways to see what would happen. It did not at all turn out like the ones pictured. I suggest having someone you know that can crochet well try out the pattern and see if it happens to them too. Then you could revise it so it doesn’t happen to others.
Jess @ Make and Do Crew
May 31, 2016 at 12:08 amHey Tashina,
I’m sorry to hear you struggled with it. I have had many readers send me photos of their finished slippers so I know that the pattern is working for some. I do understand though that there is a lot of variability in the size of flip flops used, the number of holes poked, the tightness of someone’s stitches, all of which will influence the final outcome of the pattern. I really enjoy crocheting and am constantly working on my pattern writing skills. If you’d like to email me with the sections you found confusing, I’d be happy to take a look at clarifying the pattern. MakeAndDoCrew (at) gmail (dot) com
Thanks.
Jess
Kathleen
May 31, 2016 at 5:37 amHi Jess, Thank you so much for sharing your pattern with everyone. It was an awesome thing to do. It was the answer to a prayer for me, as I needed something like this for vacation, but can not wear thong shoes or any sandal that goes between the toes. I am attempting this pattern because I do like the idea you had, however, as I crochet, my shoes are not pulling in like yours. They seem to be more boatlike as I do the rows. Am I doing something wrong or is this going to correct itself, or do i need to start skipping some stitches? My shoe size is obviously larger than yours, so I am wondering how to adjust the crochet to make the shoe fit closer.
Jess @ Make and Do Crew
May 31, 2016 at 4:49 pmHey Kathleen!
So happy you came across my pattern before you go on vacation. I have made a couple pairs of these now, and from what I can tell, it sounds like your holes might be a little closer together than mine, which is creating more stitches total, which is keeping the crocheting from tightening up like in my photos. I think your idea to do a simple decrease (sc-dec) in a few places around the toe and heel would correct this. Here’s a good photo tutorial about how to do a sc-decrease in case you need any help. Hope that makes sense!
http://www.purlsoho.com/create/2013/07/26/single-crochet-decrease/
Kathleen
May 31, 2016 at 4:59 pmOMG!!! Thank you so much!!! It is so nice of you to respond to all of these inquiries, each of them different. What you said is exactly correct, my stitches do look like more, so I am on my way to decreasing.I will let you know how this turned out.Thanks again!!
Kathleen Sabo
May 31, 2016 at 12:08 pmI love the pattern, got the flip flops, but cant get the pattern to print!
Grace Hibdon
May 31, 2016 at 2:29 pmWould be interested in the next patterns you make.
Jess @ Make and Do Crew
June 11, 2016 at 9:11 pmThanks so much, Grace! Feel free to subscribe in the box above this comment area and I’ll send you my once weekly digest of the patterns I posted from that week.
Happy crocheting!
jess
Denise
May 31, 2016 at 5:23 pmWill this pattern work with other yarn? Worsted weight 4?
Jess @ Make and Do Crew
June 11, 2016 at 9:10 pmI think any worsted weight yarn will work fine! I just used cotton because I tend to like it a lot and I thought it’d be nice and cool for summertime.
Happy crocheting!
jess
Pam
May 31, 2016 at 6:53 pmI’ve completed the shoe and starting the top. I have the 2 markers in place. I’m having trouble with Row 1. You say:
With the toe facing toward you, (1) attach the yarn at the right marker. (2) sk 1 sc from the marked stitch and begin in next sc, (3) ch 2, sl st into sc where marker is, 2 hdc in same sc you begin in (cluster made), sk 2 sc, 3 hdc in next sc, sk 2 sc, 3 hdc, sk 2 sc, sl st into marked sc, sl st in next sc (up the left edge of the slipper), turn.
OKay, I attach yarn to the same stitch the marker is in (1). Then, (2) I’m skipping one stitch and beginning in the next stitch (you mean the 2nd stitch from the marker). Then chain 2 (3) and slip stitch into where the marker is. **This is where I”m having trouble. I thought I was supposed to start on the 2nd stitch from the marker?
Maria
June 1, 2016 at 2:36 amHow can I make the slipers? I need to see the video
Jess @ Make and Do Crew
June 11, 2016 at 9:08 pmI’m putting together a video and hope to have it posted soon 🙂
Sue
June 1, 2016 at 6:31 amDo. You have a you tube video? That would be great!
Jess @ Make and Do Crew
June 11, 2016 at 9:08 pmI’m putting together a video and hope to have it posted soon 🙂
Michelle
June 1, 2016 at 8:25 amThanks for this pattern, I am very excited to try. One idea to make them sturdier if you are worried about ripping through the sole. You could put the holes straight through the sole instead of on an angle, then for the first row use that plastic thread (like that lanyard material) then after the first row switch to the cotton. (I might try it both ways to see which is better)
A clarifying question. which way do you crochet around the sole, or which side faces out? Are you going clockwise – so the right side is facing out, or counter clockwise – so the right side ends up on the inside of the slipper. Thanks very much.
Ladee
June 1, 2016 at 10:27 amTo make these “outdoor” slippers I would use 2 of the thinner Dollar Tree flip flops. Remove thong from both pair. Crochet your slippers using one pair, then glue the extra soles onto the bottom of your slippers. I don’t know if hot glue will hold up for this. I would use something like Liquid Nails or Contact Cement.
If you made a pair like this you could also make your holes from top to bottom instead of at an angle. The crochet thread would be less likely to rip the rubber. It would also protect the thread from wear when you glue the other sole to the bottom.
Just a thought…
t
June 1, 2016 at 5:08 pmI don’t understand where to put the stitch markers and the turning with them. Do you have a video that I could watch to better understand?
Jess @ Make and Do Crew
June 11, 2016 at 9:06 pmI’m putting together a video and hope to have it up soon. In the meantime, I hope that the photos above can help you figure out where the stitch markers belong. If you mimic the photos closely as far as placement, you should be in good shape.
Happy crocheting!
Jess
Teresa
June 1, 2016 at 6:15 pmI may have missed it and at the risk of sounding stupid How many holes do you poke in your shoes, say like for a medium
Jess @ Make and Do Crew
June 11, 2016 at 9:05 pmI’m making one and hope to have it up soon! 🙂
Janie
June 1, 2016 at 6:35 pmDo you have a video tutorial for this pattern. Crocheted slippers ???
Jess @ Make and Do Crew
June 11, 2016 at 9:12 pmI’m putting together a video and hope to have it posted soon 🙂
Pam
June 1, 2016 at 8:19 pmThanks for the clarification on row 1. It did help and still look forward to more pictures (and even a video someday).
FYI: This seemed to work pretty good for me. To make my holes I used a large needle and ‘sewed’ around the shoe; then crocheted into those stitches. It was very easy to ‘sew’ sideways into the foam. (just a little variation). Thanks again for this great pattern.
Lindsey
June 1, 2016 at 9:34 pmHello! I made the mistake of poking too many holes (90 for a size 10 flip flop) and enduring is far too loose. I realize I’ll have to start the stitching over again, but would you recommend I just skip over holes in the sandle or do the forest row using all holes and decreasing my stiches in subsequent rows? How that was a clearly worded question.
Lindsey
June 1, 2016 at 9:36 pmOh, autocorrect! The proper words were: everything, first row, and hope.
Jess @ Make and Do Crew
June 2, 2016 at 12:28 amI think either could work, Lindsey. If you can evenly skip holes, I’d just do that, but if not, I think doing some sc-dec around the toe and heel might work too. The good thing is that I think you’ll be able to tell pretty quickly if whatever you try is working because you can just try it on your foot 🙂
Good luck!!
Jess
Mindy Lea
June 1, 2016 at 11:41 pmFor those of you who are not able to crochet, I have the go ahead to plug my Etsy shop on this wonderful pattern made by Make And Do Crew. Thank you Jess! I put a picture of my second pair on Pinterest and got to meet this wonderful lady in virtual world.
We have many color options in stock. Go to our shop LovingLea Created at https://www.etsy.com/shop/LovingLeaCreated and check the Lightweight slippers with the Flip Flop sole out! You can also request a custom order if we do not have a color that interests you in stock.
Erin
June 2, 2016 at 8:16 amIs there a video link or YouTube video showing at the very least the highlights and some tutorial? I’m self taught and can’t really read patterns well, and rely on YouTube videos as I crochet. It would be greatly appreciated.
Jess @ Make and Do Crew
June 11, 2016 at 9:03 pmHey Erin,
I’m working on a video and hope to have it up soon. I’ll add a note to this post as soon as I do 🙂
Jess
Jp
June 2, 2016 at 10:39 amI just made my first pair and was wanting to make one for my 5 year old granddaughter and was wondering if I still do theb9 rows or would I use less for her?
Sarah Andy
June 2, 2016 at 12:29 pmHi
Just made myself a pair of these, their great. Sadly can’t post a picture as not on instagram. Thanks so much for creating the pattern.
Jp
June 2, 2016 at 3:23 pmCan you please tell me if 9 rows will be too big for a kids shoes?
Shelly
June 2, 2016 at 9:52 pmSo I used heavy thread and poked too many holes so I had to decrease the first 2 rows… I love them. I used a braided cord of the same yarn to make them fit better. They are so cute and comfy!!
Next time I will use the correct materials. Thank you for sharing this pattern!!
Jess @ Make and Do Crew
June 10, 2016 at 4:35 pmGlad to hear your improvising worked, Shelly! Thanks for your kind words!
Ladee
June 3, 2016 at 12:18 amI posted a comment. It said “waiting for moderation” or something like that for 3 days then disappeared. No wonder there were no follow-up comments.
Jess @ Make and Do Crew
June 10, 2016 at 4:35 pmHey Ladee,
You’re right. All comments get moderated. The response to this pattern has been huge and I’ve been going through them as quickly as I can get to them while still caring for my family. Thanks for your patience.
Jess
Shirlene
June 3, 2016 at 10:51 amI made a pair with the holes 1/4″ apart like you suggested and they had no ‘curl’ to them so I did a few decrease rows and that worked, sort of. Do you think that holes 1/2″ apart are too far? I love the idea and have had many people as me to meek these for them. Thanks for the pattern!
Shirlene
June 3, 2016 at 10:53 amWOW, nice spell check huh!!? (Ask me to make, it should read!
Jess @ Make and Do Crew
June 10, 2016 at 4:33 pmHey Shirlene,
Maybe something in between, like about 1/3″ or 1 cm? You’re right though, if there’s no “curl,” there needs to be fewer stitches total.
Happy crocheting!
Jess
Cindy
June 3, 2016 at 3:00 pmSo I haven’t seen this addressed and noticed it wasn’t fixed in the photos: what do you do about the holes the plastic thongs you cut out left behind? Did you plug them with something? I know some people who reuse that bottom round part by cutting it down and glue it in place then cover it on the inside with moleskin. I was just curious if there was a different way. I wouldn’t want to be walking around and catch one of those holes on the bottom on something and have it tear after all that hard work.
Jess @ Make and Do Crew
June 10, 2016 at 4:32 pmHey Cindy,
Yes, you could definitely glue the plugs back into the bottom. Since these are meant to be house slippers and not worn outside, I just left the holes open. (More ventilation for summer time ;))
Danielle
June 3, 2016 at 7:59 pmHi Jess, fabulous crochet pattern. I’m crocheting the same size 9 as you (Australian though) so might be slightly different. I’ve shaped the heel and are ready to commence the toe, however the height isn’t enough based upon your pattern. My question is could I just continue some more rounds to get the correct height, even though I’ve already shaped the heel?
Kind regards, Danielle
Jess @ Make and Do Crew
June 10, 2016 at 4:31 pmHello from the USA, Danielle! Yes, I think you could. It would just mean that your top section would come a little higher up on your foot (toward your ankle). It would be pretty minor though.
Happy crocheting!
Jess
Linda Ann
June 4, 2016 at 5:03 amI have crocheted for years, and found this extremely frustrating. I made one slipper, and it was huge. I ripped it out, used a smaller needle and again it was too big. (My holes are 1/4″ apart like you said.) The third time I decreased one or more times in almost every row. Too big. This time, I’m again decreasing and eliminated 2 rows completely. If it doesn’t fit now, I’m throwing the whole project away. I think you need help writing patterns.
A Bee
June 20, 2016 at 5:45 pmOr, you could try the other things mentioned in the pattern. Namely, getting flip flops a size down from your usual size and trying the holes 1/3″ apart (pattern does say 1/4″ to 1/3″).
My first try with a regular size flip flop and holes 1/4″ was waaaaay too big and no “curl”. I sized down and made the holes 5/16″ apart, and they’re turning out fabuloso.
Megan
June 4, 2016 at 9:43 amI have just started mine and I just have a quick question…when doing the first row, you say to insert the needle from top to bottom. Is this crocheted with the wrong side out…? I just want to be sure I am starting right since its crocheted in the round. So as I placed my first row, I went around the sole in a counterclockwise direction. I hope this makes sense.
Jess @ Make and Do Crew
June 10, 2016 at 4:29 pmHey Megan,
I do mine in the clockwise direction with the outside (right side) facing me. Has it worked out for you okay to do it the other way?
Jess
JP
June 4, 2016 at 12:35 pmWhy won’t anyone answer my question? I made one pair of these and now I want to make a pair for my granddaughter but she is five years old. Would 9 rows not be too big for her? Any suggestions? Thank you for the great pattern! I love it!
Jess @ Make and Do Crew
June 10, 2016 at 4:28 pmHey JP,
Thanks for your patience. The response to this pattern has been pretty awesome and I haven’t been able to respond to everyone’s questions and comments as quickly as I’d like. I just posted a pattern for toddler-sized boat shoe slipper in which the heel is crocheted in the same way as this pattern. You might like to check out the dimensions of that to get an idea of what would work for a kid. Also, you could always have her mother or father measure that part of her foot to get an idea of how high you need to make it.
Happy crocheting!
jess
Tally erp 9
June 5, 2016 at 2:16 amI wish I knew how to crochet! They’re beautiful!
Jennifer
June 5, 2016 at 5:19 pmHi,
Working on crocheting a pair now. I have a question about round 9 should I do the enitire row sc then put the markers in or put the markers in before row 9. I keep getting one side higher and not sure what my issue is. These are super cute!
Jess @ Make and Do Crew
June 7, 2016 at 4:42 pmPut the markers in once you’ve worked the first part of row 9. So follow exactly the steps of the pattern by (row 9) sc to the heel point you began the slipper at. Then place the markers. Then (row 9 cont.) keep sc in the same direction you were already going until you reach the first marker and follow the directions for the end of row 9.
Hope that makes sense! Let me know if not 🙂
Dianne
June 17, 2016 at 10:47 pmThank you that helped with row 9
Jess @ Make and Do Crew
June 21, 2016 at 11:37 pmSo happy to hear that, Dianne!
Robin Howell
June 5, 2016 at 6:19 pmThank you so much for sharing this pattern. I am trying to make these, but am having difficulty with the top (toe) part as a lot of others have. But I think my BIGGEST issue is this part:
“Find the approximate midpoint of the front of the slipper. Place stitch markers 10 stitches apart at the toe.”
Do I need to count 10 SC from the center on the R and L or do I count just 10 SC altogether like, 5 on the R and 5 on the L.
Margaret
June 5, 2016 at 8:26 pmThought you might get a chuckle out of this. When I was growing up my mom called these sandles/thongs SNAPPING SLIPPERS!!!
Jillian
June 7, 2016 at 11:32 amI am having some issues with the first row for the slipper top where it says “sl st back into sc where right marker is”. So I’m essentially working to the right and not to the left? I’m having a hard time getting my yarn to want to do this without becoming a mess. Please help! Thank you.
Jess @ Make and Do Crew
June 7, 2016 at 10:36 pmYes, you’re working back to the right for just one stitch to anchor the right side of your cluster to the edge of the slipper side. Does that make sense? Once it’s anchored, you work to the left just like normal crochet.
Hope that helps!
Jess
Jillian
June 8, 2016 at 10:24 amYes that does help. And then you do the 2 hdc where you did the first sl st correct? I might be getting more confused than I need to because when I do this, I don’t have 2 stitches to skip before doing a sl st in the marker on the left side.
Janelle
June 9, 2016 at 8:28 pmThis is where I am having difficulty, as well. I just can’t figure out how the instructions are supposed to fit in a 10 stitch area. For each “sk 2 sc”, if I skip one and sc into the 2nd stitch each time, I still end up with 11 spots, sl st into stitch 12 to the left before turning. If I skip the 2 and sc into a third stitch, I end up with the last sl st 15 stitches to the left. I am not used to following patterns, though, so I may be reading something wrong?
Jess @ Make and Do Crew
June 10, 2016 at 4:11 pmHey!
So, the sk 2 sc should be skipping two single crochets. So you’ll be putting the next stitch that’s called for (a hdc, I assume) in the third stitch over. (There will be two empty stitches in between.) Does that make sense? Good for you for giving pattern reading a shot! 🙂
Jess
Val Lee
June 8, 2016 at 12:39 amThank you so much for sharing this gorgeous pattern. I’m a learner crocheter and have two daughters egging me on to to give these a bash as they love them..so today this is my mission.. thanks again. 🙂
Jess @ Make and Do Crew
June 10, 2016 at 4:23 pmHey Val,
Congrats on learning a new life skill! I think everyone could benefit from having something so wonderful to do with their hands.
Good luck!
Jess
Michelle
June 8, 2016 at 7:32 pmI’m having a hard time with Row 9. I had started the heel portion of the pattern only to see that one side of the heel is higher than the other. I pulled out all the way to just before Row 9.
Per the pattern, I began Row 1 on the heel. I am just about ready to start Row 9 and I’m at the heel where I originally joined my yarn. Do I start Row 9, place the first stitch marker once I pass where it is supposed to go and continue all the way around to where I joined the yarn (placing 2nd stitch marker where necessary) and then continue around to the 1st marker? If that’s the case, one side will be higher by an additional row. I’m making these slippers for my sister-in-law and I am hoping you can clarify.
Jess @ Make and Do Crew
June 10, 2016 at 4:18 pmHey Michelle,
When you get to the back of the heel (row 9), you’ll place your stitch markers and then continue on in the same direction to the first stitch marker (so just a few inches down the side of the slipper). This is called “row 9 cont.” in the pattern. Once you finish row 9, you’ll turn your work and head back around the heel in the other direction. Doing it this way should result in both sides being the same height.
Hope that makes sense!
Jess
Ashley
June 8, 2016 at 8:08 pmHi.. was wondering if worsted weight acrylic yarn would work or is it only cotton yarn that works best?
Jess @ Make and Do Crew
June 10, 2016 at 4:16 pmYup! That would work too!
Gail
June 9, 2016 at 6:57 amI have a different problem, I have small feet and wear like a size 5 shoe. Any ideas on how to make these smaller? Any help would be greatly appreciated.
Jess @ Make and Do Crew
June 10, 2016 at 4:15 pmHey Gail,
Check out the “notes” section above for a few ideas! I think doing the pattern as is but maybe skipping the final row in the “top” section would work fine.
Happy crocheting!
Jess
Cynthia
June 23, 2016 at 5:27 amCheck out this link. It is for a child. But I found that you don’t really need a pattern for each different size. As long as you keep the holes no more than 1/4″ apart, the rest will just flow through. June adjust the 2/3 length where you put the loops and also adjust the length of the tongue by increasing the chain length. . For the men’s, I also made the tongue wider. You can either add more increases or add more rows where there is no increases.
https://makeanddocrew.com/crochet-toddler-boat-shoe-slippers-flip-flop-soles/
I hope I explained clearly and not confused anyone more!
Liz
June 9, 2016 at 12:23 pmFinished my first flip flop slipper. I’m making a pair for my daughter who is 6’2″ so has long feet of size 12. It took a couple of times of creating and taking apart but, I think I got it.
Thanks.
Liz
Jess @ Make and Do Crew
June 10, 2016 at 4:11 pmSo awesome, Liz! I love how customizable these are. My mom wears a size 11 and just made a cute pair as well.
Happy crocheting!
Jess
Beth
June 10, 2016 at 11:04 pmHI…I have went through all the comments to get help with row 9, but your answers are somewhat different for all three. Can you please explain it clearly for me? Thank you so much
Jess @ Make and Do Crew
June 11, 2016 at 9:01 pmHey Beth,
In row 9, your single crocheting until you get to the back of the heel where you started. At that point, you pause, put stitch markers in the appropriate places and then continue sc in the same direction you were working (called row 9 cont in the pattern) until you get to the stitch marker, where you complete the end of row 9 cont. At that point, you turn the slipper and head back in the other direction (row 10) toward the heel and eventually the other stitch marker.
Hope that helps.
Jess
Tess
June 11, 2016 at 4:54 pmI’m confused as to why my SC looks so much different then yours on these shoes. I’ve been crocheting for 30 years, so I know what a sc should look like and mine is not as loose as yours.
Any way you have a video for this pattern?
Jess @ Make and Do Crew
June 11, 2016 at 8:58 pmI am working on a video, Tess, and I hope to have it up soon 🙂
A Bee
June 20, 2016 at 5:58 pmLess holes around the sole and crochet *tightly*. That’s what gave mine that sort of see-through holey look like the pattern photos.
My first try I placed the holes 1/4″ apart and just used [my] regular tension, and it was coming out a clunky mess. Second try I went 5/16″ apart and really tightened up my tension. (Except for that first row of sc’s into the actual flip flop. I left that loose-ish.)
Jess @ Make and Do Crew
June 22, 2016 at 9:37 pmThanks for sharing what worked for you, A bee! I know it will help others out too.
Michele Van Brabant
June 12, 2016 at 2:46 pmI ordered the pdf but did not get page 4 when I printed it. Now can’t find original to print it.Is there anyway you could send it to me
Jess @ Make and Do Crew
June 12, 2016 at 3:36 pmHey Michele,
I just emailed you 🙂
Michele
June 13, 2016 at 6:35 pmYes got it. Thanks so much for your quick response! Made a pair today . An awesome pattern!
Jess @ Make and Do Crew
June 14, 2016 at 3:26 pmSo happy to hear that, Michele! Hope it was fun 🙂
Angie
June 13, 2016 at 8:49 amI love this pattern. I started making a yellow pair with white sole and found that there was too much sole left at the back of the heel, I guess that is why you said to buy a size smaller. I got the first one made and noticed this and the pattern worked out exactly how you said it would. I just need to buy smaller flip flops. But the possibilities. I have scads of cotton peaches and cream in all different colours. I can make summer shoes to go with every outfit I wear, how cool is that. I do use a flip flop that has a harder sole, so it should last longer, but if it only lasts for one season…..just make another pair. I bought two pairs of similar shoes in Florida in January and just love them, was planning on buying more, I paid $50 a pair, now I can just make my own……love love love these. Thanks so much Jess for posting this pattern
Jess @ Make and Do Crew
June 14, 2016 at 3:27 pmWhat a wonderful story, Angie! I was thinking the same thing when I started to notice mine getting a little dirty. At first I was bummed, and then I just thought–it’s just another crochet opportunity to make a new project! 🙂
How awesome that you can make your own shoes now for a couple bucks using supplies you already own. That is the best!
Happy crocheting!
Jess
Dawn
June 15, 2016 at 6:17 pmCan you tell me if you have come out with the pattern for men’s slippers yet?
Jess @ Make and Do Crew
June 15, 2016 at 10:57 pmHey Dawn,
I haven’t yet, but I have some men’s flip flops in my craft room that are just waiting to be transformed! If you’d like to subscribe in the box on the sidebar or above this comment area, I’ll send an email once I’ve published the free pattern for them.
Thanks for your question!
Jess
Robin
June 17, 2016 at 7:21 amI have another question about the toe part. I understand the instructions but the issue is the stitches. So if I am placing the markers 10 stitches apart, and the fist cluster is the…….
“attach the yarn at the right marker, sk 1 sc from the marked stitch and sl st into next sc (left of the marker) , ch 2, sl st back into sc where right marker is, 2 hdc in same sc you began in (cluster made)”
Then the next 2 clusters are made by skipping 2 sc and making 3 hdc in the 3rd stitch, is that correct? If so you can’t skip 2 more sc at the end to sl st into the left marker, that will go past the left marker?
Very confused on that part only’
Jess @ Make and Do Crew
June 22, 2016 at 9:48 pmHey Robin,
The first actual stitch (in the form of the ch 2) is going in one st to the left of the marker, which I don’t think was very clear how I had it written. Thanks for pointing that out. I’ve revised it up above, but here is it sort of “drawn” out as best I can with my keyboard. I hope this helps 🙂
(Left marked stitch) (sk) (cl) (sk) (sk) (cl) (sk) (sk) (cl) (Right marked stitch–start here)
Thanks for your feedback!
Jess
Robin Howell
June 23, 2016 at 9:17 amThank you. I will look at the revised pattern. 🙂
Robin Howell
June 25, 2016 at 11:32 amThank you so much for rewording this. I understand much better now. I am working on my 2nd shoe of my 2nd pair.
Jess @ Make and Do Crew
June 26, 2016 at 2:25 pmThank you so much for the feedback, Robin! I am so happy to hear that! I always aim to be as clear as possible, but I really appreciate readers like you who point out where I can improve a pattern.
Happy crocheting!
Jess
Alta Van Wyngaard
June 19, 2016 at 5:45 amPlease I want patterns of these flip flops? I havr osteoarthritis in the feet and think this will do wobders to my feet. I can’t crochet but am willing to learn.
many thanks and have blessed day
Alta
Jess @ Make and Do Crew
June 21, 2016 at 11:40 pmHey Alta,
The pattern is above this comment area within the body of the post. If you’d like a printable version, you can buy it for $2.50 here.
There are a few people making these on a commission basis and selling them as well if you don’t care to learn to make them yourself. (Although you might really enjoy it! 🙂
Jess
Jane
June 20, 2016 at 2:09 pmI am looking forward to trying this fun project
Shirley
June 20, 2016 at 5:12 pmMuch discussion and so many love these slippers. That’s enough to make a lot of us sit up and try this pattern. This is probably the #BestIdeaEver! Thank you for designing these.
Jess @ Make and Do Crew
June 21, 2016 at 11:36 pmI hope you enjoy it, Shirley! Thanks for your kind words. 🙂
Jess
Rosie
June 21, 2016 at 8:55 amI am having some trouble understanding the pattern. I have tried making one pair and they do not look like your photos. I must be doing something wrong. Are you going to make an instructional video? That would help me out on making these wonderful slippers.
Jess @ Make and Do Crew
June 22, 2016 at 9:36 pmHey Rosie,
Yes! I’m hoping to have the video up very soon. I know some people have found that when their holes are a little too close together, the slippers don’t curve inward like in the photos. If this is what you’re running into, you might try doing some decreases early on in your rows so that you have fewer total stitches.
If you’d like to subscribe in the box above, I’ll send an email when the video is finished. Otherwise, just keep checking back 🙂
Jess
Rosie
June 23, 2016 at 3:31 pmThank you. I did punch my holes further apart and seems to have worked. I can’t wait until your video is finished.
Jessica Jensen
June 22, 2016 at 1:06 pmI purchased the printable pattern for $2.50 and I still have not received it in my email. How long does this take to receive them? thanks
Jess @ Make and Do Crew
June 22, 2016 at 9:30 pmHey Jessica,
It might be worth checking your spam and junk folders as it def should arrive in less than 10 mins. I responded to your email though, so please let me know if you didn’t get what you need. Thanks for your patience!
Jess
Martha Holaday
June 24, 2016 at 10:46 pmHi, I have made a pair of these slippers, love them. I did make a few changes as I wanted to use a different type of yarn and a varigated yarn. Ok, couldn’t figure out how to post a picture of them on this site. Tried to go to [email protected], keeps bringing me back to this site, so don’t know how to get you a picture of the slippers. I did post them on Facebook!! Thanks so very much, love this idea. Plan on making a pair for my Great niece and nephew for a trip we are taking. Thought they would be great for them to wear in the rental van. That way their shoes (never know if it is rainy, muddy, etc) will be placed on a rug we will be taking for that purpose.
Jess @ Make and Do Crew
July 3, 2016 at 1:23 pmHey Martha,
I’m so glad your slippers turned out! I’d love to see a picture! Feel free to email me at Jess (at) make and do crew (dot) com (no spaces and using the @ and . signs).
Your great niece and nephew are so lucky to have you making things for them.
Happy crocheting!
Jess
Mataya
July 5, 2016 at 8:00 pmI have a question about rows 9+. Are they to make the heel or thw toe sidw thicker? I am struggling to understand.
Jess @ Make and Do Crew
July 5, 2016 at 8:54 pmHey Mataya,
They are to make the back heel part a bit taller so that it doesn’t slide off the back of your foot. So for the row called “9 cont” and on, you will just be working in the back half of the slipper. Then you’ll fasten off and move on to the toe part.
Does that make sense? Let me know if not!
Jess
Pam
July 7, 2016 at 9:38 amI am in the process of making these slippers. 20+ years ago I made some house slippers only at the time I went from top to bottom and of course the yarn frayed with wearing so they didn’t last long. I then make some use the side to top hole method and they lasted for quite a while. I only had acrylic yarn to work with and not crochet at that time so I think using cotton now will greatly improve the slippers. I purchased some from Dollar Trees because they had some beautiful printed patterns that I thought would help enhance the slipper when finished. Big mistake. On the right flip flop I had 3 holes pull right through the rubber and on the left 2 holes pulled through. Because I remember from years ago that I needed to be very careful on spacing the holes, not to be too close to the edge of the flip flop and not to pull the yarn too tight when attaching the foundation row—I was very careful yet I ended up with some soles in each slipper. Since these are for me and are the first I am making, it will be fine but I will not be using Dollar Trees flip flops again and it such a shame because they had such a wonderful array of colors to choose from plus I purchased several pair. But they were only $1 so I am ok to give away or not to use them.
I would like to add a note about the printing issue which seems to be a question posed quite often in the comments and I see on Facebook. I think it is great to offer a pdf and at a reasonable cost. Afterall, you are giving this pattern away free. If anyone has researched as I have done to make slippers using flip flops both online plus watching many YouTube videos,, at the local craft stores, in my crochet 4 crochet circles I go to weekly, and on Facebook crochet group sites one would greatly appreciate your efforts. But I am a bit computer savvy and I usually do a cut and paste into MicroSoft Word creating a document cutting out all the junk/advertising and that way I can resize photos to my size and make some print larger for my eyesight. My computer guru saw me doing this and went out online and added a “pdf” print driver for my HP printer. It is actually called “pdf995” and I have to hit the print popup option so I can choose this, or one of my 2 printers, or my Dymo labelmaker. By using this pdf995 print option it will take out all the junk/advertising. and cut down my “cut and paste” work giving me more time to crochet. You do still get some stuff that you may not want but instead of being lots of pages this reduces the document down to a reasonable size. When considering how much ink you use to print this can be very economical. I remember an online pattern if printed would have been 36 pages but using the pdf print program it was 4 pages. Again, that saves on printing, wear and tear of the printer, ink and paper costs.
I do not know if you are using Ravelry but if you aren’t you might want to use it. Any member can add photos and comments on projects which I find very very helpful. This also gives me ideas of what colors of yarn or what kind of yarn to use on a project.
Thank you kindly for sharing your pattern with the world.
Blessings for a wonderful day,
Pam aka Racie
.
Sue B D
July 7, 2016 at 7:28 pmAfter getting the slipper made, I am quite confused how you worked the “toe” portion. Mine looks nothing even close to yours, and the directions are quite confusing. When I attempt the first few stitches of the first row of the toe, it almost gets all knotted and unworkable. Do you have a picture tutorial or video tutorial of this portion?
Jess @ Make and Do Crew
July 7, 2016 at 11:39 pmHey Sue,
I’m sorry to hear you’re having trouble. Perhaps it would be helpful to check out the photos above that reference the toe section. I’ve also replied to many comments with further clarification on that section that might help answer your specific question. You might like to check those out in the comments section. Otherwise, if you’d like to let me know exactly where you’re having trouble, I’d be happy to try to help. 🙂
Jess
Sue B D
July 8, 2016 at 12:06 pmI did compare mine to the pictures, and as I stated, mine look nothing like yours. I did attempt to look in the comments, but as there are so MANY of them, I gave up trying to find any that helped figure it out. At this point, I will try something different and come up with my own finish. If I can do that, I will share that with you, so that others who are having trouble with the toe portion have another choice for the finish.
Jess @ Make and Do Crew
July 13, 2016 at 3:16 pmThanks, Sue. I’m sure a lot of people would appreciate that.
Sharon Urmanic
July 8, 2016 at 10:48 amThis is the second pair I’ve made love doing them. Your are right the flip flop from Walmart are better to do these on. The second pair I made on from Family Dollar.
Jess @ Make and Do Crew
July 13, 2016 at 3:18 pmSharon,
I’m so glad you’re enjoying this pattern. I just stocked up from Walmart so that I have some for the winter 🙂
Happy crocheting!
Jess
Karen
July 9, 2016 at 8:23 pmI ordered a pattern and still have not received it.
Jess @ Make and Do Crew
July 13, 2016 at 3:12 pmHey Karen,
I replied to your other comment (and sent you the pattern directly), but I’m noticing the email addresses you used for your comments are slightly different. If you don’t receive the pattern from me, please just send me an email and I’ll make sure you get the pattern! My email address is jess (at) makeanddocrew (dot) com.
Thanks!
jess
Karen
July 10, 2016 at 5:00 pmI ordered a pattern was charged and never received it. So upset.
Jess @ Make and Do Crew
July 13, 2016 at 3:07 pmThat’s no good, Karen! Did you happen to check your spam or junk folder? Sometimes it ends up there. It would be from a company called “Gumroad” which is who delivers the patterns for me. Either way, I’m going to email it to you directly to the email address you used for this comment. Thanks for your patience!
Jess
Marcy Wells
July 12, 2016 at 7:41 pmI love your shoe pattern! My holes were pretty messy, so I thought I’d try a different join to the shoe. Here’s what I came up with–when I posted it to my crochet FB group they were so curious that I made a quick video showing how.
https://youtu.be/GEIK2JJ9Vqk
Jess @ Make and Do Crew
July 31, 2016 at 8:45 pmMarcy,
This is awesome! I love the look of that clean line on the sole and your video is so helpful for anyone wanting to try it that way. Thanks so much for sharing!
Jess
Stephanie
August 10, 2016 at 1:36 pmWiLloyd you do a video on how to do the top? I am very lost!!
Stephanie
August 10, 2016 at 1:38 pmWow here I am with the auto correct too! Sorry!! *will you* make a video of the top of the toe 🙂
Jess @ Make and Do Crew
August 12, 2016 at 9:58 pmThat autocorrect gets me every time too. And yes, I will make a video! 🙂
D'Gee
August 25, 2016 at 6:42 pmNo video yet? I’m having the hardest time with the toe.
Susan
July 19, 2016 at 8:03 pmI’m having trouble with the toe, I got the spacing of markers 10 stitches apart what I’m having trouble with is no matter which side I’m attaching yarn to the marker stitch the instructions says to sk 1 sc from marker stitch and begin in next sc ch 2 in the notes it’s states to the left, that is where my confusion is I’m thinking it’s to the right then back to marker stitch. I don’t know just having trouble with toe.
Jess @ Make and Do Crew
July 31, 2016 at 8:41 pmHey Susan,
Sorry for the delay. Regardless of which foot you’re working on, attach the yarn on the right side of the toe (with the slipper facing you–see the photo) and then skip one stitch to the left to do the first stitch of the row. Then you’ll go back to the right for the next stitch, just to secure it into the marked stitch, from there, you’ll work the rest of the row heading left, just like you would a norma crochet row (assuming you’re right handed.)
Hope that helps. Studying the photos of the toe section might help, although you might have already done that 🙂
Jess
Katie
July 26, 2016 at 7:53 pmHello, I am currently making these. Where did you start attaching your yarn for your first stitch? I started in the middle back of the heel. And as I’m reading ahead to row 9. I would have already done half of the heel lip before needing to turn and go back to other stitch marker and it would be uneven in rows on each half of one shoe.
Is there a way around this..or would it be ok as is?
I hope this makes sense.
Thank you
Jess @ Make and Do Crew
July 30, 2016 at 2:08 pmHey Katie,
I attached in the back just like you’re talking about. You’re right that there’s an additional half row (row 9 cont), but it’s compensated for on the very last row when you work from the other side and stop at the mid-back where you started. Hope that helps!
Jess
Stephanie
August 9, 2016 at 7:40 pmUgh I have tried and tried and tried to do the top of the toe and I am completely lost! I am sure it has something to do with the fact this is my first crochet project. But I have tried and tried and tried. I have read comment, and looked at the pictures. Anyone that can help I would greatly appreciate it!!
annie
August 16, 2016 at 1:51 pmdo you have explicaation crochet slipper pattern in french
Jess @ Make and Do Crew
August 16, 2016 at 3:19 pmI’m sorry, Annie, I don’t. I will let you know if I hear of any French readers making the pattern though because perhaps they could help translate it.
Mackenzie
August 24, 2016 at 7:17 pmHello! I’m a little confused- you know how it says “Row 2-9” at that part? And then it says, “Row 9 cont.” Well, I was wondering, for row 9 do you crochet all the way around and then stop at the markers on your next round, or do you stop at the markers on the first part of row 9? Sorry if this sounds confusing, please explain!
Jess @ Make and Do Crew
August 29, 2016 at 11:15 pmHey Mackenzie,
I totally understand why this part is a little tricky to figure out. If the heel closest to you, you’ll work row 9 from the right side to toward the back of the heel. Then when you reach the heel, you’ll continue in the same direction past the back of the heel to the stitch marker on the other side (left) where you’ll work that last section called “Row 9 cont”. Does that make sense? Feel free to ask more questions if not!
Jess
Rebecca
August 27, 2016 at 9:23 pmMy daughter’s recommendation: fill in holes on bottom of sole with flex shot. It should keep any stuff from getting in the slipper through the bottom… Starting the project now, I will update with any info about whether her recommendation will last or even work.. (she’s 11)
Jess @ Make and Do Crew
August 29, 2016 at 10:35 pmHey Rebecca,
That’s a really interesting idea! I had to look up Flex Shot to see what it was. It seems like your daughter might be onto something! Please do let us know how it turns out if you try it. I know a lot of other people are interested in plugging the holes in their flip flops too.
Happy crocheting!
Jess
Chris
August 29, 2016 at 5:47 amDo you have the same pattern for knitting? I don’t know how to crochet and I would love to make these!!
Jess @ Make and Do Crew
August 29, 2016 at 4:43 pmHey Chris,
Unfortunately, I don’t currently have a knit version. My mom has ambitously tried to tackle it a few times and we can’t figure out how to make the needles cooperate with the rubber sole 🙁 I do have an Modern Crochet 101 course you can take for 99 cents with this link if you’d like to learn! http://skl.sh/2aaucCf
Jess
Alison
August 30, 2016 at 1:37 pmIs there any chance of a youtube video tutorial as i find written patterns very hard to follow and understand as i am dyslexic.
thanks
Jess @ Make and Do Crew
September 3, 2016 at 11:21 pmHey Alison,
I’m actually working on a video for a similar pair of shoes/slippers with flip flop soles that I hope to share in the next week or two. It might be a great way for you to make a pair. 🙂
If you’d like to be notified when I post it, just subscribe in the box to the right toward the top of the page or below the post and I’ll send out a note with a link to the video.
Jess
Teri
August 30, 2016 at 6:01 pmWow! I hope I run across these at some craft show someday! They look super comfortable.
Jess @ Make and Do Crew
September 5, 2016 at 2:22 pmThey are REALLY comfy! 🙂 Super lightweight and soft. A few of my readers that are Etsy sellers will take commissions for these slippers if you’d like a pair. Just scroll through the comments and you’ll see where they’ve offered their services to others. 🙂
Suzette
August 30, 2016 at 6:30 pmI regret purchasing this pattern. I am not new to crochet and the top of the toes look NOTHING like the pictures. Is there EVER going to be a video. Don’t spend the money on the printed pattern. It is NO better than the free version.
Jess @ Make and Do Crew
September 1, 2016 at 2:55 pmHey Suzette,
I’m sorry to hear you’re having trouble. My intention was never to imply that the pdf was “better” in any way. It’s just a way for people to have an ad-free, easily printable version if they’d like it. It’s the same content as the website. I’d be happy to refund your $2.50 if you’d like to tell me what email address you used to purchase it. (You can email me at Jess (at) makeanddocrew (dot) come if you don’t want to post your email address here.)
Jess
Janet
August 30, 2016 at 10:03 pmThis would be a great use of my flip flops that have stretched out but the soles are still great. I am pretty fussy about how slippery some are so I tend to feel the bottom always before I buy! I have done the split too many times with the slippery ones when I was younger and now that I am at the “break my hip age” I am careful that they have good soles.
Jess @ Make and Do Crew
September 5, 2016 at 2:21 pmLol, Janet, “break my hip age” cracked me up. These are some of the most comfortable slippers I’ve found. They are soft and SO lightweight. Of all the flip flops I’ve tried to convert into slippers, the 98 cent ones at Walmart seem to be some of the best, so even if you decide to splurge on a new pair to make slippers, it won’t cost you a lot. 🙂
Jess
Granny
August 31, 2016 at 11:37 pmThese slippers are so cute! Do you know anyone that has a similar pattern for knitting? I would love to make these (and those adorable toddler boat shoes) but I have a lot of trouble with crochet.
Thanks.
Jess @ Make and Do Crew
September 5, 2016 at 2:19 pmHey Deb,
My mom has been experimenting with a knitted version, but so far, we’re having a lot of trouble getting those darn needles to bend enough to fit the shape of the flip flop. 🙂 Even with double pointed needles, it’s proven tricky. My mom is pretty persistant though, so she might just figure it out. If so, I will def post a pattern. In the mean time, if you’re interested in practicing crochet, I have a Modern Crochet 101 class you can take for 99 cents with this link: http://skl.sh/2aaucCf As knitter, you might find crochet easier than you think because so much of the struggle is just knowing how to hold the yarn (which you practice a lot with knitting).
Happy making!
Jess
camille scala
September 1, 2016 at 6:13 amCan I purchase them? How much are they? What colors? You should sell them in stores.
Jess @ Make and Do Crew
September 5, 2016 at 2:16 pmHey Camille,
I don’t make them to sell myself, but a few of my readers who are Etsy sellers do. If you scroll through the comments, you’ll see a couple of crocheters offering their services. Hope that helps! 🙂
Jess
Tracey Goleach
September 1, 2016 at 11:01 amCan you download a tutorial video on youtube for this pattern? I can’t seem to get past row 9 :/
Jess @ Make and Do Crew
September 5, 2016 at 2:16 pmYes, I’m hoping to post a video!
Carolyn Mayzum
September 1, 2016 at 11:48 amI ordered the pattern for the crochet slippers and have not received anything in my email. Please let me know why its not being sent. thank you.
Jess @ Make and Do Crew
September 1, 2016 at 2:49 pmHey Carolyn,
I’m sorry you’re having trouble. It is sent from a company called “Gumroad” and can sometimes take 5-10 mins to arrive. If you search your email and don’t see it, please send me an email and I’ll send it off to you directly 🙂
jess (at) makeanddocrew (dot) com
Delia McLaughlin
September 9, 2016 at 2:26 pmI read the notes when I was in the yarn store. I had already bought the flip-flops in my usual size. They are humongous and look nothing like yours but are cute anyway. Thanks for sharing the pattern! BTW: I have two more pair but I made my hub go back and exchange the flip-flops for the smaller size. Hope they get done before a cruise next week!!
Jess @ Make and Do Crew
September 10, 2016 at 4:14 pmOh fun–a cruise! Yeah, for my first pair I ended up just cutting the back of the flip flops off to shorten them. They just fit differently as slippers than they do with the strap between your toes. Have a wonderful trip!!
Jess
Christina
September 13, 2016 at 5:41 pmHi Jess, Thank you so much for the pattern, the flip flops have been really fun to make, the only part i am having trouble with is the slipper top, Im not really understanding Row 1 and of course haven’t gotten any further yet, do you have a video showing how to do it please? Thank you
Jess @ Make and Do Crew
September 16, 2016 at 2:47 pmI’m hoping to make a video soon, Christina! Taking a close look at some of the photos of the top or reading the “in plain English” section might help, but I’m also happy to walk you through it if you have specific questions as you go.
Jess
Melanie
September 26, 2016 at 11:31 pmWould you happen to have a handy dandy link to a video yet? ?
Jess @ Make and Do Crew
September 27, 2016 at 8:38 pmHey Melanie,
The videos are extremely time intensive and I haven’t gotten to recreating these slippers to film a video yet. I’m sorry! I did just finish a new flip flop shoe pattern though that includes a thorough video tutorial if you’d like to have a look. 🙂
Kim Webb
September 19, 2016 at 11:16 pmI would like to print this pattern for girls night in. I hate slippers, but I think I would like these.. I am a computer loser…..how do I print this?
Jess @ Make and Do Crew
September 27, 2016 at 2:46 pmYes, these are super comfy! You can purchase the printable, ad-free pattern for $2.50 right here.
Happy crocheting!
Jess
Janeen Brown
September 20, 2016 at 5:16 pmI just found this on Facebook – it’s brilliant! One thing that REALLY caught my eye, however (oddly enough) was your social sharing widget. Do you mind sharing what plugin you use? My blog is currently a bit of a cluster when it comes to social sharing, and I’m really struggling. When I pinned your generous crochet tutorial, I noticed that your social share lets you choose a custom Pinterest image and description – exactly what I need. I’d be most appreciative if you’d share which one you are using so I may emulate it. Thank you so much for sharing your crochet experience, as well as your beautiful blog! I look forward to connecting.
Jess @ Make and Do Crew
September 27, 2016 at 2:45 pmHaha–I had asked another blogger this same thing when I saw it on her site. It’s called Social Warfare and I like it a log. It’s about $25/year, but I think it’s well worth it for that Pinterest functionality alone. Here’s my aff link if you’d like to use it: https://warfareplugins.com/?ref=338
I look forward to connecting too! Congrats on your new book!
Jess
Pat Christopher
September 20, 2016 at 7:31 pmPaid for the pdf over 30 minutes ago. Still have not seen it can someone check for me?
Pat Christopher
September 21, 2016 at 6:42 amNest morning, still no pattern. Please send it to me or tell me where to get it. I paid you for it.
Thank you
Pat Christopher
September 21, 2016 at 12:01 pmNext day at 1pm, no pattern. Please send pattern or refund the money.
Jess @ Make and Do Crew
September 27, 2016 at 2:42 pmHey Pat,
I’m so sorry you’ve been waiting. I’m quite behind on comments as my daughter just started school. You can always email me for a quicker response. The pattern should have come from “Gumroad.” In case you don’t find it when you search your email though, I’ll email it to you directly.
Thanks for your purchase!
Jess
Stacy Russell
September 30, 2016 at 6:45 amI don’t crochet but my daughter does. I love this idea and can’t wait to show her.
I found your site when someone shared this on Facebook.
Can’t wait to explore more on your site.
Jess @ Make and Do Crew
October 12, 2016 at 4:21 pmHey Stacy–welcome! I hope you can convince your daughter to make you a pair. They’re super comfy! If you ever want to learn yourself, you can take my Modern Crochet 101 course for 99 cents with my instructor referral link: http://skl.sh/2aaucCf
🙂
Shan
November 10, 2016 at 11:25 amI’m poking holes in my flipflops right now :)) and it’s kinda fun ,although I really wasn’t looking forward to this step:)) I can’t wait to finish making them so I can wear them right away. Thanks so much for the tutorial/pattern.
Jess @ Make and Do Crew
November 19, 2016 at 12:20 amYay! It’s kind of soothing to poke the holes, isn’t it? I wouldn’t have guessed it would be so fun either. I hope you enjoy your slippers!
Jess
Lindsay
November 19, 2016 at 6:58 pmI have been trying to find a good crochet slipper pattern and I was really excited to make these… buuuuuut they don’t stay on, one step and they flop of the back of my foot. totally bummeb 🙁 🙁
Jess @ Make and Do Crew
November 20, 2016 at 11:52 pmI’m sorry to hear that, Lindsay! I wonder if you did a few decreases (sc2tog) around the heel section on the last round if they might stay on better?
Nicole
November 26, 2016 at 3:11 amJust awesome! I’m wondering about them stretching. Can I incorporate an elastic yarn around the opening to prevent stretching? What do you recommend?
Jess @ Make and Do Crew
November 26, 2016 at 4:01 pmHmm. Great question! Mine have stretched a little bit in the last 6 months of wear, but not to a degree that has had a big impact. I think you could def use some elastic yarn, or just use a smaller size hook when working the last round of the pattern. You could also work a few single crochet decreases around the heel to tighten it up on the last row of the pattern if you feel like they’re a little too loose on your feet.
Also, I think most of my minor stretching is just due to using cotton yarn. If you used wool or acrylic, I’m guessing there’d be even less stretching.
Hope that’s helpful!
Nattalie
January 4, 2017 at 3:59 pmHello I love these but I was wondering if you have videos on making them. I’m not really good at reading patterns. I’m a visual learner. Thank You!
Jess @ Make and Do Crew
January 6, 2017 at 11:13 pmHey Nattalie,
I don’t have a video tutorial yet, but I’ll be filming one in the next few months. If you’d like to subscribe to my email newsletter, I’ll definitely send a note when the video tutorial is published!
Jess
Connie Blais
January 4, 2017 at 8:54 pmI think I found a solution to the flip flop problem. I am making hi-top slipper sneakers and I purchased a pair
of rawhide soles w/the stitch holds already punched.. I sewed them between the crochet sole and the bottom of the flip flops. Seem to work ok so far.
Jess @ Make and Do Crew
January 18, 2017 at 8:50 pmGreat idea! I’d love to see a pic of how they turn out. It sounds like a really interesting concept. 🙂
Tamela
January 10, 2017 at 1:23 amWhat is done with the holes ?
Thank you
Jess @ Make and Do Crew
January 18, 2017 at 9:10 pmYou can just leave them open if you plan to wear your shoes around the house as slippers or you can glue the plugs from the straps back in if you want to wear the shoes outside. 🙂
Naty
February 15, 2017 at 1:04 pmI have a simple question, you wouldn’t by any chance, have this pattern in French, not the video but the pattern, otherwise I will have to translate it for my non speaking English friend, like I did for your Boots with flipflop pattern.
Jess @ Make and Do Crew
February 18, 2017 at 10:20 pmI’m so sorry, I don’t right now. If you do translate it and would like to share your translation, I’d be thrilled to post it as a PDF on the blog for other French-speakers to benefit from. 🙂
Naty
March 13, 2017 at 6:55 pmI have translated the gray boots, I can send it but I need an email so I can do so. I am going to translate the turquoise sandal flip flop too and I will send it too if you want.
Tammy
February 16, 2017 at 10:57 amJess, these are awesome ! I tried out my old flipflops first in case I couldn’t do it.
Your tutorial was so easy to follow that I could make changes to modify what I liked while following along. I didn’t expect that my first pair would look so great and be so fun. I don’t know how to show you my pics except on Ravelry, my Rav ID is TammyBlondon
I hope you check out my pics. I was able to change the top of the foot and I love it. thanks for saying how the flipflops size up, it makes a big difference. I want to make these for my grandkids and adult boat shoes for myself as well as the heavy slippers. I go outside in my slippers a lot in the summer so these are perfect.
I can see lots of these for gifts in my future 😉
Jess @ Make and Do Crew
February 20, 2017 at 4:20 pmTammy! I love your flip flop slippers! Gosh, they turned out fantastic for your first pair! And I was blown away by the prolific amount of beautiful knitting and crochet you’ve shared on Ravelry. Holy cow! Seriously. What an inspiration!
Thanks so much for saying hello.
Jess
Nicky Lomax
March 15, 2017 at 10:24 pmPlease please please please make a video of this, I know you have a lot of other projects to do, but I want to crochet these and I’m an absolute beginner and I don’t understand the lingo very well. Trying to read the instructions makes me overwhelmed and frustrated but I enjoy your other tutorial videos. Please make one for these! I want to make slippers for people. I even had an idea to make some and donate them. I don’t know, because the more I think about it the more I think people would benefit more from crocheted boots, but I want to make sure they are male-friendly too so men who need warm shoes can enjoy them thoroughly. Do you have any gender neutral or male design boots with a video I could try? I’m disabled and have some free time and I thought maybe I could take up a hobby I could donate to those who need at the end of each year. Anyway those are my ideas, thank you for all you do!
Jess @ Make and Do Crew
April 3, 2017 at 11:05 amI’ll be sharing a video of this in the next couple of weeks! 🙂
Debbie
March 24, 2017 at 6:53 pmFinished my second pair of these today (first one was for a child) – these are mine – I don’t see a place to post a photo, so I’ll add the link to my Facebook page where I posted them.
Lori
April 17, 2017 at 5:56 pmI purchased the PDF pattern, but it did not come with the hole placement ruler, which is why I even bought it! Can you please send it to me?
Jess @ Make and Do Crew
April 23, 2017 at 2:32 pmHmm. That’s strange! I’ve just emailed it to you at the account you listed in this comment. Please let me know if you don’t receive it. 🙂
Thanks for your purchase!
Jess
Caitie
May 2, 2017 at 9:28 amThese are gorgeous! Getting going with some right away 🙂
Jess @ Make and Do Crew
May 3, 2017 at 12:51 pmThank you so much, Caitie! I just love your bunny ears egg cosies! Just pinned them. 🙂
Sascha
May 5, 2017 at 1:12 amHello I got a question 🙂
I am doing the Single Crochet rounds.
Do you end a row with a slip stitch, or just continue with SC?
Greetings, Sascha
Jess @ Make and Do Crew
May 5, 2017 at 10:02 pmHey Sascha,
You don’t need to slip stitch, you can just continue around and around and around. 🙂
Happy crocheting!
Jess
Kim McAllister
May 18, 2017 at 9:15 amDo you think these would work with a felt sole? Do you think they would curl up with a felt sole and cotton yarn? I want to make a summer slipper with cotton yarn but do not want a flip flop sole. I do not want a cotton yarn sole either because I find that they do not last long enough. I have wood floors and they get chilly even in the summer.These slippers are so cute! I was thinking of cutting out a felt sole and using a blanket stitch around to crochet the slipper onto.
Kim McAllister
May 24, 2017 at 8:14 amHi Jess,
Can you tell me the height of the slippers on the side after rows 2-9? Having a little trouble with my gauge. Thanks!
Kim.
Jess @ Make and Do Crew
May 24, 2017 at 4:08 pmHey Kim,
I’d say it’s 1.5-1.75″. Basically you want it just slightly below where a shoe would hit the back of your heel. Then you work the last few rows to build a little “lip” to keep your heel from slipping out.
Happy crocheting!
Jess
Kathryn
May 30, 2017 at 1:00 pmIs the printed ruler from the Sweater Boots the same as this one?
Jess @ Make and Do Crew
June 4, 2017 at 9:30 pmHey Katheryn,
They tend to each differ a bit because the hole spacing is based on the gauge, which is dictated by which yarn is used. So generally, no. But the ruler for the Coachella Boots and my new Seaside Slip-Ons pattern is the same. 🙂
Jess
MackK
June 3, 2017 at 9:25 amLove the pattern and idea. Unfortunately, if you have narrow feet, the resulting slipper winds up being too wide. 🙁
Jess @ Make and Do Crew
June 4, 2017 at 9:23 pmHey!
My sister has extremely narrow feet, so I’ve actually been thinking about this. If you poked your holes just a little wider apart, or did some decreases (sc2tog) near the toe in the first couple rounds, you’d end up with fewer stitches overall and I wonder if that would help “synch” them on your feet better. Does that suggestion seem like something that might work for your feet? I’m interested to know because I’m sure other narrow-footed readers have a similar question. 🙂
Jess
Annabell
June 4, 2017 at 3:06 pmhi make & do crew… I love what you do
I’ve made quite a number of flip flop moccasins through your tutorials and they are so durable and also fit so well. love you
Jess @ Make and Do Crew
June 4, 2017 at 8:53 pmI’m so happy to hear that, Annabell! When I made my first pair, I really was curious how they’d hold up. I’ve had the same experience as you–they’re incredibly durable! It’s really nice how long they last after you put your time and creativity into making them. 🙂
Happy crocheting!
Jess
Shanna
June 28, 2017 at 9:04 amHi Jess,
I’ve purchased and downloaded the PDF pattern for these flip flop slippers. I think they are perfect for the cottage!
I decided to make the first pair as a gift for my small footed friend (size 5). I decided to do only 8 rows because of the size, however, I’ve clearly made a mistake somewhere because it currently looks like a block; the sides go directly up. I’m using the right hook size and an acrylic worsted weight yarn. I don’t tend to have an issue with tension.
I think this may be for two reasons, 1) I’ve too many holes, too close together and 2) I’m not stitching tight enough. I’m not sure if the hole template printed out to the proper size . After watching your tutorial video, I see the holes should be just over 1/4″ apart. Is that right? From your experience, have you been able to estimate how many holes/stitches around in the average slipper (say size 7)?
Do you have any other tips to resolve my problem?
Thanks,
Shanna
P.S. I was trying to find the answer in the comment section of your blog but there are so many comments there. Is there a way for you to clear some of the comments?
Jess @ Make and Do Crew
July 16, 2017 at 3:33 pmHey Shanna,
It sounds like you’re on the right track with your troubleshooting. I’m guessing that one issue might be that the yarn you substituted could be a bit thicker than the 24/7 Cotton I used. 24/7 Cotton tends to be more like a light worsted or DK weight. So to use your yarn, I’d suggest poking your holes a bit further apart, like maybe 1/3 of an inch. Like you were thinking, this will result in fewer overall stitches and then you’ll have a slipper that curves in a bit just like mine does in the video.
Hope that’s helpful!
Jess
kiml
July 16, 2017 at 1:06 pmlets be honest 1. too many rows. 2. you HAVE to watch the video to understand the clusters
Katlin Donnelly
July 29, 2017 at 12:52 amHi! These are adorable and I want to make a pair! Do I have to buy the PDF pattern to get the hole punching ruler?
Jess @ Make and Do Crew
August 3, 2017 at 4:54 pmHey Katlin,
Yes, I include the ruler as a bonus for those who purchase the PDF, but you can make the slippers without it by using a measuring tape. The printable ruler just takes the guesswork out of it!
Jess
Gretchen McClain
September 19, 2017 at 7:22 pmHi Jess! I am making my first pair of slippers but can’t get the video to continue. Do you have any suggestions? I’m so glad I purchased two of your patterns!
Jess @ Make and Do Crew
September 19, 2017 at 9:52 pmHey Gretchen,
Well, that’s no good! Are you still having trouble now? The beginning is working for me. It might be helpful to just try it in a different internet browser. If that doesn’t work, please let me know! I want you to be able to watch the videos–that’s why I make them! 🙂
Jess
apurva
December 5, 2017 at 3:08 amThese are really cool! Thank you so much Jess for sharing this
Theresa
April 23, 2018 at 3:26 pmHi Jess,
I’m obsessed with these slippers!! I am however disappointed with the finished project, The first one was way to loose, so for the other slipper I changed the hook size as recommended in the FAQ section, this one too seems to loose. So I rip the first one to rework it with yet a smaller hook, again better but still doesn’t seem right. I did have to use a substitute yarn but it is 100% cotton I’m not sure if this could be my problem? I am an average crocheter but can follow a pattern. I hope you can give me some pointers on how to fix these so they can be worn.
Thanks,
Theresa
Jess @ Make and Do Crew
April 24, 2018 at 10:58 amHey Theresa,
I think the substitute yarn may be what’s making them looser. Is it a worsted weight cotton? The 24/7 Cotton in the pattern is listed as worsted, but I really think it’s more like a DK weight. My suggestion would be to poke the holes a bit further apart so that you have fewer stitches going around overall. If you happened to purchase the pattern PDF, I include a printable ruler in it for both the 24/7 Cotton as well as one that will work well with most other (slightly heavier) worsted weight cottons.
Hope that’s helpful!
Jess
Theresa
April 25, 2018 at 5:52 pmHi Jess,
Thank you for your reply, I will have to order some 24/7 yarn. In the area where I live the major stores do not carry this yarn. I thought the cotton would be good enough, I did purchase the PDF but both of the rulers are marked differently but look exactly the same distance apart, Would it work if I just punched every other hole? Maybe I can try it and see what happens. I was just hoping to be wearing them already, darn my boney feet.
Thanks again,
Theresa
Fiesty
August 2, 2018 at 6:00 amIt is truly a brilliant piece of an idea… a must to try for everyone.. thanks for sharing tutorial.. will definitely try.