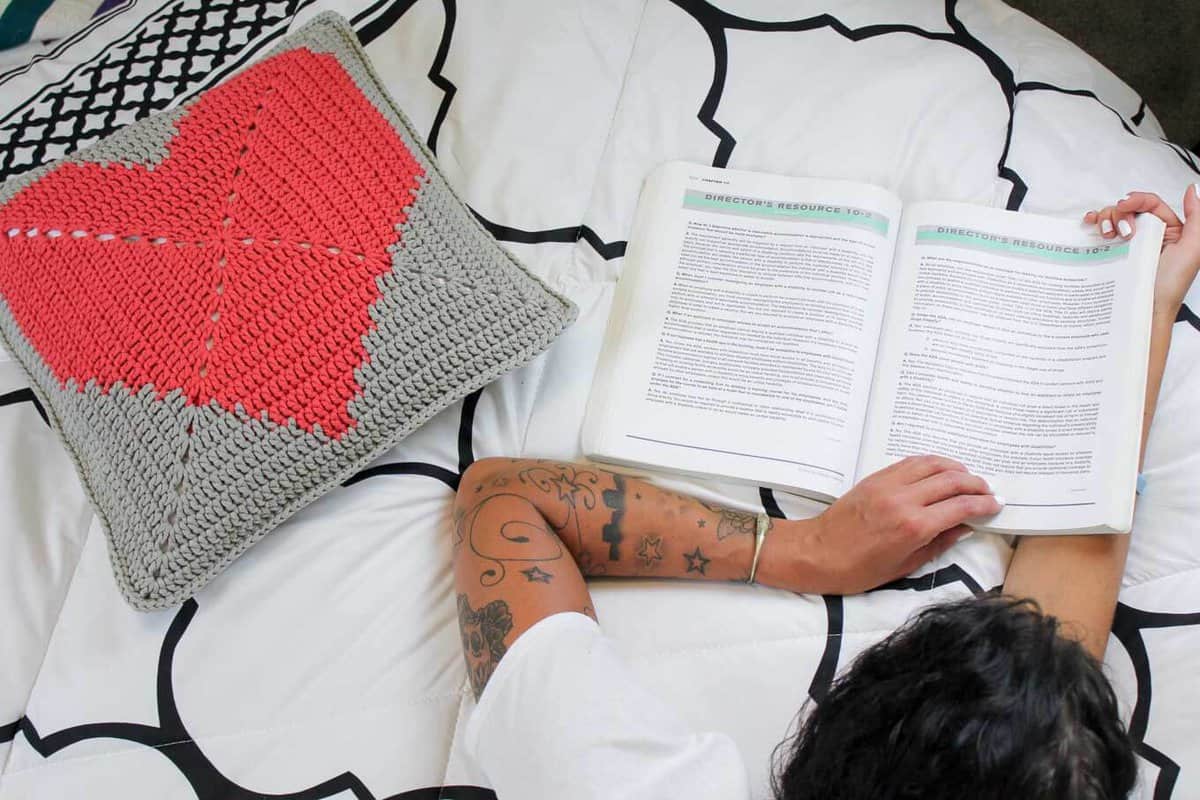
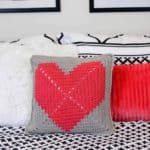
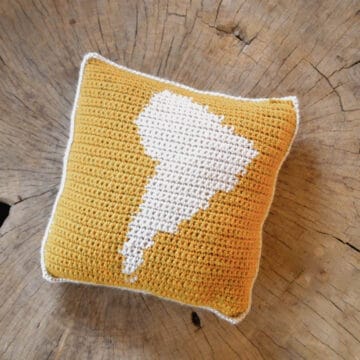
This easy crochet heart pillow uses two squares and a common pillow insert to create a modern statement piece. Make one for Valentine's Day and then enjoy it year-round in a baby nursery, teen's room, or on the living room couch.
Get the complete free pattern below or upgrade to the printable PDF.
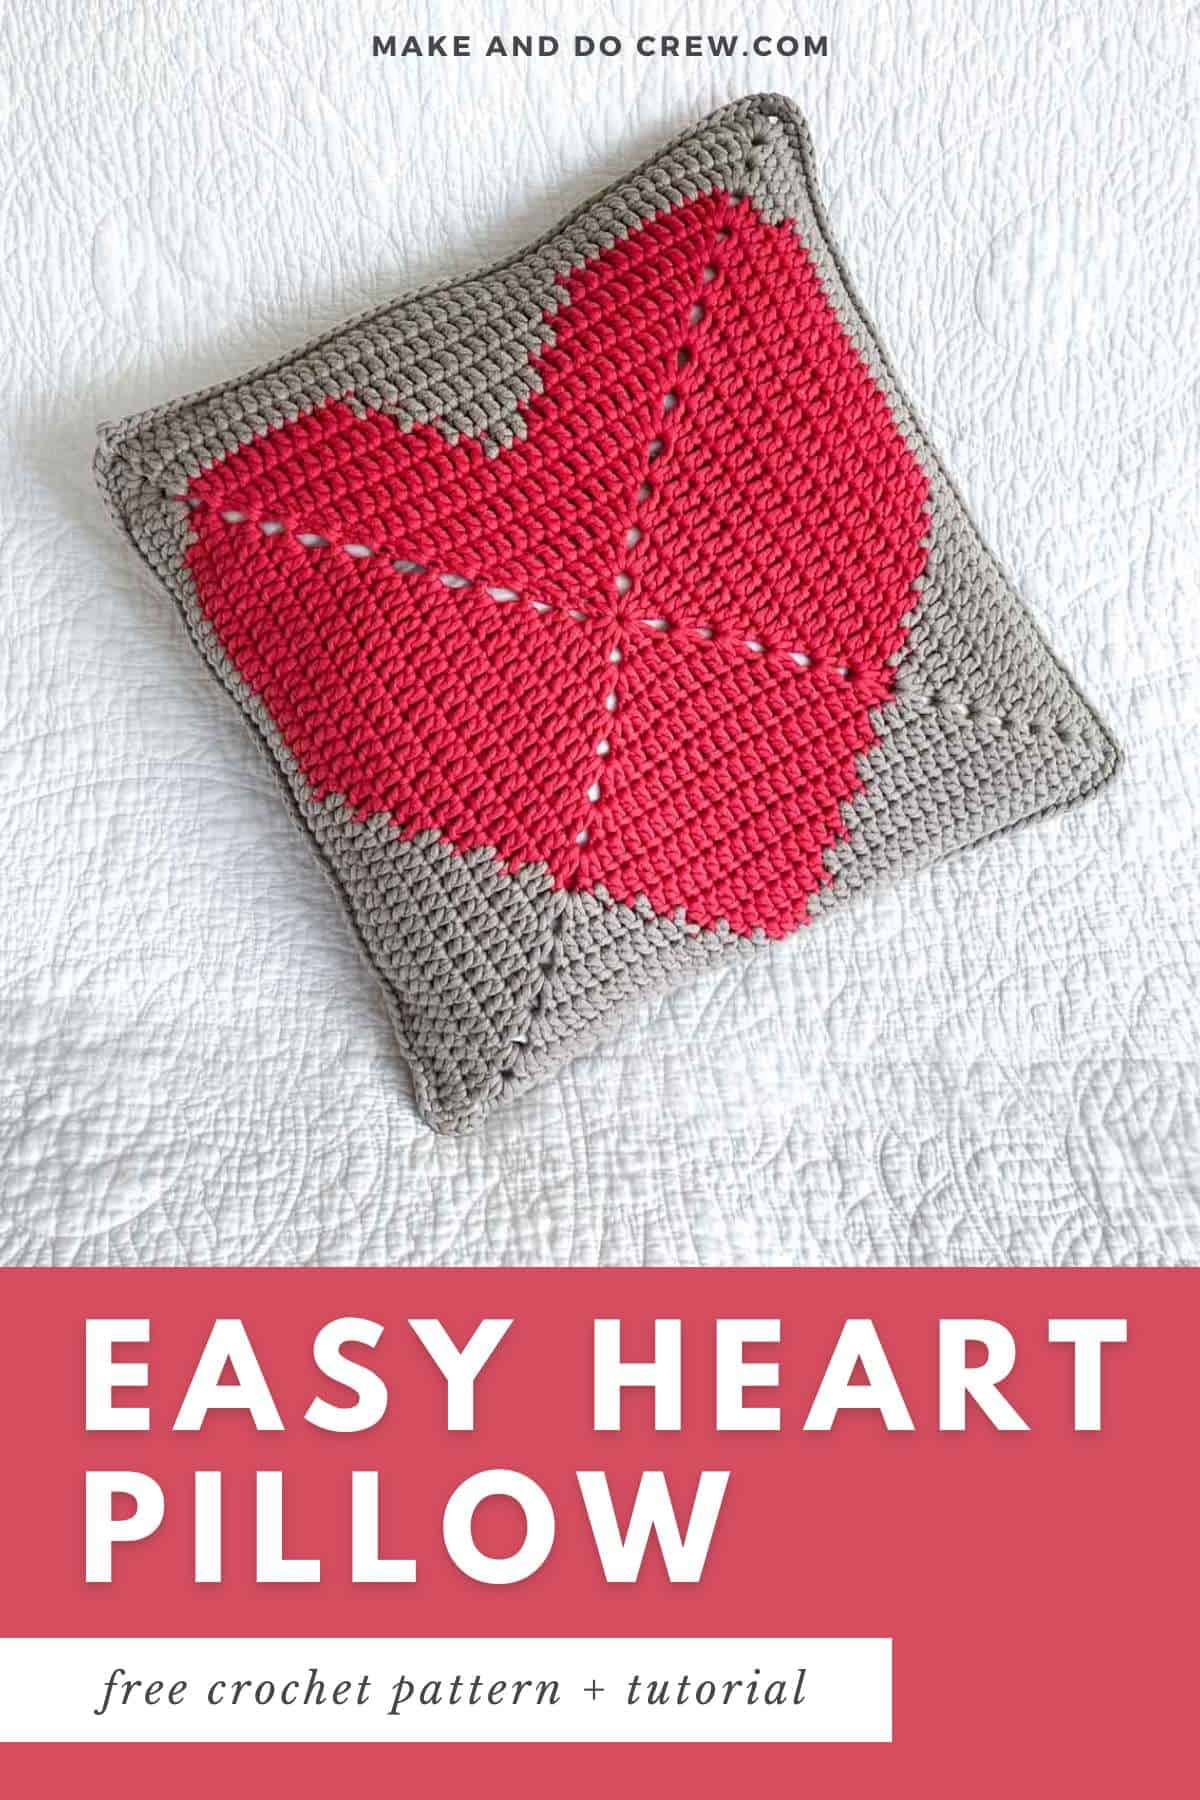
A Heart Pillow Packed With Love
Do you know someone who is headed off to college or moving away for a new adventure? This heart pillow is the perfect way to give them a tangible reminder of your love.
Keep reading for more yarn and inspiration details, or jump down to the free pattern.
Jump to:
- A Heart Pillow Packed With Love
- How to Crochet a Square Heart Pillow
- Customizing Your Pillow
- Yarn + Substitutions
- Print this Pattern
- More Pillow Patterns
- Heart Pillow - Free Pattern
- Valentine's Day Pillow FAQs
- More Free Patterns + Tutorials
- Invitation to our Facebook group
- How to Crochet an Easy Heart Pillow - Overview
Why you'll love this pillow pattern!
How to Crochet a Square Heart Pillow
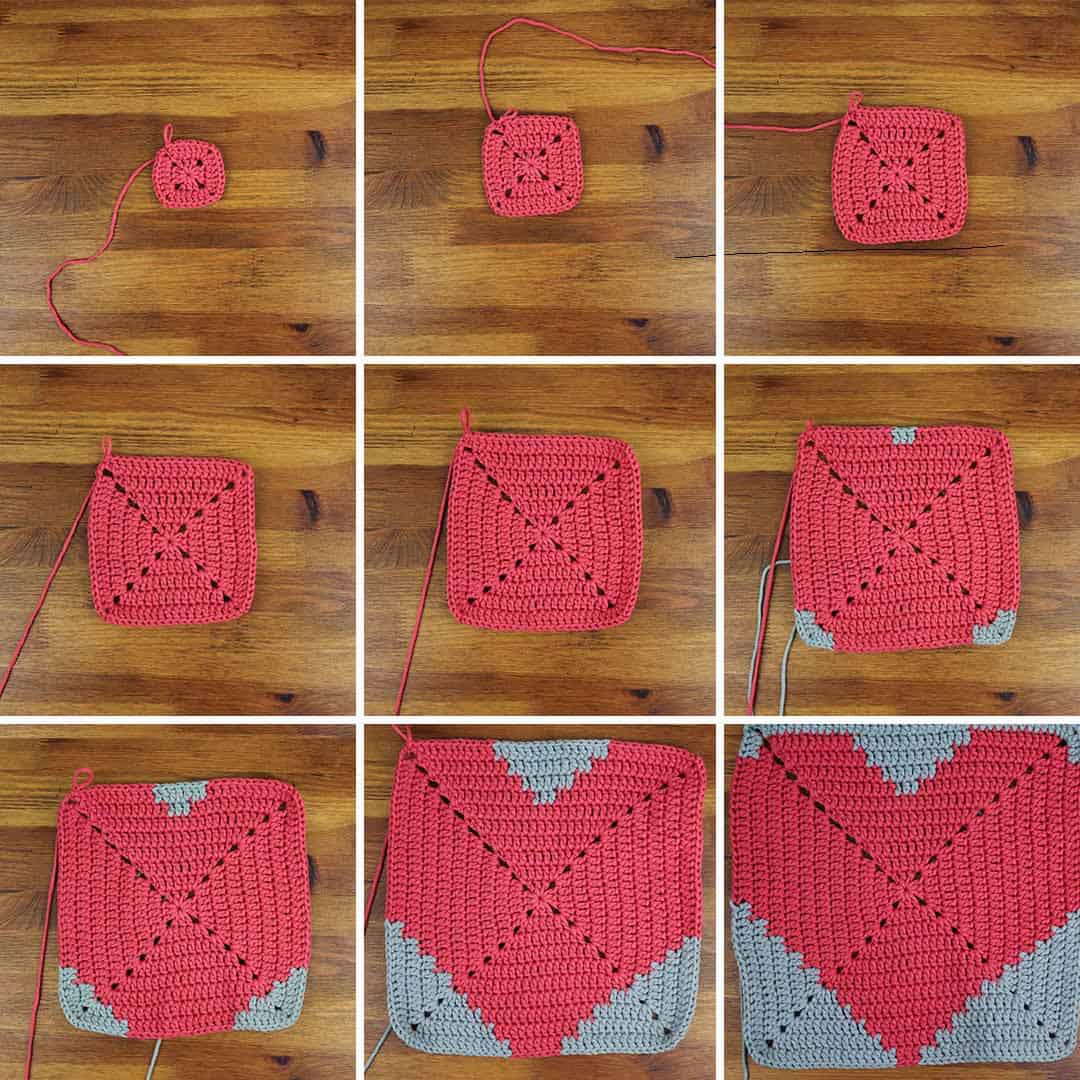
Many crochet heart pillow patterns take the actual shape of a plush heart. For this concept though, I wanted to use the basic structure of a granny square to create a square pillow that can fit a readily available pillow form.
Pattern Overview
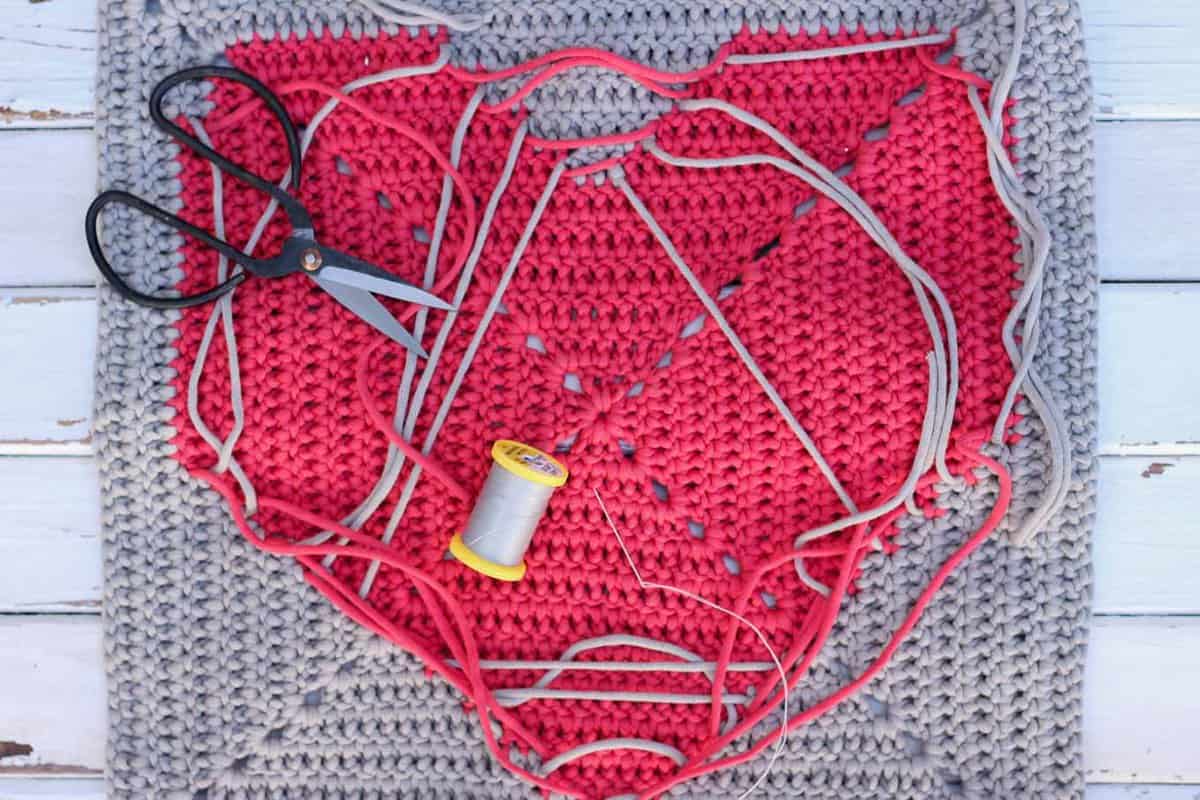
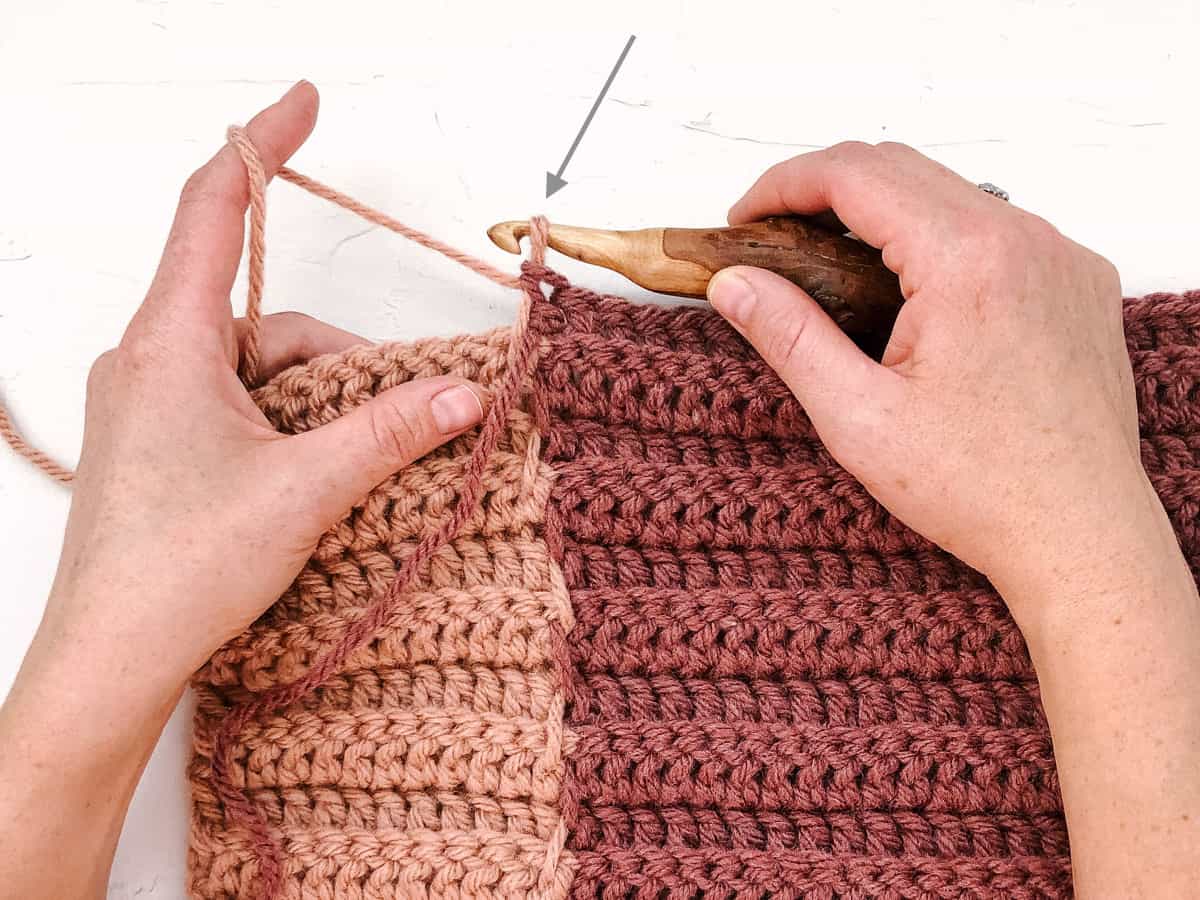
The most complicated part of this pillow is changing colors mid-round in the heart granny square. Luckily, you can hide the yarn carries inside the pillow. This means you're able to be fairly "lazy" as you practice changing colors without cutting your yarn.
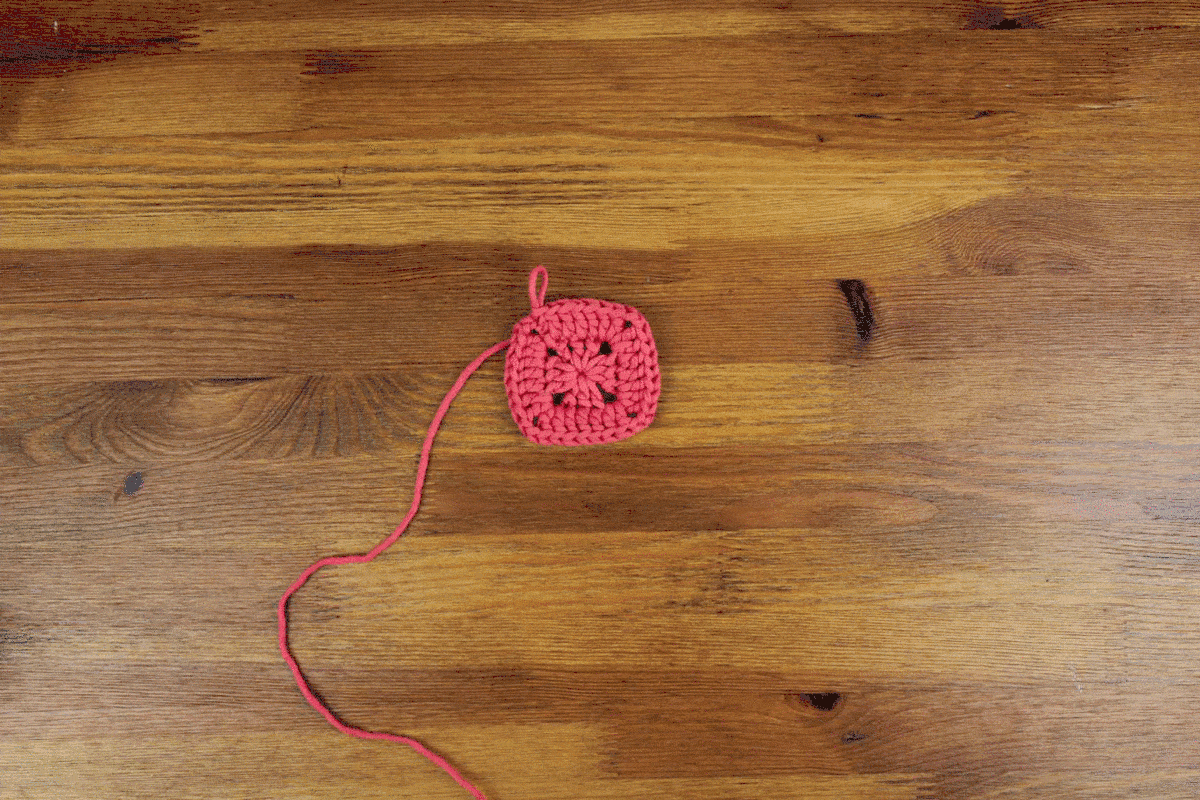
Step 1. Crochet the granny square heart. Carry your yarn across the design without cutting.
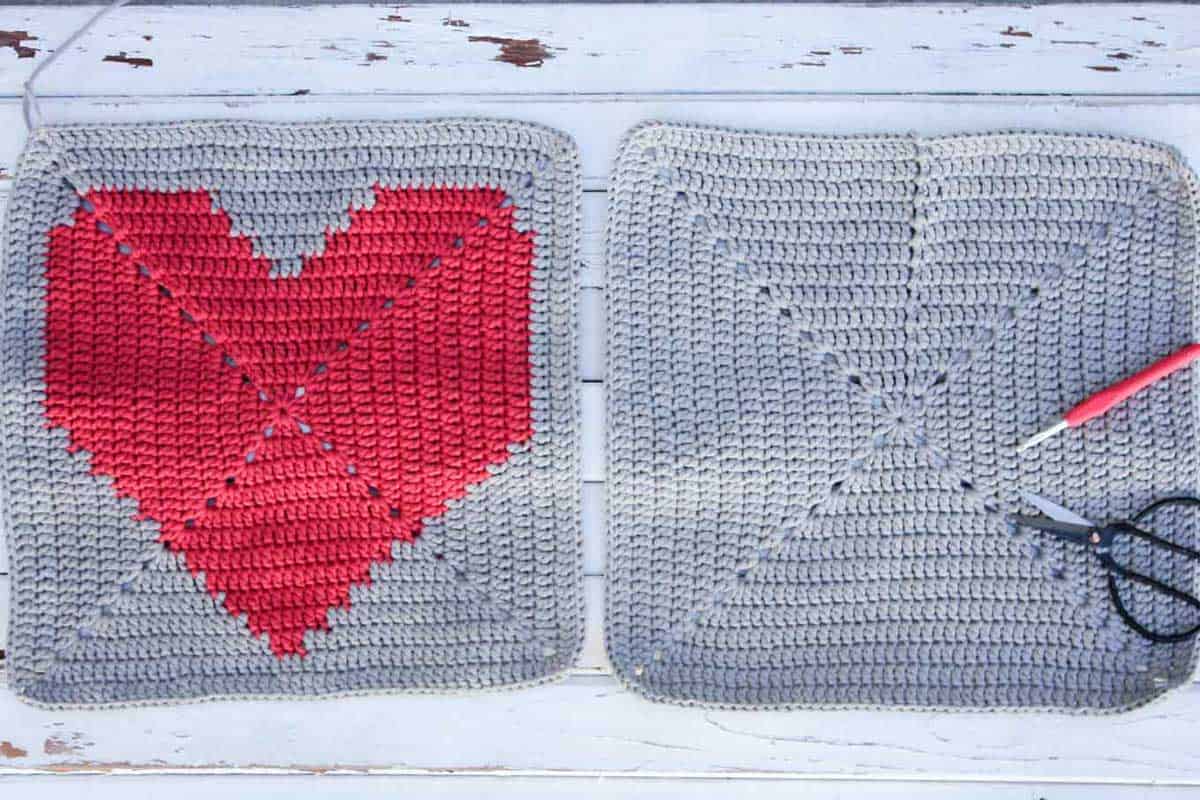
Step 2. Make a second solid square to serve as the back of the pillow. Join the back and front with single crochet, leaving one side open.
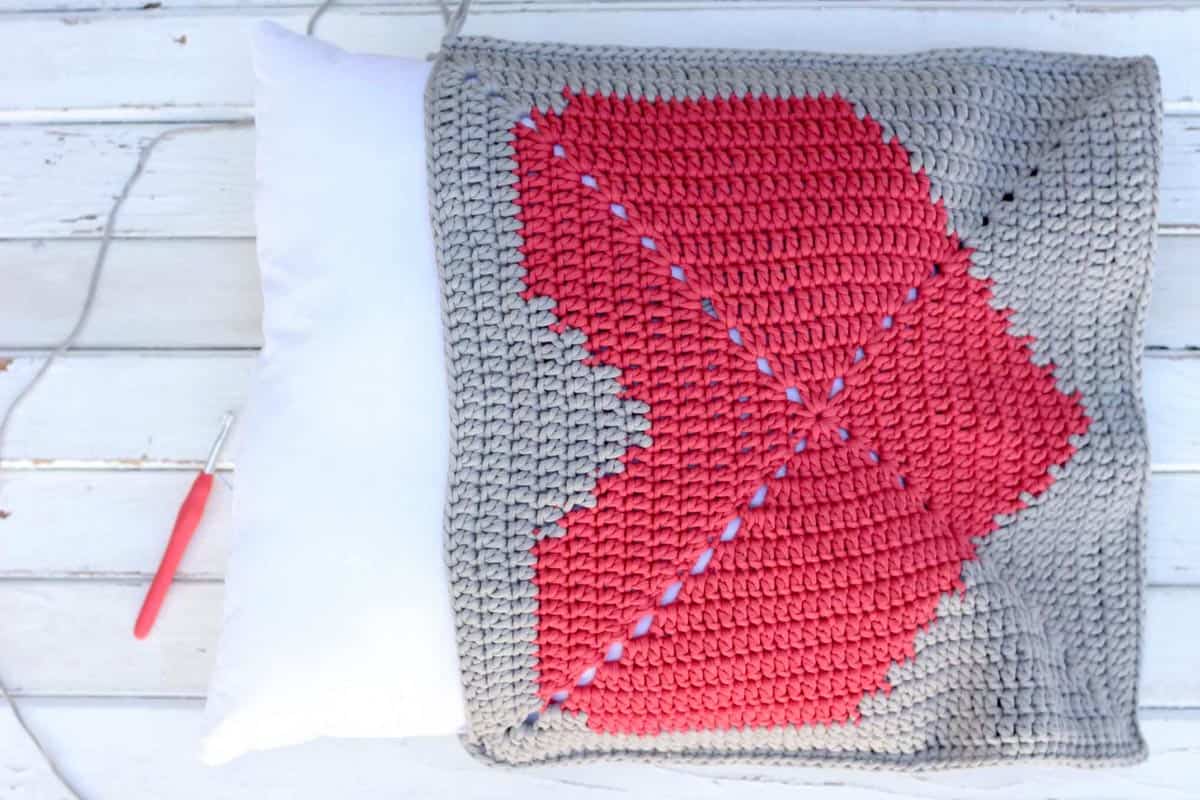
Step 3. Stuff the pillowcase with a pillow form about 2" larger than the finished cover.
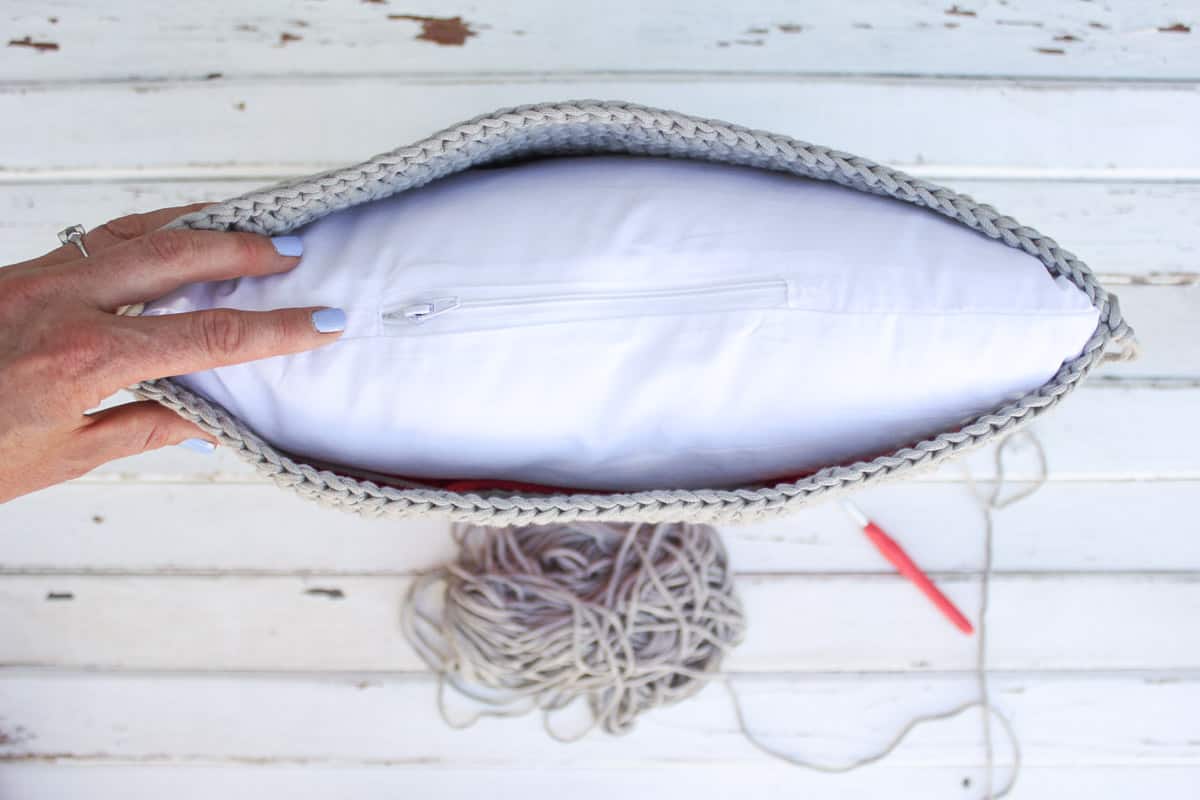
Step 4. Use single crochet stitches to close final edge of heart pillow cover.
BONUS! By using single crochet stitches to join the pillow front and back together, this project can be completed with zero sewing!
See this crochet heart square come together stitch by stitch. Thirteen rounds and you're done!
Customizing Your Pillow
There are lots of ways to customize this pattern to suit your style. Here are a few ideas:
While this pillow is a classic Valentine's Day pattern when crocheted with pink yarn, you can definitely experiment with different color combos. I like the idea of a cream background with a black heart for a farmhouse vibe.
Yarn + Substitutions
We used Bernat Maker Home Dec yarn for this heart pillow pattern. I really like the matte, smooth texture of this chunky yarn for projects like pillows and blankets.
It comes with 317 yards per ball, which means you can crochet this pillow with only two skeins of yarn total. You'll even have some of the accent (heart) color leftover. (You'll use the entire main color ball of yarn though, so be sure to meet the pattern gauge to avoid needing to purchase a second skein.)
Alternative Yarns
If Bernat Maker Home Dec is not available near you, you can check YarnSub.com for similar suggestions. A bulky yarn like Lion Brand Wool-Ease Thick & Quick would work well as a substitute and create a slightly larger pillow.
PRO TIP: Crochet pillows look best when the stitches are fairly tight. This prevents the insides from showing through. If your stitches are looking too loose or stretchy, use a smaller hook.
Print this Pattern
Prefer to crochet on the couch? Do you like to have a stitch diagram to go with your line-by-line instructions?
You'll love the premium PDF! The instantly downloadable, ad-free file is formatted for easy printing and includes the complete pattern, all the photo tutorials, and a visual stitch chart for the granny square heart.
More Pillow Patterns
We've got lots more easy, decorative crochet pillow patterns.
You must use the category name, not a URL, in the category field.Heart Pillow - Free Pattern
Supplies + Materials
• Bernat Maker Home Dec Yarn (Category 5/chunky 250 g /317 yards)
- Main Color: Clay - 1 entire skein (buy a second if you really don't want to run out)
- Accent Color: Woodberry - 1 skein
• Tapestry needle
• Size J (6.0 mm) crochet hook or size needed to obtain gauge
• Stitch markers or safety pins
• 16-18" square pillow form
• scissors
Measurements
approximately 16.5 x 16.5"
Gauge
6.5 rounds = 4”
Abbreviations + Glossary
(US Terms)
ch - chain
dc - double crochet
sc - single crochet
sl st - slip stitch
Permissions + Copyright:
Please do not publish or share this pattern as your own. You may make items to sell with this pattern. In exchange, please link back this post. Do NOT use our photos as your own sales photos.
Overall Pattern Notes
- This pattern is worked in the round without turning. The right side should always be facing you.
- I used up just about every bit of my main color yarn to make this cushion. If you don’t want to risk needing to buy an extra skein, plan to crochet the two sides together with the accent yarn instead of main color or leave off the last round of both the front and the back of the pillow. It should still fit a 16” form.
- I didn’t trim my strands as I switched between colors. I left them connected and made sure to allow for enough yarn in between each section that it wouldn’t pull too tight if the pillowcase was stretched a bit. See my note in the “finishing” section if your strands are showing through the spaces in the square.
Print This Pattern: purchase the ad-free, printable PDF with heart diagram
To switch colors: With first color yarn over, insert hook in stitch, yarn over, pull yarn through, switch to second color, yarn over and pull second color yarn through to complete the double crochet.
Side 1: Heart Square
Notes:
- Rounds 1-6 are worked in accent color only. Beginning in Round 7, you'll switch colors within the round.
- For easy reference, accent color stitches are highlighted in the written pattern below beginning in Round 7.
With accent color:
Foundation: Create a magic ring. (Or ch 4 and join with a sl st to first chain to form a ring.)
Round 1: ch 5 (counts as 1 sc and 2 ch sp), [3 dc in ring, ch 2] 3 times, 2 dc in ring, join with a sl st to 3rd of 5 ch at the beginning of round. (Each side = 3 dc)
✨Unlock this free subscriber-exclusive pattern ✨
Follow these steps to view the full free pattern below
Side 1: 1 sl st into the ch sp, ch 5, 2 dc in the same space, 1 dc in each next 21 dc, 1 dc in each next 10 dc
Wanna save this pattern?
Side 2: work [2 dc, ch 2, 2 dc] all in the next sp, 1 dc in each next 10 dc, 1 dc in each next 11 dc, 1 dc in each next 10 dc
Side 3: work [2 dc, ch 2, 2 dc] all in the next sp, 1 dc in each next 10 dc, 1 dc in each next 21 dc
Side 4: work [2 dc, ch 2, 2 dc] all in the next sp, 1 dc in each next 10 dc, 1 dc in each next 11 dc, 1 dc in each next 10 dc, 1 dc in same space as ch 5, join with a sl st to 3rd of 5 ch at the beginning of round.
Want some company while you crochet?
Get support (and camaraderie!) in the Make & Do Crew community. Join for free here.
Round 10: Repeat round 2 as follows. (Each side = 39 dc)
Side 1: 1 sl st into the ch sp, ch 5, 2 dc in the same space, 1 dc in each next 21 dc, 1 dc in each next 14 dc
Side 2: work [2 dc, ch 2, 2 dc] all in the next sp, 1 dc in each next 14 dc, 1 dc in each next 7 dc, 1 dc in each next 14 dc
Side 3: work [2 dc, ch 2, 2 dc] all in the next sp, 1 dc in each next 14 dc, 1 dc in each next 21 dc
Side 4: work [2 dc, ch 2, 2 dc] all in the next sp, 1 dc in each next 10 dc, 1 dc in each next 15 dc, 1 dc in each next 10 dc, 1 dc in same space as ch 5, join with a sl st to 3rd of 5 ch at the beginning of round.
Round 11: Repeat round 2 as follows. (Each side = 43 dc)
Side 1: 1 sl st into the ch sp, ch 5, 2 dc in the same space, 1 dc in each next 2 dc, 1 dc in each next 19 dc, dc in each next 18 dc
Side 2: work [2 dc, ch 2, 2 dc] all in the next sp, 1 dc in each next 18 dc, 1 dc in each next 3 dc, 1 dc in each next 18 dc
Side 3: work [2 dc, ch 2, 2 dc] all in the next sp, 1 dc in each next 18 dc, 1 dc in each next 19 dc, 1 dc in each next 2 dc
Side 4: work [2 dc, ch 2, 2 dc] all in the next sp, 1 dc in each dc till end of round, 1 dc in same space as ch 5, join with a sl st to 3rd of 5 ch at the beginning of round.
Fasten off accent color. Using main color yarn only:
Round 12: Repeat round 2. (Each side = 47 dc)
Round 13: Repeat round 2. (Each side = 51 dc) (Skip this round if you're worried about running out of main color.)
Our Latest Crochet Inspiration:
Here are a few more free crochet patterns and tutorials that are hot off the presses.


Side 2: Solid Square
For the backside of pillow repeat Rounds 1-13 of Heart Square, using main color yarn only.
Finishing
Touching Up the Heart Square
If you are seeing a lot of your yarn floats showing through in the background of your design, you can use regular sewing thread to lightly attach any unruly strands to a place where they won’t show through to the front. I didn’t actually find that my strands were very visible once the form was inserted.
Joining Pillow Front and Back
Place both squares together, right sides facing out. Line the stitches on each square side to the stitches on second square. Use stitch markers to pin sides together.
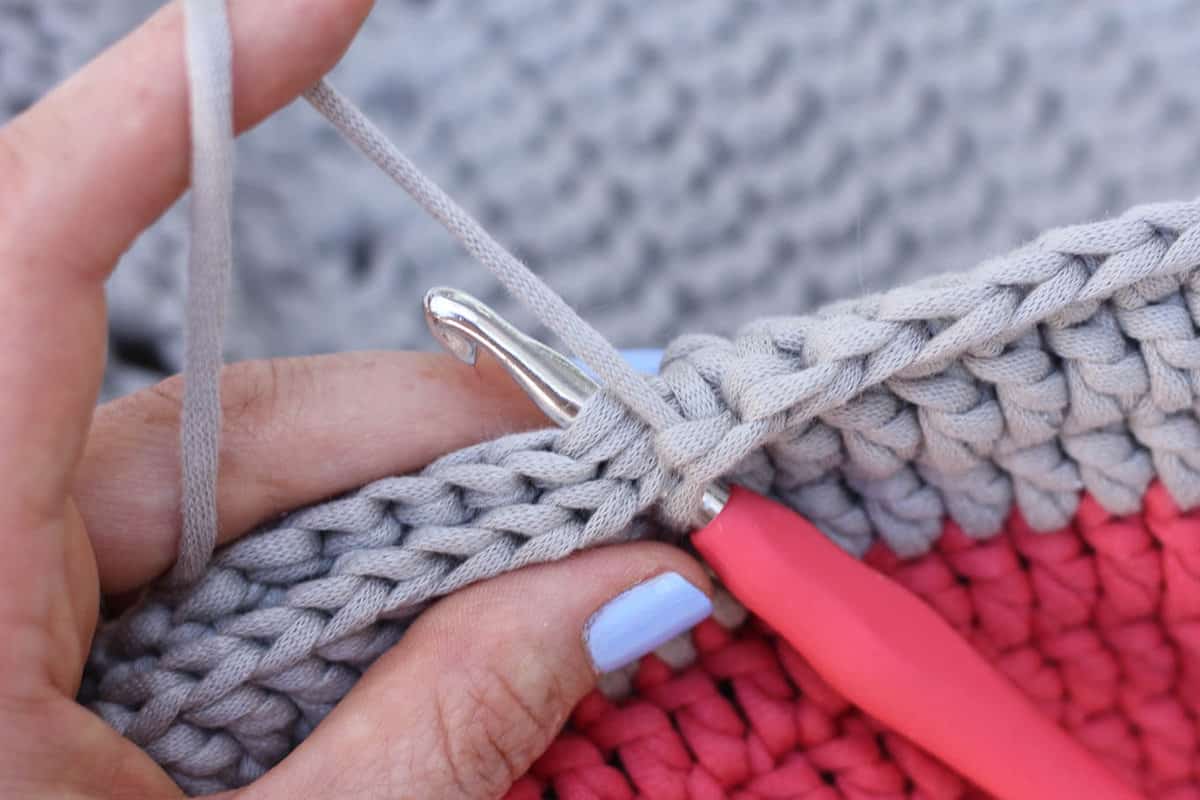
Attach yarn in any corner of pillow. Chain 1. Single crochet in each stitch to join two squares together. Here's how to do it: Insert hook through one stitch on Side #1 and all the way through to the corresponding stitch Side #2. Complete a single crochet.
Repeat around three sides, working 3 sc in each corner space. Insert pillow form and single crochet across opening to finish join. Fasten off and weave in ends.
Give the gift of your whole (handmade) heart to a deserving recipient!
Valentine's Day Pillow FAQs
Yes! This Bernat crochet heart pillow can be made with other category 5 yarns such as Lion Brand Hue + Me. For a larger pillow, try Wool-Ease Thick & Quick, which is slightly thicker than Bernat Maker Home Dec.
Unfortunatly, because this pattern is worked as a square, the end result will always be a square.
More Free Patterns + Tutorials
Obsessed with finding the best free crochet patterns? We are too!
Check out these collections of handpicked patterns to find your next project.
You must use the category name, not a URL, in the category field.Learn a New Skill
And when you're ready to master a new skill, check out our detailed guides that include everything you need to know to level up your crochet game.
- How to Corner to Corner (C2C) Crochet for Beginners - with video tutorials to get you started
- How to Crochet a Beginner Hat - make an entire beanie in 1.5 hours!
- How to Crochet Amigurumi for Beginners - the ultimate guide to making your own toys and plushies
- How to Tunisian Crochet - learn with this video and a standard hook
That was so fun! Now what?
Invitation to our Facebook group
Come discuss crocheting heart pillows and lots of other projects and techniques in our Make & Do Crew Facebook group. Here thousands of helpful crocheters answer each other's questions and share their stitches. Join us!
How to Crochet an Easy Heart Pillow - Overview
Materials
Yarn
- Bernat Maker Home Dec Yarn Category 5/chunky 250 g /317 yards
- Main Color: Clay - 1 entire skein (buy a second if you really don't want to run out)
- Accent Color: Woodberry - 1 skein
Additional Supplies
- Tapestry needle
- Size J 6.0 mm crochet hook or size needed to obtain gauge
- Stitch markers or safety pins
- 16-18 " square pillow form
- Scissors
Abbreviations + Glossary (US Terms)
- ch – chain
- dc – double crochet
- sc – single crochet
- sl st – slip stitch
Abbreviations and Glossary (US Terms):
Want some company while you crochet?
Get support (and camaraderie!) in the Make & Do Crochet Crew Facebook Group. Search “Make and Do Crochet Crew” on Facebook.com.
Permissions + Copyright
Please do not publish or share this pattern as your own. You may make items to sell with this pattern. In exchange, please link back to this page. Do NOT use my photos as your own sales photos.
Overall Pattern Notes
Instructions
How to Crochet a Heart Pillow - A Summary
- 1. Crochet the heart square by following the line-by-line instructions above. The printable PDF includes a stitch chart that can be very helpful if you're a visual learner.
- 2. Using only one color of yarn, make the square for the pillow back by following the same pattern as Side 1. (You're simply eliminating the color changes.)
- 3. Use stitch markers to pin the squares together with the right sides facing out. Take care to line up the stitches on either side of the pillow.
- 4. Single crochet around three sides of the pillow to join the front and back together. Do not fasten off.
- 5. Insert the pillow form into the "pocket" you've created.
- 6. Single crochet the fourth pillow edge shut to secure the pillow form inside.
Overall Pattern Notes
- This pattern is worked in the round without turning so the right side is facing throughout.
- The heart pillow pattern as written will require every bit of your main color yarn. Pick up an extra skein if you want to make sure you'll have enough or plan to join the squares together with the accent color if you run out.
- You don't need to fasten off after each color change. Instead loosly "float" yarn on wrongside of square and pick it up when it's needed again. See my note in the “finishing” section in the complete pattern above if your strands are showing through the spaces in the square.
bhutanknitncrochet says
Sad that video is unavailable.
Jess @ Make and Do Crew says
Which video are you referring to? This pattern doesn't have a video tutorial, so perhaps you're referencing a different pattern. I'm happy to help you find what you're looking for if you want to let me know. 🙂
Jess
Callie says
I'm having trouble finding the crocheted heart pillow chart. Help!!
Jess @ Make and Do Crew says
Hey Callie!
Did you already subscribe in the box above or on the sidebar? Once you do that, you should immediatly receive an email from me that explains how to access the Vault. The chart is linked right below the photo of the heart pillow. Let me know if you still need help finding it!
Jess
Tina says
I cant wait to try the pattern out for my husband save daughters gift but wanted to know red its for the greyish color or red I'm confused.. Thanks
Sonia-Marina Beach says
Hi,thank you VERY much for sharing your talents with me. You have inspired me SO much and helped me through a deep valley,with the way you teach. You really are a gifted Teacher who blessed more people than you will ever be able to count!! God bless you!
Greetings from South Africa.xx
Jess @ Make and Do Crew says
Oh Sonia, it brings me so much joy to hear that. Making things with my hands has helped me through some tough times too. I like to work on my projects and think about how many people all over the world are creating something they care about at the same time. Now I can think of you in South Africa!
Alex says
I am making this pillow for a Christmas present (never to early to start on those, right?) And the square will not lay flat and it is all wavy. Am I doing something wrong? Do you know how to make it flat?
I really like (LOVE) this pattern. Thanks!
Jess @ Make and Do Crew says
NEVER too early to start Christmas presents, Alex! Hmm...I think I might know what you mean about the wavy-ness because mine was slightly wavy too. It might be the case that you are able to block most of it out or resolve it by simply stuffing the pillow inside. If not though, I would guess that it might have to do with how tightly or loosely you're crocheting. If you're willing to start over, you might consider using a slightly smaller hook to see if that makes it lie flatter and be less "ruffly." Does that make sense?
Jess
Karen says
I love this pattern! I'd like to adapt it and make a granny shrug instead of a pillow. Do you have any advice on making the heart bigger?
Thanks for all your work 🙂
Shari Atoyan says
Making these for my daughter's college bound friends & for her when she graduates next year! Hank you for the free pattern?
Janie Berks says
I love your patterns, and have made the slippers with flip flops twice. However, I am not a fan of having to download a pdf converter to get this pattern. I have a granddaughter going off to college next month, this is a great pattern for her, but making me down load something I don't need and possibly has issues, is a disappointment.
Jess @ Make and Do Crew says
Hey Janie!
You shouldn't have to download a pdf converter to get the pattern. It's listed within the post. Perhaps you clicked on an ad that asked you to download something? The only thing you'd have to download for this pattern, if you wanted to, is the chart part of the pattern, which is available in the subscriber Vault. I agree that downloading a pdf convertor is no good! Please know in the future that if you see that, it's an ad and not actually part of my pattern.
Hope that helps!
Jess
Cath Clifford says
Thanks Jess. I would really love to print the cushion pattern out, but I keep getting 18 pages and it's also has parts insured by advertising and logs etc.
Do you have just the pattern itself I could print out?
Thanks Cath
Cath Clifford says
'Obsured' - not insured!!!
Mary says
Cute heart pillow. This will make many people happy. Those giving this gift of love, and those receiving their pillow.
Jess @ Make and Do Crew says
Thanks so much, Mary! I really hope it does. I had so much fun making it.
Mary Roberts says
Love the pillow. Want to make for my granddaughter..