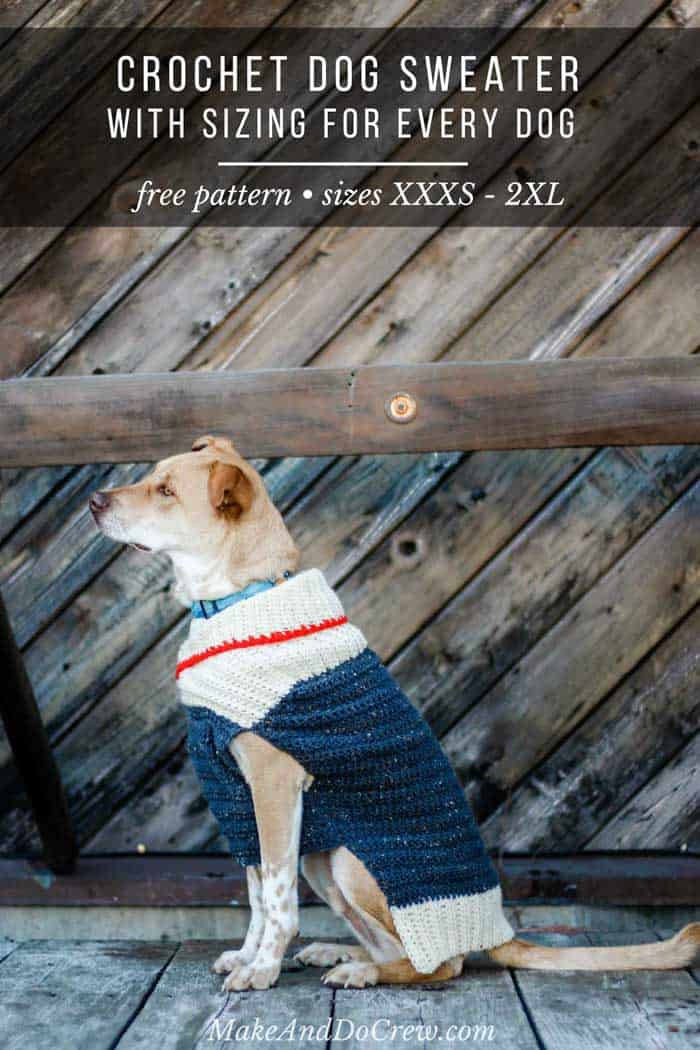
Learn how to cozy your pup up for winter with this easy crochet dog sweater pattern. Designed in nine sizes to fit very small to very large dogs, the tutorial includes notes on how to customize further for your furry friend.
Get the complete free pattern below or purchase the ad-free, printable PDF here.
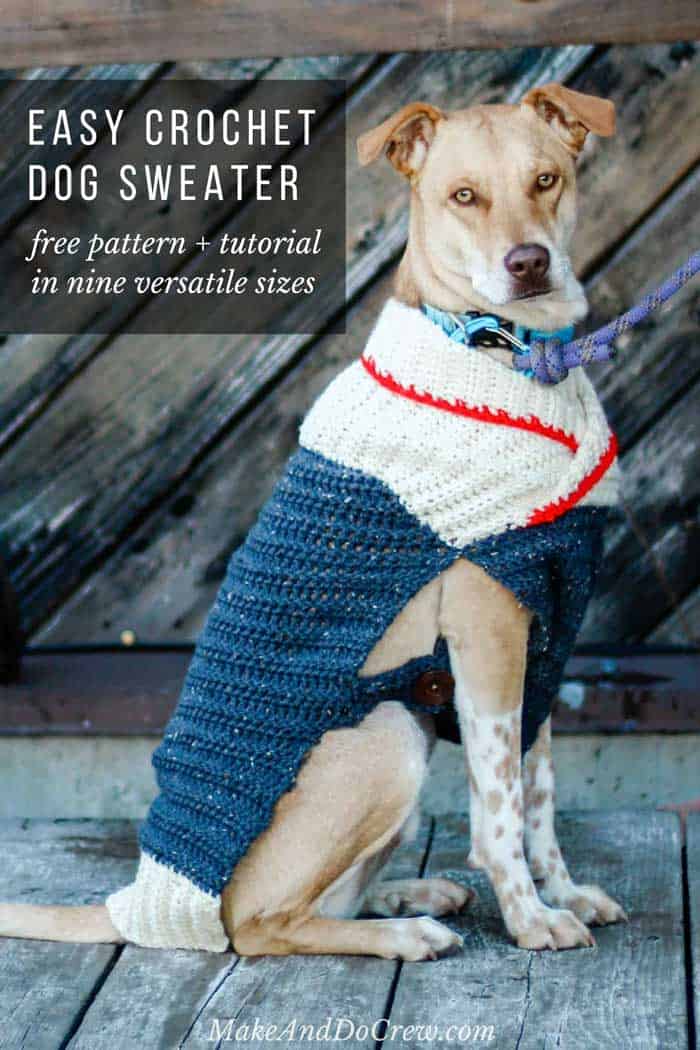
This easy crocheted dog sweater is part of a collaboration with Lion Brand Yarn. This post contains affiliate links.
Jump to:
- Free Crochet Pattern for a Dog Sweater
- Two Design Options
- Dog Sweater Pattern for Beginners
- For Small, Medium or Large Dogs
- Dog Sweater Sizes
- Choose Machine Washable Yarn
- Free Crochet Dog Sweater Pattern
- That was so fun! Now what?
- Invitation to our Facebook group
- More Patterns From Simple Shapes
- More Free Patterns + Tutorials
- How to Crochet a Dog Sweater Summary
Complete beginner? Check out our guide on How to Crochet for Beginners
Free Crochet Pattern for a Dog Sweater
'Tis the season to make gifts for those we love, but there's no reason our canine companions need to be left out of the gift-giving. This free crochet dog sweater pattern uses very simple shapes to make a stylish statement that's sure to be a hit at the dog park.
Related: How to crochet a modern cat or dog bed
Two Design Options
Since I normally design free crochet patterns for humans, it took me a bit of time to wrap my head around what would make the best crocheted dog sweater.
Eventually, I came to the conclusion that the easiest dog sweater to both crochet and wear should not include actual leg "sleeves."
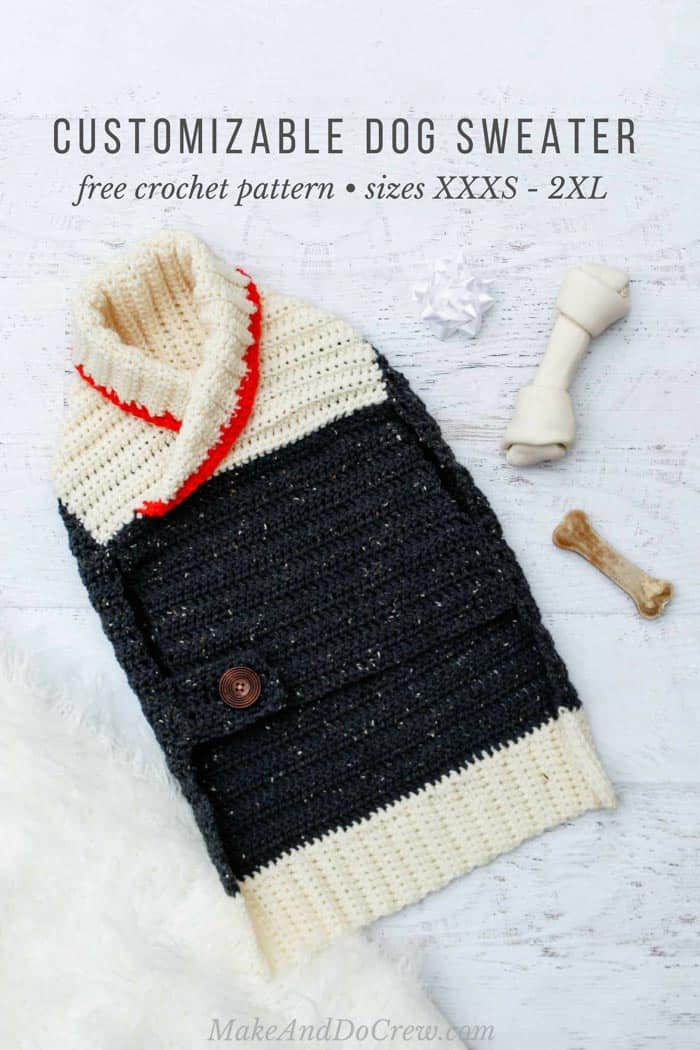
This allows the sweater to stay super cozy and be crocheted from three basic pieces. And because different pups may feel more or less comfortable getting dressed in dog clothes, I've included two options for fastening the sweater.
A Basic Seam
With this version, you simply join the crocheted pieces together. The dog's legs will need to bend to go through the sweater's arm holes.
A Button Closure
This option creates more flexibility for dogs who don't want to have their legs bent to "get dressed." This can also be helpful if you're crocheting a sweater for an elderly dog.
Dog Sweater Pattern for Beginners
One of the things I like most about crochet sweater patterns is that you can use simple shapes to make projects that look complicated and fashion-forward.
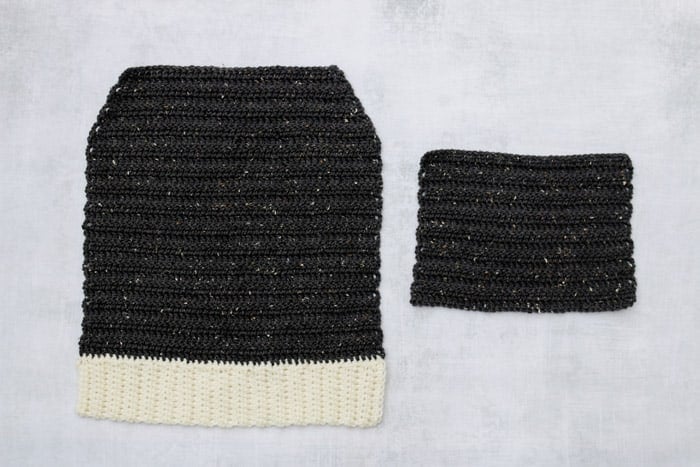
In the case of this free crochet dog sweater pattern, it's made from two rectangles and one trapezoid. It sounds simple to crochet (and it is!), but the effect is quite stylish.
With minimal decreasing, you'll be able to crochet a dog sweater that is easy, cozy, and fast to work up.
New to making garments? Check out our step-by-step guide to crocheting your first sweater.
For Small, Medium or Large Dogs
When I set out to design this crochet dog sweater pattern, I really didn't quite realize how complicated it might become to accommodate dogs of all shapes and sizes. My tech editor, Amy, deserves a ton of credit for becoming an expert on dog body shapes in a very short about of time!
We decided to include nine (!) sizes in this sweater pattern for dogs so that you can really get the best possible fit for your dog's body. From very, very small dogs, to super large dogs, I hope this pattern is useful for you and your furry family!
MORE FOR ANIMAL LOVERS: 30+ Lovable, Easy Crochet Animal Patterns
Dog Sweater Sizes
As I mentioned above, this dog sweater pattern is crocheted from very simple shapes. Feel free to customize the pattern length or width further to fit your particular dog's body.
Taking Measurements
Since dog bodies can vary even more than human bodies, I suggest taking your pup's measurements as outlined in the pattern and then choosing the most appropriate size. If the dog is between sizes, I'd choose the larger applicable size.
Size Chart
The varied sizing of this pattern makes it a good dog sweater for large dogs, medium dogs, and small dogs alike.
Dog Sweater Sizing Guidelines
| SIZE | BACK LENGTH | CHEST CIRCUMFERENCE | NECK CIRCUMFERENCE |
|---|---|---|---|
| XXXS | 9" | 10-16" | 7-11" |
| XXS | 13" | 16-20" | 11-15" |
| XS | 16" | 18-22" | 12-15" |
| S | 19" | 22-24" | 15-18" |
| M | 21" | 22-29" | 17-20" |
| L1 | 24" | 24-31" | 21-25" |
| L2 | 27" | 24-31" | 21-25" |
| 1X | 31" | 26-34" | 26-29" |
| 2X | 33" | 33-39" | 27-30" |
Choose Machine Washable Yarn
Choosing a yarn for a crochet dog sweater pattern feels a little like designing a pattern for a baby. The yarn needs to be soft AND practical. And the ability to machine wash is essential.
Lion Brand Vanna's Choice
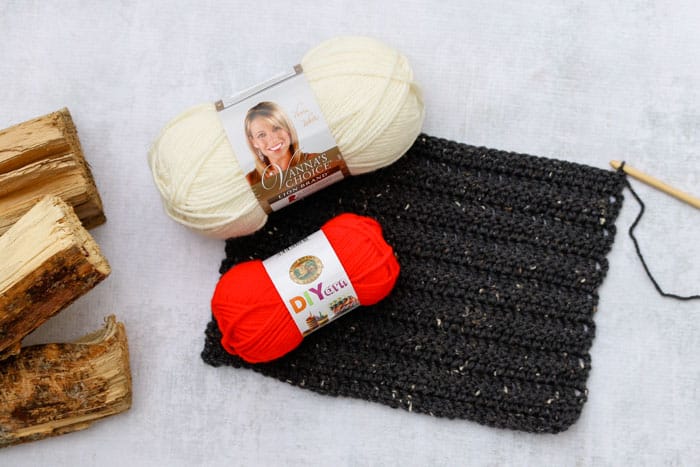
For this crochet pattern for a dog sweater, I went with Lion Brand Vanna's Choice. Here's why:
• It's worsted weight so you can make this dog coat quite quickly.
• It's very low maintenance, doesn't pill easily, and it can be washed easily in the machine.
• There are so many great colors. However you like to dress up your pup, Vanna's Choice probably has a colorway to inspire you.
The red collar accent is worked using Lion Brand DIYarn because it offers the perfect yardage and price point for little pops of color in your crochet and knit projects. I also used DIYarn in the Alpaca Love C2C Afghan and the alpaca stuffed toy pattern.
Yarn Substitutes
With this pattern, you can crochet a dog sweater with almost any worsted-weight, machine-washable yarn. Lion Brand Basic Stitch Anti-Pilling is very similar to Vanna's Choice and substitutes really well.
PRO TIP: It's always a good idea to check your gauge, especially when crocheting garments. Even if those garments are of the canine variety!
Okay, are you ready to crochet a dog sweater? Let's do it!
Ready To Roam Dog Coat
Free Crochet Dog Sweater Pattern
Purchase the ad-free, printable PDF on Love Crafts here or on Etsy here.
Don't spend hours for a "meh" result!
Tired of crocheting garments that don't fit? Learn our C.R.A.F.T. Framework to make sweaters that fit and feel amazing!
Save this pattern to your Ravelry here.
Pin it for later here.
Explanation:
Learn how to cozy up your pup for winter with this easy crochet dog sweater. Designed in nine sizes to fit very small to very large dogs, the pattern includes notes on how to customize it for your furry friend.
Because different dogs may feel more or less comfortable putting on a dog sweater, two options for fastening the sweater are included--a basic seam or a more flexible button attachment for dogs who don't want to have their legs bent to "get dressed."
This easy sweater is made with basic shapes and crochet skills including double crochet and simple seaming.
Supplies
• Lion Brand Vanna’s Choice (Weight: 4/medium - 170 yds, 3.5 oz)
- Color A: Fisherman (#860-098) - 1 (1, 1, 2, 2, 2, 2, 3, 3) skeins
- Color B: Graphite (#860-407) - 1 (1, 1, 2, 2, 2, 2, 3, 4) skeins
• Lion Brand DIYarn (Weight: 4/medium - 65 yds, 1.05 oz)
- Color C: Red (#205-113) - 1 skein for all sizes
• Tapestry needle
• Size K (6.5 mm) crochet hook
• Stitch markers or safety pins
• (2-4) 1.5” wooden buttons (optional--see “Overall Notes” below)
Sizes
XXXS, XXS, XS, S, M, L1, L2, 1X, 2X
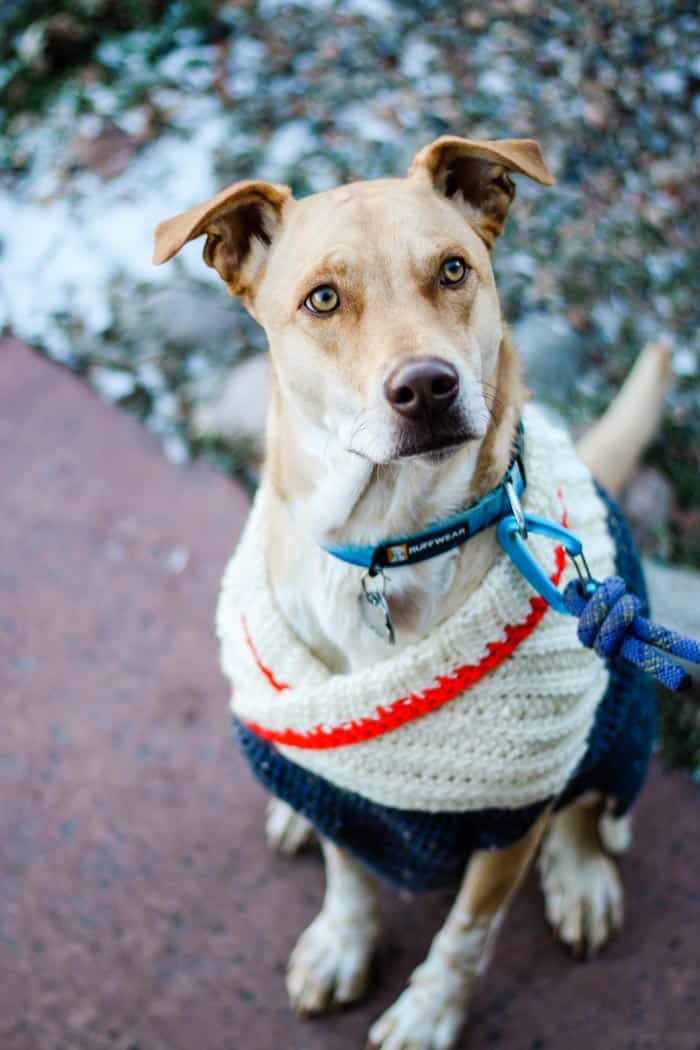
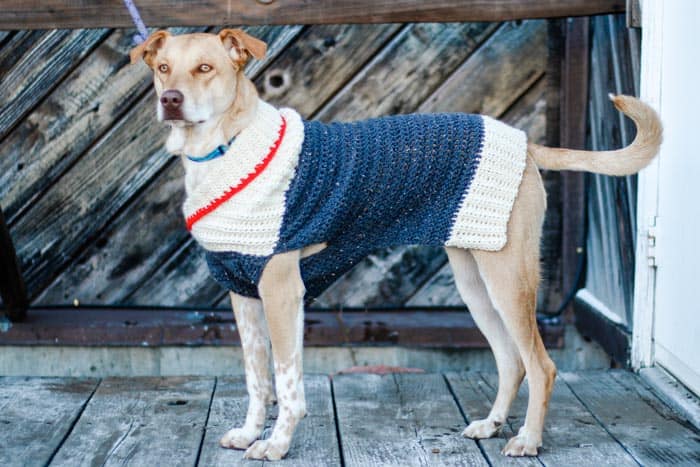
Sample pictured is a size Medium on a 45 pound dog.
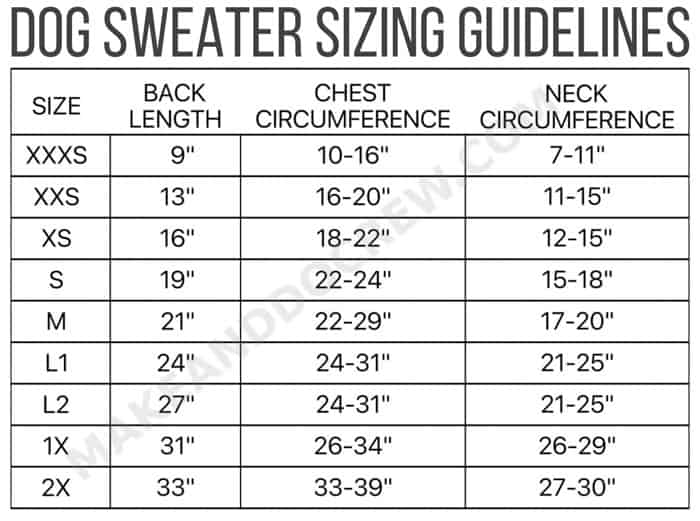
Choose your size based primarily on the dog’s length from the base of the tail to the dog’s collar and secondarily on the dog’s chest circumference at its widest part. L1 and L2 difference is based on the length of of dog’s back.
See sizing chart below to guide size selection. If between sizes, size up. For details on where to measure dog, see this website. A good rule of thumb is to allow space for two fingers between measuring tape and dog to ensure a comfortable fit.
Gauge
Main Sweater: 13 dc x 7.5 rows= 4”
Ribbing: 13 hdc x 8 rows through the back loop only = 4”
Abbreviations and Glossary (US Terms)
ch – chain
dc – double crochet
dc2tog – double crochet two together
hdc – half double crochet
hdcblo – half double crochet through the back loop only
PM – place marker
RS – right side
sc – single crochet
sk – skip
st(s) – stitch(es)
WS – wrong side
yo – yarn over
Overall Pattern + Sizing Notes
• Pattern is written and pictured with two options for fastening along side of dog’s body.
- For dogs that don’t mind having their legs put through a sweater hole, choose to seam the sides as described in finishing section.
- For more sensitive dogs, choose optional side fastener, which allows sweater to be buttoned around dog’s legs.
- Reference Side Fastener section for details on how many buttons you’ll need. (See photo of both options in blog post above as well as photo in Side Fastener section.)
• Pattern is written for smallest size with larger sizes following in parenthesis. Because pattern includes so many sizes, please go through and circle the stitch counts pertaining to your size before beginning. XXXS (XXS, XS, S, M, L1, L2, 1X, 2X)
Sweater Bottom Ribbing
Notes:
• Ribbing is worked sideways.
• Ch 2 at beginning of row does not count as a stitch.
• Row 2 and beyond are worked through the back loop only of the hdc stitches (hdcblo).
Using Color A:
Foundation Row: Ch 6 (8, 9, 11, 12, 13, 14, 16, 17).
Row 1: Sk 2 ch, hdc in each ch; turn. [4 (6, 7, 9, 10, 11, 12, 14, 15)]
Row 2: Ch 2, hdcblo in each hdc; turn. [4 (6, 7, 9, 10, 11, 12, 14, 15)]
Rows 3-16 (22, 25, 28, 31, 34, 34, 37, 44): Ch 2, hdcblo in each hdc; turn. [4 (6, 7, 9, 10, 11, 12, 14, 15)]
Do not fasten off. Rotate ribbing 90 degrees. Row 1 of Back piece will be worked into long edge of ribbing.
Sweater Back
Notes:
• Row 1 is worked at a frequency of approx. 3 sc per 1 visual ribbing ridge (which is 2 hdc rows).
• Ch 3 at beginning of row counts as first dc.
Using Color A still attached:
Row 1 (RS): Ch 1, sc 26 (36, 40, 46, 51, 55, 55, 60, 72) along long edge, completing final yo of last sc with Color B; turn. [26 (36, 40, 46, 51, 55, 55, 60, 72)]
Using Color B:
Row 2 (WS): Ch 3, sk first st, dc in each sc; turn. [26 (36, 40, 46, 51, 55, 55, 60, 72)]
Rows 3-12 (17, 21, 25, 28, 32, 36, 41, 44): Ch 3, sk first st, dc in each dc; turn. [26 (36, 40, 46, 51, 55, 55, 60, 72)]
Note:
Decreases should begin when sweater length reaches from end of dog’s back (where tail is) to approximately the front of dog’s front legs. If you’re finding the sweater piece too long, simply remove a couple of rows from the back section and move on to decreasing. Similarly, for a long, thin dog, feel free to add additional rows of double crochet before decreasing.
Decreasing:
Row 1 (WS): Ch 3, sk first st, dc2tog, dc in each dc until 2 remain, dc2tog; turn. [24 (34, 38, 44, 49, 53, 53, 58, 70)]
Wanna save this pattern?
Rows 2-3 (4, 5, 6, 7, 8, 9, 10, 11): Ch 3, sk first st, dc2tog, dc in each dc until 2 remain, dc2tog; turn. 2 sts decreased each row
At end of Row3 (4, 5, 6, 7, 8, 9, 10, 11), there should be 20 (28, 30, 34, 37, 39, 37, 40, 50) dc. Fasten off leaving 25” tail.
Sweater Belly
Notes:
• Ch 3 at beginning of row counts as first dc.
Using Color B:
Foundation Row: Ch 20 (27, 30, 34, 37, 40, 40, 43, 52).
Row 1 (RS): Sk 3 ch, dc in each ch; turn. [18 (25, 28, 32, 35, 38, 38, 41, 50)]
Row 2 (WS): Ch 3, sk first st, dc in each dc; turn. [18 (25, 28, 32, 35, 38, 38, 41, 50)]
Rows 3-7 (10, 12, 14, 16, 18, 20, 23, 24): Ch 3, sk first st, dc in each dc; turn. [18 (25, 28, 32, 35, 38, 38, 41, 50)]
Note:
If you added or eliminated rows of double crochet before decreasing in the Back, consider doing the same thing with the Belly.
Collar Ribbing
Notes:
• Ribbing is worked sideways.
• Ch 2 at beginning of row does not count as a stitch.
• Row 2 and beyond are worked through the back loop only of the hdc stitches (hdcblo).
Foundation Row: Ch 16 (21, 23, 26, 28, 31, 31, 33, 39).
Row 1 (WS): Sk 2 ch, hdc in each ch; turn. [14 (19, 21, 24, 26, 29, 29, 31, 37)]
Row 2 (RS): \Ch 2, hdcblo in each hdc; turn. [14 (19, 21, 24, 26, 29, 29, 31, 37)]
Rows 3-18 (26, 29, 34, 37, 40, 41, 46, 53): Ch 2, hdcblo in each hdc; turn. [14 (19, 21, 24, 26, 29, 29, 31, 37)]
Fasten off.
Side Fasteners
Notes:
• Side fasteners are optional. See “Overall Pattern + Sizing Notes” for more details.
• Ch 3 at beginning of row counts as first dc.
• For the 1X and 2X sizes, you may choose to add an additional button hole to each fastener to make it extra secure.
To do this, work the Center Row (buttonhole) after you’ve completed Row 2 three times. Then work 3 more rows of regular double crochet before completing one more Center Row (buttonhole). Finish with 3 rows of double crochet and the last row as listed below.
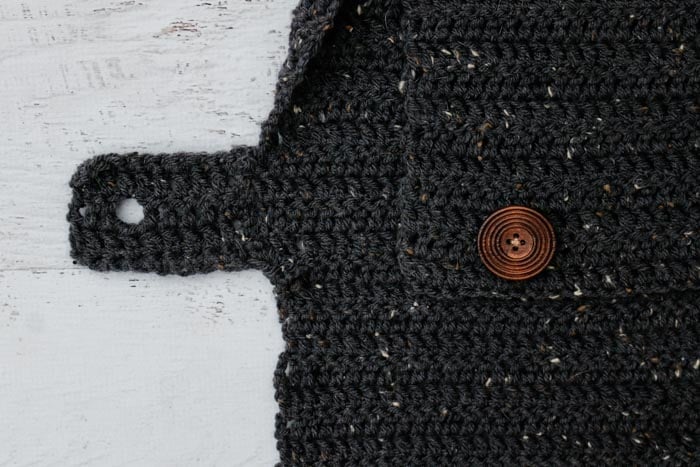
Make 2 using Color B:
Foundation Row: Ch 8 (8, 11, 11, 11, 11, 11, 16, 16).
Row 1: Sk first ch, sc in each ch; turn. [7, (7, 10, 10, 10, 10, 10, 15, 15)]
Row 2: Ch 3, sk first st, dc in each sc; turn. [7, (7, 10, 10, 10, 10, 10, 15, 15)]
Repeat Row 2 another 0 (0, 1, 1, 2, 2, 3, 3, 4) times
Center Row (buttonhole): Ch 3, sk first st, dc in next 2 dc, ch 1, sk 1 dc, dc in each dc; turn. [6, (6, 9, 9, 9, 9, 9, 14, 14) and 1 ch-1]
Next Row: Ch 3, sk first st, dc in each dc and ch-1; turn. [7, (7, 10, 10, 10, 10, 10, 15, 15)]
Repeat Row 2 another 0 (0, 1, 1, 2, 2, 3, 3, 4) times
Last Row: Ch 1, sc in each dc. [7, (7, 10, 10, 10, 10, 10, 15, 15)]
Fasten off leaving 20” tail.
Fastener will have 5 (5, 7, 7, 9, 9, 11, 11, 13) rows.
Finishing
1. Attaching Back to Belly:
With RS of Back and belly piece facing, align last (top) row of Belly with Row 12 (17, 21, 25, 28, 32, 36, 41, 44) of Back (last row before decreasing). Pin if desired.
If omitting Side Fasteners: Working from bottom of Belly up on each side, seam approx. 1.5 (2, 2.5, 3, 3.33, 3.75, 4.25, 5, 5.25)”. (See photo below.)
If including Side Fasteners: Seam Side Fastener to Back so that bottom row of Fastener aligns with bottom row of Belly. Take care to ensure button hole is on edge opposite of seam edge. (See photo in Side Fastener section above.)
2. Attaching Collar:
Turn sweater RS out. Align last row of Collar with top edge of Belly as pictured in photo C. Pin if desired. Using Color B, seam last row of Collar to top edge of Belly beginning at left edge of Collar.
Continuing with yarn attached, seam row edges of Collar to Back working across decrease section, continuing across straight edge, then across next decrease section. Finish by seaming first row of Collar to last row of Belly behind section that is already seamed and beginning with left edges of Belly and Collar aligned.
3. Collar Trim:
Using Color C, attach yarn at bottom front corner of Collar. (See photo in blog post of sweater laying flat for more visual detail.)
With inside of Collar facing you:
Row 1: Ch 1, sc evenly around Collar edge, ending where Collar meets Belly inside sweater; turn.
Row 2: Ch 1, sc in each sc, ending where Row 1 began.
Fasten off and weave in remaining ends.
Take your stylish pup out for romp, but don’t forget to post their #OOTD picture first! Speaking of which, I love these dog and owner Halloween costume ideas and can't wait to dress up with my pup this year.
I love to see your finished projects! Use #MakeAndDoCrew and tag me Instagram (@MakeAndDoCrew) to show off your stitches and have a chance to be featured.
That was so fun! Now what?
Invitation to our Facebook group
Come discuss crochet puppy sweaters and lots of other projects and techniques in our Make & Do Crew Facebook group. Here thousands of helpful crocheters answer each other's questions and share their stitches. Come join us here.
More Patterns From Simple Shapes
Crochet cardigans aren't just for dogs! These free crochet patterns are all made with beginner skills from simple shapes like rectangles.
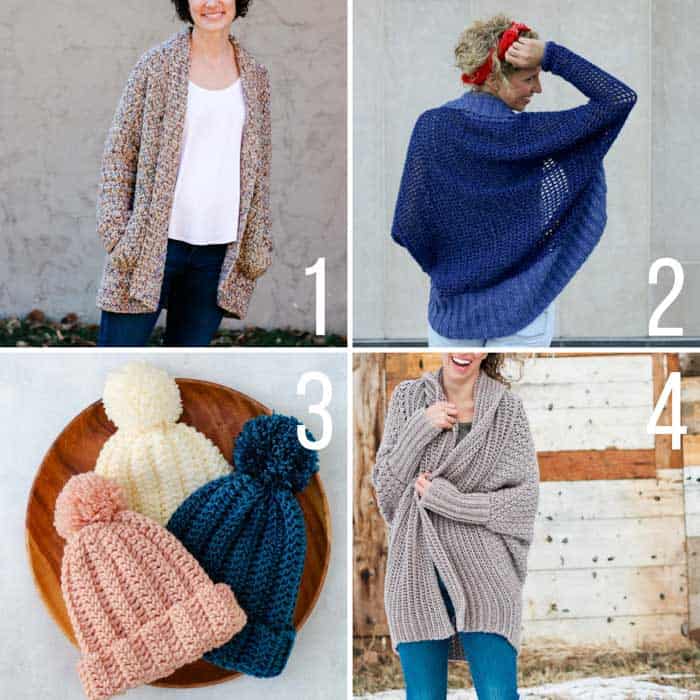
1. Up North Cardigan - free crochet pattern with minimal seaming + video tutorial
2. Stonewash Shrug - easy, free crochet sweater pattern made from a folded rectangle
3. 1 Hour Beanie - super easy and quick crochet hat pattern in sizes preschool through adult + video tutorial
4. Habitat Cardigan - draped, flowy crochet cardigan pattern made from a simple rectangle + video tutorial
More Free Patterns + Tutorials
Can't get enough free crochet patterns!? Me either. You'll definitely want to breeze through these collections to find your next project.
- 55+ Free Crochet Sweater and Cardigan Patterns - our most popular garments
- 40+ Free Crochet Blanket Patterns - baby blankets, throws + c2c graphgans
- 36+ Granny Square Patterns + tips for the perfect square
- 30+ Crochet Animal Patterns - adorable amigurumi stuffed animals
- Crochet Gift Ideas - easy patterns to make for others
- Fast Crochet Projects - start to finish in less than a day
Learn a New Skill
And when you're ready to master a new skill, check out our detailed guides that include everything you need to know to level up your crochet game.
- How to Corner to Corner (C2C) Crochet for Beginners - with video tutorials to get you started
- How to Crochet a Beginner Hat - make an entire beanie in 1.5 hours!
- How to Crochet Amigurumi for Beginners - the ultimate guide to making your own toys and plushies
- How to Tunisian Crochet - learn with this video and a standard hook
How to Crochet a Dog Sweater Summary
Materials
Yarn
- Color: Lion Brand Vanna’s Choice Weight: 4/medium - 170 yds, 3.5 oz
- Fisherman #860-098 - 1 (1, 1, 2, 2, 2, 2, 3, 3) skeins
- Graphite #860-407 - 1 (1, 1, 2, 2, 2, 2, 3, 4) skeins
- Color: Lion Brand DIYarn Weight: 4/medium - 65 yds, 1.05 oz
- Red #205-113 - 1 skein for all sizes
Additional Supplies
- Tapestry needle
- Size K 6.5 mm crochet hook
- Stitch markers or safety pins
- 2-4 1.5” wooden buttons (optional--see “Overall Notes” below)
Abbreviations + Glossary (US Terms)
- ch – chain
- dc – double crochet
- dc2tog – double crochet two together
- hdc – half double crochet
- hdcblo - half double crochet through the back loop only
- PM – place marker
- RS – right side
- sc – single crochet
- sk – skip
- st(s) – stitch(es)
- WS – wrong side
- yo – yarn over
Abbreviations and Glossary (US Terms):
Want some company while you crochet?
Get support (and camaraderie!) in the Make & Do Crochet Crew Facebook Group. Search “Make and Do Crochet Crew” on Facebook.com.
Permissions + Copyright
Please do not publish or share this pattern as your own. You may make items to sell with this pattern. In exchange, please link back to this page. Do NOT use my photos as your own sales photos.
Overall Pattern Notes
Instructions
Easy Crochet Dog Sweater - Pattern Overview
- 1. Begin with the dog sweater ribbing.
- 2. Once that is complete, crochet the sweater "back" section directly into the long edge of the ribbing.
- 3. Make the "belly" section of the dog jacket.
- 4. Crochet the collar ribbing.
- 5. (Optional) Make the side fasteners that will button to the sweater belly.
Finishing
- 6. Join the pieces of the dog coat together, beginning by attaching the back to the belly. Then seam the collar to the sweater.
- 7. For a finishing pop of color, use a contrasting color to single crochet around collar edge.
- 8. Take your stylish pup out for romp, but don’t forget to post their #OOTD picture first!
Overall Pattern Notes
- Get detailed line-by-line free pattern further up on the page. 👆
- Pattern is written and pictured with two options for fastening along side of dog’s body.
- For dogs that don’t mind having their legs put through a sweater hole, choose to seam the sides as described in finishing section.
- For more sensitive dogs, choose optional side fastener, which allows sweater to be buttoned around dog’s legs.
- Reference Side Fastener section for details on how many buttons you’ll need.



Deborah Borne says
I am having trouble figureing out how to put pieces together, especially the collar. I tried to find the tutorial but could not. I'm so confused. You referred to a picture "C" but could not find that either. Help!
Sandy says
hello. i have my pieces made but am having trouble understanding putting them together. do you have any illustrations showing how to do this? thanks so much!
Jess @ Make and Do Crew says
Hey Sandy,
I'm sorry, I don't have more photos than those that are shown in the tutorial. Is there something specific I can try to answer for you about sewing them together. 🙂
Jess
Jess Asman says
Jess,
Awww, the sweater is pretty, but I’ve got to say your model looks positively.regal wearing it...I notice when I take my baby to the groomer,and he gets a little scarf tied round his neck he stands a little straighter, gets the same look in his eyes as your nephew model! .....they KNOW when they”re lookin’ good lol...they is a sweater in my baby’s future ( my petite flower weighs ninety pounds, but we don’t believe in fat shaming in this household lol.....jess
Jess @ Make and Do Crew says
Haha, everything about your comment made me lol, Jess. I think they DO know when they're good lookin'--just like people do!
native content examples says
This design is wicked! You definitely know how to keep a
reader entertained. Between your wit and your videos, I was almost
moved to start my own blog (well, almost...HaHa!) Fantastic job.
I really enjoyed what you had to say, and more than that, how you presented it.
Too cool!
Nana K says
This is so cute and your dog looks very handsome! Thank you so much for sharing.
Jess @ Make and Do Crew says
Thanks so much, Nana. I have a pretty cute little dog nephew, don't I? 🙂
melissa bordelon says
This is a really haute dog sweater and I'm so glad you finally did a pattern for our doggies. I can't wait to make this for my dog to help keep warm and cute at the same time. Thanks so much for this wonderful pattern.
Jess @ Make and Do Crew says
Thanks so much, Melissa! It was surprisingly hard to break out of the designing for humans box, but I found it really fun.
Happy crocheting!
Jess
Colleen says
Am I not allowed to leave comments? I left one this morning her, but it is nowhere in sight?
Jess @ Make and Do Crew says
Hey Colleen,
They are moderated, so I have to approve them before they appear on the site. 🙂
Jess
Zhinka Chunmee says
anyone have any ideas on how to make this fit a big dog?
It only has sizes for tiny dogs.
My mastiff puppy has a 49 inch chest and a 34 inch neck, 37 inches from his neck to the base of his tail.
I was so excited when they said they were making more sizes, but still, nothing for a big dog anywhere, so depressing
Enid says
OMG!!! How spiffy he looks! Totally adorable.
Jess @ Make and Do Crew says
Haha, yes, spiffy is def the right word. He's a pretty cute pup!
Colleen says
I will have to study your pattern. My son and his wife have two miniature daschunds, and it’s tough making something for them. Very broad chested, long body,(that thins out after that broad chest) and so short. I made sweaters for them one year and seemed to fit them ok, but if it was wet outside, the chest part of the sweaters were always wet and muddy when they returned home..lol. They also weren’t use to wearing anything, and as soon as they put their sweaters on, they would just freeze and not move. Thanks for taking the time to make so many sizes!
Jess @ Make and Do Crew says
Hey Colleen,
Yes, I think you might be able to figure out how to customize the pattern based on looking at the pattern notes. It's pretty easy to make the main rectangle longer, so you might choose to make a fairly small size (based on the dogs' neck measurements) and then just make the main rectangle longer to cover their long bodies. 🙂
Jess
MG says
What breed of dog is your model, he or she looks so much like the dog I had, his eyes were beautiful, like a lion.
Cute sweater. My dog loved wearing coats, I sewed one for him years ago.
Thanks for the pattern.
Jess @ Make and Do Crew says
Hey MG,
This is my dog "nephew" and I know he's a mix. I can't quite remember of what right now though. Pregnancy brain has def gotten the best of me lately. 🙂
Jess
MG says
Did you ever remember what mix dog breed your dog nephew is?
Still wondering what my sweet stray dog mix breed was.
His eyes, coat, build ears are the same, but not the pattern on his legs, he had a buff under belly and under his neck and his tail formed a question mark. I named him Dingo because he reminded me of the wild dogs of Australia.
Tracy King says
You read my mind! My Sadie does NOT like going out in the cold and I was just considering crocheting something for her. Thanks so much! This is so stylish and modern. That means my hubby won’t make fun of me quite as much for crocheting for the dog. Ha ha!