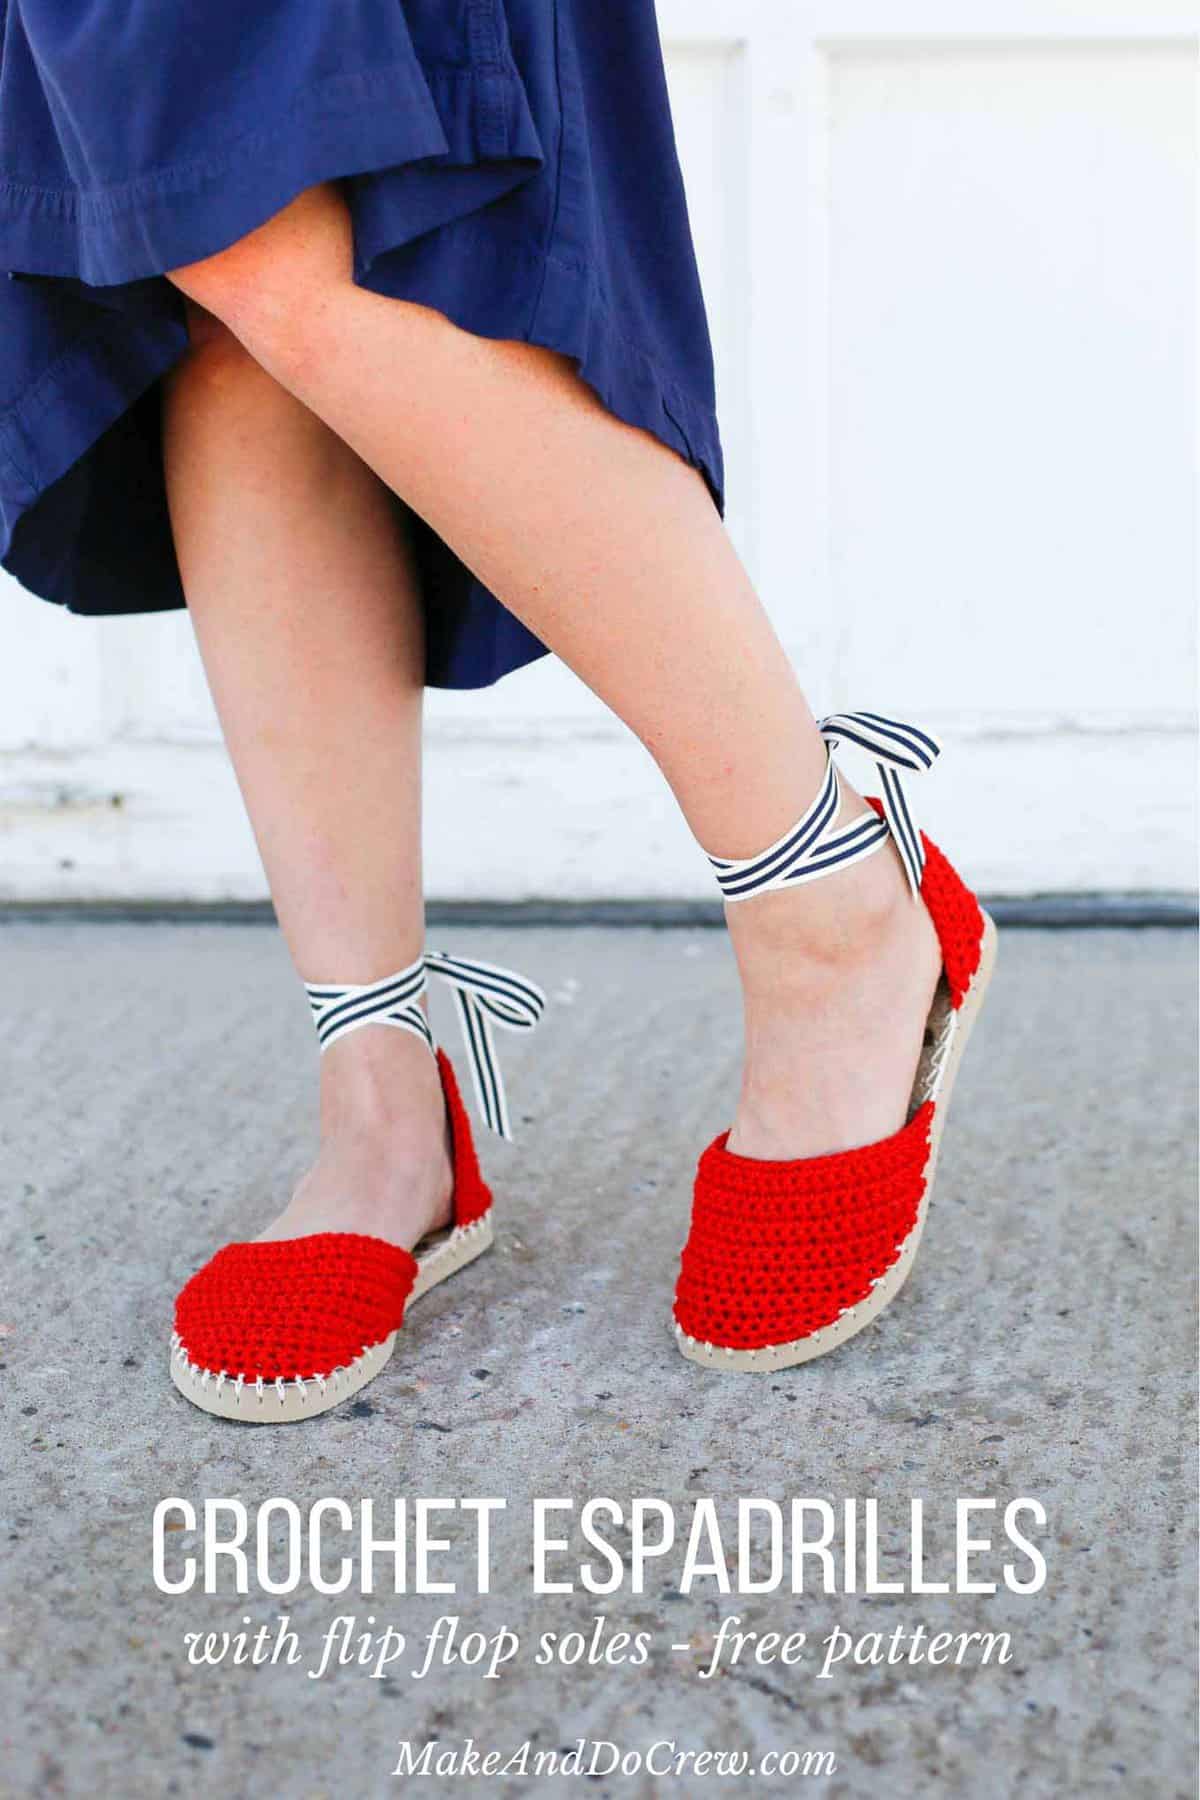
Hey beach babe! Learn how to make crochet espadrilles with flip flop soles in this free pattern and tutorial. These sandals are perfect for the pier, the beach or your rich uncle's yacht! Get the free pattern below or purchase the ad-free, printable PDF here.
This crochet sandals with flip flop soles free pattern is a collaboration with Lion Brand Yarn. This post contains affiliate links.
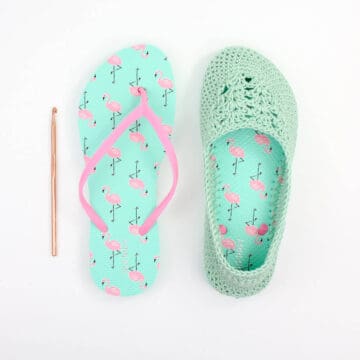
These crochet espadrilles with flip flop soles have been kicking around my head since I made my first pair of flip flop crochet shoes last year. Don't you think the woven look of espadrilles sandals just perfectly lends itself to some good old fashioned single crochet goodness?
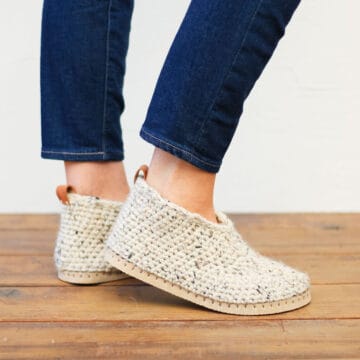
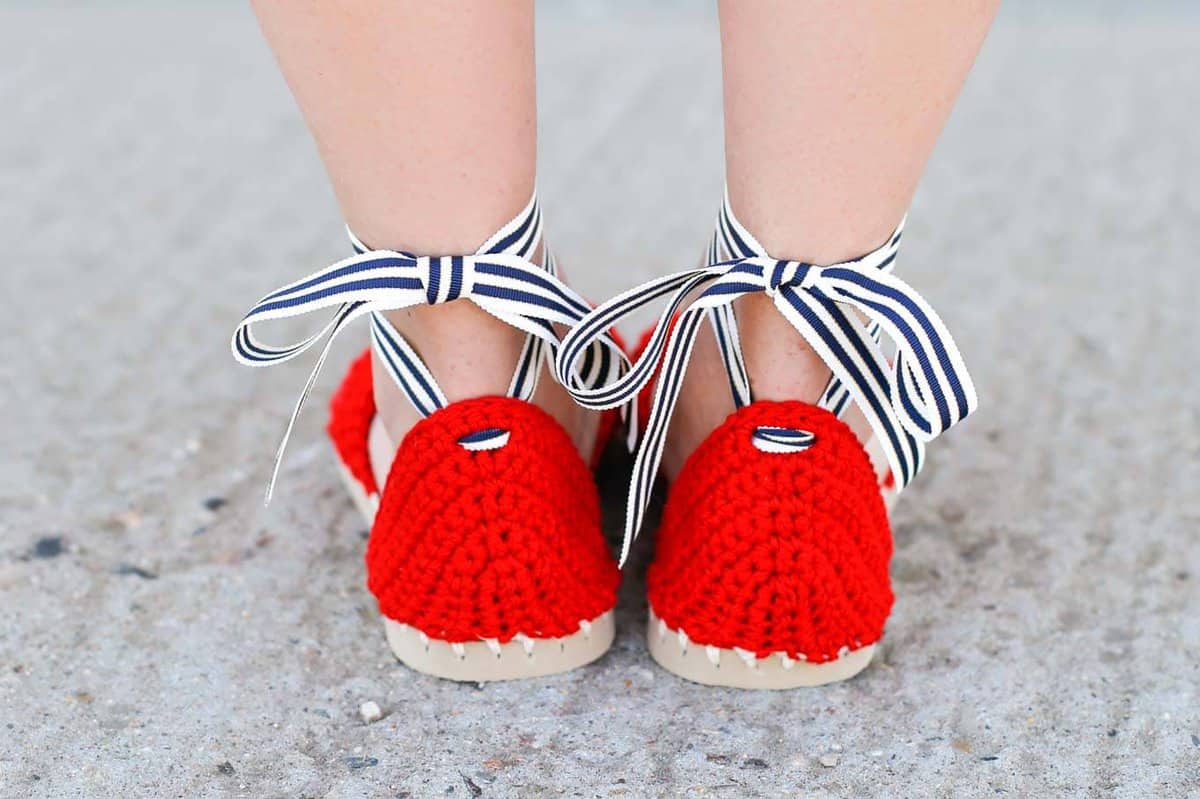 I used ribbon for the ankle straps of my crochet espadrilles, but I also think leather could look fantastic too. You can really customize the vibe of these sandals depending on the color of yarn and ribbon you choose.
I was going for a preppier, yacht babe look with these, but I can imagine a bohemian look with a more neutral color of yarn and leather ankle straps.
 If you've never made one of my crochet patterns that use flip flops, this is a great beginner project to try. You might also like to read this Flip Flop FAQs post that answers a lot of common questions about how they hold up.
These crochet espadrilles with flip flop soles are quite straightforward and work up super quickly because, let's be honest, there's just not that much crocheting to do. This means you can make a pair in every color!
 Similar to my other flip flop crochet patterns, the ad-free, printable PDF of this pattern includes a handy printable ruler to wrap around your soles to guide your hole poking. This is super helpful in ensuring that you achieve the pattern gauge and sizing.
Purchase the Crochet Espadrilles with Flip Flop Soles pattern PDF here.
Related: 30+ Modern Crochet Tops + Tanks
Find Your Next Crochet Pattern on Flip Flop Soles
Crocheting on flip flops can fast track your feet straight to comfort-ville. Flip flops offer functional, non-slip soles for your crochet slippers. They also allow you to crochet shoes customized for your particular feet.
See more free crochet flip flops patterns →
Thanks to Lion Brand Yarn for sponsoring this post and enabling more free patterns on Make and Do Crew!
And my gratitude goes to my dear friend McCall for taking photos me wearing these sandals when I visited her recently. It's not everyday you get to have your feet photographed by a real, fancy photographer! (At least in my world.)
Please do not publish or share this pattern as your own. You may make items to sell with this pattern. In exchange, please link back to this post. Do NOT use my photos as your own sales photos. You can read my policies here. Now let’s make something awesome!
Crochet Espadrilles With Flip Flop Soles - Free Pattern
Purchase the printable PDF with hole-poking guide here.
Add this pattern to your Ravelry favorites here.
Pin this pattern for later here.
Sizes (see Overall Pattern Notes):
Small – women’s shoe size 5-6 (flip flop length approx. 9.5)"
Medium – women’s shoe size 7-8 (flip flop length approx. 10)"
Large – women’s shoe size 9-10 (flip flop length approx. 10.5)"
Supplies:
So you can spend more time making shoes and less time shopping, this pattern contains affiliate links at no extra cost to you.
• Lion Brand 24/7 Cotton – 1 skein (186 yrds) divided into two balls – color: Red (MC)
• Lion Brand 24/7 Cotton – 1 skein (186 yards) – color: Ecru (SC)
• If Ecru color doesn’t match flip flop color, you’ll want about 20 yards of 24/7 Cotton that does
• Sharp tapestry needle
• Size B [2.25 mm] crochet hook or size needed to fit through flip flop holes
• Size G [4.0 mm] crochet hook
• 1-2 printed copies of the “ruler” at end of pattern or measuring tape
• 1 pair of flip flops (One size smaller than you wear normally. See pattern notes.)
• Sharp tool to poke holes (I use this clay tool. You can also try a skewer, thin drill bit or awl.)
• Sharp scissors
• 90" of ribbon (the ribbon pictured is a ½" wide)
• Fray Check or clear nail polish for ribbon ends
• Strong glue such as E6000 to glue strap plugs to sole (optional)
• Stitch markers (optional)
Gauge:
8 st = 2”, 9 rows = 2” worked in single crochet
Abbreviations and Glossary:
sc – single crochet
sk – skip
sl st – slip stich
ch – chain
WS – wrong side
RS – right side
MC – main color
SC – sole color
Sc2tog (single crochet 2 together) – [Insert hook into next st and pull up a loop] two times, yarn over and pull through all 3 loops on hook
Overall Pattern Notes:
• Transforming flip flops into slippers isn’t an exact science! Keep an open mind and don’t be afraid to customize the shoes to your liking. Check out this Flip Flop FAQs post for answers to commonly asked questions.
• You’ll likely want to size down when buying your flip flops. Look for a flop flop that offers about .25" of sole around your foot (more like the fit of a normal shoe). In the pattern sizing, the shoe sizes mentioned describe the shoe size you normally wear and not the sized-down size of your flip flops.
• The flip flops in the sample are from Old Navy--they have a great selection of colors. Find $1 flip flops on Amazon or at Walmart. Dollar Tree’s $1 flip flops tend to be a bit too flimsy, but can work if you are careful. And LionBrand.com now offers flip flops so you can get your yarn and soles in one place!
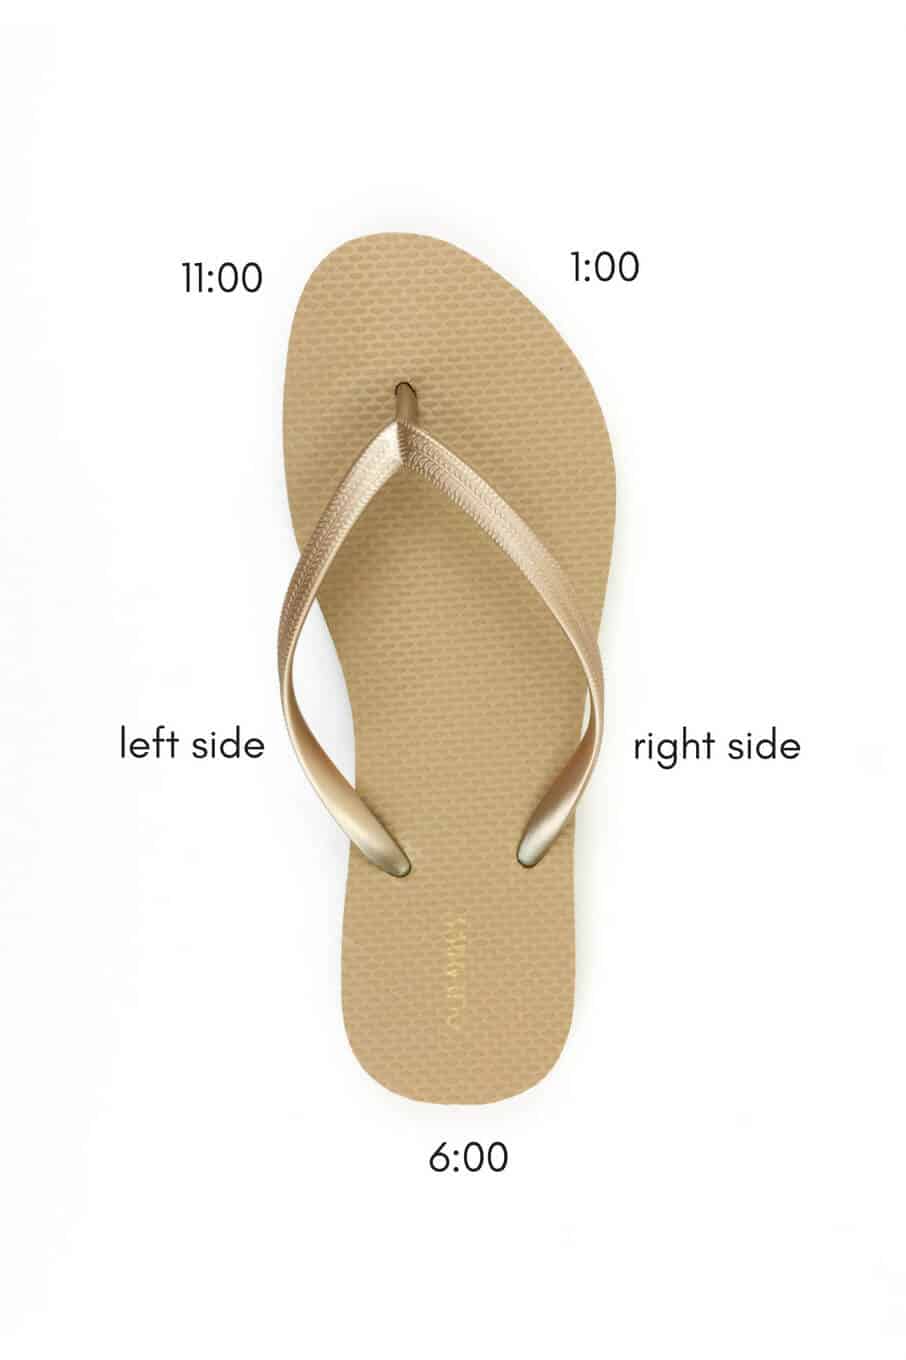
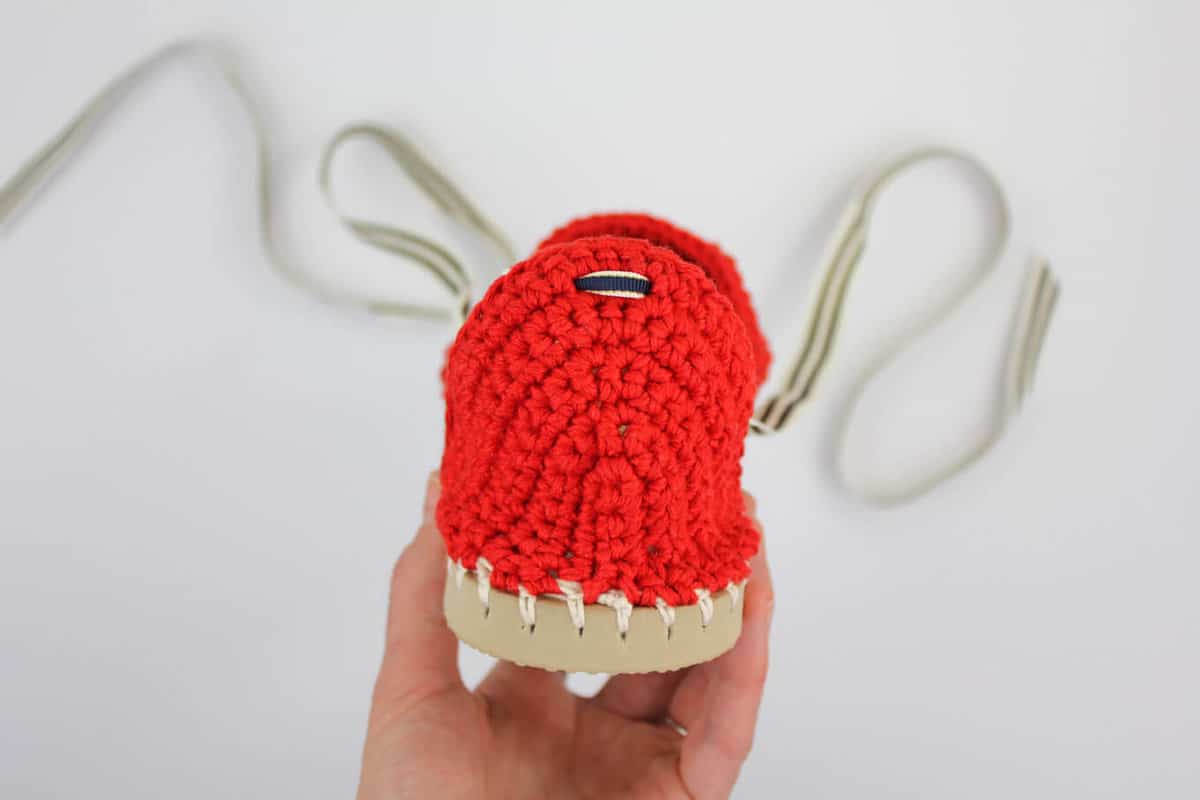
•Pattern explains locations on the flip flop as if it’s a clock where the top of the toe is 12:00 and the heel is 6:00. (See photo below.)
• Left and right shoes are identical.
• Pattern is worked with two strands of yarn held together throughout, except for the foundation round which is worked with one strand. Divide one skein of main color into two equal balls.
 Espadrilles Toe
Notes:
• The shoe is crocheted tightly, similar to amigurumi. Make a deliberate effort to keep your stitches tighter than normal. Check your gauge if you’re unsure.
• Be sure to poke the same number of holes in the second flip flop as in the first. (The printable ruler makes this pretty straightforward, but it’s still a good idea to count and double check.)
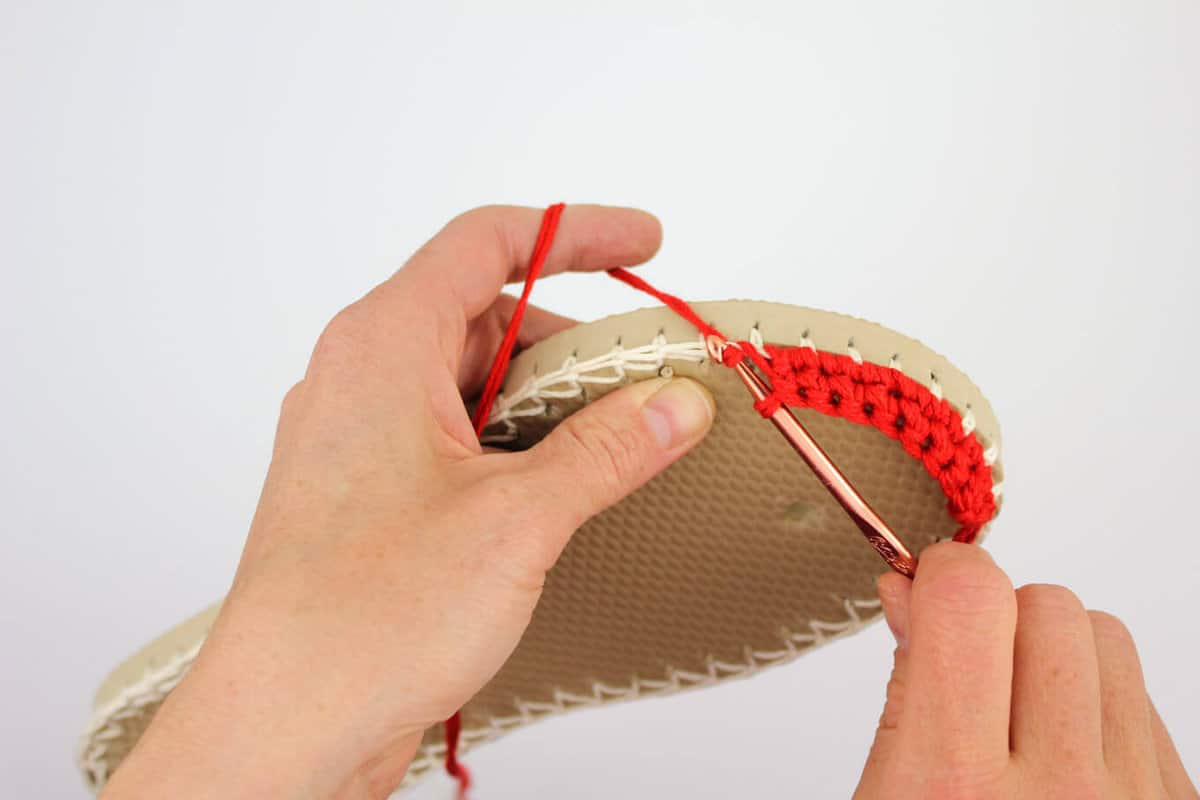
• When working sc2tog stitches on the sole, keep yarn fairly tight so as to create a smooth edge around the sole edge. It may take a couple of attempts to get the sc2tog stitch to look how you’d like it to. (See photo below.)
 To begin:
Trim straps off flip flops by cutting the mid-foot straps at an extreme angle so you can keep them in place without feeling them inside the shoe. Save the rubber plug from the strap between your toes to glue in later.
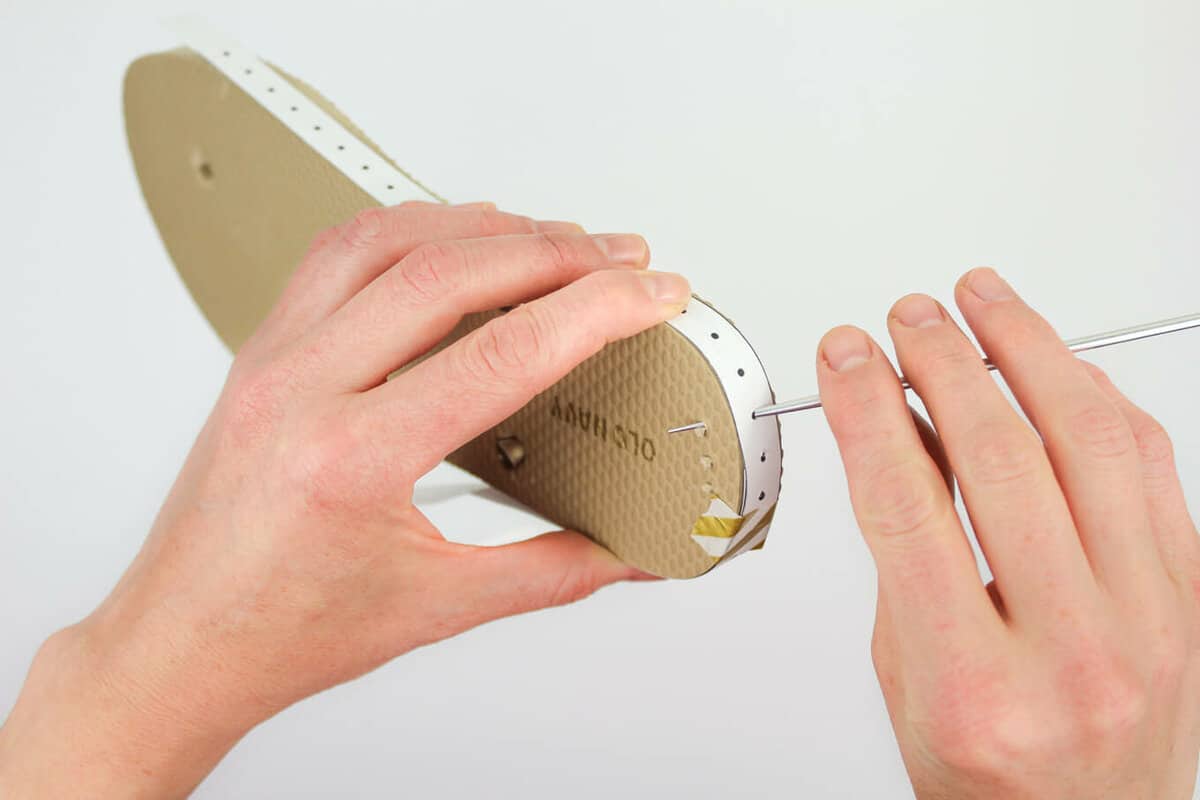
 Print “ruler.” Trim, tape pieces together and tape ruler around flip flop sole. With your sharp instrument, poke holes in each dot on the ruler. If you haven't purchased the ruler, poke holes ⅜th of and inch apart.
You want the hole to go at an angle from about the middle of the way down the sole to about ¼ inch into the top of the sole. Ensure your holes are far enough from the edge so that the yarn won’t rip through the rubber when you create your first row of crochet.
Reference Part 1 of the Breckenridge Boots video tutorial for help.
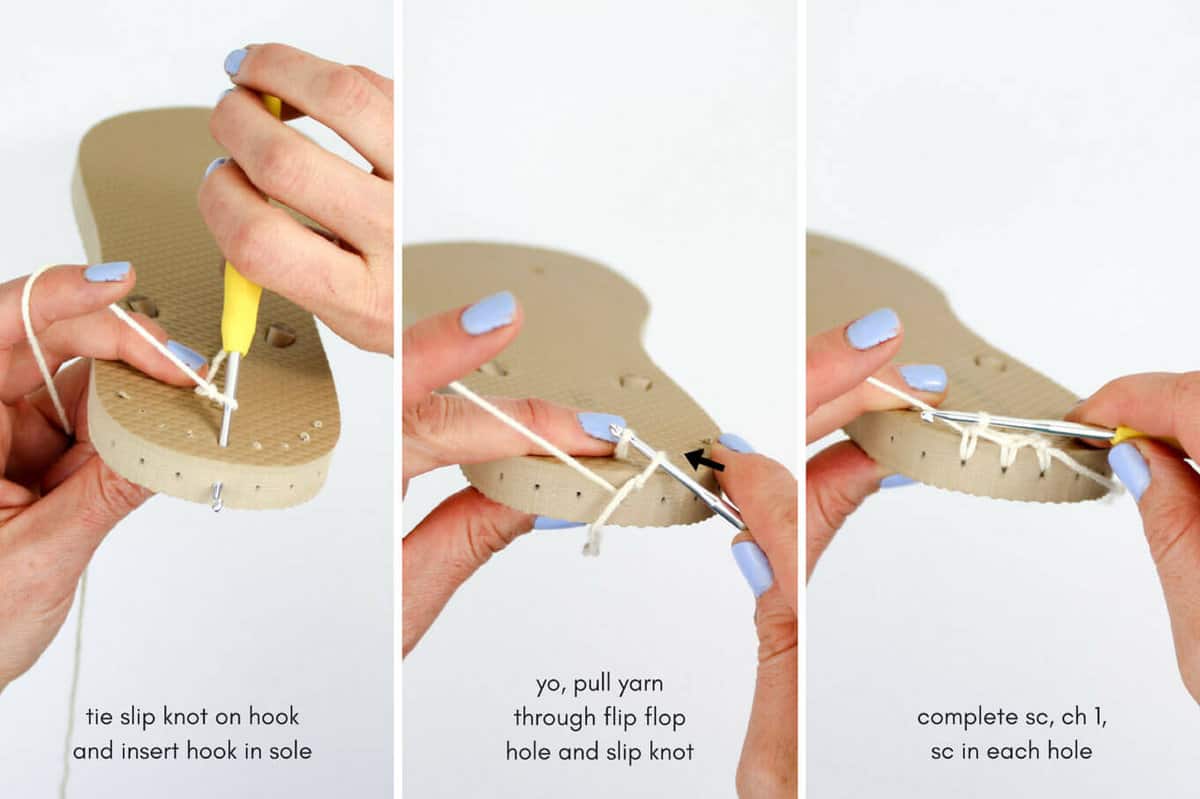
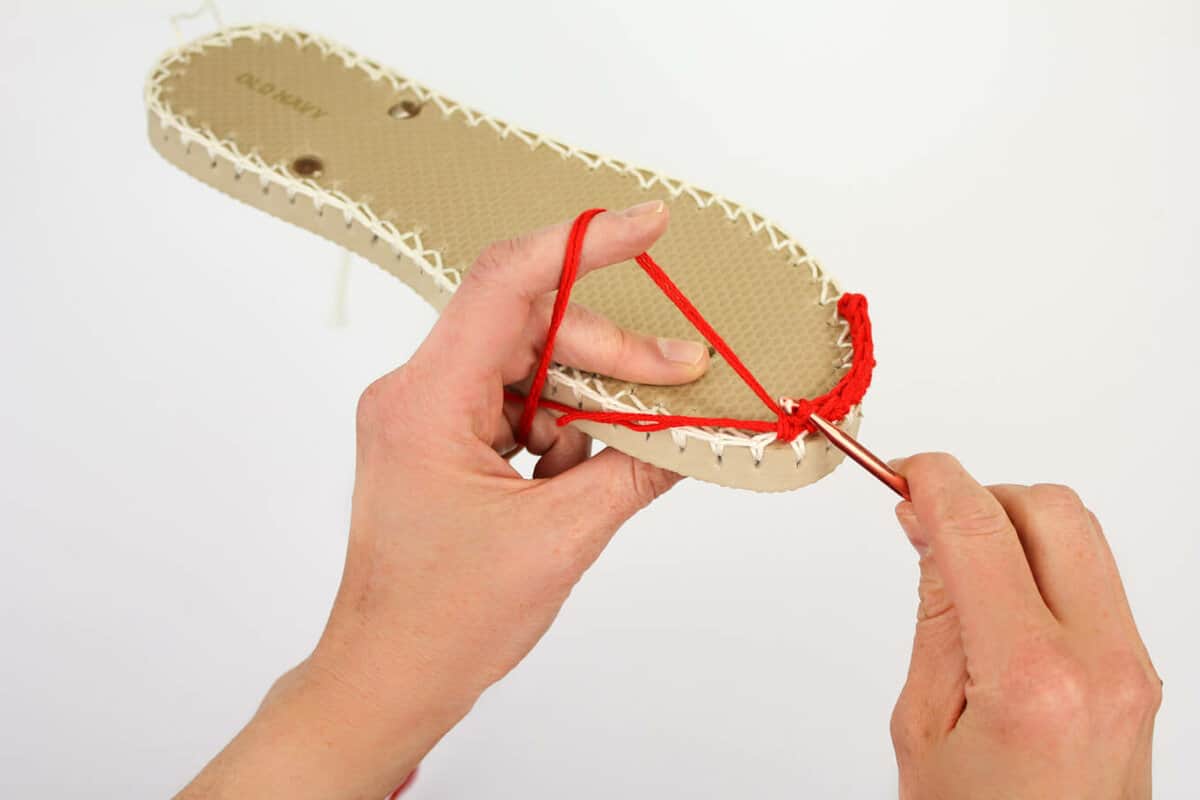
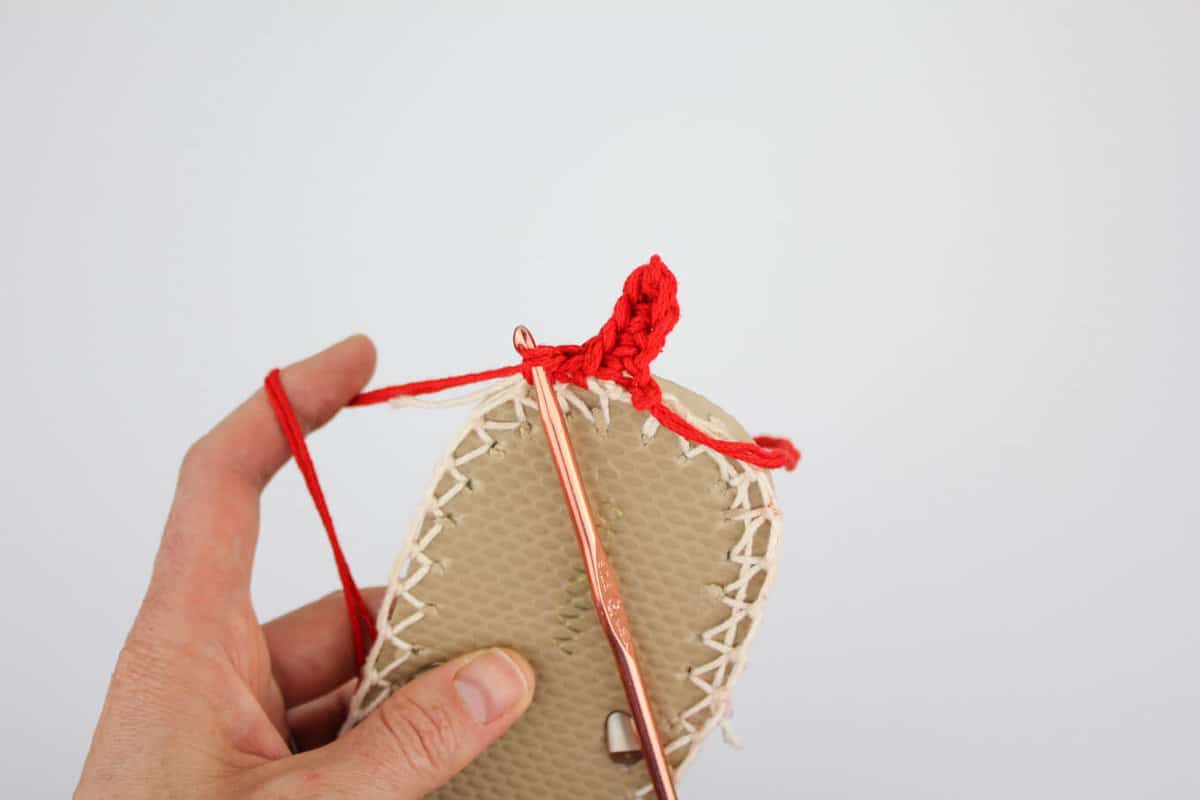
 Using one strand of SC, tie slip knot around smaller hook. Insert hook at back of heel (6:00 position) Using smallest hook, attach SC at the back of the heel by inserting your hook from the top of the flip flop toward the bottom of the sole, grabbing the yarn and pulling through to the top. Ch 1 through the loop you’ve created to of the flip flop and through the slip knot to attach the yarn to the flip flop. (See photo below.)

All Sizes:
Make 2.
Foundation Round: Continuing with size B hook and single strand of SC, ch1, sc in each hole around sole, join with a sl st to first sc. Fasten off. You will work over yarn tails in the heel section of the pattern.
Wanna save this pattern?
Place stitch markers at 11:00 and 1:00 positions with 6 stitches in between. Using larger hook and two strands of MC, make a slip knot on hook. Insert hook at the 11:00 marked st of Foundation Round (1:00 marked st for left-handed crocheters), yarn over and pull loop through slip knot to join yarn at toe. Begin Row 1 in same stitch and work over the tail of yarn you just attached.
Row 1 (RS): Ch 1, sc in next 8 sc; turn. (8) (See photo above.)
Row 2 (WS): Ch 1, sc in next 8 sc, sc 2 on sole; turn. (10)
Row 3 (RS): Ch 1, sc in next 10 sc, sc 2 on sole; turn. (12)
Row 4 (WS): Ch 1, sc in next 12 sc, sc 2 on sole; turn. (14)
✨Unlock this free subscriber-exclusive pattern ✨
Follow these steps to view the full free pattern below
Espadrilles Heel
Notes:
• The heel is worked perpendicular to the sole in Row 1, but continues to spread out across heel as rows continue.
• Left-handed crocheters, reverse mentions of “right” and “left”. Similarly, reverse mentions of 5:00 and 7:00 positions.
• Size 5-6 is listed, with instructions for sizes 7-10 in parenthesis. Sizes 7-8 and 9-10 are worked identically until Row 9.
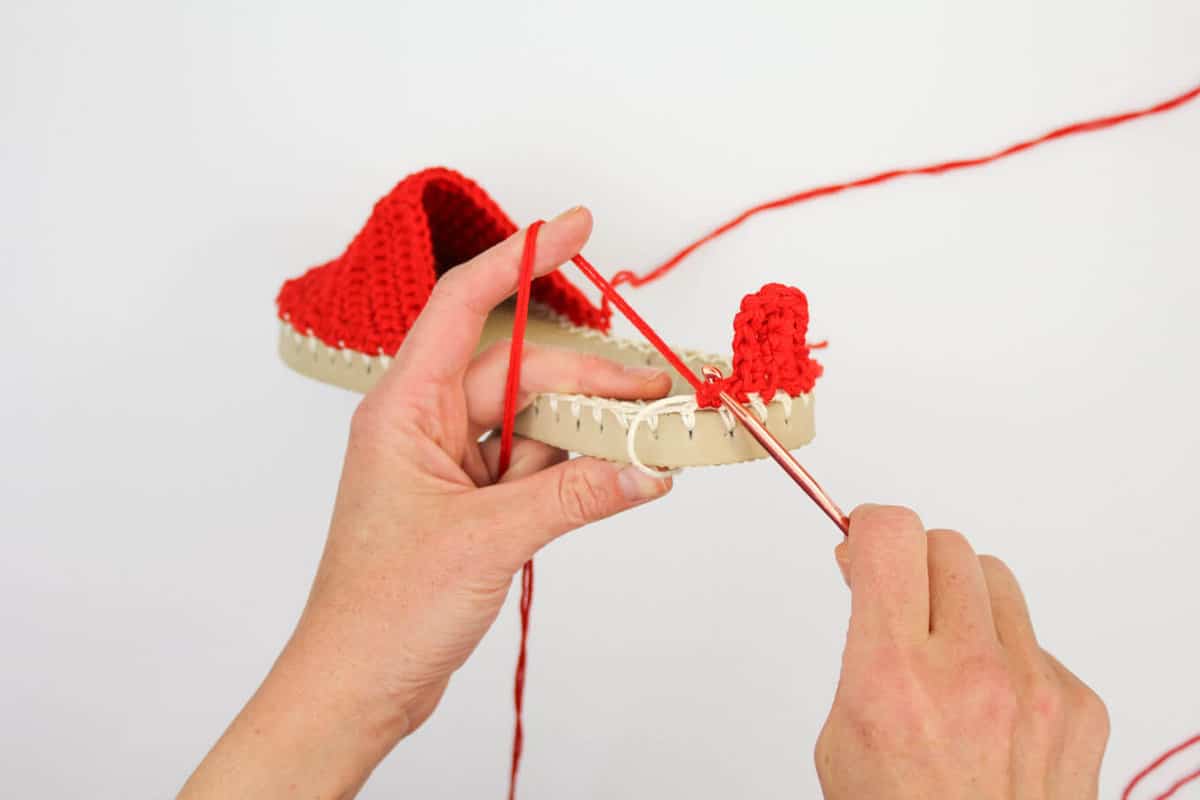
Using larger hook and two strands of MC, make a slip knot on hook. Insert hook at the 6:00 position of Foundation Round, yarn over and pull loop through slip knot to join yarn at back of heel. As heel is worked, crochet over the tail of yarn you just attached as well as the tails from the Foundation Round.
 All Sizes:
To begin: Ch 4 (5); turn so that WS of work is facing. (4), (5)
Row 1 (WS): Sk first ch, sc in next 3 (4) ch, sc 2 on sole toward the 5:00 position; turn. (5), (6) (See photo above.)
Row 2 (RS): Ch 1, sc2tog, sc in next 2 (3) sc, 2 sc in next sc; continuing down back side of chain 2 sc in next ch, sc in next 2 (3) ch, sc 2 on sole toward 7:00 position; turn. (11), (13) (See photo above.)
Row 3 (WS): Ch 1, sc2tog, sc in next 3 (4) sc, 2 sc in each of next 2 sc, sc in next 4 (5) sc, sc 2 on sole; turn. (14), (16)
Row 4 (RS): Ch 1, sc2tog, sc in next 5 (6) sc, 2 sc in each of next 2 sc, sc in next 5 (6) sc, sc 2 on sole; turn. (17), (19)
Row 5 (WS): Ch 1, sc2tog, sc in next 6 (7) sc, 2 sc in each of next 2 sc, sc in next 7 (8) sc, sc 2 on sole; turn. (20), (22)
Row 6 (RS): Ch 1, sc2tog, sc in next 8 (9) sc, 2 sc in each of next 2 sc, sc in next 8 (9) sc, sc 2 on sole; turn. (23), (25)
Row 7 (WS): Ch 1, sc2tog, sc in next 9 (10) sc, 2 sc in each of next 2 sc, sc in next 10 (11) sc, sc 1 on sole; turn. (25), (27)
Row 8 (RS): Ch 1, sc2tog, sc in next 10 (11) sc, 2 sc in each of next 2 sc, sc in next 11 (12) sc, sc 1 on sole; turn. (27), (29)
Continue finishing heel according to the shoe size you’re making. (For the larger sizes, you can also try on the shoe and decide if you’d like more heel coverage (follow size 9/10 instructions) or less (follow size ⅞ instructions).
Size 5-6 and 7-8:
Row 9 (WS): Ch 1, sc2tog, sc in next 25 (27) sc, sl st 1 on sole; turn. (27), (29)
Row 10 (RS): Ch 1, skip sl st, sc in next 27 (28) sc, sl st 1 on sole. (27), (29)
Size 9-10:
Row 9 (WS): Ch 1, sc2tog, sc in next 27 sc, sc 1 on sole; turn. (29)
Row 10 (RS): Ch 1, sc2tog, sc in next 28 sc, sc 1 on sole; turn. (30)
Row 11 (WS): Ch 1, sc2tog, sc in next 28 sc, sl st 1 on sole; turn. (30)
Row 12 (RS): Ch 1, skip sl st, sc in next 29 sc, sl st 1 on sole. (30)


Finishing
Weaving In Ends: Use a sharp tapestry needle to weave in remaining ends from toe and heel section.
 Plugging Flip Flop Holes: If you’d like, replace the small rubber circle that connected your flip flop straps to the sole between your toes. Glue it in place. In my experience, the other two mid-foot strap plugs stay in place without glue as long as they’re cut at an angle like in photo at the beginning of the pattern.
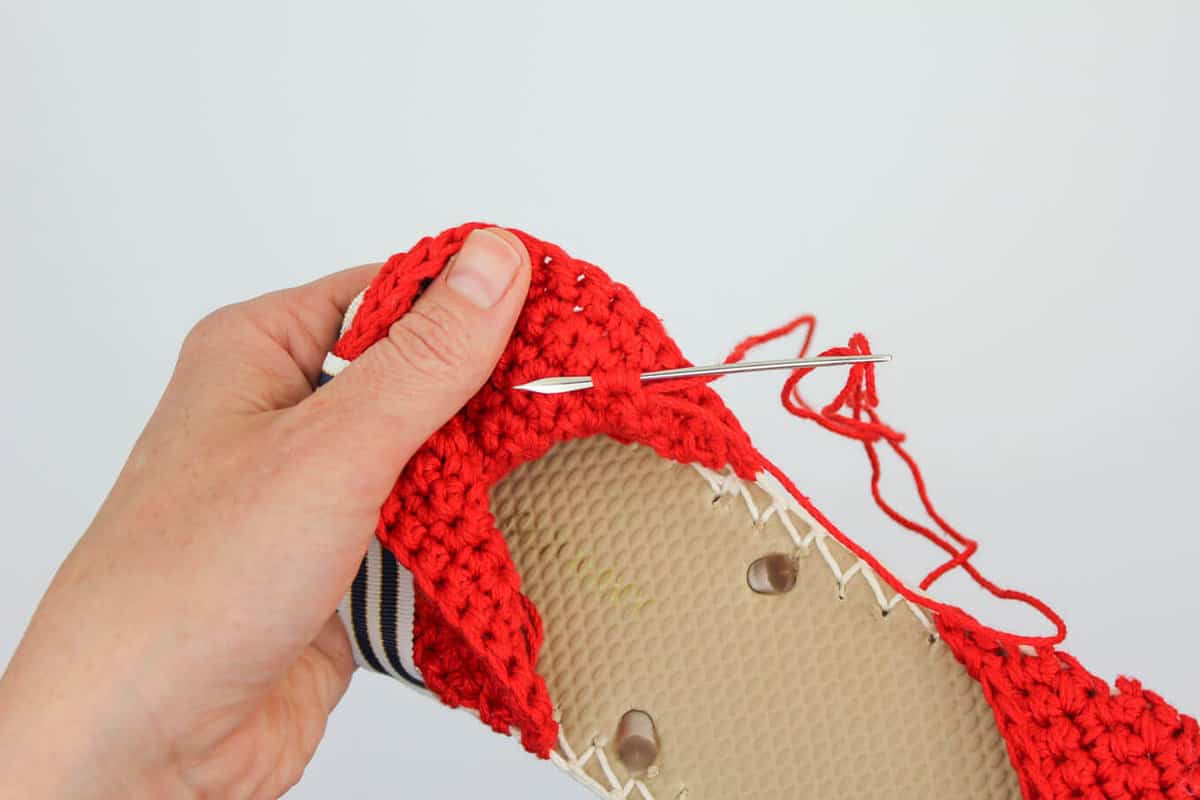
Adding Ankle Strap: Cut (2) 42” pieces of ribbon or leather. With WS of heel facing, thread ribbon through to back of shoe. (Use a crochet hook to grab it if necessary.) Leaving two single crochet between the ribbon entry points, thread ribbon back through to WS of heel. Trim ribbon ends at 45 degree angle. Add Fray Check or clear nail polish to avoid fraying. Repeat with second shoe.
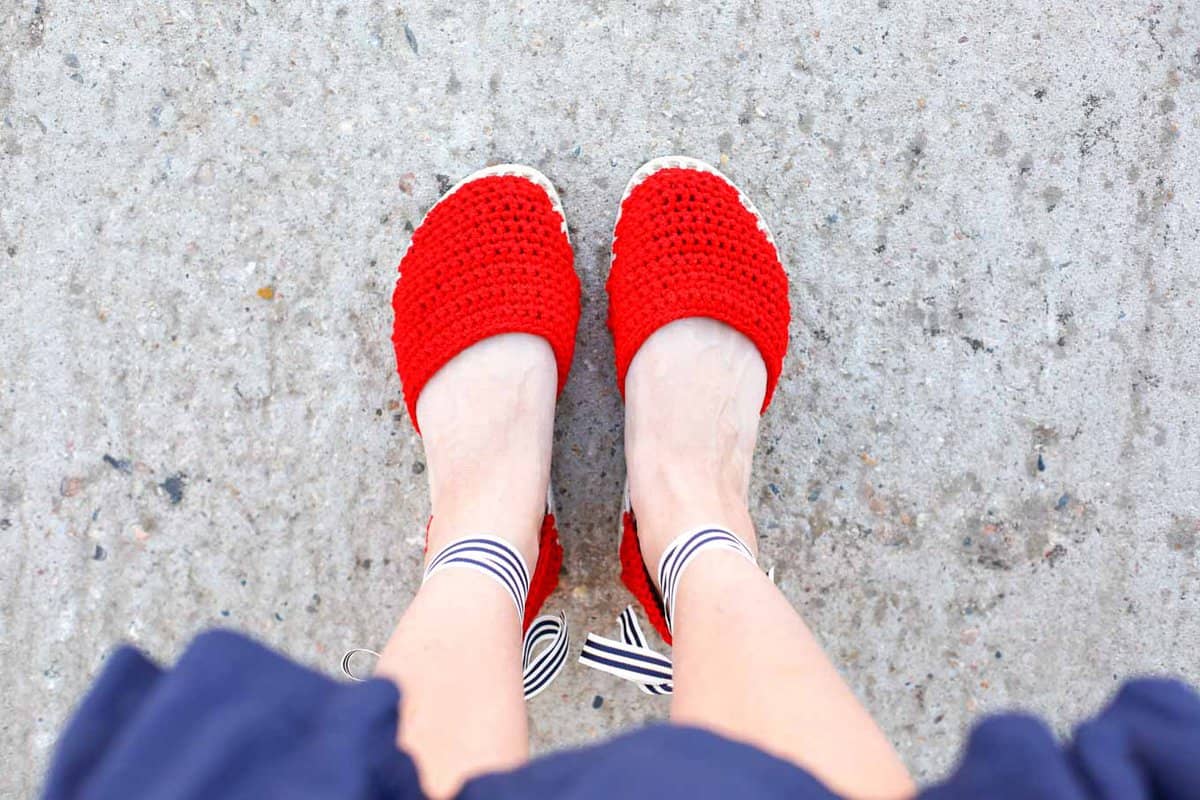
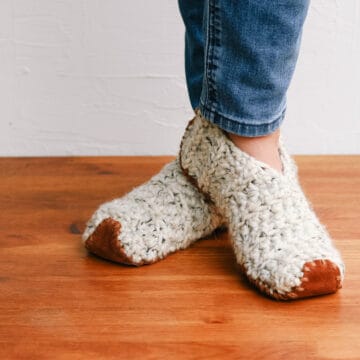
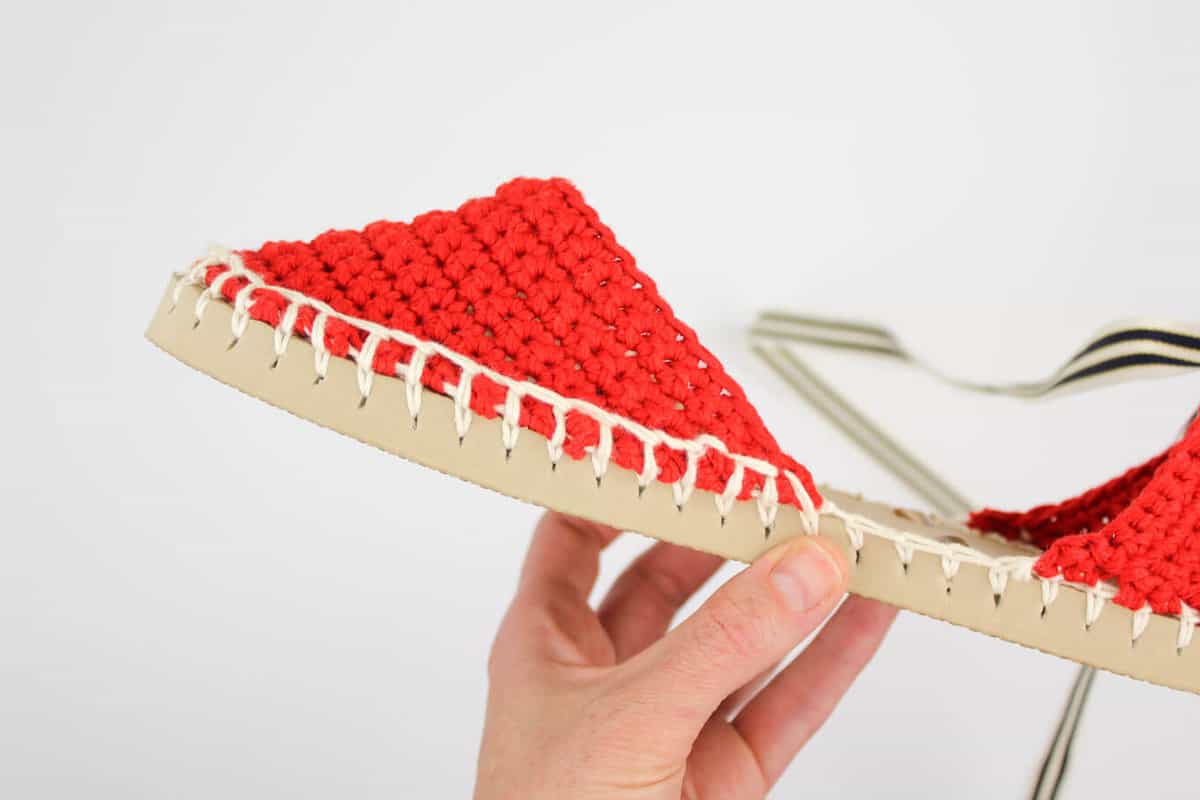
 Optional Top Stitching: If you’d like to add the classic espadrilles stitching around the toe, you can do so with a blanket stitch and one strand of SC yarn doubled over. (See photo below for example of how this looks.) I opted to leave this off in the sample.
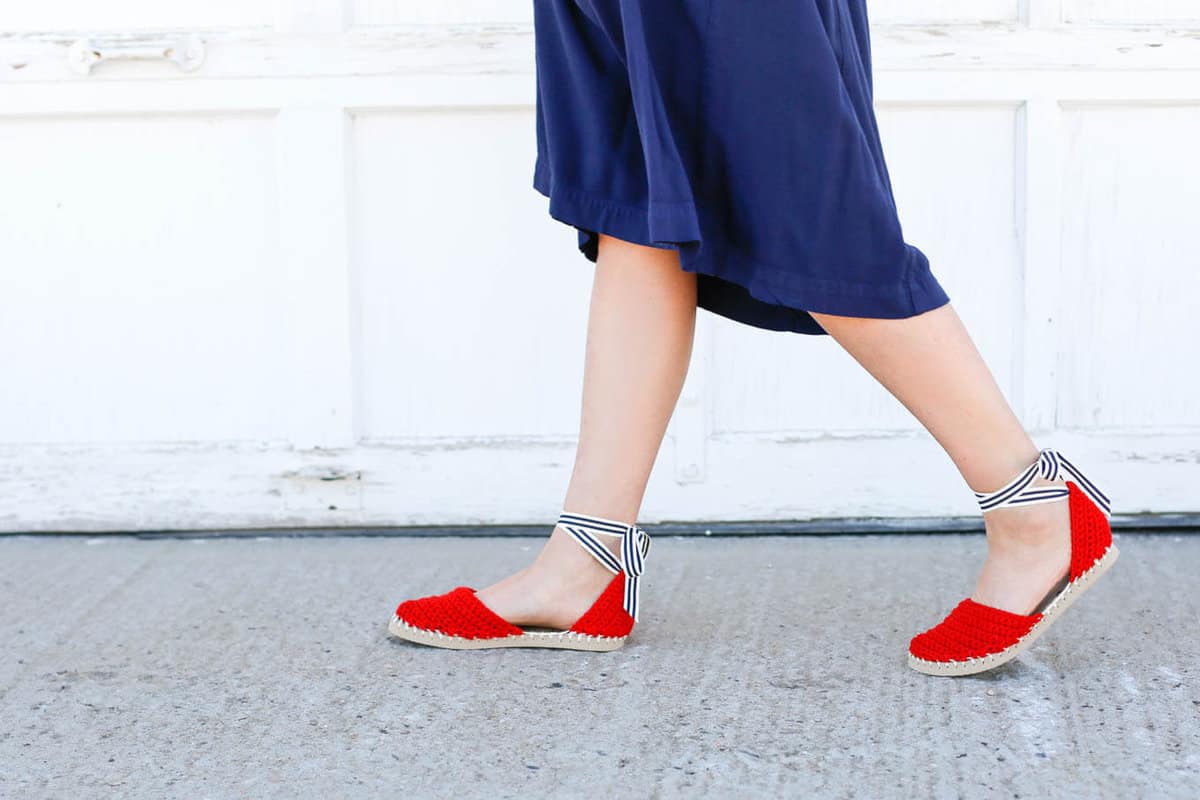
 Fancy Feet: Hit the pier, the beach or the yacht in your new DIY espadrilles!
Related: 30+ Year-Round Free Crochet Dress Patterns
That was so fun! Now what?
Invitation to our Facebook group
Come discuss crocheting espadrilles patterns and lots of other crochet projects and techniques in our Make & Do Crew Facebook group. Here thousands of helpful crocheters answer each others questions and share their stitches. Come join us here.
More Free Crochet Patterns Using Flip Flop Soles
- FAQS: How to Crochet on Flip Flops - and will they fall apart?
- Crochet Boots With Flip Flops Soles
- Lightweight Crochet Slippers with Flip Flop Soles
- Free Crochet Ugg Boot Pattern
- Crochet Beach Shoes Pattern
- Crochet Festival Boots Pattern
- Crochet Boat Shoes Slippers (for kids)
- Chukka Crochet Slipper Boots with Flip Flop Soles


carla villanueva says
hi dear!
i love it! ... but could you help with the part of the heel 🙁 ! i dont know how to do it, perpendicular !
i wit for your answer
blessings from peru !
Silvana says
Hi Jess i would like to do it and buy the PDF, but do you have it in spanish. It´s hard for me to understand
Jess @ Make and Do Crew says
I'm sorry I don't know more Spanish, Silvana! I wish I would have stuck with it a bit more in high school! 🙂
Kayla Thomas says
How do you work on the wrong side? What do you mean by That?
Jess @ Make and Do Crew says
The wrong side just means that you have the inside of the shoe facing you as you work. It's a note that's in there more so that you can keep track of where you are in the pattern when you're working a row (and not because you need to do anything different with your actual crochet stitches.) 🙂
Monica says
Hello Jess,
You have an awesome way tutorial how to make a crochet sandal.. can't wait to make for my own sandal crochet soon.??
Jess @ Make and Do Crew says
Thanks so much Monica!
Susan says
Hi Jess!
I LOVE your espadrille pattern! I just finished my first pair and gave them to my sister-in-law. They fit her perfectly! Thank you for sharing your creative pattern.
Your instructions are so very clear and easy to follow.
I'm looking forward to making more espadrilles several different colors.
Most Grateful and Kind Regards,
Susie J in Texas
Maggie Schur says
I just received the espadrilles kit...yarn and pattern. The pattern says there is a ruler at the end but there is not! This is a real cool looking pattern so I want to get going and to make it right. The photos are great!
Jess @ Make and Do Crew says
Hey Maggie,
Thanks so much! The ruler should have been included in the kit from Lion Brand and I'm so sorry it wasn't. I've emailed you a copy of it.
Happy crocheting!
Jess
Sarah says
I absolutely adore these shoes! I saw them on Pinterest about a week ago and haven't stopped thinking about them since. I was at Michaels today and saw that they have flipflops for $1.50 (CDN) so I grabbed a pair, along with some worsted-weight cotton, so now I'm all set to go.
The only problem is I NEVER wear ankle straps. I have thick ankles that I'm a bit self-conscious about, so the less attention I can draw to that particular area the better. Do you think I'd be able to combine the toe from these shoes with the back from your Seaside Slip-Ons? (I like the full back of those shoes but really prefer the closed toe of these ones.) Or are the two patterns too dissimilar?
Thanks!
Jess @ Make and Do Crew says
Hey Sarah,
I have that happen to me too where a crochet idea just wedges itself in my brain. 🙂
I def think that combining the two could work. I think it's a great idea, actually. One thing to note is that the 24/7 Cotton is slightly lighter than a regular worsted weight yarn, so if you're subbing a different yarn, you might decide you prefer the look of just one strand. You could also poke your holes slightly closer together if you just use one strand of thicker yarn.
These shoes are always a fun experiment. Hope you enjoy the process!
Jess
Sarah says
Thank you for the response and the tip about the yarn weight! I'll play around a bit to get a good fabric before trying this on actual sandals. (Maybe I'll hold one strand together with a different, thinner yarn.) It'll be a fun experiment!
Peggy says
im having trouble locating a store online that has the lion brand 24/7 in the right colors. is there an alternate yarn I could use?
Janet says
How tall should the back heel part be when it's done? I've completed the pattern for the heel through the size 5-6 instructions (I wear a size 9 shoe) and mine is already 3.5 inches tall. I'm wondering if my ruler slipped while I was poking holes and I have too many holes cramped in back there? I really don't want it to be any taller but I'd also like some more coverage on the sides of the heel. Do you think continuing to work back and forth in rows on the sides of the heel and putting slip stitches at the top rather than single crochet could work?
Peggy says
hi Jess I cant wait to make this, but Im having trouble finding the lion brand 24/7 yarn in the right colors. can I substitute lily sugar and cream or peaches and cream?
Peace says
"Row 1 (RS): Ch 1, sc in next 8 sc; turn. (10) (See photo above.)"
Why is it 10 stitches in total? Shouldn't it be 9?
Jess @ Make and Do Crew says
Yes, it actually should be eight stitches total. Thanks so much for pointing that out!
Jess
Sherry says
I love these and wanted to watch the video, but the link is dead. Can you please check it out?