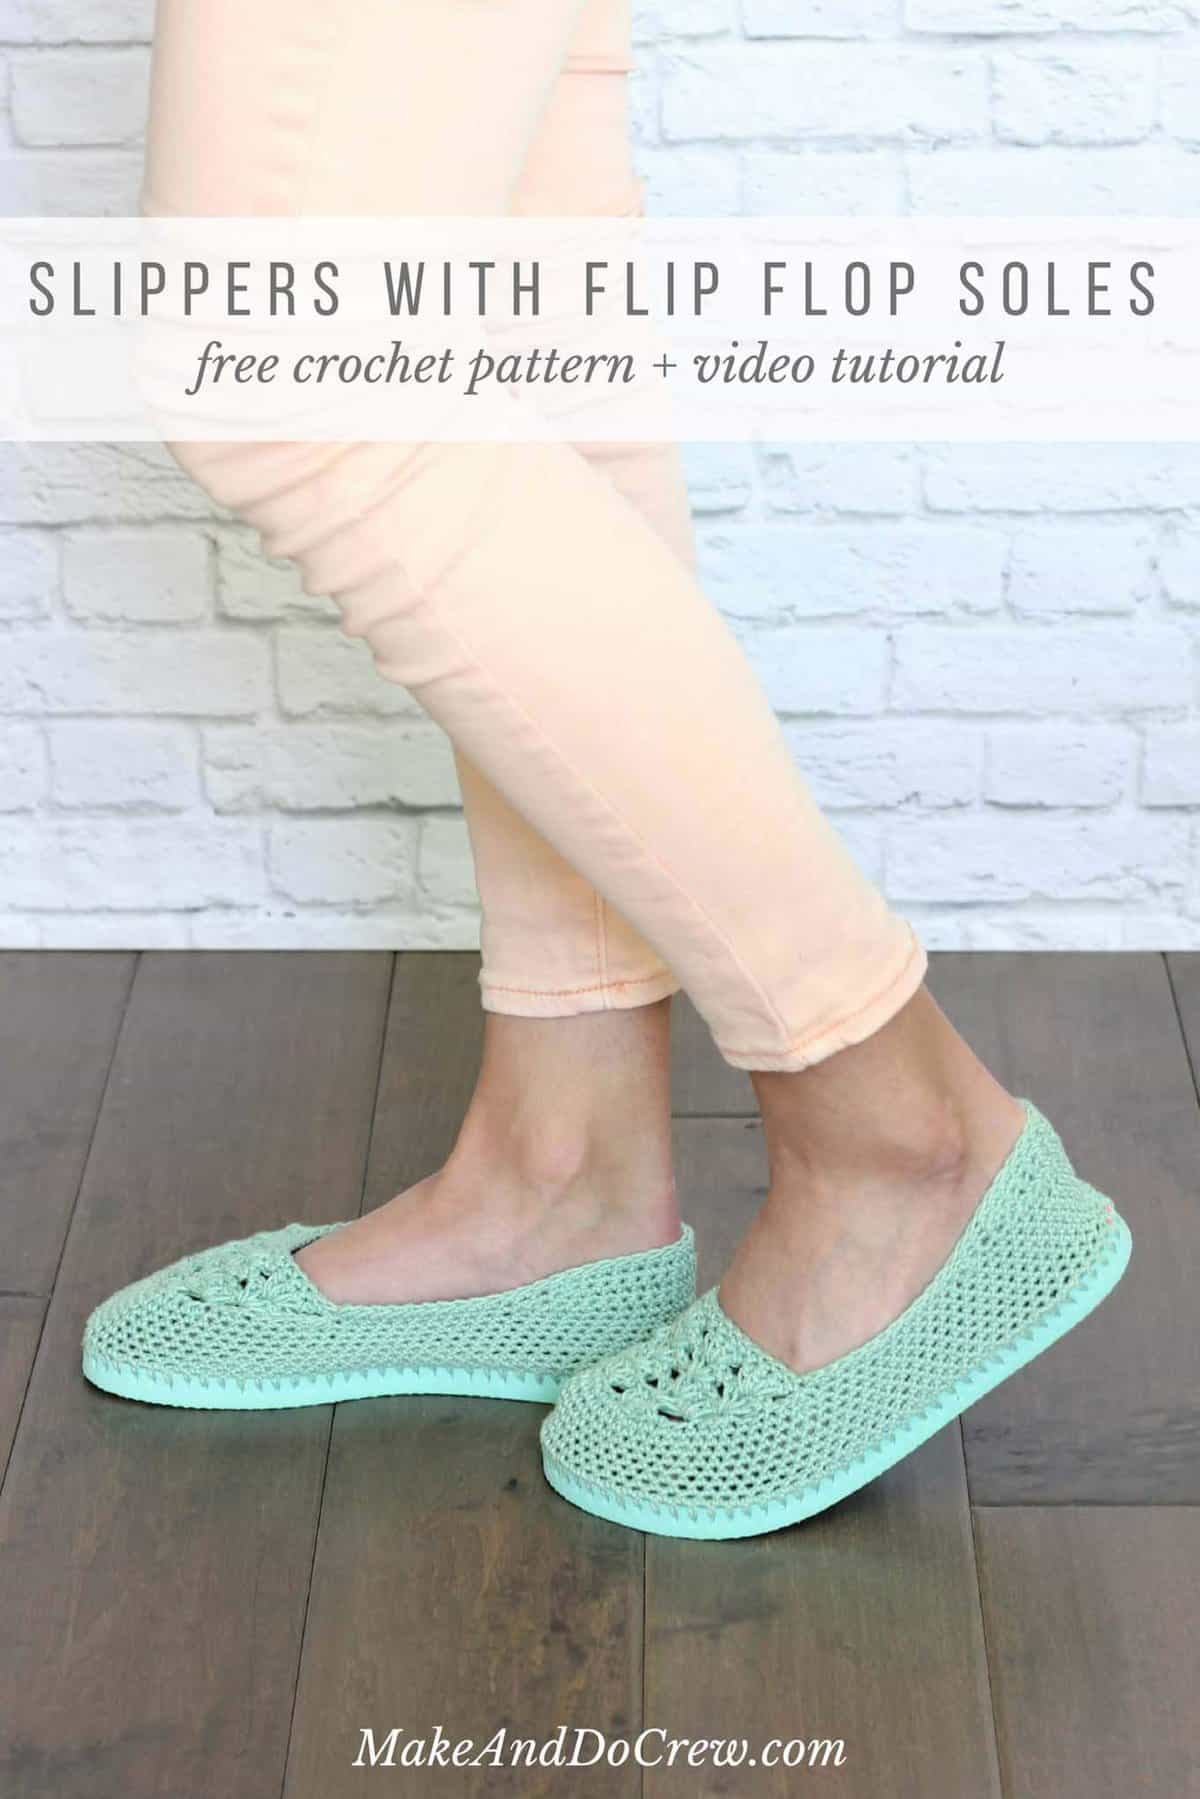
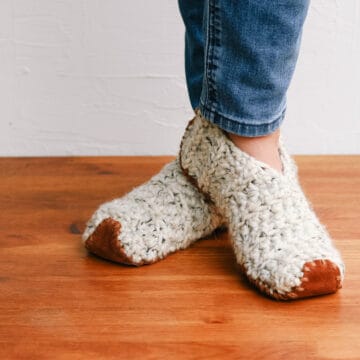
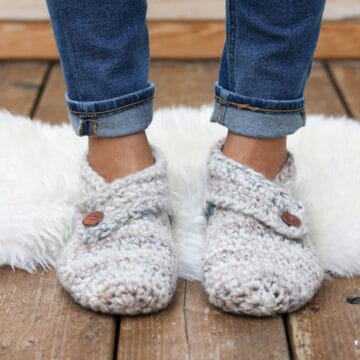
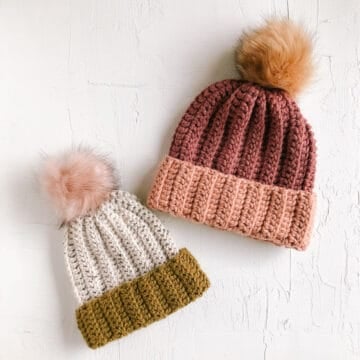
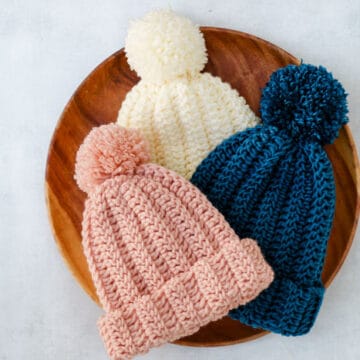
Cotton yarn and a rubber sole make this free crochet slippers with flip flop soles pattern perfect for wearing around the house (or even outside!)
View the entire free pattern and video tutorial below or purchase the printable, ad-free pdf with hole poking guide here.
This free crochet slippers with flip flop soles pattern is a collaboration with Lion Brand Yarn. This post contains affiliate links.
UPDATE: This pattern has been super popular since I published the original version last May. Many of you have requested a video tutorial for these crochet slippers with flip flop soles, so today I’m really happy to have a totally revised and updated version of the pattern that includes a step-by-step video tutorial.
In this version, I’ve updated the toe top section of the pattern, re-written some details for clarity AND added a printable ruler to the ad-free PDF of the pattern to guide your hole poking.
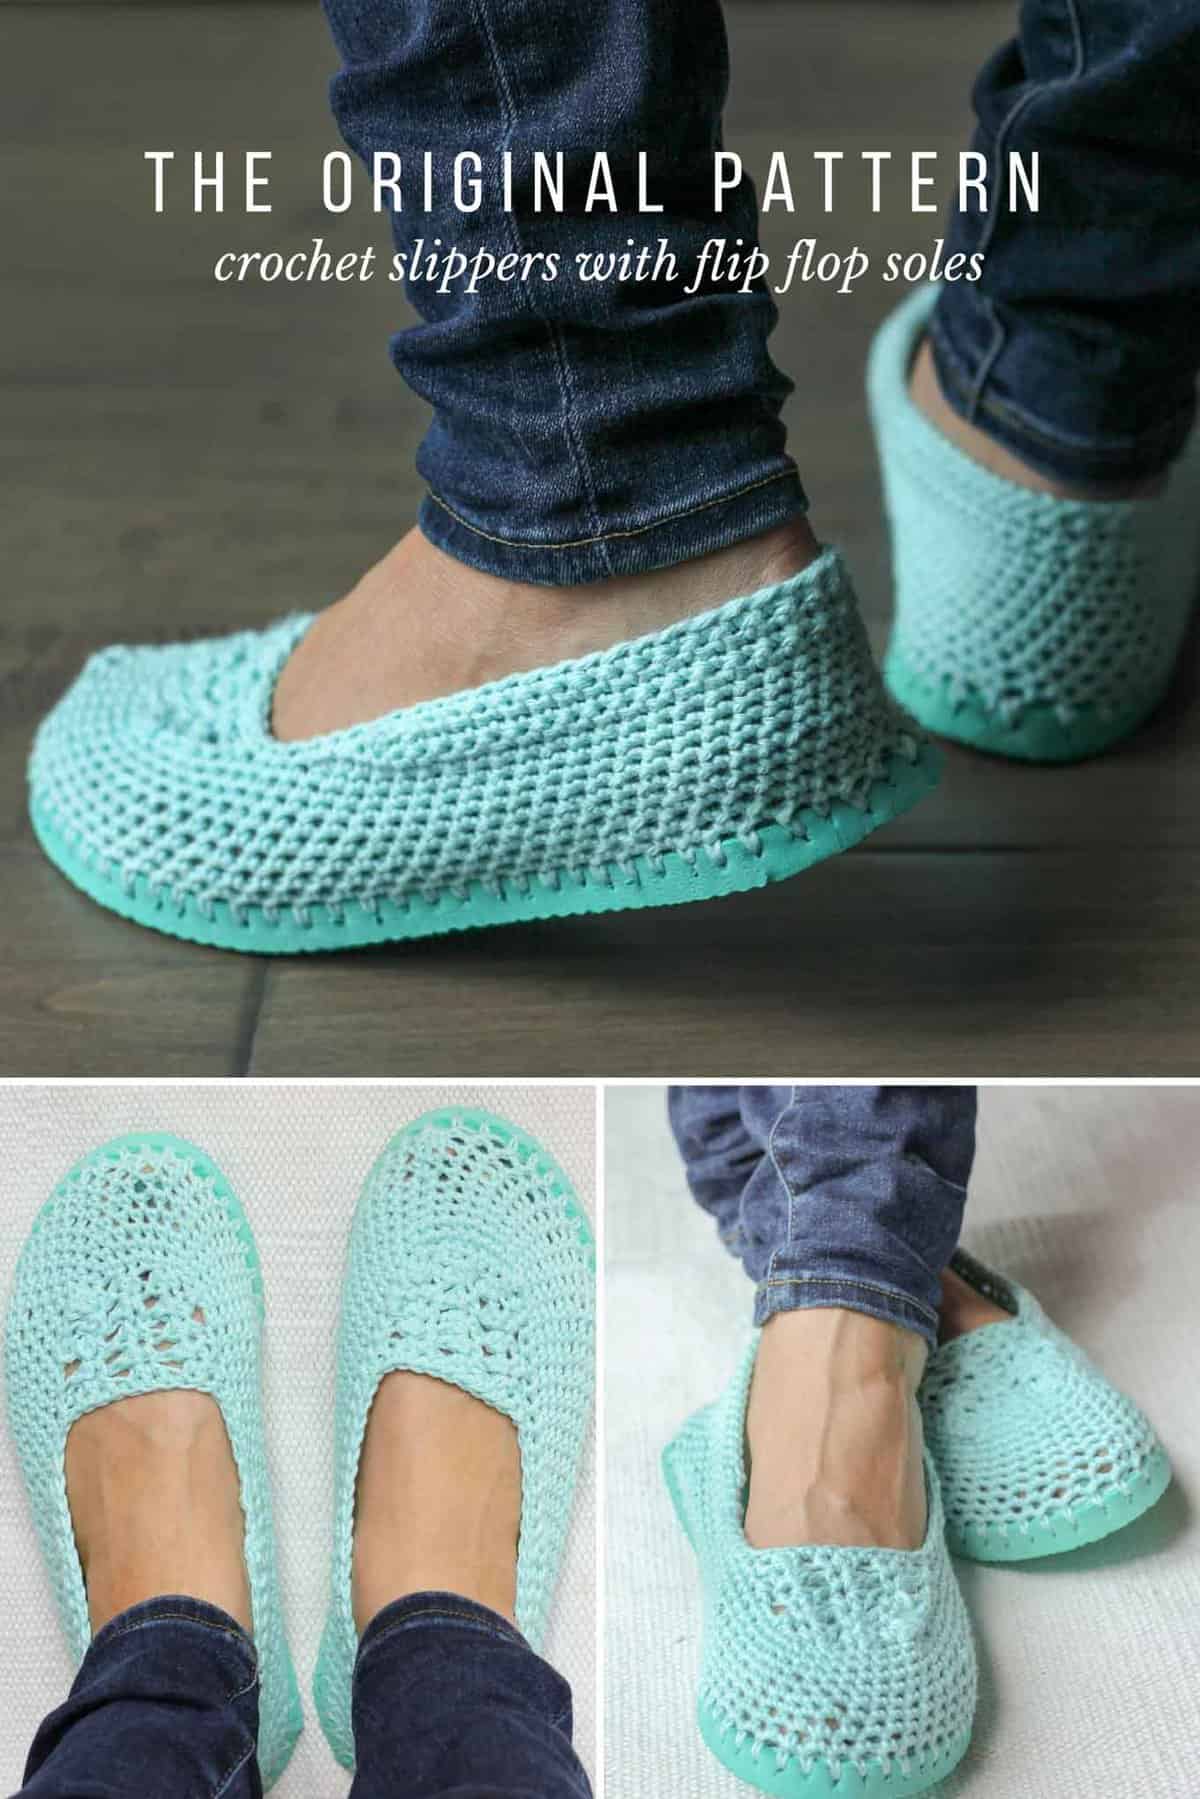
(If you just want the original crochet slippers with flip flop soles pattern though, don’t fret, you can still find it for free here!)
 Many readers have asked how these crochet slippers with flip flop soles hold up over time. I’ve answered that question (with photos!) and many more in my FAQs about crocheting on flip flops.
Without further ado, here’s the original blog post with the updated free crochet slippers with flip flop soles pattern and new video tutorial below. And if you’re interested, you can find all the free flip flop crochet patterns I’ve shared since making this first pair, right here.
Guys, I’m so excited to share this pattern. I hope you love making crocheted slippers with a legit, flip flop sole as much as I did. When I originally stumbled across these crocheted boots made by Croche Da Alessandra, the idea for some flip-flop-based summer slippers wedged in my brain and refused to shake loose until I just made the things.
 Until about a week ago, I’ve been wearing some felted knit slippers my mom made me. They’re AMAZING. But now that it’s officially spring, they’re becoming a little less practical with each tick of the thermometer.
 So if, like me, you prefer to keep your feet covered when you’re shuffling around the house, but you find warm weather to be less than slipper-compatible, these are for you! (And if you’re the free-wheeling type that prefers not to have your toes covered at all during the summer months, check out all my other free crochet patterns instead.)
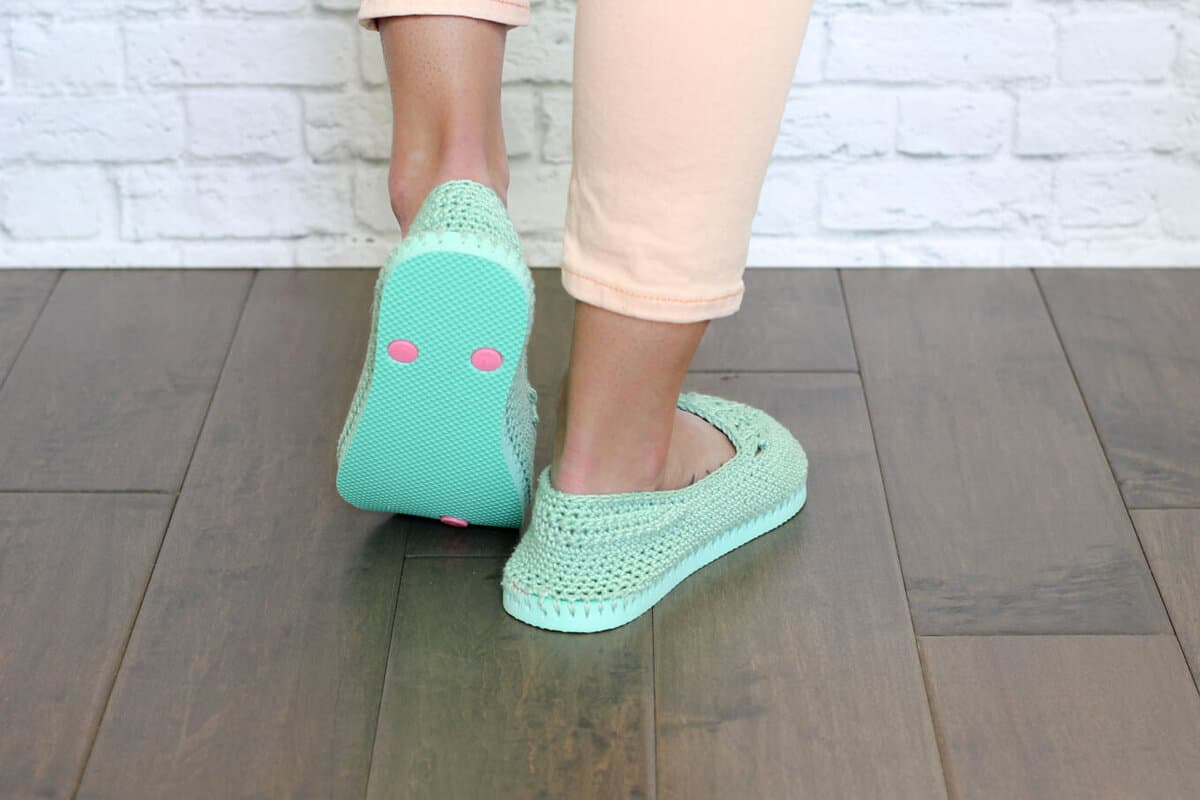
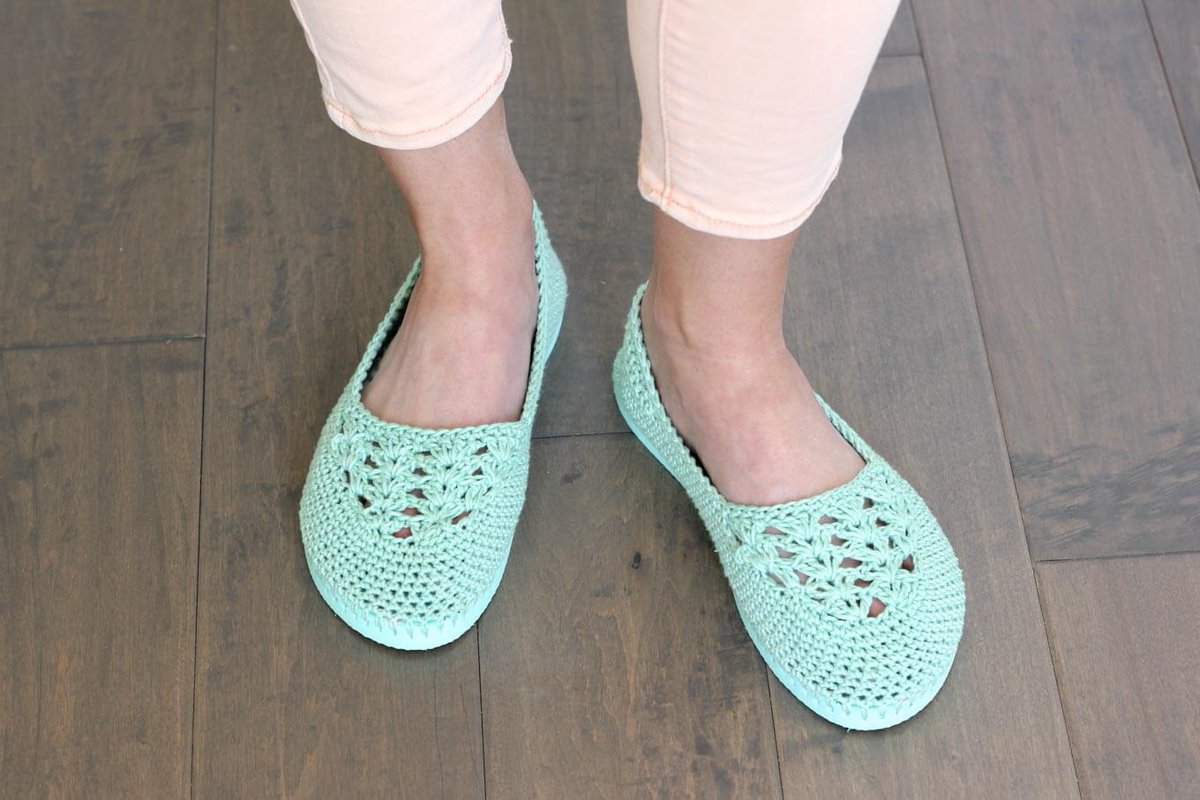
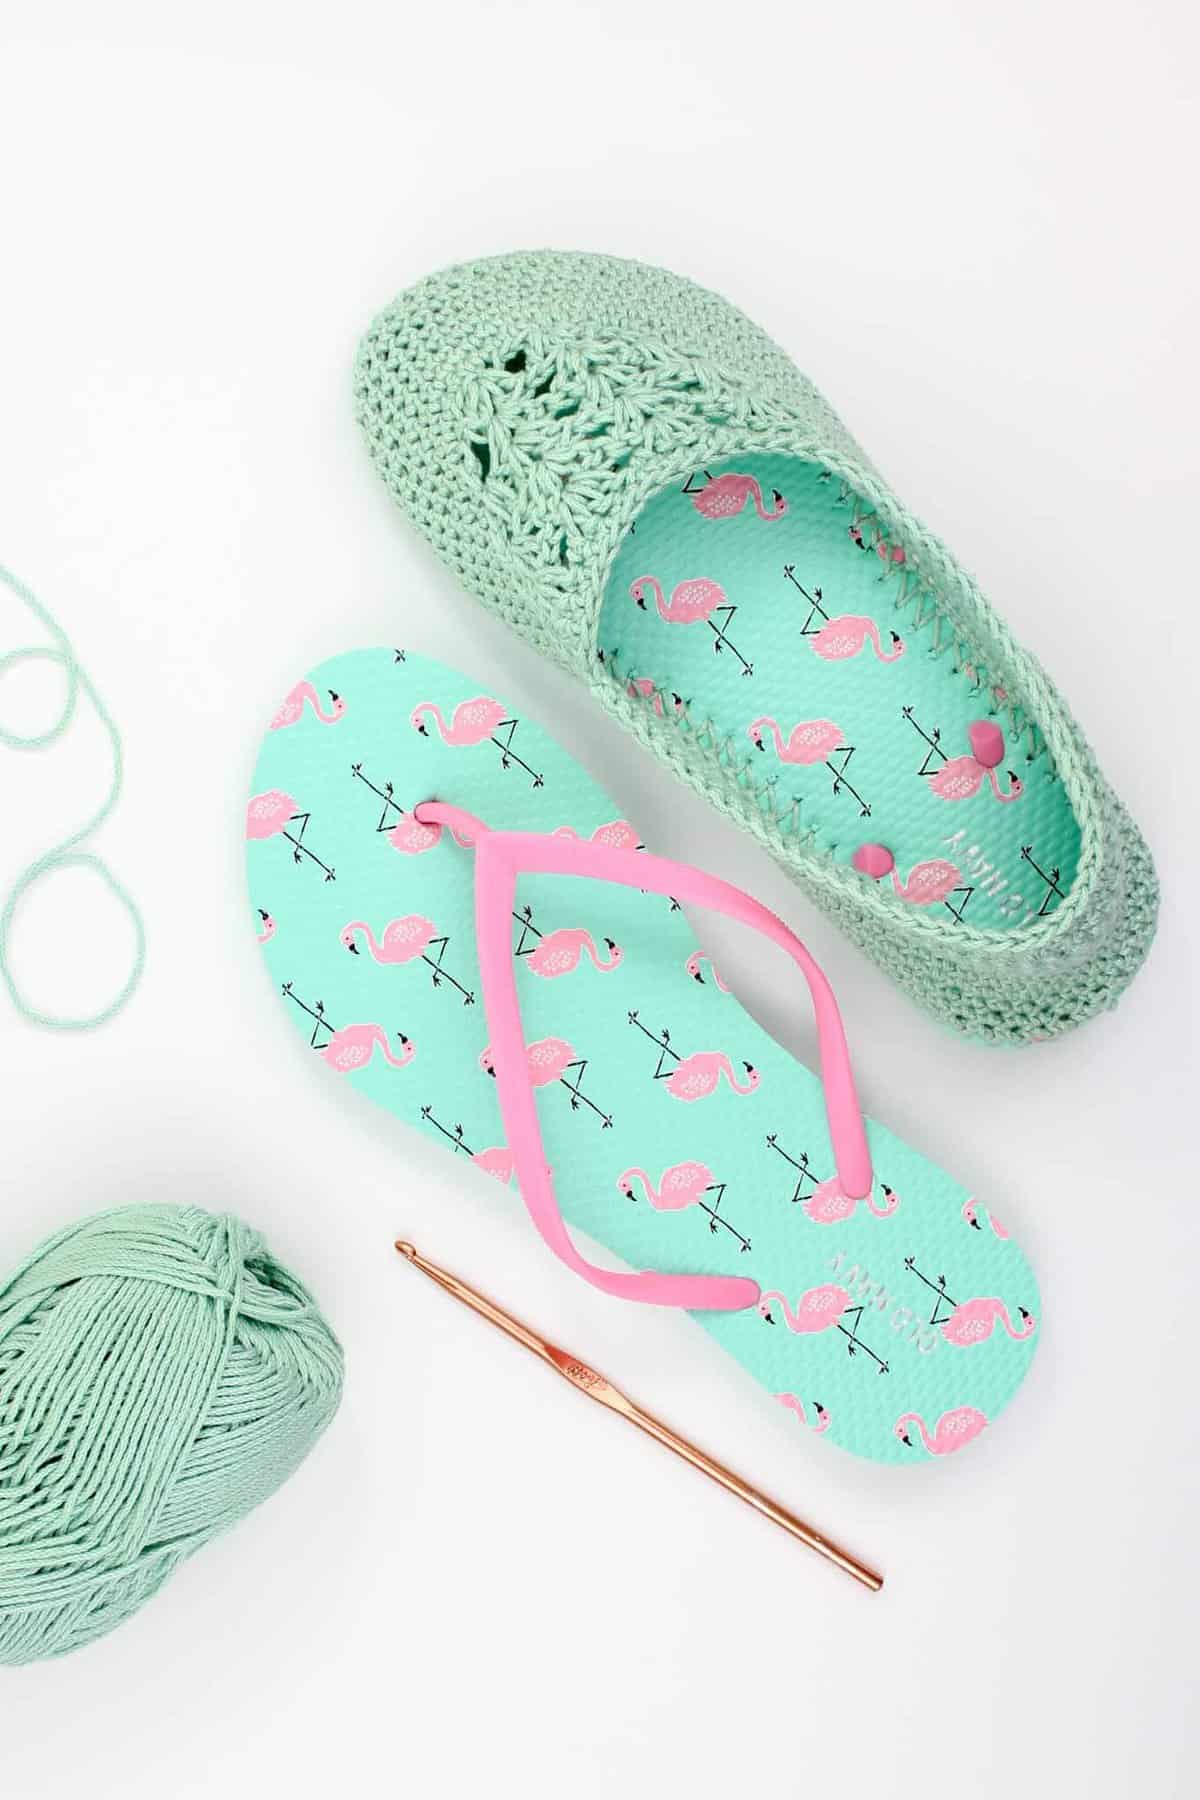
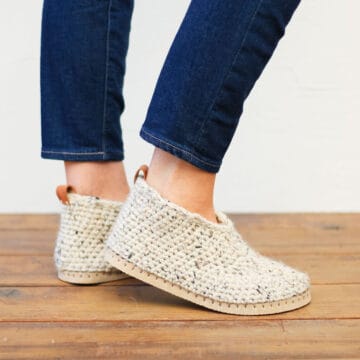
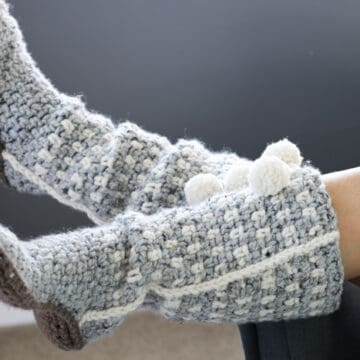
These crocheted slippers with flip flop soles let in a lovely breeze with each step, thanks to the slightly open weave and breathable Lion Brand 24/7 Cotton yarn. The flip flop (or “thong” if you live in certain parts of the world) sole makes these a little more substantial than regular crocheted slippers and perfectly grippy to scoot around your house.
These even work well as crocheted shoes to wear outside. They might just be the most comfortable pair of shoes you’ve ever worn. (And don’t they look a bit like Toms?)
 The ad-free PDF now includes a printable ruler to help guide your hole poking. This little bonus is super helpful in achieving the gauge and ensuring that you don’t have too many or too few stitches around your flip flop sole. (Regardless of the size you’re making–isn’t that magic?!)
You can purchase the PDF of this pattern with the ruler here on LoveCrafts.com or here on Etsy.
Related: 30+ Free Crochet Top Patterns for Warm Weather
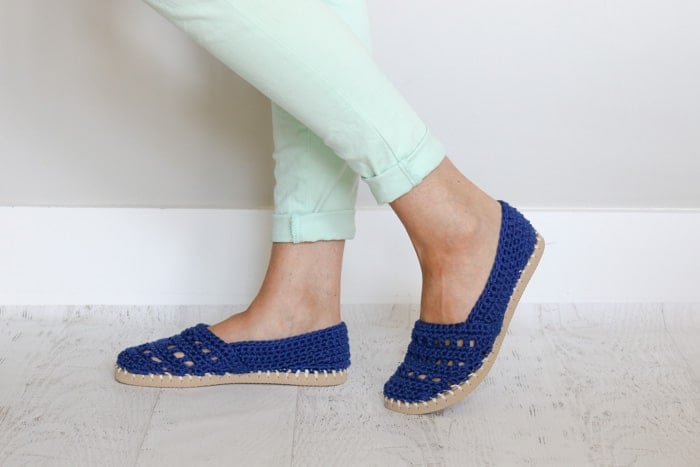
Find Your Next Crochet Pattern on Flip Flop Soles
Crocheting on flip flops can fast track your feet straight to comfort-ville. Flip flops offer functional, non-slip soles for your crochet slippers. They also allow you to crochet shoes customized for your particular feet.
See more free crochet flip flops patterns →
Please do not publish or share this pattern as your own. You may make items to sell with this pattern. In exchange, please link back to this post. Do NOT use my photos as your own sales photos. You can read my policies here. Now let’s make something awesome!
Summer Crochet Slippers with Flip Flop Soles – Free Pattern
Purchase the printable, ad-free PDF with hole poking ruler here on LoveCrafts.com or here on Etsy.
Add this pattern to your Ravelry favorites here.
Pin this pattern for later here.
Sizes:
This pattern works well for women’s sizes 6-10, but you can easily add or eliminate a row to the top section to make it longer or shorter for other sizes.
Abbreviations (US Terms):
ch – chain
cluster – 4 dc in one stitch
half cluster – 2 dc in one st
dc – double crochet
sk – skip
sl st – slip stitch
sc – single crochet
st(s) – stitch(es)
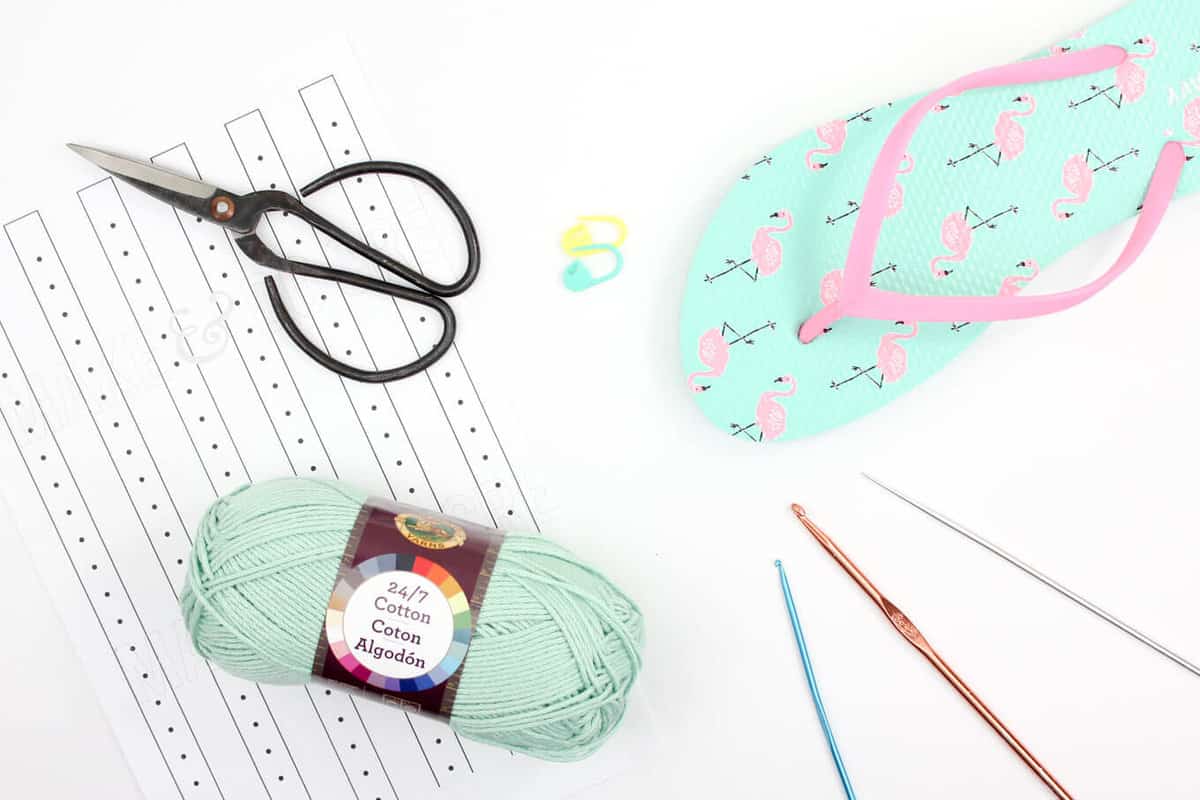 Supplies:
So you can spend more time making shoes and less time shopping, this pattern contains affiliate links at no extra cost to you.
• Lion Brand 24/7 Cotton – 1 skein (186 yards) Color: Mint
• Tapestry needle
• Size B [2.25 mm] crochet hook or size needed to fit through flip flop holes
• Size G [4.0 mm] crochet hook
• 1-2 printed copies of the “ruler” at end of the printable pattern or a measuring tape
• 1 pair of flip flops (One size smaller than you wear normally. See pattern notes.)
• Sharp tool to poke holes (I use this clay tool. You can also try a skewer, thin drill bit or awl.)
• Sharp scissors
• Stitch markers
• Strong glue such as E6000 to glue strap plugs to sole (optional)
Gauge:
7.5 sc = 2”
12 rows = 2”
Notes:
• Transforming flip flops into slippers isn’t an exact science! Keep an open mind and don’t be afraid to customize the shoes to your liking. Check out this Flip Flop FAQs post for answers to commonly asked questions.
Wanna save this pattern?
• You’ll likely want to size down when buying your flip flops. Look for a flop flop that offers about .25″ of sole around your foot (more like the fit of a normal shoe). In the pattern sizing, the shoe sizes mentioned describe the shoe size you normally wear and not the sized-down size of your flip flops.
• The flip flops in the sample are from Old Navy–they have a great selection of colors. Find $1 flip flops on Amazon or at Walmart. Dollar Tree’s $1 flip flops tend to be a bit too flimsy, but can work if you are careful. And LionBrand.com now offers flip flops so you can get your yarn and soles in one place!
• Left and right shoes are identical.
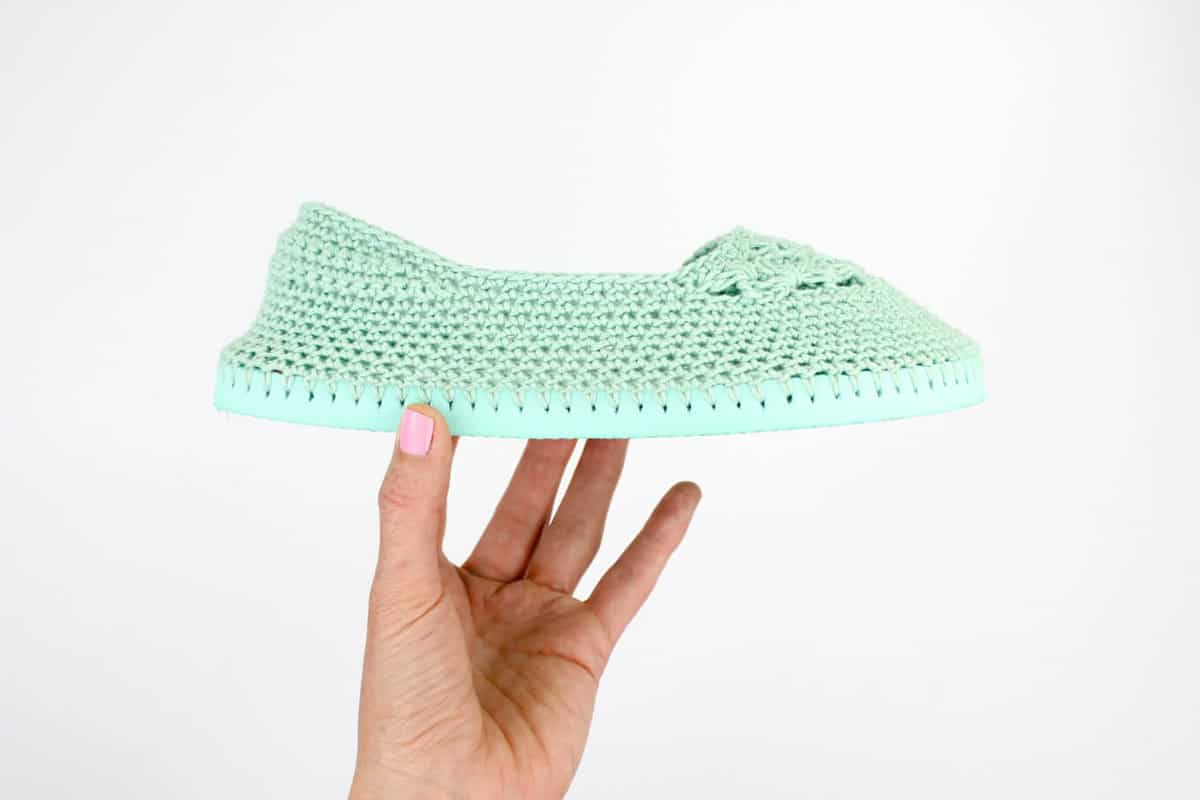
• Similar to some ballet flats, your slippers should curl in a bit. That’s what gets them to shape to your feet without a lot of increasing or decreasing. They will stretch out slightly with wear.
• The slipper sides and heel are worked in a spiral, so you will not ch 1 at the beginning of each round.
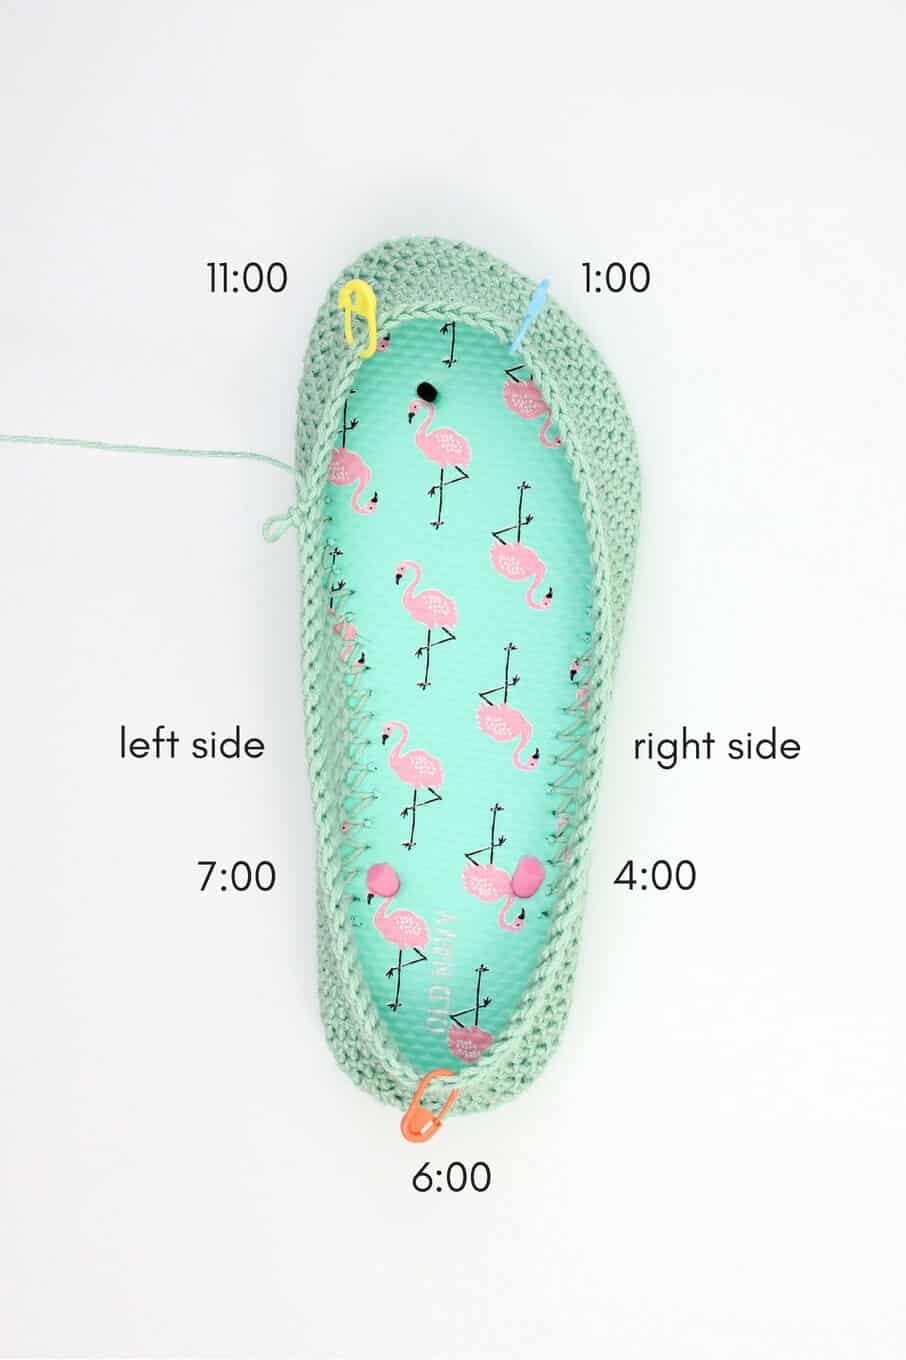
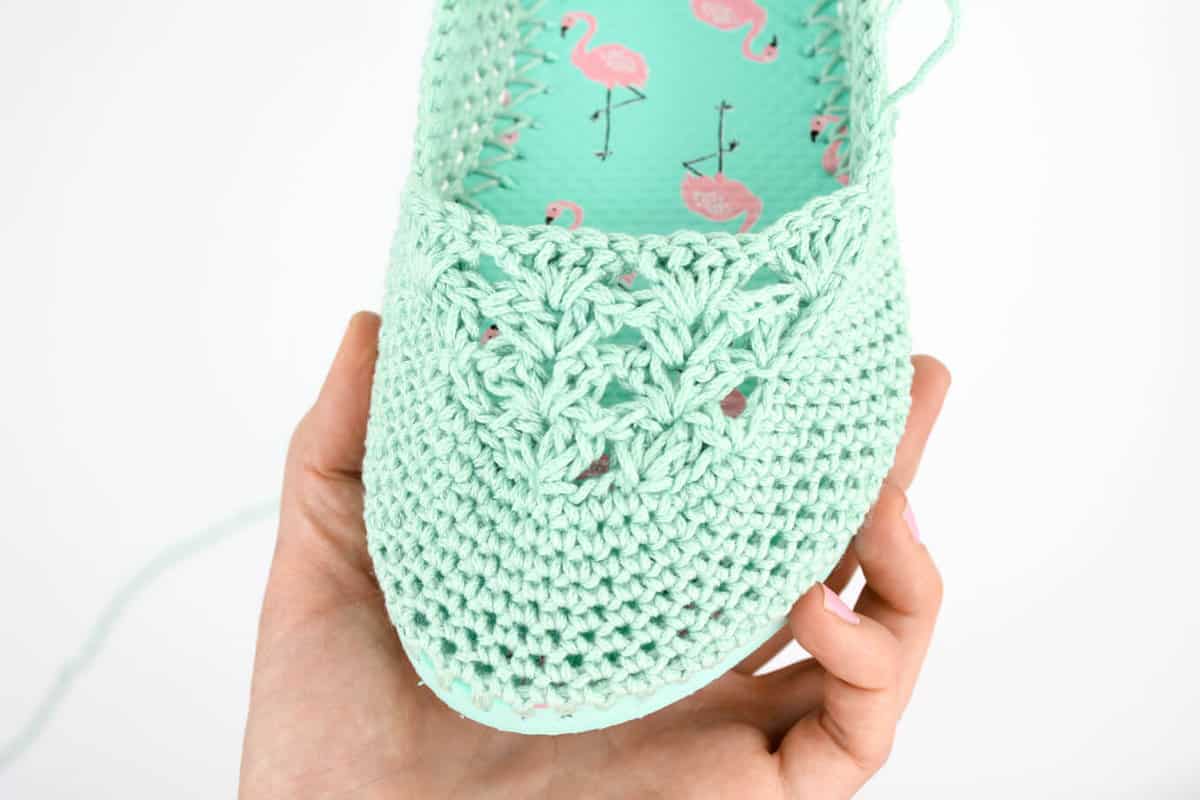
• Pattern explains locations on the flip flop as if it’s a clock where the top of the toe is 12:00 and the heel is 6:00.

Related: 30+ Free Crochet Dress Patterns: Beginner to Advanced
Slipper Sides and Heel
Notes:
• The shoes are crocheted tightly, similar to amigurumi. Make a deliberate effort to keep your stitches tighter than normal. Check your gauge if you’re unsure.
• Be sure to poke the same number of holes in the second flip flop as in the first.
To begin:
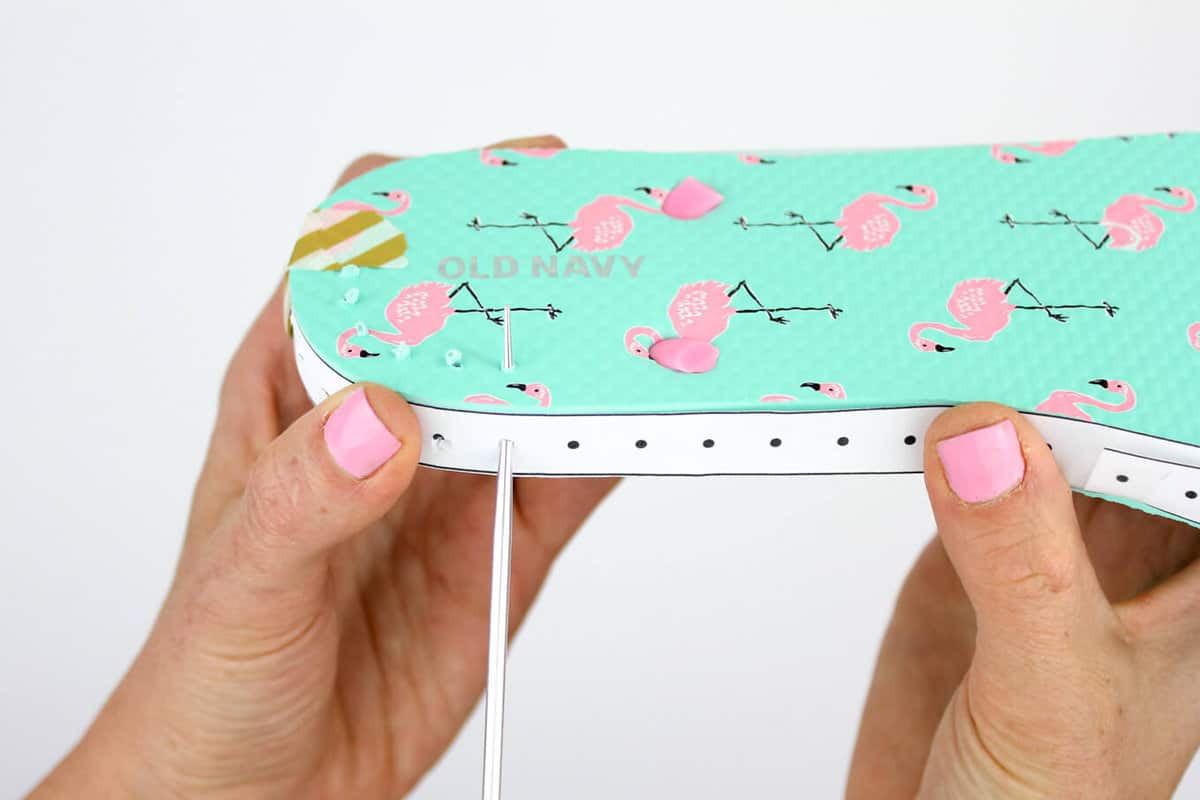
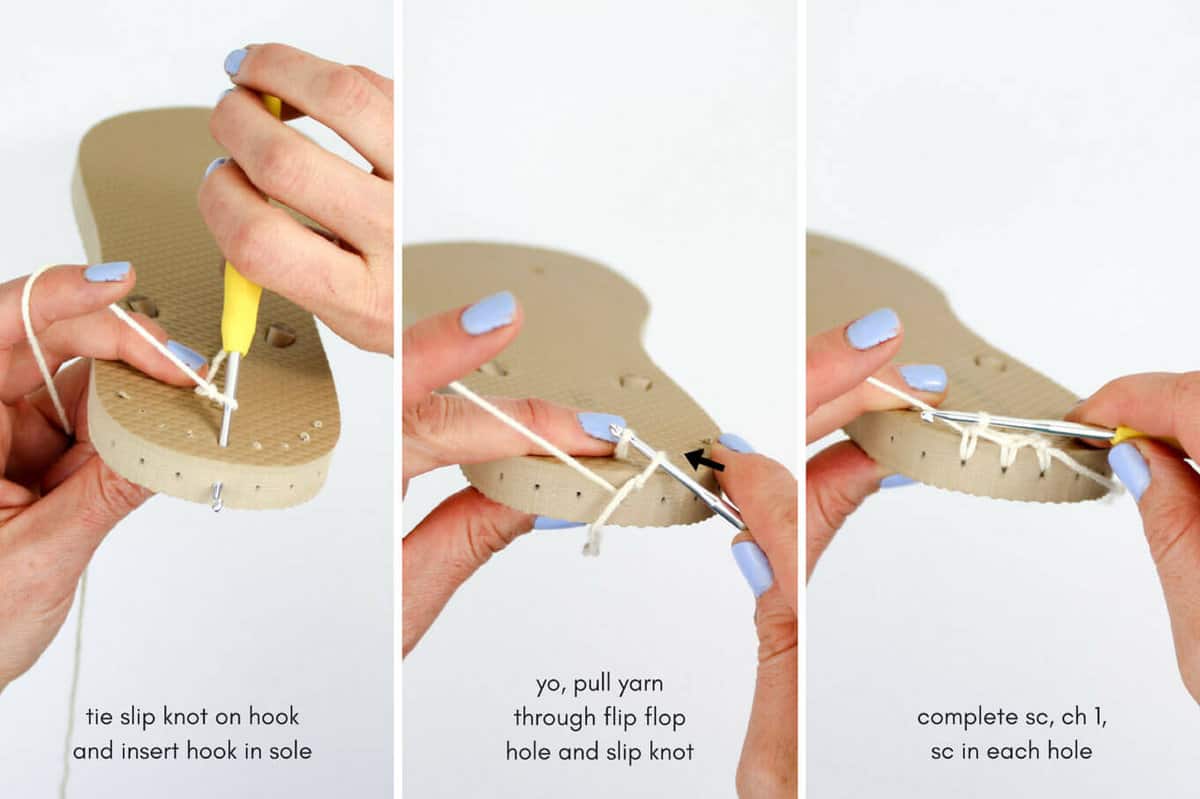
Trim straps off flip flops by cutting the mid-foot straps at an extreme angle so you can keep them in place without feeling them inside the shoe. (See photo above with the hole poking ruler.) Save the rubber plug from the strap between your toes to glue in later.
If you’re using the printable ruler, trim and tape the pieces together and tape ruler around flip flop sole. With your sharp instrument, poke holes in each dot on the ruler. (See photo above the pattern.) Alternatively, use a measuring tape to poke holes slightly more than .25″ apart around the sole. Pierce the hole at an angle from about the middle of the way down the sole to approximately .25” into the top of the sole. Reference the video tutorial for help.
Tie slip knot around smaller hook. Insert hook at back of heel (6:00 position) from the top of the flip flop toward the bottom of the sole, grabbing the yarn and pulling through to the top of the flip flop and through the slip knot to attach the yarn to the flip flop. Crochet over the tail of this yarn as you work Round 1.
 Round 1: Continuing with smaller hook, sc in each hole around sole, join with a sl st to first sc. Do not turn. Place marker in first st of round and move it up as you work each round (or just keep track of which sole hole you began in).
✨Unlock this free subscriber-exclusive pattern ✨
Follow these steps to view the full free pattern below
Rounds 2-9: With larger hook, sc in each sc around sole. Do not turn.
Remove marker. Place stitch markers at 4:00 and 7:00 positions. This is where the back heel “lip” of your slipper will taper to.
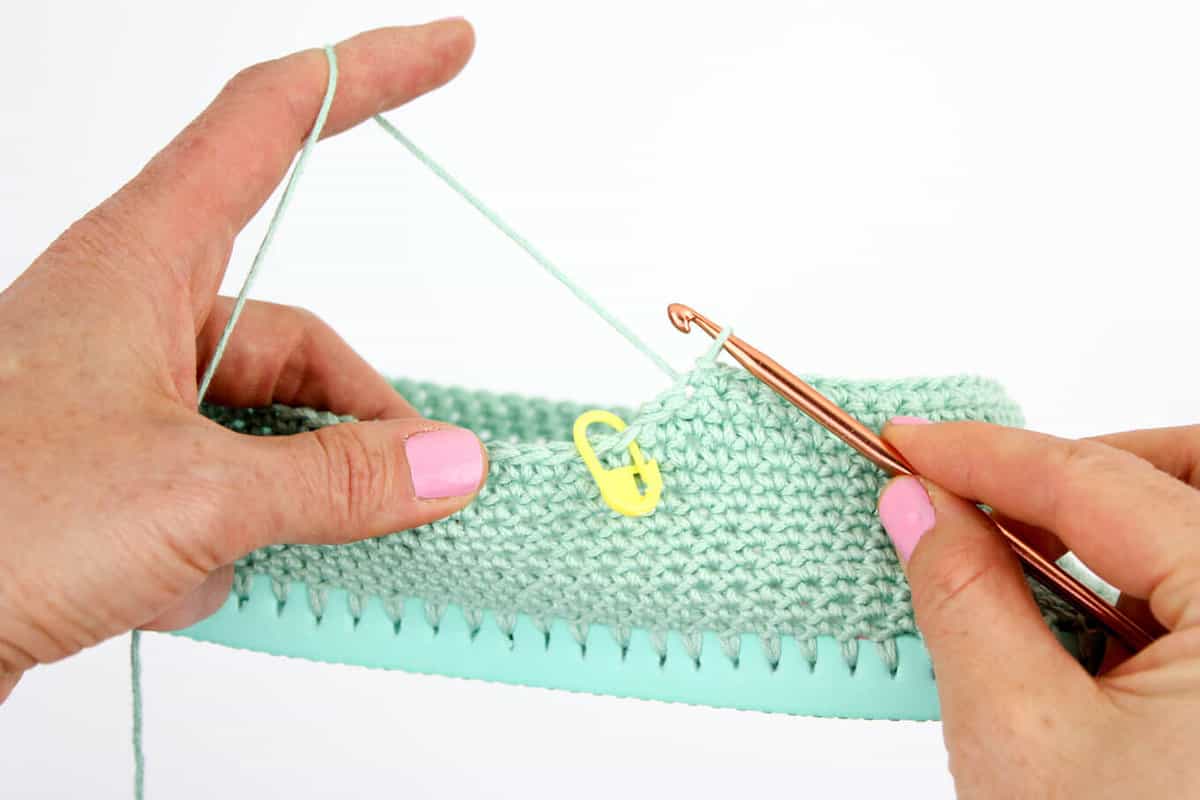
Do not turn work, continue with the rest of row 9.
Row 9 cont: Sc in each sc until 1 st remains before next marked st, sl st in next sc, turn. (See photo below.)
To make heel taper appear smoother, keep working yarn toward the inside of shoe when starting Rows 10-13. (See 8:25 mark of video tutorial for example.)
Row 10: Ch 1, sk first sl st, sl st in next sc, sc in each sc until 1 st remains before next marked st, sl st in next sc, turn.
Rows 11-12: Ch 1, sk first sl st, sl st in next sc, sc in each sc until 3 stitches remain before next marked st, sl st in next sc, turn.
Row 13: Ch 1, sk first sl st, sl st in next sc, sc in each sc to back of the heel, sl st in next sc. Fasten off.
Do not weave in end. You’ll work over this tail later.
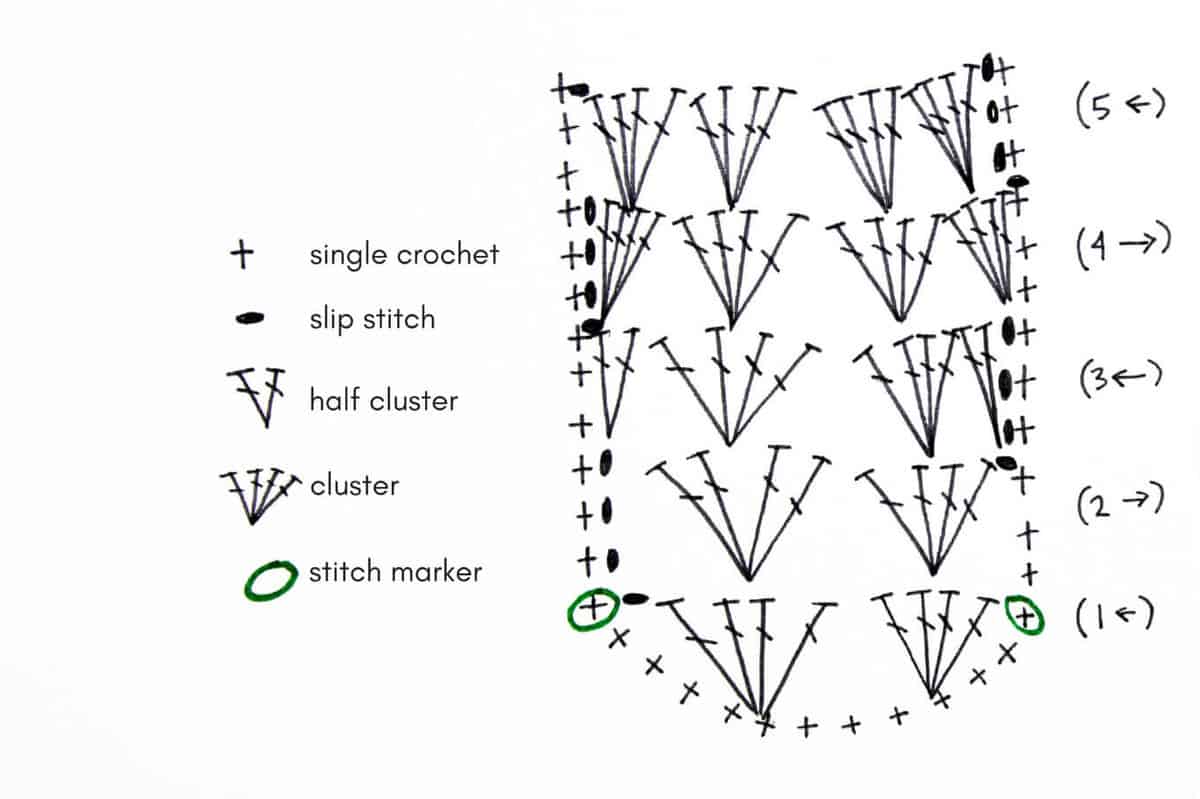
Slipper Top
Notes:
• Cluster = 4 dc in one st
• Half Cluster = 2 dc in one st
• In rows 2-5, the clusters are worked between the two middle dc of the cluster in the previous row.
• Reference video tutorial or chart above for visual explanation.
Find the approximate midpoint of the front of the slipper. Place stitch markers at the 1:00 and 11:00 positions with 11 sc between them. (See “clock” photo at top of pattern.)
Join yarn in 11:00 marked st. (Left handed crocheters, join in 1:00 marked st and reverse mentions of “right” and “left.”) Weave in the tail from attaching yarn now before this section is worked.
Row 1: With the toe facing toward you, (sk 3 sc, cluster in next sc) 2 times, skip 3 sc, sl st in next marked st, sl st in next 3 sc of Rnd 9 (up left edge of slipper), turn. (2 clusters) (See photo below.)
Row 2: Cluster in center of each of next 2 clusters, skip 2 sc in Rnd 9, sl st in next sc of Rnd 9 to join, sl st in next 3 sc (up right edge of slipper), turn. (2 clusters)
Row 3: Half cluster in sl st where Row 2 joined Rnd 9, cluster in center of each of next 2 clusters, half cluster in last sl st of Row 1, skip 2 sc in Rnd 9, sl st in next sc of Rnd 9 to join, sl st in next 3 sc (up left edge of slipper), turn. (2 clusters and 2 half clusters)
Row 4: Cluster in sl st where Row 3 joined Rnd 9, cluster in center of each of next 2 clusters, cluster in last sl st of Row 2, skip 2 sc in Rnd 9, sl st in next sc of Rnd 9 to join, sl st in next 3 sc (up right edge of slipper), turn. (4 clusters)
Row 5: Cluster in center of each of next 4 clusters, skip 2 sc in Rnd 9, sl st in next sc of Rnd 9 to join, do not turn. (4 clusters)
Round 6: Sc in each st around entire shoe, do not turn. (See photo J.) (Crochet over yarn tail at heel as you work.)
Round 7: Sc in each sc around heel stopping once you reach the slipper top section, sl st 1 into edge of top.
 Fasten off and weave in end. Repeat pattern with second flip flop sole. Tap your toes together, smile and run around your house because you just made your own crochet slippers with flip flop soles!
That was so fun! Now what?
Invitation to our Facebook group
Come discuss crocheting flip flop slipper patterns and lots of other crochet projects and techniques in our Make & Do Crew Facebook group. Here thousands of helpful crocheters answer each others questions and share their stitches. Come join us here.
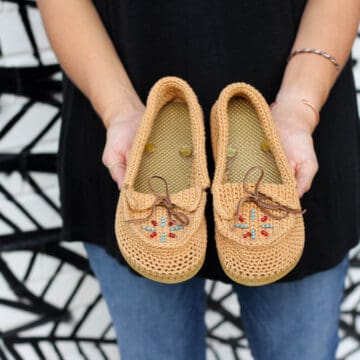
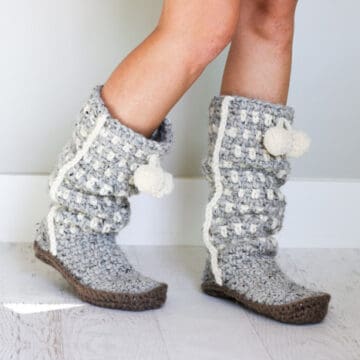
More Free Crochet Patterns Using Flip Flop Soles
- FAQS: How to Crochet on Flip Flops – and will they fall apart?
- Crochet Boots With Flip Flops Soles
- Free Crochet Ugg Boot Pattern
- Chukka Crochet Slipper Boots with Flip Flop Soles
- Crochet Moccasins Shoes
- Crochet Beach Shoes Pattern
- Crochet Festival Boots Pattern
- Crochet Boat Shoes Slippers (for kids)
Now that your toes are comfy, you might enjoy these free crochet patterns:
 Cocoon Cardigan — free crochet pattern made with two simple rectangles!
[convertkit form=4869877]


milissa says
I love all your patterns. thank you so very much so sharing them with us. Have a safe weekend
Linda says
I would like a knitted pattern for these flip flops does anyone have one
Melissa says
Thank you thank you for this pattern. I’m super excited to make me a pair.
barb says
this is awesome,,, making some large ones for my diabetic hubby that has BIG feet ( size 15),, thank you so much for this,,
gerry says
Thank you for sharing this pattern. I can’t wait to try it !
Jess @ Make and Do Crew says
Yay! I hope you enjoy making your own pair, Gerry. Let me know if you have any questions. And feel free to send me a pic of the finished project! I’d love to see what you make.
Happy crocheting!
Jess
Lorna D Miser says
Super cute and clever! I’m impressed!
Jess @ Make and Do Crew says
Thanks so much for your kind words, Lorna. I appreciate your comment. 🙂
Happy crocheting!
Jess
Par says
I’m anxious to try.. I’m traveling and wish I could find a Pinterest logo to store this link. Am I missing it somewhere? I always need rubber soled slippers. Thank you
Jess @ Make and Do Crew says
Hey Par,
I’m hoping you figured this out, but if not, you can always pin my posts by clicking on the Pinterest logo at the very top of the post (right underneath the title). Thanks for sharing my patterns on Pinterest!
Jess
Anne Smith says
Love these slippers. I have a couple of questions. I’ve worked the first nine rows and the slippers are already very tall (2 2/3 “). Does this sound correct? Your stitches look to be more like a sl instead of a sc. Any guesses to what I’m doing wrong?
Thanks
Jess @ Make and Do Crew says
Hey Anne!
That’s a great question. Without looking at them, there are a few things that might contribute to a larger gauge. My guess is that your sole holes might be a little closer together than mine, and therefore your stitches aren’t quite as stretched out as mine. Mine almost flattened a bit, and thus do look a little like a slip stitch. The great thing about this pattern though is that the number of rows doesn’t really matter, it’s more the general height up your foot that you should focus on. Just try them on and stop the rounds when the sides and back are almost as tall as you’d like, knowing that you’ll add a couple of rows just in the back near the heel.
Does that make sense? Feel free to ask more questions if not! I’m happy to help however I can!
Happy crocheting!
Jess
Kim Klashinsky says
Hi there!
I absolutely love this idea but I don’t crochet, is it possible to adapt this pattern for knitting???
Thanks 🙂
Kim
Judy says
I was also wondering the same thing or if someone could make for me and I would pay them
Julie says
Kim – I am no professional or pattern writer, but I have knitted for about 57 years and also do “some” crocheting. I am only guessing, but I think maybe if you are able to do the 1st row, to get the yarn IN the foam, that you could then change to DP knitting needles and pick up stitches with the knitting needles, all the way around, continuing to knit until they are the size you want, following the same shaping, etc of the pattern for the heel and then picking up stitches at the top to do that too. Adjust gauge to get what you want with whatever size needles you prefer to use. You may need 5 or 6 needles to get around the sole. If you don’t have enough of one size, alternate two consecutive sizes as you go around. The needles will move around the slipper, one section at a time, so it won’t be noticeable anyway. If you are not able to do the 1st row with sc , if you know how to embroider, you could try using a blanket st around the sole to get the yarn started and continue with the pattern as above. As I said, this is just a guess. I am not an expert, by any means, and I have not tried this yet as I just found the pattern, but my brain goes in different directions than it would be expected to, and I come up with some crazy ideas. Some work. Some don’t. Happy kn itting.
Deshika says
Hello my name is deshika I would like to make those slippers ,but I just can’t crochet.
Susan says
Perhaps Anne Smith is using. larger hook than you used and different yarn gauge. And that is why her sides are so high. Can you tell us what size hook and gauge yarn you used please? Also, a photo to show how you started in the back would be helpful. Thanks so much.
susie says
As the first 9 rows are in the round, do the rows start getting smaller? Your photo makes them look like they cinch inward, closing in over the foot. Or do the rows go straight up?
pinkpolarbear says
Are you in the UK by chance? If so, then your sc is actually our double and would be much taller as a consequence.
PaiPai's Mom says
Hi! What a cute house shoe and fantastic summer pattern!! These are pretty darn cute for out of the house as well. I need to wear an arch support insole around the house (hardwood and baby chasing can destroy me before breakfast!) and I’ve struggled to find a slipper pattern that would support such an addition. Do you think these guys would? It seems like the sturdy nature of the sole would be better than just felted slippers, but I’m wondering if the crochet is enough to keep them in place. Any thoughts?
Jess @ Make and Do Crew says
Hey!
I think an arch support would probably do fine in these, as long as it wasn’t a tall orthotic or something. As you’re working the slippers, you can try them on with your arch support and see if you need to add a couple extra rows to the back to make sure that the back of your heel is adequately covered and so they won’t fall off. Hope that makes sense! Can’t wait to see what you make!
xo
Pam says
I would make them a size bigger & use an insole maybe?? I too have arch problems & suffer after wearing flat flops & sandals!!But dang it it’s summer & these are just too stinking cute!! I can’t crochet but my sister can!!! I can’t wait to get mine!!!
Jess @ Make and Do Crew says
Sisters are the best for outsourcing the projects you don’t know how to do 🙂
Patsy says
I wonder how it would work if you glued an insole onto the flip flop before putting in the holes and use them as a support for the flip flop to make a sturdier base as most have a cloth top
choctaw soldier says
discount stores also have some adheasive that can be used to glue “sport insoles” down, so the “flip flop feel” remains but with extra support it in a yellow tube with purple accents, not sure the name but its like a souped up rubber cement (its non irritating once it has dried and can be used for a number of tasks. i even used it to repair vinyl tiling in my kitchen lol) …. . but i know the feeling about flat feet and hardwood. i go barefootin’ as much as possible – but being prior military somedays my feet just can’t do it.
Cheryl says
Very cute and comfy looking slippers! Am I missing something though? What happened to row 13?
Jess @ Make and Do Crew says
Cheryl! Thanks so much for your hawk eyes! You’re totally right. Row 14 should be called row 13. There is no row 14. I’ve updated the pattern. Thanks again for your proofreading!
Happy crocheting!
Jess
Momma says
I can’t wait to make some of these! My felted wool slippers are getting too hot!
Jess @ Make and Do Crew says
I know! Mine too, Momma! I have some flip flops and yarn to make you some. They’re just in my queue behind a few other projects. 😉
Elsie says
You mention the following in your article:
(And if you’re the free-wheeling type that prefers not to have your toes covered at all during the summer months, check out all my other free crochet patterns instead.)
I tried clicking on the link referred to here, but was not able to find any other patterns for those of us who don’t like our toes covered. Can you please help? Thanks!
LadyKajun
Joyce hipps says
I have been looking all spring for these patterns .thank you so much.
Jess @ Make and Do Crew says
Yay! I hope you enjoy them, Joyce. I’ve been loving shuffling around the house in mine. 🙂
Happy crocheting!
Jess
Tina says
If you made them with a cotton yarn they would make great pool shoes just an idea
Aubrey says
Hello there ???? I love this pattern, but I’m concerned that the yarn would just rip through the holes. The foam that the flip-flop soles are made out of seems so flimsy. Did you have any problems with that? Thank you!
Jess @ Make and Do Crew says
Hey Aubrey,
That’s a great question! And you’re right to be concerned because depending on the firmness of the foam, I think that could potentially happen. The flip flops pictured in this tutorial are from Dollar Tree and they are a little flimsy. That’s why I didn’t recommend them in the post actually. Walmart has far sturdier ones that also cost $1, so that’s what I’m going to use for future patterns. Even so, the yarn hasn’t ripped through the flimsy flip flops even though I’ve been wearing these slippers quite a bit.
Another thing to do just to ensure this doesn’t happen though is to keep your holes from being punched too close to the edge and then being sure to use a small crochet hook for the first row so that you’re not stretching the holes a lot with a big hook. Then once you have the foundation row, you can switch to a more appropriately sized hook.
Hope that helps! Happy crocheting!
jess
Angie says
Would using a yarn needle and threading the yarn in a spiral around the flipflop (through pre-poked holes) and starting the crochet in the yarn rather than trying to crochet through the holes also work? I know it would look different, but it might be easier to start that way, especially if you’re worried about fitting a hook through the hole, and there would be less wear and tear since you’d only be pushing the needle through one way.
SANDRA says
I made mine just as u suggested and it seems to work also.
Irene says
Would it be more sturdy if you used a light weight “paracord” type cord for the foundation rows and then attached crochet cotton to that?
Kathy says
What would you charge me to make a few pairs of these?
Stephie Jeffries says
If you are still interested in these, I would be more than happy to make you some.
Sandy M. says
Very good suggestion. Also using liquid stitch to fill the holes, let dry completely will help stabilize the shoe.
Marge says
I used a skinny spiral skewer for making holes and then used an E crochet hook for the first row and switched to a H hook for the rest.
I also left the 3 plugs in the soles and super glued them in place so your foot doesn’t get moisture.
Arlene Rogers wilhite says
I was thinking the same thng; to put a round of yarn around first then ataching the needle to the second round.. etc…
Gale says
How do I get the pattern? Interested in making some.
Jess @ Make and Do Crew says
Hey Gale!
The pattern is right above this comment area, in the area with the text and photos of the slippers. Let me know if you don’t understand what I mean.
Happy crocheting!
Jess
Kimberly says
Having trouble with Slipper Top row 1. I joined with a sl st. It says to sk 1 sc from marked st and begin in next sc. Do I sc here then ch 2 and sl st back into the beginning marked st at in the right?
Tammy says
Just wondering if maybe gluing a piece of felt to flip flop to help from tearing the hole while wearing/ crocheting it.
Mary Petzoldt says
I can’t get the pattern, I guess I don’t understand
Diane Baker says
I cannt find it anywhere. I tried to just print this blog, but ended up with 51 pages! Help!!
Jess @ Make and Do Crew says
By popular demand, I’ve added a printable PDF download you can purchase from the link at the top of this post 🙂
Jess @ Make and Do Crew says
Hey Mary,
I’ve put together a printable pdf and you can purchase it by clicking on the link at the top of the post.
Thanks for your support!
Jess
Carmen says
I love your pattern but I have trouble reading patterns. Would you have a schematic of the roundsaround the sole?
kazeem aminat says
good day.is it possible to get a slower and better detailed video of this tutorial. would appreciate if thats possible.
Jess @ Make and Do Crew says
Hey Kazeen,
I’m wondering if maybe you saw the shortened version of this tutorial and not the longer 20 minute one. 🙂 If you scroll up a bit, right above the free pattern, you can see a video player that will play the longer, in depth tutorial. I’m guessing that will be more of what you need.
Happy crocheting!
Jess
Tammy says
I would love th a pattern also. Thanks.
Darlene says
click to PRINT with your mouse and then select only pgs 10-13, NOT all pgs.
Christy says
If you click on the “read more” area under the picture it takes you to the pattern. You will just have to scroll down a little to see it. I’m making these now!
Linda says
How can I get this pattern? My senior group would love to make some for our fund raising.
Jess @ Make and Do Crew says
Thanks for offering help Susy!
I really appreciate when you purchase my printable pattern PDFs instead of printing the blog post because the small fee for the pdf helps me cover the expenses from the site. (When you don’t visit the site because you have a printed pattern, I don’t earn any ad revenue and therefore have a hard time creating more free patterns for the blog.)
Thanks for understanding!
Jess
Greta says
Tap the see more and the rest of the article will show up with the pattern.
Penny lee says
Need slipper pattern
Lynn says
Me to can’t find it. Please show me. I’m very interested in making a pair.
Lynn says
It didn’t go with the other. But where’s the pattern?
cheri says
if you use an app like clean print you can print from this page and delete what you don’t want and add what you do.
Janice says
You can screen shot the pattern. Email the pictures to yourself. Position on a document and print them.
Jacinta says
Is there a book ? I would like to send my son one as he is incarcerated and he has learned to crochet.
Jess @ Make and Do Crew says
Hey Jacinta,
How wonderful that your son has learned how to crochet. It’s one of my favorite ways to relax and settle myself at the end of a day. I don’t currently have a book, I’m sorry. I usually prefer people to share the links to my patterns instead of printing them, but please feel free to print this page to give to him if that would be helpful.
Jess
Nat says
Maybe you can gather a bunch of different patterns/articles/pics of stitches and take them to like staples or OfficeMax and have them bind it like for a presentation booklet and then send to him with some yarn…..then you can make it personal and find some cool stuff that you know he would like…..I think my heart would swell if someone sent me that!!!! 🙂 then send him yarn/pattern of something YOU would like so he can make it for you….. My ma is my favorite person to torture with my projects!! ?
Margaret says
Nat, that sounds like a really wonderful idea, but in the Texas Criminal Justice system, this would not be allowed. Any publications have to be shipped directly from a book store. I imagine this is the same with all prison systems. Otherwise, contraband could easily be slipped into the prisons, and God knows they don’t need anything else getting in there. I would suggest that going to a bookstore, finding a crochet book that’s easy to follow with easy to make patterns, and have the bookstore send the book to him in the prison. They do it all the time. I’ve done it myself. Good luck, and happy crocheting.
Aubrey says
Thanks for the reply. I am definitely going to put this on my list of projects!
thea says
why not crochet the slipper and put removable soles in them like you do shoes they will wash easier? I am trying that.
Jenni says
What if you poked the holes straight down through the flip flop and then gorilla glued an extra sole to the bottom? They might be more sturdy and you could actually walk around outside with them…if you wanted to.
At any rate…they are really fun!
toni ramski says
might feel uncomfortable to walk on that stitching?? but an interesting option i guess..
Jess @ Make and Do Crew says
Hey Toni,
Surprisingly, I can’t even feel the stitching. I think it’s because the the yarn is actually quite flush with the flip flop sole. I find them super comfortable 🙂
Christine says
Any chance you might do a YouTube video showing how to make these?! I’m having trouble starting them. You’re so pretty, you need to make a video:)
Rosanne Segovia says
I agree. I am having some trouble understanding the instructions. I would love to see the youtube video.
Janet Petrak says
I’m also having trouble following the directions. When you say 3 stiches before the marker to you mean before as in towards the toe or towards the heel?? I’ve made 1 slipper after two false starts and it is very loose and sloppy. I have a very small foot so I’m going to try to downsize the hook and see what happens.
Jess @ Make and Do Crew says
For rows “9 cont” and onward, you’re only working in the back half of the slipper. So you stop 3 stitches short of the marker, toward the heel. This essentially creates a tapered edge so that the back heel section rises gradually. If you look at a few of the photos shot from the side, you might see what I mean.
As for how loose it is, you might want to try having fewer holes in your sole overall. If you don’t want to/can’t re-poke them, you could always decrease a some stitches as you crochet around the first few rows. For reference, my size 9 pair have 69 holes around each sole. I think using a smaller hook is a great idea too.
Georgia says
Could you use a yarn needle and sew a row of stitches around the sole so you aren’t punching a crochet hook through?
Jess @ Make and Do Crew says
Yes! I think that would probably work great. Nice idea, Georgia!
Serena says
Lover youtube crochet flip flops
Kathy says
Would a dab of super glue or hot glue in the holes help strengthen the flip flop? I might give that a try! These are so cute!!
Barbara says
Using most glues on the foam soles will only melt the soles, creating a bigger problem. Maybe rubber cement would work without melting the foam soles.
Yvette says
I just glued the little round parts back in mine with some Tacky Craft glue.
Holly says
Can you make a video on how to start the first row????? I can’t figure out it out from the way you explained it, thanks
Kathy says
Hello, i got to row 9 and not understanding the rest. Is everything a slip stich in rows 10-12
MamaNorton says
Would it help to put super glue on the soles ?
Donna says
iThese are what I have been looking for 2 yrs. I don’t know how to Crochet, but I will find someone who does. Do you make them for sale ??? I have an Artery Disease that make my feet swell .
thanks so much to my friend as she sent me here. And thank You for sharing !!!
Veda says
Why not use glue around the soles once they are crocheted. Would that work
TJ says
I wonder if dropping a bit of hot glue into each hole to secure would help?
Alice Munneke says
Hi Jess, I m having truble with the toe. Don’t understand the toe part of the pattern. Need help PLEASE!!
Jess @ Make and Do Crew says
Hey Alice,
What are you having trouble with specifically? I’d love to help if I had a little more detail. I’ve also answered several questions about the toe section in previous comments, so you might like to have a look at those answers to see if they’re helpful to you at all. 🙂
Jess
Beth says
I’m also confused about the toe section. After row 5 do I continue all the way around? Then what’s the other “row 5” that comes after the fasten off step in round 6? It says something about hdc in 3rd SC from hook, but I supposedly just fastened off
Jess @ Make and Do Crew says
Hey Beth!
After row 5, yes you continue around in the same direction working around the entire ankle until you get back to where you started.
The additional row 5 was a typo! I just did some updates on this pattern and forgot to delete that. Thanks so much for pointing it out!
Jess
Cynthia says
I have used craft glue, putting a drop in all the holes top and bottom. I am hoping that will help. I just made them but really want to make more.
Jess @ Make and Do Crew says
Cool! Let us know how that works out, Cynthia. I save the “plugs” from the current pair I’m working on to try the same thing.
Cynthia says
On the link you provided to amazon, only the yellow flip flops are $1.00, all other colors are $3.99
Jess @ Make and Do Crew says
Hey Cynthia,
That is true. I’m sorry if my wording was unclear. I was linking to those so that people who don’t have access to stores with flip flops (like in the winter) saw they could still get them online. I’ve had great luck with Walmart’s $.98 flip flops though. The foam is pretty sturdy.
Happy crocheting!
Jess
Nancy Kelly says
I couldn’t find any place to post my question so here it is: my crochet needles are very old and all have numbers instead of letters, what numbers could match up to the hooks you recommend? Thank you, Nancy
Melanie says
Hey I was wondering if you make and sell these? If so how much?
Jess @ Make and Do Crew says
Hi Melanie,
I don’t actually make them to sell, but some Esty sellers do. If you scroll through the comments, you can see a few people offering their services.
🙂
Karen says
I msde some similsr but used my own pattern after the foundation row. I only had 1 hole break through, then just was more careful when pushinh hook through the sole. Mine turned out great! I even entered them into our County Fair and received a Blue Ribbon! (Used WalMart flip flops $.97 & pattern was a Mary Jane dedign).
Jess @ Make and Do Crew says
Wow! Congrats, Karen! That is so awesome!
Nana says
You could always use a little glue in the holes to help hold them in place, and to fill the holes made when cutting away the straps. ( hot glue, / guerrilla glue) . Aside from the flimsy sole- supposedly, I think they are fine for out side in the summer on a dry day…running errands…especially if made like moccasins!
Jess @ Make and Do Crew says
Yes totally! I actually just shared a moccasin pattern in which I glued the little rubber circles from the straps back into the holes in the rubber soles. It worked great.
Susan says
Thank you for the pattern, I have made twelve now and will be making more (Christmas gifts). But like a dummy I threw away the straps and round plugs, do you have any suggestions on what can be used to cover/plug up the holes?
Jess @ Make and Do Crew says
Hmm. That’s a good question. If you have one extra set of flip flops, perhaps you could just cut small circles from the sole and use them to plug the holes on the other pairs? (I’d glue them in.) 12 pairs is SO impressive! I’d love to see a pic if you’d like to share one.:)
alice parrow says
what do you do with the holes where you cut the straps off plz let me not ty dipadoa@gmail.com
Jess @ Make and Do Crew says
For slippers, you can just leave them open and you won’t really notice they’re there. If you’d like to plug them though, you can just glue the piece from the flip flop strap that used to be in the hole right back in its former home. 🙂
Andrea Bates says
Hi Jess-
I spent today preparing the flip flop soles and discovered something that works really well to mark the Kohls on the flip-flop soles.
I made a paper copy of the top of the flip-flops sole. I marked a line on the paper copy 1/4 inch in from all edges and I marked each hole 5/16 inches apart. Then I punched out each hole with a hole punch. I then put the paper copy on the top of the flip-flop sole and held it in place of a couple of straight pins. ( do not mark the top of your souls with an ink pen or a marking pen )
I then used a Straight Pin to push into the center of each hole around ( turn the top of the pin around in a circle a few times – this makes it much easier to see each mark on the flip-flop sole).
You can use a BEAD REAMER To push through all of your marks on your flip-flops sole. It makes precise holes any circumference you would like and allows you to see very clearly where you are pushing through the top over onto the side of the sole.
Hope these two tips help to make your project go faster.
Jess @ Make and Do Crew says
This is such a great idea, Andrea! Thank you for sharing! I might have to incorporate this idea into the next tutorial. It’s really smart!
And I had never heard of a bead reamer. I just had to look it up. I can see how it would work perfectly for this.
Thanks so much for sharing your creativity with us!
Jess
Aubrey says
Thank you so much for your reply. I am definitely can put these on my to do list!
Judy beard says
Will someone please send me this pattern to my email it’s judybeard98@gmail.com
Jess @ Make and Do Crew says
Hey Judy,
The pattern is above this comment area, within the article. (It’s maybe a bit hard to notice because there are a lot of photos involved too.) I’m sorry, I don’t have it contained in a way that’s easily email-able at this moment.
Happy crocheting!
Jess
Maria says
Please click under the first photos where it says “read more”
Eline says
What i did, is copy the pattern to a word document. Then i suppose is ready to email..
Maria says
Judy, the pattern is under the first pictures. Look for the box that says “read more”. Most articles on websites do this. Just scroll up again to the original post and click “read more.” Once you’ve done this- the pattern will always show.
Designer, I love this pattern and love HL store. ❤️ Thanks for posting I will be sure to include your links.
Linda says
Could someone send the pattern to my email? linda.munter@gmail.com thanks
Maria says
Read my reply above
Norma says
Can’t find the pattern for crocheted slippers on foam. Please send.
lynn says
You could also run a bead of hot glue over the holes on the inside of the shoe after you are done crocheting. It would strengthen that edge, I think. Thanks. Great idea.
BONITA RANKEY says
RUN A THIN BEAD OF HOT GLUE AROUND THE FIRST ROUND OF STITCHES. THAT SHOULD HOLE EVERYTHING.
Mindy Lea says
On the flimsy flip flops I used an Awl and it is better to punch the hole straight through from top to bottom. I didn’t have any tears after doing this. I had already gone through the side and two out of the first four stitches tore. I was able to salvage the flip flops.
The next pair I made were slightly heavier flip flops. I used an Awl to punch the holes and the smallest crochet Hook I have is a D/3 or 3.25mm so I made the holes 1 cm apart instead of the 1/4 inch and went through the side as low as I could go and 1 cm from the edge of the top of the flip flop. I didn’t have any tears on those. I was making a size 10 slipper.
Debbie says
But won’t this method weaken the exposed stitches to rapid wear, being that they are on the floor?
Jess @ Make and Do Crew says
Hey Debbie,
None of the stitches are actually touching the floor. They’re all on the top half of the flip flop sole. I’ve been wearing mine for about a month everyday and they’re holding up really well. 🙂
Happy crocheting!
Jess
Wanda says
My first slipper I poked the holes bottom to top… Opps should of watched the video..learnt to Poke holes from the side to the top
Jess @ Make and Do Crew says
Haha–I can see how that could happen, Wanda. 🙂 Good think flip flops are generally pretty cheap to replace.
Happy crocheting!
Jess
Liz says
I think they are way too cute to be relegated to slippers and think they’ll work great with sundresses or beach wear. I’m concerned about the flip flop tearing. Has that been a problem for you or others who’ve tried this pattern? Are there any recommendations on the thickness or density for the sole?
Jess @ Make and Do Crew says
I haven’t had any trouble with them tearing in the month or so I’ve been wearing them at home (A LOT ;)). I’ve found that Walmart flip flops are a great density. The Dollar Tree ones are too flimsy and the Michael’s ones tend to fall apart a bit more (although they’re working okay.)
Hope that helps!
jess
Wanda says
I wore mine to the pool.. The store..
Lhdelane says
I was so excited to get started on these, but 3 of the first 4 stitches ripped right through. So disappointed!
Lhdelane says
Ok. Update. I am getting the hang of it. 3 tips: First, go slowly on that first row through the sole. Second, keep the hook facing down as you pull the hook up through the sole. If the hook faces the side, it tears easily. Third, crochet loosely on this first row.
Jess @ Make and Do Crew says
Thanks for sharing your tips, Lhdelane! It helps everyone! 🙂
Wanda says
Got mine made … But had trouble keeping them on.. Had to run some yarn in around the top to tighten them.. I also made a small pair and I got the second one upside down so then had two right feet… Mine are finished and I love them ..
Shoshana says
I might also recommend using a wax thread and a heavy needle to stitch all the way through the sole about 1/4 inch in. I forget what the stitch is called but loop the thread back through the previous stitch with every pass through the sole so that there is a continuous line of thread on both the top and bottom. Then start the pattern as written, using the wax thread as your foundation row. That would also make it better for outdoor wear. It’s what I intend to try.
retta says
can not get pattern