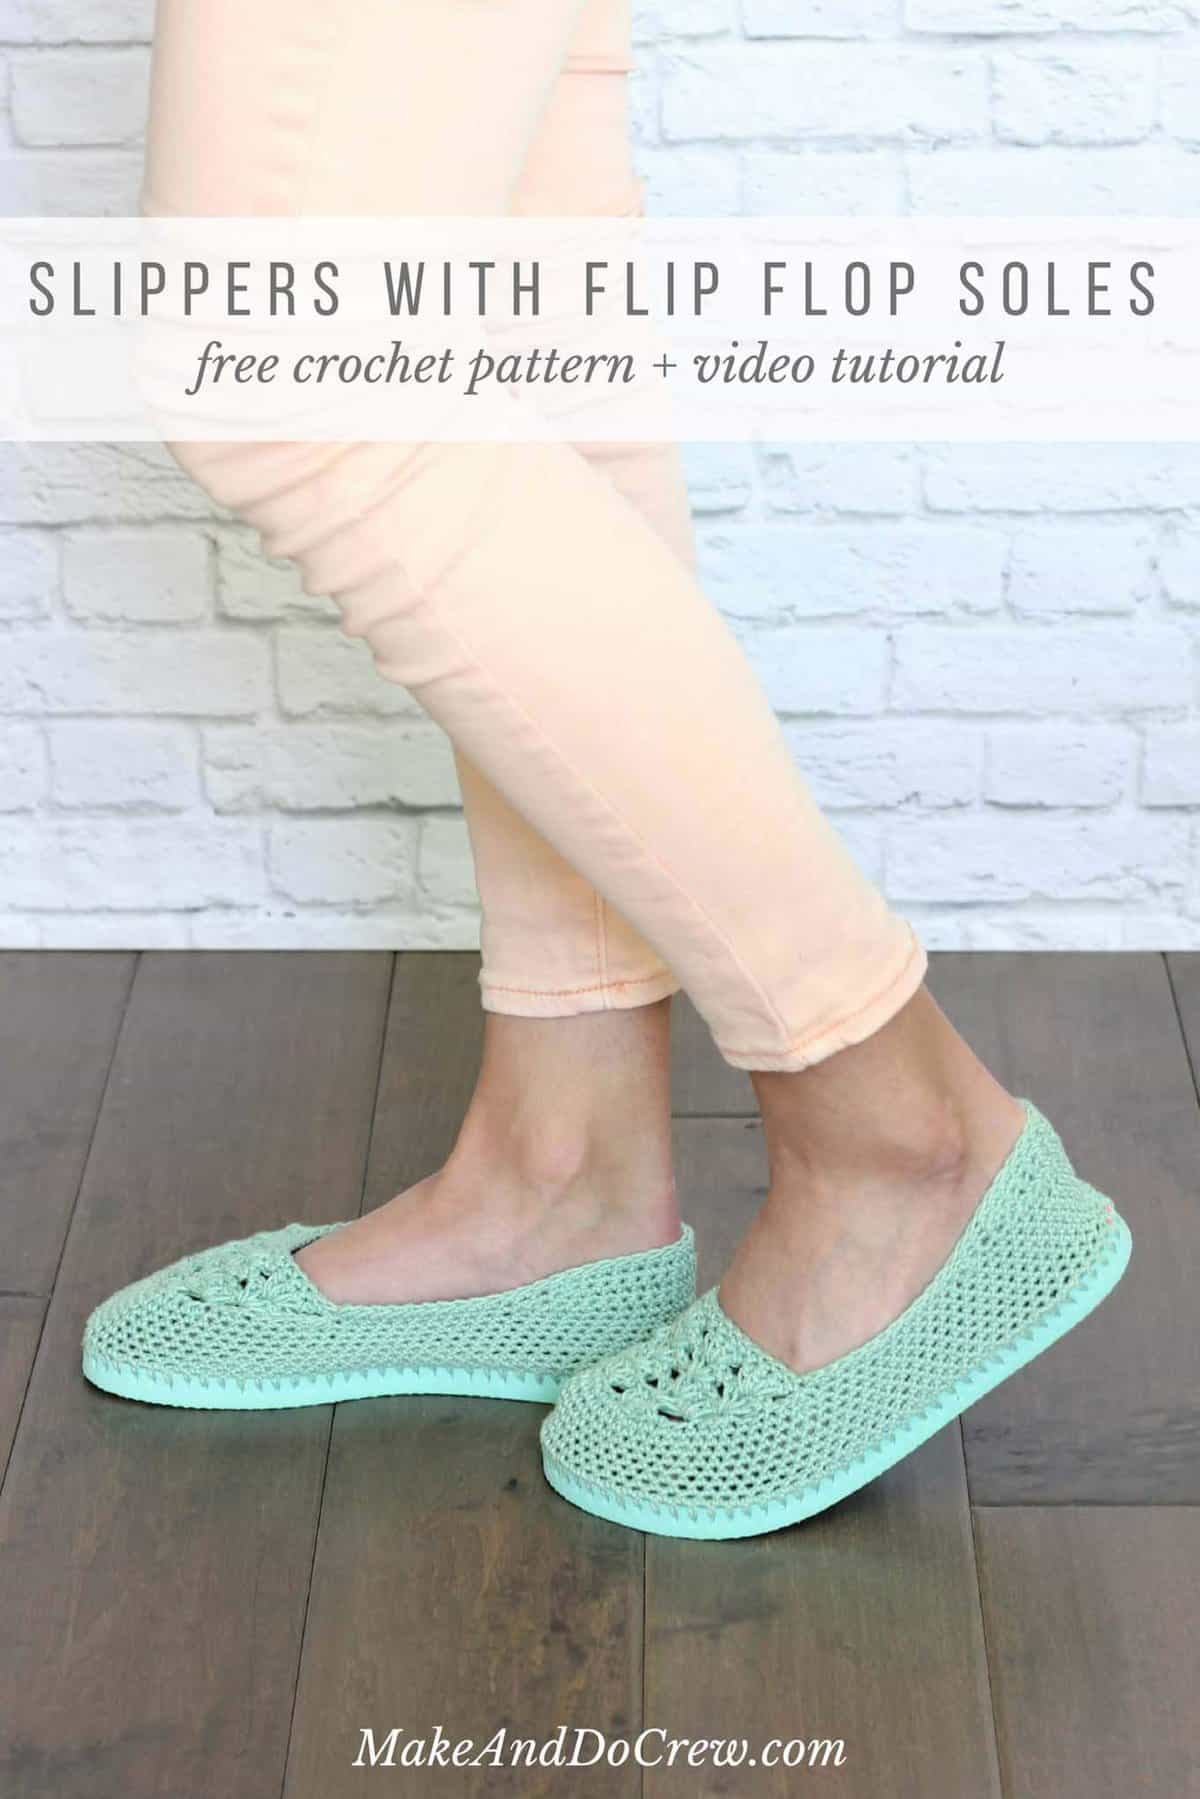
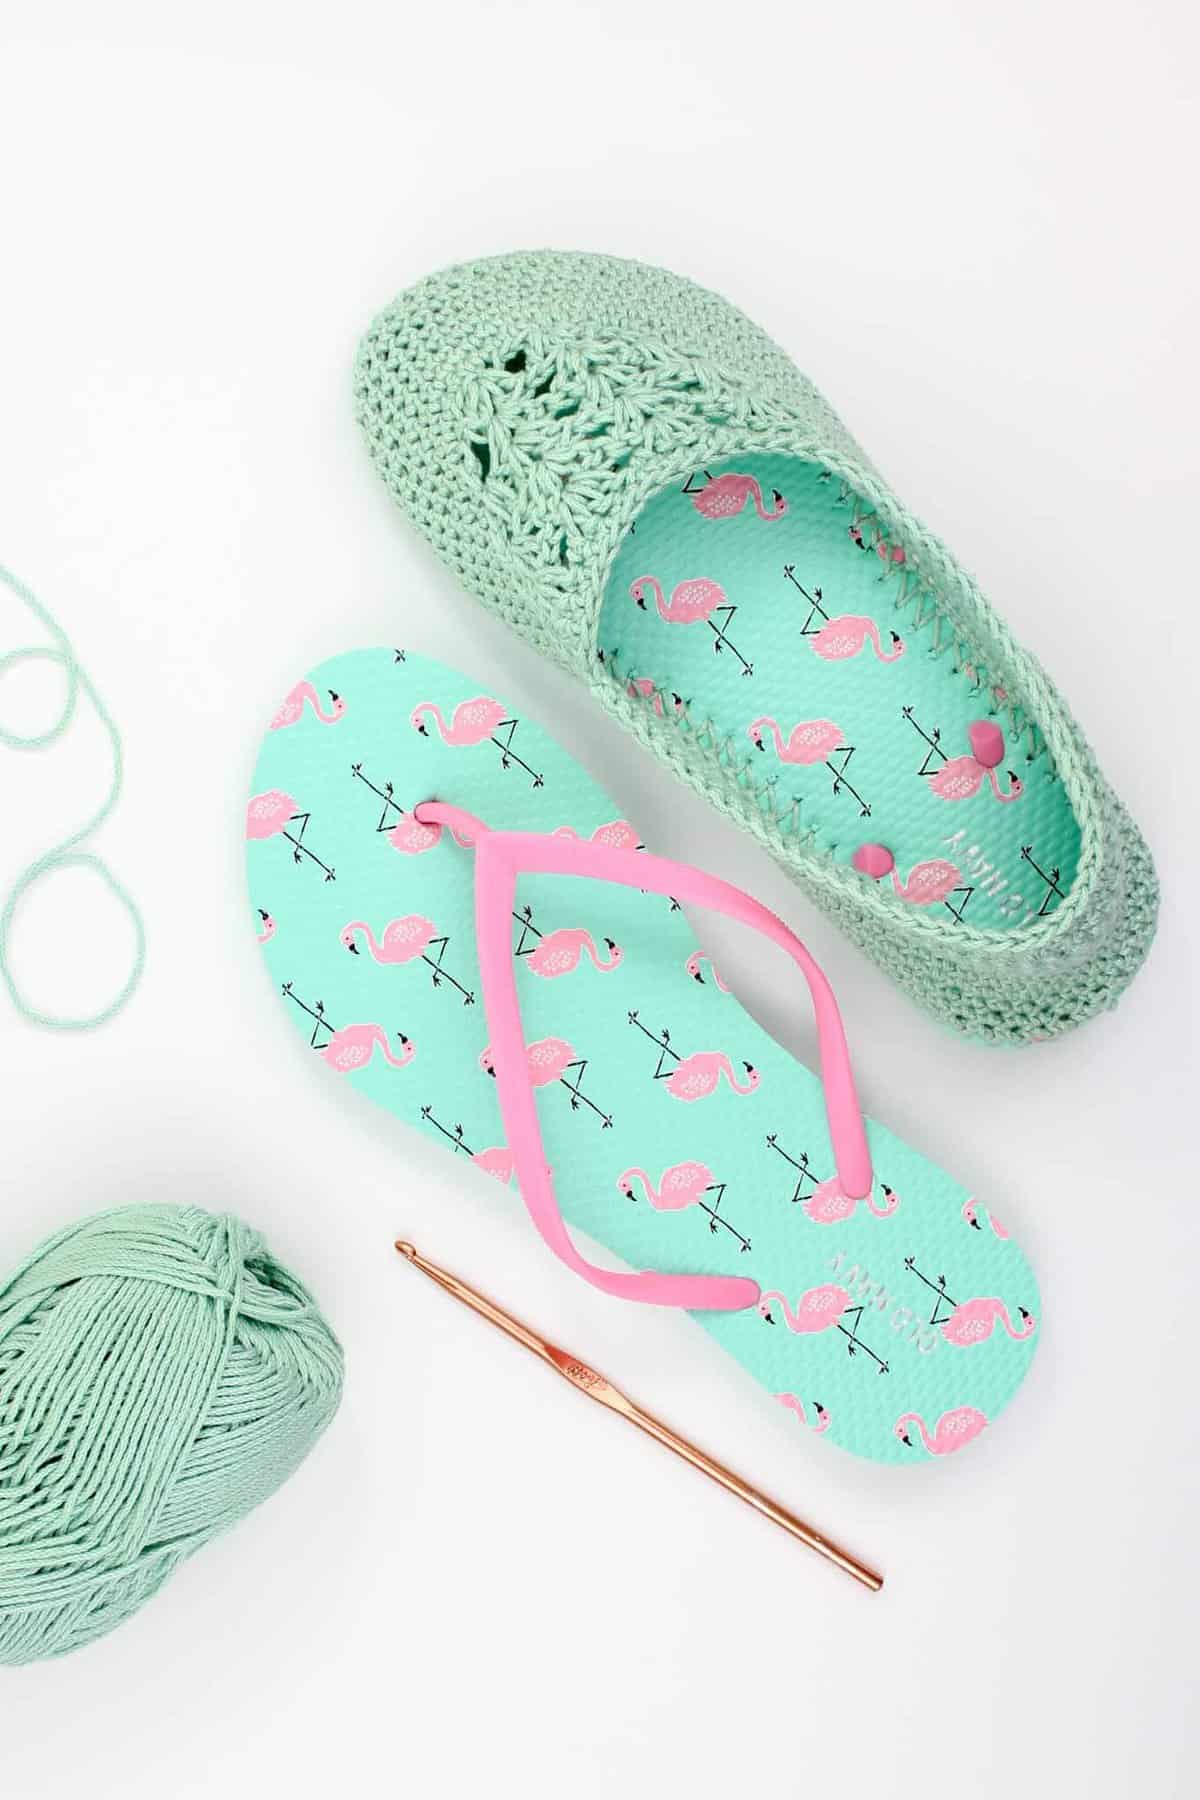
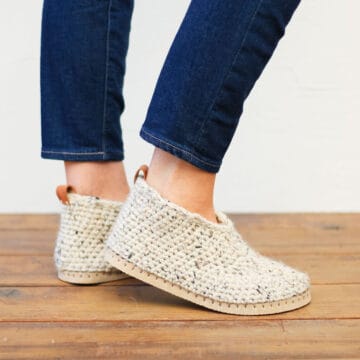
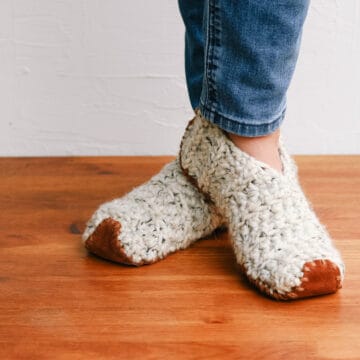
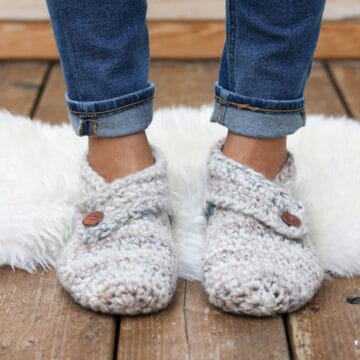
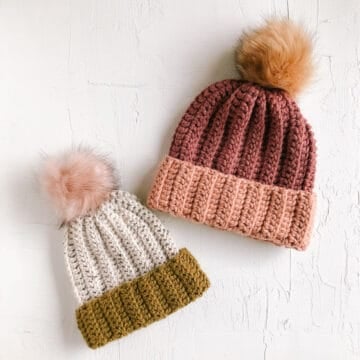
Cotton yarn and a rubber sole make this free crochet slippers with flip flop soles pattern perfect for wearing around the house (or even outside!)
View the entire free pattern and video tutorial below or purchase the printable, ad-free pdf with hole poking guide here.
This free crochet slippers with flip flop soles pattern is a collaboration with Lion Brand Yarn. This post contains affiliate links.
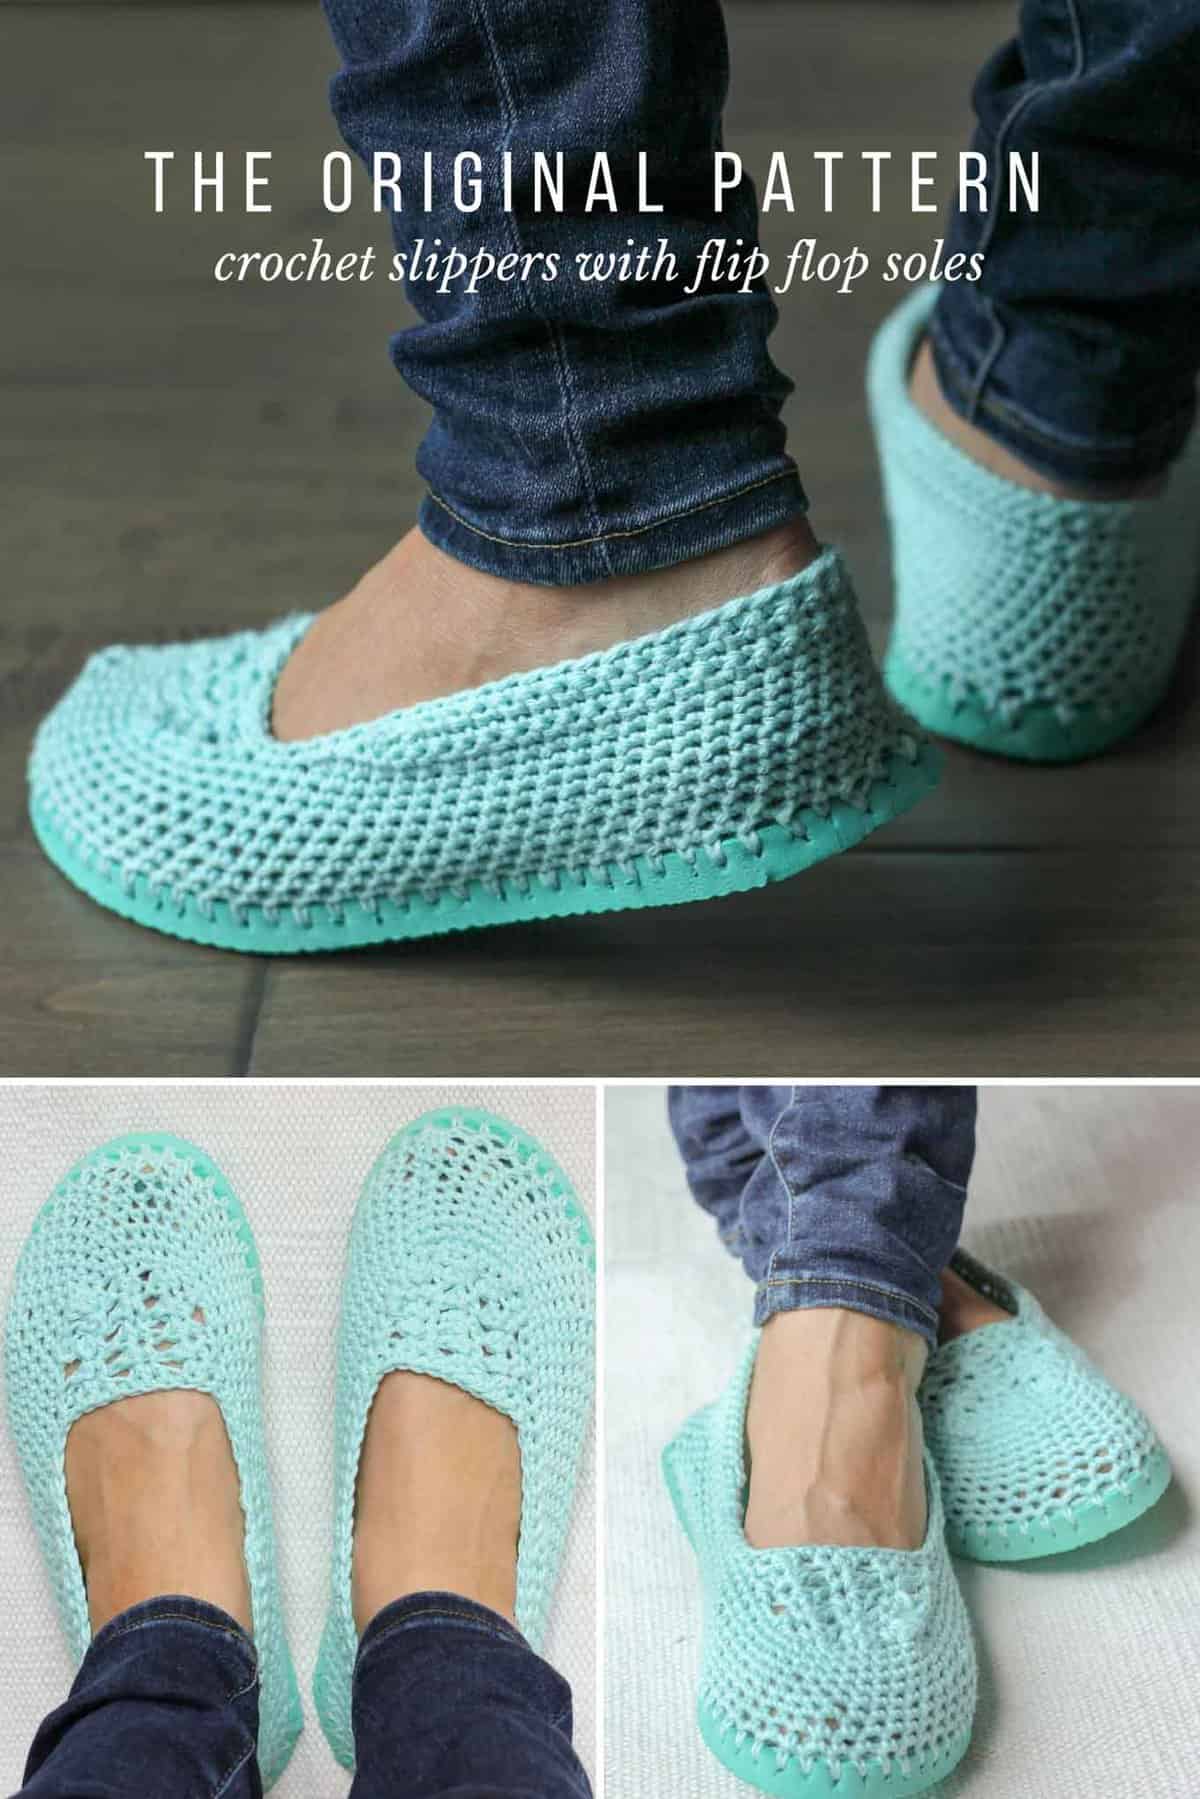
UPDATE: This pattern has been super popular since I published the original version last May. Many of you have requested a video tutorial for these crochet slippers with flip flop soles, so today I'm really happy to have a totally revised and updated version of the pattern that includes a step-by-step video tutorial.
In this version, I've updated the toe top section of the pattern, re-written some details for clarity AND added a printable ruler to the ad-free PDF of the pattern to guide your hole poking.
(If you just want the original crochet slippers with flip flop soles pattern though, don't fret, you can still find it for free here!)
 Many readers have asked how these crochet slippers with flip flop soles hold up over time. I've answered that question (with photos!) and many more in my FAQs about crocheting on flip flops.
Without further ado, here's the original blog post with the updated free crochet slippers with flip flop soles pattern and new video tutorial below. And if you're interested, you can find all the free flip flop crochet patterns I've shared since making this first pair, right here.
Guys, I’m so excited to share this pattern. I hope you love making crocheted slippers with a legit, flip flop sole as much as I did. When I originally stumbled across these crocheted boots made by Croche Da Alessandra, the idea for some flip-flop-based summer slippers wedged in my brain and refused to shake loose until I just made the things.
 Until about a week ago, I’ve been wearing some felted knit slippers my mom made me. They’re AMAZING. But now that it’s officially spring, they’re becoming a little less practical with each tick of the thermometer.
 So if, like me, you prefer to keep your feet covered when you’re shuffling around the house, but you find warm weather to be less than slipper-compatible, these are for you! (And if you're the free-wheeling type that prefers not to have your toes covered at all during the summer months, check out all my other free crochet patterns instead.)
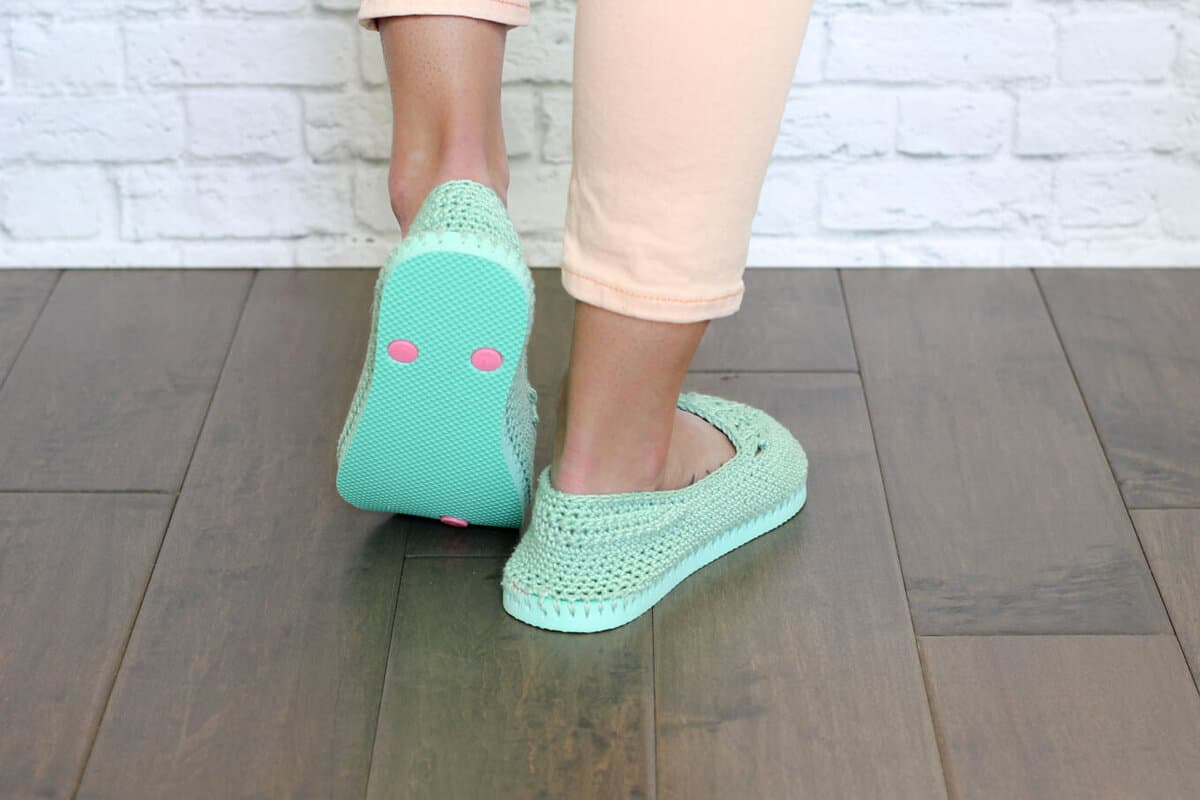
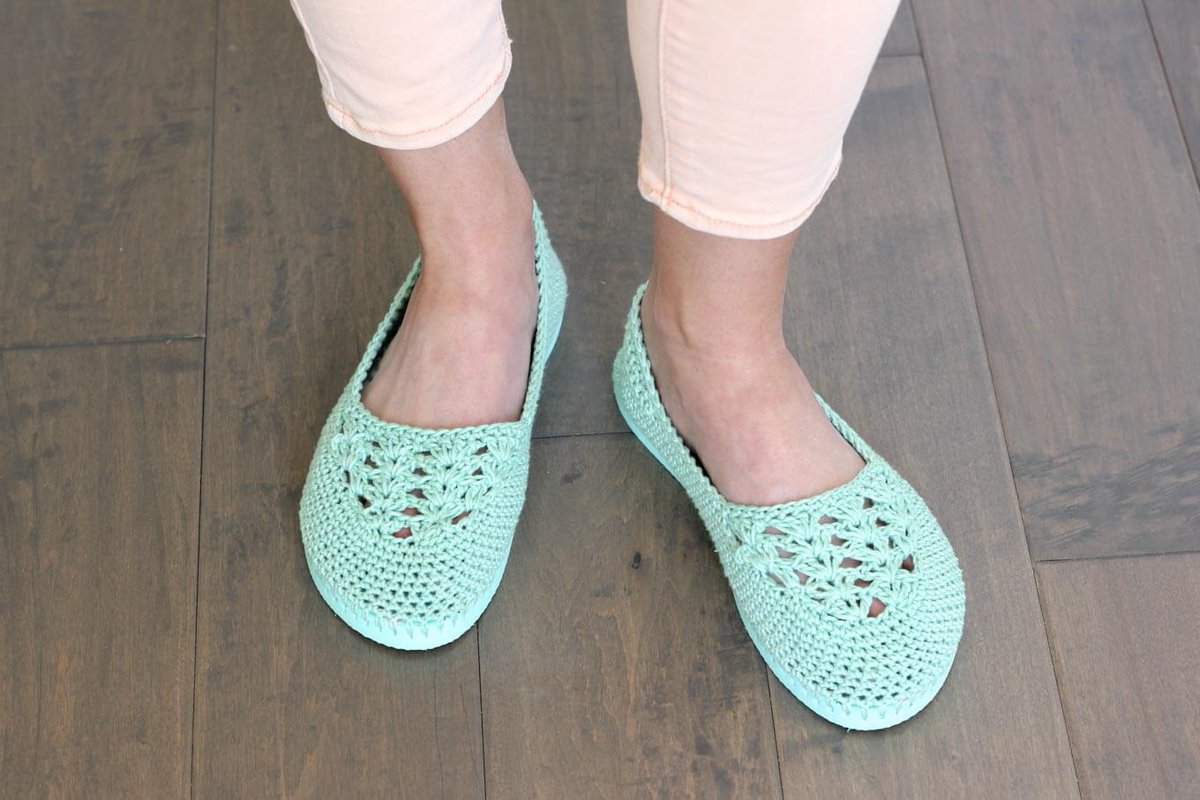
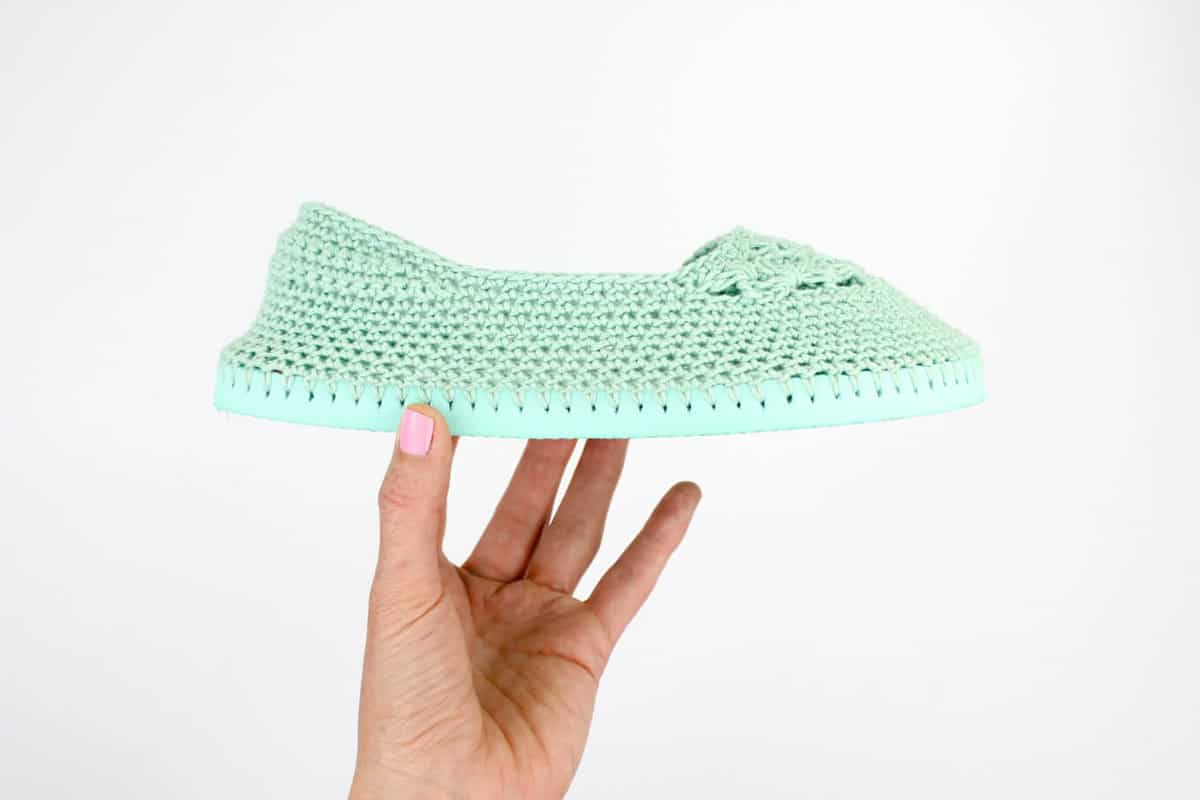
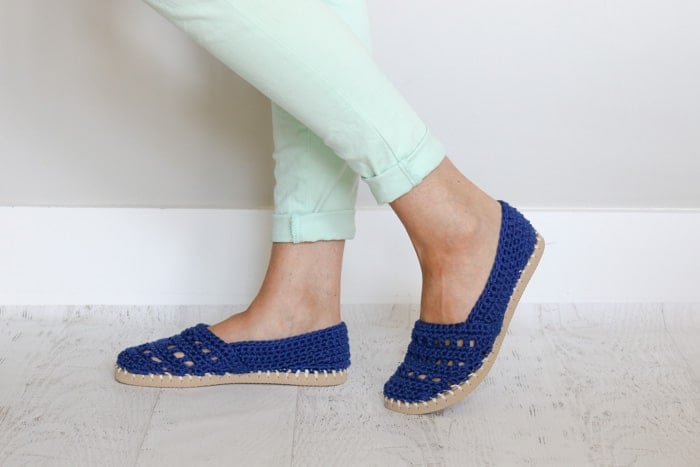
These crocheted slippers with flip flop soles let in a lovely breeze with each step, thanks to the slightly open weave and breathable Lion Brand 24/7 Cotton yarn. The flip flop (or “thong” if you live in certain parts of the world) sole makes these a little more substantial than regular crocheted slippers and perfectly grippy to scoot around your house.
These even work well as crocheted shoes to wear outside. They might just be the most comfortable pair of shoes you've ever worn. (And don’t they look a bit like Toms?)
 The ad-free PDF now includes a printable ruler to help guide your hole poking. This little bonus is super helpful in achieving the gauge and ensuring that you don't have too many or too few stitches around your flip flop sole. (Regardless of the size you're making--isn't that magic?!)
You can purchase the PDF of this pattern with the ruler here on LoveCrafts.com or here on Etsy.
Related: 30+ Free Crochet Top Patterns for Warm Weather
Find Your Next Crochet Pattern on Flip Flop Soles
Crocheting on flip flops can fast track your feet straight to comfort-ville. Flip flops offer functional, non-slip soles for your crochet slippers. They also allow you to crochet shoes customized for your particular feet.
See more free crochet flip flops patterns →
Please do not publish or share this pattern as your own. You may make items to sell with this pattern. In exchange, please link back to this post. Do NOT use my photos as your own sales photos. You can read my policies here. Now let’s make something awesome!
Summer Crochet Slippers with Flip Flop Soles - Free Pattern
Purchase the printable, ad-free PDF with hole poking ruler here on LoveCrafts.com or here on Etsy.
Add this pattern to your Ravelry favorites here.
Pin this pattern for later here.
Sizes:
This pattern works well for women's sizes 6-10, but you can easily add or eliminate a row to the top section to make it longer or shorter for other sizes.
Abbreviations (US Terms):
ch – chain
cluster – 4 dc in one stitch
half cluster – 2 dc in one st
dc - double crochet
sk - skip
sl st - slip stitch
sc - single crochet
st(s) – stitch(es)
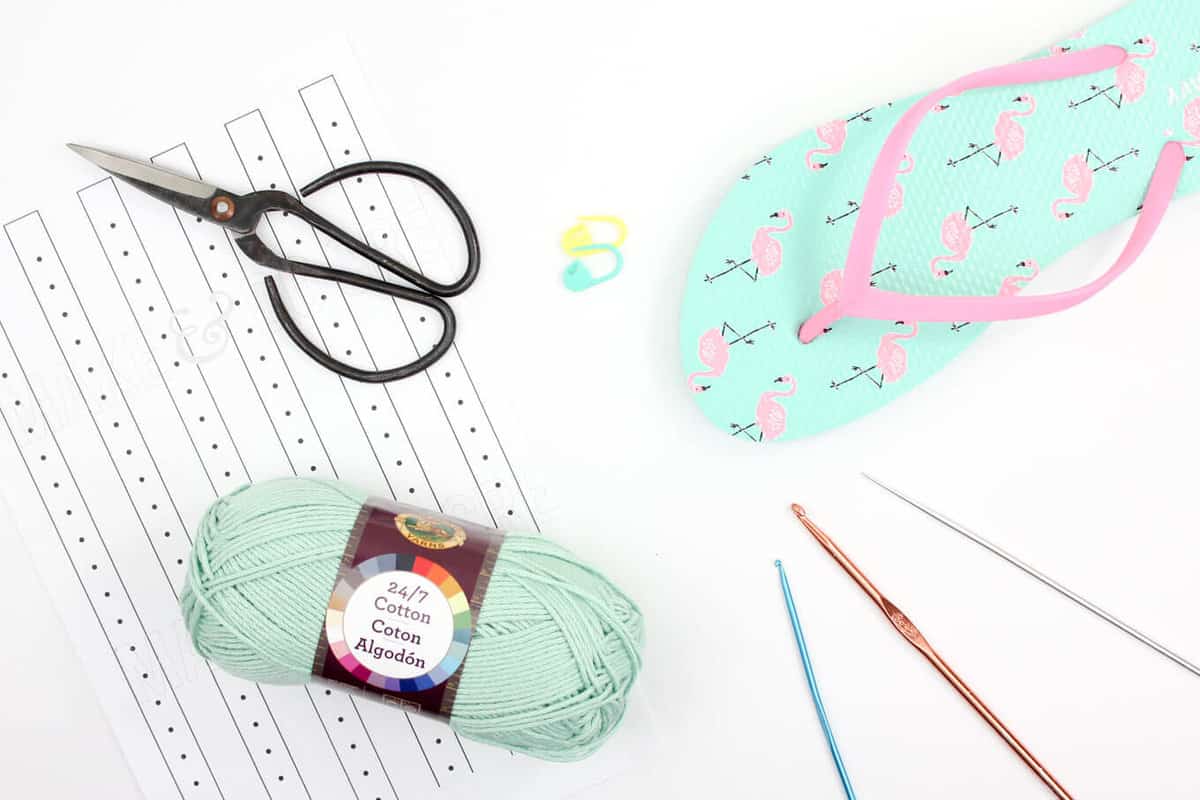 Supplies:
So you can spend more time making shoes and less time shopping, this pattern contains affiliate links at no extra cost to you.
• Lion Brand 24/7 Cotton – 1 skein (186 yards) Color: Mint
• Tapestry needle
• Size B [2.25 mm] crochet hook or size needed to fit through flip flop holes
• Size G [4.0 mm] crochet hook
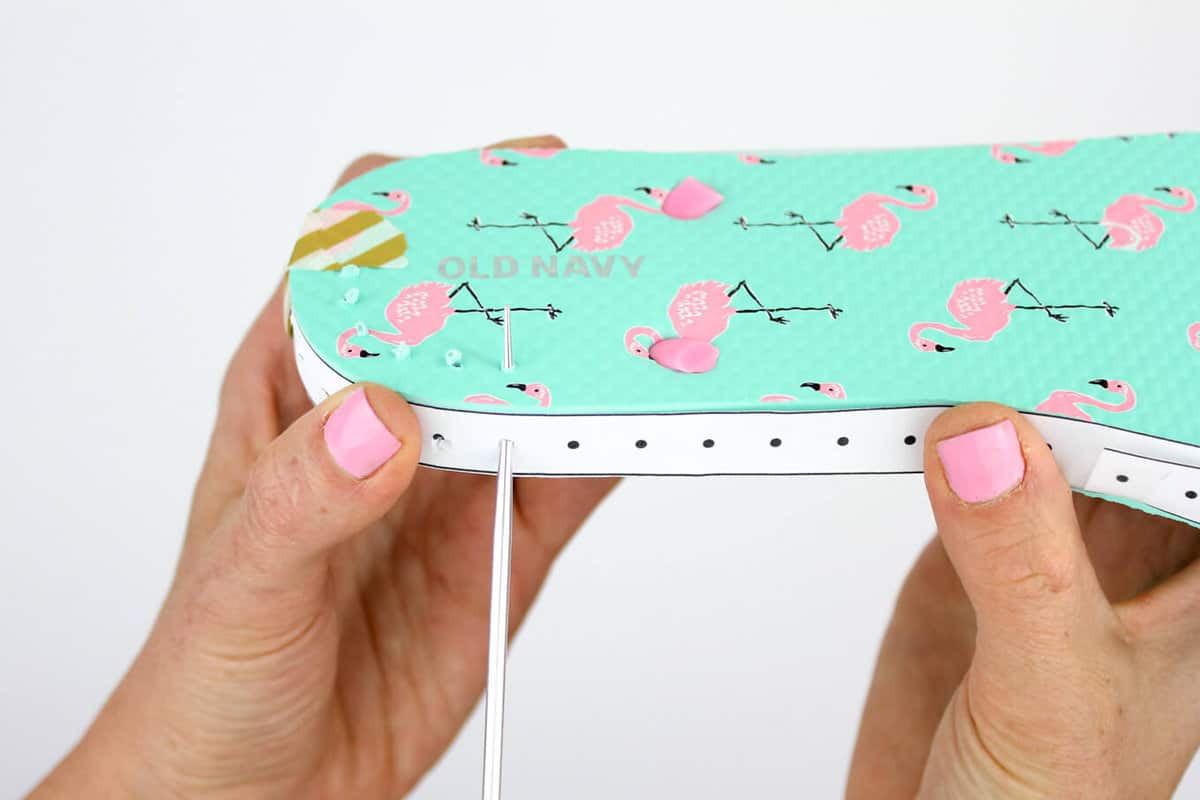
• 1-2 printed copies of the “ruler” at end of the printable pattern or a measuring tape
• 1 pair of flip flops (One size smaller than you wear normally. See pattern notes.)
• Sharp tool to poke holes (I use this clay tool. You can also try a skewer, thin drill bit or awl.)
• Sharp scissors
• Stitch markers
• Strong glue such as E6000 to glue strap plugs to sole (optional)
Gauge:
7.5 sc = 2”
12 rows = 2”
Notes:
• Transforming flip flops into slippers isn’t an exact science! Keep an open mind and don’t be afraid to customize the shoes to your liking. Check out this Flip Flop FAQs post for answers to commonly asked questions.
Wanna save this pattern?
• You’ll likely want to size down when buying your flip flops. Look for a flop flop that offers about .25" of sole around your foot (more like the fit of a normal shoe). In the pattern sizing, the shoe sizes mentioned describe the shoe size you normally wear and not the sized-down size of your flip flops.
• The flip flops in the sample are from Old Navy--they have a great selection of colors. Find $1 flip flops on Amazon or at Walmart. Dollar Tree’s $1 flip flops tend to be a bit too flimsy, but can work if you are careful. And LionBrand.com now offers flip flops so you can get your yarn and soles in one place!
• Left and right shoes are identical.
• Similar to some ballet flats, your slippers should curl in a bit. That’s what gets them to shape to your feet without a lot of increasing or decreasing. They will stretch out slightly with wear.
• The slipper sides and heel are worked in a spiral, so you will not ch 1 at the beginning of each round.
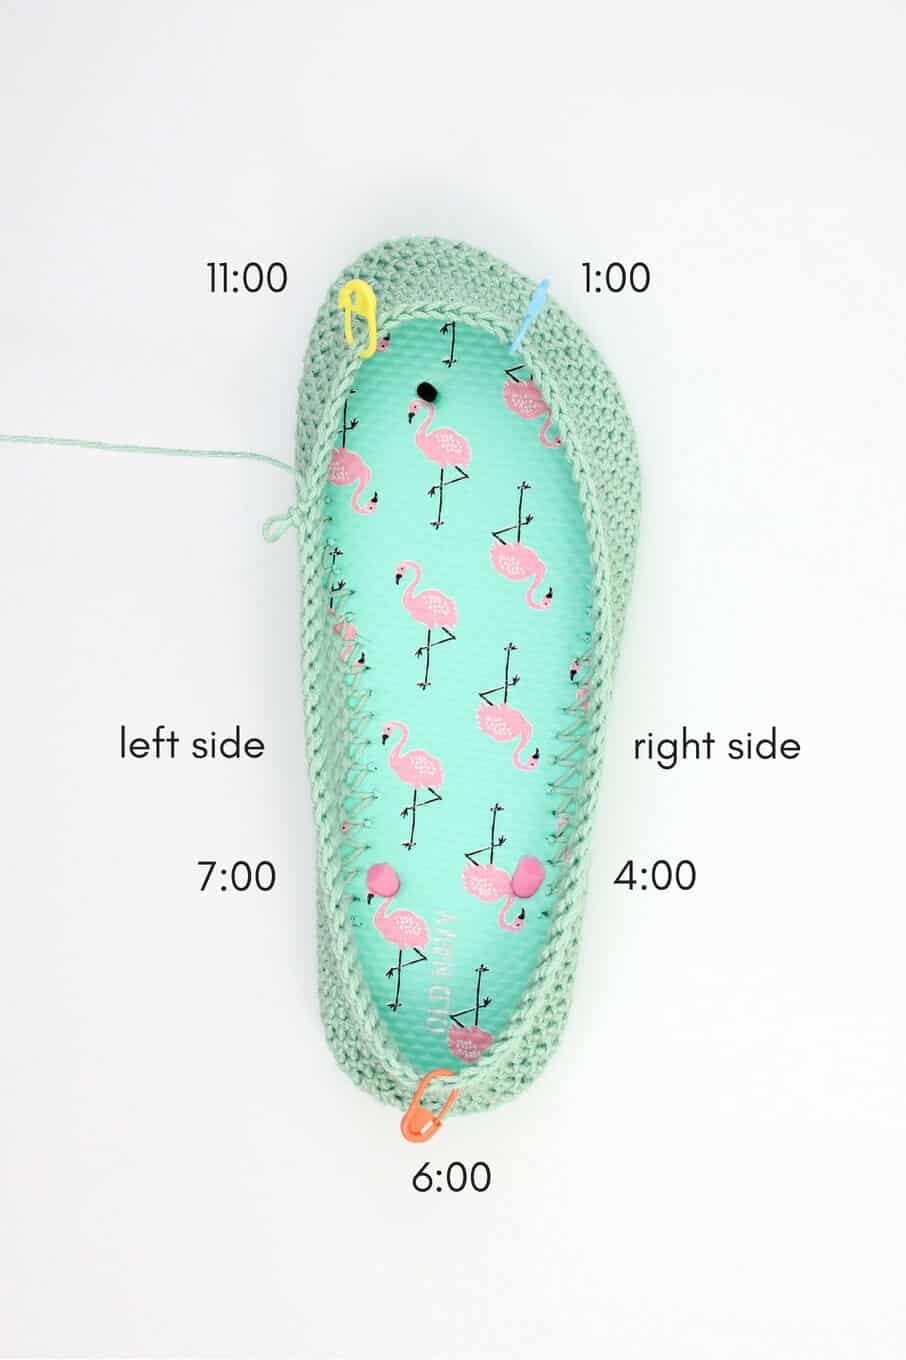
• Pattern explains locations on the flip flop as if it’s a clock where the top of the toe is 12:00 and the heel is 6:00.
Find Your Next Crochet Slippers Pattern
See more free crochet slippers & socks patterns →
Related: 30+ Free Crochet Dress Patterns: Beginner to Advanced
Slipper Sides and Heel
Notes:
• The shoes are crocheted tightly, similar to amigurumi. Make a deliberate effort to keep your stitches tighter than normal. Check your gauge if you’re unsure.
• Be sure to poke the same number of holes in the second flip flop as in the first.
To begin:
Trim straps off flip flops by cutting the mid-foot straps at an extreme angle so you can keep them in place without feeling them inside the shoe. (See photo above with the hole poking ruler.) Save the rubber plug from the strap between your toes to glue in later.
If you're using the printable ruler, trim and tape the pieces together and tape ruler around flip flop sole. With your sharp instrument, poke holes in each dot on the ruler. (See photo above the pattern.) Alternatively, use a measuring tape to poke holes slightly more than .25" apart around the sole. Pierce the hole at an angle from about the middle of the way down the sole to approximately .25” into the top of the sole. Reference the video tutorial for help.
Tie slip knot around smaller hook. Insert hook at back of heel (6:00 position) from the top of the flip flop toward the bottom of the sole, grabbing the yarn and pulling through to the top of the flip flop and through the slip knot to attach the yarn to the flip flop. Crochet over the tail of this yarn as you work Round 1.
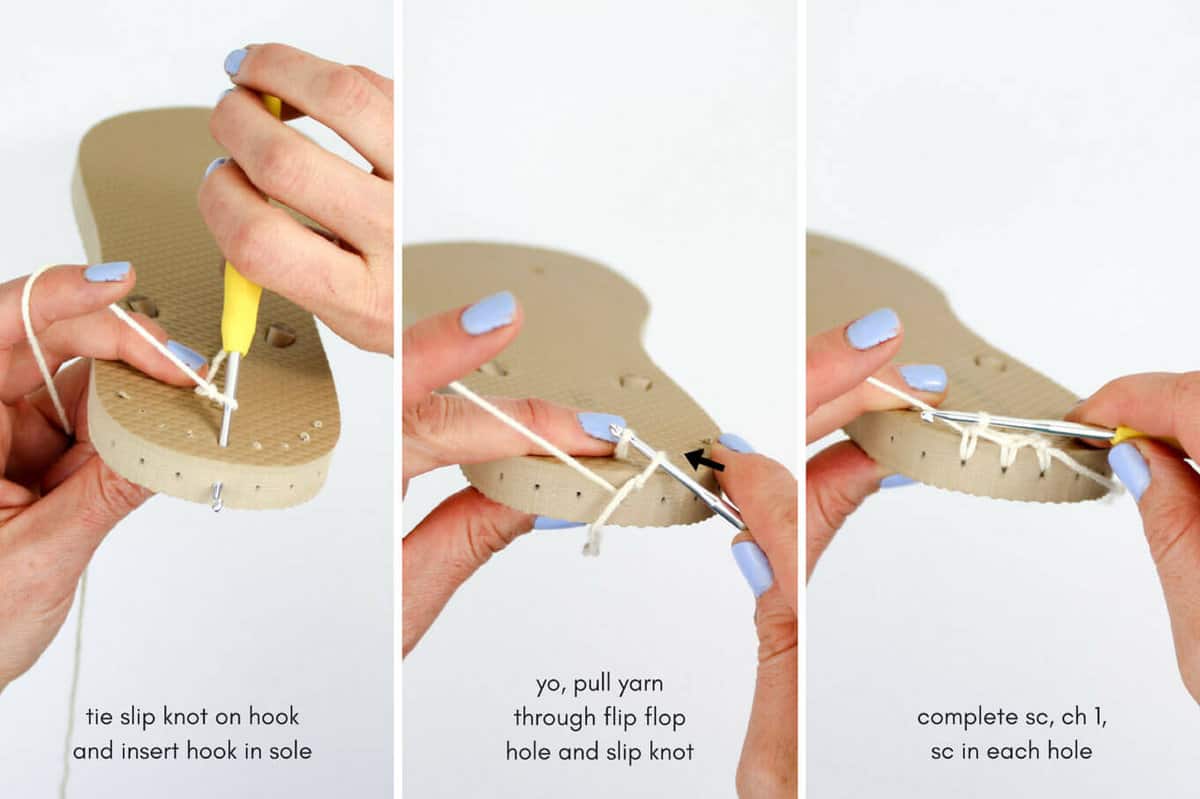 Round 1: Continuing with smaller hook, sc in each hole around sole, join with a sl st to first sc. Do not turn. Place marker in first st of round and move it up as you work each round (or just keep track of which sole hole you began in).
✨Unlock this free subscriber-exclusive pattern ✨
Follow these steps to view the full free pattern below
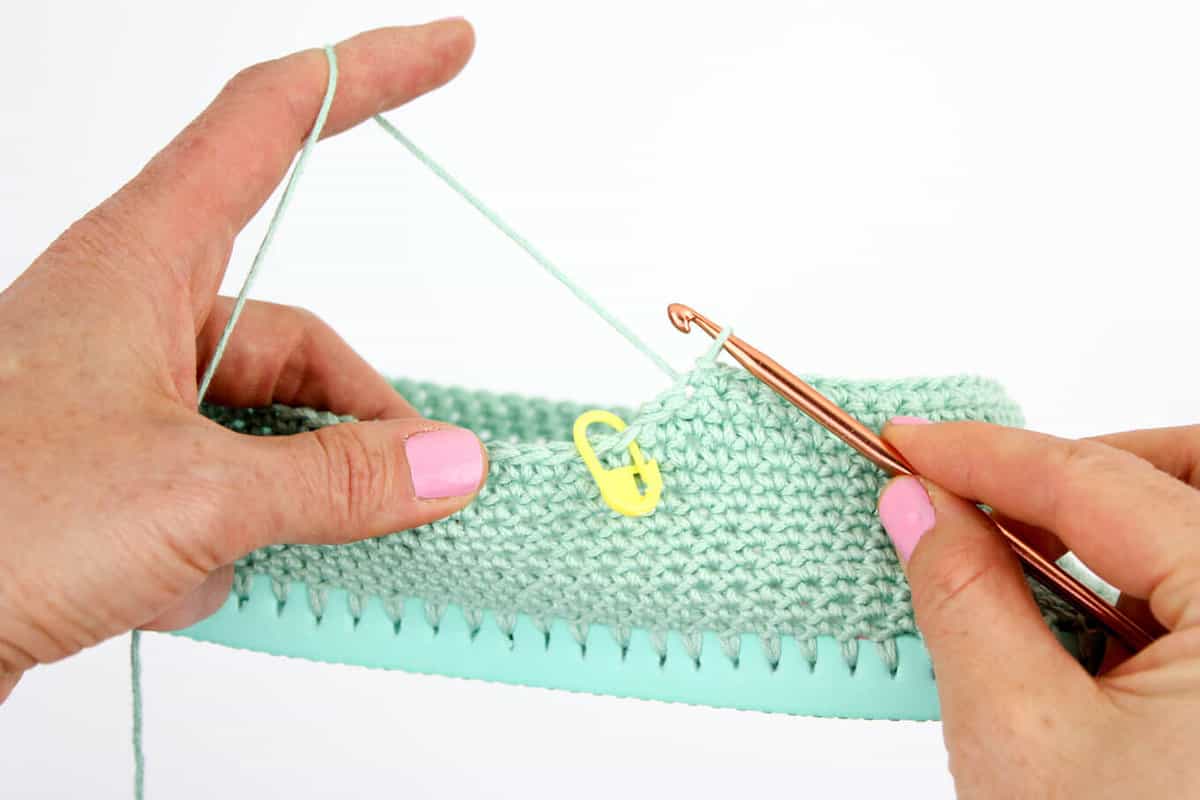
Rounds 2-9: With larger hook, sc in each sc around sole. Do not turn.
Remove marker. Place stitch markers at 4:00 and 7:00 positions. This is where the back heel “lip” of your slipper will taper to.
Do not turn work, continue with the rest of row 9.
Row 9 cont: Sc in each sc until 1 st remains before next marked st, sl st in next sc, turn. (See photo below.)
To make heel taper appear smoother, keep working yarn toward the inside of shoe when starting Rows 10-13. (See 8:25 mark of video tutorial for example.)
Row 10: Ch 1, sk first sl st, sl st in next sc, sc in each sc until 1 st remains before next marked st, sl st in next sc, turn.
Rows 11-12: Ch 1, sk first sl st, sl st in next sc, sc in each sc until 3 stitches remain before next marked st, sl st in next sc, turn.
Row 13: Ch 1, sk first sl st, sl st in next sc, sc in each sc to back of the heel, sl st in next sc. Fasten off.
Do not weave in end. You’ll work over this tail later.
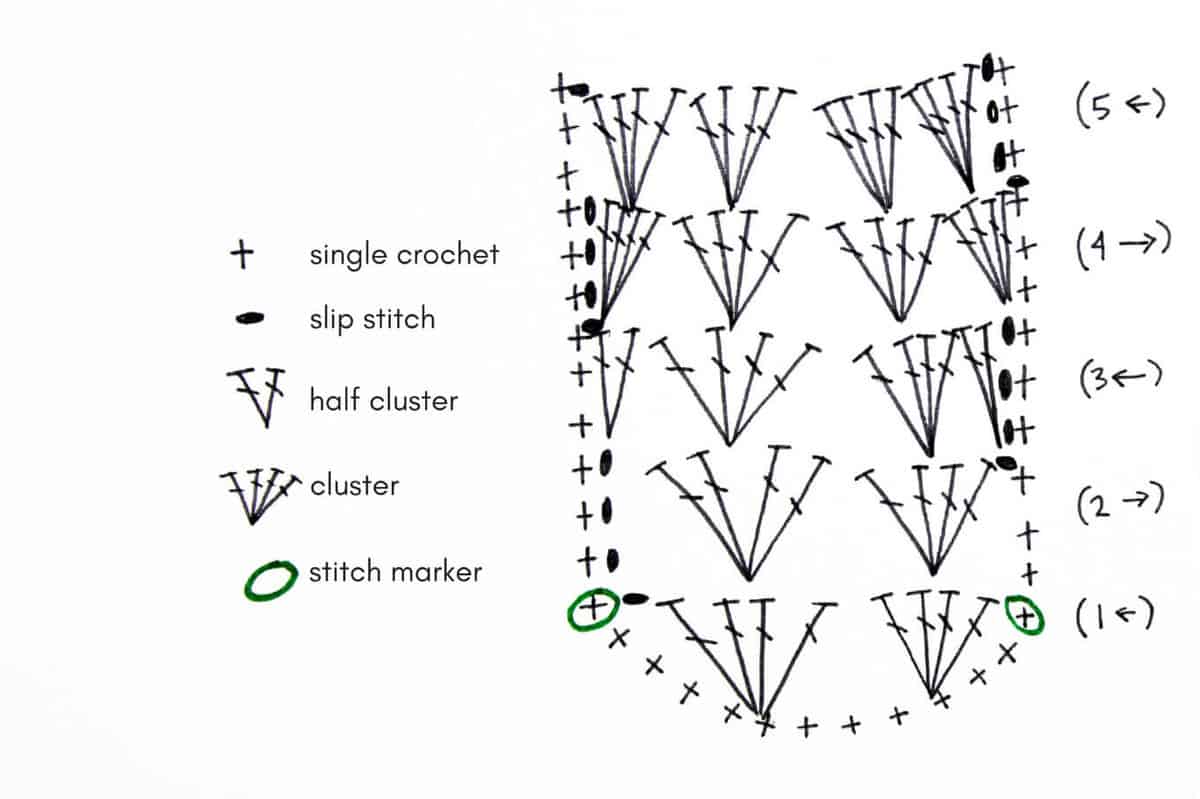

Slipper Top
Notes:
• Cluster = 4 dc in one st
• Half Cluster = 2 dc in one st
• In rows 2-5, the clusters are worked between the two middle dc of the cluster in the previous row.
• Reference video tutorial or chart above for visual explanation.
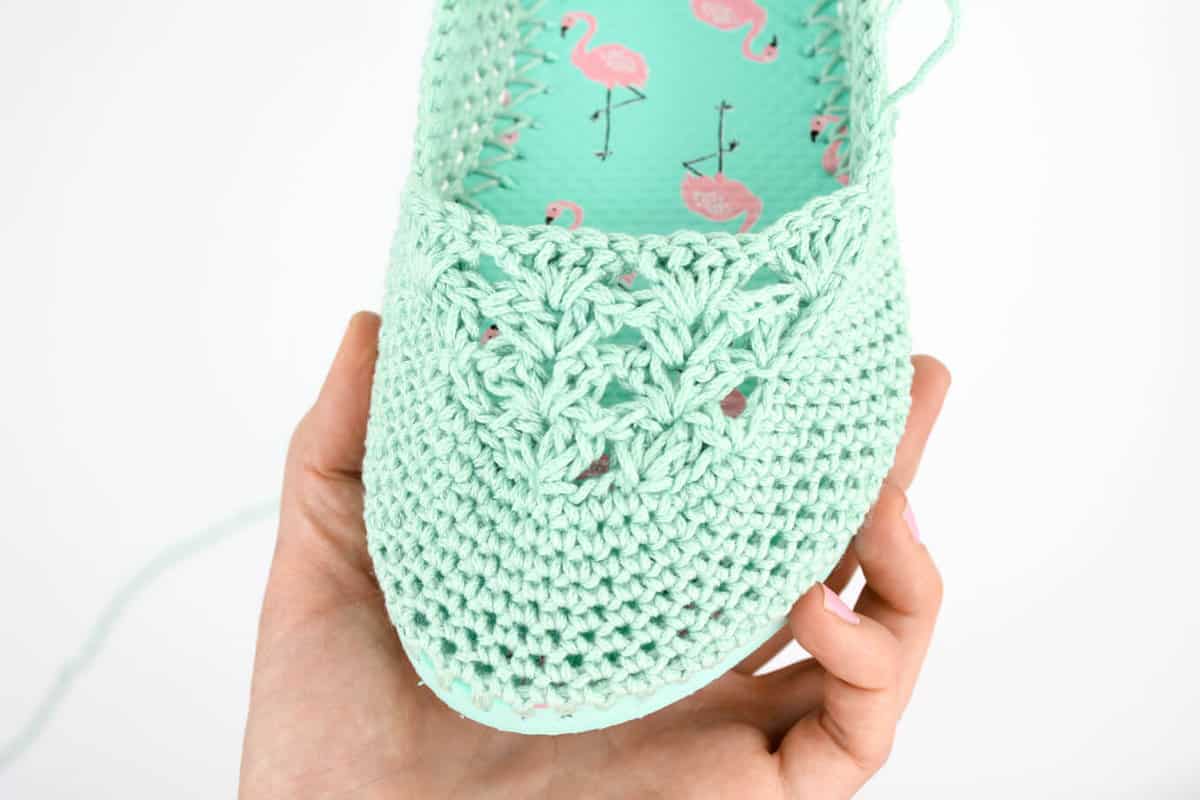
Find the approximate midpoint of the front of the slipper. Place stitch markers at the 1:00 and 11:00 positions with 11 sc between them. (See "clock" photo at top of pattern.)
Join yarn in 11:00 marked st. (Left handed crocheters, join in 1:00 marked st and reverse mentions of "right" and "left.") Weave in the tail from attaching yarn now before this section is worked.
Row 1: With the toe facing toward you, (sk 3 sc, cluster in next sc) 2 times, skip 3 sc, sl st in next marked st, sl st in next 3 sc of Rnd 9 (up left edge of slipper), turn. (2 clusters) (See photo below.)
Row 2: Cluster in center of each of next 2 clusters, skip 2 sc in Rnd 9, sl st in next sc of Rnd 9 to join, sl st in next 3 sc (up right edge of slipper), turn. (2 clusters)
Row 3: Half cluster in sl st where Row 2 joined Rnd 9, cluster in center of each of next 2 clusters, half cluster in last sl st of Row 1, skip 2 sc in Rnd 9, sl st in next sc of Rnd 9 to join, sl st in next 3 sc (up left edge of slipper), turn. (2 clusters and 2 half clusters)
Row 4: Cluster in sl st where Row 3 joined Rnd 9, cluster in center of each of next 2 clusters, cluster in last sl st of Row 2, skip 2 sc in Rnd 9, sl st in next sc of Rnd 9 to join, sl st in next 3 sc (up right edge of slipper), turn. (4 clusters)
Row 5: Cluster in center of each of next 4 clusters, skip 2 sc in Rnd 9, sl st in next sc of Rnd 9 to join, do not turn. (4 clusters)
Round 6: Sc in each st around entire shoe, do not turn. (See photo J.) (Crochet over yarn tail at heel as you work.)
Round 7: Sc in each sc around heel stopping once you reach the slipper top section, sl st 1 into edge of top.
 Fasten off and weave in end. Repeat pattern with second flip flop sole. Tap your toes together, smile and run around your house because you just made your own crochet slippers with flip flop soles!
That was so fun! Now what?
Invitation to our Facebook group
Come discuss crocheting flip flop slipper patterns and lots of other crochet projects and techniques in our Make & Do Crew Facebook group. Here thousands of helpful crocheters answer each others questions and share their stitches. Come join us here.
More Free Crochet Patterns Using Flip Flop Soles
- FAQS: How to Crochet on Flip Flops - and will they fall apart?
- Crochet Boots With Flip Flops Soles
- Free Crochet Ugg Boot Pattern
- Chukka Crochet Slipper Boots with Flip Flop Soles
- Crochet Moccasins Shoes
- Crochet Beach Shoes Pattern
- Crochet Festival Boots Pattern
- Crochet Boat Shoes Slippers (for kids)
Now that your toes are comfy, you might enjoy these free crochet patterns:
 Cocoon Cardigan -- free crochet pattern made with two simple rectangles!
[convertkit form=4869877]


Kathy B. says
Love this pattern. Very creative use for flip flops. Thank you for sharing th is pattern.
Emily says
Could you please clarify row 1 of the toe? I read it as: to attach at the marker, then skip, then go back to the marker, without working anything into the stircg you skipped to? Is it actually attach to the right OF the marker?
It could be easy, but it's confusing the heck out of me.
Any help would be appreciated.
Jess @ Make and Do Crew says
Emily--
This part of the pattern was really tricky for me to explain, so thanks for asking a great clarifying question. I'm sure others are wondering the same thing. I've updated the pattern with a bit more detail above. Here's what it says:
Row 1: With the toe facing toward you, attach the yarn at the right marker. sk 1 sc from the marked stitch and sl st into next sc (left of the marker), ch 2, sl st back into sc where right marker is, 2 hdc in same sc you began in (cluster made), sk 2 sc, 3 hdc in next sc, sk 2 sc, 3 hdc, sk 2 sc, sl st into marked sc, sl st in next sc (up the left edge of the slipper), turn.
So in plain English: Essentially, you're attaching the yarn in the same stitch the marker is in. Then skipping a stitch (toward the left), slip stitching into that stitch and then chaining 2. You'll attach those chained stitches with a slip stitch back into the same right side marked stitch you began in.
I hope that makes a little more sense? Looking at the photo right below this section of the pattern (that shoes the toe and the stitch markers might be helpful too.)
Happy crocheting 🙂
Jess
Annie says
Hi!
Oh I LOVE these little slippers! I was so excited when I first saw this pattern and couldn't wait to start making my first pair! They are just the cutest....they look so summery! Thank you soooo very much for sharing your wonderful pattern!
I'm presently in the process of crocheting my first one and so far things are coming out good. I'm now beginning to start the toe area and I have a question.... I'm so sorry I'm so dense with this but I'm having a little trouble understanding the beginning of Row 1 instructions. Could you please clarify/explain this area (below) a little more if possible?
Where the instructions say "Row 1: With the toe facing toward you, attach the yarn at the right marker. sk 1 sc from the marked stitch and begin in next sc, ch 2, sl st into sc where marker is,...." (I understand from this point on).
I understand I'm to attach the yarn in the same stitch that has the right marker in it. Then I'm to skip 1 sc (moving left towards center of toe area), then chain into the next sc (?), chain 2.....and it's at this point where I'm confused. Instruction says to slip stitch into the sc where marker is. So it appears I will be moving to the right again?
I thank you so much for any help you can me give with this! I can't wait to finish my first pair!
Jess @ Make and Do Crew says
Hey Annie!
This part of the pattern was really tricky for me to explain, so thanks for asking a great clarifying question. I’m sure others are wondering the same thing. I’ve updated the pattern with a bit more detail above. Here’s what it says:
Row 1: With the toe facing toward you, attach the yarn at the right marker. sk 1 sc from the marked stitch and sl st into next sc (left of the marker), ch 2, sl st back into sc where right marker is, 2 hdc in same sc you began in (cluster made), sk 2 sc, 3 hdc in next sc, sk 2 sc, 3 hdc, sk 2 sc, sl st into marked sc, sl st in next sc (up the left edge of the slipper), turn.
So in plain English: Essentially, you’re attaching the yarn in the same stitch the marker is in. Then skipping a stitch (toward the left), slip stitching into that stitch and then chaining 2. You’ll attach those chained stitches with a slip stitch back into the same right side marked stitch you began in. So yes, you work to the right again temporarily to attach the cluster and then head toward the left like you'd normally crochet a row.
I hope that makes a little more sense? Looking at the photo right below this section of the pattern (that shoes the toe and the stitch markers might be helpful too.)
Happy crocheting ?
Annie says
Hi Jess!
Wow - thank you for writing back so quickly! I understand your instructions perfectly....you couldn't have explained any better! I so appreciate all the time you took in explaining this step in further detail....thanks so much Jess!
Annie
Jess @ Make and Do Crew says
Yay! Thanks for letting me know, Annie!
BJ says
am having trouble with the very first row. can you do a video or picture of how to do it??? thanks
Jess @ Make and Do Crew says
Yes, BJ, I'll add a few extra photos as soon as I can 🙂 In the meantime, I've added a bit more written description in that section of the pattern that might help you get going.
Thanks for the suggestion to add more photos!
Jess
Doddie Guthrie Greenhill says
I having trouble understanding the following:
Rows 2-9: With larger hook, cont in sc around the sole. (Crochet in the round. You don’t need to sl st and ch 1 at the end of each row.)
Place two stitch markers in the middle of the sole. This is where the back “lip” of your slipper will taper off to.
Row 9 cont: sc to 1 stitch before first marker, sl st, turn.
Does this mean I complete Row 9 and 1/2 before starting row 10:
Jess @ Make and Do Crew says
Hey Doddie,
Yes, so you'll work row 9 all around the slipper, returning to the point where you originally tied your yarn on. Then you'll pause, add the stitch markers, and then continue crocheting in the same direction without turning your work to complete the rest of row 9 (to the stitch marker).
Then you'll turn and head back toward the heel and eventually the stitch marker on the other side.
Does that make sense? 🙂
Shelley says
I saw these and immediately wanted to make them but I had one small problem. I'd never crocheted before! I went to the store and bought all of the supplies and after practicing sc over and over in a rectangle I decided to give these a shot. I did well (although getting through the flip flop soles initially proved to be quite the challenge) up until I got to the toe area. I watched several videos on how to half double crochet but for some reason I just couldn't quite understand what to do when connecting the first stitch to the side of the toe area. No matter, I made something up (after watching several other videos) and my first shoe came together! Fits pretty well, although it does not look as slim as yours, definitely a bit bulkier in the sides, and the toe area is pretty different but not unattractive. If you could get a video of your technique up, it would really help me as well as other beginners I'm sure. If you are shy, most videos I've seen don't even show faces, just hands set up in front of a camera. Really all I need on video is the toe section. The rest was pretty easy, even for a beginner! Everyone should give this a try!
Jess @ Make and Do Crew says
Holy moly, Shelley! This was your first project!?! I am totally blown away! Good for you for tackling it! I'm seriously so impressed. Even for us more experienced crocheters, the first couple rows around the flip flop is a little awkward so you're not alone there. I really hope to make a video soon. I think it could help a lot of people.
Congrats on mastering a new skill! What are you going to try making next!?
Jess
Kristine says
A video would be wonderful!!!!!
Melissa says
Hello. Thank you so much for the free slipper pattern!! I've had many coworkers tag me in this pattern 🙂 I have started one slipper and I'm having trouble with round 1 of the slipper top. I'm not understanding where to begin my first stitch.
Jess @ Make and Do Crew says
Hey Melissa,
I'm going to add a few more photos in the next couple of days, but in the meantime I added more written explanation in that section of the pattern. Check it out and see if it helps clarify things a bit. 🙂
Jess
Julia Edwards says
How do I print this pattern?
Linda Kruger says
I am knitting slippers for the grand children. My son send me the link for the flipflop slippers. Is he trying to tell me something??
Carly Lipps says
Do you sell preordered ones? I'd love 2 pairs, one for my mom and myself.
Stephanie says
Hi, I've made it to the top of the slipper and am having a very hard time with the intrauctions with the pattern. I've placed my markers 10 stitches apart but I cannot figure out how to get it going. I'd appreciate some help. Thank you!!!
Jess @ Make and Do Crew says
Hey Stephanie,
A few people had questions about this section. I found it pretty hard to explain when writing the pattern, so I'm glad you're all asking clarifying questions 🙂 I've updated that part of the pattern with more detail. Have a look and see if it helps! (Also looking at the photo directly below the first row of the toe might help too.)
Thanks!
Jess
Cheryl Ward says
I want to make several different colored Slippers, but I am having problems printing out your pattern for the Slippers With Flip Flops. Could you please help in telling me a better way to doing it, without having to print out all of those pages,, and not just the instructions.
Thanks ahead of time.