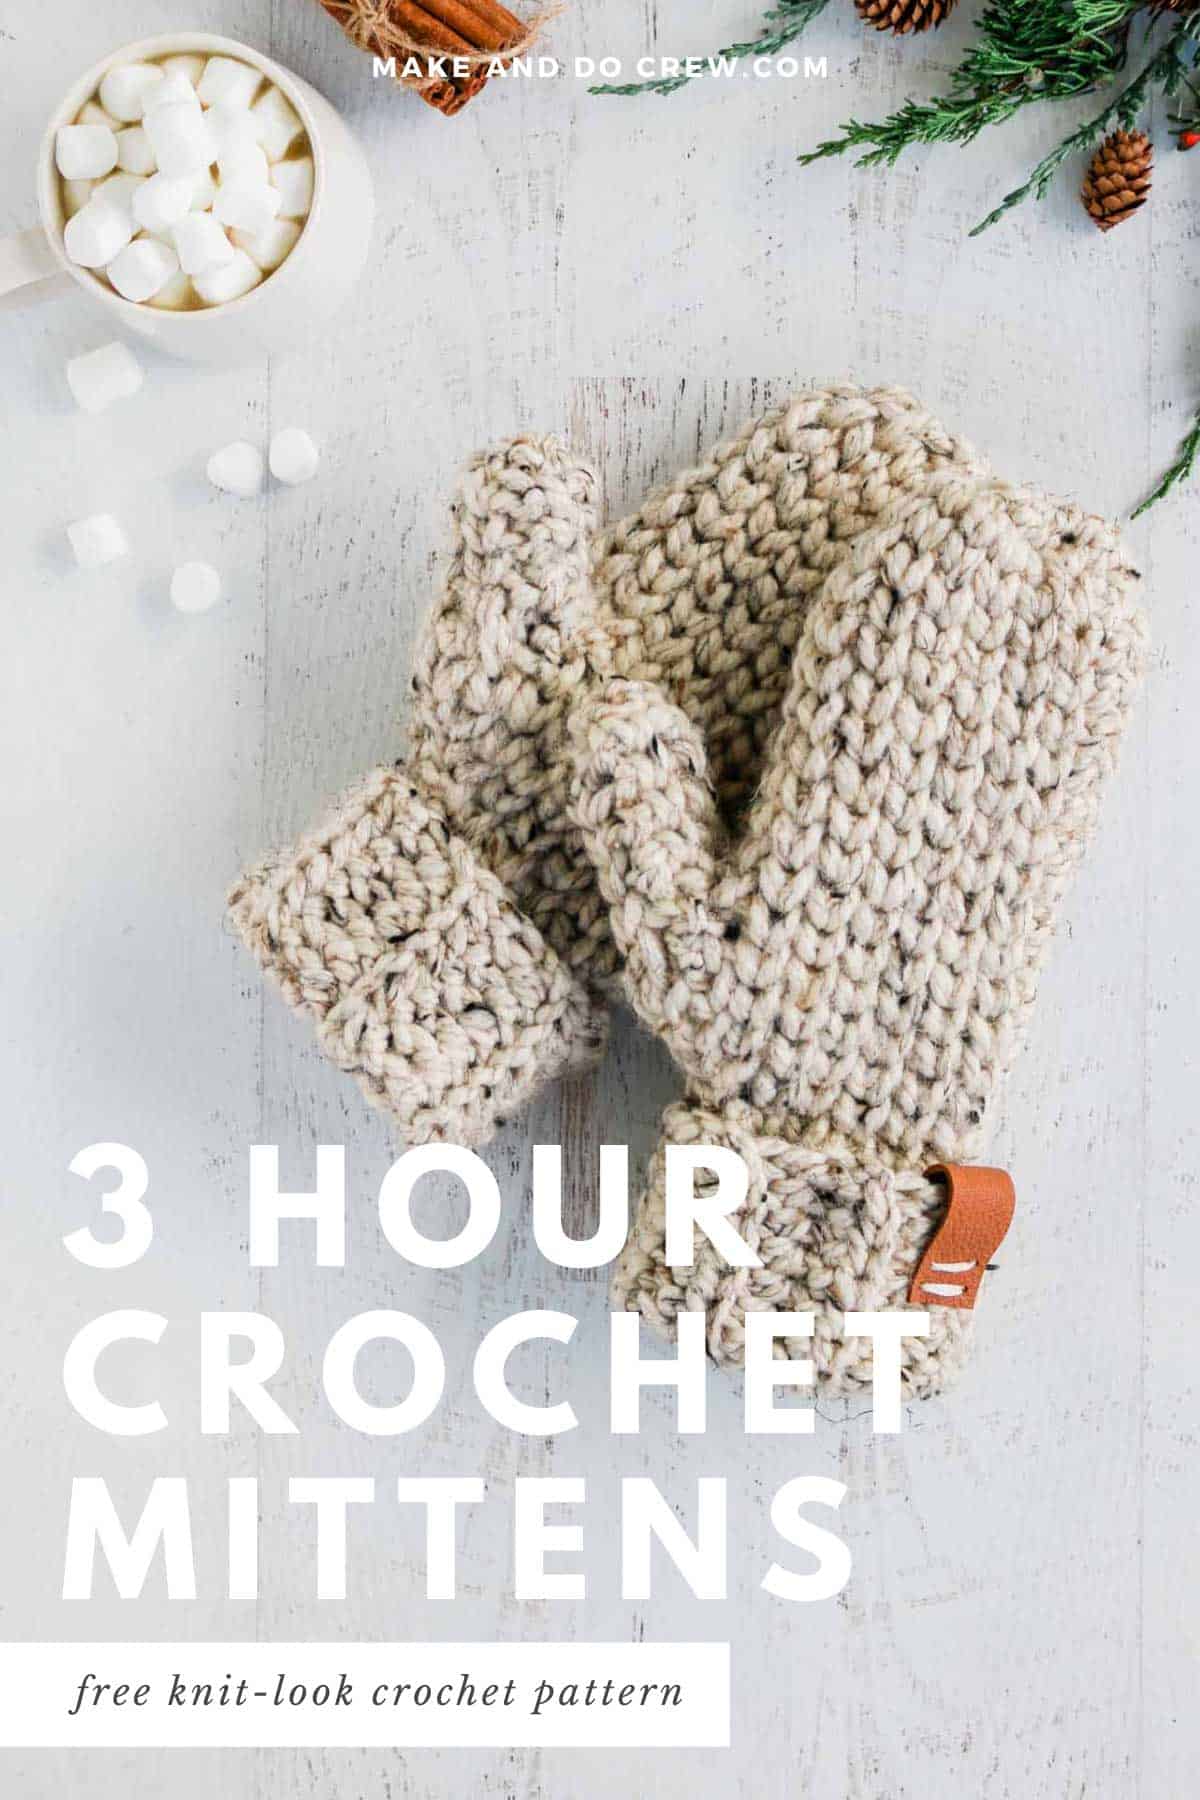
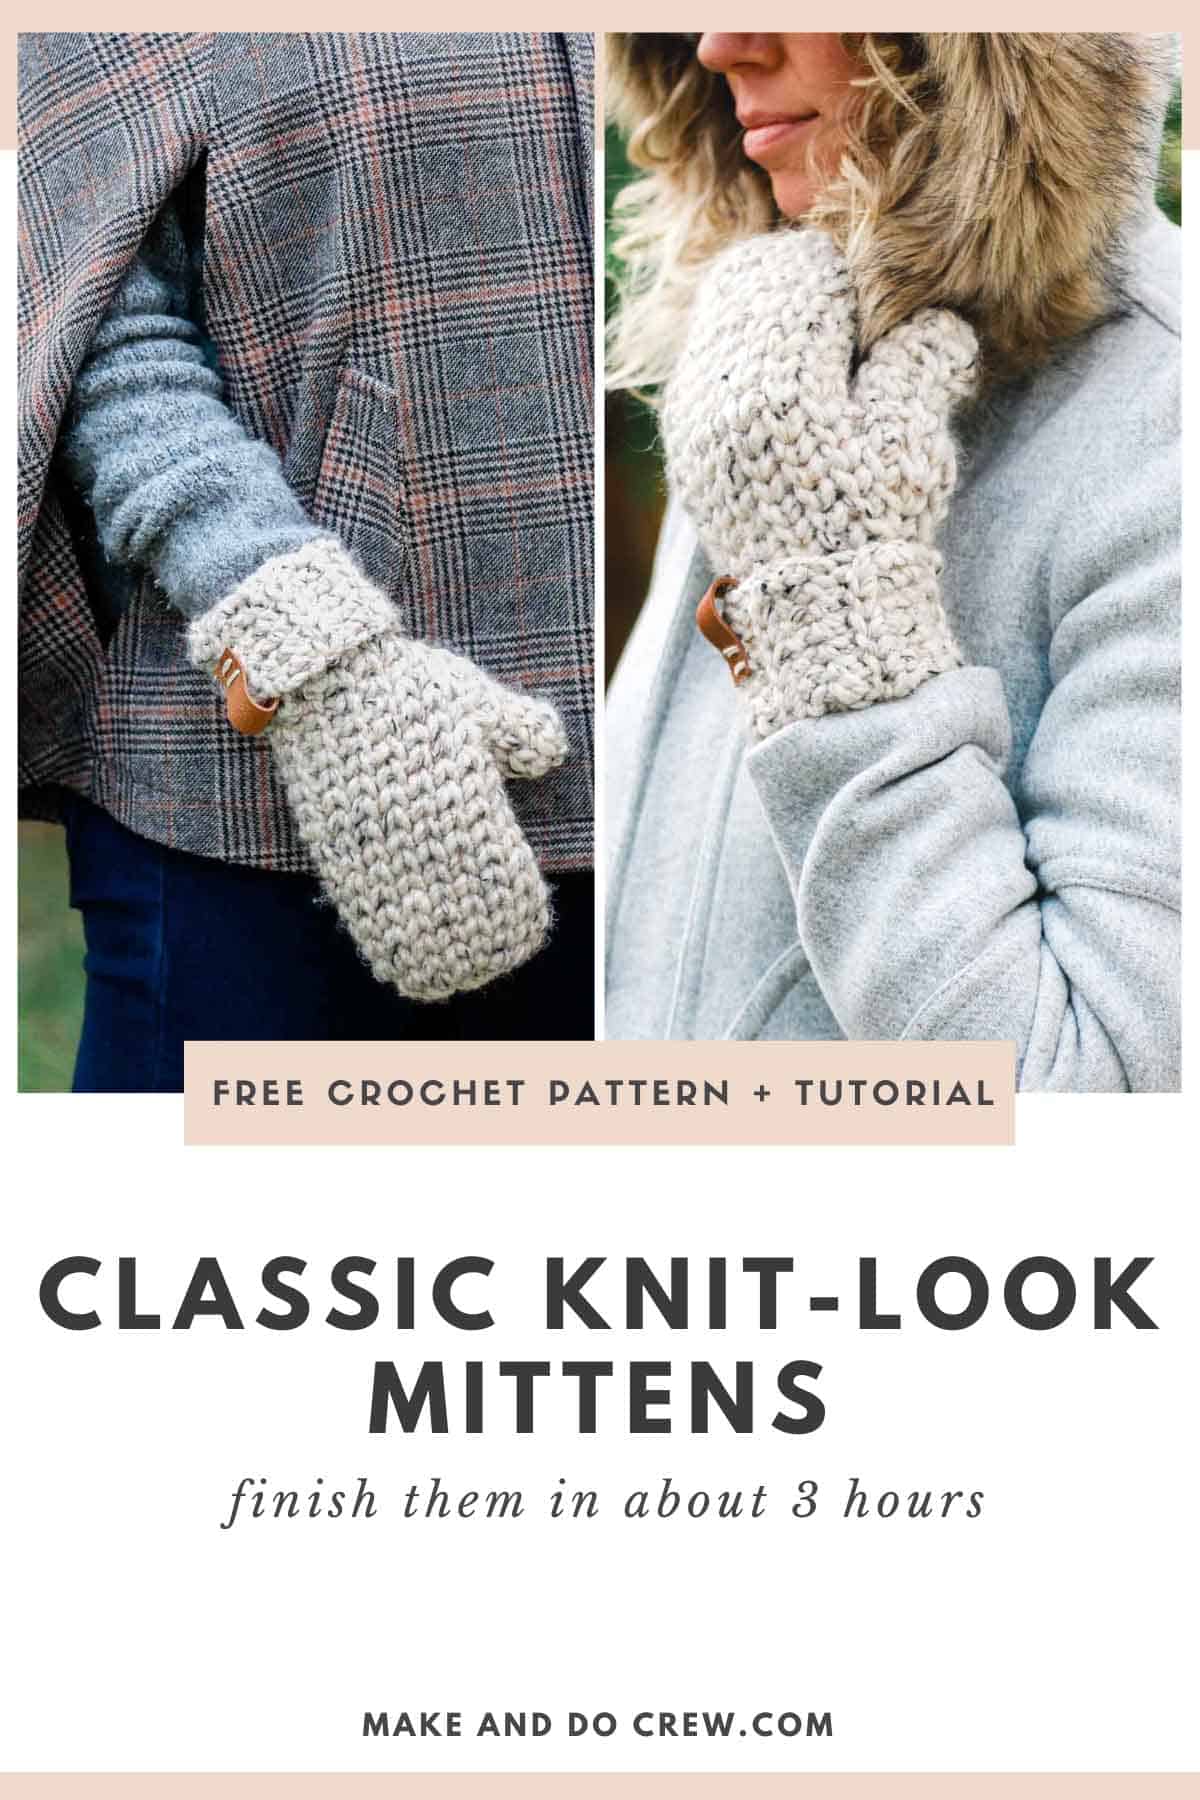
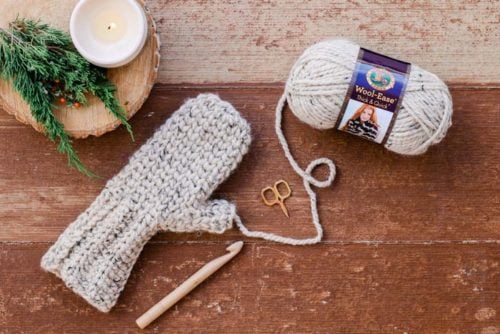
This simple chunky crochet mittens pattern looks knit and can be worked up in about three hours! Get the free pattern below or purchase the ad-free, printable PDF here.
This free chunky crochet mittens pattern is part of a collaboration with my friends at Lion Brand Yarn. This post contains affiliate links.
The Only Crochet Mittens You'll Need This Winter
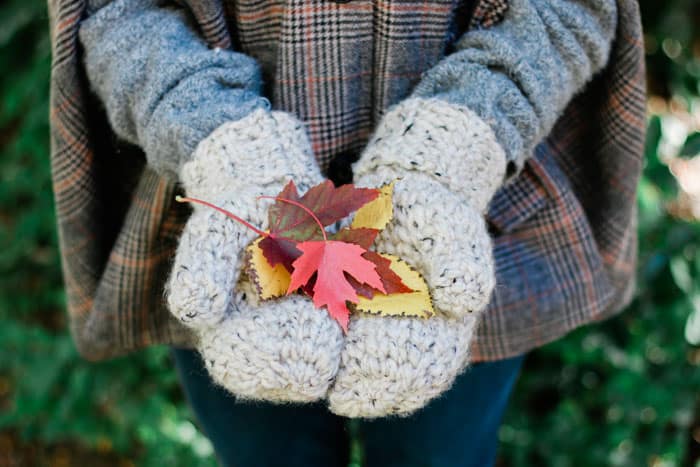
These classic chunky crochet mittens will keep your fingers super warm whether you're chopping firewood or walking across campus. Maybe they'll remind you of the knit mittens your grandma used to make or maybe of the pair you bought at LL Bean a few seasons ago. Either way, these mitts are the real cozy deal.
Keep reading for all the pattern, yarn and mitten stitch details or scroll down for the free pattern.
[ez-toc]
Crochet That Looks Knit
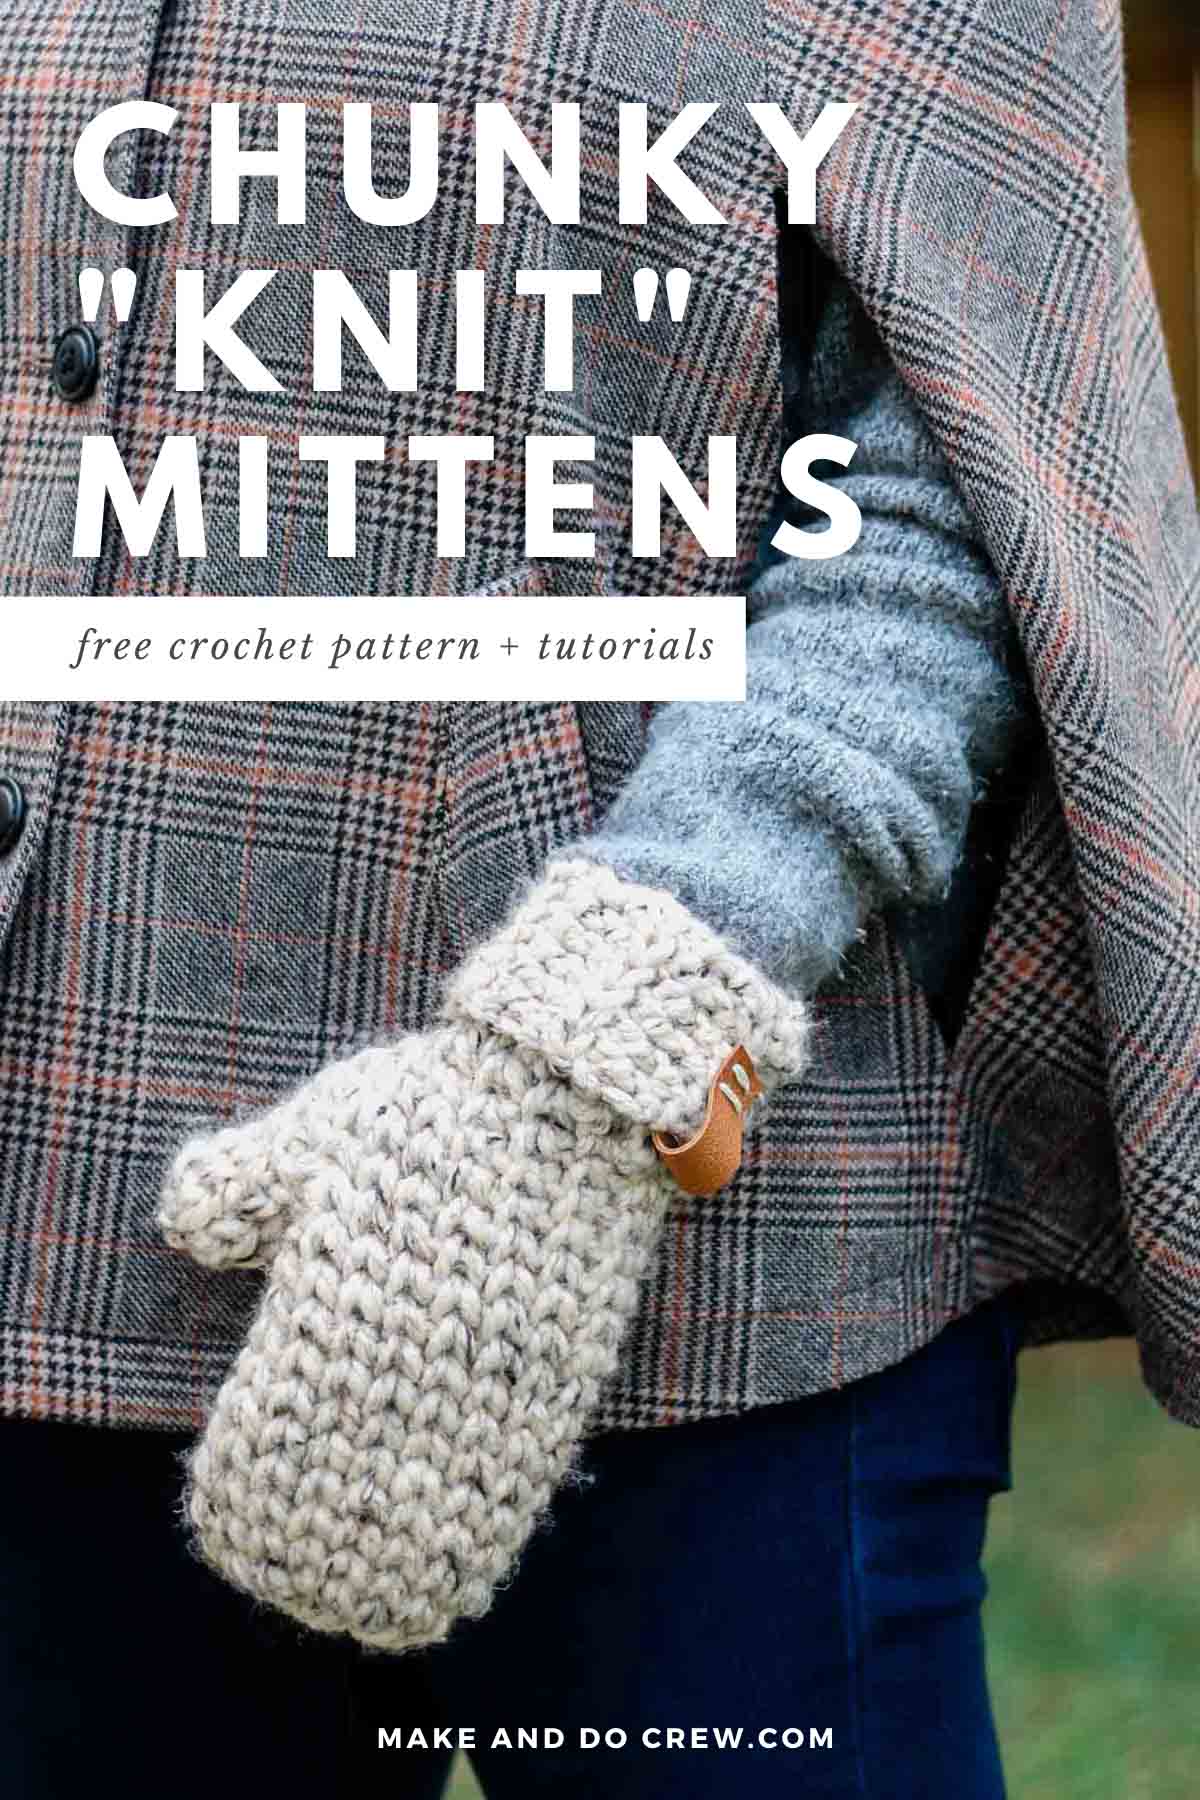
To the untrained eye (and maybe even the expert eye), these chunky crochet mittens look like they've been knit.
This pattern uses the Waistcoat crochet stitch (aka Center Single Crochet), which mimics the look of knit stockinette stitch incredibly well. I like the look of this stitch so much, I created a video tutorial with exactly how to make crochet look like knitting using the Waistcoat stitch.
The Mitten Stitch
If this is your first time trying the crochet knit stitch, definitely check out the waistcoat stitch video tutorial for some helpful tips before crocheting your mittens.
I tried several times to master this technique before finally figuring out a few mandatory tricks to make it successful, and I cover each of those mistakes (and corrections!) in the video tutorial.
Classic Mittens Using Worsted Weight Yarn
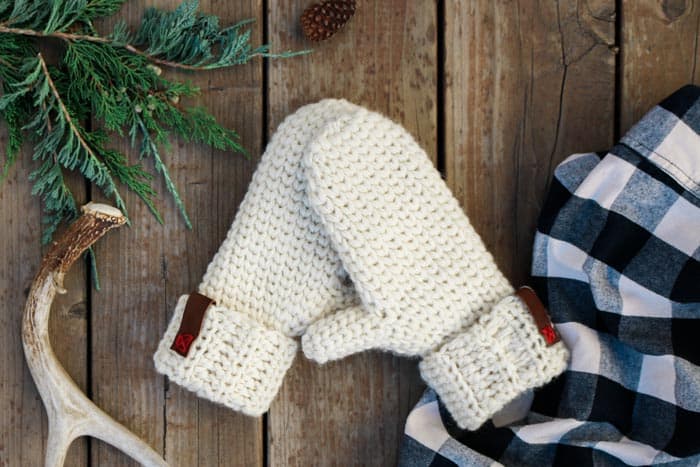
To long-time followers of Make & Do Crew, this 3 Hour Mitten pattern might look a bit familiar. Last year, I shared a free pattern and tutorial on how to make very similar lighter-weight crochet mittens with two strands of worsted weight yarn held together.
If you have some worsted weight wool in your stash or just want a slightly more delicate-looking mitten, you'll love the Morning Mittens pattern (pictured below).
Related: The Morning Mittens free crochet pattern ⇨
Are Mittens the Perfect Crochet Gift?
I know a lot of us are thinking about gift-making this time of year. And if your holiday planning is anything like mine, you might need a gift that can come together at the last minute. Ha.
I wanted to see if I could take the foundation of the original Morning Mittens pattern and create a faster crochet mittens pattern using bulky yarn. I'm so happy with the result because this is a crochet gift I know a lot of us would love to receive--and actually use!
And hiya, this chunky crochet mittens pattern can seriously be whipped up in about three hours! I'm all for quick gratification crochet projects, especially when there's a holiday deadline looming.

My Go-To Chunky Yarn
For this chunky crochet mittens pattern, I used my all-time favorite thicker yarn, Lion Brand's Wool-Ease Thick & Quick. A lot of us knitters and crocheters love this yarn for how well it wears and how many colors it comes in. Okay, and let's be honest, we also love that it allows us to crank out projects faster than you can say "Wool-Ease Thick & Quick."
This Oatmeal color proved to be the perfect choice for some classic cozy mitten vibes. You can also see this color in action in the equally-comforting Saturday Men's Crochet Slippers pattern.
Get the 3-Hour Mittens Crochet Kit
If you want to have easy access to ALL the colors of Wool-Ease Thick & Quick, you'll love the 3 Hour Mittens kit. This all-in-one kit from Lion Brand includes all the yarn you'll need and a bonus printable digital copy of the pattern.
Deliver it! click to purchase a kit with all the yarn you'll need ⇨
Okay, I hope you enjoy making and wearing these chunky crochet mittens as much as I did. My only complaint is that I can't crochet when I'm wearing them, but then again, I also can't crochet if my fingers fall off from frostbite, so I think it's an acceptable mitten compromise.
Pin it! click to pin this pattern for later ⇨
3 Hour Chunky Crochet Mittens
Free Pattern + Tutorial
Explanation:
Whether you’re headed to the backcountry or just back to the coffee shop, these chunky mittens will keep your hands toasty warm like the mitts your grandma used to make. While they look like knit stockinette, they’re actually crochet! The simple pattern works up in about three hours, making these mittens a go-to handmade gift this holiday season.
Supplies + Materials
Purchase a kit with all the yarn + a digital copy of the pattern here.
• Lion Brand Wool-Ease Thick & Quick (Weight: 6/super bulky - 106 yds, 6 oz)
-Oatmeal (#640-123) – 2 skeins (approx. 225 g)]
• Size L (8.0 mm) crochet hook
• Size P/Q (15.0 mm) crochet hook
• Stitch markers or safety pins
• Tapestry needle
• Leather scraps, hole punch and embroidery thread (optional)
Sizes
One size - fits most women's hands
Gauge
Ribbing: 5 hdc x almost 3 rows = 2”
Main Mitten: 4 sc x 4 rows = 2”
Abbreviations and Glossary (US Terms)
ch – chain
sc – single crochet
hdc – half double crochet
hdcblo - half double crochet through the back loop only
st(s) – stitch(es)
sl st – slip stitch
post – the vertical strands of yarn in a sc stitch (See photo below.)
RS – right side
WS – wrong side
For a very similar “knit” looking crochet mitten using two strands of worsted weight yarn held together, see the Morning Mittens pattern.
Step 1: Crochet the Mitten Cuff
Notes:
• The right and left cuffs are worked identically.
• Row 2 and beyond are worked into the back loop of the hdc stitch only (hdcblo).
• Ch 2 at beginning of each round does not count as a st.
Make 2.
Using smaller hook:
Foundation: Ch 15.
Row 1 (RS): Hdc in third ch, hdc in each hdc; turn. (13)
Rows 2 - 12: Ch 2, hdcblo in each hdc; turn. (13)
Fasten off, leaving 15” tail to seam cuff.
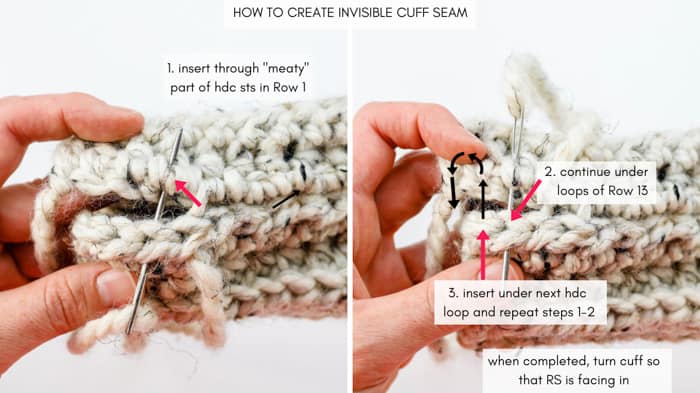
Step 2: Seaming Cuff
With RS facing out, pin cuff into a loop by placing the initial chain row underneath Row 12. Using cuff tail and a tapestry needle, work a basting stitch to join edges. Take care to create enough overlap that foundation chain doesn’t stretch and create large gaps. (See photo B.)
Turn cuff inside out to proceed with mitten hand.
3. Crocheting Mitten Hand
Notes:
• Follow notes throughout on how to work right and left hands. Where not noted, right and left hands are worked identically.
• Hands are crocheted in the round with each row beginning with a ch 1 and ending with a sl st to the first sc of round. Neither the ch 1 or sl st count as sts.
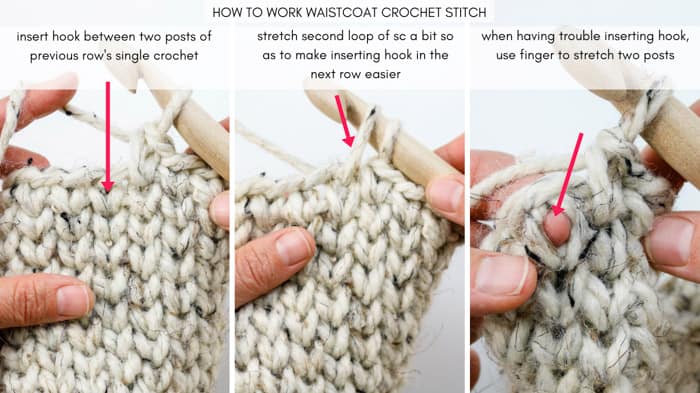
• Row 2 and beyond are worked into the middle of each sc stitch rather than the top loops. See Photo C for hook placement. Besides inserting your hook in a slightly different location, you will still be working regular sc stitches. View a video tutorial on this stitch with lots of helpful tips here.
• Take care to keep stitches loose so that it’s easier to insert hook as described in photos below As you work each sc, it’s helpful to raise your hook a bit after picking up your second loop so as to ensure the two posts remain loose enough for next round. It’s normal that your stitches require a small bit of effort to push hook through, but if it’s proving very difficult, it means stitches must be worked even looser by pulling hook higher.
• Left-handed crocheters: Work pattern as written except where indicated. Instructions for right handed mitten will actually create a mitten that fits your left hand and visa versa.
• To create fingerless mitts instead of mittens, fasten off after Round 10.
RIGHT & LEFT MITTENS: attaching yarn
With WS of cuff seam facing you, attach yarn anywhere along either edge of cuff.
RIGHT & LEFT MITTENS: increasing for thumb
Using larger hook:
Round 1: Ch 1, work 12 sc evenly around (essentially 1 sc per hdc row), sl st to first sc to join. (12)
Round 2: Ch 1, sc in next 5, 2 sc in each of next 2 sc, sc in next 5 sc, sl st to join. (14)
Round 3: Ch 1, sc in next 6, 2 sc in each of next 2 sc, sc in next 6 sc, sl st to join. (16)
Wanna save this pattern?
Round 4: Ch 1, sc in next 7, 2 sc in each of next 2 sc, sc in next 7 sc, sl st to join. (18)
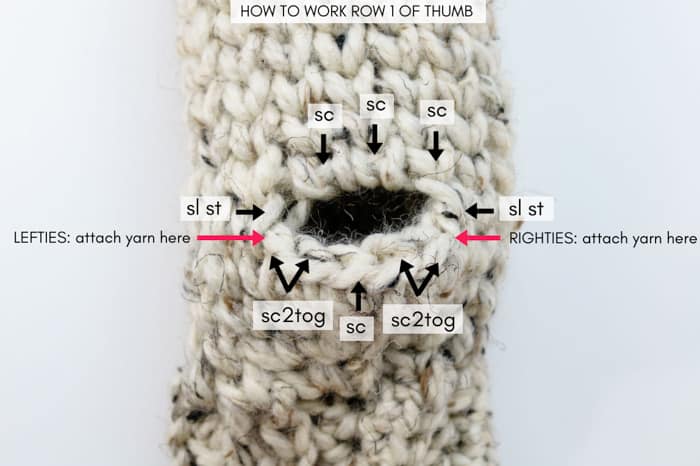
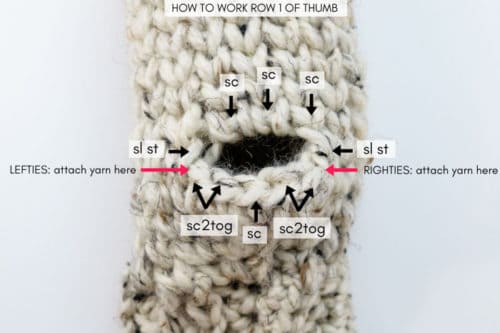
RIGHT mitten: creating thumb hole & hand
Round 5: Ch 1, sc in each of next 7 sc, sk 5 sc, loosely ch 2, sc in each of next 6 sc, sl st to join. (15)
Round 6: Ch 1, sc in each sc and ch, sl st to join. (15)
Weave in any ends now as it will become difficult to do so later.
Rounds 7-15: Ch 1, sc in each sc, sl st to join. (15)
See Photo E for how to decrease (sc2tog) while working between posts of each sc stitch.
Round 16: Ch 1, sc in each of next 6 sc, sc2tog, sc in each of next 5, sc2tog, sl st to join. (13)
Round 17: Ch 1, sc in each of next 5 sc, sc2tog, sc in each of next 4, sc2tog, sl st to join. (11)
Proceed to instructions for closing top.
LEFT mitten: creating thumb hole & hand
Round 5: Ch 1, sc in each of next 6 sc, sk 5 sc, loosely ch 2, sc in each of next 7 sc, sl st to join. (15)
Round 6: Ch 1, sc in each sc and ch, sl st to join. (15)
Weave in any ends now as it will become difficult to do so later.
Rounds 7-15: Ch 1, sc in each sc, sl st to join. (15)
See Photo D for how to decrease (sc2tog) while working between posts of each sc stitch.
Round 16: Ch 1, sc in each of next 5 sc, sc2tog, sc in each of next 6, sc2tog, sl st to join. (13)
Round 17: Ch 1, sc in each of next 4 sc, sc2tog, sc in each of next 5, sc2tog, sl st to join. (11)
Proceed to instructions for closing top.
RIGHT & LEFT mittens: closing top
Fasten off, leaving 15” tail to close top.
Mitten top is closed using a technique commonly used in amigurumi stuffed animal patterns where tapestry needle is worked through only front loops of each single crochet stitch.
Thread tail from mitten top onto tapestry needle. Insert needle from inside of mitten, under front loop of first sc, out toward you. Repeat each each sc around taking care to always work from inside mitten to out. (See photo below.) Do not tighten down as you go.
Once you return back to first sc stitch, gently cinch circle together until it closes. Use tapestry needle to weave in remaining tail. Here’s a helpful tutorial with more details on this technique.

4. Creating Thumb
Notes:
• See photo below for visual explanation of thumb.
• As in the mitten hand, all sc stitches are worked between posts of sc from previous round.
RIGHT & LEFT mittens: creating thumb
Right-handed crocheters: Attach yarn at right “corner” of thumb where Rounds 4 and 5 meet. Work clockwise.
Left-handed crocheters: Attach yarn at left “corner” of thumb where Rounds 4 and 5 meet. Work counterclockwise.
Round 1: Ch 1, sc2tog, sc in next sc, sc2tog, sl st to “corner” between Rounds 4 and 5, sc in each of next 3 (the last of which is tricky to spot, check photo for clarification), sl st to opposite “corner” between Rounds 4 and 5, sl st to join. (6)
Rounds 2-6: Ch 1, sc in each sc (do not work into sl sts), sl st to join. (6)
Fasten off leaving 12” tail.
RIGHT & LEFT mittens: closing thumb
Work as described for mitten top.
Step 5: Adding Leather Accents
To add optional leather accents, use a rotary cutter or scissors to create two 1” x 3.5” strips of leather. (Try a thrifted leather jacket, purse or wallet!)
Punch four holes in each corner of leather strips using either ⅛-1/16th inch hole punch, leather punch or nail and hammer.
Fasten leather to mitten cuffs using embroidery thread.
Tuck away your crochet hook (just for a bit), put on your mittens and head outside for a snowball fight.
Making Mittens + Gloves - Common Questions
For most people, it is easier to crochet mittens. When knitting mittens, you need to use double-pointed needles, which is a slightly advanced skill. To crochet mittens, you only need to know how to work in the round.
The amount of yarn you need to crochet mittens depends on the pattern. For the 3 Hour Mittens pattern, you need approximately 225 grams of category 6 yarn (2 skeins of Wool-Ease Thick & Quick).
Many people choose to crochet gloves and mittens using wool or wool-blend yarns. This is because wool is naturally water-repellant and can help keep your hands warm and dry.
More Free Patterns + Tutorials
Can't get enough free crochet patterns!? Me either. You'll definitely want to breeze through these collections to find your next project.
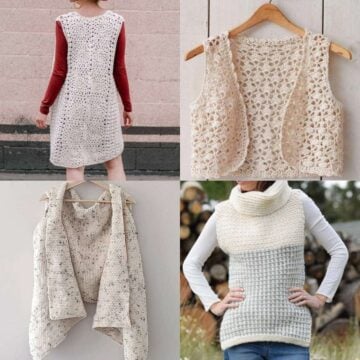
- 55+ Free Crochet Sweater and Cardigan Patterns - our most popular garments
- 40+ Free Crochet Blanket Patterns - baby blankets, throws + c2c graphgans
- 36+ Granny Square Patterns + tips for the perfect square
- 30+ Crochet Animal Patterns - adorable amigurumi stuffed animals
- Crochet Gift Ideas - easy patterns to make for others
- Fast Crochet Projects - start to finish in less than a day
Learn a New Skill
And when you're ready to master a new skill, check out our detailed guides that include everything you need to know to level up your crochet game.
- How to Corner to Corner (C2C) Crochet for Beginners - with video tutorials to get you started
- How to Crochet a Beginner Hat - make an entire beanie in 1.5 hours!
- How to Crochet Amigurumi for Beginners - the ultimate guide to making your own toys and plushies
- How to Tunisian Crochet - learn with this video and a standard hook
That was so fun! Now what?
Invitation to our Facebook group
Come discuss crocheting mittens and lots of other crochet projects and techniques in our Make & Do Crew Facebook group. Here thousands of helpful crocheters answer each others questions and share their stitches. Come join us here.
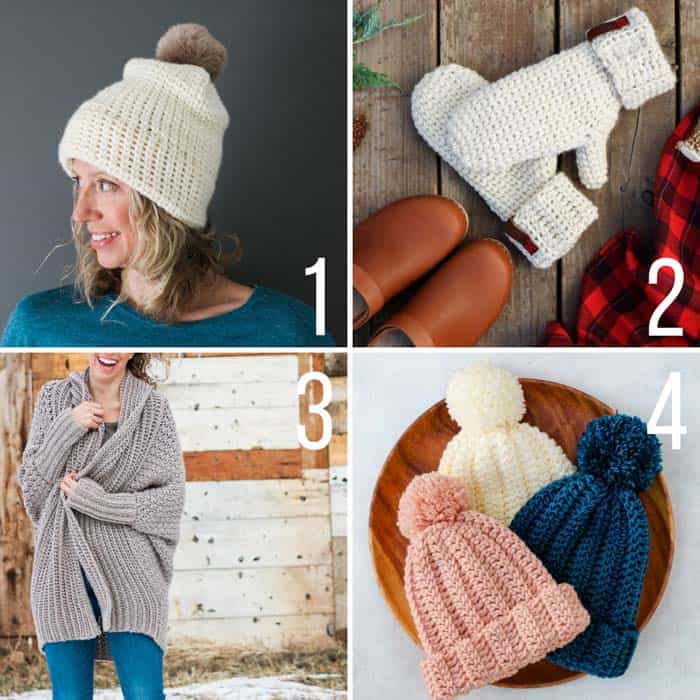
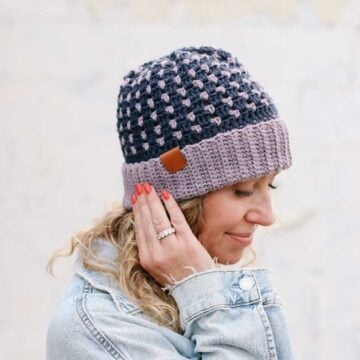
1. The Everywhere Beanie - free crochet pattern also using the Waistcoat stitch
2. Morning Mittens - very similar to the 3 Hour Crochet Mittens, just made with worsted weight yarn instead
3. Habitat Cardigan - free crochet sweater pattern + video tutorial that's perfect for beginners
4. 1 Hour Hat - very simple crochet beanie pattern + video tutorial (child-adult sizes)

The How to Crochet Easy Mittens - An Overview
Materials
Yarn
- Color: Lion Brand Wool-Ease Thick & Quick Weight: 6/super bulky - 106 yds, 6 oz
- Oatmeal #640-123 2 skeins (approx. 225 g)]
Additional Supplies
- Size L 8.0 mm crochet hook
- Size P/Q 15.0 mm crochet hook
- Stitch markers or safety pins
- Tapestry needle
- Leather scraps hole punch and embroidery thread (optional)
Abbreviations + Glossary (US Terms)
- ch – chain
- sc – single crochet
- hdc – half double crochet
- hdcblo - half double crochet through the back loop only
- st(s) – stitch(es)
- sl st – slip stitch
- post – the vertical strands of yarn in a sc stitch (See photo below.)
- RS – right side
- WS – wrong side
Abbreviations and Glossary (US Terms):
Want some company while you crochet?
Get support (and camaraderie!) in the Make & Do Crochet Crew Facebook Group. Search “Make and Do Crochet Crew” on Facebook.com.
Permissions + Copyright
Please do not publish or share this pattern as your own. You may make items to sell with this pattern. In exchange, please link back to this page. Do NOT use my photos as your own sales photos.
Overall Pattern Notes
Instructions
3 Hour Easy Crochet Chunky Mittens - Pattern Overview
Mitten Cuff
- 1. Foundation Chain 15, using a smaller hook.
- 2. For Row 1, half double crochet in third chain, half double crochet in each half double crochet; turn
- 3. For Rows 2-12, half double crochet through the back loop only; turn.
- 4. Fasten off leaving tail to seam cuff.
- Hand of Mitten
- 5. Attach yarn with wrong side of cuff facing you along either ridge of cuff.
- 6. Increasing for thumb using a larger hook. Chain one, work 12 single crochet evenly around, slip stitch to first single crochet to join.
- 7. Repeat for Rounds 2-4.
Mitten Thumb
- 8. Attach yarn to thumb.
- 9. Follow the instructions for creating thumb hole and hand for right and left mitten.
- 10. Close mitten and thumb tops using amigurumi method.

Finishing
- 11. Add optional leather accents and fasten using embroidery thread.
- 12. Tuck away your crochet hook (just for a bit), put on your mittens and head outside for a snowball fight.


chloe says
Will this fit an average men's hands? what do i need to do to make it fit an average size men's hands?
Eva Ruter says
Hi Jess,
I love your patterns. I’ve made several pairs of your cabin boots and Seaside Slipons. Do you have a pattern for fingerless mittens that is similar to this 3-hour mitten? Or how wouldvI go about turning this into a fingerless mitten. I saw you say to fasten off at row 10 to make it fingerless but I want to add a top/flap to go over the fingers. Thank you.
Eva Ruter
Sarah says
I love all your patterns and this one is amazing! The fact that it only takes a few hours is the cherry on top!! These are definitely on my list to make for Christmas gifts!! Thank you!!!
Jess @ Make and Do Crew says
Thank you so much, Sarah! I'm all for fast projects too.
I love your recent pumpkin pattern!
Jess
Jessica says
Thank you for this pattern! Do you have any suggestions for hiding the slip stitch seam more? I feel like I can really see it as I continue with each round. Thank you.
Jess @ Make and Do Crew says
In my experience, just really tightening it down much more than you'd pull any other stitch can help. It's slightly noticeable in mine, but I don't find it distracting from the overall look. 🙂
Happy crocheting!
Jess
Sheryl says
Are the thumb stitches picked up as usual through the top loops or is this round also through the space between stitches? Is the stitch count at the end of rnd 5 correct - I get 16. If the rnd starts with 18 and you loose 2 with 'sk 4 sc, loosely ch 2' you'd have 16 correct? If that's right then all subsequent rows are off by 1.
Jess @ Make and Do Crew says
Hey Sheryl,
Yes, you caught an error! It should be "skip 5" for both the right and left thumbholes. It's been corrected above.
As for where you place the stitches, you are indeed working into that same space in the middle of the sc. That's what will keep all the stitches looking the same in your mitten. 🙂
Happy crocheting!
Jess
Michelle Erwin says
I wish there was a whole tutorial video I am having problems with the thumb part ugh
Jess @ Make and Do Crew says
Hey Michelle,
Thanks for your feedback. If there's enough interest, I'll definitely consider a video. Is there a certain aspect of the thumb I can try to help you with?
Jess
myra says
my first crochet experience was to crochet edging on my aunts cotton handkies at about age 10.
Jess @ Make and Do Crew says
Aw, what a sweet way to begin crocheting!
Sheryl says
These are fantastic!! I literally just got home from a conference and was going to park my butt on the couch and read or watch TV but I might have to make mitts instead. Will be marking these as a favorite in Ravelry right away.
Alicia Penrose says
I figured it out! I started the first row wrong.
Jess @ Make and Do Crew says
Great! I love that when I can figure out the problem myself. Thanks so much for supporting this pattern. 🙂
Jess
Alicia Penrose says
I am a bit confused on how to shape the cuff. I have finished row 12. The length of the cuff measures about 9". Do I fold it in half then stitch the seams together, or do I just stitch the whole length?
Jessika Asman says
Jess,
I am going to try this pattern - looks simple and finishes up beautifully. You really are a wonder, girl. Thanks for a great looking and eminently doable pattern....Jess from Michigan (aka Jess the elder to differentiate from all the others)
Jess @ Make and Do Crew says
Haha, yeah there really are quite a few women named Jess wandering around the earth aren't there? 🙂
Thanks so much for your kind words, Jess! I hope you enjoy the pattern.
Jess