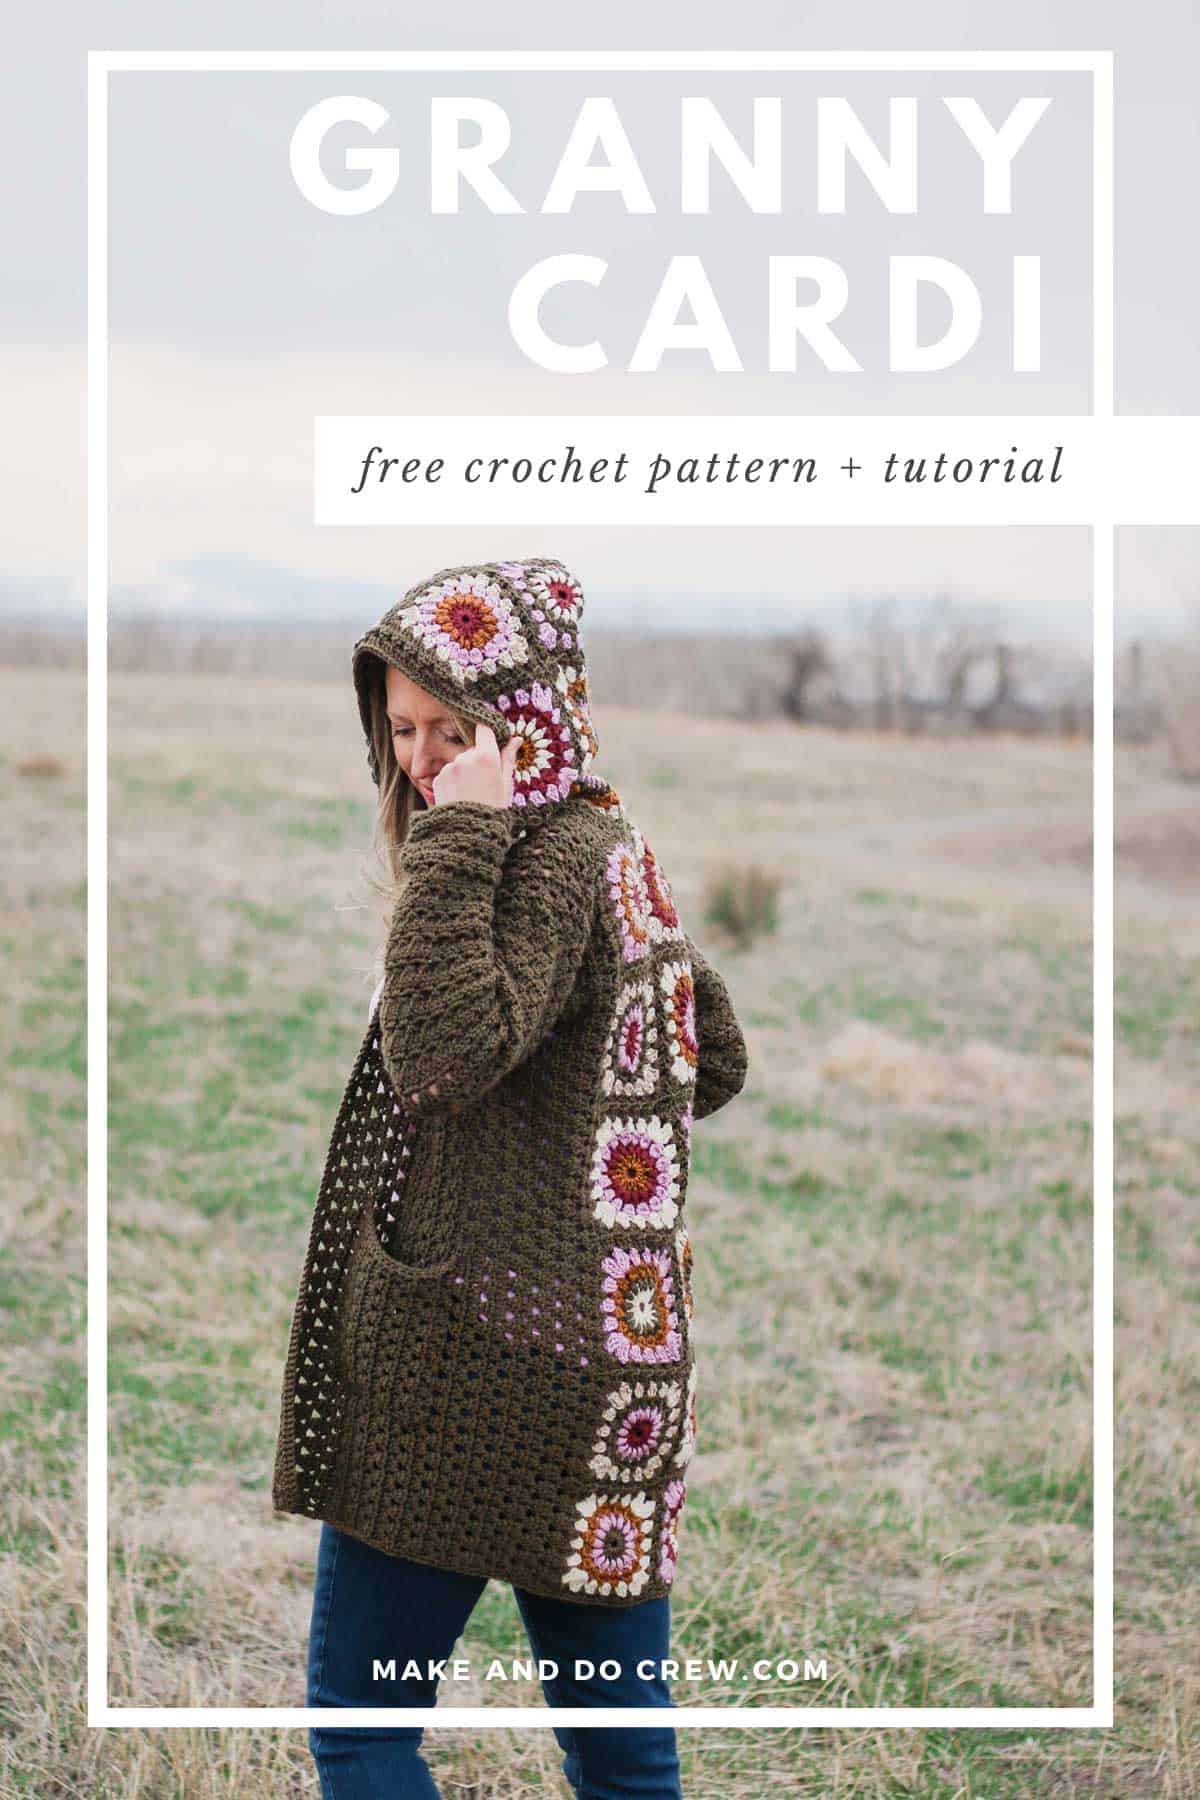
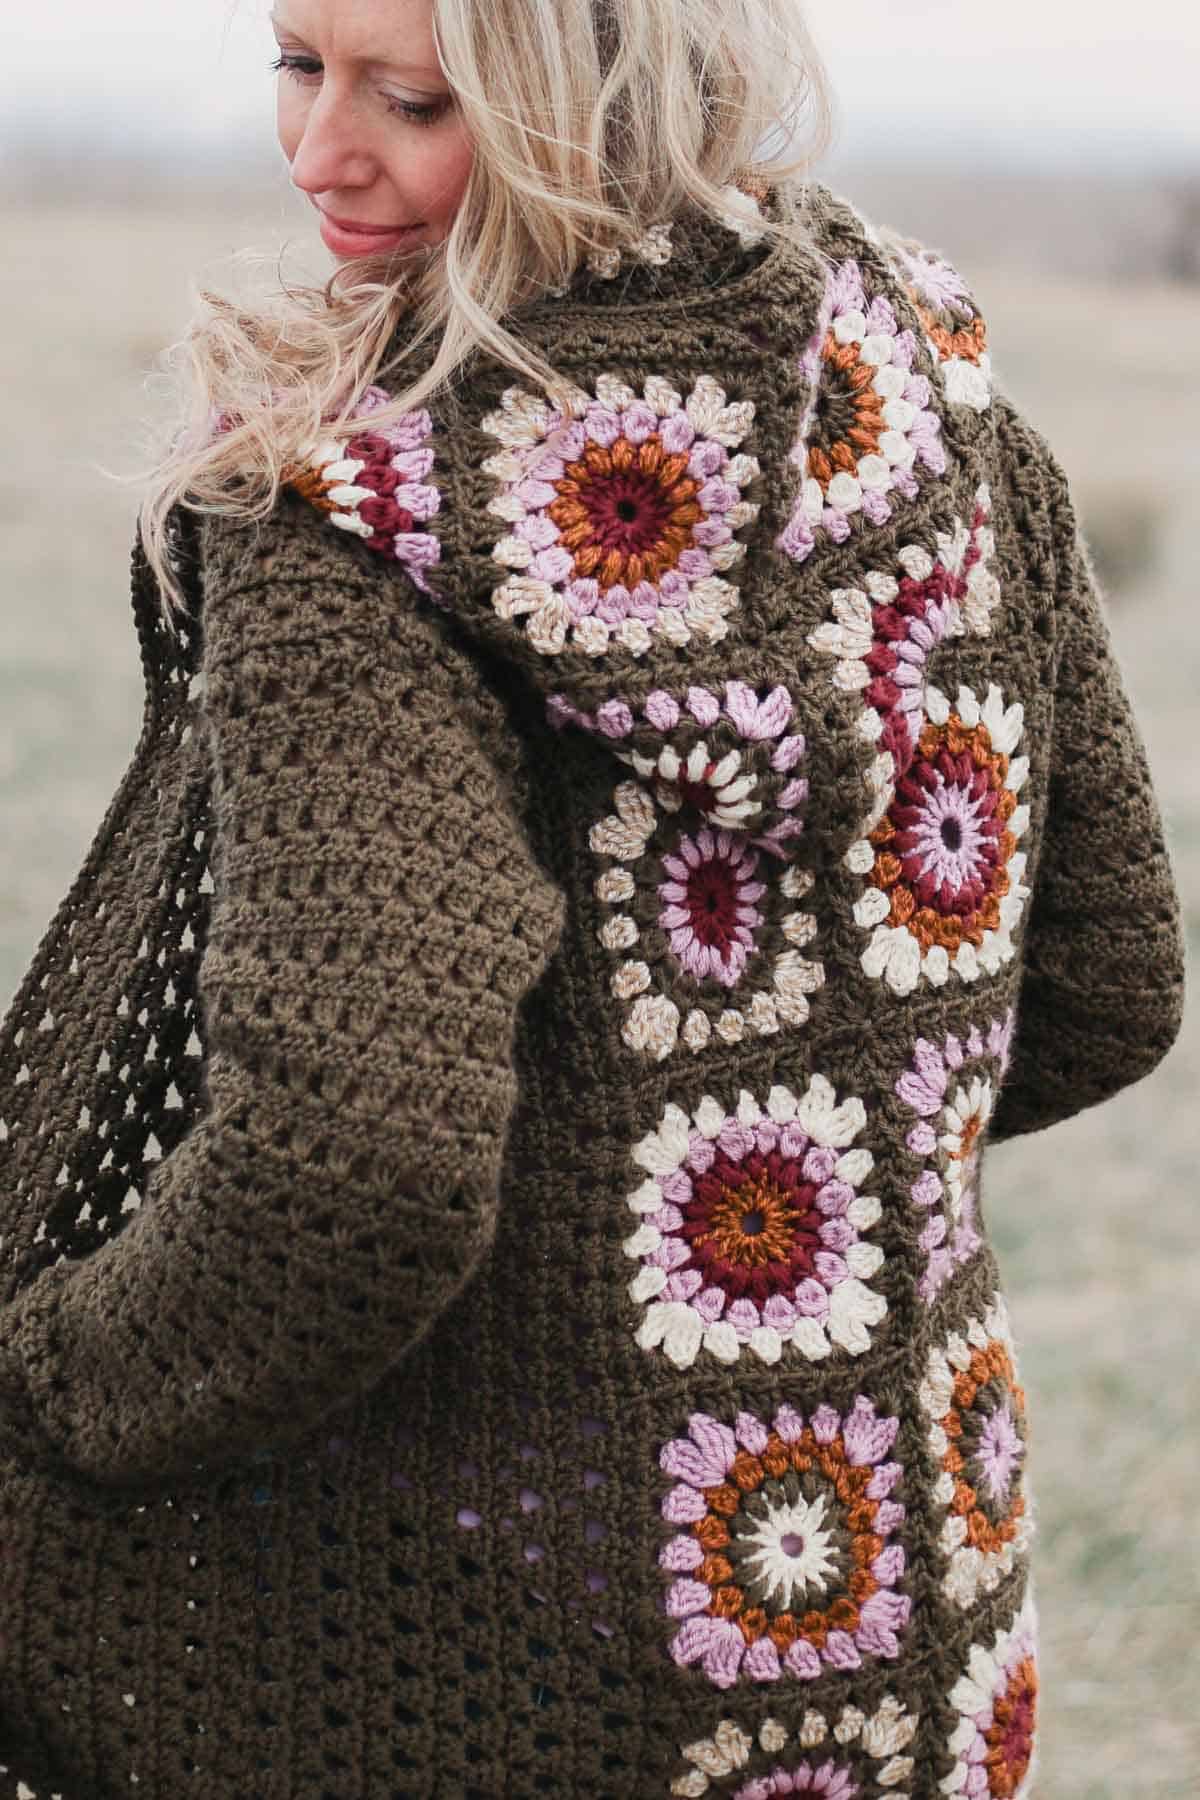
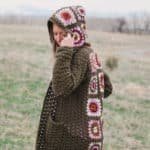
This crochet granny square cardigan pattern plays on the retro classic with reimagined modern details. You're sure to love the seamless design and cozy hood!
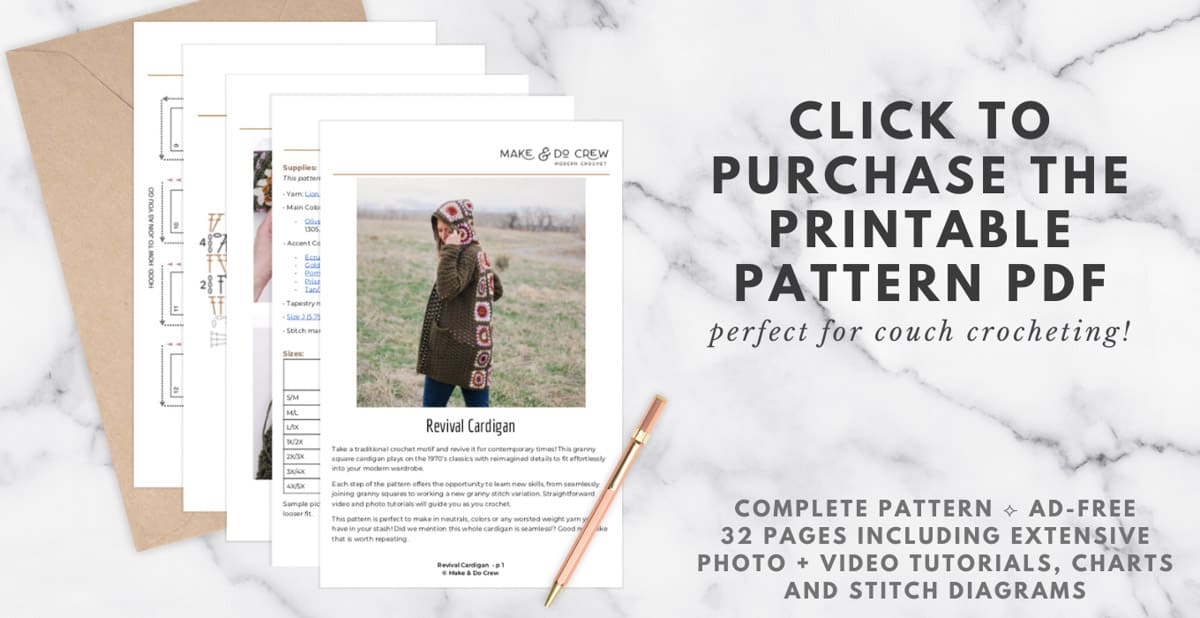
Scroll down for the free pattern or purchase the complete ad-free, printable PDF.
The free pattern is part of a collaboration with Lion Brand Yarns. This post contains affiliate links.
Jump to:
- Crochet Granny Square Cardigan, Reimagined
- Crochet Skills You'll Practice
- Revival Granny Square Cardigan Free Pattern
- Part One: Making the Granny Squares
- Part Two: Joining Squares
- Part Three: Pockets + Sweater Back
- Part Four: Joining Hood + Adding Sleeves
- Part Five: Finishing + Border
- Tips for Choosing Yarn Colors
- FAQs
- Invitation to our Facebook group
- How to Crochet a Granny Square Cardigan
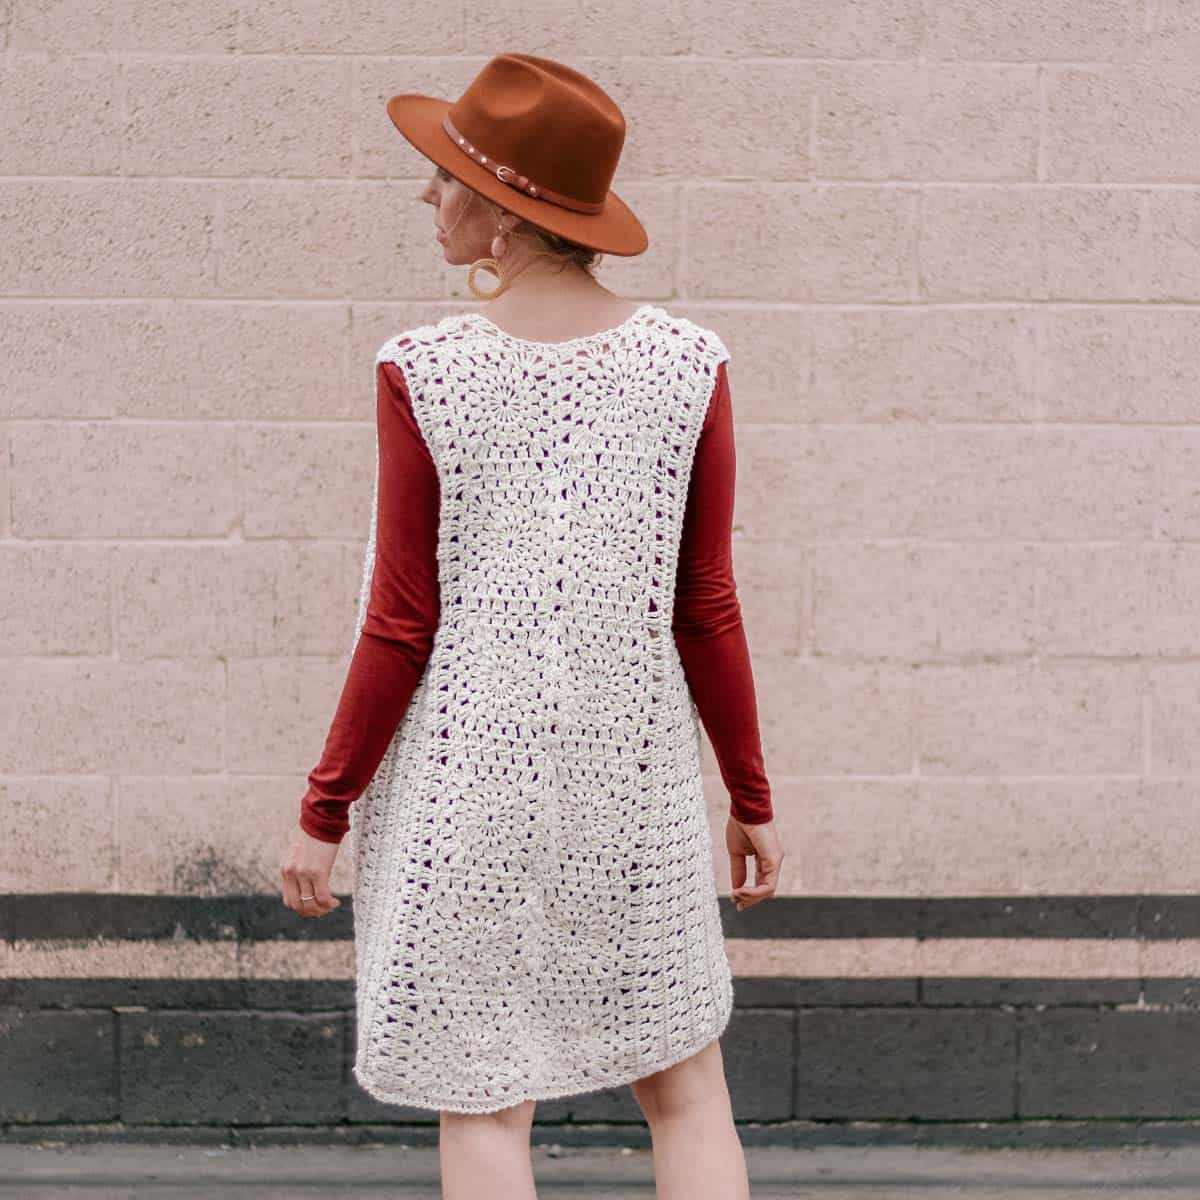
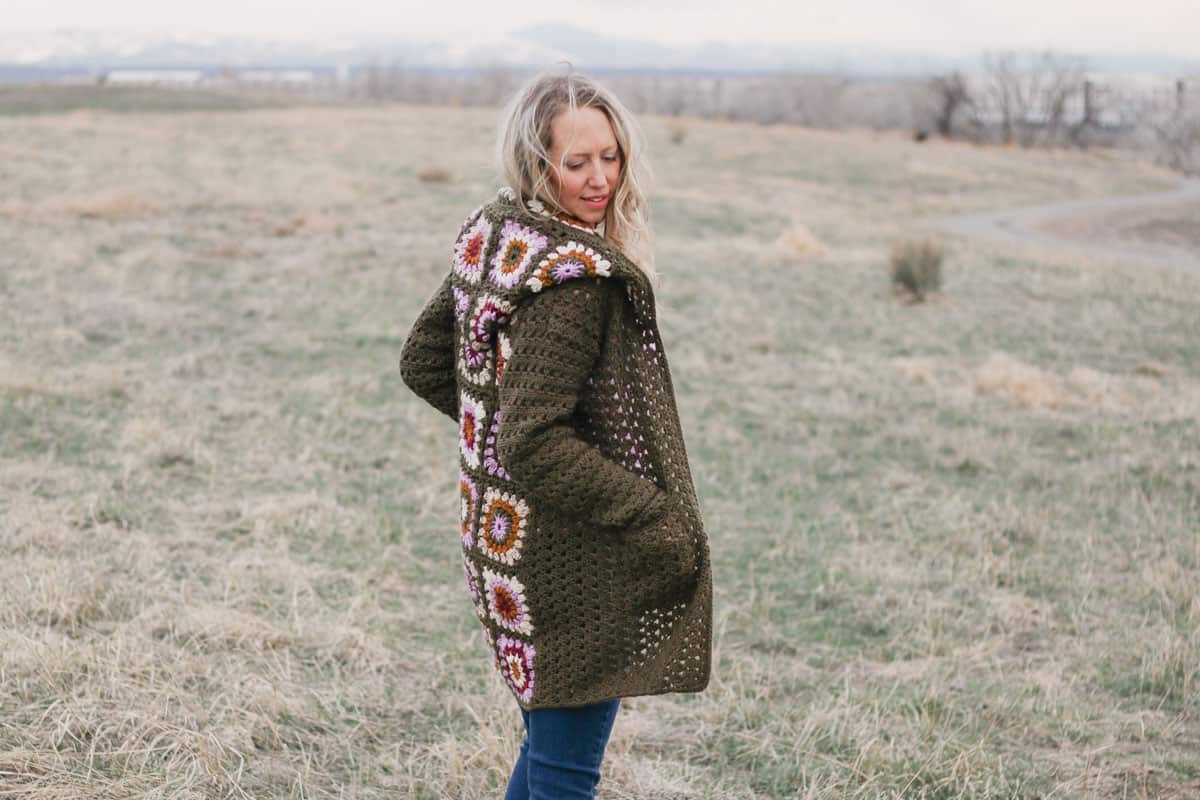
Crochet Granny Square Cardigan, Reimagined
For my own take on the traditional granny square jacket, I wanted to try something a little different, something a bit understated that still highlighted the iconic granny square motif.
Related: Don't miss our daisy granny square tutorial for a cute variation on the classic
Video Tutorials + Easy Instructions
I intentionally broke this cardigan pattern into four digestible sections to help ensure you feel lots of success along the way. Each pattern stage includes written instructions and a photo or video tutorial of the skills involved.
Use these links to jump to each section of the free pattern.
Part One: Crocheting the Granny Squares
Part Two: Joining Squares
Part Three: Sweater Back
Part Four: Joining Hood
Part Five: Finishing + Border
Crochet Skills You'll Practice
One of the best things you'll have a chance to master in this pattern is joining crochet squares as you go. Yes. You heard me. In this granny square cardigan, there's no seaming squares together. In fact, there's no seaming whatsoever in the entire pattern!
You'll make a bunch of grannies, and I'll show you how to join them together in a nice drapey way that works beautifully in a garment.
Then we'll use a modern granny stitch variation to crochet the sweater fronts, sleeves, and pockets. I think you're going to love it, just like the makers who came before you.
Why you'll love the Revival Cardigan!
Revival Granny Square Cardigan Free Pattern
What Yarn Should I Use?
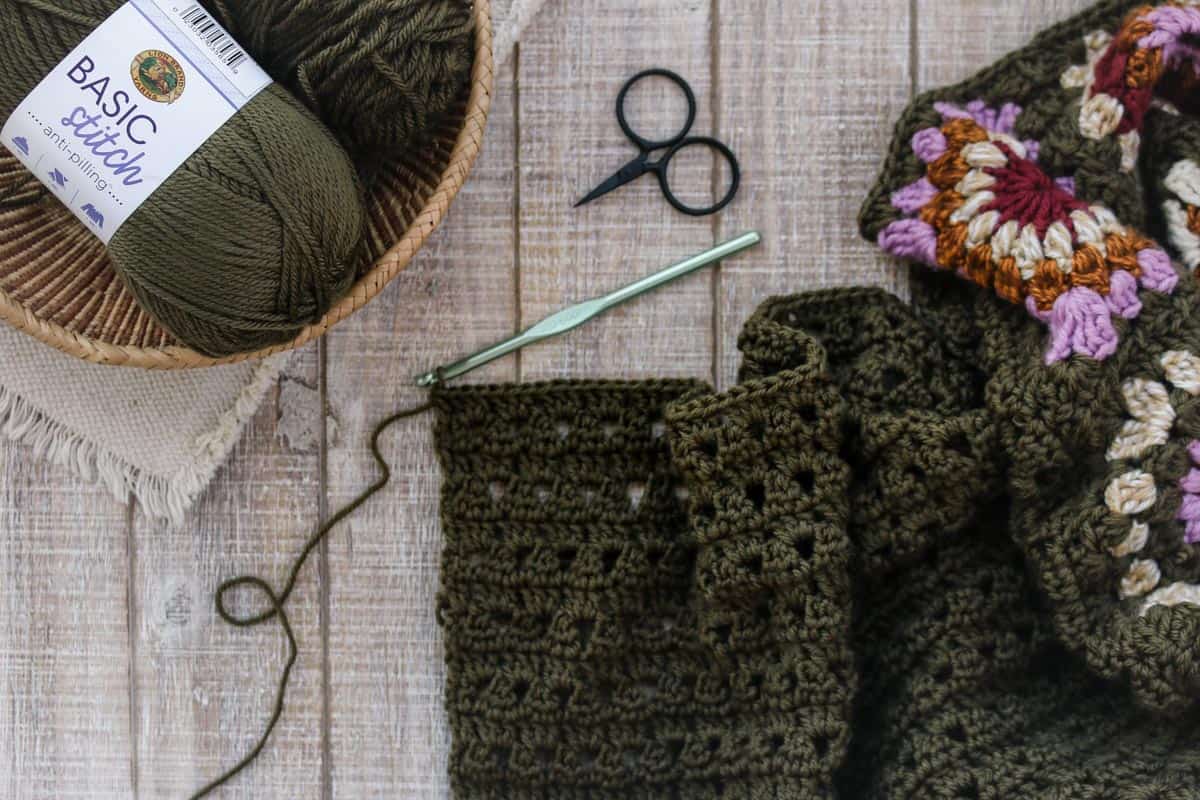
For this crochet granny square cardigan, I used Lion Brand Yarn's Basic Stitch Anti-Pilling yarn. I chose this yarn because the anti-pilling quality is sort of a no-brainer for something you plan to wear A LOT. Plus, this line of medium-weight yarn includes a lot of fantastic colors.
If you'd like to shop your stash before buying new yarn, any worsted-weight yarn with decent drape will work great for this.
You could even begin making the granny squares from scraps on hand while you wait for the yarn to arrive for your main sweater color.
Jump to the bottom of the page to get my tips on choosing colors and achieving a balanced design.
Supplies Needed
Here are the crochet supplies you'll need for this granny square jacket:
• Yarn: Lion Brand Basic Stitch Anti-Pilling (Weight: 4/medium - 185 yds, 3.5 oz)
• Main Color (A):
- Olive (202-132) – 8 (9, 11, 11, 13, 14, 15) skeins [(approx. 775 (880, 1025, 1100, 1210, 1305, 1485) g)]
• Accent Colors (5 colors, 7 total skeins required for all sizes):
- Ecru (202-098) – 2 skeins
- Gold Heather (202-401) – 1 skein
- Pomegranate (202-138) – 1 skein
- Prism (202-142) – 2 skeins
- Tan/White (202-603) – 1 skein
• Tapestry needle
• Size J/5.75 mm crochet hook or size needed to obtain gauge (using a smaller or larger hook size is completely acceptable if it helps you achieve the gauge)
• Stitch markers or safety pins
click to pin this pattern for later ⇨
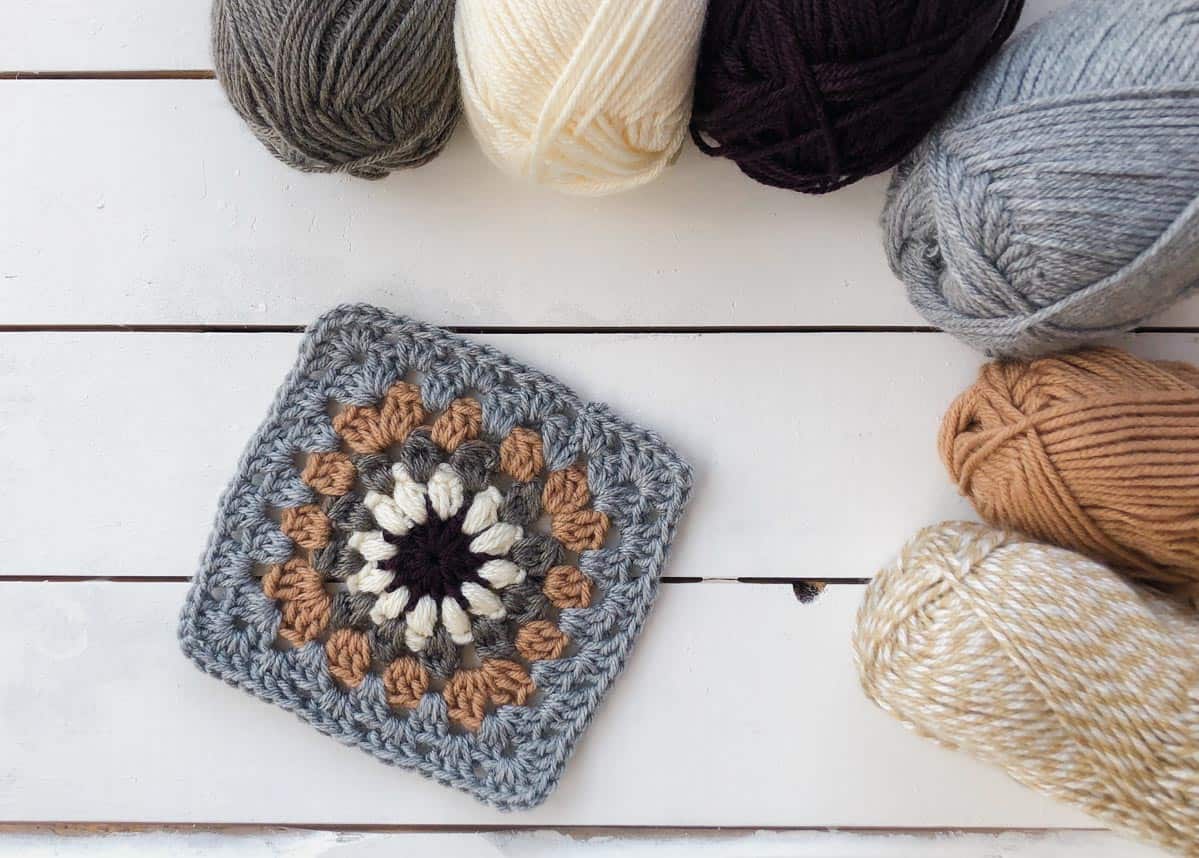
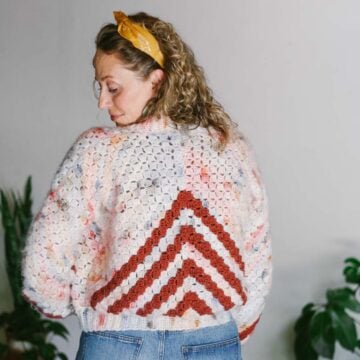
Alternative Neutral Palette
Here's what's pictured in the photo above:
• Yarn: Lion Brand Basic Stitch Anti-Pilling (Weight: 4/medium - 185 yds, 3.5 oz)
• Main Color (A):
- Silver Heather (202-404) – 8 (9, 11, 11, 13, 14, 15) skeins
• Accent Colors (same amount of yarn required for all sweater sizes):
- Ecru (202-098) – 2 skeins
- Tan/White (202-603) – 2 skeins
- Eggplant (202-145) – 1 skein
- Taupe Heather (202-402) – 1 skein
- Lion Brand DIYarn - Camel (205-124) - 4 skeins (120g total)
Alternatively, you can also work your squares and sweater in one color to really highlight the texture of these modernized granny squares.
Designer Note: A Modern Twist on a Classic
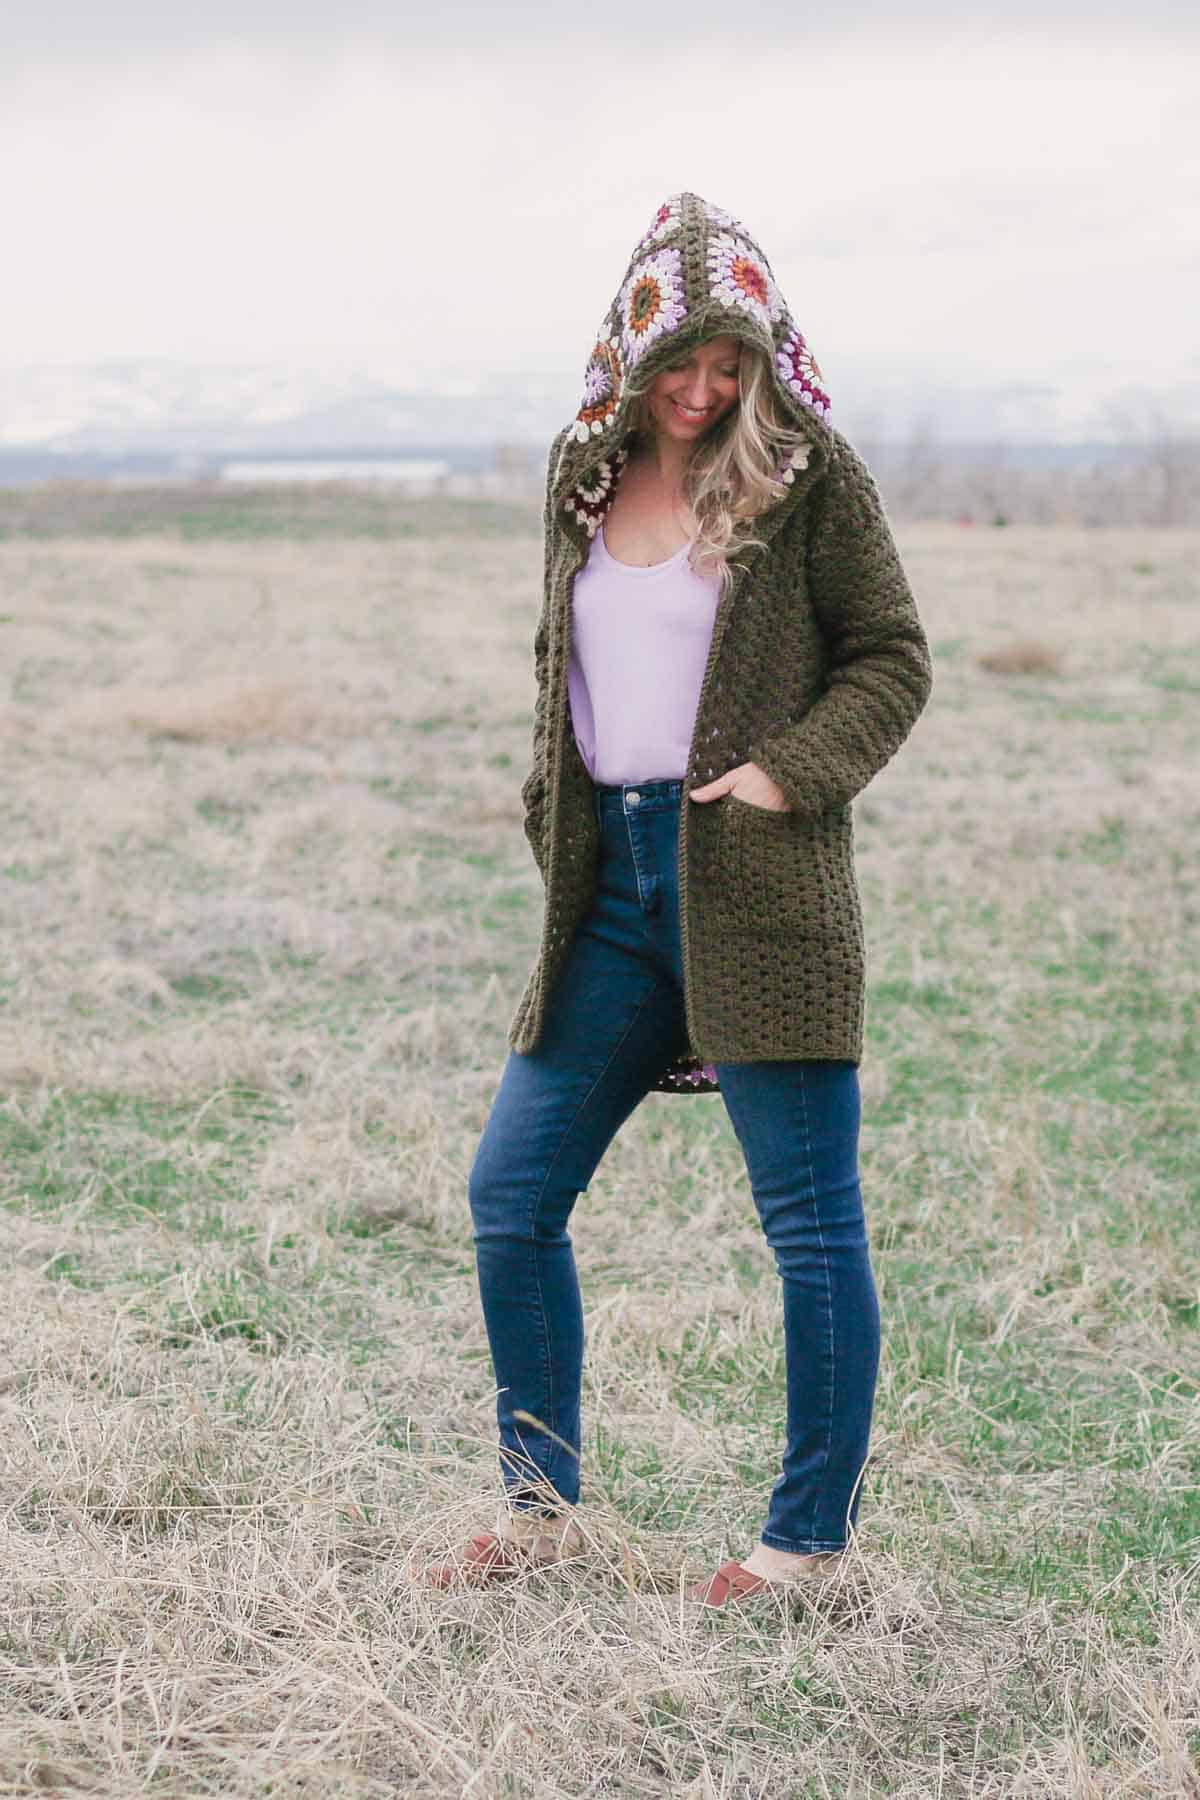
While I love a classic crochet granny square, I knew this cardigan was asking for something less overtly "retro." Instead of an entire jacket made of grannies, the Revival Cardigan uses the squares as a stunning accent.
While this cardi is quite comfy and cozy, the open granny stitches will make it at home in your warm-weather wardrobe as well.
Choosing a Size
This cardigan is designed with a fair amount of positive ease (looseness), so it's quite forgiving in sizing. Measuring your bust and choosing a size based on that is a great place to start.
The sweater sample pictured is a size M/L on a 5'9" model with a 38" bust. If in doubt, size up for a looser fit.
| Womens Sizes | Fits Actual Bust (Inches) |
| S/M | 33" |
| M/L | 37" |
| L/1X | 41" |
| 1X/2X | 45" |
| 2X/3X | 49" |
| 3X/4X | 53" |
| 4X/5X | 57" |
How to Print This Pattern
I wanted to make this PDF really, really helpful. So it includes the complete written pattern all in one place, tons of step-by-step photo tutorials, links to video tutorials, a stitch chart, and join-as-you-go granny square diagrams.
I hope you enjoy this in-depth resource and having the entire pattern in one easily printable file!
Grab the ad-free, printable PDF in our shop.
Gauge
Each granny square after blocking (4 rounds) = 4.75”
Abbreviations and Glossary (US Terms)
3dcCluster – group of 3 dc (granny st)
ch(s) – chain(s)
ch1sp – space created by 1 ch
ch2sp – space created by 2 chs
dc – double crochet
dc2tog – double crochet 2 together (decrease)
dc3tog – double crochet 3 together (decrease)
rep – repeat
RS – right side
sk – skip
sl st – slip stitch
st(s) – stitch(es)
tch – turning chain
WS – wrong side
yo – yarn over
Helpful Resources + Tutorials
If you're new to learning how to crochet, check out these beginner guides that will level-up your skills.
- Crochet Supplies - what to buy and what you can skip
- Crochet Glossary - common terms, abbreviations, and techniques explained
- How to Read Crochet Patterns - tackle your next project with confidence
- How to Check Your Crochet Gauge - skipping this step is a common beginner mistake
- How to Weave in Your Ends - make this necessary evil less painful with these tips
- Blocking Your Crochet - why it matters and how to do it
New to making cardigans? Don't miss How to Crochet a Sweater for our best beginner tips.
Special Stitches
BegDcCl – beginning double crochet cluster – [yo, insert hook in the designated stitch, yo and pull up a loop, yo and pull through 2 loops] 3 times in the same stitch, yo and pull through all 4 loops.
4DcCl – 4 double crochet cluster – [yo, insert hook in the designated stitch, yo and pull up a loop, yo and pull through 2 loops] 4 times in the same stitch, yo and pull through all 5 loops.
Puff – [yo, insert hook in the designated stitch, yo and pull up a loop] 3 times in the same stitch, yo and pull through all 7 loops on hook, ch 1 to close puff.
Partial Puff – [yo, insert hook in the designated stitch, yo and pull up a loop] twice in the same stitch, yo and pull through all 5 loops on hook, ch 1 to close puff.

Part One: Making the Granny Squares
Tips For Choosing and Arranging Colors:
• It can be helpful to generally alternate between lighter and darker colors each round. This prevents any one square from looking particularly “heavy” or “light” in the overall design.
• Similarly, end each square with a lighter color in Round 4 (or a darker color if using a light-colored main color for sweater). This will provide contrast between the edges of each square and the main sweater.
• If using scrap yarn for granny squares, feel free to use more than six total colors. Also, you can make each square identical if a less random look is desired. (Additional yarn in your Round 4 color may be required.)
Notes:
• No matter what size of crochet sweater you're making, you'll notice that you need the same number of squares. This helps keep the pattern a bit easier to follow.
• See the abbreviations section above for explanations of each stitch.
• Watch this Sunburst granny square video tutorial or reference photos below for visual guidance while learning this step.
• This sunburst square is worked in the round without turning. Each round is finished with a sl st to the first st of the round.
• Ch 3 at beginning of round always counts as 1 dc. Work these chs quite tightly so as to minimize the potential gap they can create in a round.
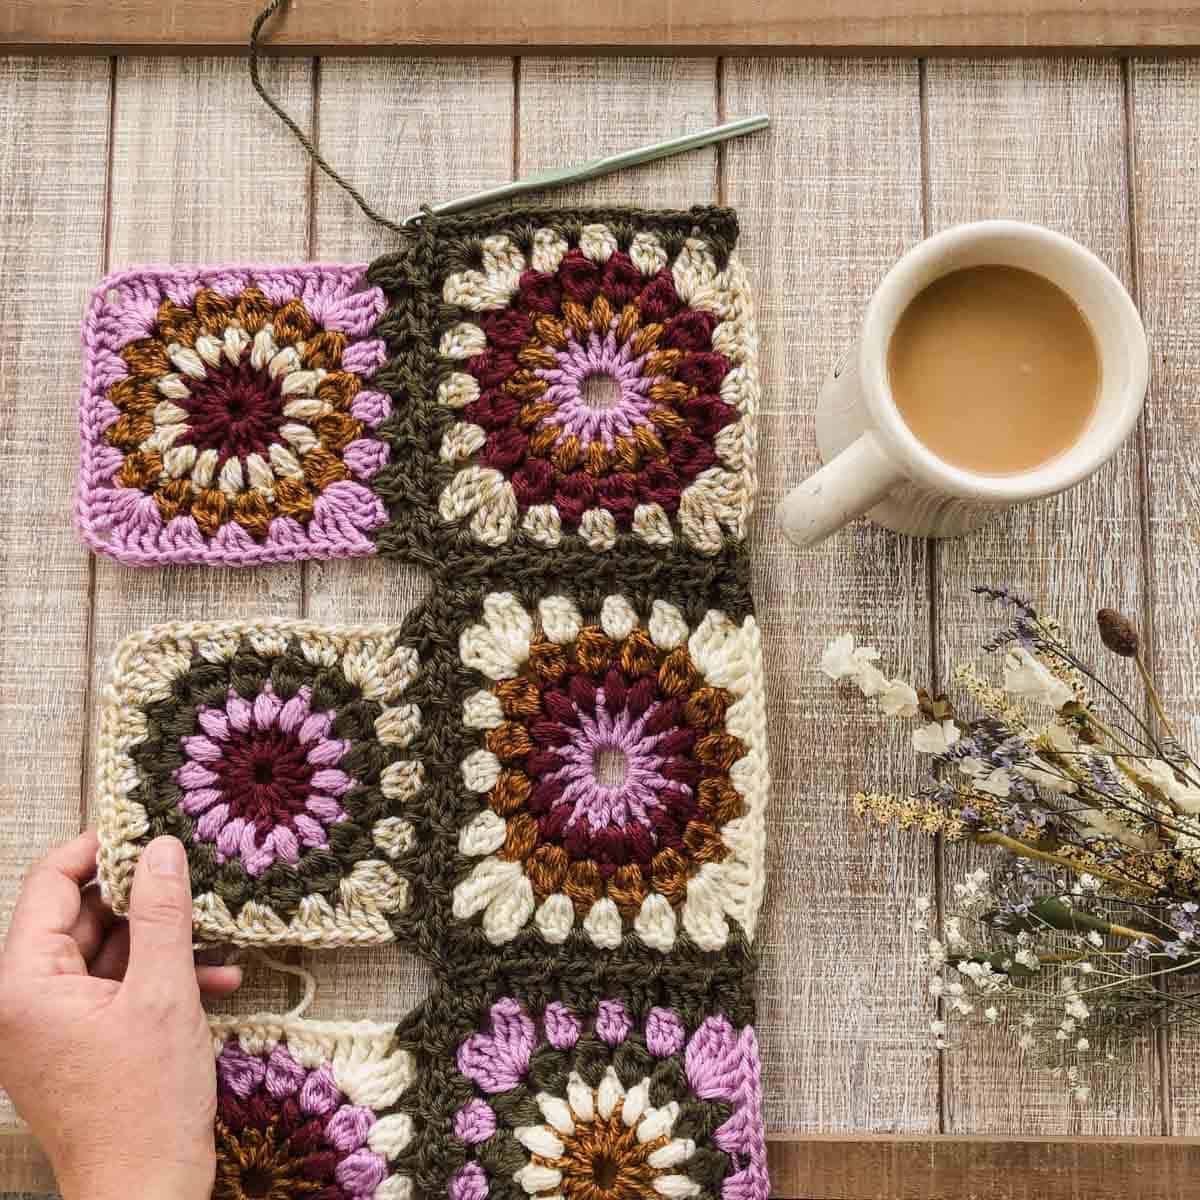
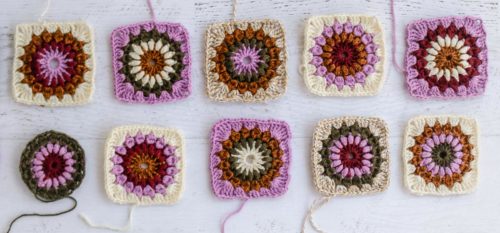
The step-by-step photo tutorial below shows how to crochet a sunburst granny square.
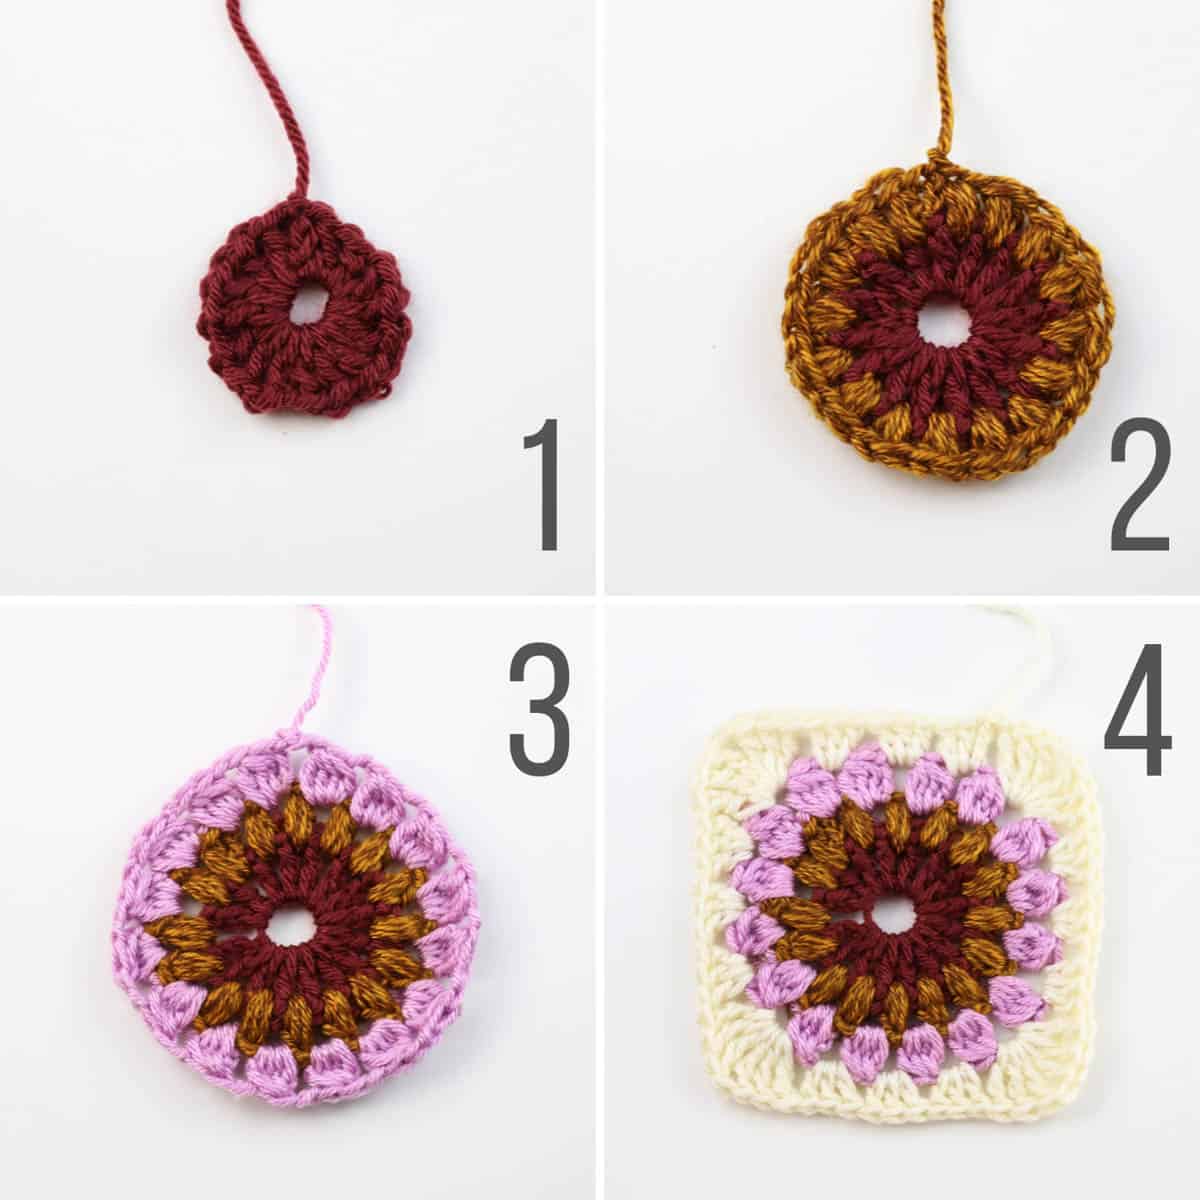
All Sizes: Make 24 granny squares.
Foundation: Create a magic ring (or ch 4, sl st to join).
Round 1: Ch 4 (counts as 1 dc, 1 ch1sp), [dc, ch 1] in ring 15 times, sl st to third ch from beginning of round to join. (32 sts)
Fasten off. Attach next color yarn in any ch1sp.
Round 2: Ch 3, partial puff in same ch1sp as yarn attached in, [puff in next ch1sp] 15 times, sl st to top of first puff to join. (16 puff sts)
Fasten off. Attach next color yarn in any ch1sp.
Round 3: Ch 2, BegDcCl in same ch1sp as yarn attached in, ch 2, [4DcCl in next ch1sp, ch 2] 15 times, sl st to top of first cluster to join. (48 sts)

Don't spend hours for a "meh" result!
Tired of crocheting garments that don't fit? Learn our C.R.A.F.T. Framework to make sweaters that fit and feel amazing!
Fasten off. Attach next color yarn in any ch2sp. Now we will turn our circle into an official granny square.
Round 4: Ch 3, 2 dc in same ch2sp as yarn attached in, [3 dc in next ch2sp] twice, [3 tr, ch 1, 3 tr] in next ch2sp, *[3 dc in next ch2sp] 3 times, [3 tr, ch 1, 3 tr] in next ch2sp, rep from * twice more. (4 distinct sides made)
Fasten off.
Designer Note: My Favorite Way to Crochet Granny Squares
In my experience, each square takes about 20-30 minutes to make so they're pretty satisfying to knock out between meetings or while you're watching a show.
My favorite way to whip up these squares is with an assembly line approach. I crochet a bunch of round 1 circles. Then I add a round 2 of puff stitches to each circle. Next, each motif gets a round 3 of dc clusters. You get the idea.
I find this approach gives me the fastest sense of progress and a big feeling of accomplishment when several grannies are finished. Of course, you can crochet your grannies however you wish!
Blocking
Block all squares. To block, pin corners of each square down using T-pins. Direct steam from an iron or steamer at each square. (Do not touch iron directly to yarn, instead hold 8-12” away.) Blocking may seem unnecessary, but it really improves the overall look and shape of the squares.
If you don't have a blocking board, check out this DIY blocking board tutorial. It's the perfect size for blocking smaller motifs.
The photo below shows how you will seamlessly join the granny squares together to form the back panel of your cardigan.
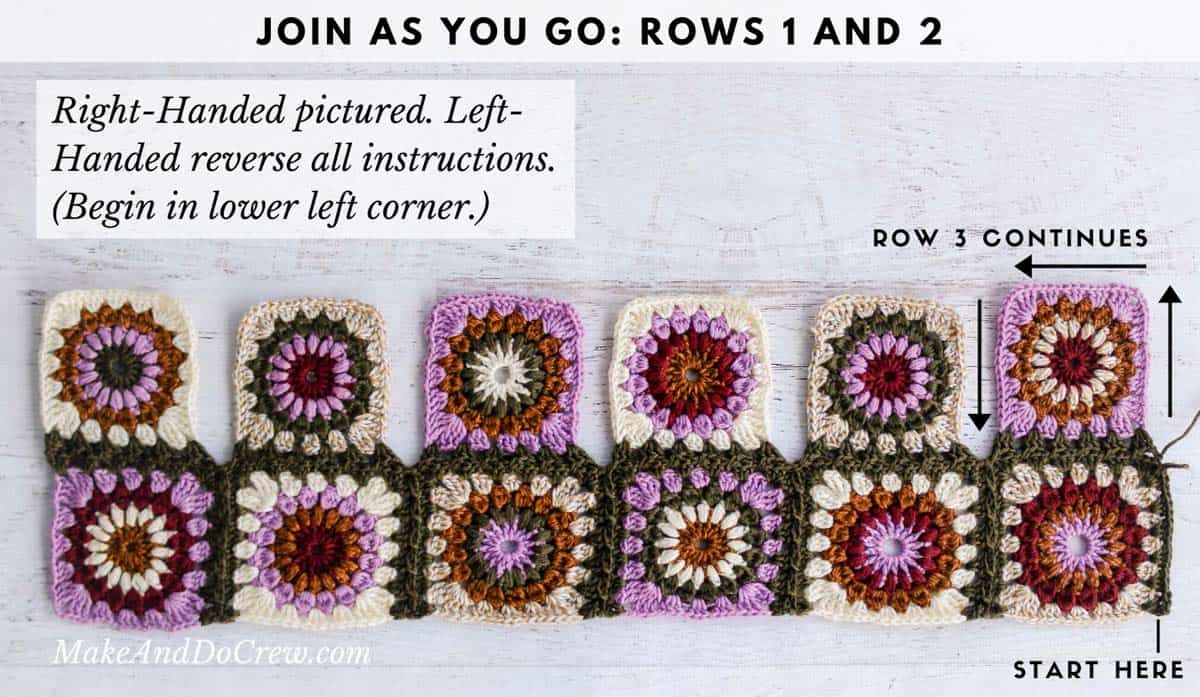
Part Two: Joining Squares
Notes:
• Two rows of six squares are joined for the sweater back. Three rows of four squares are joined separately for the sweater hood. See photos below for more details.
• Squares are joined using a join-as-you-go method that creates zero extra ends to weave in. Hooray! Watch a video tutorial on this crochet joining method.
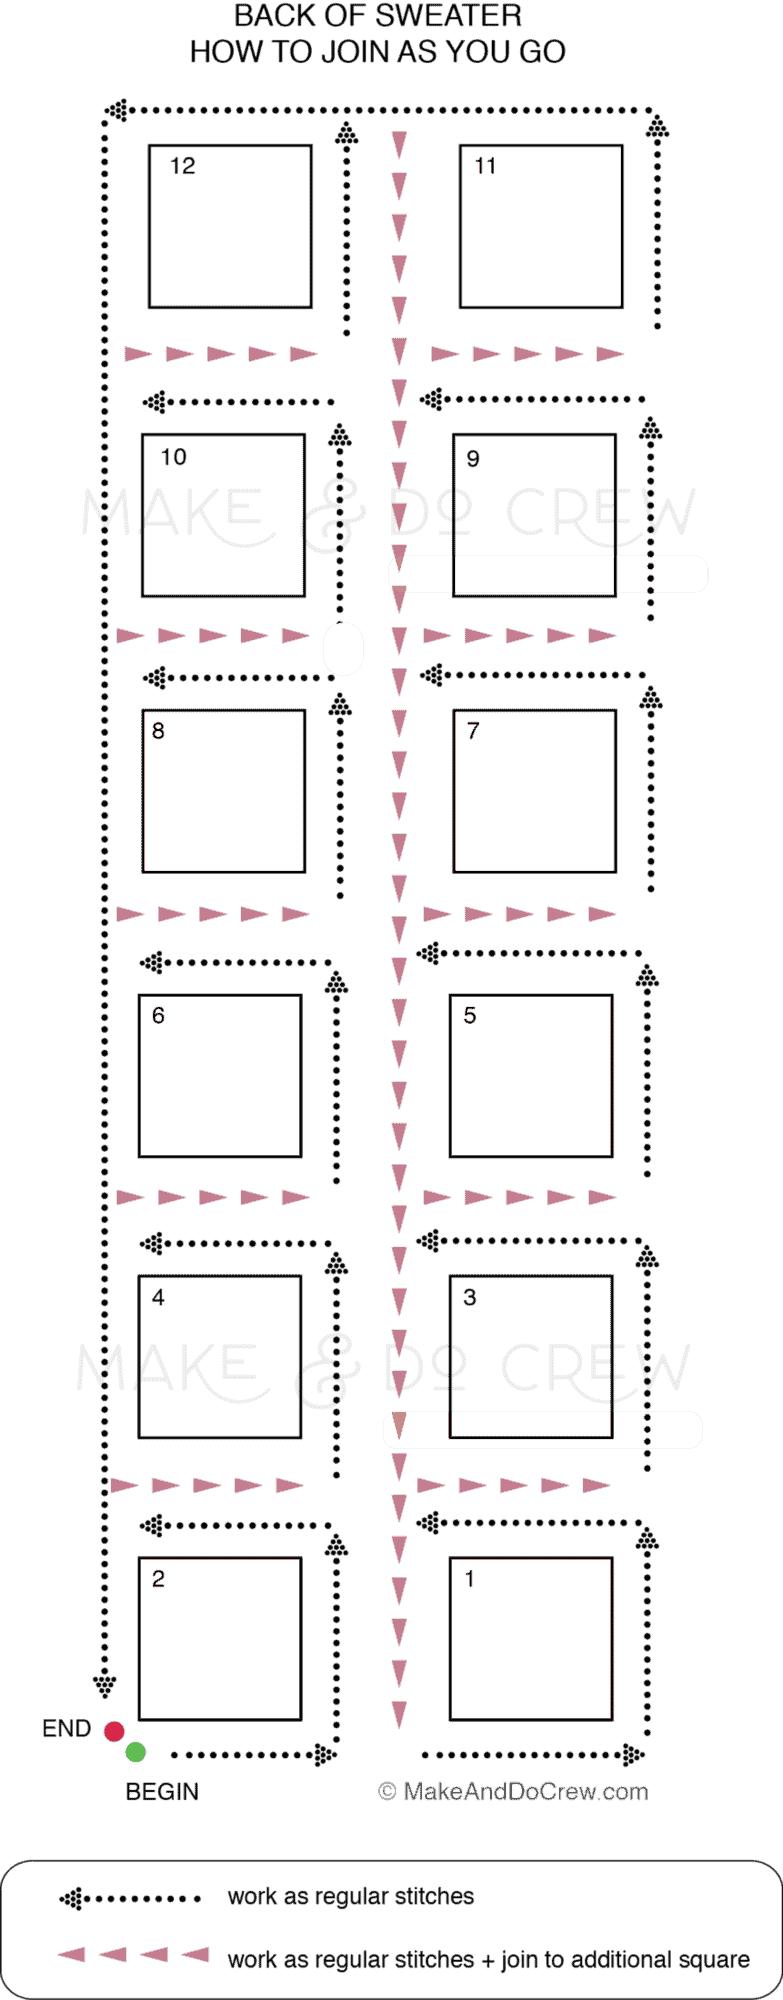
Sweater Back Grannies
Arrange squares as desired in two rows of six. Follow diagram above that maps out the path to join all 12 squares without fastening off.
Attach Color A in bottom corner:
In Same Corner: Ch 3 (counts as 1 dc), 2 dc in corner…
Along Next 3 Sides of Square: ...3 dc in between each 3dcCl to next corner…
And In Second and Third Corners: …[3 dc, ch 1, 3 dc] all in corner sp…
In Fourth Corner: ...3 dc, ch 2, (grab next square)...
In Second Granny Square:
In First Corner: ...3 dc, ch 2…
Along First Side of Square: …*Remove loop from hook, insert hook from the top down in next space of first granny square (between 3dcClusters), pick up working loop, pull through space; 3 dc in next space of second square, ch 2; rep from * to corner…
Second Corner: ...Remove loop from hook, insert hook from the top down in last space between 3dcClusters of first granny square, pick up working loop, pull through space, 3 dc in corner, ch 2, remove loop from hook, insert hook from the top down in adjacent corner of first granny square, pick up working loop, pull through space; 3 dc in same corner space of second granny square….
Second and Third Sides of Square and Third Corner: Work as sides/corner of square 1 were worked.
Fourth Corner: Work as fourth corner of first square was worked.
Repeat this joining process with 4 more squares. On sixth square, stop after second side is worked, just before 3rd corner (two sides will be unworked at this point). See diagram on p30.
Third Corner of Sixth Square: ...3 dc, ch 2, (grab next square)...
Joining Second Row of Grannies:
First Side of First Square: 3 dc, ch 2 in first corner, *remove loop from hook, insert hook from the top down in next space (between 3dcClusters) of adjacent granny square, pick up working loop, pull through space; 3 dc in next space on working square, ch 2; rep from * to corner…
Corner Join: ...Remove loop from hook, insert hook from the top down in last space between 3dcClusters of adjacent granny square, pick up working loop, pull through space, 3 dc in corner of working square, ch 2, remove loop from hook, insert hook from the top down in nearest corner space of Row 1, pick up working loop, pull through space, slst into corner space of next square in Row 1, ch 2**, (grab next granny square to be joined on second row)...
Corner of Next Square: ...3 dc in corner space, ch 2, rep from * to next corner…
Continue adding squares in this manner until row 2 contains 6 squares, ending at **...
Finishing End of Row Corner: ...3 dc in corner of 6th square, ch 2, remove loop from hook, insert hook from the top down in nearest corner space of Row 1, pick up working loop, pull through space, 3 dc in same corner of 6th square…
The photo below shows how the granny squares will look once you've finished joining them together.
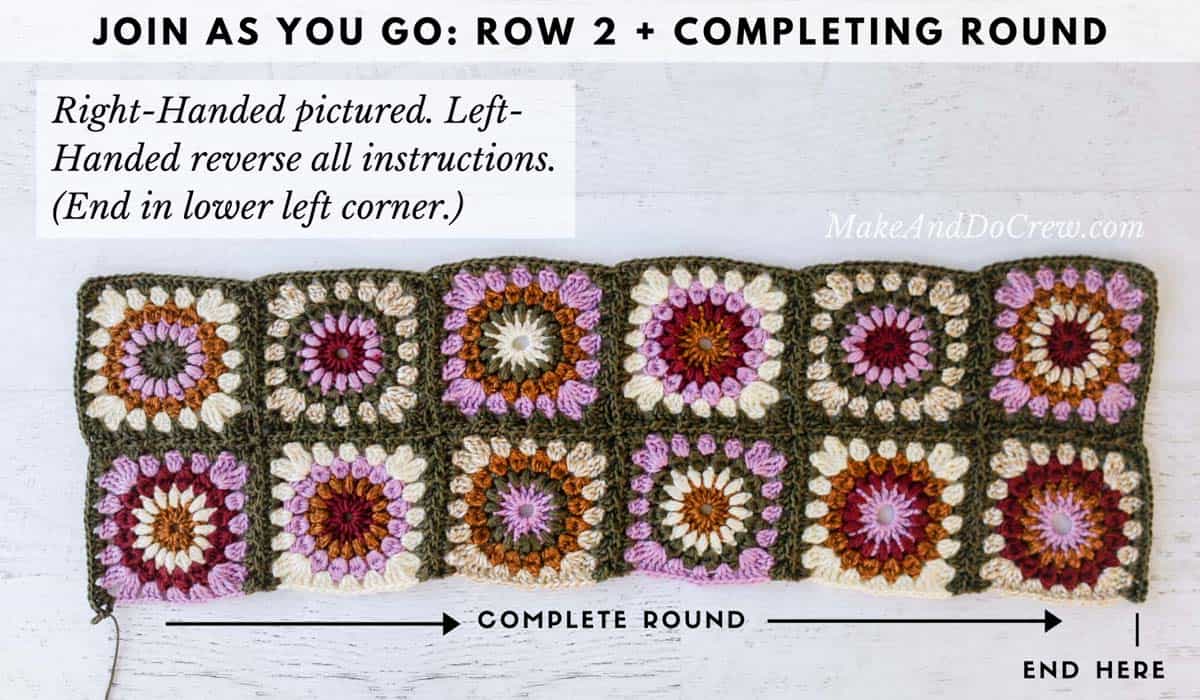
Completing Joining Round:
Continue around the second row of squares as shown in diagram on p30. Place 3 dc between each 3dcCl and place [3 dc, ch 1, 3 dc] in each corner space, joining as you go in the same manner as before.
Next, work down the first half of unfinished short edge of 12-granny rectangle in the same manner. At intersection where Granny Rows 1 and 2 meet, work into corners as 3 dc in corner of first granny, ch 1, sl st in ch2sp between grannies of first and second rows, ch 1, 3 dc in corner of next granny. Continue short edge with 3 dc between each 3dcCl to next corner.
The photo below shows how to navigate the intersections of joining the squares together.
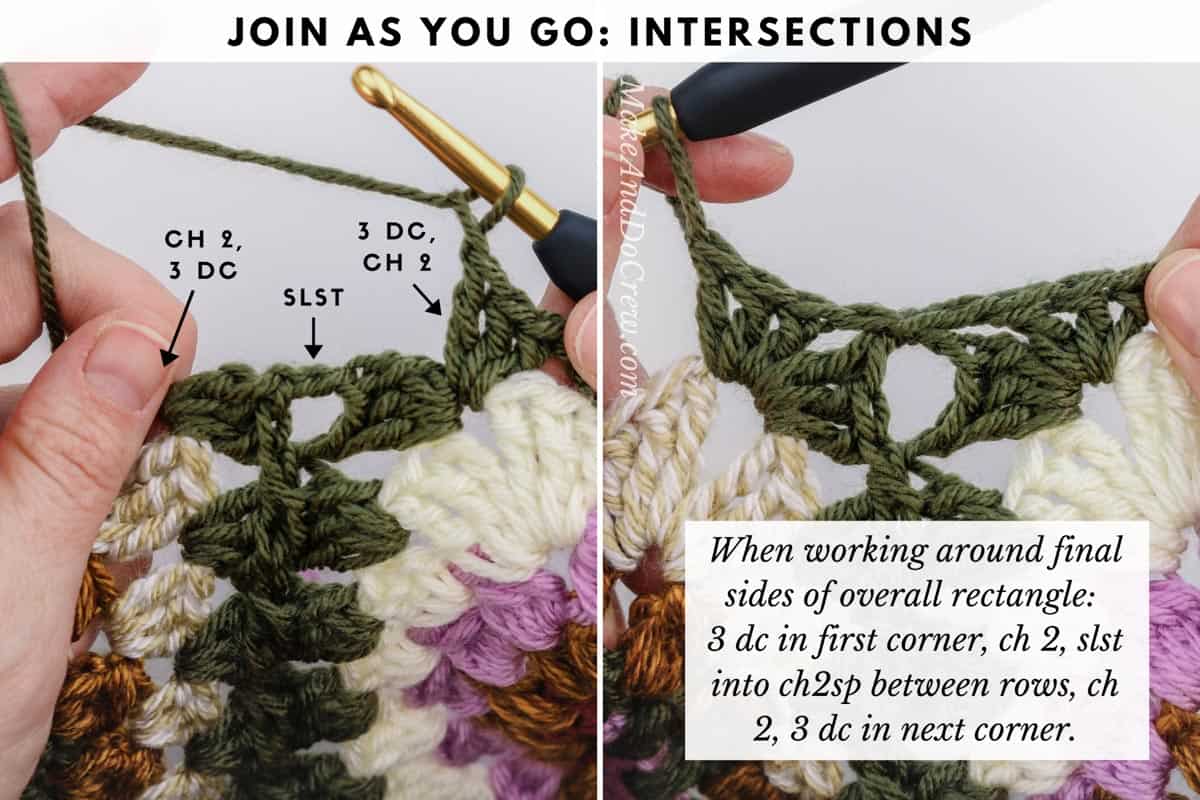
Place [3 dc, ch 1, 3 dc] in next corner and finish final edge with 3 dc between each 3dcCluster and work each intersection between grannies as was done for intersection of Granny Rows 1 and 2.
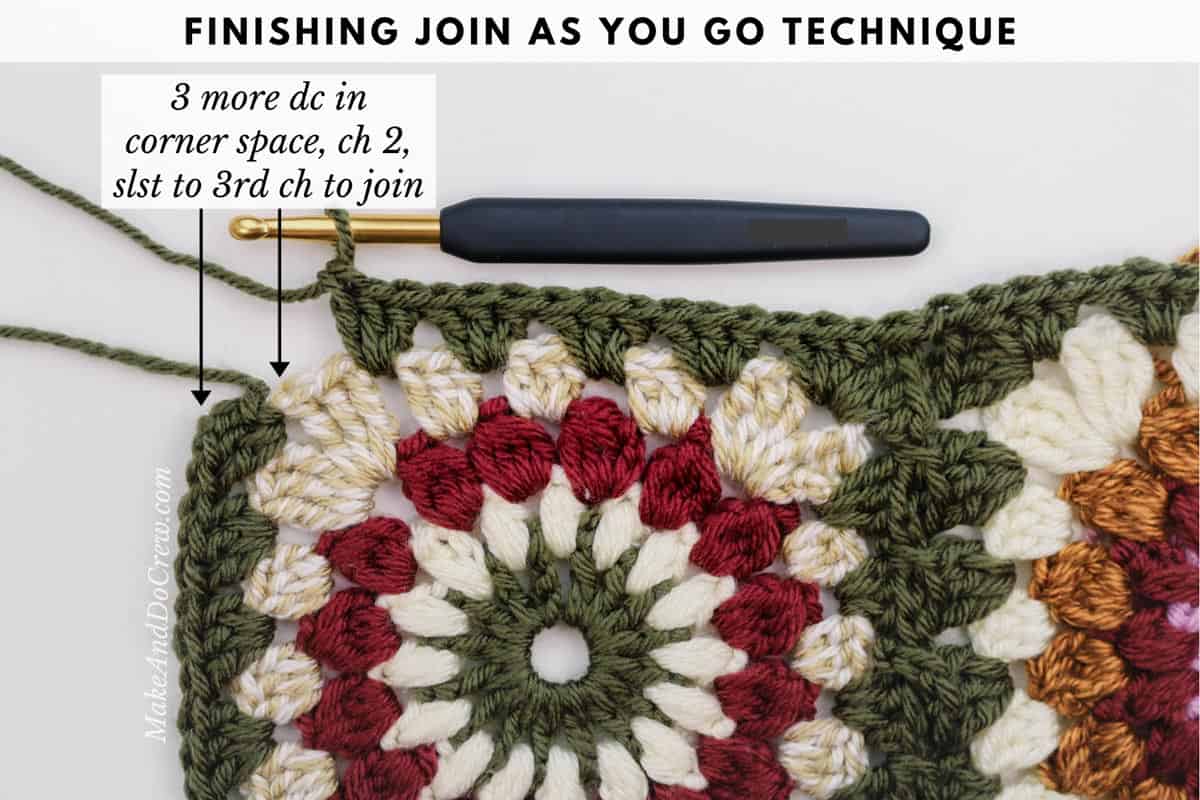
Final Corner Where Joining Began: 3 dc, ch 1, slst to 3rd chain to join. Do not fasten off.
The tutorial photo below shows how to finish off the join-as-you-go crochet technique.
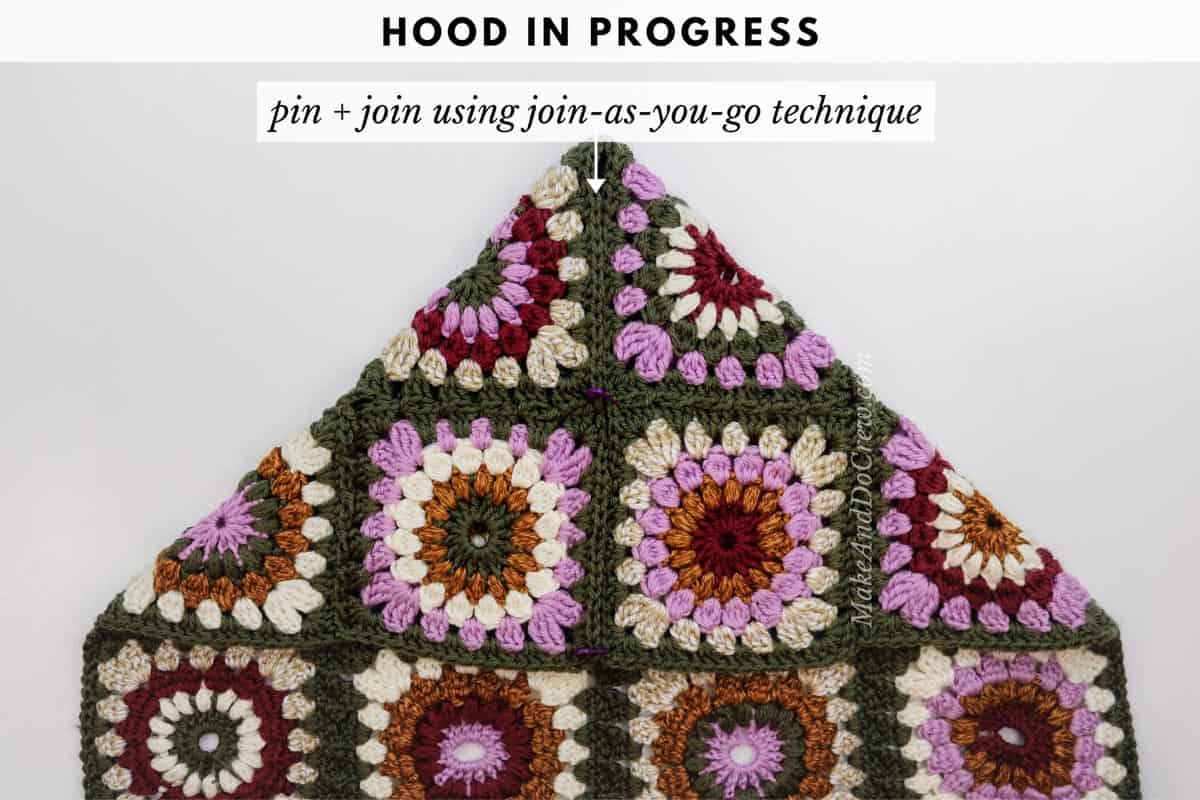
Sweater Hood Grannies
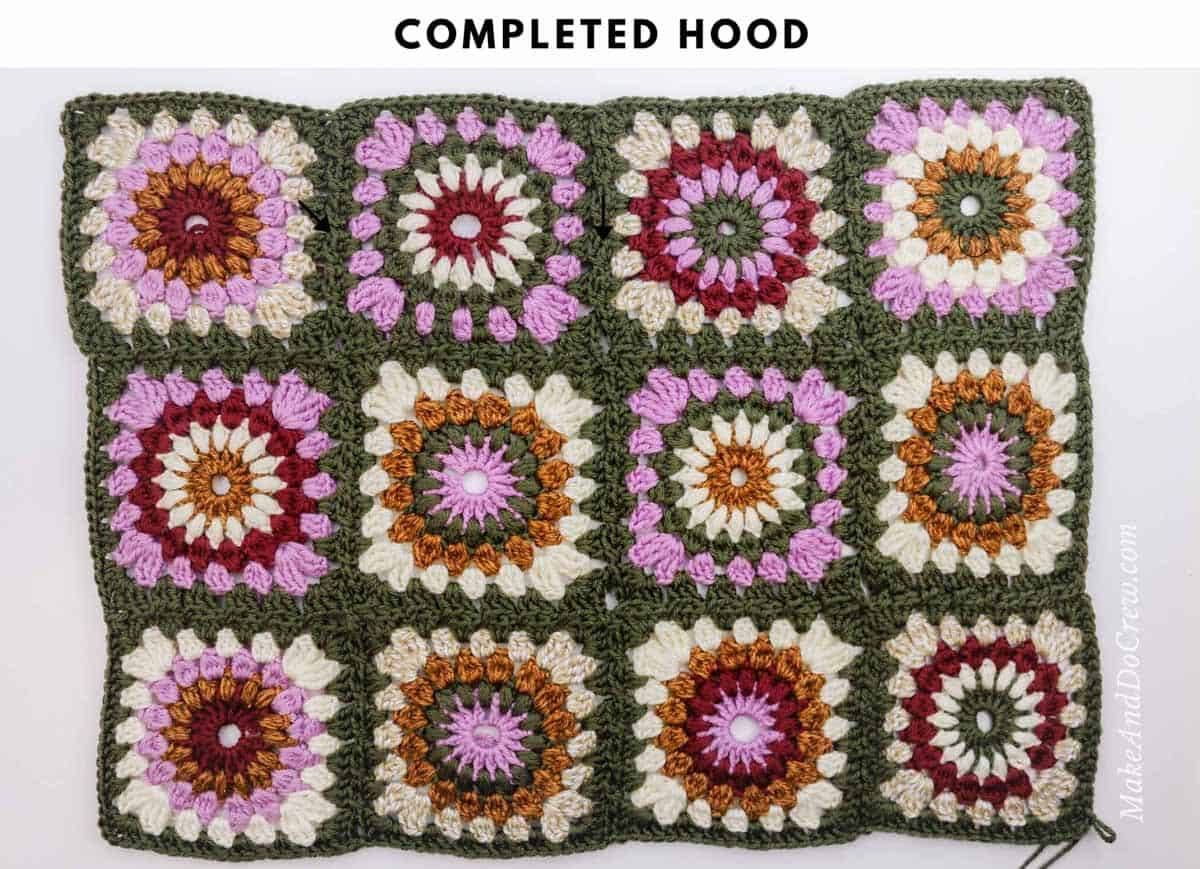
Arrange squares as desired in three rows of four. See photo below. When arranging, consider which colors you’d prefer closest to your face and place those at the edges of your rows of four. Use same joining techniques as for Sweater Back Grannies to join all 12 squares.
If you'd like detailed visual instruction, follow the Hood diagram on p31 of the printable PDF that maps out the path to join all 12 squares without fastening off.
The photo below shows how the sweater hood will look once all the grannies have been joined.
Part Three: Pockets + Sweater Back
We are now going to make the cardigan pockets so that we can also check the gauge of the main stitch used throughout the body of the cardigan.
Daisy Farm Crafts has a helpful video tutorial on the basics of this stitch.
!! Gauge Check !!
Follow the instructions below for crocheting one pocket. This will serve as your gauge swatch and later, a pocket. Once finished, measure center four inches of pocket vertically and horizontally.
Compare to Main Sweater gauge listed above. Please don’t skip this step or you will risk your sweater not fitting as expected.
If there are too many stitches in 4” horizontally, increase your hook size and re-swatch. If there aren’t enough stitches in 4” horizontally, decrease your hook size and re-swatch.
Cardigan Pockets
Notes:
• If you're a visual learner or less-experienced pattern reader, you may find it helpful to reference the stitch chart in the printable PDF.
Use color A throughout.
Left Pocket / Gauge Swatch
Foundation: Chain 28.
Row 1 (RS): Sk first 3 ch (counts as 1 dc), dc into next ch, sk next 2 ch, *3 dc into next ch, sk next 2 ch; rep from * until 1 ch remains, 2 dc in last ch; turn. (7 3dcClusters, 4 dc)
Row 2 (WS): Ch 3, dc in 2nd st, ch 2, *dc3tog over next 3dcCluster, ch 2; rep from * to last 2 sts, dc in last 2 sts; turn.
Row 3 (RS): Ch 3, sk next dc, 3 dc in each ch2sp across to last 2 sts, sk next dc, 1 dc into top of tch; turn.
Row 4 (WS): Ch 4 (counts as 1 dc, 1 ch1sp), dc3tog over first 3dcCluster, *ch 2, dc3tog over next 3dcCluster; rep from * across to tch, ch 1, dc into top of tch; turn.
Row 5 (RS): Ch 3, 1 dc in first dc (base of ch-3), sk ch1sp, 3 dc in each ch2sp across, ending with 2 dc into 3rd ch of tch; turn.
Row 6 (WS): Ch 3, 1 dc in next dc, ch 2, *dc3tog over next 3dcCluster, ch 2; rep from * to last 2 sts, 1 dc in next dc, 1 dc into top of tch; turn.
Rep Rows 3-6 once more.
Rep Rows 3-4 once more. Pocket should now contain 12 rows. Do not fasten off.
When making the gauge swatch, stop here and measure. Follow instructions in Gauge Check section to adjust hook size if necessary. If gauge is measuring correctly, move on to finishing border.
With WS of pocket facing, Border is worked along raw edge of rectangle that is closest to attached yarn. This will become the top of the pocket.
Finishing Border Row 1: Ch 1, sc along raw row edges with a frequency of *2 sc in one row edge, 1 sc in next row edge; rep from * to end of rectangle side; turn.
Finishing Border Row 2: Ch 1, sc in each sc to end. Fasten off, leaving a 30” tail.
Right Pocket
When beginning Foundation Chain, wind up approx 4 yards of yarn to be reserved for pocket border and seaming. Do not cut yarn. Secure reserved yarn in a ball and then create a slip knot for your chain using the same strand of yarn.
(Keeping this mini ball of yarn attached at the beginning of the chain prevents needing to reattach yarn later and saves two ends to weave in.)
Rep Rows 1-12 of Left Pocket. Note that for Right pocket, the WS of the rectangle will be attached to sweater facing out. This allows the pocket rows to match the RS/WS rows of the Right Sweater Front. Fasten off.
With WS of pocket facing, the crochet border is worked along raw edge of rectangle using yarn that was reserved at beginning of pocket.
Rep Finishing Border Rows 1 and 2 of Left Pocket.
Back of Cardigan
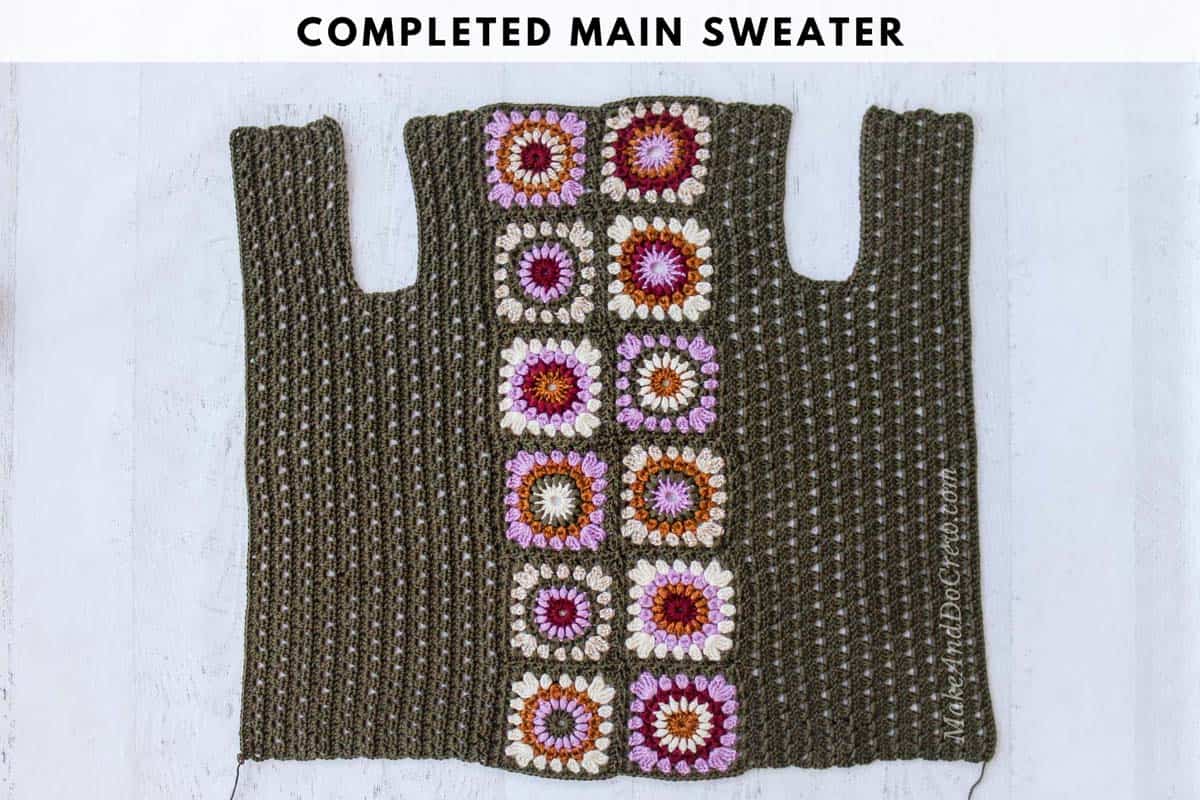
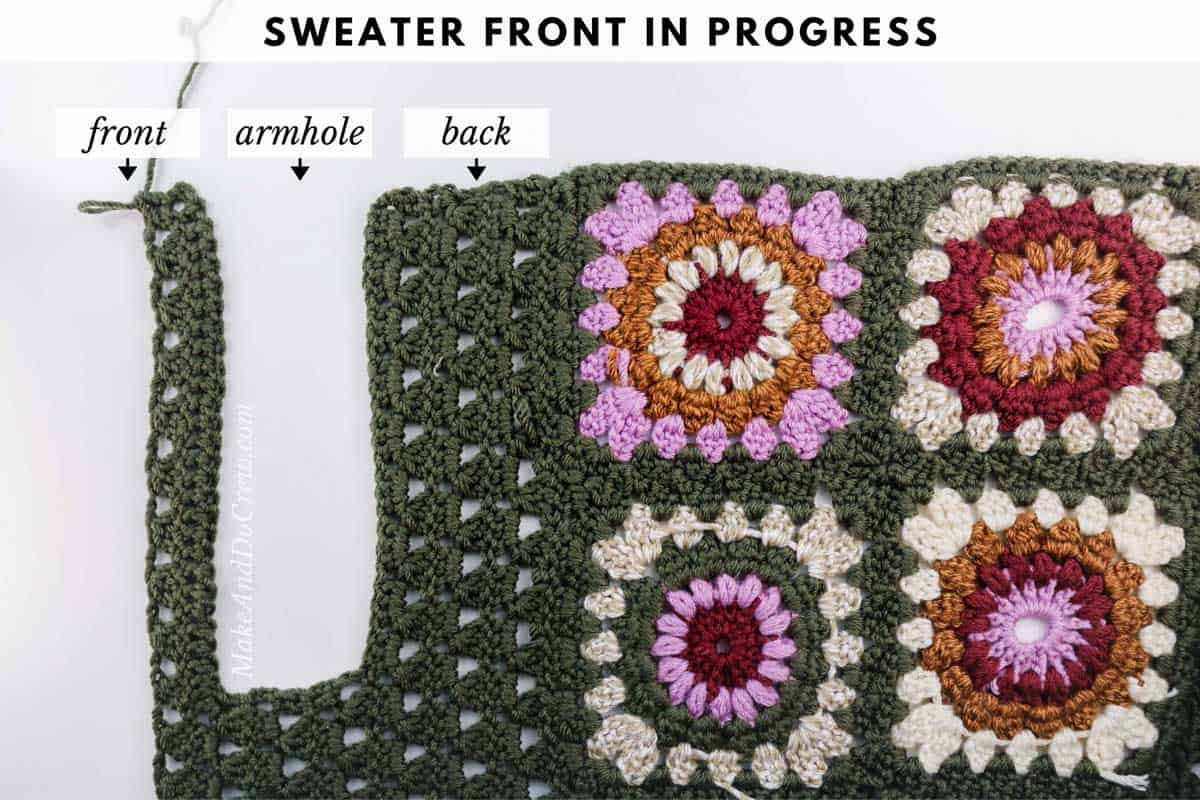
In this section, we're adding rows on each side of the granny square panel. This widens the back of the cardigan based on the size you're making. Then, we create the armholes and the front panels.
At the end of this portion, you'll have a large rectangle with two armholes, like the photo below.
Notes:
• In Row 1, “Cluster” refers to a set of 3 dc from the previous round of joining.
• Ch 4 counts as 1 dc and 1 ch1sp throughout.
• See stitch chart on p29 of the printable PDF for visual guidance.
Using Color A working yarn still attached from Sweater Back Grannies:
RIGHT BACK:
(Left-Handed: Left Back)
With WS facing and yarn still attached from joining, Row 1 is worked along the nearest long side of the rectangle from the top (neck) to the bottom of the sweater.
Row 1 (WS): Ch 3, dc in first corner sp, 3 dc in space between first two clusters, 3 dc in space between each cluster across. At each join seam between squares: (1 dc in corner, 1 dc in seam, 1 dc in next corner). At end of row, place 2 dc in corner sp; turn. (35 3dcClusters, 4 dc)
Row 2 (RS): Ch 3, dc in 2nd st, ch 2, *dc3tog over next 3dcCluster, ch 2; rep from * in each 3dcCluster to last 2 sts, dc in last 2 sts; turn.
Row 3 (WS): Ch 3, sk next dc, 3 dc in each ch2sp across to last 2 sts, sk next dc, 1 dc into top of tch; turn.
Row 4 (RS): Ch 4, dc3tog over first 3dcCluster, *ch 2, dc3tog over next 3dcCluster; rep from * across to tch, ch 1, dc into top of tch; turn.
Row 5 (WS): Ch 3, 1 dc in first dc (base of ch-3), sk ch1sp, 3 dc in each ch2sp across, ending with 2 dc into 3rd ch of tch; turn.
SIZE S/M stop here
Row 6 (RS): Ch 3, 1 dc in next dc, ch 2, *dc3tog over next 3dcCluster, ch 2; rep from * to last 2 sts, 1 dc in next dc, 1 dc into top of tch; turn.
Row 7 (WS): Rep Row 3.
SIZE M/L stop here
Row 8 (RS): Rep Row 4.
Row 9 (WS): Rep Row 5.
SIZES L/1X and 1X/2X stop here
Row 10 (RS): Rep Row 6.
Row 11 (WS): Rep Row 3.
SIZES 2X/3X, 3X/4X stop here
Wanna save this pattern?
Row 12 (RS): Rep Row 4.
Row 13 (WS): Rep Row 5.
SIZE 4X/5X stop here
ALL SIZES: Working yarn is now at what will become the bottom edge of sweater for all sizes.
RIGHT ARMHOLE:
(Left-Handed: Left Armhole)
SIZES S/M, L/1X, 1X/2X, and 4X/5X Only
Row 1 (RS): Ch 3, dc in 2nd st, ch 2, [dc3tog over next 3dcCluster, ch 2] 27 (-, 25, 25, -, -, 23) times, 1 dc in next st, 1 dc2tog over next 2 sts; turn. [27 (-, 25, 25, -, -, 23) dc3tog, 4 dc]
Row 2 (WS): Ch 3, sk next dc, 3 dc in each ch2sp across to last 2 sts, sk next dc, 1 dc into top of tch; turn. [27 (-, 25, 25, -, -, 23) 3dcClusters, 2 dc]
Row 3 (RS): Ch 4, dc3tog over first 3dcCluster, *ch 2, dc3tog over next 3dcCluster; rep from * across to tch, ch 1, dc into top of tch; turn.
Row 4 (WS): Ch 3, 1 dc in first dc (base of ch-3), sk ch1sp, 3 dc in each ch2sp across, ending with 2 dc into 3rd ch of tch; turn.
SIZE S/M stop here
Row 5 (RS): Ch 3, 1 dc in next dc, ch 2, *dc3tog over next 3dcCluster, ch 2; rep from * to last 2 sts, 1 dc in next dc, 1 dc into top of tch; turn.
Row 6 (WS): Ch 3, sk next dc, 3 dc in each ch2sp across to last 2 sts, sk next dc, 1 dc into top of tch; turn.
SIZES L/1X, 1X/2X stop here
Row 7 (RS): Ch 4, dc3tog over first 3dcCluster, *ch 2, dc3tog over next 3dcCluster; rep from * across to tch, ch 1, dc into top of tch; turn.
Row 8 (WS): Ch 3, 1 dc in first dc (base of ch-3), sk ch1sp, 3 dc in each ch2sp across, ending with 2 dc into 3rd ch of tch; turn.
Row 9 (RS): Ch 3, 1 dc in next dc, ch 2, *dc3tog over next 3dcCluster, ch 2; rep from * to last 2 sts, 1 dc in next dc, 1 dc into top of tch; turn.
Row 10 (WS): Ch 3, sk next dc, 3 dc in each ch2sp across to last 2 sts, sk next dc, 1 dc into top of tch; turn.
SIZES M/L, 2X/3X, and 3X/4X only:
Row 1 (RS): Ch 4 (counts as 1 dc and ch1sp), [dc3tog over next 3dcCluster, ch 2] - (26, -, -, 25, 24, -) times, dc3tog over next 3dcCluster, ch 1, dc in first st of next 3dcCluster; turn, leaving remaining sts unworked. [- (27, -, -, 26, 25, -) dc3tog, 2 dc]
Row 2 (WS): Ch 3, dc in first dc (base of ch-3), sk ch1sp, 3 dc in each ch2sp across, ending with 2 dc into 3rd ch of tch; turn. [- (26, -, -, 25, 24, -) 3dcClusters, 4 dc)
Row 3 (RS): Ch 3, 1 dc in next dc, ch 2, *dc3tog over next 3dcCluster, ch 2; rep from * to last 2 sts, 1 dc in next dc, 1 dc into top of tch; turn.
Row 4 (WS): Ch 3, sk next dc, 3 dc in each ch2sp across to last 2 sts, sk next dc, 1 dc into top of tch; turn.
SIZE M/L stop here
Row 5 (RS): Ch 4 (counts as 1 dc, 1 ch1sp), dc3tog over first 3dcCluster, *ch 2, dc3tog over next 3dcCluster; rep from * across to tch, ch 1, dc into top of tch; turn.
Row 6 (WS): Ch 3, dc in first dc (base of ch-3), sk ch1sp, 3 dc in each ch2sp across, ending with 2 dc into 3rd ch of tch; turn.
Row 7 (RS): Ch 3, 1 dc in next dc, ch 2, *dc3tog over next 3dcCluster, ch 2; rep from * to last 2 sts, 1 dc in next dc, 1 dc into top of tch; turn.
Row 8 (WS): Ch 3, sk next dc, 3 dc in each ch2sp across to last 2 sts, sk next dc, 1 dc into top of tch; turn.
SIZE 2X/3X stop here
Row 9 (RS): Ch 4 (counts as 1 dc, 1 ch1sp), dc3tog over first 3dcCluster, *ch 2, dc3tog over next 3dcCluster; rep from * across to tch, ch 1, dc into top of tch; turn.
Row 10 (WS): Ch 3, dc in first dc (base of ch-3), sk ch1sp, 3 dc in each ch2sp across, ending with 2 dc into 3rd ch of tch; turn.
SIZES M/L, L/1X, 1X/2X, 2X/3X, 4X/5X only:
Last Armhole Row (RS): Ch 4 (counts as 1 dc, 1 ch1sp), dc3tog over next 3dcCluster, *ch 2, dc3tog over next 3dcCluster; rep from * across to tch, ch 1, dc into top of tch; ch - (30, 36, 36, 33, -, 42); turn. [-(27, 25, 25, 26, -, 23) dc3tog, 2 dc, -(30, 36, 36, 33, -, 42) chs]
Armhole should now contain - (5, 7, 7, 9, -, 11) rows.
SIZES S/M and 3X/4X only:
Last Armhole Row (RS): Ch 3, 1 dc in next dc, ch 2, *dc3tog over next 3dcCluster, ch 2; rep from * across to last dc before tch, 1 dc in next dc, 1 dc in top of tch; ch 26 (-, -, -, -, 32, -); turn. [27 (-, -, -, -25, -) dc3tog, 4 dc, 26 (-, -, -, -, 32, -) chs]
Armhole should now contain 5 (-, -, -, -, 11, -) rows.
The photo below shows what the front of your sweater will look like once you've crocheted the armhole.
RIGHT FRONT:
(Left-Handed: Left Front)
SIZES S/M and 3X/4X only:
3 rows are worked for these sizes so they can “catch up” and all sizes will have the same set of instructions for the remainder of Left Front.
Row 1 / Beginning Front Row (WS): Sk 3 ch (counts as 1 dc), dc in each ch until arm inset is reached; (remainder of row is worked into Last Armhole Row), dc in first dc, sk next dc, 3 dc in each ch2sp across to last 2 sts, sk next st, 1 dc into top of tch; turn. [25 (-, -, -, -, 31, -) dc at beginning of row, 28 (-, -, -, -, 26, -) 3dcClusters, 2 dc at end of row]. Working yarn should now be at bottom of sweater.
Row 2 (RS): Ch 4 (counts as 1 dc, 1 ch1sp), dc3tog over first 3dcCluster, *ch 2, dc3tog over next 3dcCluster; rep from * across to tch, dc into top of tch; turn.
Row 3 (WS): Ch 3, dc in first dc (base of ch-3), sk ch1sp, 3 dc in each ch2sp across to tch, 2 dc into 3rd ch of tch; turn.
SIZES M/L, L/1X, 1X/2X, 2X/3X, and 4X/5X only:
Beginning Front Row (WS): Sk 3 ch (counts as 1 dc), dc in each ch until arm inset is reached; (remainder of row is worked into Last Armhole Row), dc in first dc, sk ch1sp, 3 dc in each ch2sp across; ending with 2 dc into third ch of tch; turn. [- (29, 35, 35, 32, -, 41) dc at beginning of row, - (26, 24, 24, 25, -, 22) 3dcClusters, 2 dc at end of row). Working yarn should now be at bottom of sweater.
ALL SIZES:
Row 1 (RS): Ch 3, 1 dc in next dc, *ch 2, dc3tog over next 3dcCluster; rep from * in each 3dcCluster, **ch 2, dc3tog over next 3 dc; rep from ** until 2 dc remain, ch 1, dc in next dc, dc into top of tch; turn. (35 dc3tog, 4 dc)
Row 2 (WS): Ch 3, 3 dc in each ch2sp across to tch, 1 dc into top of tch; turn.
Row 3 (RS): Ch 4 (counts as 1 dc, 1 ch1sp), dc3tog over first 3dcCluster, *ch 2, dc3tog over next 3dcCluster; rep from * across to tch, dc into top of tch; turn.
Row 4 (WS): Ch 3, dc in first dc (base of ch-3), sk ch1sp, 3 dc in each ch2sp across to tch, 2 dc into 3rd ch of tch; turn.
Row 5 (RS): Ch 3, 1 dc in next dc, ch 2, *dc3tog over next 3dcCluster, ch 2; rep from * across to last 2 sts, 1 dc in next dc, 1 dc into top of tch; turn.
Rep Rows 2-5 one (two, two, two, two, two, three) times more.
SIZE 4X/5X stop here
Rep Row 2 once more.
SIZES M/L, L/1X, and 3X/4X stop here
Rep Row 3 once more.
SIZES 1X/2X and 2X/3X stop here
Rep Row 4 once more.
SIZE S/M stop here
Right Front should now contain 15 (15, 15, 16, 16, 17, 18) rows. Right-Handed: Fasten off. Left-Handed: If desired, place marker in live stitch and keep yarn attached for border section. If this is cumbersome, fasten off and reattach later.
LEFT BACK/ARMHOLE/FRONT:
(Left-Handed: Right Back/Armhole/Front)
With RS facing, attach yarn in top corner by neck.
Repeat Right Back/Armhole/Front. Note that the RS/WS designations of each row will be reversed. The RS of the Granny Squares dictate the RS of the cardigan.
Left Front should now contain 15 (15, 15, 16, 16, 17, 18) rows. Right-Handed: If desired, place marker in live loop and keep yarn attached for border section. If this is cumbersome, fasten off and reattach later. Left-Handed: Fasten off.
The photo below shows the cardigan when it's ready to be joined at the shoulders.
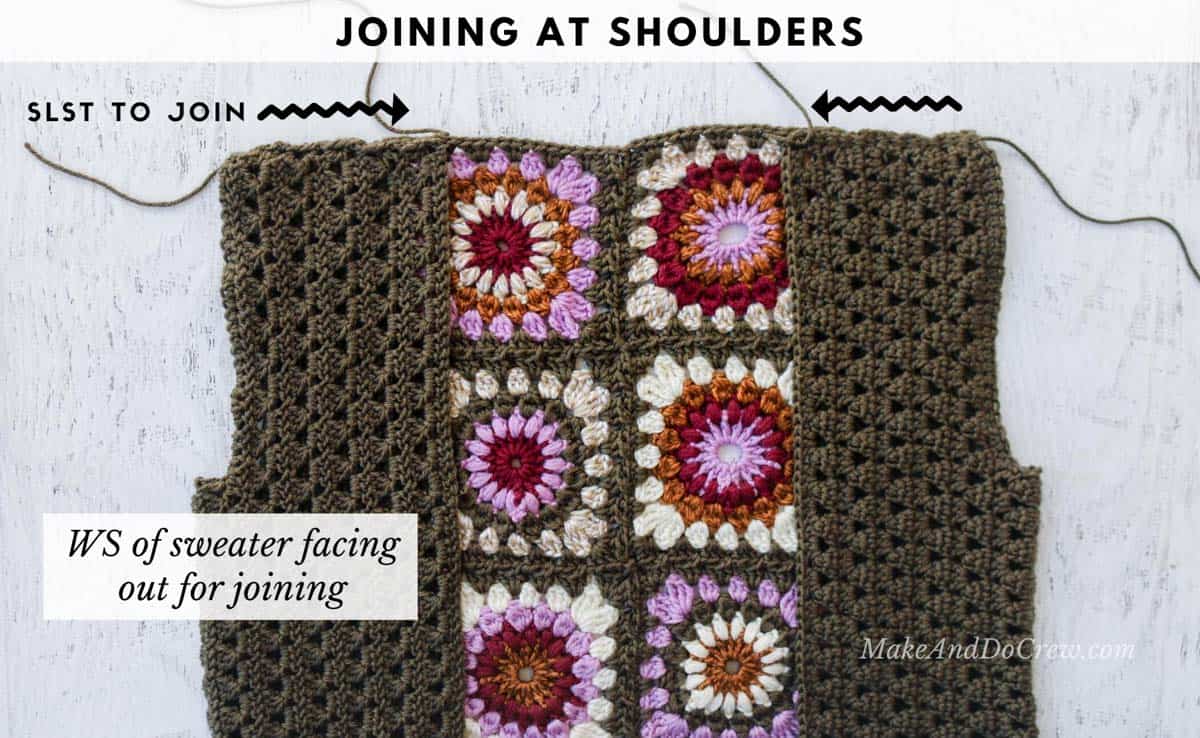
Joining Shoulders
Gently steam block sweater before joining shoulders. Do not touch iron/steamer to yarn while blocking.
With RS facing in and WS facing out, pin sweater fronts to sweater back at shoulders. Beginning from shoulder and working toward neck, slst to join front to back. Rep on second side. Fasten off.
The photo below shows how to begin pinning the hood to your cardigan in place.
Part Four: Joining Hood + Adding Sleeves
To finish our granny square sweater pattern, we'll be joining the hood to the cardigan body and adding sleeves.
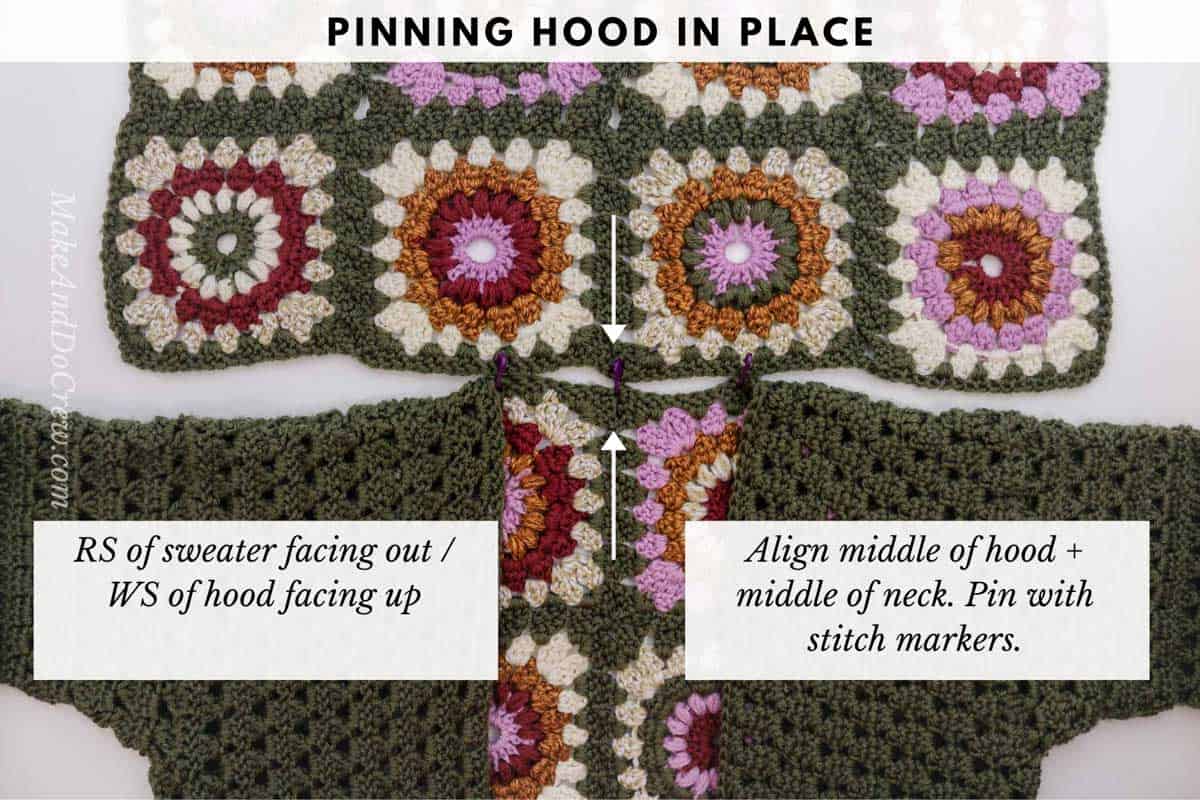
Connecting Hood
Pinning Hood To Cardigan: With RS of sweater facing up and WS of hood facing up, pin middle of hood to middle of back of neck, lining up center grannies. Fold each bottom corner of hood toward sweater front and pin to front edge of sweater. (When pinning, try to situate so that neither piece is stretched.)
The photo below shows how to pin the hood in place in order to join it onto the body of the sweater.
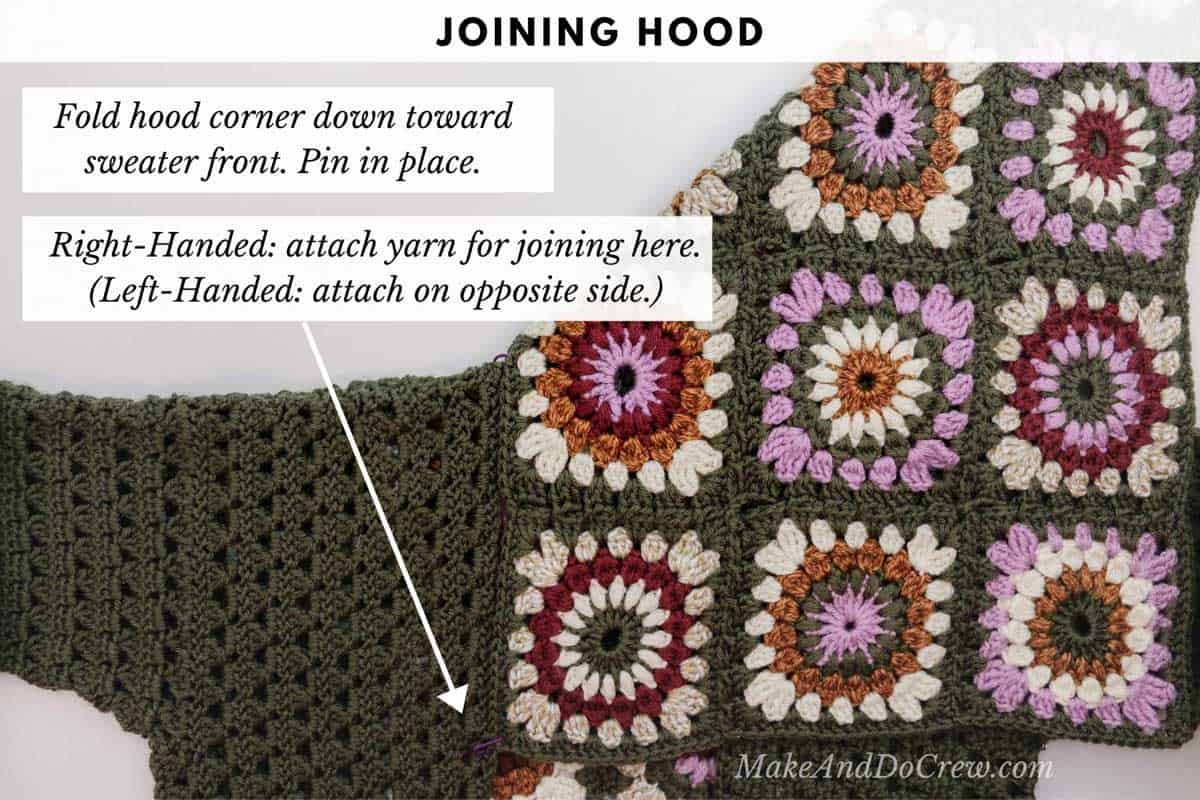
Attaching Yarn: On right front where hood corner meets sweater front, attach yarn in space between two clusters on Sweater Front. (Left Handed: left Sweater Front.) Joining row is worked into sweater and attached to hood with two chains between each cluster space, just as the granny squares were joined previously.
For clarity, pattern references the sweater fronts and back as simply “Sweater.”
The photo below shows how to use the join-as-you-go technique to attach the hood to the sweater front.
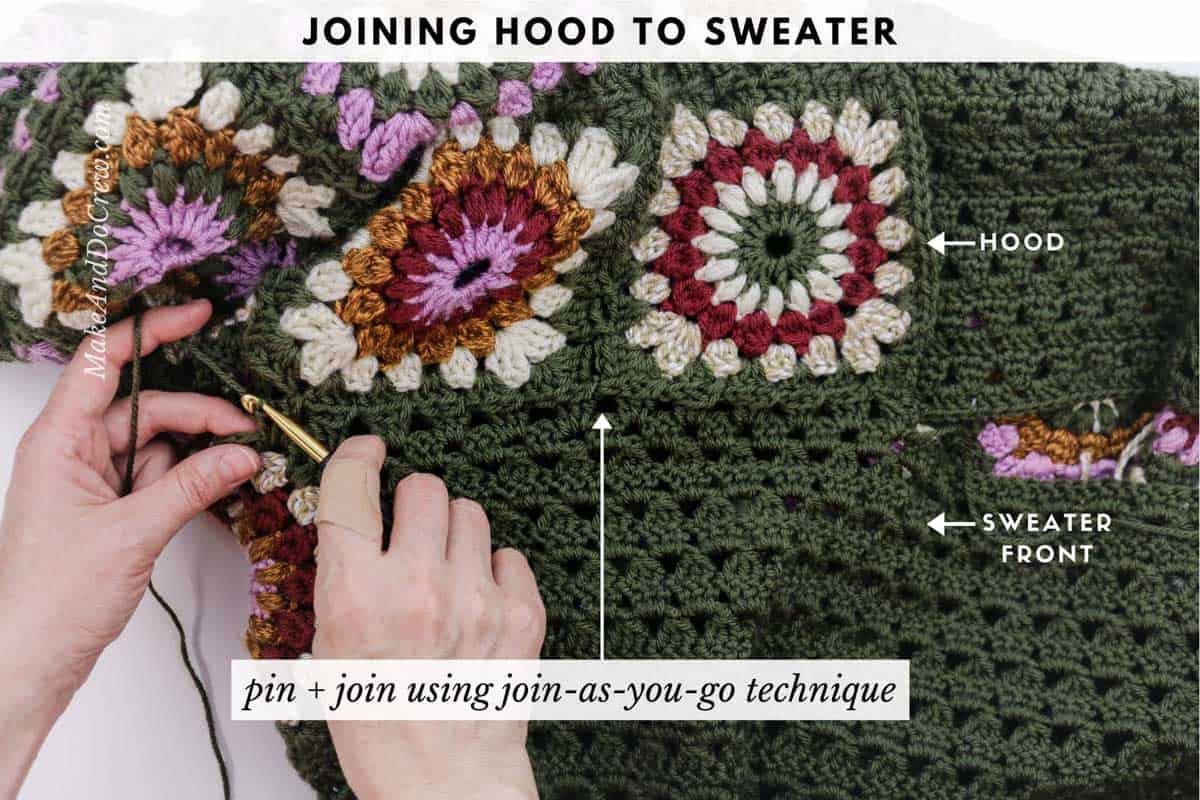
Joining Row: Ch 3, slst to first corner space of Hood, 3 dc in next Sweater space, ch 2, *remove loop from hook, insert hook from the top to bottom in next space in Hood, pick up working loop, pull through space; 3 dc in next space of Sweater, ch 2; rep from * to opposite Hood corner, end with a sl st into corner space of hood and 1 dc in next Sweater space. Fasten off.
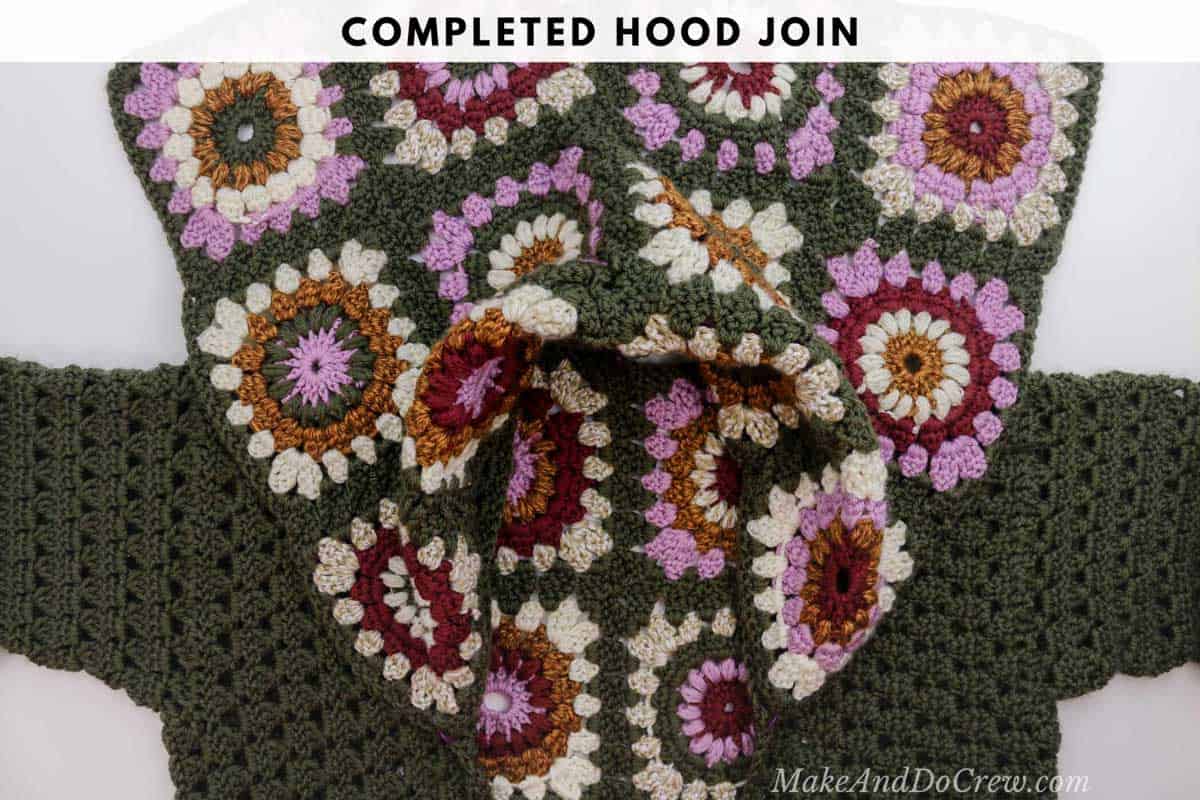
Pro Tip: The intent is to get the smoothest join possible, so you may choose to place 3 dc sts at the intersections where the granny squares meet in the hood, placing them in a way that visually works best for you.
The photo below shows how the hood will look once it's completely joined to the cardigan.
Pinning Top of Hood: Bring top corners of hood toward each other, folding hood in half at crown of head. Pin together. Attach yarn in one corner at front (face side) of hood and use the join-as-you-go technique to join sides of hood together as follows.
Seaming Top Of Hood: Ch 3, slst to first corner space of second (opposite) side of hood, 3 dc in next space on first side, ch 2, *remove loop from hook, insert hook from the top to bottom in next space of second side, pick up working loop, pull through space; 3 dc in next space on first side, ch 2; rep from * to crown of hood, end with a sl st into crease of hood. Fasten off.
The photo below shows an in-progress view of seaming the top of the hood.
Adding Sleeves
Now we'll add sleeves directly into the existing armhole openings.
Notes:
• Sleeves are worked in joined, turned rounds which means at times the RS will be facing and at times the WS will be facing.
• To increase mobility around elbow, a section of rows are intentionally worked even.
• It can be helpful to place a marker in the last decrease row you work to easily keep track of when it’s time to work another one.
• Clusters will continue to line up visually as they did in body of sweater. If you get lost, let this help guide you.
• Similarly, if the thought of decreasing intimidates you, the most important thing to track is that you have the correct number of clusters and ch2sps at the end of each decrease round.
• Ch-3 counts as 1 dc throughout.
Right Sleeve:
With RS facing out, attach yarn in the first dc of any 3dcCluster on Back at armhole below shoulder. (Exact placement isn’t important.)
Foundation Round (RS):
Ch 2, dc2tog over next 2 dc (counts as 1 dc3tog), *ch 2, dc3tog over next 3dcCluster; rep from * to shoulder join…
...ch 2, dc3tog over shoulder join…
…*ch 2, working into unused loops of chain sts, dc3tog over each set of 3 dc along sweater Front edge (dc3tog sts should line up with dc3tog sts in sweater Front); rep from * to arm inset…
…[ch 2, dc3tog] 2 (2, 3, 3, 4, 4, 4) times over arm inset span…
…**ch 2, dc3tog; rep from ** up remaining sts of Back…
...ch 2, sl st to top of first dc3tog to join; turn.
Round 2 (WS): Ch 3, 2 dc in first ch2sp, 3 dc in each remaining ch2sp around, sl st to top of ch-3 to join; turn. [19 (21, 26, 26, 25, 25, 31) 3dcClusters]
Round 3 (RS): Ch 2, sk first dc, dc2tog over next 2 dc (counts as 1 dc3tog), *ch 2, dc3tog over next 3dcCluster; rep from * around working last dc3tog over last 2 dc and tch, ch 2, sl st to top of first dc3tog to join; turn.
With sweater laying flat, PM in 1 (1, 1, 1, 1, 1, 2) dc3tog nearest to bottom underarm crease (or on either side of crease for size 4X/5X, leave one dc3tog in between markers).
This marks the decrease point moving forward. When moving marker based on instructions, always move it to a st that keeps it nearest to the center of the underarm (or centered around that center for size 4X/5X). This better disguises the decreases.
After each decrease, move marker to middle stitch of the 3 dc decrease cluster.
Round 4 (WS-dec): Ch 3, 2 dc in first ch2sp, 3 dc in each ch2sp until 1 space remains before marker, dc in next ch2sp, dc in top of marked dc3tog, dc in next ch2sp (decrease made, move marker to middle stitch of dec cluster, for size 4X/5X repeat dec once more), 3 dc in each remaining ch2sp to end, sl st into top of ch-3 to join; turn. [18 (20, 25, 25, 24, 24, 29) 3dcClusters]
Round 5 (RS): Rep Round 3. [18 (20, 25, 25, 24, 24, 29) dc3tog]. Move marker to top of resulting dc3tog st(s).
Round 6 (WS): Rep Round 2. Move marker between two nearest 3dcClusters (or, for size 4X/5X, both markers on either side of center, as before).
Round 7 (RS): Rep Round 3. Move marker to top of nearest dc3tog st(s).
Round 8 (WS-dec): Rep Round 4. [17 (19, 24, 24, 23, 23, 27) 3dcClusters]
Rep Rounds 5-8 (5-8, 7-8, 7-8, 7-8, 7-8, 5-8) 2 (2, 2, 2, 2, 2, 1) more time(s).
Sleeve should now contain 15 (17, 22, 22, 21, 21, 25) 3dcClusters.
Elbow - Working Even:
ALL SIZES:
Rep Rounds 5-6 three times.
Continue Decreasing:
ALL SIZES:
Rep Rounds 7-8 once. For size 4X/5X, remove one st marker and place remaining st marker in 3dcCluster nearest center underside of sleeve (as described for other sizes). [14 (16, 21, 21, 20, 20, 23) 3dcClusters)
Rep Rounds 5-8 (5-8, 7-8, 7-8, 7-8, 7-8, 7-8) 1 (2, 7, 6, 5, 5, 8) more time(s). Sleeve should now contain 13 (14, 14, 15, 15, 15, 15) 3dcClusters.
Wrist - Working Even:
ALL SIZES:
Rep Rounds 5-6 six (four, three, four, five, five, two) more time(s).
Sleeve should have 40 rounds and 13 (14, 14, 15, 15, 15, 15) 3dcClusters.
Finishing Round (RS): Ch 1, sc in each dc around, sl st to first st to join. Fasten off.
Left Sleeve:
With RS facing, attach yarn in the first dc of a 3dcCluster on Back at armhole below shoulder. (Exact placement isn’t important.)
Foundation Round (RS):
Ch 2, dc2tog over next 2 dc (counts as 1 dc3tog), *ch 2, dc3tog over next 3dcCluster; rep from * to arm inset…
…[ch 2, dc3tog] 2 (2, 3, 3, 4, 4, 4) times over arm inset span…
…*working into unused loops of chain sts, ch 2, dc3tog over each set of 3 dc along sweater Front edge (dc3tog sts should line up with dc3tog sts in sweater Front); rep from * to shoulder join…
...ch 2, dc3tog over shoulder join…
…*ch 2, dc3tog; rep from * down remaining sts of Back…
...ch2, sl st to top of first dc3tog to join; turn.
Rounds 2-41: Work as for Right Sleeve.
Gently steam block sleeves if desired.
Part Five: Finishing + Border
To finish our granny stitch cardigans, we'll add a continuous border around the front panels and bottom of sweater. Then we'll sew our pockets on.
Continuous Border
Notes:
• Border Rows 1 and 2 are worked up front panel, around front of hood and down second front.
If Color A is still attached at bottom corner of Left Front (left-handed: Right Front), use that yarn. If not, attach Color A on appropriate side. Begin with WS of sweater facing.
SIZES S/M, M/L, L/1X, and 3X/4X only:
Border Row 1 (WS): Ch 3, *ch 2, dc3tog over next 3dcCluster; rep from * in each 3dcCluster around to bottom front corner on opposite side, ch 1, dc in tch; turn. (When working over intersection where hood joins sweater, just place dc3togClusters as evenly as possible.)
Border Row 2 (RS): Ch 3, dc in first dc (base of ch-3), sk ch1sp, 3 dc in each ch2sp around to bottom front corner on opposite side, 2 dc into 3rd ch of tch; do not turn.
With RS continuing to face you, work Border Round 3 beginning along bottom edge of sweater.
SIZES 1X/2X, 2X/3X, and 4X/5X only:
Border Row 1 (WS): Ch 4, *3 dc in next ch2sp; rep from * to hood; work 3 dc in space between each 3dcCluster on Hood, **3 dc in next ch2sp; rep from ** across next Front, ch 1, 1 dc in last st. Turn. (When working over intersection where hood joins sweater, just place 3dcClusters as evenly as possible.)
Border Row 2 (RS): Ch 3, *ch 2, dc3tog over next 3dcCluster; rep from * in each 3dcCluster around to bottom front corner on opposite side, ch 1, dc in tch; do not turn.
With RS continuing to face you, work Border Round 3 beginning along bottom edge of sweater.
ALL SIZES:
Border Round 3 (RS): Ch 1, sc along raw row edges with a frequency of *2 sc in one row edge, 1 sc in next row edge**; rep from * to granny square insert, sc across granny square insert, rep from * to ** until you reach bottom front corner on opposite side; then continue up Front placing 1 sc in each st (each ch counts as 1 st) until bottom front corner on opposite side is reached, sl st to first st to join. Fasten off.
Attaching Pockets
Pockets were completed in Part Two: Joining Squares. Now we'll attach them to the sweater.
Pin pockets to sweater fronts taking care to align rows of pocket and sweater. 3dcCluster rows of pocket should line up with 3dcCluster rows of sweater. Similarly, RS pocket rows should line up with RS sweater rows. Using existing tails where possible, whip stitch pockets to sweater front.
Weave in remaining ends. (You can do it!)
Wear your granny sweater with pride, knowing you’re paying tribute to all the grannies that came before you!
Tips for Choosing Yarn Colors
The color palette you choose will influence whether your modern granny square cardigan feels like a beautiful statement piece or a gorgeous everyday wardrobe staple. Both options can be absolutely stunning!
Check out the #RevivalCardigan on Instagram or the project page on Ravelry for lots of colorful cardigan inspiration from fellow makers.
Getting the Look You Want
Once I learned the following trick for choosing colors, I stopped getting quite as stress-sweaty in the yarn aisle. It's really helpful in the case of this granny square jacket pattern because you have the option of using many different colors.
Here’s the deal—all colors have a value, which is basically their relative lightness or darkness. Combining colors with different values (some light, some medium, some dark) can create a higher contrast, balanced look. This puff stitch scarf is a good example.
A project with colors in similar tones can have a nice, subtle vibe. But if your colors are ALL the same tone, your project can end up lacking definition or just looking a little “muddy.” Your eye won’t be able to find a place to rest.
How To Assess the Color Contrast
How to actually assess the value of any color that wasn’t a shade of grey, though? That baffled me for the longest time.
Then I learned this trick, and it has really helped me stop second-guessing my color choices the entire time I’m crocheting--or at least do it a little less!
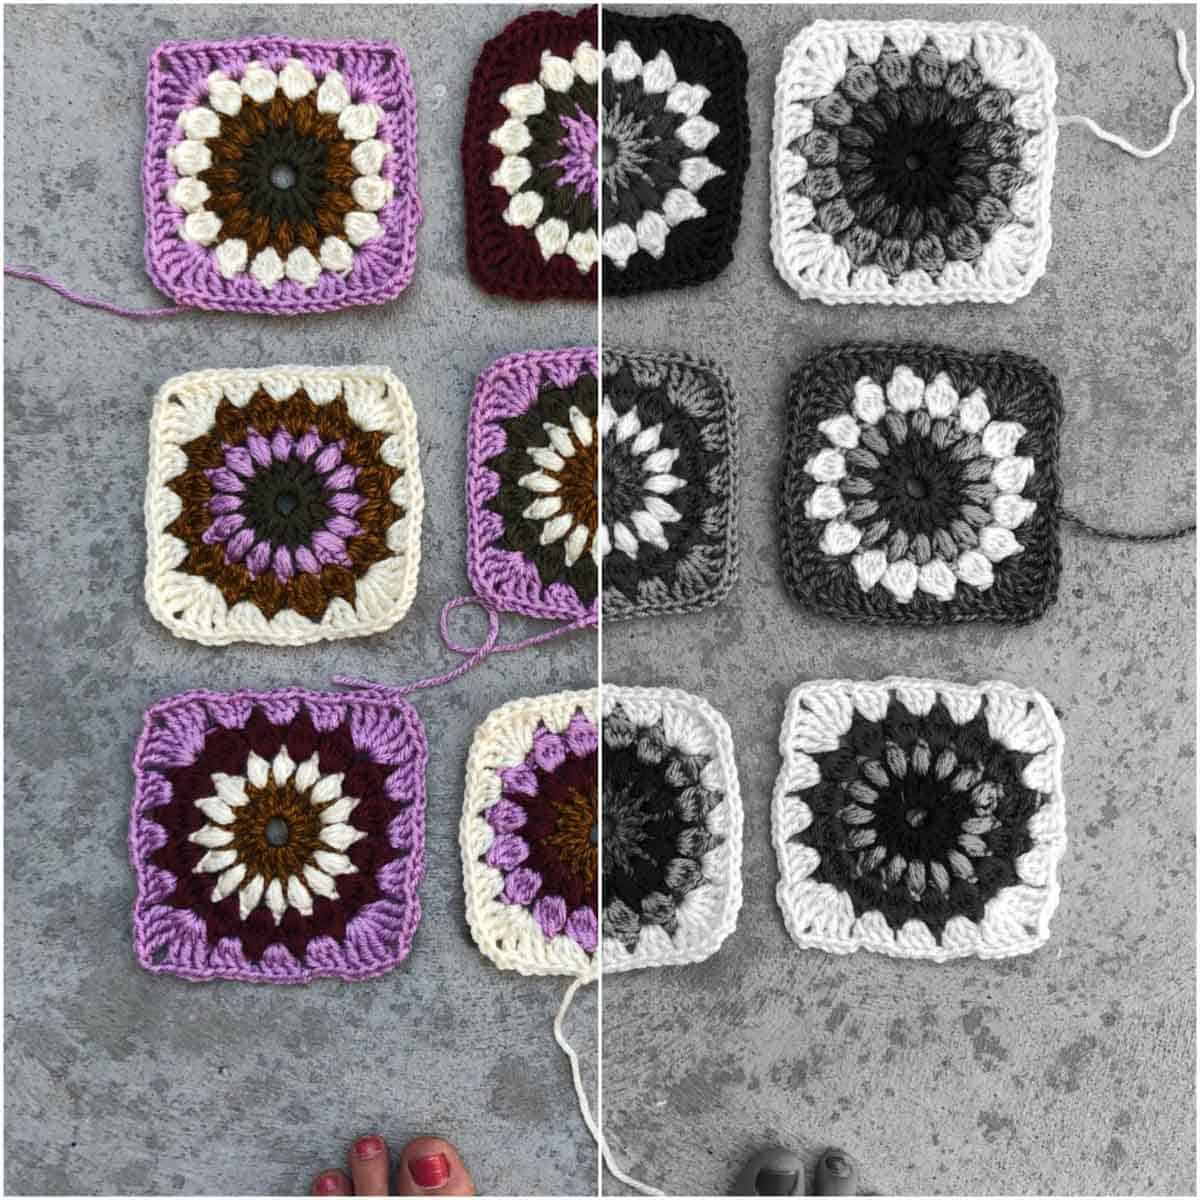
Take a photo of your colors and convert it to black and white. (You can easily do all of this on your phone in the basic camera app.) Doing so reduces colors to their relative value.
Is the level of contrast what you’re going for? If not, add a color or two that is noticeably lighter or darker than the rest and take another photo.
Achieving a Balanced Design
It can be helpful to generally alternate between lighter and darker colors each round. This prevents any one square from looking particularly “heavy” or “light” in the overall design.
Similarly, if you're going for a scrappy granny square sweater look, using a good mix of colors for all the round 1 circles (and subsequent rounds) can help achieve a random playful vibe.
In other words, avoid using the same color for most of the square centers, or the round 2 rings, etc. Mix it up and have fun!
FAQs
It can vary based on the size of the garment and the size of the squares. In the case of this Revival Cardigan pattern, it takes 24 squares to make any of the sweater sizes.
It can vary. One of the best aspects of granny squares is that the size can be adjusted by working additional rounds. In this pattern, each square should measure 4.75" after blocking.
Granny squares can be joined together by many methods. Some of the most popular include seaming with a tapestry needle, using single crochet stitches to "seam" the pieces together and using a granny stitch join as you go technique.
This sweater jacket is truly a seamless cardigan because we use method of crocheting the squares together with double crochet stitches.
That was so fun! Now what?
Invitation to our Facebook group
Come discuss making granny square sweaters and lots of other crochet projects and techniques in our Make & Do Crew Facebook group. Here thousands of helpful crocheters answer each others questions and share their stitches.
Find Your Next Free Cardigan Pattern
Browse the free patterns below for your next favorite cardi.
See more free crochet cardigan patterns →
How to Crochet a Granny Square Cardigan
Materials
Yarn
- Lion Brand Basic Stitch Anti-Pilling Weight: 4/medium - 185 yds, 3.5 oz
- Olive 202-132 – 8 (9, 11, 11, 13, 14, 15) skeins [(approx. 775 (880, 1025, 1100, 1210, 1305, 1485) g)]
- Ecru 202-098 – 2 skeins
- Gold Heather 202-401 – 1 skein
- Pomegranate 202-138 – 1 skein
- Prism 202-142 – 2 skeins
- Tan/White 202-603 – 1 skein
Additional Supplies
- Tapestry needle
- Size J 5.75 mm crochet hook or size needed to obtain gauge
- Stitch markers or safety pins
Abbreviations + Glossary (US Terms)
- 3dcCluster – group of 3 dc (granny st)
- ch(s) – chain(s)
- ch1sp – space created by 1 ch
- ch2sp – space created by 2 chs
- dc – double crochet
- dc2tog – double crochet 2 together (decrease)
- dc3tog – double crochet 3 together (decrease)
- rep – repeat
- RS – right side
- sk – skip
- sl st – slip stitch
- st(s) – stitch(es)
- tch – turning chain
- WS – wrong side
- yo – yarn over
Abbreviations and Glossary (US Terms):
Want some company while you crochet?
Get support (and camaraderie!) in the Make & Do Crochet Crew Facebook Group. Search “Make and Do Crochet Crew” on Facebook.com.
Permissions + Copyright
Please do not publish or share this pattern as your own. You may make items to sell with this pattern. In exchange, please link back to this page. Do NOT use my photos as your own sales photos.
Overall Pattern Notes
Instructions
Crochet Square Cardigan - Basic Process
- 1. Crochet the gauge swatch and adjust your hook size if necessary. (Good news! The gauge swatch can double as one of your pockets.)
- 2. Crochet 24 sunburst granny squares.

- 3. Use the join as you go technique to seamlessly join your squares.
- 4. Create the left armhole first, then the right armhole.
- 5. Join the shoulder seam and try your sweater on. Celebrate your progress!
- 6. Crochet the sleeves directly into the cardigan body. (No seaming!)
- 7. Attach the hood, pockets and work some finishing details.
- 8. You did it! You now have a Revival Granny Square Cardigan!
Overall Pattern Notes


Leave a Reply