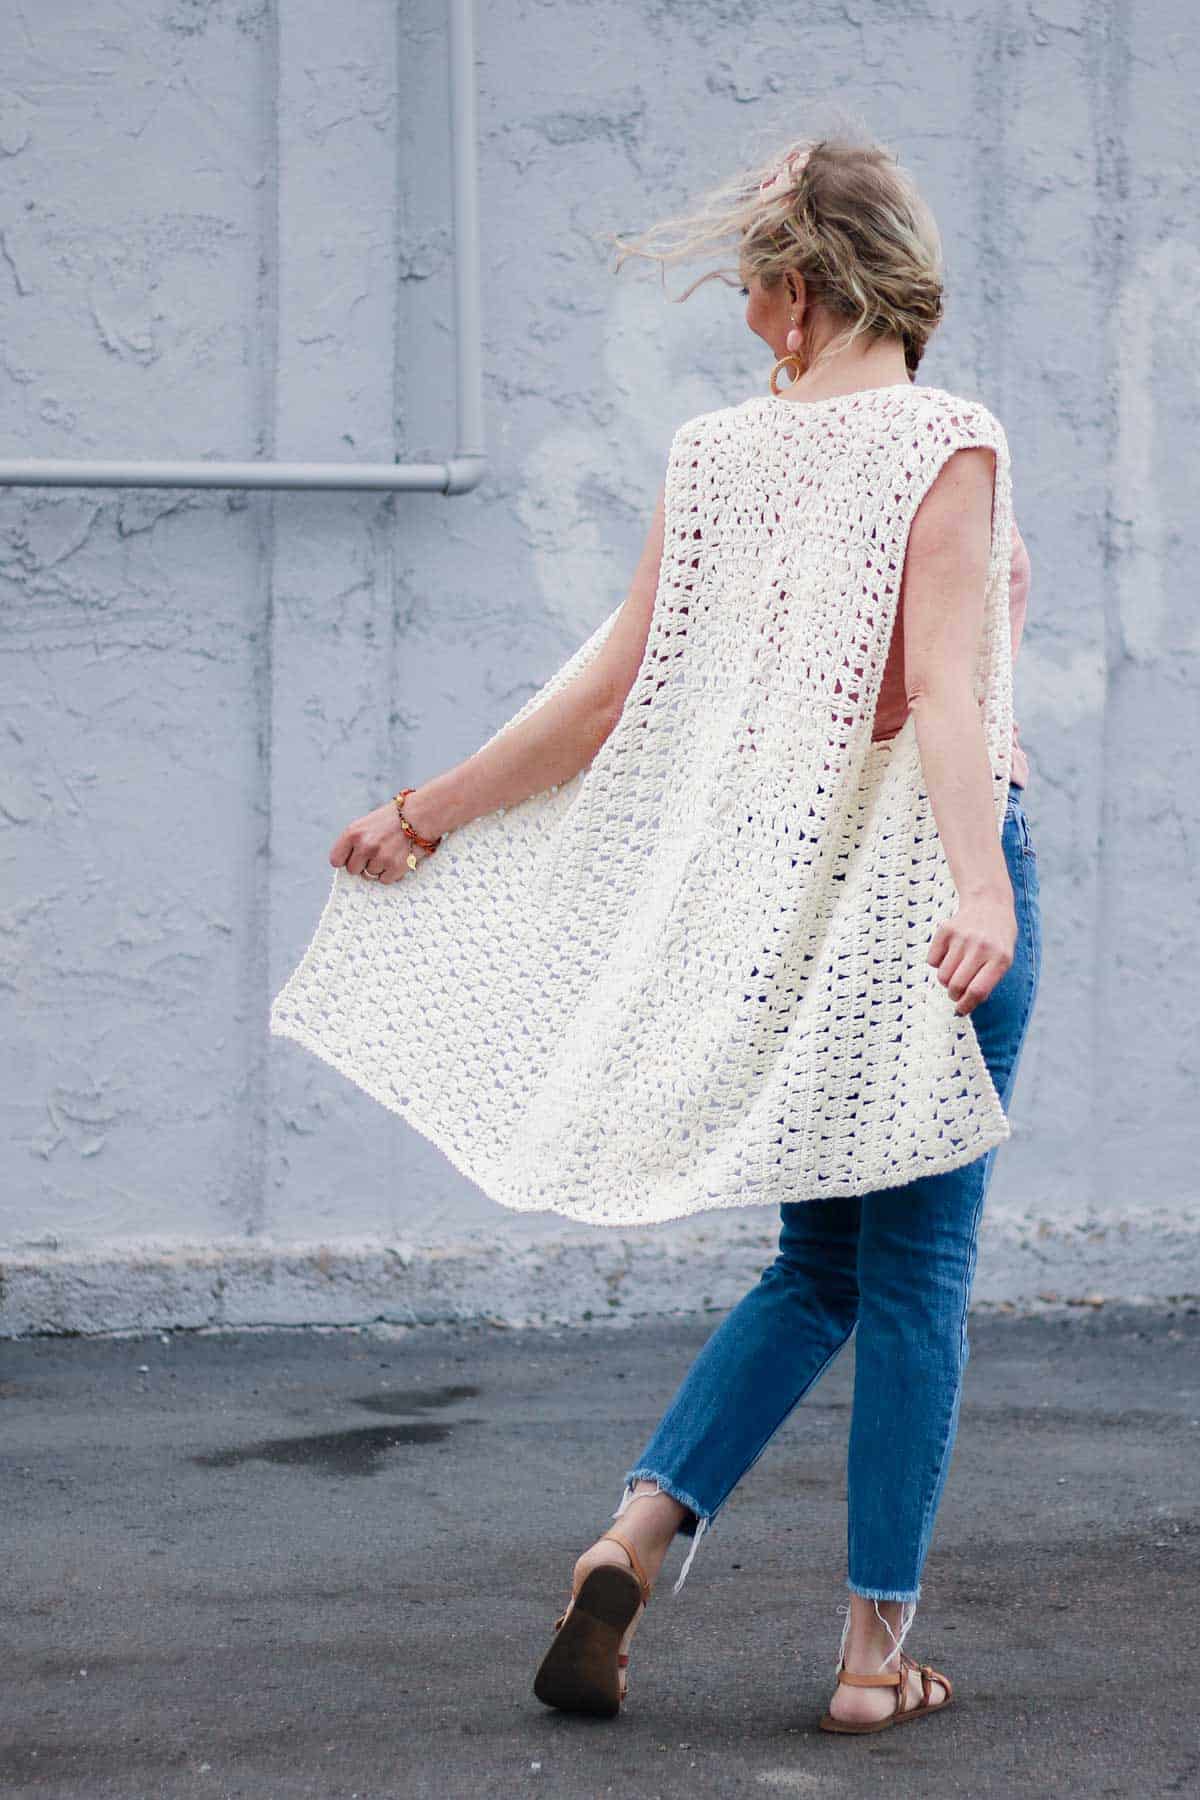
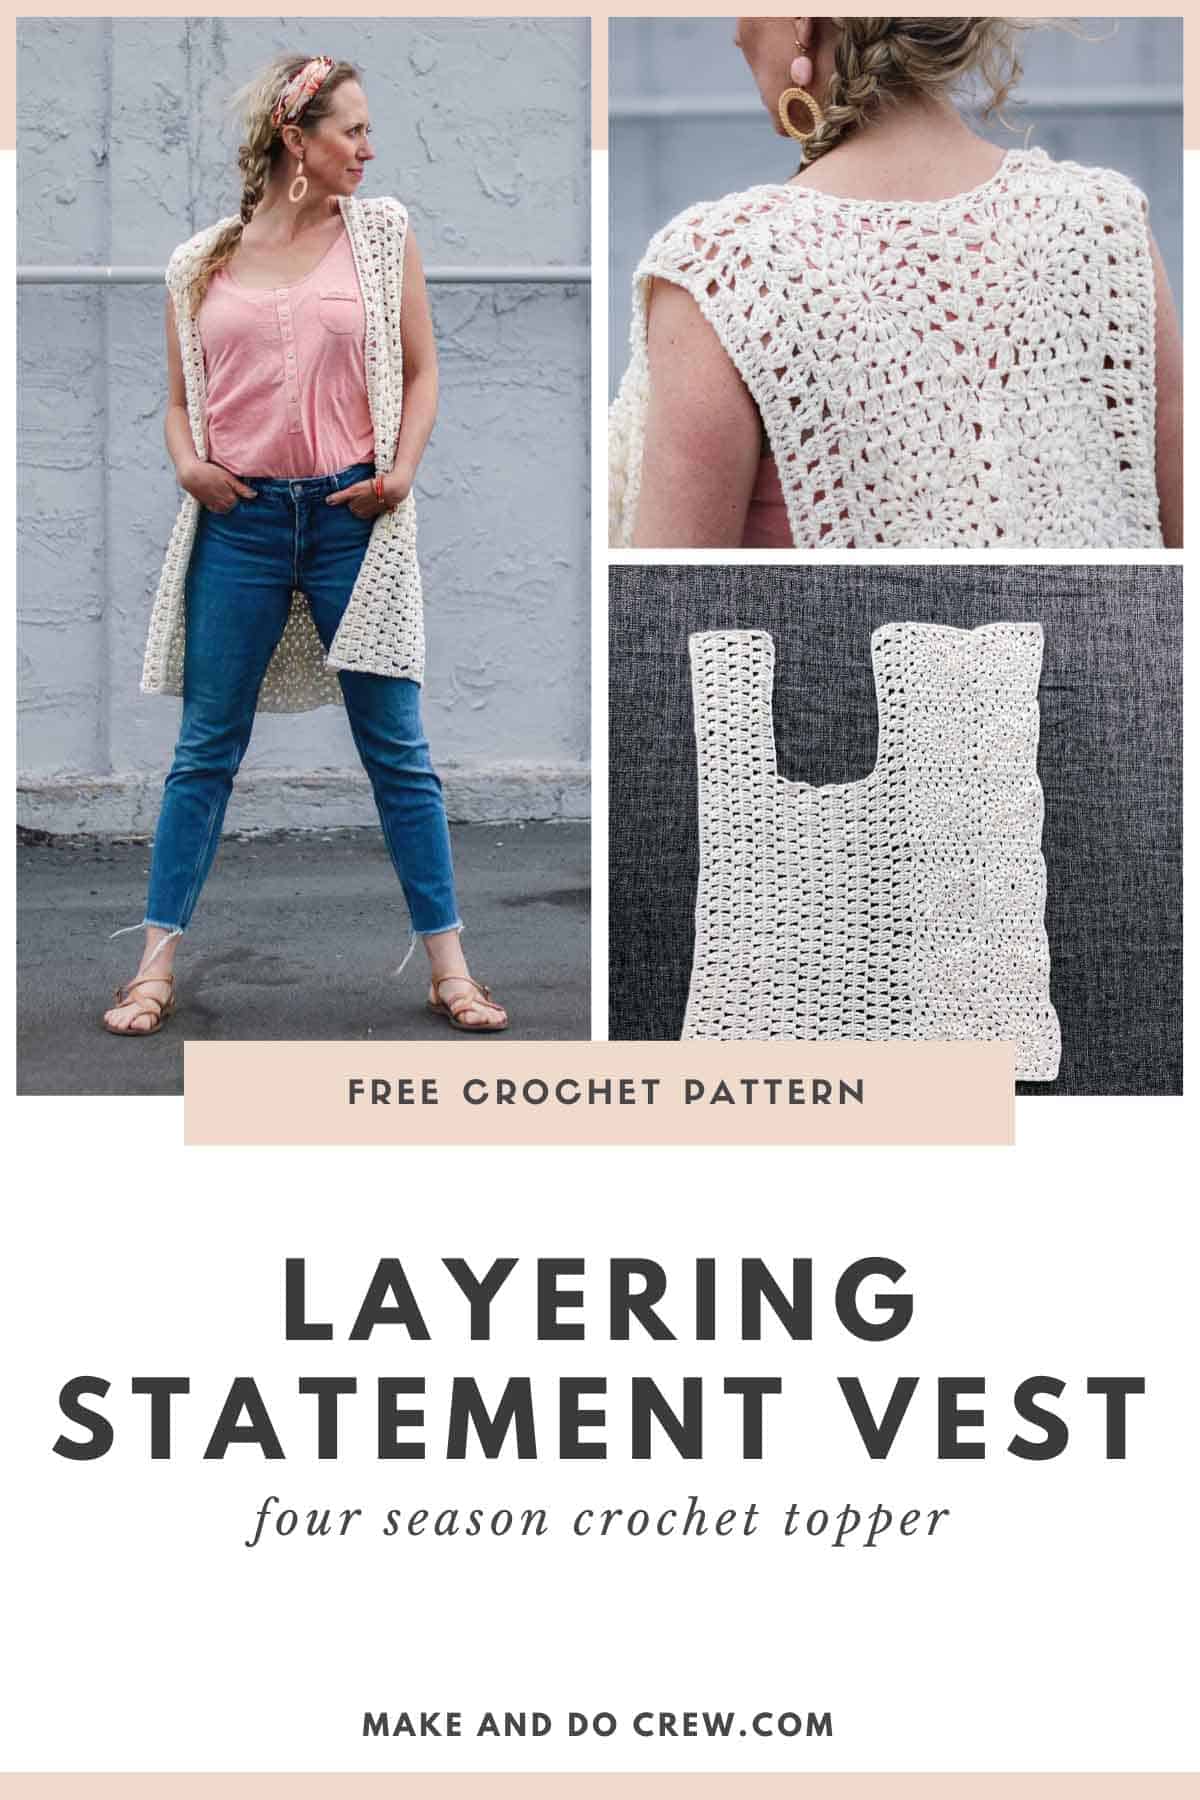
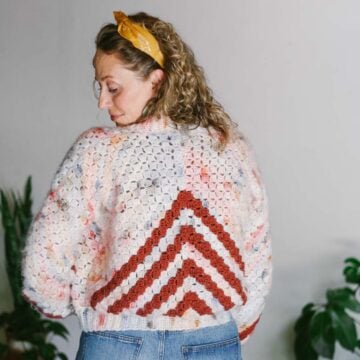
Sunburst granny squares team up with a modern, airy take on the traditional granny stitch in this free bohemian crochet vest pattern. Get the free pattern below or purchase the ad-free, printable PDF on LoveCrafts here or Etsy here.

This free bohemian crochet vest pattern is part of a collaboration with Lion Brand Yarns. This post contains affiliate links.
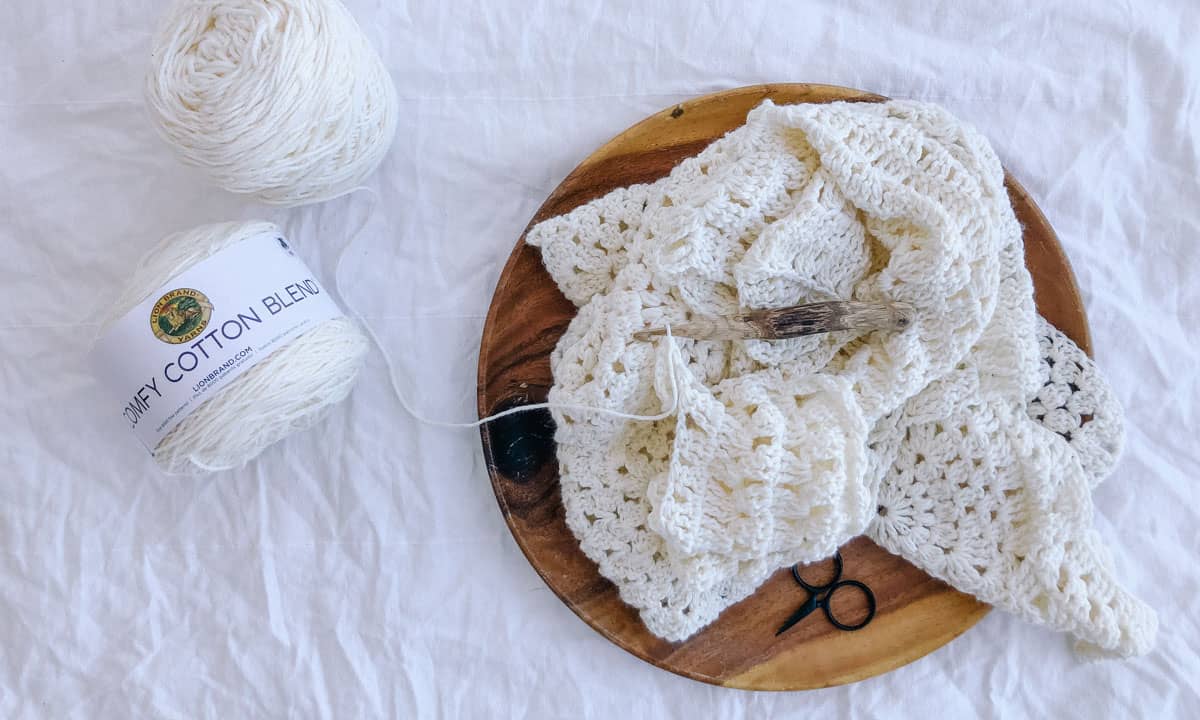
Begin this granny square vest begin by crocheting quick and satisfying squares, connect them using a continuous join technique (video included!) and then crochet the main body of the vest.
Add some effortless bohemian flair to just about any outfit with this four season statement piece! Read on for more details about the yarn and inspiration or scroll down for the complete free pattern.
Granny Squares, The Vest Version
I can't get enough granny squares lately. First it was making sunburst crochet squares, which turned into designing the Revival Cardigan, which then led me to want a satisfying "quick win" project during quarantine, which led to the Dahlia Scrapgan pattern. Ha. Sounds a bit like the book "When You Give a Mouse a Cookie."

Seamless With a Boho Vibe
If you followed along with the Revival Cardigan Casual Crochet Along, this bohemian crochet vest pattern is probably going to look familiar. Like the Revival Cardi, this vest pattern begins with sunburst granny squares to create a gorgeous vintage-inspired panel in the back.
These quick granny squares are finished off with a continuous join crochet technique, which means there is ZERO seaming needed to bring them all together. Whoohoo! And then again, just like in the Revival Cardigan, you'll work from each side of the granny square panel to complete the garment. Treble crochet stitches are used to keep the vest light, airy and perfect to throw on over just about any outfit.
A Yarn You'll Love (If You Don't Already)
My momma helped make the sample of this bohemian crochet vest pattern using a yarn from Lion Brand called Comfy Cotton Blend. This is the same yarn used in the Up North Cardigan and it's just a fantastic, affordable option for garments, home dec projects and even baby patterns.
What I love so much about Comfy Cotton Blend is that it includes a natural fiber (you guessed it---cotton!) mixed with some acrylic which creates a fiber that has the "organic," earthy vibe of cotton with the washability and price tag of acrylic. And the worsted weight of it means your projects come together pretty quickly without being chunky and dense. I just wish this yarn came in more solid colors because I'd love to make everything in it!
Lion Brand offers a kit that includes all the yarn you'll need to crochet your vest, plus a printable digital copy of the pattern. Get the Evermore Vest kit here!
purchase a kit with all the yarn you'll need ⇨
The Printable Pattern Option
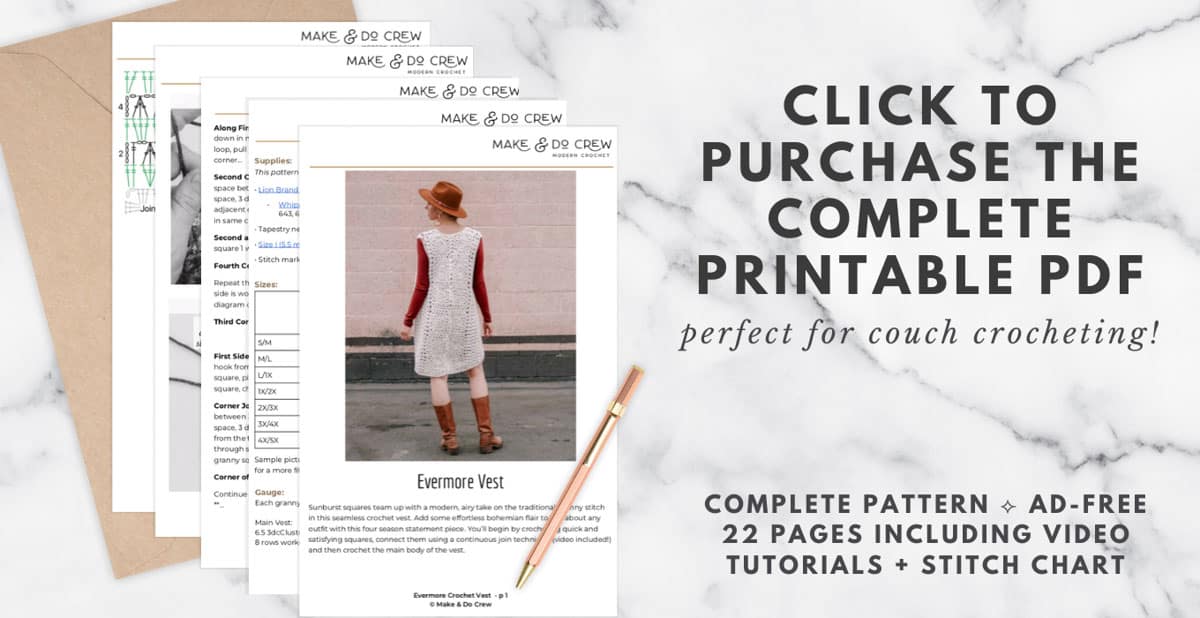
I know a lot of you prefer to print your patterns to crochet from the couch or the car or the beach. I offer ad-free PDFs to help you have an easily printable option that you can also view beautifully from your phone or tablet. In the Evermore Vest PDF, in addition to the complete pattern, tutorials and diagrams, I've included a bonus stitch chart that makes understanding the vest sides and fronts a breeze. If you're new to pattern reading or just prefer a more visual option, this stitch chart is going to be your best friend.
You can grab the ad-free, printable PDF on LoveCrafts here or Etsy here.
click to pin this pattern for later ⇨
More Free Crochet Sweater Patterns
Crochet sweater patterns don't need to be difficult. In fact, most of ours are made with very simple shapes. Dive into the wonderful world of crochet garments with cardigans, pullovers, ponchos, shrugs and more!


See more free crochet sweater patterns →
More Free Crochet Sweater Patterns
Crochet sweater patterns don't need to be difficult. In fact, most of ours are made with very simple shapes. Dive into the wonderful world of crochet garments with cardigans, pullovers, ponchos, shrugs and more!

See more free crochet sweater patterns →
Evermore Vest
Bohemian Crochet Vest - Free Pattern
Purchase the ad-free, printable PDF on LoveCrafts here or Etsy here.
Save this pattern to your Ravelry here.
Pin this pattern for later here.
Explanation:Sunburst squares team up with a modern, airy take on the traditional granny stitch in this seamless crochet vest. Add some effortless bohemian flair to just about any outfit with this four season statement piece. You’ll begin by crocheting quick and satisfying squares, connect them using a continuous join technique (video included!) and then crochet the main body of the vest.
Supplies:
• Lion Brand Comfy Cotton Blend (Weight: 3/light - 392 yds, 7 oz)
- Whipped Cream (756-098) – 3 (3, 4, 4, 4, 4, 4) skeins [(approx. 529 (556, 601, 628, 643, 685, 710) g)]
• Tapestry needle
• Size J (6.0 mm) crochet hook or size needed to obtain gauge
• Stitch markers or safety pins
purchase a kit with all the yarn you'll need ⇨
Sizes:
| Fits Actual Bust In Inches | Length (shoulder to bottom) In Inches | # of skeins required | |
| S/M | 33-36 | 33.5 | 3 |
| M/L | 37-41 | 33.5 | 3 |
| L/1X | 41-44 | 33.5 | 4 |
| 1X/2X | 45-48 | 33.5 | 4 |
| 2X/3X | 49-52 | 33.5 | 4 |
| 3X/4X | 53-56 | 33.5 | 4 |
| 4X/5X | 57-60 | 33.5 | 4 |
Gauge:
Each granny square after blocking (4 rounds) = 4.5”
Main Vest:
6.5 3dcClusters = 6”
8 rows worked in pattern = just over 6”
Abbreviations and Glossary (US Terms):
3dcCluster – group of 3 dc (granny st)
ch(s) – chain(s)
ch1sp – space created by 1 ch
ch2sp – space created by 2 chs
dc – double crochet
rep – repeat
RS – right side
rsc - reverse single crochet
sk – skip
sl st – slip stitch
sp(s) – space(s)
st(s) – stitch(es)
tch – turning chain
tc3tog – 3 tc closed as one st
tc – treble crochet
WS – wrong side
yo – yarn over
BegDcCl – beginning double crochet cluster – [yo, insert hook in the designated stitch, yo and pull up a loop, yo and pull through 2 loops] 3 times in the same stitch, yo and pull through all 4 loops.
4DcCl – 4 double crochet cluster – [yo, insert hook in the designated stitch, yo and pull up a loop, yo and pull through 2 loops] 4 times in the same stitch, yo and pull through all 5 loops.
Puff – [yo, insert hook in the designated stitch, yo and pull up a loop] 3 times in the same stitch, yo and pull through all 7 loops on hook, ch 1 to close puff.
Partial Puff – [yo, insert hook in the designated stitch, yo and pull up a loop] twice in the same stitch, yo and pull through all 5 loops on hook, ch 1 to close puff.

Purchase the ad-free, printable PDF on LoveCrafts here or Etsy here ⇨
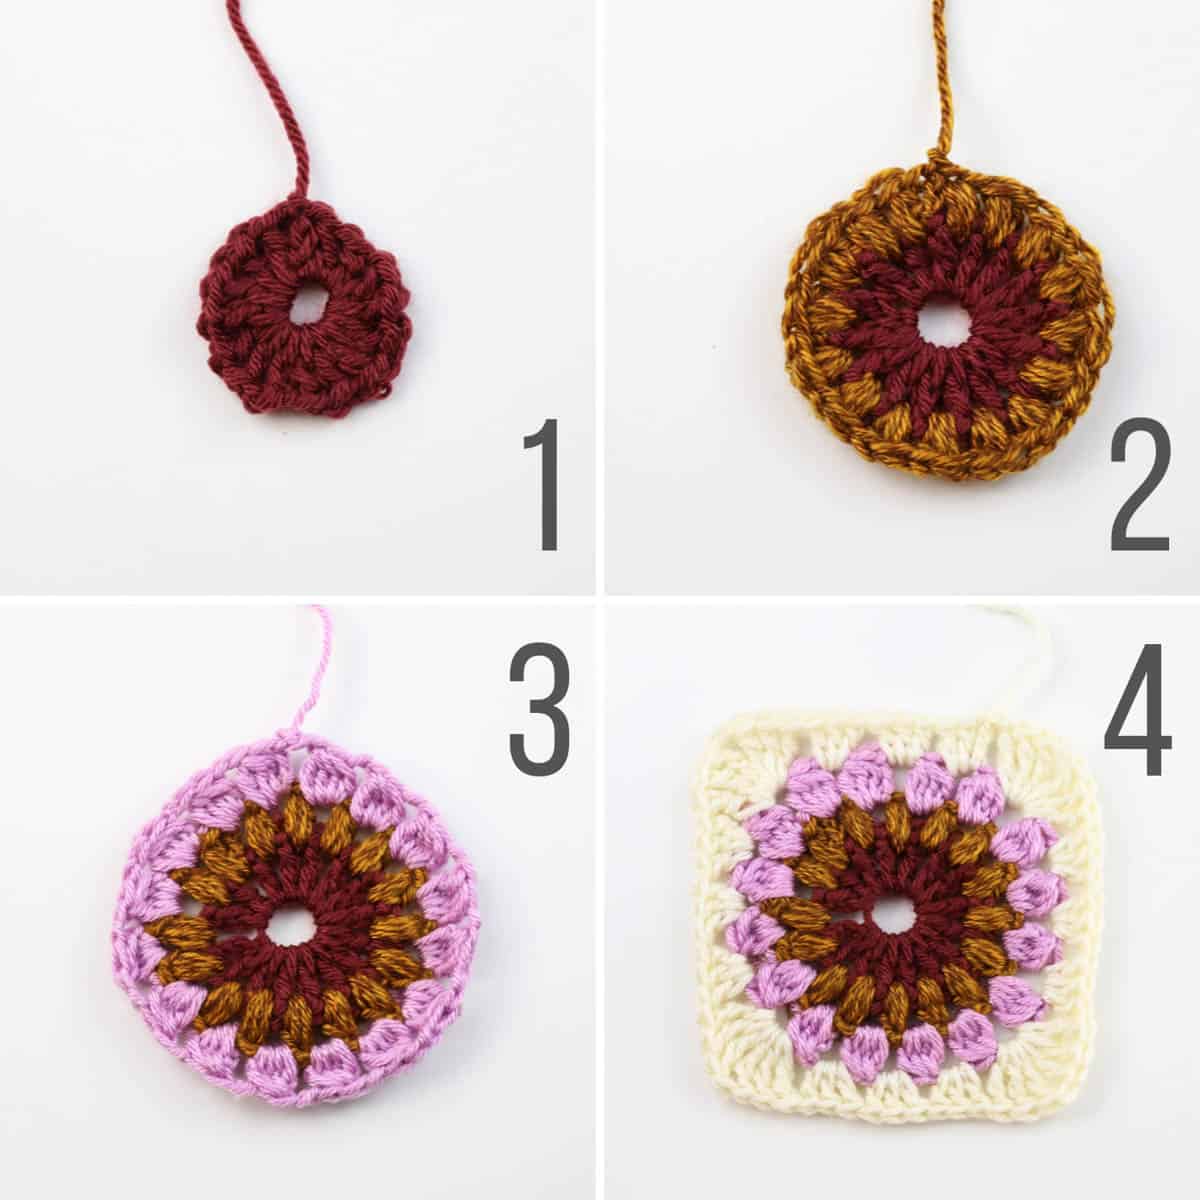
Granny Squares
Notes:
- See Abbreviations section above for explanations of each stitch.
- Watch this sunburst granny square video tutorial for visual guidance.
- Sunburst granny square is worked in the round without turning. Each round is finished with a sl st to the first st of the round.
- Ch-3 at beginning of round always counts as 1 dc. Work these chs quite tightly so as to minimize the potential gap they can create in a round.
All Sizes: Make 12 granny squares.
Foundation: Create a magic ring (or ch 4, sl st to join).
Round 1: Ch 4 (counts as 1 dc, 1 ch1sp), [dc, ch 1] in ring 15 times, sl st to third ch from beginning of round to join. (32 sts)
Round 2: Sl st into next ch1sp, ch 3, partial puff in same ch1sp, [puff in next ch1sp] 15 times, sl st to top of first puff to join. (16 puff sts)
Round 3: Sl st into next ch1sp, ch 2, BegDcCl in same ch1sp, ch 2, [4DcCl in next ch1sp, ch 2] 15 times, sl st to top of first cluster to join. (48 sts)
✨Unlock this free subscriber-exclusive pattern ✨
Follow these steps to view the full free pattern below
Now we will turn our granny circle into an official granny square.
Round 4: Sl st into next ch2sp, ch 3, 2 dc in same ch2sp as sl st, [3 dc in next ch2sp] twice, [3 tr, ch 1, 3 tr] in next ch2sp, *[3 dc in next ch2sp] 3 times, [3 tr, ch 1, 3 tr] in next ch2sp, rep from * twice more. (4 distinct sides made)
Fasten off.
Granny square should measure 4.5” after blocking. Once first square is complete, take the time to block and measure to ensure sizing is on track. If square is measuring small, increase your hook size and remake. If square is measuring large, decrease hook size and remake.
Blocking
Block all granny squares. To block, pin corners of each square down using T-pins. Direct steam from an iron or steamer at each square. (Do not touch iron directly to yarn, instead hold 6-10” away.) Blocking may seem unnecessary, but it really improves the overall look and shape of the squares.
Find Your Next Crochet Cardigan Pattern
See more free crochet cardigan patterns →
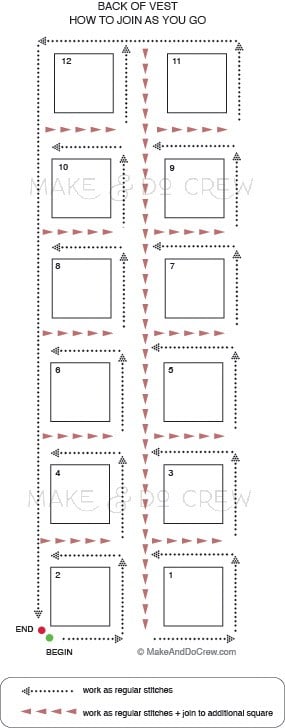
Joining Squares
Notes:
- Squares are joined using a join as you go method that creates zero extra ends to weave in. Hooray!
- In all sizes, two rows of six granny squares are joined for the vest back. See a video tutorial on this continuous joining method here.
Arrange squares in two rows of six. Make sure RS is facing up on all squares. See photo at end of pattern. Follow diagram at end of pattern that maps out the path to join all 12 squares without fastening off.
Attach yarn in bottom corner of first square:
In Same Corner: Ch 3 (counts as 1 dc), 2 dc in corner…
Along Next 3 Sides of Square: ...3 dc in between each 3dcCl to next corner…
And In Second and Third Corners: …[3 dc, ch 1, 3 dc] all in corner sp…
In Fourth Corner: ...3 dc, ch 2, (grab next granny square)...
In Second Granny Square:
In First Corner: ...3 dc, ch 2…
Along First Side of Square: …*Remove loop from hook, insert hook from the top down in next space of first granny square (between 3dcClusters), pick up working loop, pull through space; 3 dc in next space of second square, ch 2; rep from * to corner…
Second Corner: ...Remove loop from hook, insert hook from the top down in last space between 3dcClusters of first granny square, pick up working loop, pull through space, 3 dc in corner, ch 2, remove loop from hook, insert hook from the top down in adjacent corner of first granny square, pick up working loop, pull through space; 3 dc in same corner space of second granny square….
Second and Third Sides of Square and Third Corner: Work as sides/corner of square 1 were worked.
Fourth Corner: Work as fourth corner of first square was worked.
Repeat this joining process with 4 more squares. On sixth square, stop after second side is worked, just before 3rd corner (two sides will be unworked at this point). See diagram on at end of pattern.
Third Corner of Sixth Square: ...3 dc, ch 2, (grab next granny square)...
Joining Second Row of Grannies:
First Side of First Square: 3 dc, ch 2 in first corner, *remove loop from hook, insert hook from the top down in next space (between 3dcClusters) of adjacent granny square, pick up working loop, pull through space; 3 dc in next space on working square, ch 2; rep from * to corner…
Corner Join: ...Remove loop from hook, insert hook from the top down in last space between 3dcClusters of adjacent granny square, pick up working loop, pull through space, 3 dc in corner of working square, ch 2, remove loop from hook, insert hook from the top down in nearest corner space of Row 1, pick up working loop, pull through space, sl st into corner space of next square in Row 1, ch 2**, (grab next granny square to be joined on second row)...
Corner of Next Square: ...3 dc in corner space, ch 2, rep from * to next corner…
Continue adding squares in this manner until Row 2 contains 6 squares, ending at **...
Finishing End of Row Corner: ...3 dc in corner of 6th square, ch 2, remove loop from hook, insert hook from the top down in nearest corner space of Row 1, pick up working loop, pull through space, 3 dc in same corner of 6th square…
Completing Joining Round:
Continue around the second row of squares as shown in diagram on at end of pattern. Place 3 dc between each 3dcCl and place [3 dc, ch 1, 3 dc] in each corner space, joining as you go in the same manner as before.
Next, work down the first half of unfinished short edge of 12-granny rectangle in the same manner. At intersection where Granny Rows 1 and 2 meet, work into corners as 3 dc in corner of first granny, ch 1, sl st in ch2sp between grannies of first and second rows, ch 1, 3 dc in corner of next granny. Continue along short edge with 3 dc between each 3dcCl to next corner.
Place [3 dc, ch 1, 3 dc] in next corner and finish final edge with 3 dc between each 3dcCluster and work each intersection between grannies as was done for intersection of Granny Rows 1 and 2.
Final Corner Where Joining Began: 3 dc, ch 1, sl st to 3rd chain to join. Do not fasten off.
Find Your Next Crochet Pullover Sweater
See more free crochet pullovers patterns →
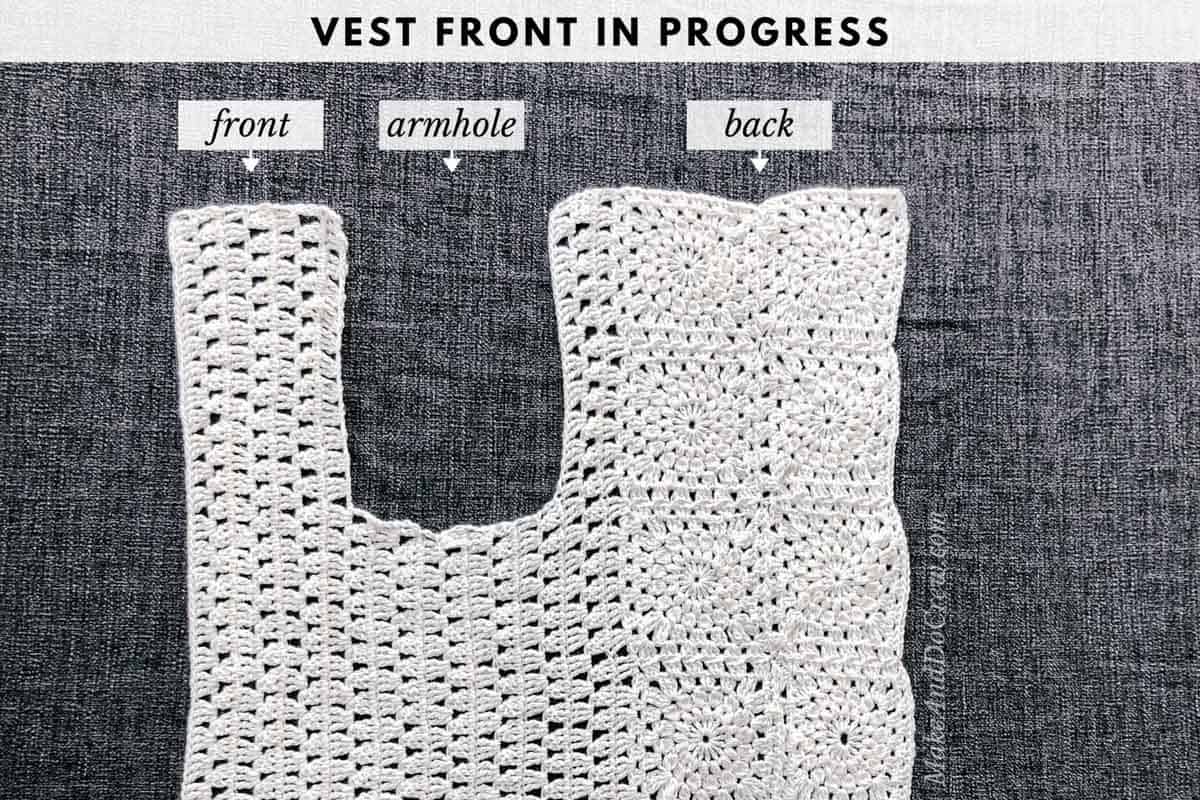
Vest Back
Notes:
- In Row 1, “Cluster” refers to a set of 3 dc from the previous round of joining grannies.
- Ch-5 counts as 1 tr and 1 ch1sp throughout.
- Ch-4 counts as 1 tr throughout.
- See stitch chart in printable PDF for visual guidance.
- Daisy Farm Crafts has a video tutorial on the basics of this stitch here. (Note that in this video she’s using double crochet and in this pattern, we’re using treble crochet.)
Using working yarn still attached from Vest Back Grannies:
Left Back:
(Left-Handed: Right Back)
With RS facing and yarn still attached from joining, Row 1 is worked along the nearest long side of the rectangle from the top (neck) to the bottom of the vest.
Row 1 (RS): Ch 4, tc in first corner sp, 3 tc in space between first two clusters, 3 tc in space between each cluster across. At each join seam between squares: (1 tc in corner, 1 tc in seam, 1 tc in next corner). At end of row, place 2 tc in corner sp; turn. (35 3tcClusters, 4 tc)
Row 2 (WS): Ch 4, tc in 2nd st, ch 2, *tc3tog over next 3tcCluster, ch 2; rep from * over each 3tcCluster to last 2 sts, tc in last 2 sts; turn.
Row 3 (RS): Ch 4, sk next tc, 3 tc in each ch2sp across to last 2 sts, sk next tc, 1 tc into top of tch; turn. (36 3tcClusters, 2 tc)
Stop here for Size S/M and M/L only; go to Left Armhole
Row 4 (WS): Ch 5, tc3tog over first 3tcCluster, *ch 2, tc3tog over next 3tcCluster; rep from * over each 3tcCluster to last st, ch 1, tc into top of tch; turn.
Row 5 (RS): Ch 4, 1 tc in first tc (base of ch-4), sk ch1sp, *3 tc in next ch2sp; rep from * to tch, end with 2 tc into 4th ch of tch; turn. (35 3tcClusters, 4 tc)
Stop here for Sizes L/1X, 1X/2X, and 2X/3X only; go to Left Armhole
Row 6 (WS): Ch 4, tc in 2nd st, ch 2, *tc3tog over next 3tcCluster, ch 2; rep from * over each 3tcCluster to last 2 sts, tc in last 2 sts; turn.
Row 7 (WS): Ch 4, sk next tc, 3 tc in each ch2sp across to last 2 sts, sk next tc, 1 tc into top of tch; turn.
Stop here for Sizes 3X/4X ond 4X/5X only; go to Left Armhole
Wanna save this pattern?
Left Armhole:
(Left-Handed: Right Armhole)
SIZES S/M, M/L, 3X/4X, and 4X/5X Only
Row 1 (WS): Ch 5, tc3tog over first 3tcCluster, ch 2, [tc3tog over next 3tcCluster, ch 2] 26 (24, -, -, -, 23, 23) times, ch 1, 1 tc in next st; turn, leaving remaining sts unworked. [27 (25, -, -, 24, 24) tc3tog clusters, 2 tc]
Row 2 (RS): Ch 4, 1 tc in first tc (base of ch-4), sk ch1sp, 3 tc in each ch2sp across, ending with 2 tc into 4th ch of tch; turn. [26 (24, -, -, -, 23, 23) 3tcClusters, 4 tc]
Row 3 (WS): Ch 4, 1 tc in next tc, ch 2, *tc3tog over next 3tcCluster, ch 2; rep from * to last 2 sts, 1 tc in next tc, 1 tc into top of tch; turn. [26 (24, -, -, -, 23, 23) tc3tog clusters, 4 tc]
Row 4 (RS): Ch 4, sk next tc, 3 tc in each ch2sp across to last 2 sts, sk next tc, 1 tc into top of tch; turn. [27 (25, -, -, -, 24, 24) 3tcCluster, 2 tc]
Stop here for Size S/M and skip to Last Row of Left Armhole.
Row 5 (WS): Ch 5, tc3tog over first 3tcCluster, *ch 2, tc3tog over next 3tcCluster; rep from * over each 3tcCluster to last st, ch 1, tc into top of tch; turn.
Rep Rows 2-4 once more.
Stop here for Size M/L; skip to Last Row of Left Armhole.
Rep Row 5, then Rows 2-4 once more
Stop here for Size 3X/4X; skip to Last Row of Left Armhole.
Rep Row 5, then Row 2, and go to Last Row of Left Armhole.
Stop here for Size 4X/5X; skip to Last Row of Left Armhole.
SIZES L/1X, 1X/2X, and 2X/3X Only
Row 1 (WS): Ch 4, 1 tc in next tc, ch 2, [tc3tog over next 3tcCluster, ch 2] 24 times, 1 tc in each of next next 2 tc; turn, leaving remaining sts unworked. (24 tc3tog clusters, 4 tc)
Row 2 (RS): Ch 4, sk next tc, 3 tc in each ch2sp across to last 2 sts, sk next tc, 1 tc into top of tch; turn. (25 3tcClusters, 2 tc)
Row 3 (WS): Ch 5, tc3tog over first 3tcCluster, ch 2, [tc3tog over next 3tcCluster, ch 2] 24 times, ch 1, tc next st; turn. (25 tc3tog clusters, 2 tc)
Row 4 (RS): Ch 4, 1 tc in first tc (base of ch-4), sk ch1sp, 3 tc in each ch2sp across, ending with 2 tc into 4th ch of tch; turn. (24 3tcCluster, 4 tc)
Row 5 (WS): Ch 4, 1 tc in next tc, ch 2, [tc3tog over next 3tcCluster, ch 2] 24 times, 1 tc in each of next next 2 tc; turn. (24 3tcCluster, 4 tc)
Rep Rows 2-4 once more.
Stop here for Size L/1X and skip to Last Row of Left Armhole.
Rep Row 5, then rep Row 2.
Stop here for Size 1X/2X; skip to Last Row of Left Armhole.
Rep Rows 3-4 and go to Last Row of Left Armhole.
Stop here for Size 2X/3X; skip to Last Row of Left Armhole.
All Sizes -- Last Row of Left Armhole
Armhole should now contain 4 (8, 8, 10, 12, 12, 14) rows. The next row ends with an addition to begin working the front.
SIZES S/M, M/L, 1X/2X, and 3X/4X Only
Last Row of Left Armhole (WS): Ch 5, tc3tog over first 3tcCluster, ch 2, [tc3tog over next 3tcCluster, ch 2] 26 (24, -, 23, -, 23, -) times, ch 1, tc into 4th ch of tch; ch 38 (46, -, 46, -, 50, -). [27 (25, -, 24, -, 24, -) tc3tog clusters, 2 tc, 38 (46, -, 46, -, 50, -) ch]
SIZES L/1X, 2X/3X, and 4X/5X Only
Last Row of Left Armhole (WS): Ch 4, 1 tc in next tc, ch 2, tc3tog over first 3tcCluster, ch 2, [tc3tog over next 3tcCluster, ch 2] - (-, 23, -, 23, -, 23) times, ch 2, 1 tc in next tc, 1 tc into top of tch; ch - (-, 49, -, 49, -, 53). [- (-, 24, -, 24, -, 24) tc3tog clusters, 2 tc, - (-, 49, -, 49, -, 53) ch]
Left Front:
(Left-Handed: Right Front)
SIZES S/M, M/L, 1X/2X, and 3X/4X Only
Row 1 / Beginning Front Row (RS): Sk 4 ch (counts as 1 tc), tc in next ch, skip next ch, *tc in next 3 chs, skip next ch; rep from * until arm inset is reached; (remainder of row is worked into Last Armhole Row), 2 tc in first tc, 1 tr in first ch1sp, 3 tc in each ch2sp across, ending with 2 tc into 4th ch of tch; turn. (35 tc clusters, 4 tc) Working yarn should now be at bottom of vest.
Row 2 (WS): Ch 4, 1 tc in 2nd tc, ch 2, *tc3tog over next 3tcCluster, ch 2; rep from * over each 3tcCluster to last 2 sts, 1 tc in each of last 2 sts; turn.
Row 3 (RS): Ch 4, sk next tc, 3 tc in each ch2sp across to last 2 sts, sk next tc, 1 tc into top of tch; turn.
Row 4 (WS): Ch 5, tc3tog over first 3tcCluster, *ch 2, tc3tog over next 3tcCluster; rep from * across to tch, ch 1, 1 tc into top of tch; turn.
Row 5 (RS): Ch 4, 1 tc in first tc (base of ch-4), sk ch1sp, 3 tc in each ch2sp across, ending with 2 tc into 4th ch of tch; turn.
Row 6 (WS): Rep Row 2.
Row 7 (RS): Rep Row 3.
Stop here for Sizes S/M and M/L.
Row 8 (WS): Rep Row 4
Stop here for Sizes 1X/2X and 3X/4X.
SIZES L/1X, 2X/3X, and 4X/5X Only
Row 1/Beginning Front Row (RS): Sk 5 ch (counts as 1 missed ch and 1 tc), *tc in next 3 chs, skip next ch; rep until arm inset is reached; (remainder of row is worked into Last Armhole Row), sk first 2 tc, 3 tc in each ch2sp across to last 2 sts, sk next tc, 1 tc into top of tch; turn. (36 tc clusters, 2 tc) Working yarn should now be at bottom of vest.
Row 2 (WS): Ch 5, tc3tog over first 3tcCluster, *ch 2, tc3tog over next 3tcCluster; rep from * across to tch, ch 1, 1 tc into top of tch; turn.
Row 3 (RS): Ch 4, 1 tc in first tc (base of ch-4), sk ch1sp, 3 tc in each ch2sp across, ending with 2 tc into 4th ch of tch; turn.
Row 4 (WS): Ch 4, 1 tc in 2nd tc, ch 2, *tc3tog over next 3tcCluster, ch 2; rep from * over each 3tcCluster to last 2 sts, tc in last 2 sts; turn.
Row 5 (RS): Ch 4, sk next tc, 3 tc in each ch2sp across to last 2 sts, sk next tc, 1 tc into top of tch; turn.
Row 6 (WS): Rep Row 2.
Row 7 (RS): Rep Row 3.
Stop here for Size L/1X.
Row 8 (WS): Rep Row 4.
Stop here for Sizes 2X/3X.
Row 9 (RS): Rep Row 5.
Stop here for Sizes 4X/5X.
More Free Crochet Shirts + Tops Patterns
See more free crochet shirts + tops patterns →
All Sizes
Counting from first round after granny squares were joined, Left Side should now contain 15 (19, 21, 24, 26, 28, 31) rows of tc stitches. Fasten off.
Right Back/ Armhole / Front
(Left-Handed: Left Back/Armhole/Front)
With WS facing, attach yarn in top corner by neck.
Repeat Left Back/Armhole/Front. Note that the RS/WS designations of each row will be reversed. The RS of the Granny Squares dictate the RS of the vest.
Counting from first row after granny squares were joined, Right Side should now contain 15 (19, 21, 24, 26, 28, 31) rows of tc stitches. Place marker in live stitch and keep yarn attached for Finishing Border.
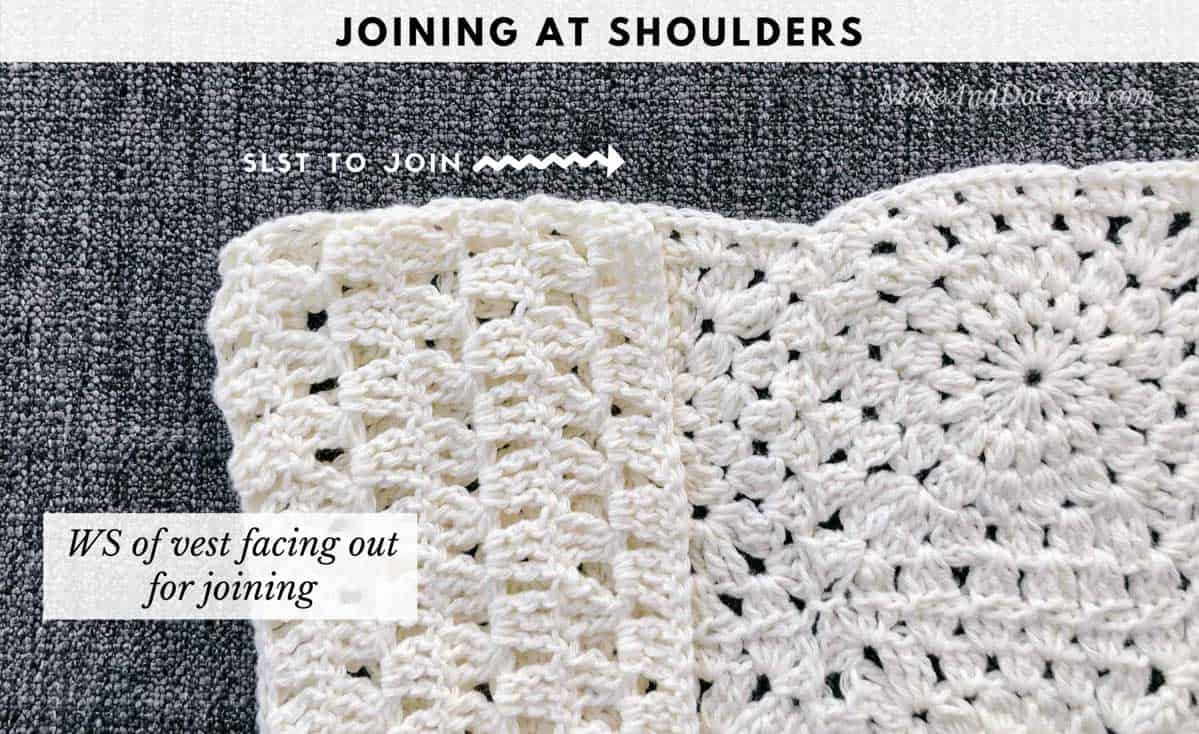
Joining Shoulders
With RS facing in and WS facing out, pin vest fronts to back at shoulders. Beginning from shoulder and working toward neck, sl st to join front to back. Rep on second side. Fasten off.
Finishing + Border
Steaming
Gently steam block vest if desired. Do not touch iron/steamer to yarn while blocking.
Finishing Border
Notes:
- Border is worked in reverse single crochet (crab stitch), which means you’re crocheting in the opposite direction you’re used to. Watch the end of this crochet fedora video tutorial for a visual demonstration.
With RS facing and using yarn still attached at bottom (bottom, bottom, top, top, top, bottom)of Right Front:
Right-handed - work clockwise beginning with the bottom (bottom, bottom, Right Front, Right Front, Right Front, bottom) of vest.
Left-handed - work counterclockwise beginning with the Right Front (Right Front, Right Front, bottom, bottom bottom, Right Front) of vest.
Finishing Border: Ch 1, rsc evenly around entire vest placing 1 st in each tc and 2-3 sts in each row raw edge, sl st first st of round to join. Fasten off.
Weave in remaining ends.
Wear your vest with pride knowing your bohemian spirit will shine evermore!
That was so fun! Now what?
Invitation to our Facebook group
Come discuss crocheting bohemian vest patterns and lots of other projects and techniques in our Make & Do Crew Facebook group. Here thousands of helpful crocheters answer each others questions and share their stitches. Come join us here.
Find Your Next Sweater Project
- Poncho With Pockets - slim cut + kangaroo pocket
- The Dwell Sweater - with plus sizes + video tutorials
- Beginner Cardigan - made from rectangles
- Pullover Yoke Sweater - nearly seamless
- Long Boho Cardigan Pattern - with fringe!
- Summer Crochet Cardigan Pattern - short sleeved topper
- Lightweight Cardigan - made from hexagons
- Color Block Cardi Pattern - drapey and soft
More Free Patterns + Tutorials
Can't get enough free crochet patterns!? Me either. You'll definitely want to breeze through these collections to find your next project.
- 55+ Free Crochet Sweater and Cardigan Patterns - our most popular garments
- 40+ Free Crochet Blanket Patterns - baby blankets, throws + c2c graphgans
- 36+ Granny Square Patterns + tips for the perfect square
- 30+ Crochet Animal Patterns - adorable amigurumi stuffed animals
- Crochet Gift Ideas - easy patterns to make for others
- Fast Crochet Projects - start to finish in less than a day
Learn a New Skill
And when you're ready to master a new skill, check out our detailed guides that include everything you need to know to level up your crochet game.
- How to Corner to Corner (C2C) Crochet for Beginners - with video tutorials to get you started
- How to Crochet a Beginner Hat - make an entire beanie in 1.5 hours!
- How to Crochet Amigurumi for Beginners - the ultimate guide to making your own toys and plushies
- How to Tunisian Crochet - learn with this video and a standard hook


Leave a Reply