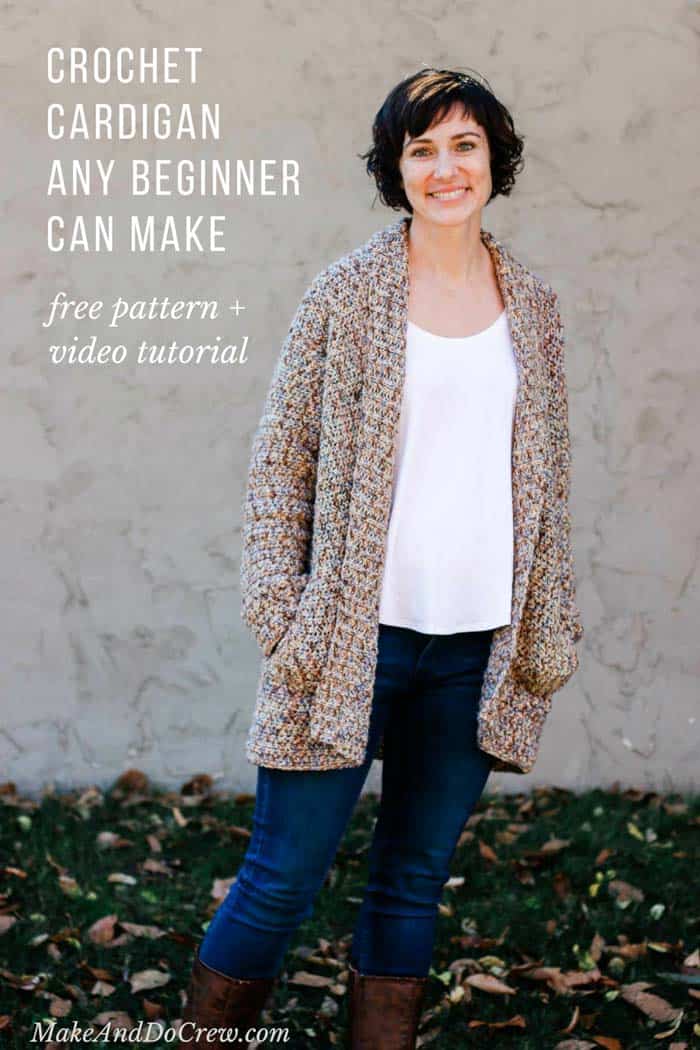
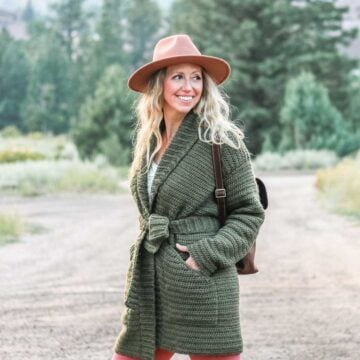
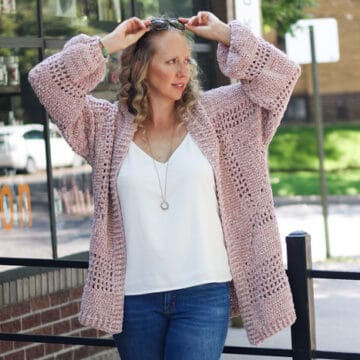
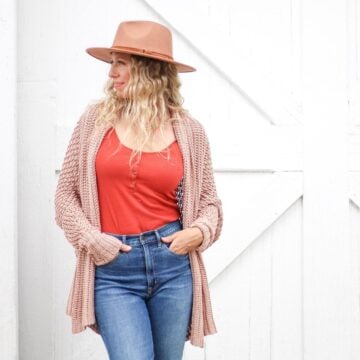
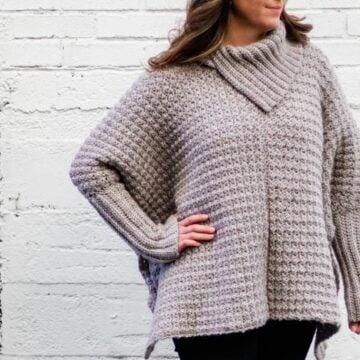
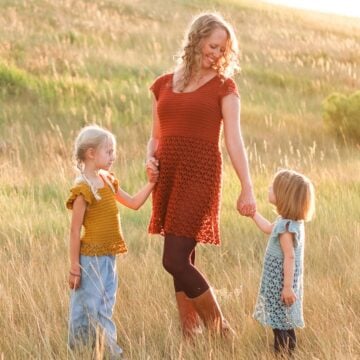
This easy, cotton crochet cardigan pattern for beginners uses a very simple construction to create a show-stopping look with entry-level skills.
Get Part 1 of the free pattern and video tutorial below, including plus sizes, or purchase the complete ad-free, printable PDF with schematic here. Find Part 2 here.
This crochet cardigan pattern for beginners is part of a collaboration with Lion Brand Yarn. This post contains affiliate links.
Jump to:
- The Pattern Lowdown
- Can a Beginner Crochet The Up North Cardigan?
- Why You'll Love This One Piece Sweater
- What Makes This Make and Do Crew Cardigan So Easy?
- The Perfect Fiber for an All Season Cardigan
- Lightweight & Comfy Yarn
- Video Tutorial: How to Crochet the Up North Cardigan
- Up North Cardigan Pattern Written Instructions - Part 1
- Final Thoughts
- That was so fun! Now what?
- Invitation to our Facebook group
The Pattern Lowdown
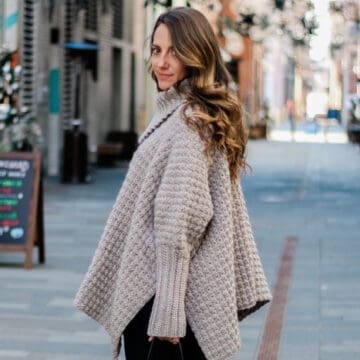
With the main fronts and backs of this easy crochet sweater pattern for beginners worked in one piece and the sleeves crocheted in the round in Part 1, you'll eliminate many of the seams you'd find in a crochet or knit sweater.
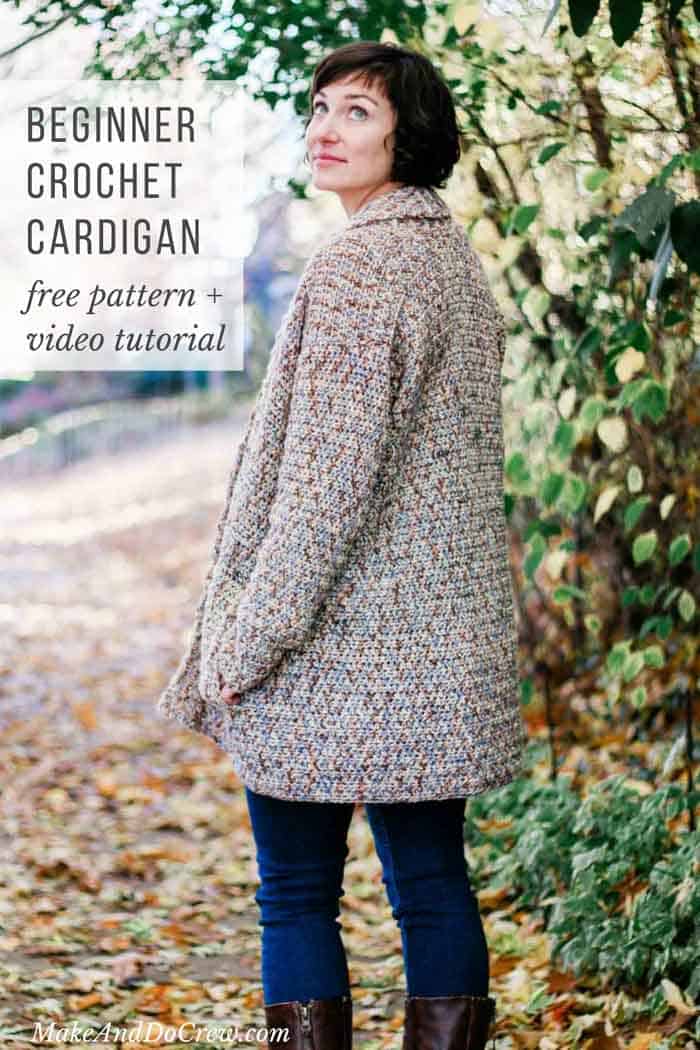
Instead, in Part 2, you'll focus your energy on a few specific accent details like a rolled collar and comfy pockets that'll elevate the entire look of your handmade cardigan.
Keep reading for lots more pattern details or scroll down for Part 1 of the video tutorial and the free crochet cardigan pattern for beginners.
Can a Beginner Crochet The Up North Cardigan?
Yes, they can!
For the longest time, I thought that learning how to crochet a sweater had to be this mind-numbing process of counting, increasing and decreasing, only to end up with something that would get passed over in a thrift store. Guys, I was so wrong.
Crocheting a sweater is a little like following a recipe. The pattern tells you each step of the process and your job is to execute those steps in order. Well, the Up North Cardigan is a very simple recipe.
Why You'll Love This One Piece Sweater
To make this easy crochet cardigan pattern, you only need to know how to half double crochet, work in the round and sew a very simple seam. (Don't worry, though; a tutorial is included in the free pattern below!)
For me, these steps represent my favorite kind of crochet sweater pattern--each one on its own is quite easy and beginner-friendly, but the sum of the steps creates something that looks far from entry-level.
Related: 30+ Free Crochet Poncho Patterns - for all seasons
More Free Crochet Sweater Patterns
Crochet sweater patterns don't need to be difficult. In fact, most of ours are made with very simple shapes. Dive into the wonderful world of crochet garments with cardigans, pullovers, ponchos, shrugs and more!


See more free crochet sweater patterns →
What Makes This Make and Do Crew Cardigan So Easy?
Often I think the overwhelm in figuring out how to crochet a sweater comes from the idea that there are so many complicated pieces to make, only to then need to figure out how to not ruin them in the process of putting them together.
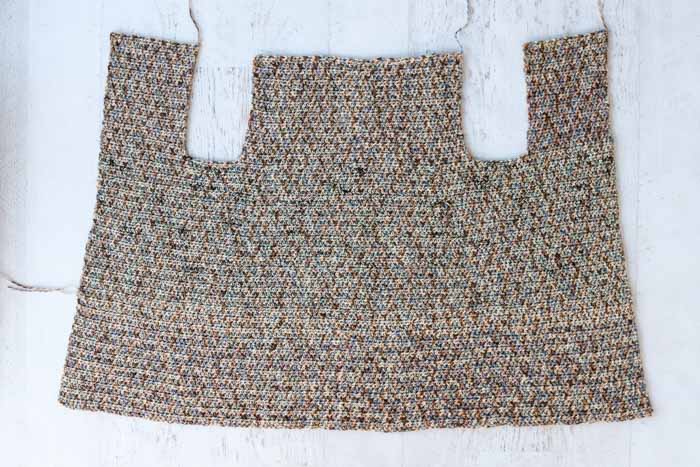
In the case of this beginner crochet cardigan pattern, the entire main body of the sweater is worked in one piece that is slightly tapered. This means simple shoulder seams are the only seaming necessary to turn your odd-shaped tablecloth into something wearable.
If you like the sound of this, you'll love the free Remix Cardigan pattern too!
Next, you'll work the sleeves in turned rounds, which means they're very similar to crocheting regular side to side rows of half double crochet, but you'll slip stitch to join each one so that you don't have to seam the sleeves once they're finished.
(Sound confusing? The video tutorial below covers each part of crocheting this sweater step-by-step!)
Lastly, you'll use more half-double crochet stitches to make a coordinated ribbed collar and pocket cuffs.
AND THEN...you'll have your very own completely handmade sweater that looks and feels like a luxury splurge!

The Perfect Fiber for an All Season Cardigan
Cotton is one of my favorite fibers to crochet with (like in the Urban Nomad Boho Bag pattern or for crochet shoes with flip flop soles), but I hadn't ever come across an affordable cotton yarn that I also thought had the right softness and drape for a crochet sweater pattern.
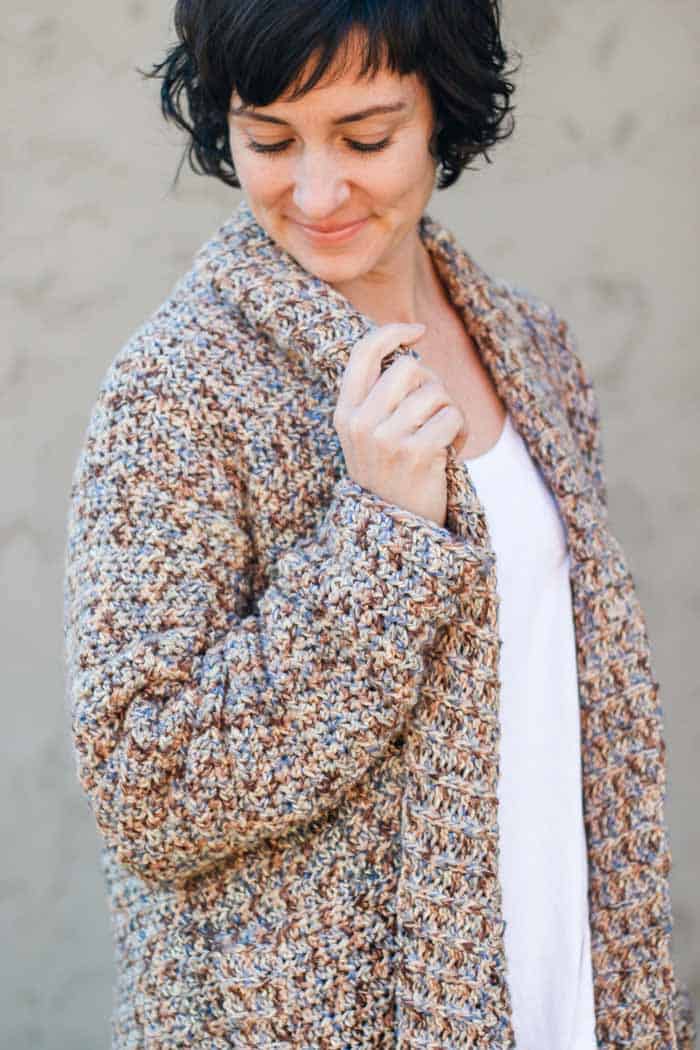
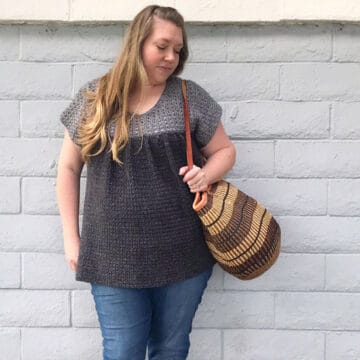
Enter Lion Brand's Comfy Cotton Blend! This yarn is a fairly new addition to Lion Brand's lineup, and as it sounds, it's a blend of 50 percent cotton and 50 percent acrylic.
The result is this beautiful marled yarn that is lightweight enough to drape elegantly and heavy enough to make for a comfortable, sophisticated-feeling sweater.
Lightweight & Comfy Yarn
It's hard to explain, but this sweater has a different weight to it that is incredibly pleasant to wear. I hope you try this yarn because everyone I've chatted with about it on Instagram has loved it too. (If we're not Instagram friends, come over and say hello!)
There are many lovely nature-inspired colors of Comfy Cotton Blend, and you can check them out here.
UPDATE: Lion Brand has turned the Up North Crochet Cardigan into a crochet kit! You’ll receive all the yarn you need to make your own, plus a printed copy of the pattern. Grab your kit here!

Don't spend hours for a "meh" result!
Tired of crocheting garments that don't fit? Learn our C.R.A.F.T. Framework to make sweaters that fit and feel amazing!
Related: 27+ Free Crochet Beanie Patterns

Video Tutorial: How to Crochet the Up North Cardigan
No matter how easy the pattern is, I know some of us just learn better visually, so below you'll find Part 1 of the step-by-step video tutorial for crocheting the Up North Cardigan. (And if crochet video tutorials are your jam, you can find all our video tutorials here!)
Once you're finished with Part 1, move on to Part 2 of the video tutorial and free pattern.
Up North Cardigan Pattern Written Instructions - Part 1
Explanation:
This easy crochet cardigan pattern for beginners uses a very simple construction to create a show-stopping look with entry level skills.
With the main fronts and backs of this pattern worked in one piece and the sleeves crocheted in the round, you'll eliminate many of the seams you'd find in a typical sweater.
Instead, you'll focus your energy on a few specific accent details like a rolled collar and comfy pockets that'll elevate the entire look of your four-season cotton cardigan.
Advanced beginner skills required, including half double crochet, working in the round and basic seaming. (See photo below in Seaming section for tutorial.)
Supplies:
Purchase a kit with all the yarn + a printed copy of the pattern here.
• Lion Brand Comfy Cotton Blend (Weight: 3/light - 392 yds, 7 oz)
- Driftwood (#756-710) – 5 (5, 6, 7, 7, 8) skeins
[(approx. 880 (980, 1095, 1220, 1315, 1430) g)]
• Tapestry needle
• Size K (6.5 mm) crochet hook
• Stitch markers or safety pins
• T-pins and iron or steamer for blocking
Sizes:
Small - fits 28-32” bust
Medium - fits 32-36” bust
Large - fits 36-40” bust
1X - fits 40-44” bust
2X - fits 44-48” bust
3X - fits 48-52” bust
Sample pictured on a 5’5” model with a 32” bust.
For additional measurement details for each finished size, see schematic in ad-free, printable PDF.
Gauge:
13 hdc x 10 rows = 4”
Abbreviations and Glossary (US Terms):
ch – chain
dec – decrease
hdc – half double crochet
hdc2tog – half double crochet two together
hdcflo – half double crochet through the front loop only
hdcflo2tog– half double crochet two together through the front loop only
inc – increase
PM – place marker
RS – right side
sk – skip
sl st – slip stitch
st(s) – stitch(es)
WS – wrong side
Overall Pattern Notes:
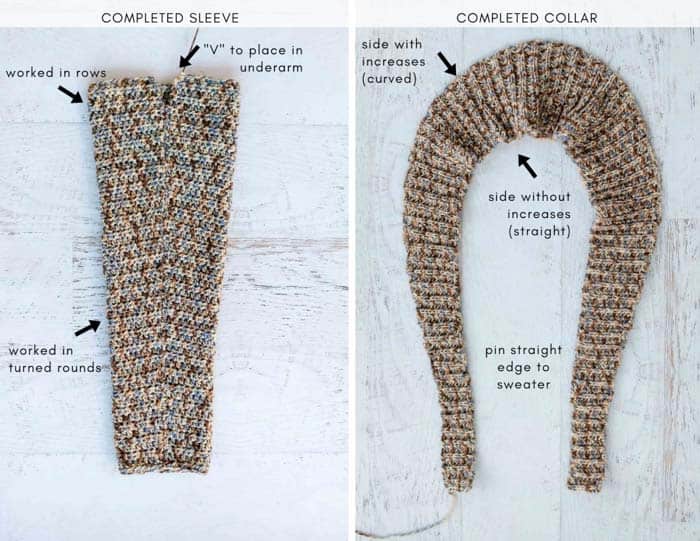
• To minimize seaming, cardigan back and fronts are worked in one piece. Similarly, sleeves are worked in the round and added to main sweater piece. Collar and pockets are worked separately and added last.
• Chain 2 at beginning of row never counts as a half double crochet.
• Pattern is written for smallest size, with larger sizes following in parentheses. S (M, L, 1X, 2X, 3X) It can be helpful to circle all notes for your size before beginning.
Wanna save this pattern?
Main Body of Sweater
Notes:
• Recommended Foundation Row is worked in foundation half double crochet stitches because it’s much easier than working into a long chain.
If foundation half double crochet intimidates you, use Alternative Foundation Chain followed by Alternative Foundation Row 1.
Recommended Foundation Row 1 (RS): 122 (134, 148, 160, 174, 186) foundation hdc; turn. [122 (134, 148, 160, 174, 186)]
Or
Alternative Foundation Chain (WS): Ch 124 (136, 150, 162, 176, 188).
Alternative Foundation Row 1 (RS): Sk 2 ch, hdc in each ch to end; turn. [122 (134, 148, 160, 174, 186)]
✨Unlock this free subscriber-exclusive pattern ✨
Follow these steps to view the full free pattern below
Row 7 (WS dec): Ch 2, hdc in next 35 (40, 46, 49, 52, 56) hdc, hdc2tog, hdc in each hdc until 2 sts remain before marker, hdc2tog, hdc in each hdc to end of row; turn. [114 (126, 140, 152, 166, 178)]
Row 9 (WS dec): Ch 2, hdc in next 35 (40, 46, 49, 52, 56) hdc, hdc2tog, hdc in each hdc until 2 sts remain before marker, hdc2tog, hdc in each hdc to end of row; turn. [112 (124, 138, 150, 164, 176)]
End with a WS row. Do not fasten off. Remove markers.

Dividing for Back and Fronts:
Notes:
• Back and both fronts will now be worked in separate columns. (See photo in blog post above for what back and fronts will look like once complete.)
• When working between markers, last stitch will be completed in stitch before marker, then turn work.
PM in between the stitches listed below counting from each side of sweater front edges (2 new markers from each edge, 4 markers total). These 4 markers mark the edges of the two armholes.
First set:
S: 22nd and 23rd sts
M: 24th and 25th sts
L: 24th and 25th sts
1X: 27th and 28th sts
2X: 30th and 31st sts
3X: 32nd and 33rd sts
Second Set:
S: 30th and 31st sts
M: 35th and 36th sts
L: 41st and 42nd sts
1X: 44th and 45th sts
2X: 47th and 48th sts
3X: 51st and 52nd sts
First Front:
Continuing with yarn attached:
Row 1 (RS): Ch 2, hdc in each hdc to first armhole marker; turn. [22 (24, 24, 27, 30, 32)]
Row 2 (WS): Ch 2, hdc in each hdc to end; turn. [22 (24, 24, 27, 30, 32)]
Repeat Rows 1 and 2 until 20 (20, 22, 24, 24, 26) rows total are completed in First Front. End with a WS row. Fasten off leaving a 24” tail.

Back:
With RS facing, attach yarn in 31st (36th, 42nd, 45th, 48th, 52nd) stitch, right on the other side of armhole from First Front.
Row 1 (RS): Ch 2, hdc in each hdc to armhole marker; turn. [52 (54, 56, 62, 70, 74)]
Row 2 (WS): Ch 2, hdc in each hdc to armhole marker; turn. [52 (54, 56, 62, 70, 74)]
Repeat Rows 1 and 2 until 20 (20, 22, 24, 24, 26) rows total are completed in Back. End with a WS row. Fasten off.
Second Front:
With RS facing, attach yarn in st after last st marker.
Row 1 (RS): Ch 2, hdc in each hdc to end; turn. [22 (24, 24, 27, 30, 32)]
Row 2 (WS): Ch 2, hdc in each hdc to armhole marker; turn. [22 (24, 24, 27, 30, 32)]
Repeat Rows 1 and 2 until 20 (20, 22, 24, 24, 26) rows total are completed in Second Front. End with a WS row. Fasten off leaving a 24” tail.


Sleeves
Main Sleeves:
Notes:
• Sleeves are worked in turned rounds. After slip stitch to join at end of each round, TURN work so next round can be worked in opposite direction.
• See photo above for completed sleeve.
Make 2.
Foundation Round: Ch 30 (30, 34, 34, 36, 38), sl st to join taking care not to twist ch.
Round 1 (RS): Ch 2, hdc in each ch, sl st to join; turn. [30 (30, 34, 34, 36, 38)]
Rounds 2-4: Ch 2, hdc in each hdc, sl st to join; turn. [30 (30, 34, 34, 36, 38)]
Round 5 (RS inc): Ch 2, 2 hdc in first hdc, hdc in each hdc until 1 st remains, 2 hdc in last hdc, sl st to join; turn. [32 (32, 36, 36, 38, 40)]
Repeat Rounds 2-5 an additional 11 (11, 11, 2, 5, 4) times. Sleeve should have 54, (54, 58, 40, 48, 48) sts.
Sizes S and M only: Increasing completed, go to All Sizes.
Size L only: Repeat Round 5 once more. (60 sts)
Increasing completed, go to All Sizes.
Sizes 1X, 2X, and 3X only:
You will work 2 even rounds followed by 1 increase round.
Repeat Rounds 3-5 an additional - (-, -, 12, 9, 9) times. [-, (-, -, 64, 66, 66)]
Size 1X only: Repeat Round 5 one more time. Increasing completed, go to All Sizes. (66 sts)
Size 2X only: Increases Completed, go to All Sizes.
Size 3X only: Repeat Rounds 4-5 twice. Increasing completed, go to All Sizes. (70 sts)
All Sizes:
There should be 49 (49, 50, 50, 52, 52) rounds completed before starting next section.
Remaining rows are worked without a sl st to join so as to create a slight “V” in top of sleeve.
Size S only:
Rows 1-3: Ch 2, hdc in each hdc; turn. [54 (-, -, -, -, -)]
Size M only:
Rows 1-5: Ch 2, hdc in each hdc; turn. [- (54, -, -, -, -)]
Sizes L, 1X, and 2X only:
Rows 1-8: Ch 2, hdc in each hdc; turn. [- (-, 60, 66, 66, -)]
Size 3X only:
Rows 1-10: Ch 2, hdc in each hdc; turn. (70 sts)
All Sizes:
Fasten off, leaving a 30” tail.
Final Thoughts
Woohoo! Your one piece crochet cardigan has come so far. Now you're ready to move on to Part 2, where we'll work on the ribbed collar, add pockets, and join everything together.
Find Your Next Sweater Project
Easy crochet sweaters are our absolute fave. Level up your handmade wardrobe with some of our most loved cardigan, pullover, and hoodie patterns.
You must use the category name, not a URL, in the category field.That was so fun! Now what?
Learn a New Skill
When you're ready to master a new skill, check out our detailed guides that include everything you need to know to level up your crochet game.
- How to Corner to Corner (C2C) Crochet for Beginners - with video tutorials to get you started
- How to Crochet a Beginner Hat - make an entire beanie in 1.5 hours!
- How to Crochet Amigurumi for Beginners - the ultimate guide to making your own toys and plushies
- How to Tunisian Crochet - learn with this video and a standard hook
Invitation to our Facebook group
Come discuss crocheting the Up North cardigan and lots of other projects and techniques in our Make & Do Crew Facebook group. Here thousands of helpful crocheters answer each others questions and share their stitches. Come join us here.


Sarah Russell says
I really love your pattern! Beautiful outcome! 🙂 I've shared it on my own blog, linking back here of course, as I know a lot of my crochet beginner viewers would love to see this pattern!
Jess @ Make and Do Crew says
Hey Sarah,
Thank you so much for sharing my pattern! I really appreciate it.
Jess
Juanita Crocker says
Hello! This is a super cute and sweet sweater, However after watching the video my opinion is that this would be beyond a beginner project, I would say its more like intermediate due to the many different steps needed to make it. I'm an experienced crocheter, have been doing it for years and all the steps and different things to do was even overwhelming to me. I do love it but it would be a lengthy project to make. Maybe sometime I might tackle it when I have more time. God Bless!
Jess @ Make and Do Crew says
Hey Juanita,
Thanks for the feedback. Since every project varies in length, I assign the difficulty based on the skills needed to complete it instead of the time needed to complete. In this case, those skills are quite accessible and thoroughly explained in the video tutorial.
Of course, some less experienced crocheters (and some more advanced) will seek smaller projects, but for those who want the satisfaction of making a garment, I think this one can be appropriate for most levels.
Happy crocheting!
Jess
Jody says
Hi! Love this cardigan and I’m going to have a go at making it. I have never made a garment before in crochet - so i’m Really looking forward to making this. What other weight or type of yarn can you suggest if I don’t want to use the cotton blend? I’m thinking of something soft & snuggly.
Jess @ Make and Do Crew says
Hey Jody!
I'm so happy to hear you'll give this one a go. I've been loving wearing mine! I'd search YarnSub.com for some alternate DK/light worsted weight yarns. The most important thing when subbing the yarn is to achieve the pattern gauge so you know your sweater will fit. 🙂
Jess
Suzanne says
Maybe I am overlooking something, but I have not been able to find the tutorial videos for the Up North Cardigan.
Do I have to purchase the pdf pattern to gain access to the videos?
Regards,
Suzanne
Jess @ Make and Do Crew says
Hey Suzanne,
Do you use an ad-blocker? If so, that will often make the video player disappear. 🙁
Without an ad-blocker turned on though, you should be able to see it above the beginning of the written pattern.
Jess
Norma Sanford says
Could you put this in a kit.? Include the pattern and yarn.
Linda says
As much as I would LOVE to make this with Lion Brand Comfy Cottan Blend, I’m from Canada, where it isn’t available. Also, when I go online, I CAN have it...at a price of $18.50 EACH~. Sad face...
Jess @ Make and Do Crew says
AW MAN! That's a bummer. I really like this yarn, but $18.50 is a lot! You could search YarnSub.com to see what other options you might be able to use that are available near you. 🙂
Sharon says
This pattern says it is free. I am unable to get the free download, why? Following the instructions just takes me in a circle. Never see a print button.
Janice Johnson says
Jess, I would like to make the Up North cardigan in a wool yarn, I would like a warmer cardigan. Is that possible with this pattern. What changes do I need to make, i.e. crochet hook, gauge, etc...
Jess @ Make and Do Crew says
Hey Janice,
I think a wool would be beautiful. My suggestion would be to look for a similar weight yarn (category 3-DK weight) and then do a gauge swatch to see if you need to adjust your hook size to meet the pattern gauge. YarnSub.com is a good resource to look for yarns with a similar gauge to what a pattern calls for. 🙂
Jess
Jessika says
I’ll add this easy beauty to my never ending list! Thanks Jess...
Happy Thanksgiving...Jessika
Jess @ Make and Do Crew says
Yay! My list is about that long too! 🙂
Happy Thanksgiving!
Jess
Liz says
Can't wait for the FULL video of this, has I have trouble reading patterns.. hope it's on youtubr?
Jess @ Make and Do Crew says
Hey Liz,
Yes, it'll be on the blog in a few days and Youtube a few days after that! 🙂
Jess
Stephanie Lau says
Such a cute cardigan, Jess! Love the construction!
Darlene Reuss says
Are Christmas Afghan graphs and written instructions available for fee or in any of your books? Trying to scroll through page after page on your site very time consuming and I like to have a hard copy of my patterns when I do projects