In the third stage of the Alchemy Cardigan Crochet Along, we'll learn how to crochet both mesh sleeves in this breezy cardigan. Part 3 of the free pattern and video tutorial are below, or you can purchase the ad-free, easily printable PDF with stitch chart and schematic here.
This free crochet sweater pattern and video tutorial are part of a collaboration with my friends at LoveCrochet.com. This post contains affiliate links.
Welcome back to the Alchemy Cardigan crochet along! So many of you blew through the first two stages of this lightweight cardigan much faster than I expected, so I'm certain these sleeves will be a piece of cake. Then next week, you'll finish up your sweater by joining everything together and adding ribbing, sleeve cuff straps and pocket liners. You all have been incredibly fast and creative working this pattern and you're on the downhill now!
I also want to say thanks to everyone who's shared their work or helped out a fellow crocheter in the Love Crochet CAL Facebook group. It's been a joy to see everyone's hard work and watch how generous this crochet community is with each other. You guys are awesome!

New To the Alchemy Cardigan Crochet Along?
Here's where you can find everything you need to get started:
• Get your Lion Brand Vanna's Style yarn from LoveCrochet.com here.
• Purchase the ad-free, printable PDF with stitch charts, schematic and other helpful charts here on LoveCrafts.com or here on Etsy.
• Read the Crochet Along Intro with info about how this whole thing works here.
• Start Part 1 of the free pattern and video tutorial here. Find Part 2 here.
• Ask questions and share your progress in the helpful Love Crochet CAL Facebook group here.
What To Expect In Part 3
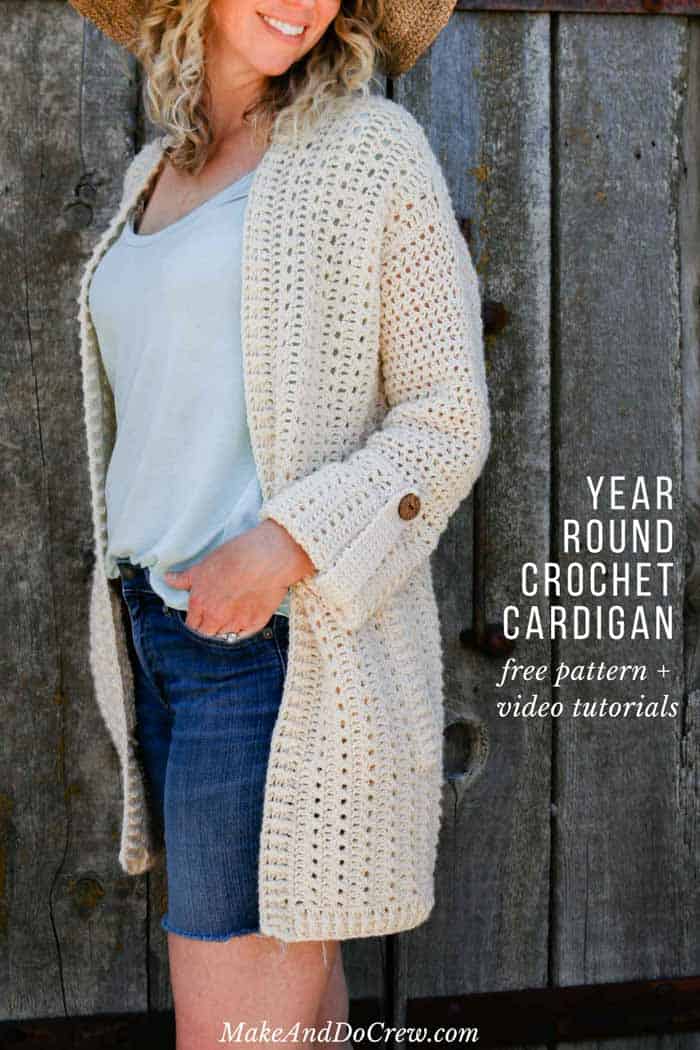
Today's sleeve stage of the sweater pattern is quite straightforward because it builds on some skills you've already practiced quite a bit. The cuff of the sleeve is worked in the main stitch pattern using alternating double crochet rows and "X" rows.
Once that's complete, you'll begin to work half double crochet mesh rows into the raw edge of the established cuff. In order to give the sleeve a gentle slope to the shoulder, some simple increases are added along the way. Please note that there's new gauge information for the sleeve in the pattern below. It's worth checking your sleeve gauge to make sure it fits perfectly with the other pieces of your sweater. (Check out the beginning of the Part 1 video to learn how to check your gauge.)
Once again, I've added a stitch chart to the ad-free, printable PDF for all the visual learners like me. I find stitch charts to be the very quickest and easiest way to understand a pattern, so you'll find a simple chart that shows how the increase rows differ from the non-increase rows in the PDF.
The PDF also includes a helpful chart that shows which sleeve rows are increase rows for each size, S-4X. If you're having any trouble with understanding the frequency of increase rows or you're a less experienced pattern reader, this chart will be your best friend. You can grab the ad-free, printable PDF here.

And if you've purchased the PDF and just want to watch all the video tutorials in one place, head over to our Alchemy Cardigan CAL page on LoveCrochet.com.
As usual, you can find the Part 3 video tutorial below and scroll down a bit further for the free version of the pattern.
More Free Crochet Sweater Patterns
Crochet sweater patterns don't need to be difficult. In fact, most of ours are made with very simple shapes. Dive into the wonderful world of crochet garments with cardigans, pullovers, ponchos, shrugs and more!


See more free crochet sweater patterns →
Free Written Pattern – Part 3
Purchase the ad-free, printable PDF with schematic and stitch chart here on LoveCrafts.com or here on Etsy.
Pin it for later here.
You can find the other pattern stages here: Part 1, Part 2, Part 4
Explanation:
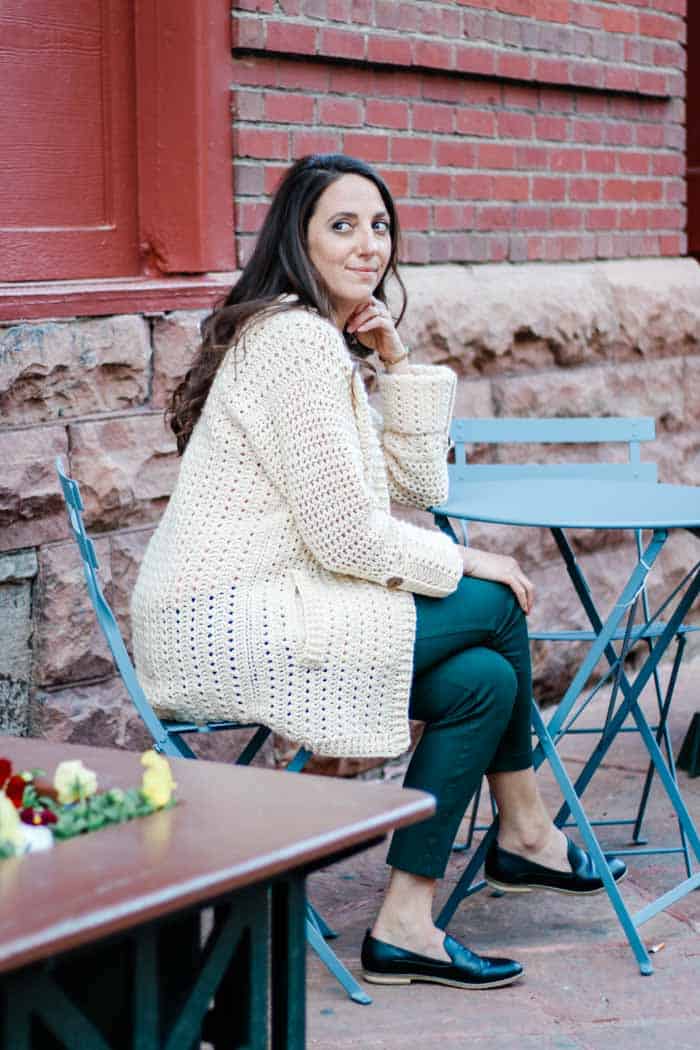
Whether you’re new to garment crocheting or an old pro, the Alchemy Cardigan will transform what you think is possible with a hook, some yarn and your own two hands. This lightweight sweater is perfect to toss on for some summer stargazing or layer with a long-sleeve shirt in the colder months.
Worked sideways to create flattering vertical rows, the entire sweater is made with different applications of a simple double crochet stitch (U.K: treble crochet). A few modern details, like cuffed sleeves and wooden buttons, ensure this cardigan will be a wardrobe staple for years to come. Released in four separate manageable stages, in this crochet along, you’ll learn some new intermediate-level techniques and then have a chance to master them with plenty of step-by-step practice.
Supplies:
• Lion Brand Vanna’s Style (Weight: 3/light – 254 yds, 3.5 oz)
– Ecru (#867-098) – 6 (7, 8, 8, 9, 10, 11) skeins [(approx. 570 (640, 710, 790, 900, 975, 1060) g)]
• Tapestry needle
• Size I (5.5 mm) crochet hook
• Stitch markers or safety pins
• (2) ¾” or 1” buttons
• Sewing needle and thread to match buttons
Sizes:
S, M, L, XL, 2X, 3X, 4X
Fits Bust:
S: 32-34”
M: 36-38”
L: 40-42”
XL: 44-46”
2X: 48-50”
3X: 52-54”
4X: 56-58″
See schematic in the printable, ad-free PDF for additional measurements.
Gauge:
Main Pattern:
14 sts = 4”
7.5 rows = 4”
Sleeves as worked in hdc mesh:
19 sts = 4”
10 rows = 4”
Please check your gauge and adjust your hook size accordingly! This is critical to making a sweater that meets the sizing listed in the pattern. See first few minutes of the Part 1 video tutorial for explanation of how to do this.
Abbreviations and Glossary (US Terms):
bpdc – back post double crochet
ch – chain
dc – double crochet
dc2tog – double crochet two together
fpdc – front post double crochet
PM – place marker
rep – repeat
RS – right side
sc – single crochet
sp – space
sl st – slip stitch
st(s) – stitch(es)
tch – turning chain
WS – wrong side
Overall Pattern Notes:
• Ch 3 at beginning of a row always counts as a dc.
Wanna save this pattern?
Sleeves
Notes:
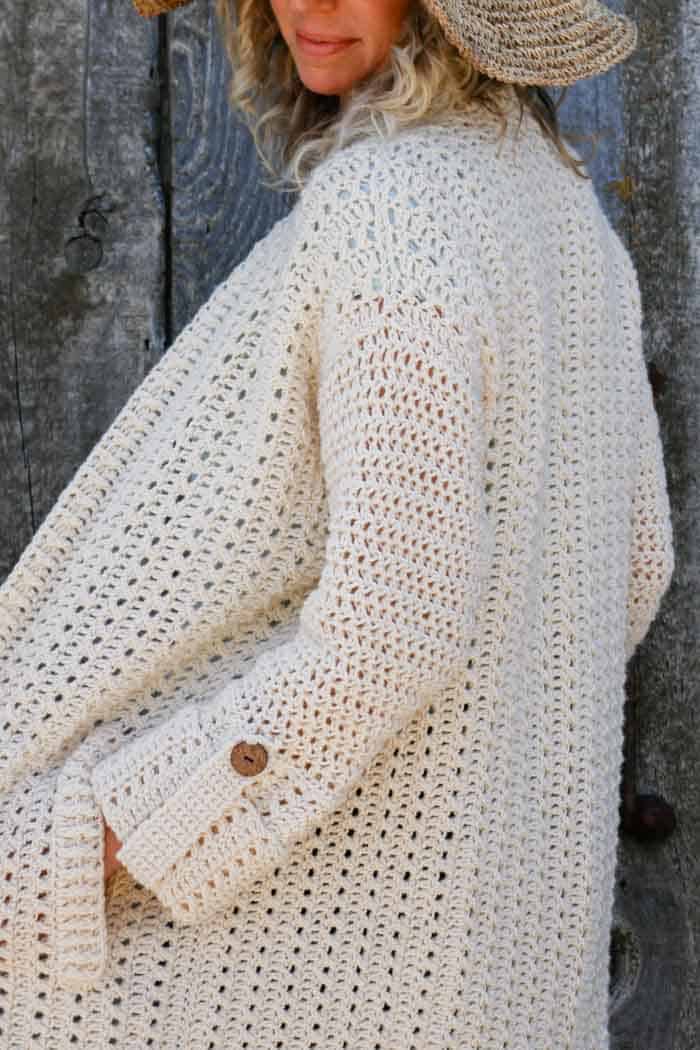
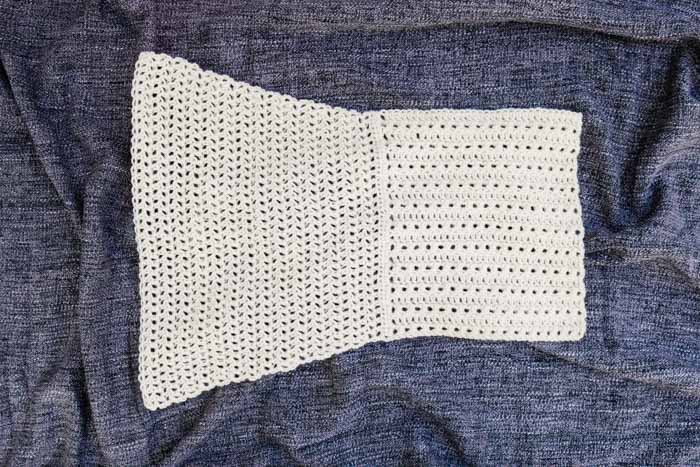
• Cuff is worked first sideways in same stitch pattern as main sweater. Sleeve is then worked into cuff in rows of half double crochet mesh.
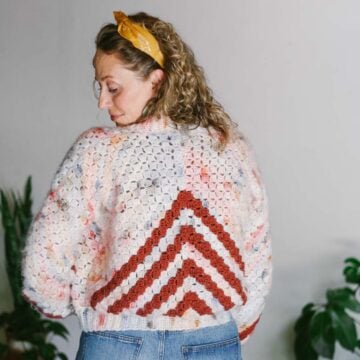
• As written, WS of sleeve cuff will appear on outside of finished sweater, similar to any rolled sleeve. This is intentional. This also means that if you choose to eliminate elbow cuff strap, RS of cuff will appear on outside of sleeve. If you’d like the sleeve cuff to have RS showing when rolled up, you may simply sew it to the sweater this way (but work the entire sleeve as written below.)
• See completed sleeve in photo above.
Make 2.
Cuff:
Foundation Row: Ch 36 (all sizes).
Row 1 (RS): Sk 3 ch (counts as 1 dc), dc in each ch to end; turn. (34 dc)
Row 2 (WS): Ch 3, sk first dc, *sk next dc, dc in next dc, working behind last dc made, dc in last skipped dc (X made); rep from * until tch remains; dc in third ch of tch; turn (16 Xs)
Row 3 (RS): Ch 3, sk first dc, dc in each dc to end of row; turn. (34 dc)
Rep Rows 2 and 3 (8 (9, 9, 9, 10, 10, 10)) more times each.
Work one additional rep of Row 2. Do not fasten off.
TIP: It’s worth making a new gauge swatch using the hdc mesh pattern below and checking it against the sleeve gauge listed at the top of the pattern to ensure your sleeves fit within the other pieces of your sweater. Ch any even number of ch to make a gauge swatch.
Sleeve:
Rotate cuff 90 degrees so that Row 1 below can be worked into raw side edge where yarn is attached. WS of cuff should be facing for Row 1. Row 1 may take some adjusting to get the stitches evenly spaced, but it will be worth it when your sleeve looks awesome! See stitch chart at end of pattern for visual explanation.
Row 1 (WS): Ch 2 (counts as 1 hdc), work 48 (52, 52, 52, 56, 56, 56) hdc evenly across; turn. (49 (53, 53, 53, 57, 57, 57) hdc)
Row 2 (RS): Ch 3 (counts as 1 hdc and 1 ch), sk 2 hdc, hdc in next hdc, *ch 1, sk 1 hdc, hdc in next hdc; rep from * across, ending with last hdc in tch; turn. (24 (26, 26, 26, 28, 28, 28) ch-1 sps)
Row 3 (WS): Ch 3 (counts as 1 hdc and 1 ch), sk hdc and ch, hdc in next hdc, *ch 1, hdc in next hdc; rep from * across, ending with last hdc in tch; turn. (24 (26, 26, 26, 28, 28, 28) ch-1 sps)
Row 4 (inc): Ch 3, hdc in first ch-1 sp, ch 1, hdc in next hdc, * ch 1, sk next ch, hdc in next hdc; rep from * across until tch sp remains, [ch 1, hdc in last tch sp] twice; turn. (26 (28, 28, 28, 30, 30, 30) ch-1 sps)
Rows 5-19: Rep inc Row 4 every 3 (3, 2, 1, 1, 1, 1) row(s), 1 (5, 3, 1, 1, 3, 7) more time(s), then rep inc Row every 4 (0, 3, 2, 2, 2, 2) rows, 3 (0, 3, 7, 7, 6, 4) times, for a total of 5 (6, 7, 9, 9, 10, 12) inc rows, including Row 4. After the last inc row, there are 34 (38, 40, 44, 46, 48, 52) ch-1 sps.
TIP: In layman’s terms, this means you will work Rows 5-19 as follows. (This is not in addition to what’s written above, but rather an alternative explanation that isn’t in pattern-speak.) See chart I for the same line-by-line information in chart form.
Small:
Rows 5-6: NON inc row
Row 7: inc row
Rows 8-10: NON inc row
Row 11: inc row
Rows 12-14: NON inc row
Row 15: inc row
Rows 16-18: NON inc row
Row 19: inc row
Find Your Next Crochet Cardigan Pattern
See more free crochet cardigan patterns →
Medium:
Rows 5-6: NON inc row
Row 7: inc row
Rows 8-9: NON inc row
Row 10: inc row
Rows 11-12: NON inc row
Row 13: inc row
Rows 14-15: NON inc row
Row 16: inc row
Rows 17-18: NON inc row
Row 19: inc row
Large:
Rows 5: NON inc row
Row 6: inc row
Row 7: NON inc row
Rows 8: inc row
Row 9: NON inc row
Row 10: inc row
Rows 11-12: NON inc row
Row 13: inc row
Rows 14-15: NON inc row
Row 16: inc row
Rows 17-18: NON inc row
Row 19: inc row
XL:
Row 5: inc row
Row 6: NON inc row
Row 7: inc row
Rows 8: NON inc row
Row 9: inc row
Row 10: NON inc row
Rows 11: inc row
Row 12: NON inc row
Row 13: inc row
Row 14: NON inc row
Row 15: inc row
Row 16: NON inc row
Row 17: inc row
Row 18: NON inc row
Row 19: inc row
2XL:
Row 5: inc row
Row 6: NON inc row
Row 7: inc row
Rows 8: NON inc row
Row 9: inc row
Row 10: NON inc row
Rows 11: inc row
Row 12: NON inc row
Row 13: inc row
Row 14: NON inc row
Row 15: inc row
Row 16: NON inc row
Row 17: inc row
Row 18: NON inc row
Row 19: inc row
3XL:
Rows 5 - 7: inc row
Rows 8: NON inc row
Row 9: inc row
Row 10: NON inc row
Rows 11: inc row
Row 12: NON inc row
Row 13: inc row
Row 14: NON inc row
Row 15: inc row
Row 16: NON inc row
Row 17: inc row
Row 18: NON inc row
Row 19: inc row
4XL:
Rows 5 - 11: inc row
Row 12: NON inc row
Rows 13: inc row
Row 14: NON inc row
Row 15: inc row
Row 16: NON inc row
Row 17: inc row
Row 18: NON inc row
Row 19: inc row
All sizes:
Work the following rows:
Rows 20-30: Rep Row 3.
Fasten off.
Stay tuned for the FINAL crochet along pattern stage next week where we'll add all our finishing touches! (UPDATE: Here's Part 4!) In the meantime, you might enjoy subscribing to my weekly free crochet patterns and tutorials. I send out helpful crochet tips, and tutorials for modern projects just like this!
[convertkit form=5208695]
That was so fun! Now what?
Invitation to our Facebook group
Come discuss crocheting alchemy sweater patterns and lots of other crochet projects and techniques in our Make & Do Crew Facebook group. Here thousands of helpful crocheters answer each others questions and share their stitches. Come join us here.
Find Your Next Sweater Project
- Crochet Wrap Sweater Pattern - unique take on a raglan
- Beginner Raglan Sweater Pattern - ideal first top down pattern
- Lightweight Mesh Top - doubles as a beach coverup
- Hexagon Layering Cardigan - with bishop sleeves
- Granny Square Cardigan - modern take on a classic motif
- Seamless Crochet Poncho - a great first garment for beginners
- Basic V-Neck Pattern - classic styling
- High Low Jumper Pattern - finish in one weekend
More Free Patterns + Tutorials
Can't get enough free crochet patterns!? Me either. You'll definitely want to breeze through these collections to find your next project.
- 55+ Free Crochet Sweater and Cardigan Patterns - our most popular garments
- 40+ Free Crochet Blanket Patterns - baby blankets, throws + c2c graphgans
- 36+ Granny Square Patterns + tips for the perfect square
- 30+ Crochet Animal Patterns - adorable amigurumi stuffed animals
- Crochet Gift Ideas - easy patterns to make for others
- Fast Crochet Projects - start to finish in less than a day
Learn a New Skill
And when you're ready to master a new skill, check out our detailed guides that include everything you need to know to level up your crochet game.
- How to Corner to Corner (C2C) Crochet for Beginners - with video tutorials to get you started
- How to Crochet a Beginner Hat - make an entire beanie in 1.5 hours!
- How to Crochet Amigurumi for Beginners - the ultimate guide to making your own toys and plushies
- How to Tunisian Crochet - learn with this video and a standard hook


Youy says
In the sleeve, it increase only until row19, then straight for the next 10 rows?
پرداخت قبض says
tanks. i will enjoy from you post and want read every day your websites.
Phyllis Reyna says
I was checking back and I located part 4 of the Alchemy Cardigan. Thank you again. I so want to do this. 🙂
Phyllis Reyna says
Hi Jess, this is Phyllis again. This is Wednesday and I didn't get a part 4 yet. You said to substitute the Mandala but I want a one color sweater. I already have a mixed color one. But thank you for your info. I love your patterns and am so trying to get them for future use for gifts. Thank you for everything. Have a wonderful day and keep up the good work.
Phyllis says
Hey Jess, So far I have not seen where you are making the pocket insides or elbow straps, I am hoping they are included in the assembly part next time. Sorry to get ahead of you but I did not see them so I was wondering about it. I can't wait to do this but so far I have not found the yarn. I have both Meijer and Walmart nearby, but their yarns don't seem comparable.. I may have to order them online. Do you have any other suggestions or substitution yarns? Thank you so much for all the free patterns. So far I have made a few of the patterns and they have turned out real nice. Thanks again
Phyllis
Jess @ Make and Do Crew says
Hey Phyllis,
So glad you hear you've enjoyed some of my patterns! I know some people are using Lion Brand Mandala yarn for this pattern and having pretty good luck with the gauge. It's only $3.99 at Walmart now, so that's pretty awesome!
The elbow straps and all the other finishing touches (like pockets) will be included in Part 4 tomorrow. 🙂
Jess
Dawn says
Hi Jess , what size buttons do you suggest using for this cardigan ? Thanks again for this pattern and tutorial. Getting ready to start second sleeve . Can’t wait to put it all together !
Jess @ Make and Do Crew says
You're welcome, Dawn! I suggest .75-1" buttons. The ones on the sample are .75"
Happy sleeve making!
Jess