Learning how to read crochet patterns is an exciting next step once you’ve mastered some basic crochet stitches and techniques.
In this guide, I’ll decode pattern lingo, abbreviations, and terms so you can confidently follow written crochet instructions.
Plus, I’ll share tips on avoiding common pattern-reading mistakes so you can get started crocheting anything you’d like!
This guide contains affiliate links.
Jump to:
How to Read Crochet Patterns
When crocheters refer to ‘patterns’, we mean the written instructions to follow for a complete project. This full package contains all the information you need regarding supplies and techniques.
Most crochet designers use a shared system of abbreviations and symbols and a similar structure for presenting all the information.
Let’s break down the process of following a crochet pattern into two steps. First, I’ll explain the basics of the crochet lingo used in written instructions. Then, we’ll walk through the sections of a crochet pattern one by one.
Quick Start Guide
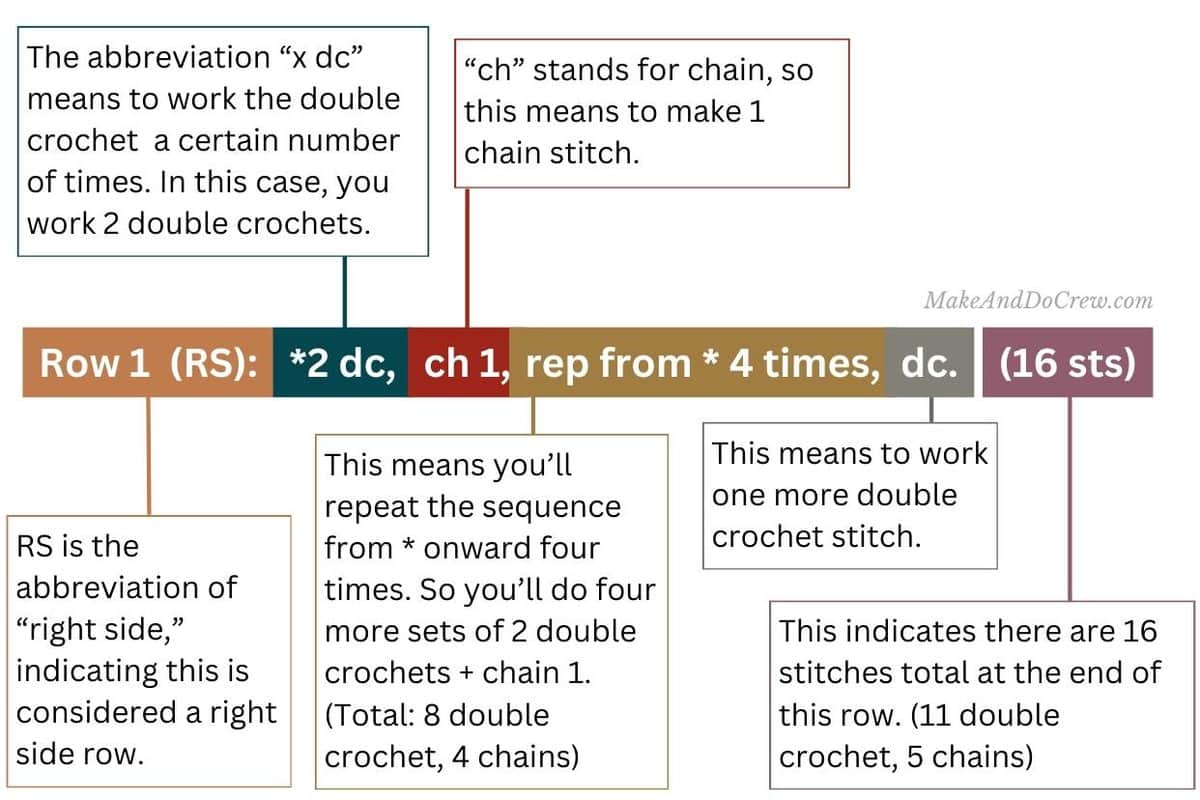
Reading a crochet pattern is similar to following step-by-step instructions to drive somewhere. Here is an infographic that shows how each section of crochet instructions can be broken down into small chunks of information.
If you already have a specific question about reading crochet patterns, jump to that section of the article.
- Learning the abbreviations
- What do parenthesis, brackets and asterisks mean?
- How do I check my gauge?
- What do the symbols on a pattern mean?
- Common mistakes and how to fix them
Learning the Language of Written Instructions
The crochet abbreviations and symbols in written instructions can definitely seem overwhelming at first glance. Familiarizing yourself with this new code can indeed take a little while. However, the good news is that you don’t need to memorize everything immediately.
Begin by learning the most common abbreviations and symbols. Remember, you can always look up anything you’re unsure of. Even after 30 years of crocheting, I still come across abbreviations I need to research.
Let’s begin with basic stitch abbreviations, terms, and symbols in beginner crochet patterns.
Stitch Abbreviations
Following almost any crochet pattern will involve a few basic crochet stitches. For a refresher on beginner stitches, take a look at our guide to getting started with crochet.
Designers may include an abbreviations glossary in the pattern. If you’re just starting to read patterns, I recommend writing the following abbreviations down or printing them out. It can be easier to refer to a note beside you than to flip back and forth within a pattern.
| Stitch Abbreviation | Stitch Name (US Terms) |
|---|---|
| Ch | Chain stitch |
| Sl st | Slip stitch |
| Sc | Single crochet |
| Hdc | Half double crochet |
| DC | Double crochet |
| Tr (or trc) | Triple (or treble) crochet |
Terms
Once you know which stitches are required, you need to know what you’re doing with them. Shortened versions of instructions are called terms. These indicate the actions you need to take.
Here are the most common crochet terms:
| Abbreviated Version | Meaning |
|---|---|
| Inc | Increase (add a stitch or several) |
| Dec | Decrease (take away one stitch or several) |
| Turn | Turn your work |
| Join | Join two stitches together |
| Rep | Repeat the step |
Check out this full list of crochet abbreviations and terms from the Craft Yarn Council if you come across something that’s not covered above.
Symbols
Since many crochet patterns involve a lot of repeated stitches or techniques, designers use parentheses, brackets, and asterisks to keep instructions concise and readable.
Parentheses ()
Parentheses are used to group a set of stitches that will be worked together, usually in the same stitch or space.
This example asks you to work a double crochet, then a chain stitch, then another double crochet into one single stitch.
Designers may also use parentheses for a set of stitches, which you should repeat several times. The number of times you should follow those instructions is written after the parentheses.
In this example, you repeat the entire parenthesis sequence of half double crochet, then a puff stitch, then a chain stitch three times. Unless specified, each of these stitches should be worked into the stitch below, so this sequence would take place over nine stitches total.
Brackets [ ]
Many pattern designers use brackets in the same way as parentheses. This means that brackets mostly indicate a series of stitches to be repeated.
The above example is asking you to do single crochet, then half double crochet, then single crochet again all into the same single stitch.
Asterisks * and Double Asterisks **
Similarly to parentheses and brackets, asterisks show a group of stitches or instructions that you should follow a set number of times.
Let’s look at a single asterisk example first.
This instruction means you’ll single crochet in one stitch, then double crochet in each of the next two stitches. Then you’ll repeat this sequence (single crochet, then two double crochet) over and over again until the end of the row.
You may find both asterisks (*) and double asterisks (**) in the same section. Using these two forms helps differentiate between sets of instructions. Let’s look at example of how single and double asterisks can be used in one set of instructions.
Here, you should follow the instructions in single asterisks (*) twice. Then you’ll start again at the single asterisk (*) and crochet the double asterisk (**) instructions once. You’ll end by slip stitching into the top chain in the turning chain that began the round.
When you meet a complex instruction like this, remember to read it through carefully and take it step by step. Pausing at each comma can help break up the instructions into smaller, managable chunks of information.
How to Follow Crochet Patterns: Step-by-Step
Luckily, crochet patterns often follow a fairly standard format. This structure consists of essential information and help at the beginning of the pattern, followed by the step-by-step instructions.
Read through all the sections before you begin. Doing this will help you imagine the big picture of what you’re working towards.
When reading a crochet pattern, you may come across the following information:
Skill level
Most crochet patterns indicate the skill level required to complete the project. Each level involves more complex stitches, colorwork, and techniques.
A beginner level pattern from different designers may differ greatly though, so it’s helpful to read through the skills used to get a feel for the difficulty.
Beginner and Easy Crochet Patterns
Beginner crochet patterns are a great place to practice basic stitches and shaping.
A simple crochet scarf or washcloth is often a manageable project when you’re just learning how to read crochet patterns. If you want to level up your skills, try new techniques in basic granny squares or practice making something wearable like a beanie made from a flat rectangle.
Intermediate Crochet Patterns
Crocheters with more experience can experiment with, lacework doilies, and mandalas, for example. Intermediate-level patterns might include:
- A wider variety of stitches: Think clusters, shells, and bullion stitches.
- More advanced shaping: Increases and decreases are used to create sleeves, fitted garments and shaped beanies and hats.
- Interesting textures: Texture might be created through stitches like puff stitches or with lace or fluffy yarn, which is slightly trickier to work with.
- More complex color changes: Colorwork is a lot of fun, but managing multiple yarn colors in one project takes practice.
- Following a chart: In techniques like C2C crochet, you will encounter visual graph patterns, which many crocheters often find easier to read.
- More seaming and joining: Some stuffed animal patterns, pieced blankets and garments can require more finishing work.
Advanced Crochet Patterns
Seasoned crafters can create stunning items such as Tunisian lace projects, cable sweaters, and large, detailed afghan blankets.
However, advanced-level crochet patterns require a lot of patience and experience. The intricate results can be stunning works of art. Some features of advanced patterns include complex stitch patterns, lacework, cables, or detailed colorwork.
Tools, Yarn and Notions
Most crochet patterns call for the typical equipment that’s probably already in your crochet bag. Here’s an overview of the items that you’ll need for nearly every pattern:
- Crochet hook: The particular hook size will depend on the project's needs.
- Yarn: Most patterns recommend yarn weight and fiber, plus indicate if you need different colors.
- Tapestry needle: You may need a yarn needle for weaving in ends, seaming pieces together, or adding other finishing touches to your work.
Other crochet supplies that may not be listed explicitly in the materials section but are handy to have include:
- Scissors: An essential part of your craft kit for cutting yarn and trimming loose ends.
- Stitch markers: For keeping track of repeats and counts.
- Measuring tape: To help you check gauge and measure your work’s dimensions.
- Pins or clips: Projects with multiple separate pieces may require pins or clips to hold these parts together temporarily.
- Blocking board and steamer or iron: Not every project requires crochet blocking, but it can go a long way to making your stitches look polished and even.
Wanna save this pattern?
Gauge
Alongside recommendations of hook size and yarn weight, you’ll likely spot a suggested gauge. This means how many stitches and rows are in a four-inch square of the finished fabric.
Achieving the correct gauge is key for ensuring your project turns out the desired size. Test a gauge swatch before your main project and change your hook size if necessary. If you have too many stitches/rows in four inches, try a larger hook. If you have too few stitches/rows in four inches, try a smaller hook.
Pro Tip: It’s always okay to adjust your hook size to achieve the recommended pattern gauge. Stitch tension is personal and can even vary from day to day, depending on your mood!
Sizing and Measurements
Understanding gauge is the first step to crafting a piece that is the perfect size. Specific measurements might not be vital for items such as scarves or baby blankets.
However, wearable pieces such as sun hats, tops, cardigans and sweaters require attention to gauge, particularly if they have a fitted style.
Picking Your Size
Patterns present sizing in different ways: with XS-XL labels or numerical measurements, for example. Typically, specifications are given for bust, sleeve, head, and body measurements, depending on the garment.
Identify which size is right for you by measuring yourself or the recipient. Compare this with the measurements, schematic, or sizing chart in the pattern.
Achieving the Right Dimensions
When a pattern includes more than one size, the instructions and stitch counts for each are always listed from smallest to largest. You only follow one number in the sequence.
In the above example, a different number of chains are needed for each size.
Small: Chain 12.
Medium: Chain 14.
Large: Chain 16.
Extra Large: Chain 18
Double Extra Large: Chain 20.
It helps to highlight the instructions that are relevant to your size before beginning so that you’re only following one set of numbers.
When learning how to crochet a sweater, it can be helpful to choose a pattern you can try on as you go. Hexagon cardigans are a fantastic example of this. You can make modifications as you go to ensure the finished garment fits your particular body.
Pro Tip: Even after the gauge is met, re-measure your gauge as you made different sections of the pattern to ensure your stitches are consistent throughout the project.
Instructions
In this article, we are mostly concentrating on written instructions, which use the abbreviations and symbols we just learned. Another way to convey instructions is via crochet charts, which I’ll briefly discuss in this section.
Both types of patterns bring their own benefits with them. Your preference will depend on your learning style.
Check out this guide to learn more about reading crochet charts and diagrams.
Rows and Rounds
In written instructions, steps are presented by row or round of crochet. Each line of instruction includes the sequence of stitches required for each row or round.
Rows
When working flat, rows are the horizontal sequences of stitches you work from one end of the project to the other. At the end of each row, you turn your work and work back and forth across the project.
Shawls, towels, and blankets are usually worked in rows.
Rounds
When crocheting in the round, ‘rounds’ refer to the circular lines of stitches forming the closed loop. (AKA rounds are the circular version of rows.) Typically, you join the last stitch of one round to the first stitch of the next to create a seamless circle.
Baby booties, coasters, and baskets are often worked in the round.
How to Read Crochet Charts
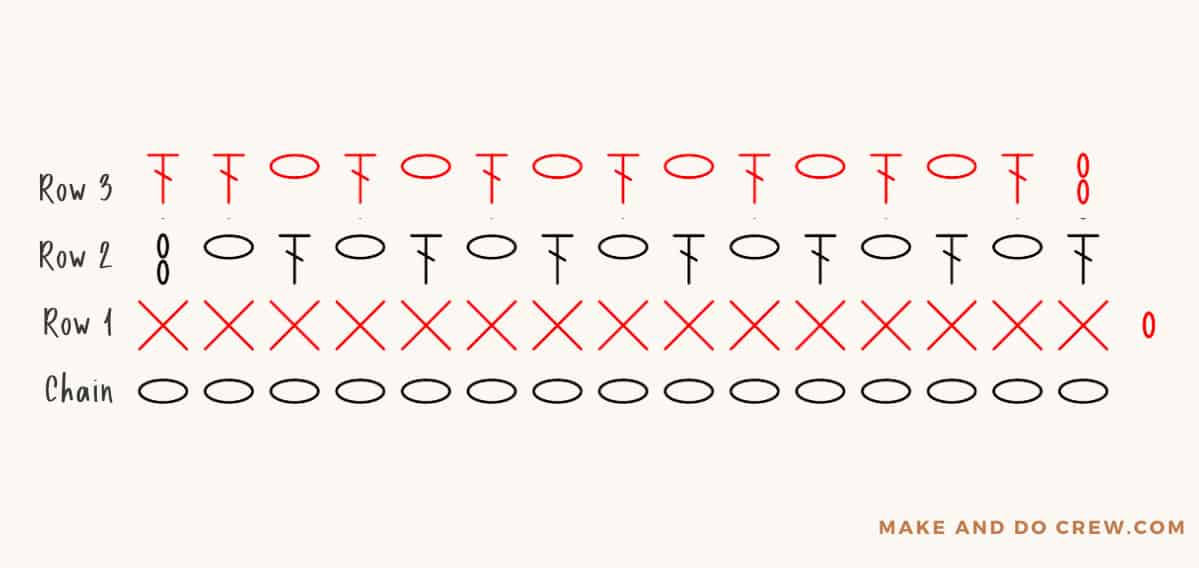
Crochet charts are great for visual learners as they are concise and symbol-based. They help visualize the placement of stitches in relation to one another.
In diagrams, one symbol represents one stitch. Crochet symbol charts with rows are read from bottom to top and right to left. Circular pieces worked in the round are read from the center outwards.
Typically, numbers tell you how many rows to crochet, while letters indicate colors. Similarly to written instructions, brackets contain information about stitch pattern repeats.
Sometimes, the same pattern will include both kinds of instructions. This way, you get all the visual and accessibility advantages of a chart, with added clarification from written instructions.
Crochet Garment Instructions
Garments such as cardigans or blouses follow the same structure as other crochet patterns. They also generally include some specialized information. For example, you’ll likely find instructions for shaping, sizing, and seaming pieces together.
You should also be aware of some specific terminology:
- Right/left sleeve, shoulder: When you see pieces, such as sleeves, labeled as ‘right’ or ‘left,’ this refers to where on the body it’ll be worn.
- Right-/left-hand corner: ‘Right-hand’ and ‘left-hand corner’ indicate the corner closest to your right or left hand.
- Right/wrong side: ‘Right’ versus ‘wrong’ refers to which side of the garment will be on show when the item is worn. The ‘right side’ faces outwards.
- Reverse shaping: ‘Reverse shaping’ involves the mirror-image of the instructions used for the piece, such as a shoulder, on the other side of the garment. Take your time with figuring out how you’ll do this. I find that making notes or sketching the finished section helps.
Common Mistakes
Like any learning process, mistakes might happen as you practice following crochet patterns. Here are the most frequent issues and some advice on how to avoid them.
Misunderstanding US/UK Terminology
Terms used to refer to stitches vary across countries. In the States, designers use American terms, while creators in the UK and Australia are likely to stick with British terminology.
Crochet patterns and tutorials being readily available online is a fantastic opportunity for learning and discovering. However, it does mean that you need to be extra thorough when confirming where a design comes from. Remember to check the notes section of your pattern and other clues like symbol diagrams.
One helpful tip is that the term ‘single crochet’ only appears in US terminology. If you see this term, you’ll know straight away that you’re dealing with American vocabulary.
Keep this chart handy for quick conversions.
| US Term | US Abbreviation | UK Term | UK Abbreviation |
|---|---|---|---|
| Chain | ch | Chain | ch |
| Slip stitch | ss | Slip stitch | ss |
| Single crochet | sc | Double crochet | dc |
| Half double crochet | hdc | Half treble crochet | htr |
| Double crochet | dc | Treble crochet | tr |
| Treble crochet | tr | Double treble crochet | dtr |
| Double treble crochet | dtr | Triple treble crochet | ttr |
Misreading Symbols or Charts
Misinterpreting instructions in brackets, asterisks, or parentheses can throw off the whole pattern. Read and reread every instruction so you have a solid mental image of what you’ll be doing and how many times to do it.
When learning to read a crochet chart, checking the key is crucial. Always refer back to it to avoid mixing up the symbols. Following a crochet diagram in the right direction (right to left and bottom to top for rows, from the center outwards for rounds) is fundamental.
If you’re left-handed, you’ll need to reflect the chart so you can read the first row from left to right.
Skipping Introductory Sections
It can be tempting to dive headfirst into hands-on work when you’re super excited about a project. However, information given before the main body of the pattern is vital for your work’s success.
Skipping past gauge and yarn requirements can lead to your item not being the right size. Most of the time, it’s essential to use the same weight (aka thickness) of yarn as the pattern calls for.
For example, if the project needs to be made with worsted weight yarn (category 4) and you substitute a super bulky yarn (category 6), your project will turn out much larger than expected.
Rushing through the Pattern
Take the time to absorb pattern information before you begin and during the process. Be sure to digest all the information thoroughly beforehand and give your full attention to each new step you encounter. This will all get easier with practice!
Handy Tips For Beginners
On top of following the specific instructions for each pattern, here are some practical ideas for ensuring success as you learn to read crochet patterns.
Mark your progress with stitch markers. Think of stitch markers as helpful sticky notes you can add to your crocheting. Markers can help you keep track of rounds, important repeats or other features of your pattern, such as garment sections, or increases and decreases.
Note your place in the pattern. Recording how far you’ve got, any modifications you’ve made, or issues you’ve encountered will ensure a smoother return to your project after a break. You can track progress with a simple pen and paper, in a row-counting app (I love My Row Counter), or by marking off or annotating your printed-out instructions or chart.
Count your stitches frequently. Take a step back from your work now and then to see how your project is progressing compared to what the pattern expects. Identifying issues early on will save you time and frustration in the long run.
Ask for help if you need it. While fixing mistakes after you’ve made them is a valuable learning experience, it isn’t the most fun one. If you end up lost or confused, ask an experienced crocheter. You might even learn one or two useful tips for future practice!
Join our Facebook group to ask questions of our helpful community of crocheters. All skill levels are always welcome.
FAQs
Learning how to read a crochet pattern gets easier with practice and patience. When you look at your first-ever pattern, the combination of abbreviations and symbols may seem like a foreign language.
You’ll soon learn common pattern features and better visualize how instructions compare with a finished piece. There are plenty of free online beginner patterns that also include video tutorials to follow along with, like this toddler hat, which can be helpful as you’re getting started.
The first step in choosing the right size in a crochet pattern is to study the sizing information provided by the designer. Next, compare this to your measurements and consider what fit you’d like the finished piece to have.
You should also consider how much ‘positive ease’ the pattern should have. This refers to the intended difference in size between the garment and the wearer.
Yes, modifying crochet patterns is okay if you feel confident and sure of what you want and how to achieve it. You may want to make adjustments to a pattern to customize the fit or look of the finished piece.
Plan out the appropriate modifications before you begin. Your preparation may involve taking measurements of the intended wearer, consulting resources for guidance, adjusting the pattern’s stitch counts, or marking changes on the pattern. This will ensure your adjustments are useful and consistent.
Don’t panic if you make a mistake while working a crochet pattern. First, stop working and identify where you went wrong.
Once you know what the issue is, consider if you need to tear out some stitches or if you can make a correction later on. For example, if you stitch count is off by one, sometimes you can simply add an extra stitch at the end of the next row and avoid undoing your work.
If the mistake needs to be corrected in order to continue, remove your hook and gently tear out the stitches back to wear issue lies. Before continuing, find your current place in the pattern as it will have changed as you “deleted” your progress.
Pro Tip: If you “frog” (rip out) a bunch of stitches, avoid the tempatation to wind your ball of yarn back up tightly. Doing so can stretch the yarn and actually change its thickness, which can affect your gauge later on. Instead, wind it around a few of your fingers so there’s some slack in the ball you wind up.
Stitch counts in crochet patterns guide crafters through different sizes of the same item. Typically, the sizes are listed from smallest to largest, following the smallest size in parentheses.
Be consistent and only follow counts for one size. It can help to mark or highlight the relevant counts before you start crocheting.
In crochet instructions, ‘repeat’ can refer to a set of stitches or instructions that needs to be followed more than once in a row. Pattern designers use brackets, parentheses, or asterisks to represent repeats and numbers to show how many times you should follow the sequence.
Some Parting Words of Encouragement
While the lack of a completely uniform pattern writing style might sound confusing, it’s also what makes the tradition of crocheting so charming.
Read through the entire pattern to get a feel for the designer’s pattern writing style, and you’ll soon feel fluent in many different crochet pattern “dialects.” Happy crocheting!
That was so fun! Now what?
Invitation to our Facebook group
Come discuss understanding written crochet patterns and lots of other projects and techniques in our Make & Do Crew Facebook group. Here thousands of helpful crocheters answer each others questions and share their stitches. Come join us here.

Leave a Reply