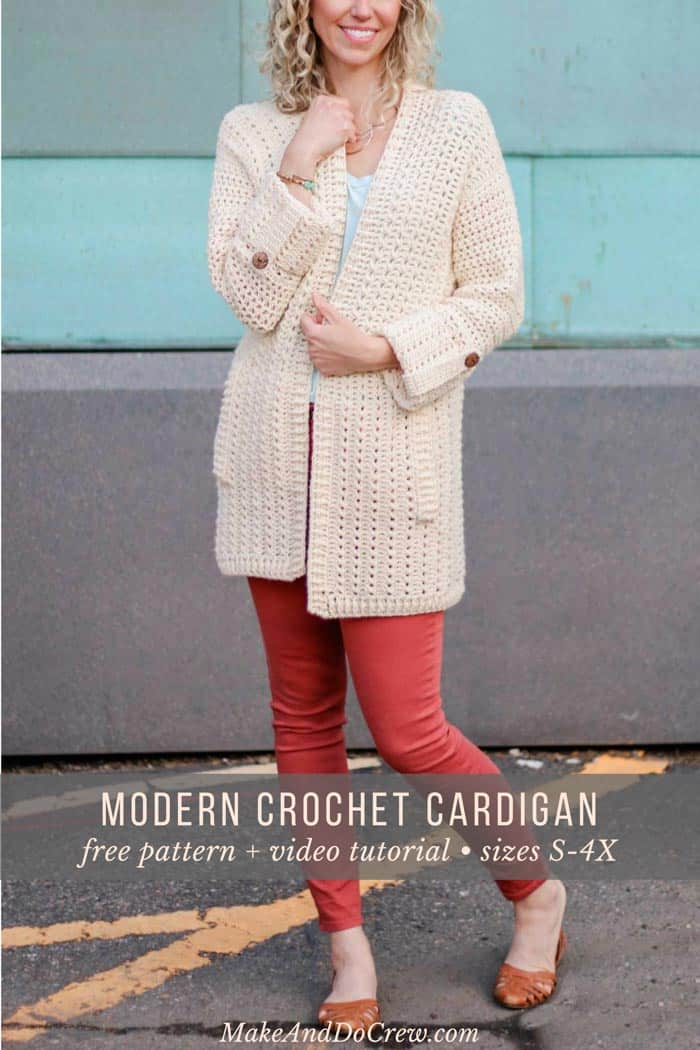
In the fourth and final stage of the Alchemy Cardigan Crochet Along, we'll join all the pieces together and add the finishing touches to make this your new favorite sweater! Get the free pattern below, or you can purchase the ad-free, easily printable PDF with stitch chart and schematic here.
This free crochet sweater tutorial is part of a collaboration with my friends at LoveCrochet.com. This post contains affiliate links.
When we started the Alchemy Cardigan Crochet Along three weeks ago, I was a tad worried that no one would be able to keep up--that we'd make it to this point without a single person completing all of the stages! Well, I clearly underestimated your commitment to crochet.
You guys are an industrious bunch of crocheters! If you're in the Love Crochet Crochet Along Facebook group (join here!), you've probably admired all the photos of sweater pieces that have been posted over the last three weeks. (You can check check out #AlchemyCAL on Instagram too for lots of crochet along inspiration.) It's been amazing to see how beautifully your cardigans are turning out, even when they're laying on the couch, table or floor in separate pieces.
But today the pieces will no longer be pieces because it's time to build a sweater!
If You're New to the Alchemy Cardigan Crochet Along:
Here's where you can find everything you need to get started:
• Start here to learn everything you need to know about how this works.
• Get your Lion Brand Vanna's Style yarn from LoveCrochet.com here.
• Start Part 1 of the free pattern and video tutorial here. Find Part 2 here. Find Part 3 here.
• Ask questions and share your progress in the helpful Love Crochet CAL Facebook group here.
Putting It All Together
Part 4 of the CAL might seem like it has a lot of parts, but I promise you'll be wearing this sweater in no time. Each little step of Part 4 is quite quick and super satisfying because you're moving full speed ahead toward a finished sweater made with your own two hands.
Today we'll be joining all the sections together, adding the sleeve cuffs, ribbing and pockets. Aaaand then celebrating because we'll have just finished a really ambitious project! Please, please, please, share a pic of your sweater so we can all admire it. Post it in the Love Crochet CAL Facebook group here or share it on Instagram with the hashtag #AlchemyCAL.
Without further ado, please find the video tutorial below and scroll down a bit for the free pattern. If you like your video tutorials all in one place, you can head to our Alchemy Cardigan CAL page on LoveCrochet.com.
Alchemy Cardigan Crochet Video Tutorial Part 4
More Free Crochet Sweater Patterns
Crochet sweater patterns don't need to be difficult. In fact, most of ours are made with very simple shapes. Dive into the wonderful world of crochet garments with cardigans, pullovers, ponchos, shrugs and more!
See more free crochet sweater patterns →
Alchemy Cardigan Free Crochet Pattern Part 4
Purchase the ad-free, printable PDF with schematic and stitch chart here on LoveCrafts.com or here on Etsy.
Pin it for later here.
Find Part 1, Part 2 and Part 3 of the free written pattern.
Explanation:
Whether you’re new to garment crocheting or an old pro, the Alchemy Cardigan will transform what you think is possible with a hook, some yarn and your own two hands. This lightweight sweater is perfect to toss on for some summer stargazing or layer with a long-sleeve shirt in the colder months.
Worked sideways to create flattering vertical rows, the entire sweater is made with different applications of a simple double crochet stitch (U.K: treble crochet). A few modern details, like cuffed sleeves and wooden buttons, ensure this cardigan will be a wardrobe staple for years to come. Released in four separate manageable stages, in this crochet along, you’ll learn some new intermediate-level techniques and then have a chance to master them with plenty of step-by-step practice.
Supplies:
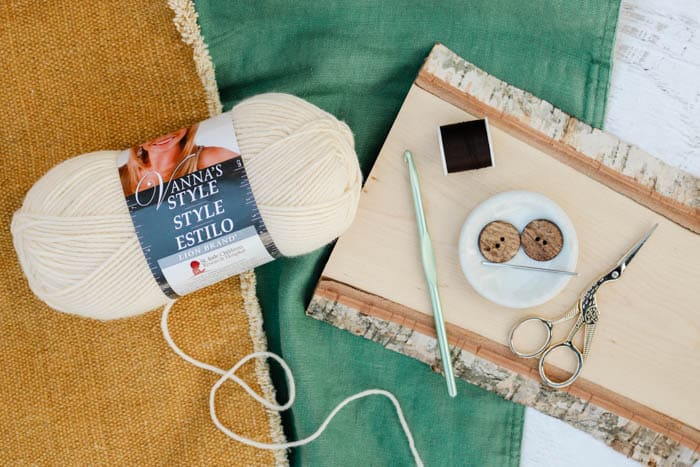
• Lion Brand Vanna’s Style (Weight: 3/light – 254 yds, 3.5 oz)
– Ecru (#867-098) – 6 (7, 8, 8, 9, 10, 11) skeins [(approx. 570 (640, 710, 790, 900, 975, 1060) g)]
• Tapestry needle
• Size I (5.5 mm) crochet hook
• Stitch markers or safety pins
• (2) ¾” or 1” buttons
• Sewing needle and thread to match buttons
Sizes:
S, M, L, XL, 2X, 3X, 4X
Fits Bust:
S: 32-34”
M: 36-38”
L: 40-42”
XL: 44-46”
2X: 48-50”
3X: 52-54”
4X: 56-58″
See schematic in the printable, ad-free PDF for additional measurements.
Gauge:
Main Pattern:
14 sts = 4”
7.5 rows = 4”
Sleeves as worked in hdc mesh:
19 sts = 4”
10 rows = 4”
Please check your gauge and adjust your hook size accordingly! This is critical to making a sweater that meets the sizing listed in the pattern. See first few minutes of the Part 1 video tutorial for explanation of how to do this.
Abbreviations and Glossary (US Terms):
bpdc – back post double crochet
ch – chain
dc – double crochet
dc2tog – double crochet two together
fpdc – front post double crochet
PM – place marker
rep – repeat
RS – right side
sc – single crochet
sp – space
sl st – slip stitch
st(s) – stitch(es)
tch – turning chain
WS – wrong side
Overall Pattern Notes:
• Ch 3 at beginning of a row always counts as a dc.
Assembly
Notes:
• While the video tutorial above walks you through the seaming one half of the sweater at a time, feel free to seam both shoulders, then both sleeves, etc.
Seaming Shoulders:
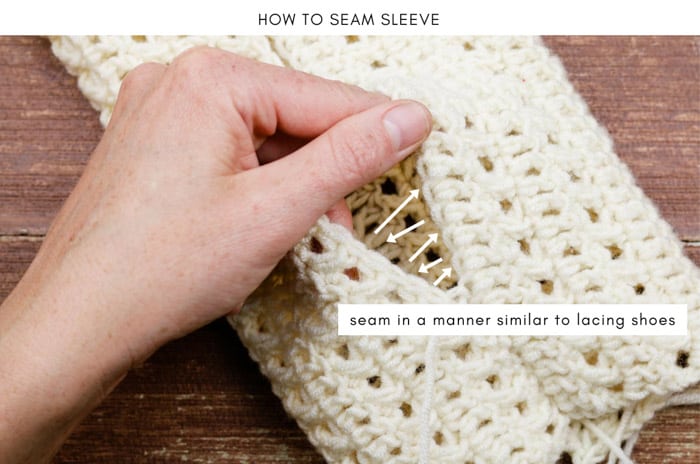
With WS facing out, pin shoulder seams taking care to line up each vertical row on the front and back pieces. Use a tapestry needle to seam from outside shoulder toward neck on each side. See Part 4 video tutorial or photos below for more details on suggested seaming technique.
Setting in Sleeves:
With WS facing out on both sweater and sleeve (check cuff to determine WS), pin sleeve into shoulder inset.
TIP - As mentioned in Sleeve section: WS of sleeve cuff will appear on outside of finished sweater, similar to any rolled-up sleeve. This also means that if you choose to eliminate elbow cuff strap, RS of cuff will appear on outside of sleeve. This is intentional. If instead, you’d like the "pretty" RS of the cuff to appear on the outside of the rolled sleeve, you may simply sew opposite of the instructions above. This means you’ll pin it now with RS facing out.
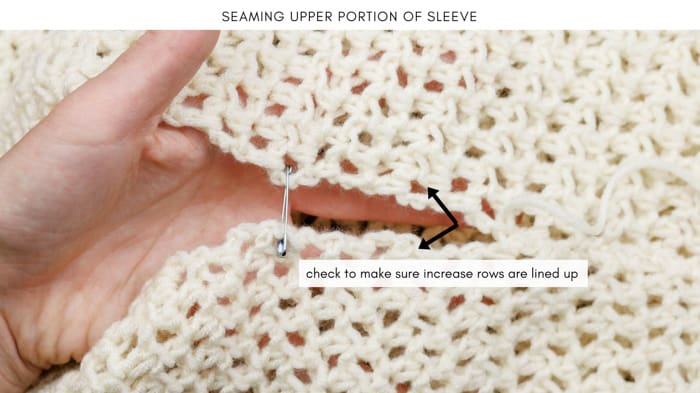
Use a tapestry needle to join using same stitch technique as previous seam. Repeat on second sleeve.
Seaming Sleeves:
With WS still facing out, fold and pin each sleeve taking care to line up each row of hdc. Starting at wrist and working toward shoulder, use a tapestry needle to join using same stitch technique as previous seam. Repeat on second sleeve. (See photos above.)
Seaming Sides:
With WS still facing out, pin fronts to back at the sides. Use a tapestry needle to join using same stitch technique as previous seam. Repeat on second side.
Admire:
Pause. Run to the nearest mirror and admire all your hard work that’s starting to take shape!
Finishing Touches
Notes:
• Ch 3 still counts as dc throughout.
Bottom Ribbing:
Turn sweater so RS is facing out. Attach yarn in bottom front corner of left side of sweater. (Lefties: Attach yarn in bottom front corner of right side of sweater.) Ribbing is worked along bottom edge of sweater from one front corner to the opposite front corner.
Row 1 should begin with RS of sweater facing.
Row 1 (RS): Ch 3, 2 dc in vertical row, *2 dc in each vertical row; working 1 extra dc in each side seam rep from * until 1 vertical row remains at opposite front corner, 3 dc in last vertical row; turn. (Total number of bottom dc sts, including ch 3, should be an even number.)
Row 2 (WS): Ch 3, sk first dc, *1 fpdc around next dc, 1 bpdc around next dc; rep from * to end of row, 1 fpdc around ch 3; turn.
Row 3 (RS): Rep Row 2, do not turn.
Do not fasten off. Move on to collar ribbing.
Collar Ribbing:
With yarn still attached from bottom ribbing, Row 1 of collar ribbing is worked again with RS of sweater facing out. Ribbing is crocheted up front edge of sweater, around back of neck and down opposite front edge.
Row 1 (RS): Ch 3, 1 dc in first vertical row of bottom ribbing, 2 dc in each of next 2 vertical rows of bottom ribbing; dc in each dc along sweater front, 2 dc in each vertical row along back of neck, dc in each dc along sweater front, 2 dc in each of next 3 vertical rows of bottom ribbing; turn. (Total number of bottom dc sts, including ch 3, should be an even number.)
Row 2 (WS): Ch 3, sk first dc, *1 fpdc around next dc, 1 bpdc around next dc; rep from * to end of row, 1 fpdc around ch 3; turn.
Wanna save this pattern?
Row 3 (RS): Rep Row 2.
Fasten off.
Cuff Strap:
Notes:
• Strap is intended to be worked quite tightly. Either continue with same size hook and hold tension a bit tighter or size down one hook size.
• As written, strap is not intended to be functional and includes no button hole.
Foundation Row: Ch 6.
Row 1: Sc in second ch from hook and each ch to end; turn. (5)
Rows 2-50: Ch 1, sc in each sc to end; turn.
Strap should measure approximately 11”. Remove or add rows if necessary.
Attaching Cuff Strap + Button:
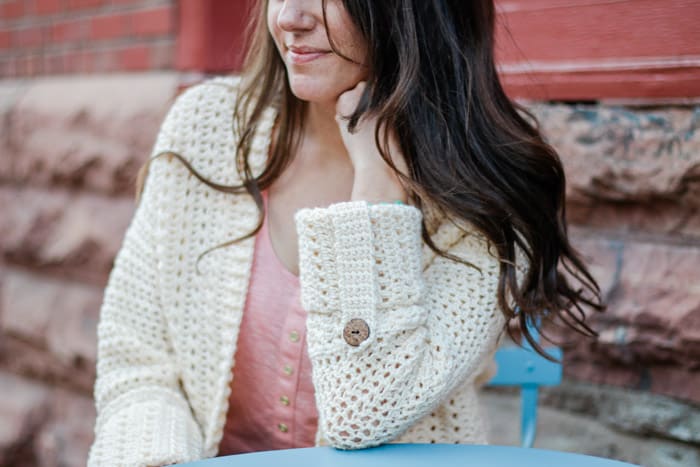
With RS of sweater facing out, fold sleeve cuff in half. Lining up strap with shoulder seam, pin strap around cuff. (Strap is reversible so choose whichever side you like.)
Use a sewing needle and thread that matches button to sew button to cuff strap, working through sleeve and both ends of strap.
Pocket Ribbing:
Pocket ribbing is worked just like bottom and collar ribbing, except that it is crocheted separately and attached after. Skip this step if you eliminated pocket slits in sweater fronts.
Make 2.
Foundation Row: Ch 32.
Row 1 (RS): Sk 3 dc, dc in each ch to end; turn. (30)
Row 2 (WS): Ch 3, sk first dc, *1 fpdc around next dc, 1 bpdc around next dc; rep from * to end of row, 1 frdc around ch 3; turn.
Row 3 (RS): Rep Row 2.
Fasten off leaving a 20” tail.
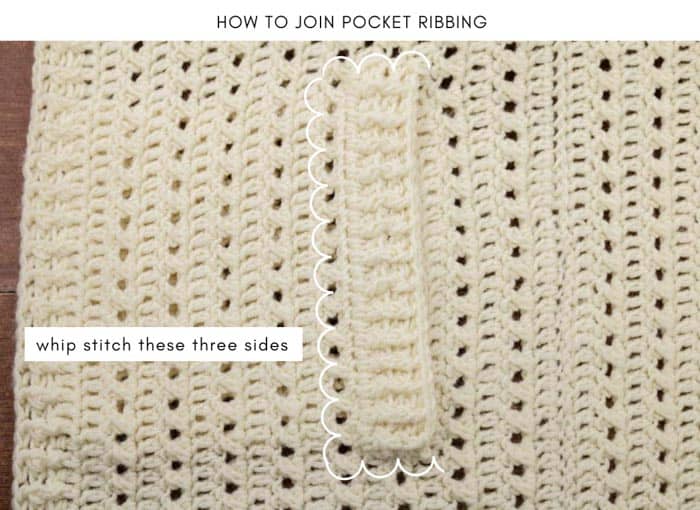
Attaching Pocket Ribbing:
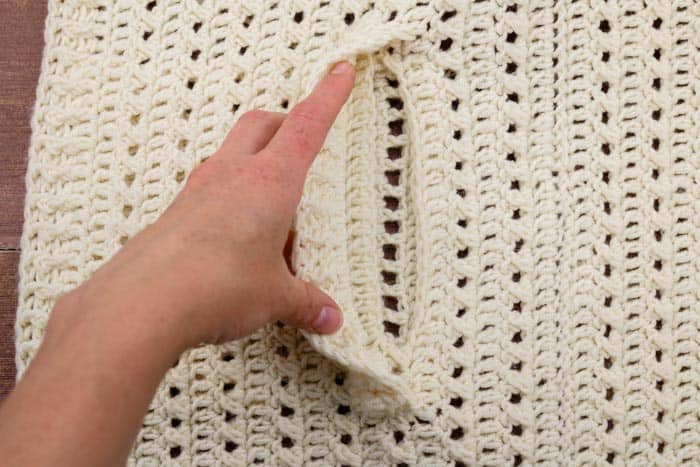
With Row 3 of pocket ribbing facing toward back piece of sweater, pin ribbing as pictured in photos above. Take care to ensure ribbing is centered over pocket slit.
Using a tapestry needle and ribbing tail, whipstitch ribbing to sweater.
Pocket Backing:
When tying slip knot to begin ch, leave a 24” tail to sew pocket on later.
Make 2.
Foundation Row: Ch 29.
Row 1 (RS): Sk 3 dc, dc in each ch to end; turn. (27)
Row 2 (WS): Ch 4 (counts as 1 dc and 1 ch-1 sp), sk 2 dc, dc in next dc, * ch 1, sk 1 dc, dc in next dc; rep from * to end of row. (13 ch-1 sps)
Row 3 (RS): 3, sk first dc, dc in each dc and ch-1 sp to end of row; turn.
Rows 4, 6, 8, 10, 12 (WS): Rep Row 2.
Rows 5, 7, 9, 11 (RS): Rep Row 3.
Small:
Fasten off after Row 12.
Medium-4X:
Work Rows 13-14.
Row 13 (RS): Rep Row 3.
Row 14 (WS): Rep Row 2.
Fasten off.
Attaching Pocket Backing:
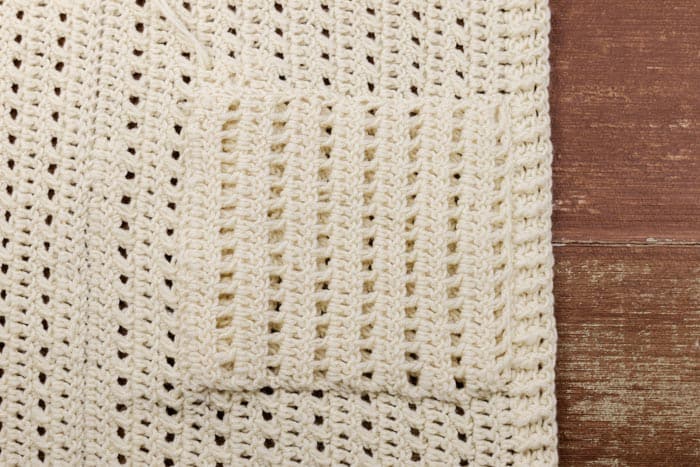
With RS of pocket backing facing WS of sweater front, pin backing as pictured in photo below. Take care to align rows of ch-1 sps in backing with rows of Xs in cardigan front.
Using tapestry needle and tail from pocket backing, whip stitch around all four sides of backing.
Repeat with second pocket backing on opposite cardigan front.
Hallelujah!
Weave in all remaining ends, you crochet rockstar, you.
Now that we've made an entire Alchemy Cardigan, I have so many more free crochet pattern and tutorials to share with you. Sign up below so you never miss another free modern crochet pattern from Make & Do Crew.
That was so fun! Now what?
Invitation to our Facebook group
Come discuss crocheting alchemy sweater patterns and lots of other crochet projects and techniques in our Make & Do Crew Facebook group. Here thousands of helpful crocheters answer each others questions and share their stitches. Come join us here.
Find Your Next Sweater Project
- Pullover Yoke Sweater - nearly seamless
- Long Boho Cardigan Pattern - with fringe!
- Summer Crochet Cardigan Pattern - short sleeved topper
- Lightweight Cardigan - made from hexagons
- Color Block Cardi Pattern - drapey and soft
- Easy Tunisian Crochet Cardigan - clever reversible cardi
- Casual Pullover Sweater - with exposed seams
- Simple Everyday Cardigan - using the easy V-stitch
More Free Patterns + Tutorials
Can't get enough free crochet patterns!? Me either. You'll definitely want to breeze through these collections to find your next project.
- 55+ Free Crochet Sweater and Cardigan Patterns - our most popular garments
- 40+ Free Crochet Blanket Patterns - baby blankets, throws + c2c graphgans
- 36+ Granny Square Patterns + tips for the perfect square
- 30+ Crochet Animal Patterns - adorable amigurumi stuffed animals
- Crochet Gift Ideas - easy patterns to make for others
- Fast Crochet Projects - start to finish in less than a day
Learn a New Skill
And when you're ready to master a new skill, check out our detailed guides that include everything you need to know to level up your crochet game.
- How to Corner to Corner (C2C) Crochet for Beginners - with video tutorials to get you started
- How to Crochet a Beginner Hat - make an entire beanie in 1.5 hours!
- How to Crochet Amigurumi for Beginners - the ultimate guide to making your own toys and plushies
- How to Tunisian Crochet - learn with this video and a standard hook





Agnes says
Hi! I left a comment before with a question on how to sew in the arms, but now I have watched the tutorial on youtube and I understand every step completely! I've never seen such clear detailed instructions on how to sew the parts together! So I just want to say THANK YOU for this beautiful pattern with such clear instructions!!! <3 I just started the cardigan in wool and I'm so excited to finish it! Love the pockets and arm cuffs, the details really makes a big difference! I'm going to post my results on Instagram when I'm done. Thank you again!
Jess @ Make and Do Crew says
Gosh, thank you so much for the feedback, Agnes. I'm so happy to hear that the instructions were clear to you because I'm always trying to learn how to be a better teacher. I hope you love your new sweater!
Jess
Agnes says
Hi! I just started this pattern and I love it! I'm just curious on how to sew the sleeves on to the body, can't find it anywhere? Would love some help, thank you!
Rachel Scott says
Hi Jess. With the staycation and hexagon cardigans both WIP (run out of wool!) I thought I’d make this in the meantime. It’s turned out really well, although I could probably have got away with a smaller size. Must be slimmer than I thought. Lol! I used extended sc for the sleeves rather than hdc, only as I prefer it. Going to try the c2c kimono next. No idea when I’m going to wear them all!
Sherrie says
I made the size large and it turned out really big (not sure what happened there ) but I will put it on the sofa in the winter to keep warm watching tv. I am still doing the part 4 stuff and when I went to sew on the pocket cuff, of course I sewed it on wrong and had to take it off and do it again. I mean really I even looked at it before I sewed that one down, lol. All I have left is sewing in the pockets and putting on the buttons. This has been really fun, never done a crochet along before. Hope you will do more in the future.
Jess @ Make and Do Crew says
I hope to do more too! And I sewed my sleeve on wrong too, lol. Even after I looked at it too! 🙂