Crochet diagrams can look intimidating at first glance, but don’t be discouraged. In this beginner's guide, we break down how to read a crochet stitch chart step-by-step and share 25 easy visual patterns to practice with.
Learning how to read a crochet diagram is a lot like learning how to read a book. Once you understand the letters (or, in this case, the stitch symbols), you can tackle the whole diagram.
And with a little practice, you may find reading crochet charts easier than written patterns!
What Are Crochet Diagrams?
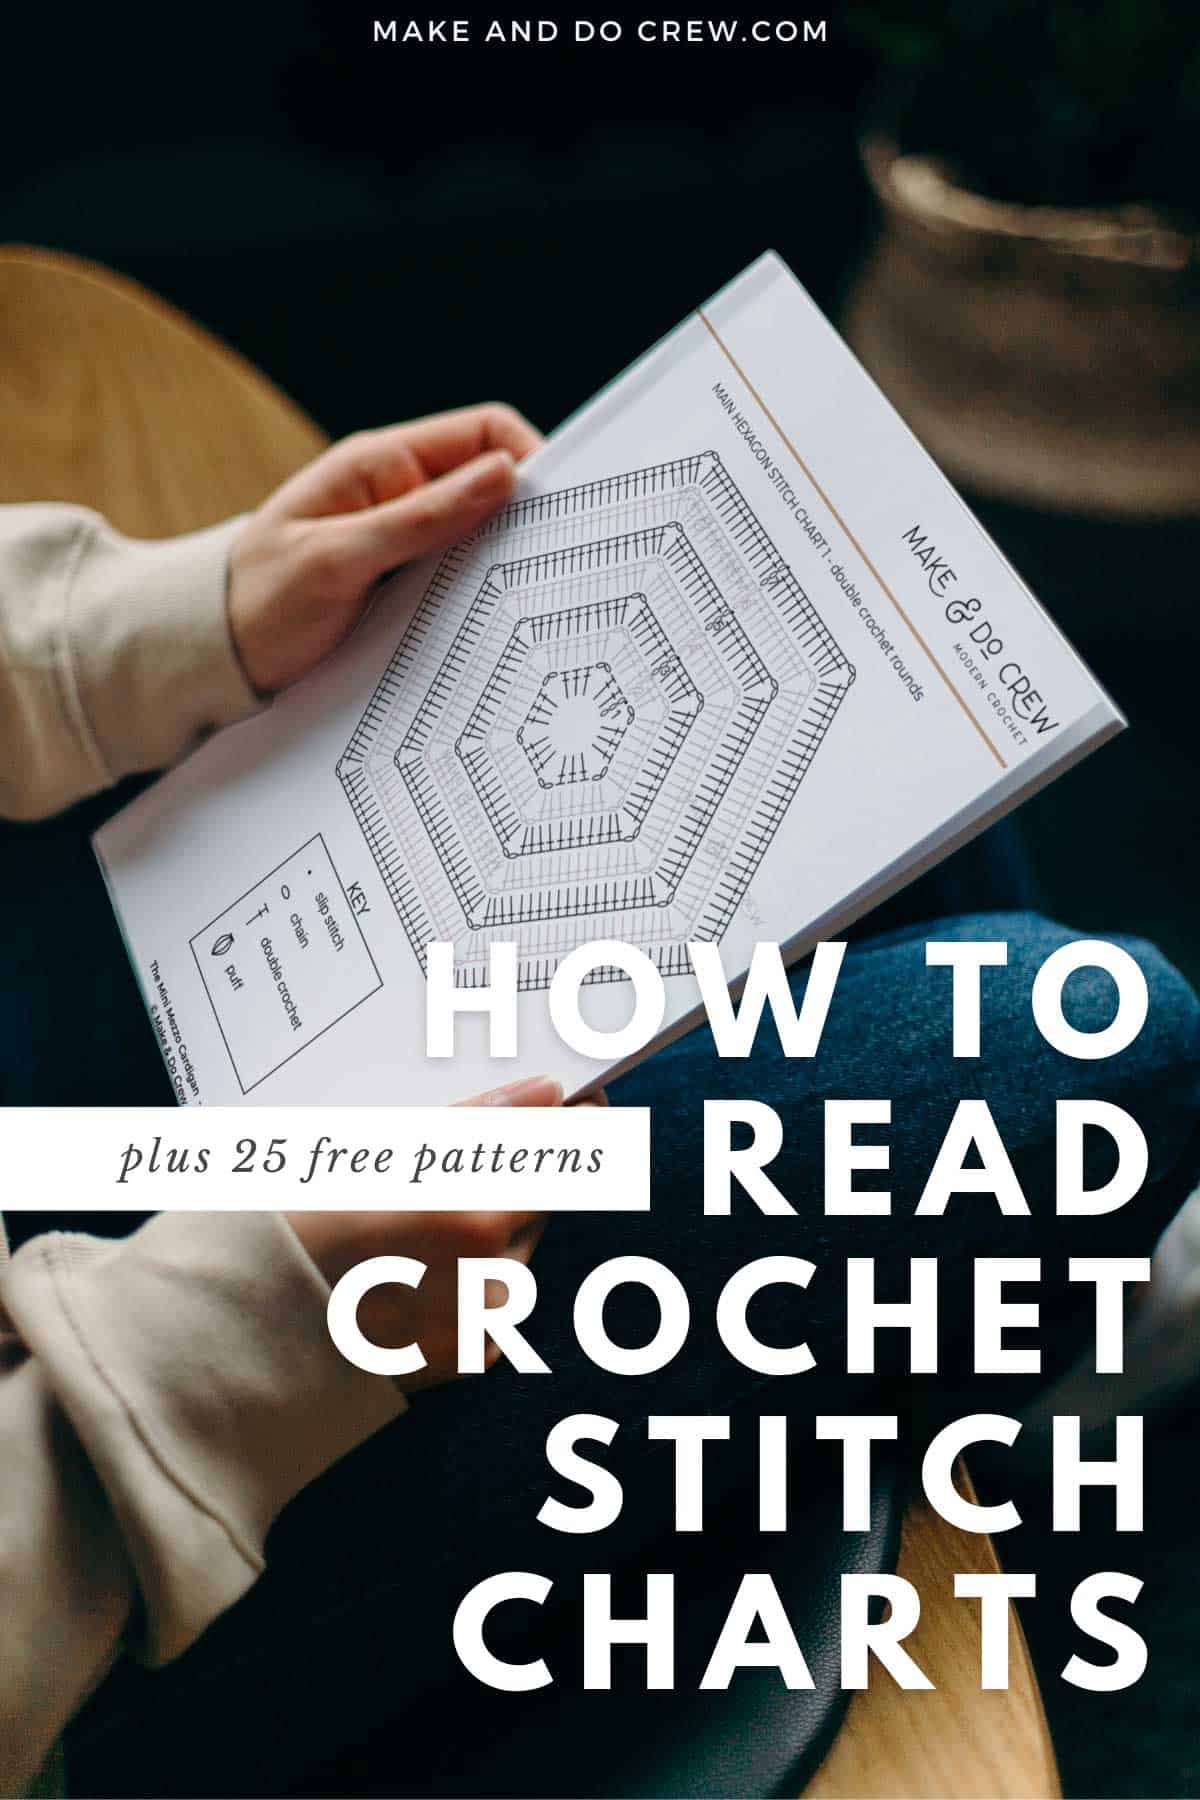
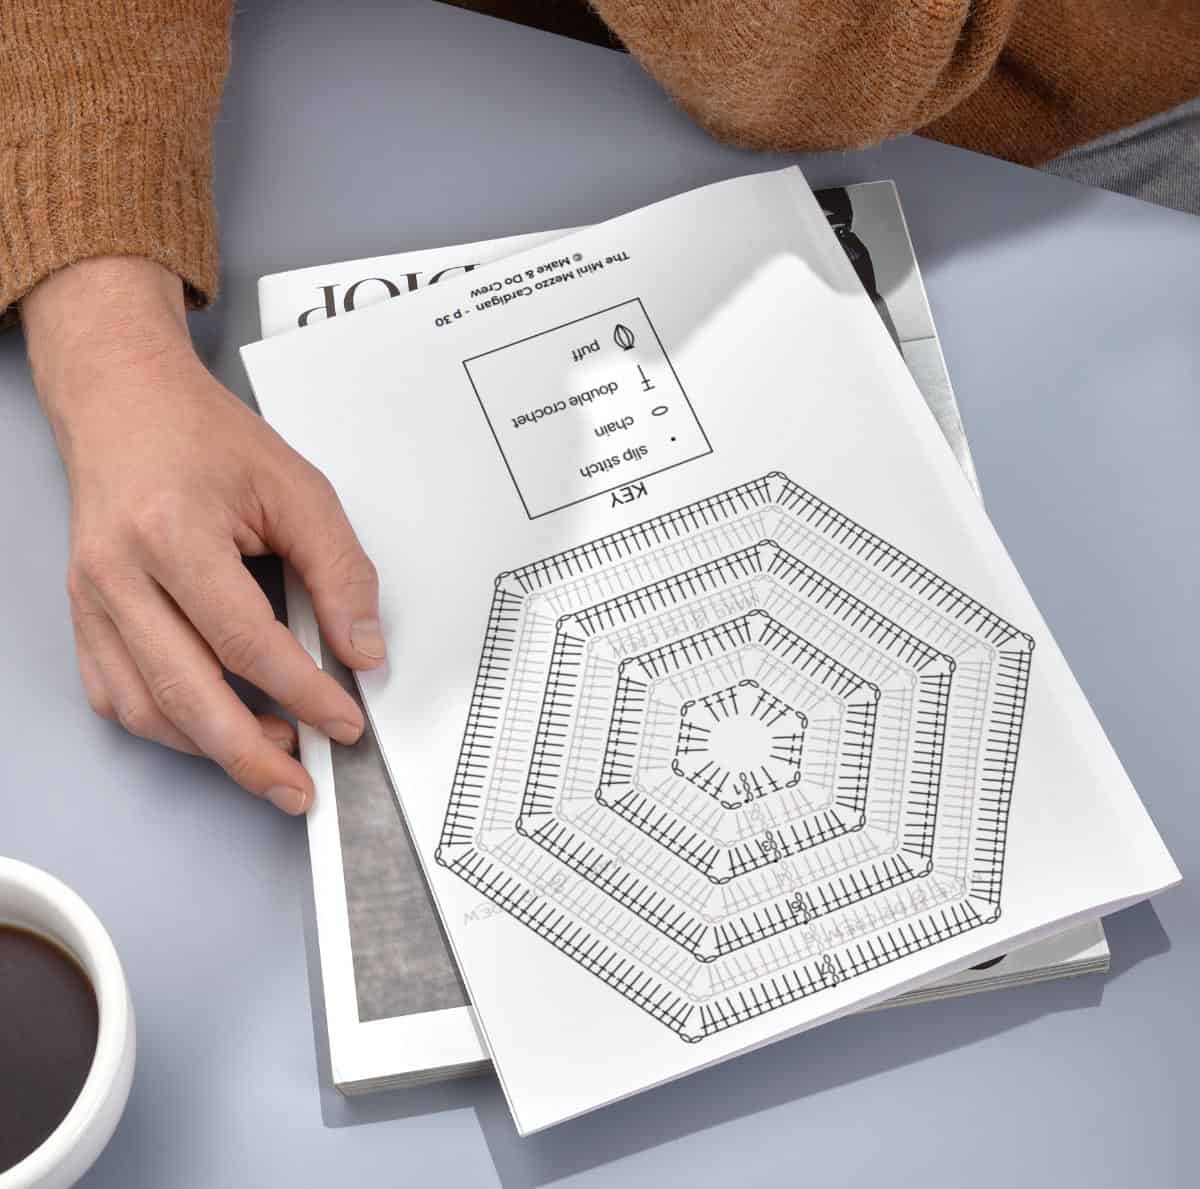
A diagram is a visual representation of a crochet pattern. These charts usually include each row or round of a pattern. Each symbol represents an individual stitch or cluster of stitches and looks roughly like the stitch it represents.
Stitch diagrams may look like a long-lost hieroglyphic language, but they're not as difficult to read as they appear.
Jump to:
- What Are Crochet Diagrams?
- The Benefits Of Visual Patterns
- How To Read Crochet Diagrams
- Basic Stitch Symbols
- Stitch Placement
- Key Points To Remember
- Free Crochet Diagram Patterns
- Tips for Following Visual Crochet Patterns
- Keeping Track Of Your Place
- Reading Graph Patterns
- FAQs About Crochet Diagrams
- Invitation to our Facebook group
The Benefits Of Visual Patterns
Learning to read a crochet diagram can make following a pattern much easier. Here are a few reasons many beginners and experienced crocheters alike prefer charts:
- Crochet diagrams are great for visual learners, as the symbols look like the stitches they represent. The whole diagram is a visual representation of the finished item.
- It’s easy to find your place or check whether you have missed a stitch by matching your project with the diagram.
- The symbols transcend language barriers. This shared crochet language allows you to follow patterns from crochet books in other languages. You don’t need to speak Japanese to tackle a Japanese amigurumi pattern!
- A diagram can enhance and clarify the written instructions. Because they provide visual instruction, crochet charts can be easier to follow when a pattern gets complicated.
- Although crochet diagrams may look complex, they can be more concrete than written instructions, which can be easily misinterpreted.
How To Read Crochet Diagrams
There are two bits of information to decipher when reading a crochet diagram: what the stitch is and where it goes.
Identifying the stitch is easy when you know what you’re looking for. All you have to do is figure out which symbol matches which stitch.
What The Symbols Mean
Different symbols are used to represent each stitch (or stitch cluster). Most patterns come with a stitch diagram key to help you understand what each crochet symbol means, so you don’t need to memorize them.
(Remember that US and UK crochet symbols can look different and go by different names – check which your pattern uses.)
Understanding the anatomy of a stitch symbol will help you figure out what type of stitch it is and how to form it.
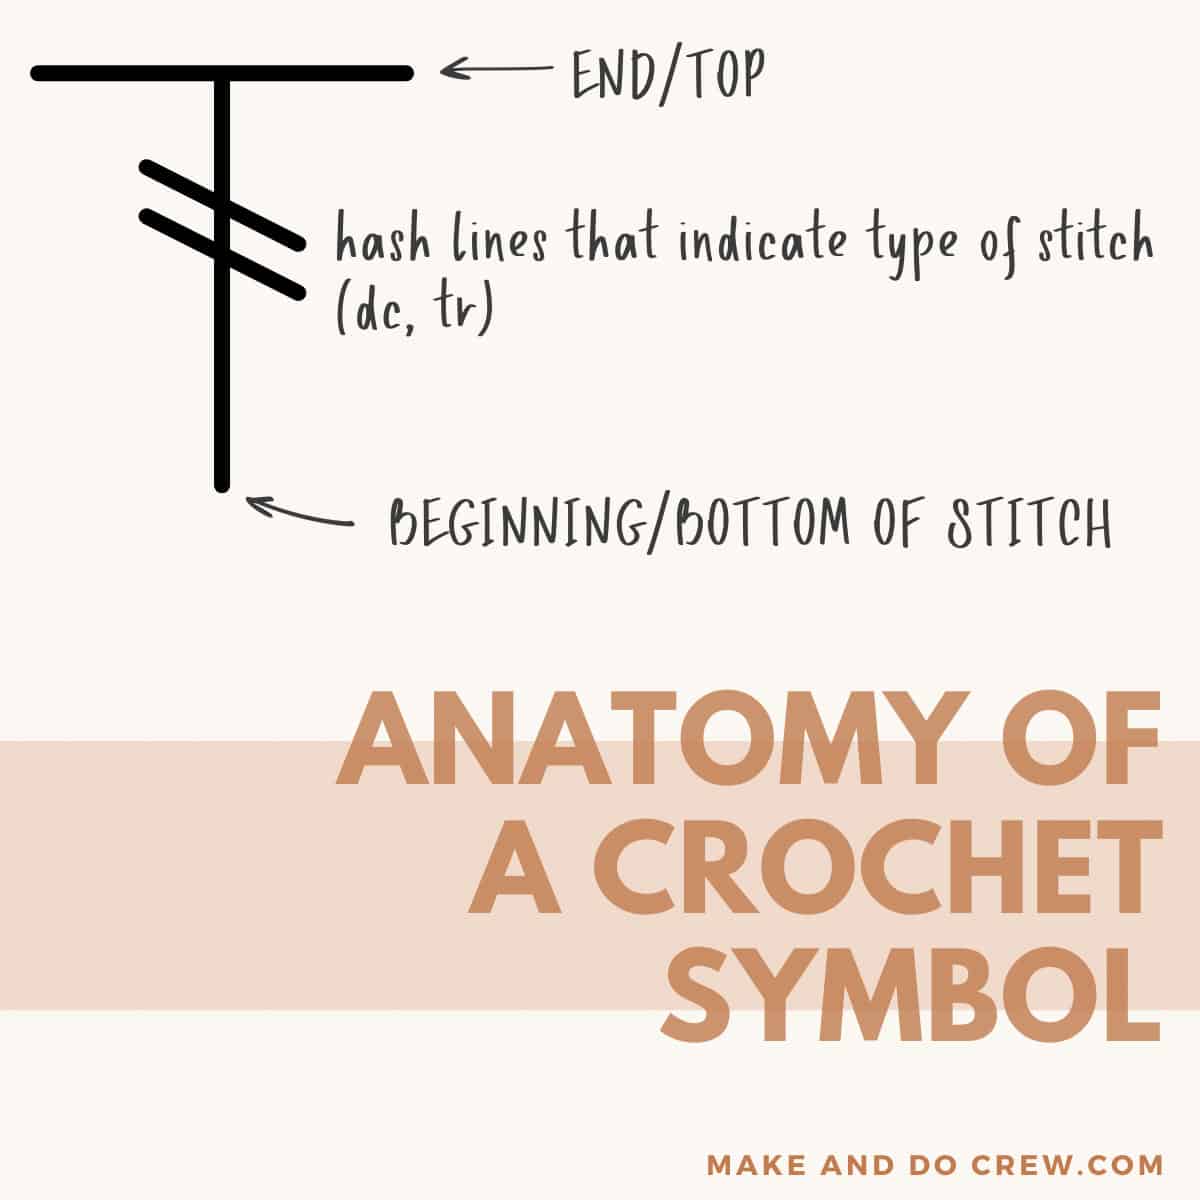
- The plain end of the symbol shows the start of the stitch. This tells you where to make your stitch, whether that’s in another stitch or a chain space.
- The middle hatch lines tell you what type of basic stitch it is (for example, dc or tr). This example has one hack line, meaning it’s a double crochet stitch.
- The angle of the symbol shows the direction in which the stitch should be made.
- The long horizontal end represents the closing of the stitch.
As you can see, even a little symbol has a lot to tell you!
Basic Stitch Symbols
Although you don’t need to memorize all of the crochet stitch symbols, it’s worth being able to recognize some basic stitches.
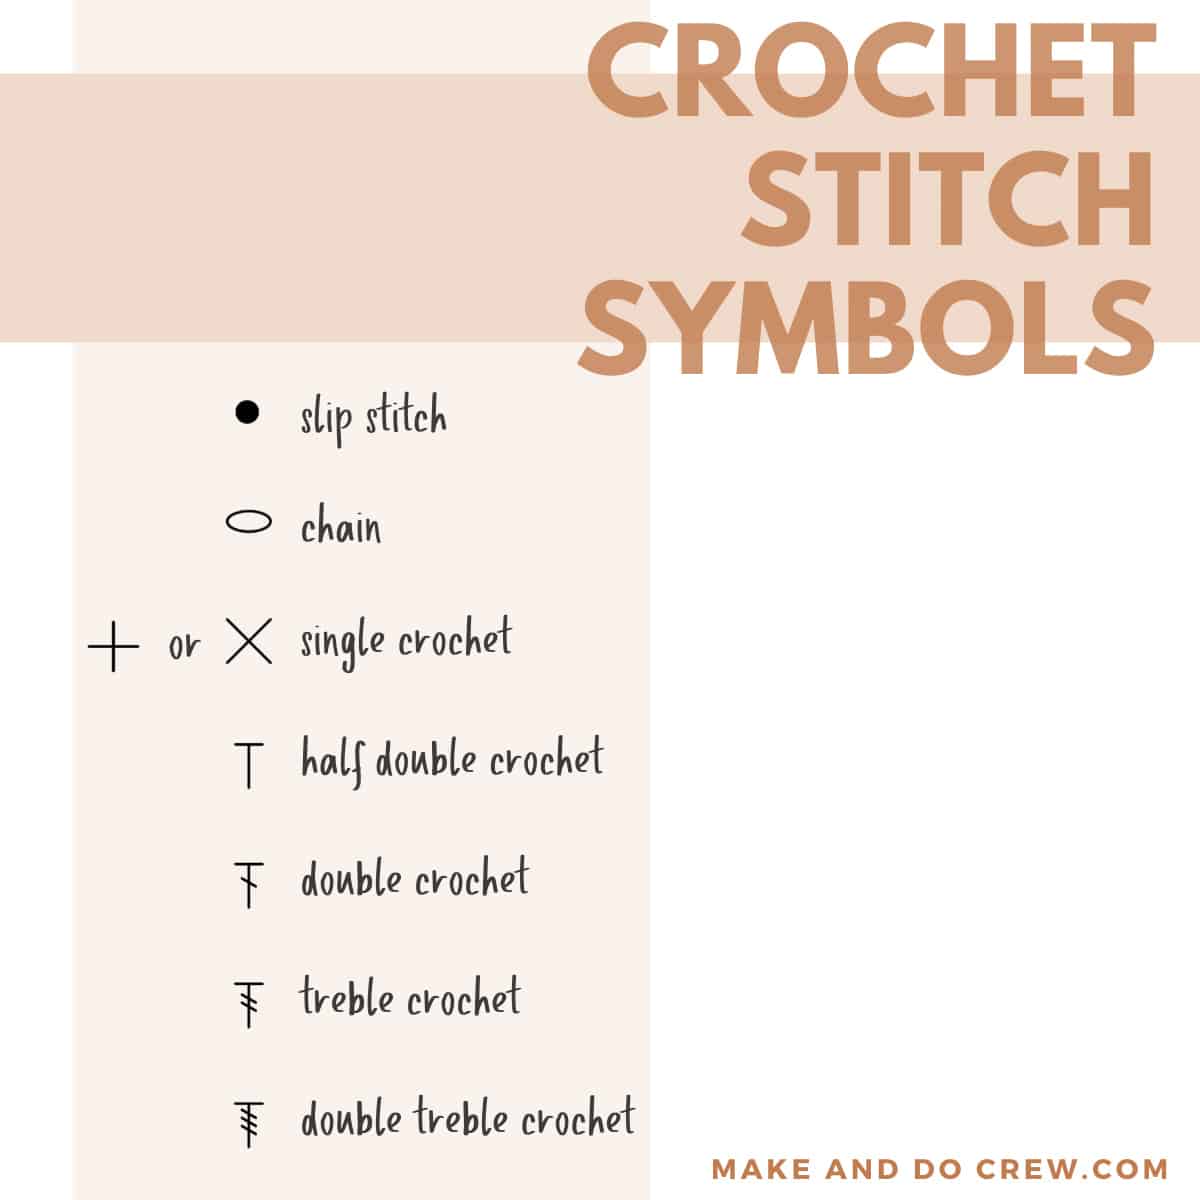
Below, you’ll find the symbols for the most commonly used stitches, like single crochet, double crochet, treble crochet, and slip stitch.
Chain Stitch
A helpful aspect of crochet stitch symbols is that they look like the stitch they represent. Look at the symbol for chain stitch below - the little oval looks just like your yarn does in a chain stitch.
Single, Double, And Treble Stitches
A single stitch is often represented as a cross (aka an "x") or plus sign.
Diagonal lines help you distinguish between double and triple stitches. These lines represent the number of yarn overs. The double crochet has one hatch because the stitch is made with one yarn over. The treble has two hatch lines representing two yarn overs
Puffs, Bobbles and Other Advanced Stitches
Crochet diagrams may also use advanced stitches. Less common symbols you might come across combine multiple basic stitches, like in the case of puff, picot or popcorn stitches. These special symbols are not as universal as other stitches, so check your diagram’s key.
I've found that the best place to look up standardized stitch symbols is the Craft Yarn Council.
Stitch Placement
You can also figure out where each stitch belongs in relation to the others from a visual diagram. The vertical lines of the stitch symbol you where to start the stitch, aka where to insert your hook. Arrows may be used if the stitch placement is unusual.
As in a written pattern, stitches go in sequence side-by-side unless the pattern tells you otherwise. Even in the case of a project that's worked in the round like a hexagon, the stitches in the diagram tend to line up next to each other.
Front and Back Loop And Post Stitches
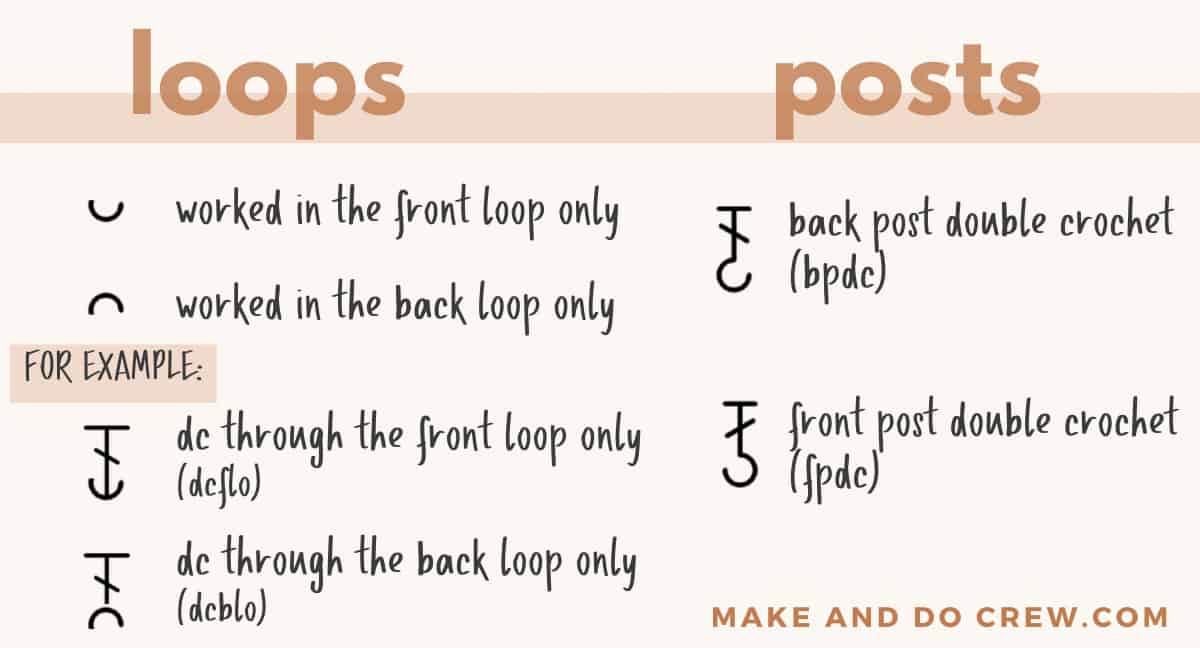
Generally, you can assume that a stitch is worked under both loops of the stitch below. Stitches worked under only the front loop or back loop have a different symbol. Post stitch symbols include a hook at the bottom.
I know this might seem like a lot to keep track of, but remember, you can usually cross-reference the visual diagram with a written pattern. If you're unsure how to interpret the written version, check the stitch chart, and visa versa.
Chain Spaces
Stitches can be worked into chain spaces or gaps between clusters. (Think of a granny square, for example.) Additional written instructions may tell you whether to work into a stitch or into a space, so read any written guidance before blindly following the chart.
Increasing And Decreasing
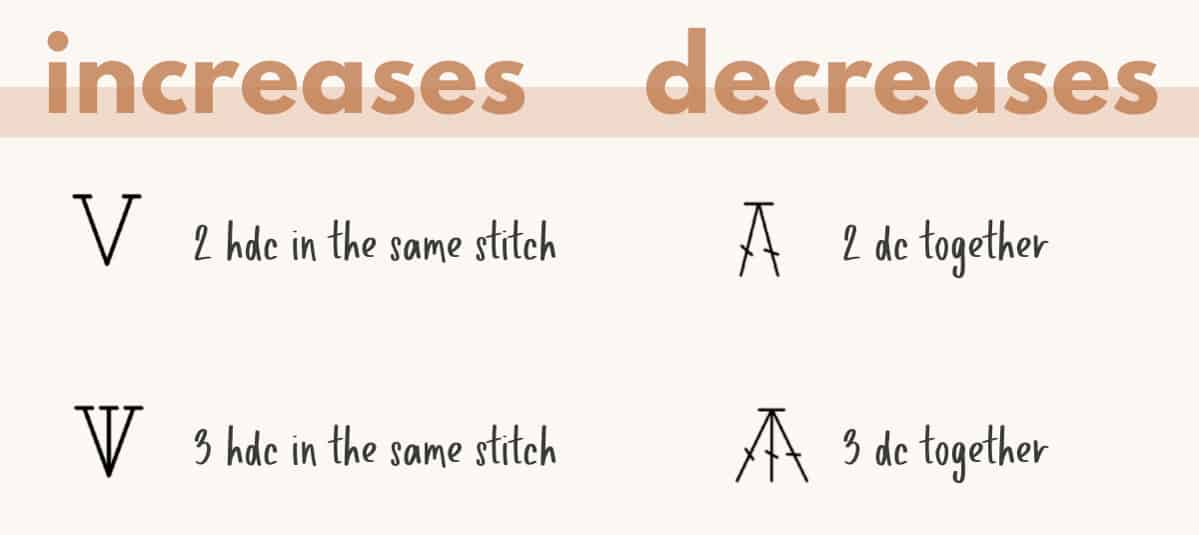
Trying to find increases and decreases in your stitch diagram? Look for the point where the symbols meet.
If the intersection is at the bottom, you need to increase. If the intersection is at the top, you’ll need to decrease.
Sometimes you might need to increase or decrease more than two stitches at once. This is shown as a combination of three or more stitches, all meeting at the top or bottom.
Working With Partial Diagrams
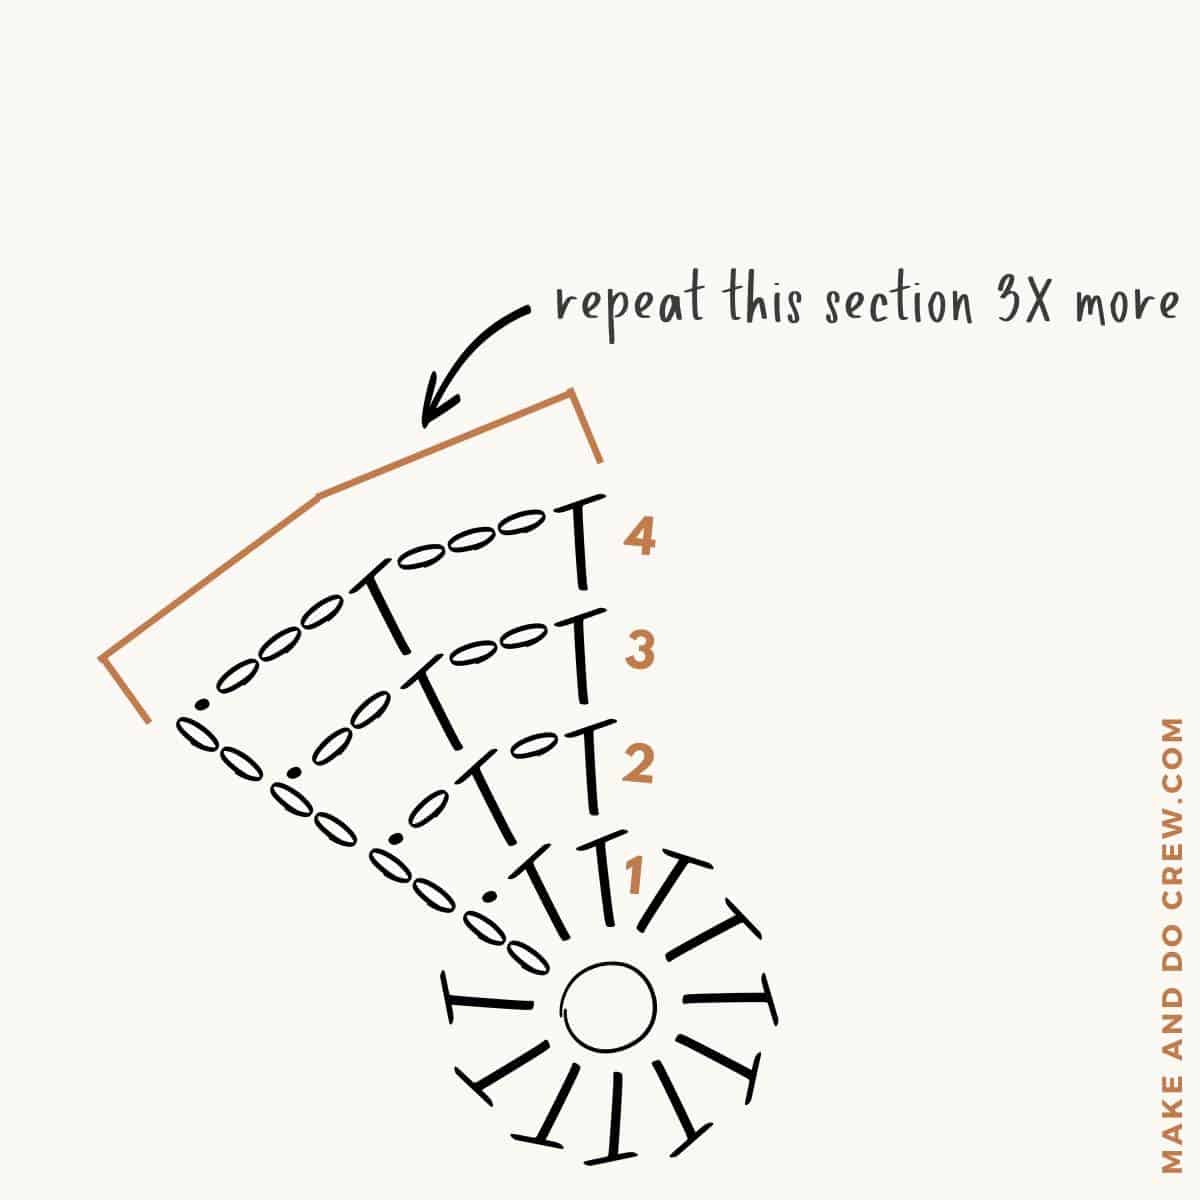
You might find that your pattern comes with a partial diagram if the crochet motif is repetitive.
Don’t panic! A partial chart has the same information as a full stitch diagram. Simply repeat the stitches on the partial chart to form the full piece.
Repeating the Pattern
Here's what the example partial diagram below is telling us:
- Start with a magic loop.
- The pattern is worked in the round without turning. (You can tell this because the slip stitches are in the same position for each round.)
- The first round is 11 half double crochets and one turning chain, all worked into the magic loop.
- Round 2 begins a repeat where one chain is added between each hdc stitch. This is repeated around the circle.
- Rounds 3 and 4 each add an additional chain between each hdc stitch and repeat around the circle.
Key Points To Remember
Interpreting crochet diagram symbols doesn't need to give you a headache. Keep these basic concepts mind when reading stitch charts.
Printable Patterns With Diagrams
I love stitch charts as a tool for teaching crochet techniques, so I try to include them in our premium, printable PDFs as often as possible. Here are a few of my favorite patterns with diagrams in the paid PDFs.
Free Crochet Diagram Patterns
Ready to unleash your new diagram reading skills? These crochet patterns will give you many opportunities to practice and help you make adorable items.
Wanna save this pattern?
Basic Geometric Shapes
Just starting with your first diagram? Begin with one of these simple crochet projects to get the hang of working with symbols.
Crochet Stitches with Charts
Here, you’ll find fun crochet chart patterns that each combine written instructions with a diagram – ideal for checking your understanding.
Holiday Diagrams
Looking for the perfect holiday crochet project? This collection of Christmas diagrams will have you crocheting tree skirts, unique ornaments, and festive mug rugs in no time.
Cute Items to Crochet
Practice reading crochet patterns with diagrams while making something super sweet! These novelty projects are extra fun and achievable when learning to read crochet charts.
Obsessed with finding the best free crochet patterns?
Check out these collections of handpicked patterns to find your next project.
You must use the category name, not a URL, in the category field.Tips for Following Visual Crochet Patterns
Now that you can recognize the stitch symbols and understand their placement, the next step is to practice following a diagram.
Before Starting
Before picking up your yarn and crochet hook, there are a few things you should look for to avoid a lot of demoralizing unraveling later.
Where To Begin
Looking at an entire diagram may feel overwhelming. The key is to find the beginning and work one stitch at a time – just as you would with a written pattern.
Following The Diagram
Crochet as you usually would, either row-by-row or in a round. Interpret a symbol (instead of a word) for each stitch.
- Find the first stitch (an arrow usually indicates this).
- Work the first round until it is closed (or until the row has the required number of stitches).
- Locate how to move to the next round (or row). Is there a turning chain? A slip stitch? Do you change colors?
Pro tip: Practice working from diagrams with written instructions to help you double-check your work as you learn.
Keeping Track Of Your Place
Different colors are often used to differentiate rows/rounds in a chart. For example, the symbols on the right side row are often black, while the wrong side rows may be blue or red. Understanding this can help you track your place in the pattern diagram.
Alternatively, some diagrams only number the right-side rows, or number the right side on the right and the wrong side on the left.
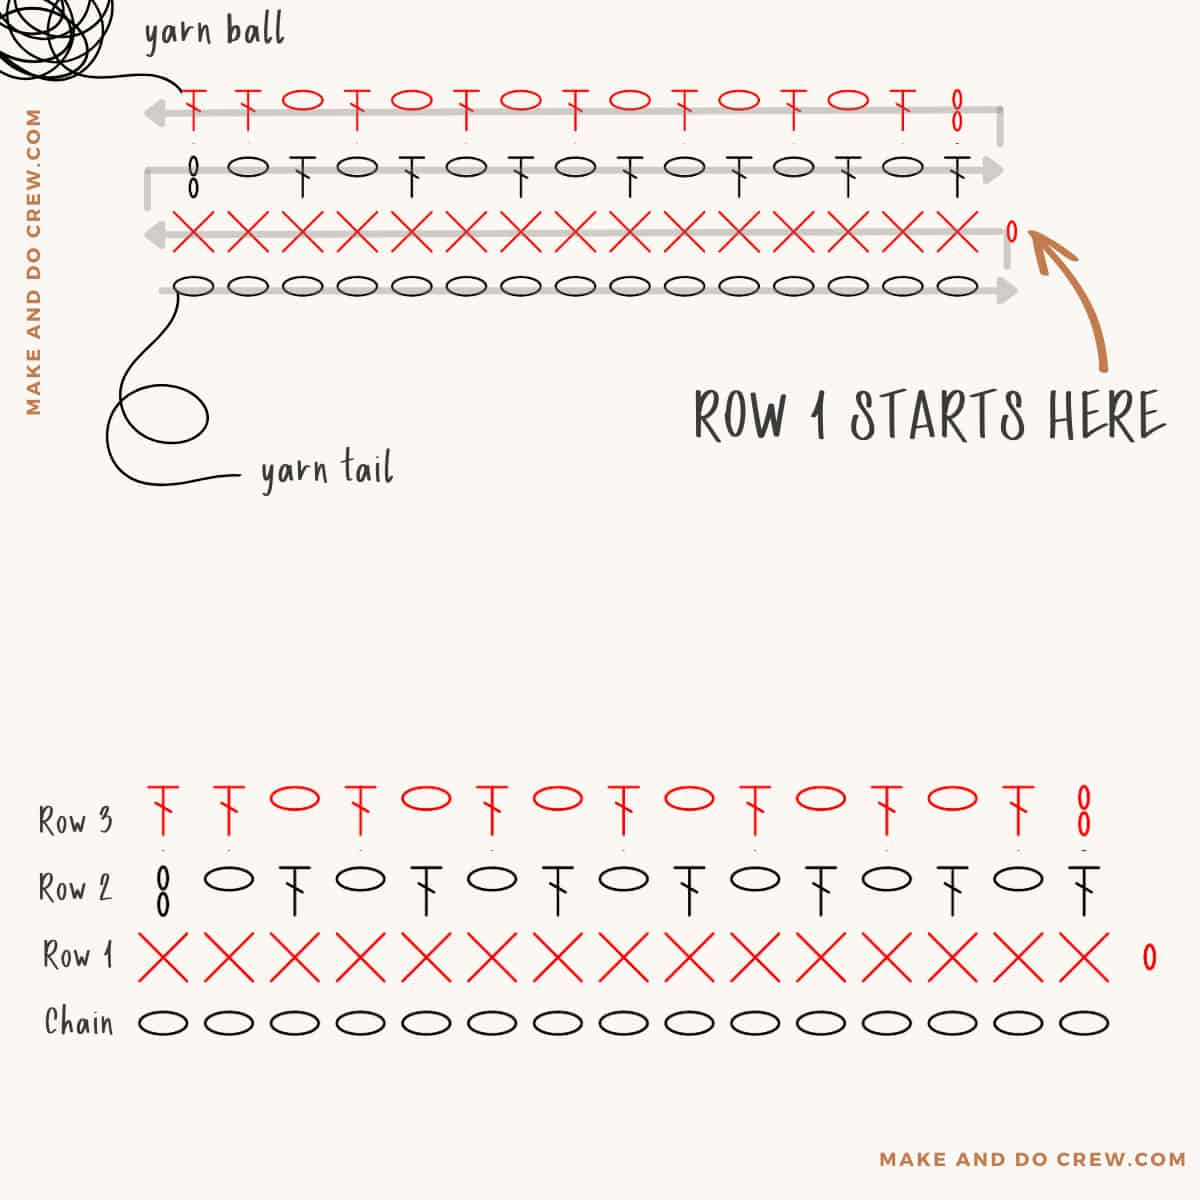
Pro tip: Mark off your rows as you crochet, either with marks on the diagram or using a row counter. Using stitch markers in your work can also help you keep track of your stitches and rows.
Reading Graph Patterns
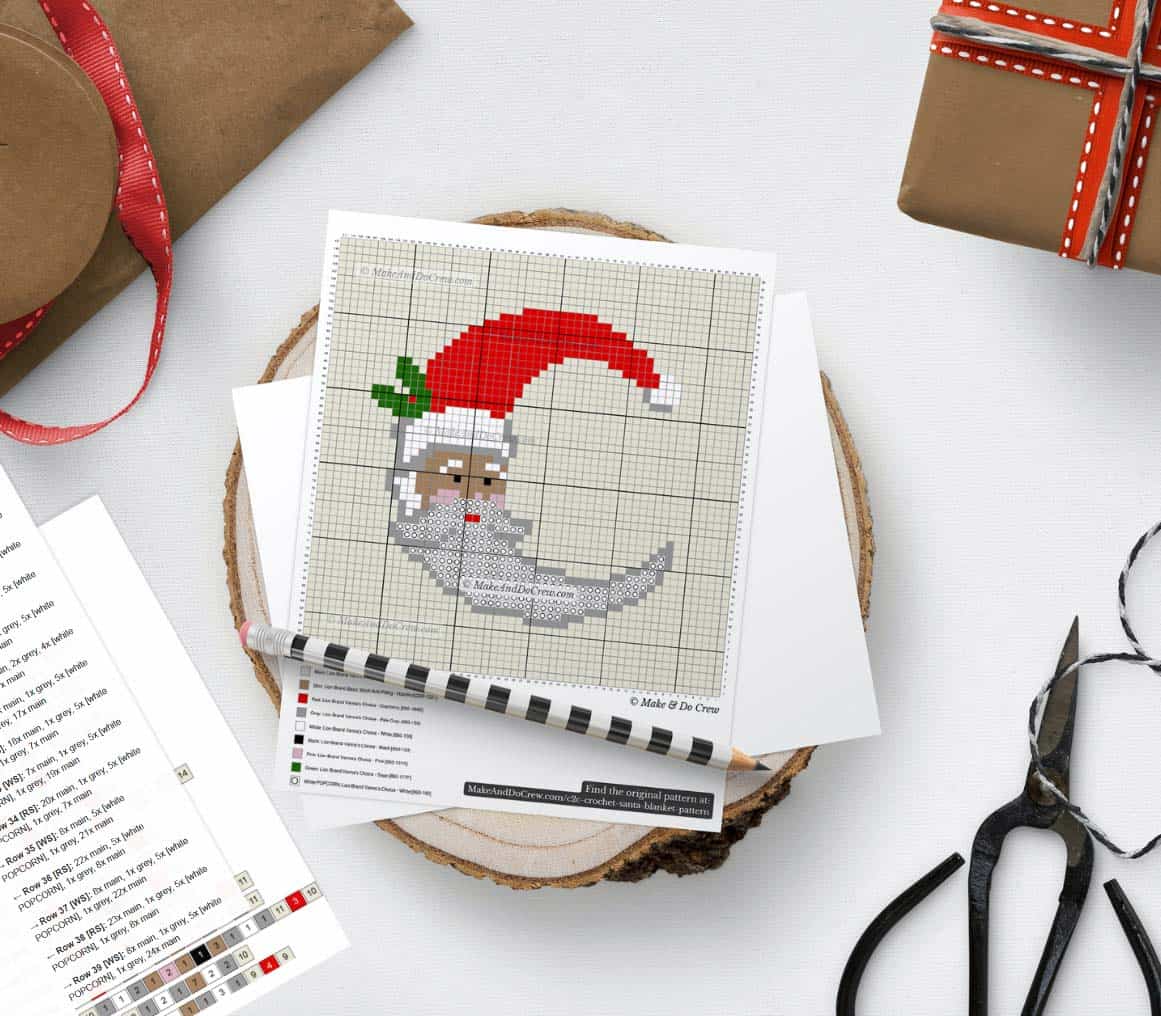
Crochet graph patterns are often used to visualize colorwork, as in corner-to-corner (c2c), mosaic or tapestry crochet. Depending on the type of pattern, they are read from the bottom up or from the lower right corner to the upper right corner.
Similar to diagrams, each box of a graph pattern represents one crochet stitch or group of stitches.
Learn more about designing your own crochet graphs using free online tools like StitchFiddle.
FAQs About Crochet Diagrams
One of the easiest crochet diagrams for beginners is the iconic granny square. Traditionally, only simple stitches are used, and the repetition makes reading the diagram easier. Turn several matching granny squares into a stylish bag or bucket hat.
Although crochet symbols are not completely standardized, most patterns use the same symbols, especially for basic stitches.
Charts often refer to US crochet terms, but some UK-based crochet designers may use UK terms. Make sure to check the information that comes with your crochet pattern chart.
Most charts are written for right-handed crocheters, so some adjustment is required for lefties. Simply work from the same instructions but in the opposite direction. Effectively, you need to reverse the stitch chart.
Pro tip: If you struggle to hold a backward image of the pattern in your head, snap a photo of the chart and use the basic photo editing tools on your phone to reflect it.
There are various free and paid tools for designing crochet diagrams. One of the most popular free options is StitchFiddle.com. It allows designers to create stitch charts and graph patterns from scratch or by uploading a photo.
More Crochet Tutorials
What's next? Now that you know how to read stitch diagrams, try one of these easy crochet tutorials.
Learn a New Skill
When you're ready to master a new skill, check out our detailed guides that include everything you need to know to level up your crochet game.
- How to Corner to Corner (C2C) Crochet for Beginners - with video tutorials to get you started
- How to Crochet a Beginner Hat - make an entire beanie in 1.5 hours!
- How to Crochet Amigurumi for Beginners - the ultimate guide to making your own toys and plushies
- How to Tunisian Crochet - learn with this video and a standard hook
That was so fun! Now what?
Invitation to our Facebook group
Discuss deciphering crochet patterns with diagrams and lots of other projects and techniques in our Make & Do Crew Facebook group. Here thousands of helpful crocheters answer each other's questions and share their stitches. Join us!


Leave a Reply