In the second stage of the Alchemy Cardigan Crochet Along, we'll learn how to crochet both front pieces of this summery sweater. Part 2 of the free pattern and video tutorial are below, or you can purchase the ad-free, easily printable PDF with stitch chart and schematic here. Look for Part 3 next Monday!
This free cardigan pattern and video tutorial are part of a collaboration with my friends at LoveCrochet.com. This post contains affiliate links.
Oookay, friends! Who's excited to move onto Part 2 of the pattern this week? My buddies at LoveCrochet.com and I have been BLOWN AWAY by how fast and beautifully some of you have completed Part 1. It's been so fun to watch all the progress you're making in the Crochet Along Facebook Group. If you haven't joined yet, it's a great place to get help if you're struggling or see inspiration from other crocheters who are working right alongside you. The community aspect of this crochet along is one of my favorite parts.
And if you're an Instagram enthusiast like me, remember to take your photos with #AlchemyCAL so we can all see what you're up to! (Pursuing the hashtag is a great place to get color inspo if you're new too!)
New To the Alchemy Cardigan Crochet Along?
Here's where you can find everything you'll need:
• Get your Lion Brand Vanna's Style yarn from LoveCrochet.com here.
• Purchase the ad-free, printable PDF with stitch chart and schematic here on LoveCrafts.com or here on Etsy.
• Read the Crochet Along Intro with info about how this whole thing works here.
• Start Part 1 of the free pattern and video tutorial here.
• Ask questions and show off your stitches in the helpful Love Crochet CAL Facebook group here.
What's In Store for Part 2
This week, we're going to learn how to make the two front pieces of your crochet cardigan. The awesome thing this week is that you're already an old pro at everything you need to know! The fronts are worked very similarly to the back piece and should result in the same shoulder slant and armhole shape.
A few people have asked if they could use a foundation double crochet stitch to begin the back piece instead of a regular chain and then one row of double crochet. The answer is yes! If you're more comfortable with a foundation double crochet and find that it avoids the dreaded tight chain problem, go for it. Similarly, feel free to use the same technique to start both front pieces. (Once the foundation double crochet row is complete, move on to Row 2.)
As a reminder to the couch crocheters like me, you can purchase the ad-free PDF that's formatted for easy printing right here. It's includes a visual stitch chart and schematic with a lot of extra measurements, plus all the tutorial photos that are included in each blog post.
And if you've purchased the PDF and just want to watch all the video tutorials in one place, head over to our Alchemy Cardigan CAL page on LoveCrochet.com.
Alright, without further ado, find the Part 2 video tutorial below and Part 2 of the free pattern directly below the video player. And I'll see you right back here next Monday where we'll learn how to make the sleeves!
More Free Crochet Sweater Patterns
Crochet sweater patterns don't need to be difficult. In fact, most of ours are made with very simple shapes. Dive into the wonderful world of crochet garments with cardigans, pullovers, ponchos, shrugs and more!
See more free crochet sweater patterns →
The Alchemy Cardigan Crochet Along Video Tutorial
Free Written Pattern – Part 2
Purchase the ad-free, printable PDF with schematic and stitch chart here.
Pin it for later here.
Find Part 1 of the free pattern here.
Explanation:
Whether you’re new to garment crocheting or an old pro, the Alchemy Cardigan will transform what you think is possible with a hook, some yarn and your own two hands. This lightweight sweater is perfect to toss on for some summer stargazing or layer with a long-sleeve shirt in the colder months.
Worked sideways to create flattering vertical rows, the entire sweater is made with different applications of a simple double crochet stitch (U.K: treble crochet). A few modern details, like cuffed sleeves and wooden buttons, ensure this cardigan will be a wardrobe staple for years to come. Released in four separate manageable stages, in this crochet along, you’ll learn some new intermediate-level techniques and then have a chance to master them with plenty of step-by-step practice.
Supplies:
• Lion Brand Vanna’s Style (Weight: 3/light – 254 yds, 3.5 oz)
– Ecru (#867-098) – 6 (7, 8, 8, 9, 10, 11) skeins [(approx. 570 (640, 710, 790, 900, 975, 1060) g)]
• Tapestry needle
• Size I (5.5 mm) crochet hook
• Stitch markers or safety pins
• (2) ¾” or 1” buttons
• Sewing needle and thread to match buttons
Sizes:
S, M, L, XL, 2X, 3X, 4X
Fits Bust:
S: 32-34”
M: 36-38”
L: 40-42”
XL: 44-46”
2X: 48-50”
3X: 52-54”
4X: 56-58″
See schematic in the printable, ad-free PDF for additional measurements.
Gauge:
Main Pattern:
14 sts = 4”
7.5 rows = 4”
Please check your gauge and adjust your hook size accordingly! This is critical to making a sweater that meets the sizing listed in the pattern. See first few minutes of the Part 1 video tutorial for explanation of how to do this.
Abbreviations and Glossary (US Terms):
bpdc – back post double crochet
ch – chain
dc – double crochet
dc2tog – double crochet two together
fpdc – front post double crochet
PM – place marker
rep – repeat
RS – right side
sc – single crochet
sp – space
sl st – slip stitch
st(s) – stitch(es)
tch – turning chain
WS – wrong side
Overall Pattern Notes:
• Ch 3 at beginning of a row always counts as a dc.
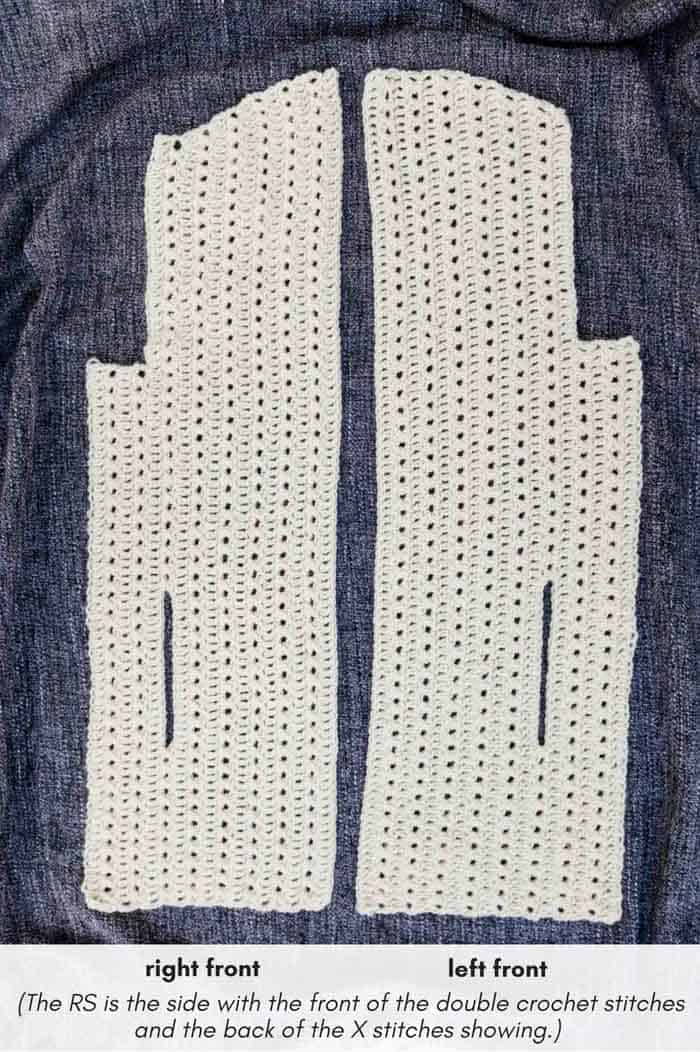
Notes:
• Sweater fronts worked vertically from one underarm side to where cardigan opens in the front. (See photo above.)
• Because there’s a definite RS and WS of fabric, we’ll be working two reflecting pieces for the front. These will mimic the exact shape of the right and left sides of the sweater back.
• Pocket slit is optional. Continue working regular double crochet Xs to eliminate pockets.
• Replace Foundation Row and Row 1 with one single row of foundation double crochet if desired. Work 64 (66, 66, 68, 68, 70, 70) total fdc in this case.
Right Front
Make 1.
Underarm Indent:
Foundation Row: Ch 66 (68, 68, 70, 70, 72, 72).
Row 1 (RS): Sk 3 ch (counts as 1 dc), dc in each ch to end; turn. (64 (66, 66, 68, 68, 70, 70) dc)
Row 2 (WS): Ch 3, sk first dc, *sk next dc, dc in next dc, working behind last dc made, dc in last skipped dc (X made); rep from * until tch remains; dc in third ch of tch; turn. (31 (32, 32, 33, 33, 34, 34) Xs)
Row 3 (RS): Ch 3, sk first dc, dc in each dc to end of row; turn. (64 (66, 66, 68, 68, 70, 70) dc)
Row 4 (WS): Ch 3, sk first dc, *sk next dc, dc in next dc, working behind last dc made, dc in last skipped dc (X made); rep from * until tch remains; dc in third ch of tch; turn. (31 (32, 32, 33, 33, 34, 34) Xs)
Do not fasten off.
Attach a second ball of yarn in tch at beginning of Row 4.
With new ball of yarn, ch 27 (29, 31, 33, 35, 37, 39). Fasten off new ball and pull yarn through last ch to create 26 (28, 30, 32, 34, 36, 38) total workable chs. ((31 (32, 32, 33, 33, 34, 34) Xs and 26 (28, 30, 32, 34, 36, 38) ch)
Continue Row 1 of next section with original ball of yarn.
Shoulder Increasing:
Row 1 (RS): Ch 3, sk first dc, dc in each dc and ch to end of row; turn.
(90 (94, 96, 100, 102, 106, 108) dc)
TIP: Count your stitches to ensure there are the correct number of double crochets after adding the new chain.
Row 2 (WS pocket slit): Ch 3, sk first dc, *sk next dc, dc in next dc, working behind last dc made, dc in last skipped dc (X made)**; rep rep from * 25 (26, 27, 28, 29, 30, 31) more times (26 (27, 28, 29, 30, 31, 32) Xs total made); ch 18, sk 19 sts, dc in next (20th) st, working behind last dc made, dc in last skipped (19th) dc (X made); rep rep from * to ** until tch remains; dc in third ch of tch; turn. (9 (10, 10, 11, 11, 12, 12) Xs below pocket slit)
Row 3 (RS inc): Ch 3, sk first dc, dc in each dc and ch until 2 dc remain, 2 dc in each of last 2 dc; turn. (92 (96, 98, 102, 104, 108, 110) dc)
Rows 4-5 (7, 9, 11, 13, 15, 17): Continuing in established pattern, rep a RS inc Row every RS row, 1 (2, 1, 0, 1, 0, 1) time(s), then rep a RS inc Row every other RS row, 0 (0, 1, 2, 2, 3, 3) time(s). At the end of increasing there are 94 (100, 102, 106, 110, 114, 118) dc.
TIP: To see row-by-row instructions in layman’s terms for the increase rows above (Rows 4-5 (7, 9, 11, 13, 15, 17), reference the Back section of the pattern. While the increase for the Right Front is worked at the end of the dc row instead of the beginning, the actual frequency of dc increase rows and X rows does not differ from the Back.
Center Front:
Rows 1, 3, 5 (WS): Ch 3, sk first dc, *sk next dc, dc in next dc, working behind last dc made, dc in last skipped dc (X made); rep from * until tch remains; dc in third ch of tch; turn. (46 (49, 50, 52, 54, 56, 58) Xs)
Rows 2, 4, 6, (RS): Ch 3, sk first dc, dc in each dc and ch to end of row; turn. (94 (100, 102, 106, 110, 114, 118)100 dc)
Fasten off.
Left Front
Notes:
• Left front is worked identically to the first portion of the Back section. Review the Back section video tutorial for extra help (Part 1).
Make 1.
Underarm Indent:
Wanna save this pattern?
Foundation Row: Ch 66 (68, 68, 70, 70, 72, 72).
Row 1 (RS): Sk 3 ch (counts as 1 dc), dc in each ch to end; turn. (64 (66, 66, 68, 68, 70, 70) dc)
Row 2 (WS): Ch 3, sk first dc, *sk next dc, dc in next dc, working behind last dc made, dc in last skipped dc (X made); rep from * until tch remains; dc in third ch of tch; turn (31 (32, 32, 33, 33, 34, 34) Xs)
Row 3 (RS): Ch 3, sk first dc, dc in each dc to end of row; turn. (64 (66, 66, 68, 68, 70, 70) dc)
Row 4 (WS): Ch 3, sk first dc, *sk next dc, dc in next dc, working behind last dc made, dc in last skipped dc (X made); rep from * until tch remains; dc in third ch of tch; at end of row: ch 28 (30, 32, 34, 36, 38, 40); turn. (31 (32, 32, 33, 33, 34, 34) Xs + 28 (30, 32, 34, 36, 38, 40) ch)
Shoulder Increasing:
Row 1 (RS): Sk 3 ch (counts as 1 dc), dc in each dc and ch to end of row; turn. (90 (94, 96, 100, 102, 106, 108) dc)
TIP: Count your stitches to ensure there are the correct number of double crochets after adding the new chain.
Row 2 (WS pocket slit): Ch 3, sk first dc, *sk next dc, dc in next dc, working behind last dc made, dc in last skipped dc (X made)**; rep from * 8 (9, 9, 10, 10, 11, 11) more times (9 (10, 10, 11, 11, 12, 12) Xs total made); ch 18, sk 19 sts, dc in next (20th) st, working behind last dc made, dc in last skipped (19th) dc (X made); rep rep from * to ** until tch remains; dc in third ch of tch; turn. (26 (27, 28, 29, 30, 31, 32) Xs above pocket slit)
Row 3 (RS inc): Ch 3, 2 dc in first dc, dc in each dc and ch to end of row; turn. (92 (96, 98, 102, 104, 108, 110) dc)
Rows 4-5 (7, 9, 11, 13, 15, 17): Continuing in established pattern, rep a RS inc Row every RS row, 1 (2, 1, 0, 1, 0, 1) time(s), then rep a RS inc Row every other RS row, 0 (0, 1, 2, 2, 3, 3) time(s). At the end of increasing there are 94 (100, 102, 106, 110, 114, 118) dc.
TIP: To see row-by-row instructions in layman’s terms for the increase rows above (Rows 4-5 (7, 9, 11, 13, 15, 17), reference the Back section of the pattern.
Center Front:
Rows 1, 3, 5 (WS): Ch 3, sk first dc, *sk next dc, dc in next dc, working behind last dc made, dc in last skipped dc (X made); rep from * until tch remains; dc in third ch of tch; turn. (46 (49, 50, 52, 54, 56, 58) Xs)
Rows 2, 4, 6 (RS): Ch 3, sk first dc, dc in each dc and ch to end of row; turn. (94 (100, 102, 106, 110, 114, 118) dc)
Fasten off.
Woohoo! You’re halfway done with the crochet along! In Part 3, we’ll learn how to make the lightweight, cuffed sleeves.
That was so fun! Now what?
Invitation to our Facebook group
Come discuss crocheting alchemy cardigan patterns and lots of other crochet projects and techniques in our Make & Do Crew Facebook group. Here thousands of helpful crocheters answer each others questions and share their stitches. Come join us here.
Find Your Next Sweater Project
- Pullover with Removable Cowl - unique and easy design
- Hooded Sweater Pattern - Self, striping Mandala yarn pattern
- Tapestry Crochet Pattern - classic fisherman's sweater
- Seamless Cardigan Pattern - doable first sweater for beginners
- How to Crochet a Top Down Sweater - stylish, slim fit
- Lightweight Cropped Sweater - stylish 3 season top
- Easy Poncho With Sleeves - made entirely from rectangles
- Beginner Cardigan with Video - uses only half double crochet stitches
More Free Patterns + Tutorials
Can't get enough free crochet patterns!? Me either. You'll definitely want to breeze through these collections to find your next project.
- 55+ Free Crochet Sweater and Cardigan Patterns - our most popular garments
- 40+ Free Crochet Blanket Patterns - baby blankets, throws + c2c graphgans
- 36+ Granny Square Patterns + tips for the perfect square
- 30+ Crochet Animal Patterns - adorable amigurumi stuffed animals
- Crochet Gift Ideas - easy patterns to make for others
- Fast Crochet Projects - start to finish in less than a day
Learn a New Skill
And when you're ready to master a new skill, check out our detailed guides that include everything you need to know to level up your crochet game.
- How to Corner to Corner (C2C) Crochet for Beginners - with video tutorials to get you started
- How to Crochet a Beginner Hat - make an entire beanie in 1.5 hours!
- How to Crochet Amigurumi for Beginners - the ultimate guide to making your own toys and plushies
- How to Tunisian Crochet - learn with this video and a standard hook





Phyllis says
Yes Jess, and thank you for clarifying that. I think I kind of figured it out that, that was the way it was supposed to be but only after I had left the message. Thank you again for getting back to me.
Phyllis
Betzabeth says
Hola! Quisiera saber cuando sale la parte 3, realmente las 2 partes las acabe muy rapido y muero de ganas por estrenarlo.
Phyllis says
Hi Jess, I am a little confused, On the Right front section at shoulder increasing Row 2 (WS pocket slit, it is written as "Rep. from * (25(26,27,28, 29, 30, 31) more times (26,(27,28, 29, 30, 31, 32) Xs made. Then on Left front section at shoulder increasing Row 2 (WS pocket slit, it is written as "Rep. from * 8 (9,9,10,10,11,11) more times. 9(10,10, 11,11, 12,12) Xs made. I am not sure if I am understanding that it is supposed to be written the same or different. It is confusing. I watched the videos but I can not follow the video and check out how the pattern is written at the same time. I hope you can understand what I am trying to say. It may just be a typo. Thank you very much for your time. I love this so much and really want to make it.
Jess @ Make and Do Crew says
Hey Phyllis,
Great question and I do think I understand what you're asking. They are intentionally different because you're working two different front sections that mirror each other. So on one, you're coming at the pocket from the top down and on the other, you're working from the bottom up. That's where the difference in numbers of Xs comes from. Does that make sense?
Jess
Dawn says
This is a great pattern but i really wish in your tutorial you went thru each of the steps with an explanation instead of telling us to refer back to the cardigan back ( part one ) it got confusing and in the written pattern the way you list the sizes ( in parentheses) and the rows was confusing , i found myself getting very frustrated : your explanation in part one of the shoulder increases where you wrote it out plainly was very clear I’m glad it was rewritten or at that point i may have given up :
Jess @ Make and Do Crew says
Thanks for the feedback, Dawn. I understand where you're coming from. I try to tow the line between keeping these videos a manageable length and also very helpful to the most people.
Do you feel like you've got the hang of it now?
Jess
Corry Dubois says
Hello I paid for this pattern but I didn't receive a downloadable part 2
Greetings Corry
Jess @ Make and Do Crew says
Hey Corry,
It will appear in your LoveCrochet.com pattern library and you can just update the newly updated PDF. Each week will work this way and you won't have to purchase the pattern again. 🙂
Jess
Darla Scholten says
I’m confused about the amount of yarn needed. Can’t find Vanna’s Style and would like to substitute with a cotton blend. Your pattern says 6 skeins of 254 yards each skein for Vanna’s Style for the smallest size; wouldn’t that be 1524 yards total? Or, 3.5 ounces times 6 skeins = 21 ounces. What does the “approx 570 (640,710, ...) refer to?
Jess @ Make and Do Crew says
That last number refers to the number total grams needed. Any yarn label should offer both ounces and grams so you can just sub yarn accordingly that way. 🙂
Tae says
Yay! I’m so excited to get started!!
Linda says
I’ve been waiting for Part 2 before starting...I plan on making the Fronts and Back in one continuous piece to eliminate the side seams. I cannot get Vanna’s Style in Canada, so I will also be fudging the yarn, making sure to do a swatch first.
Wish me luck!
Jess @ Make and Do Crew says
That sounds like fun! While I think it might have been too complicated for the general pattern, I absolutely love the idea of trying any sweater this way!
Jess @ Make and Do Crew says
Awesome! I'm happy to hear that. 🙂