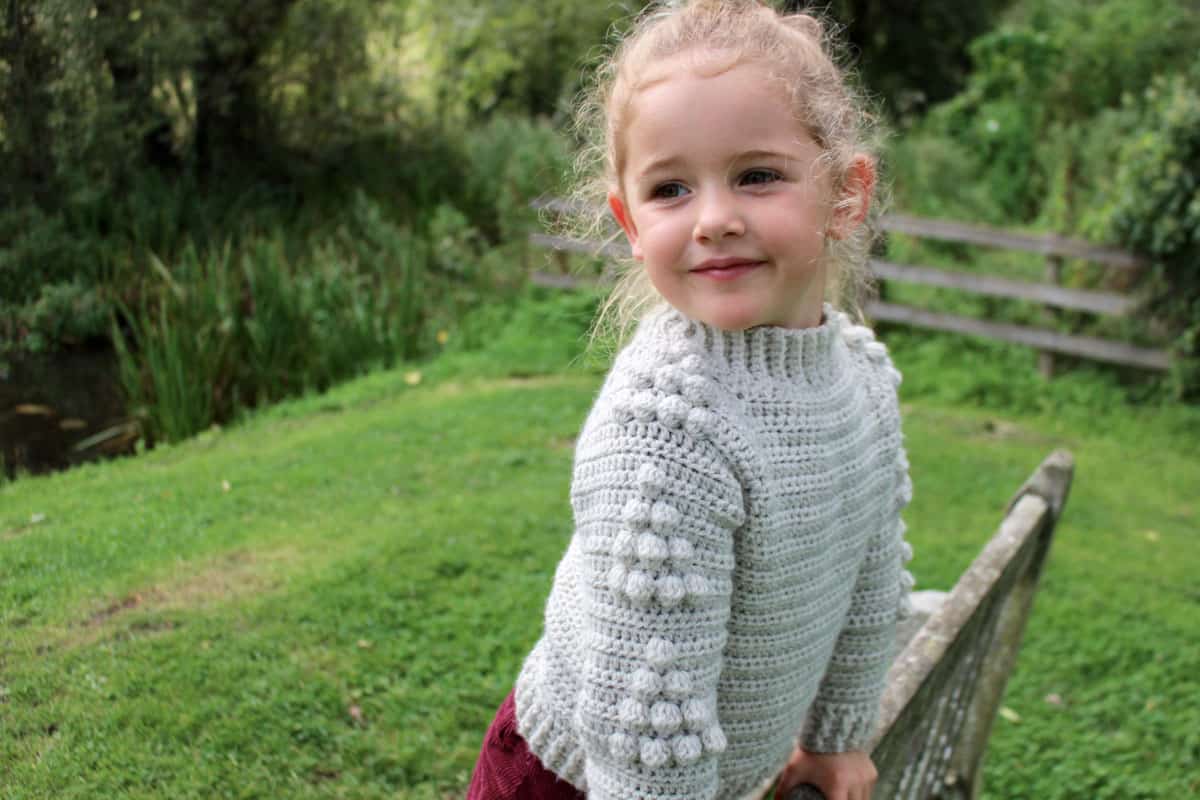
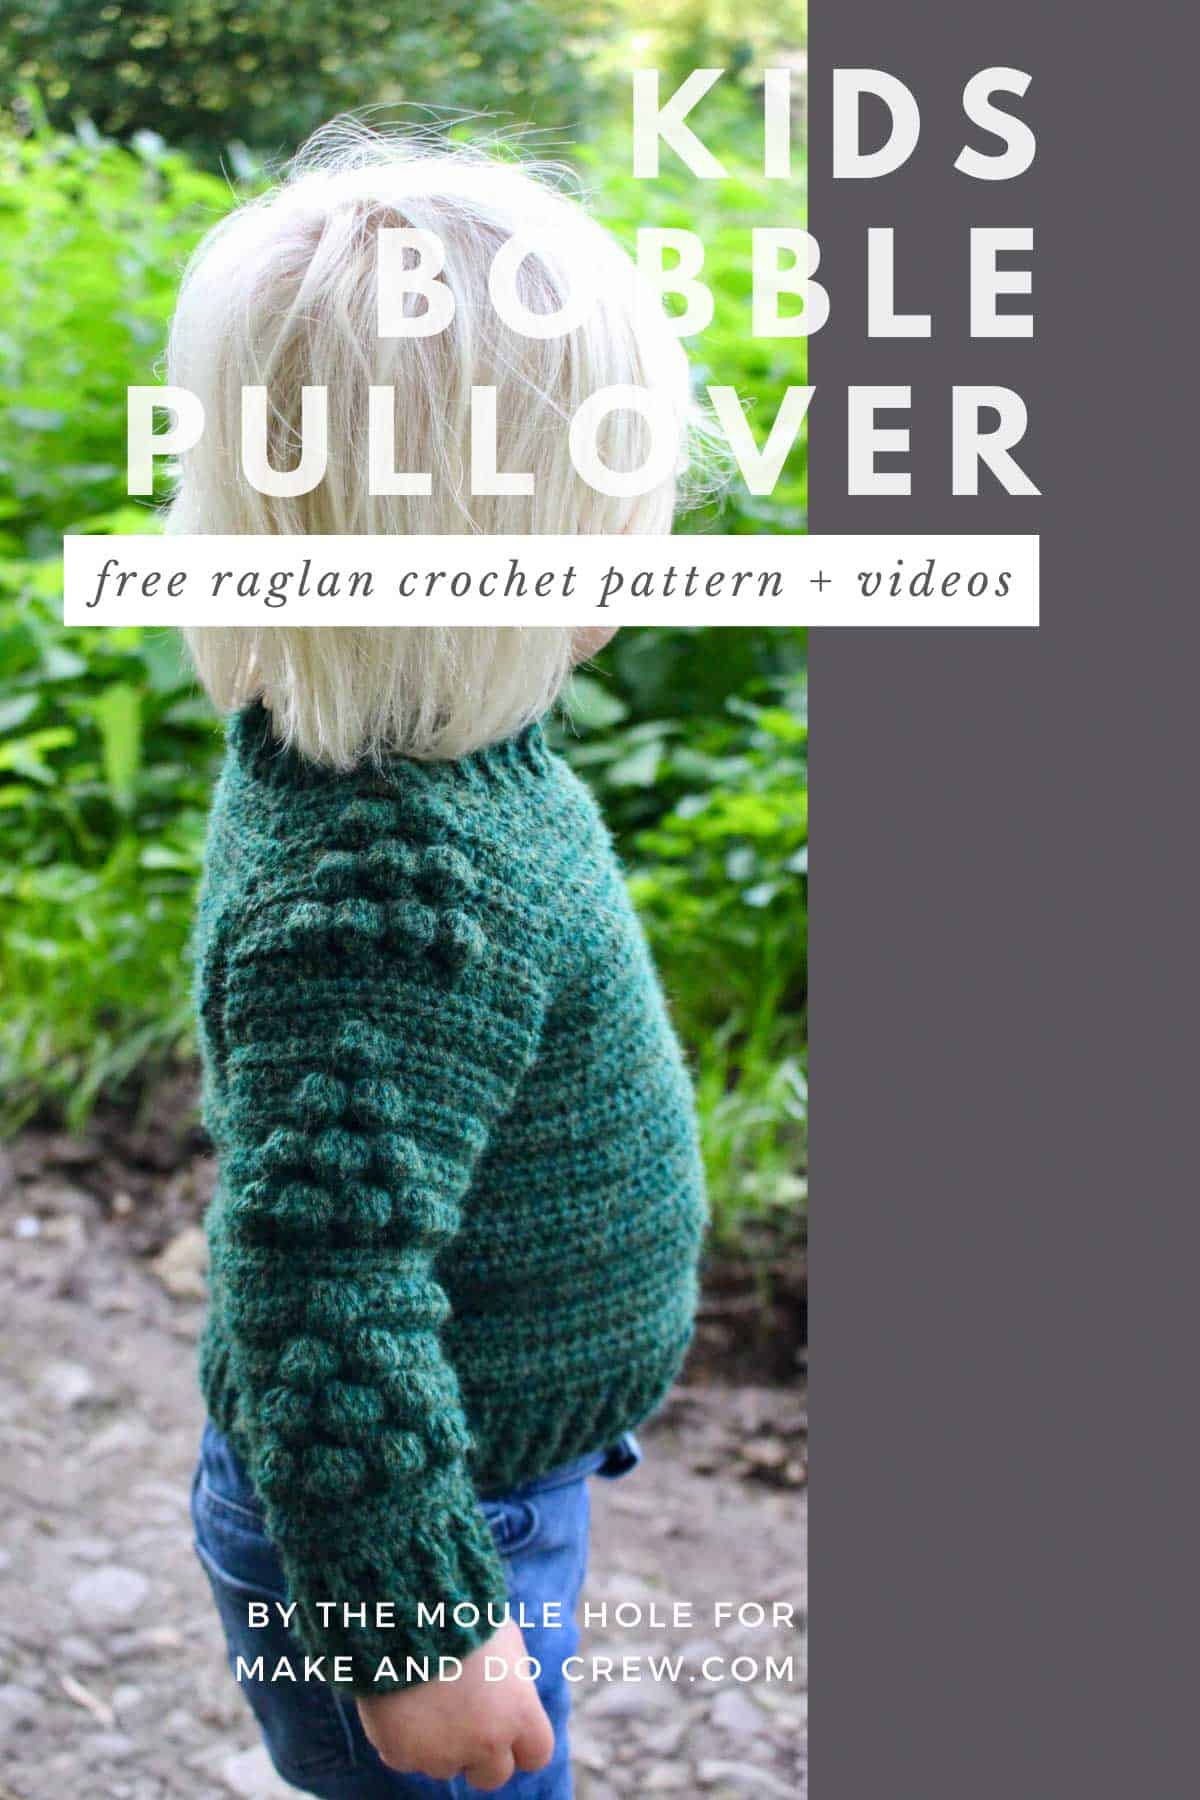
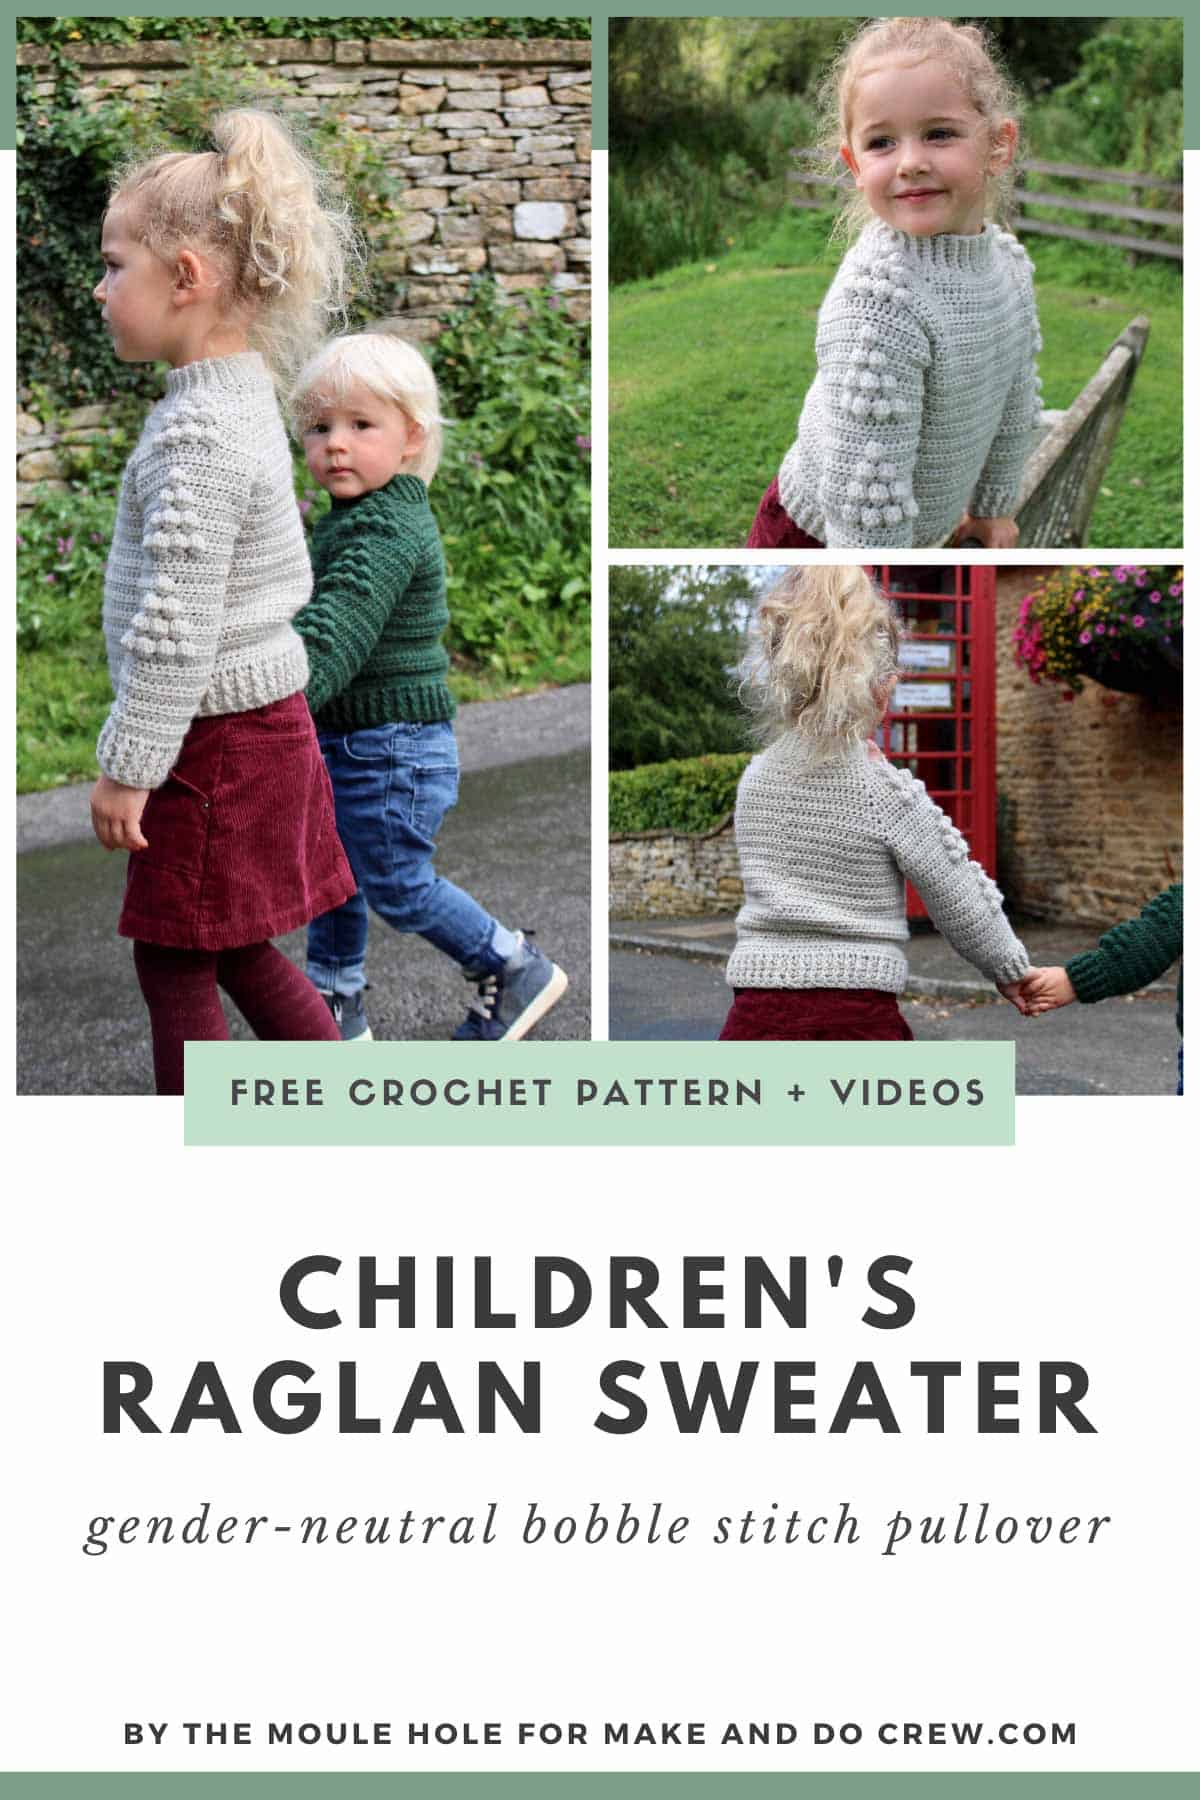
This raglan crochet baby sweater is equal parts cute and cozy--a modern take on a classic children's pullover sweater. Get the free pattern in sizes 6 months-10 years below or purchase the ad-free, printable PDF here.

Thanks to Lion Brand Yarns for providing the yarn for this raglan crochet baby sweater pattern. This post contains affiliate links.
Jump to:
- The Inspiration For My Crochet Baby Sweater Pattern
- Warm and Comfortable Layer for Toddlers
- The Perfect Yarn for Crochet Baby Sweaters
- Nearly Seamless, Top-Down Raglan Construction
- Stitches Used
- Peace River Pullover Crochet Baby Sweater Free Pattern
- Pullover Sweater Written Instructions
- Final Thoughts
- Frequently Asked Questions
- That was so fun! Now what?
- Invitation to our Facebook group
Today Nadia from The Moule Hole is here with her free raglan baby sweater crochet pattern! You can see lots of of Nadia's crochet patterns her blog, The Moule Hole, and on Etsy and Ravelry. And be sure to check her out on social media too: Instagram, Pinterest, and Facebook. Nadia, take it away!
The Inspiration For My Crochet Baby Sweater Pattern
Hello friends! I am Nadia Moule from The Moule Hole. It is such an honour to be here designing something for all of you gorgeous people out there. I am a Canadian girl living in England and even though I love it here, I definitely get homesick for the Great North.
I grew up in a small town called Fairview in Northern Alberta, where temperatures in the winter can plummet to minus forty degrees. I have so many fond memories of sledding, skiing, and snowmobiling in the hills that surround The Peace River.
Warm and Comfortable Layer for Toddlers
I designed The Peace River Pullover whilst daydreaming about a little log cabin in the woods I used to visit as a child.
I can still smell the old fireplace burning wood, I can taste the hot chocolate with gooey marshmallows and feel the warmth of the room as I fell asleep to the sound of my relatives playing guitars and fiddles and singing old country songs.
I hope to spend some time with my children in this magical winter wonderland some day but for now, they can keep cozy in the “Peace River Pullover.”
New to making garments? Check out our step-by-step guide to crocheting your first sweater.
The Perfect Yarn for Crochet Baby Sweaters
I chose Lion Brand Wool-Ease for the The Peace River Pullover. This is my first time working with Wool Ease and I have fallen for it, hard!
The colours are perfect for the rustic and cozy style of this pullover sweater and the stitch texture looks incredible, especially the bobble motif.
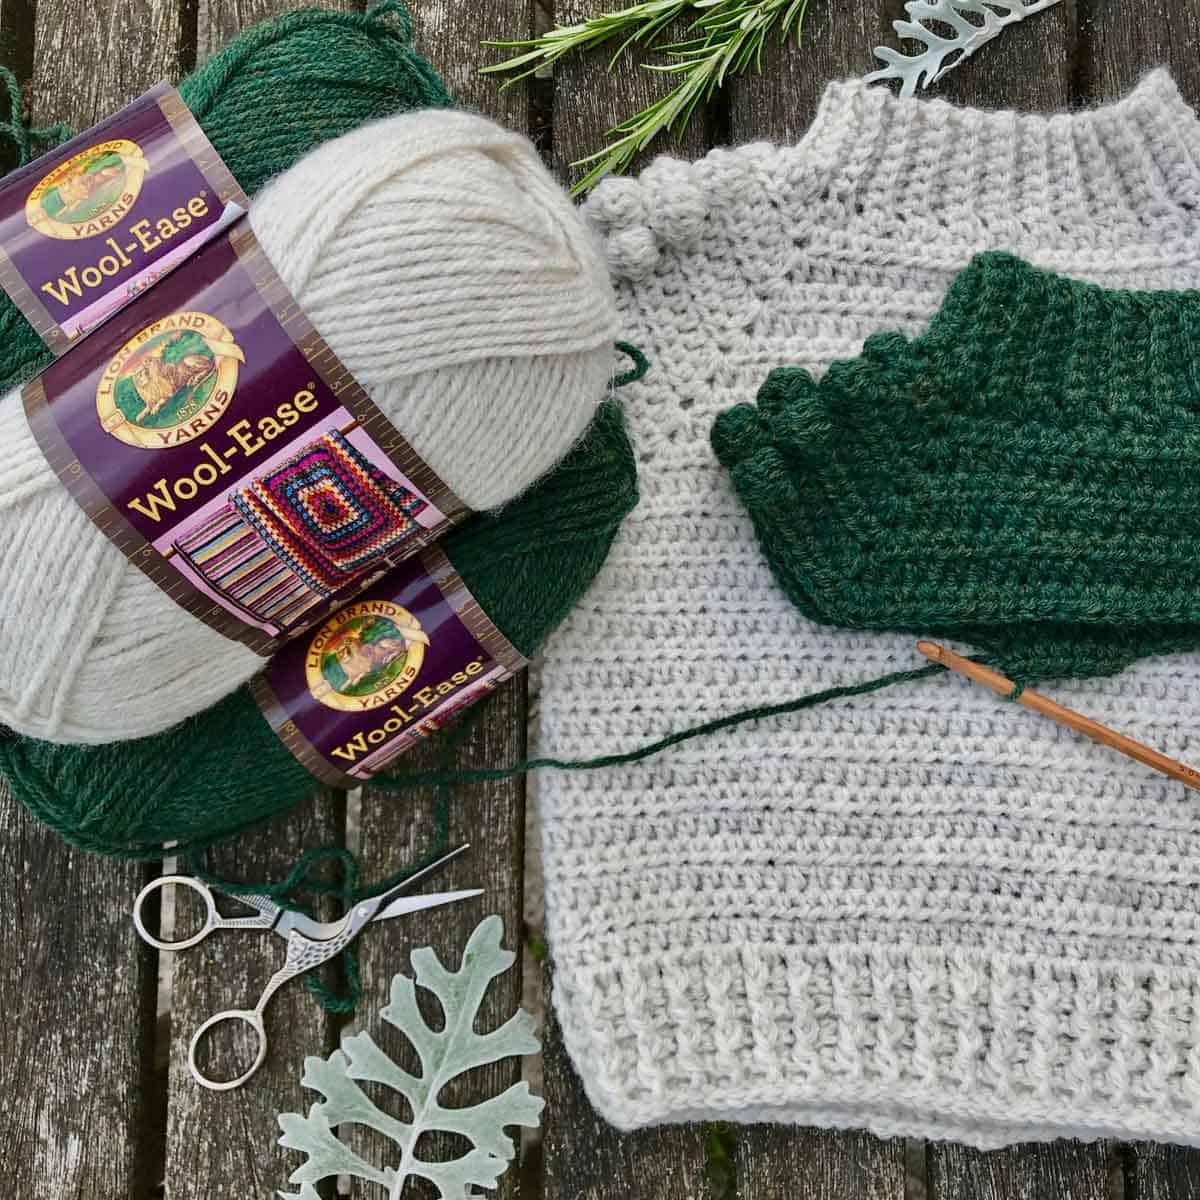
I adore how soft the yarn feels on my hands while crocheting and how it easily slides along my hook. It will keep your little one very toasty on a cold winter’s day!
I cannot wait to work with this yarn again and may have to whip up something for myself in one of the amazing colours.
Nearly Seamless, Top-Down Raglan Construction
The Peace River Pullover is a great pattern to try if you have been doing simple crochet garments and baby blankets, and want to push yourself to the next level.
It is constructed in a raglan style which means it is worked from the top down. The sleeves are added on after you complete the body of the sweater.
Stitches Used
If you haven't tried the bobble stitch yet, this is a great way to learn it! Another exciting stitch in this pattern is front/back post double crochet (fpdc/bpdc) which creates a ribbed edging. It may look intimidating but once you learn it you will be so happy you did.
If you need some guidance with any of the techniques used in this easy crochet baby sweater pattern, I have video tutorials for the bobble stitch, sleeve separation, sleeve join and fpdc/bpdc on my website.
I do have a wonderful PDF version of this pattern with colour coordinated sizing, all stitch counts, and extra photos available from Etsy, Ravelry, or LoveCrafts.
click to pin this pattern for later ⇨
More Free Crochet Sweater Patterns
Crochet sweater patterns don't need to be difficult. In fact, most of ours are made with very simple shapes. Dive into the wonderful world of crochet garments with cardigans, pullovers, ponchos, shrugs and more!


See more free crochet sweater patterns →
Peace River Pullover Crochet Baby Sweater Free Pattern
Purchase the ad-free, printable PDF on LoveCrafts, Etsy or Ravelry.
Pin this pattern for later here.
Explanation: The Peace River Pullover is a quick crochet baby sweater for beginners, using worsted weight yarn. The graphic "tree" bobbles on the sleeves are perfect for the winter season ahead. The raglan design means there is minimal seaming at the end.
The sleeves are worked back and forth and then seamed up at the end so it is easy to keep track of stitch counts.
This is the perfect project for these chilly, dark and cozy evenings in front of a fire or a few candles. Make this sweater for any baby boy or girl in your life!
Skills required: hdc crochet, bobble stitch, back loop single crochet, front/back post double crochet.
Supplies:
• Lion Brand Wool-Ease (Weight: 4/medium- 197 yds, 3oz)
- Natural Heather (#620-098) OR Forest Green Heather (#620-180) - 2 [3, 3, 4, 5, 5] skeins. Approximately 150g [200g, 250g, 300g, 350g, 400g]
• Size H (5.0mm) crochet hook
• Stitch marker
Sizes/Measurements:
Size Chest Measurement Sleeve Length
6-12 Months 18 inches 7.6 inches
1-2 Years 21 inches 8.5 inches
3-4 Years 23 inches 10 inches
5-6 Years 27 inches 12 inches
7-8 Years 29 inches 12.5 inches
9-10 Years 32 inches 13.5 inches
Gauge:
• 15 sts/12 rows = 4X4 inch in hdc
Abbreviations and Glossary (US Terms):
st or sts - stitch or stitches
ch - chain stitch
sl st - slip stitch
sk - skip
n/a - not applicable
hdc - half double crochet
dc - double crochet
hdc2tog - half double crochet two stitches together
dc2tog - double crochet two stitches together
fpdc - front post double crochet
bpdc - back post double crochet
RS - right side of the cardigan
WS - wrong side of the cardigan
bo - bobble stitch, *yarn over, insert hook into st, pull up a loop, yarn over, pull through two loops*, repeat from *four more times (There will be six loops on your hook), yarn over, pull through all six loops.

Don't spend hours for a "meh" result!
Tired of crocheting garments that don't fit? Learn our C.R.A.F.T. Framework to make sweaters that fit and feel amazing!

Overall Pattern Notes:
• I have included sizes 6-12 months up to 9-10 years.
• The smallest size is written first with all other sizes written in the brackets. 6-12Months [1-2yrs, 3-4yrs, 5-6yrs, 7-8yrs, 9-10yrs].
• To keep the bobble motif on the sleeves of this crochet kids sweater, I had to write the instructions for the sleeves separately for each size. Make sure you follow the sleeve instructions for the size you are doing.
Pullover Sweater Written Instructions
Follow the free pattern below to crochet this chunky baby sweater. Includes sizes for toddlers and kids as well.
Collar
ROW 1
Ch 8, sc in the 2nd ch from hook, sc in the next 6 chs, turn (7 sc)
ROW 2
ch1, sc in the back loop only of the next 7 sc, turn
✨Unlock this free subscriber-exclusive pattern ✨
Follow these steps to view the full free pattern below
Repeat row 2 until you have 46 [50, 50, 58, 58, 62] rows. Sl st ends together to join and form the neck hole. Make sure the seam is on the inside before beginning the yoke.
Yoke
ROW 1 (RS)
ch2 (does not count as a stitch here and throughout) one hdc in the end of each row around the neck hole. 46 [50, 50, 58, 58, 62] sts, sl st to the first hdc, turn
ROW 2 (WS)
ch2 sk the sl st here and throughout.
Hdc in the next 7 [8, 8, 9, 9, 10] sts.
Hdc/ch1/hdc in the next st.
Hdc in the next 3 [3, 3, 4, 4, 4] sts.
Bo in the next st.
Hdc in the next 3 [3, 3, 4, 4, 4] sts.
Hdc/ch1/hdc in the next st.
Hdc in the next 14 [16, 16, 18, 18, 20] sts.
Hdc/ch1/hdc in the next st.
Hdc in the next 3 [3, 3, 4, 4, 4] sts.
Bo in the next st.
Hdc in the next 3 [3, 3, 4, 4, 4] sts.
Hdc/ch1/hdc in the next st.
Hdc in the next 7 [8, 8, 9, 9, 10] sts.
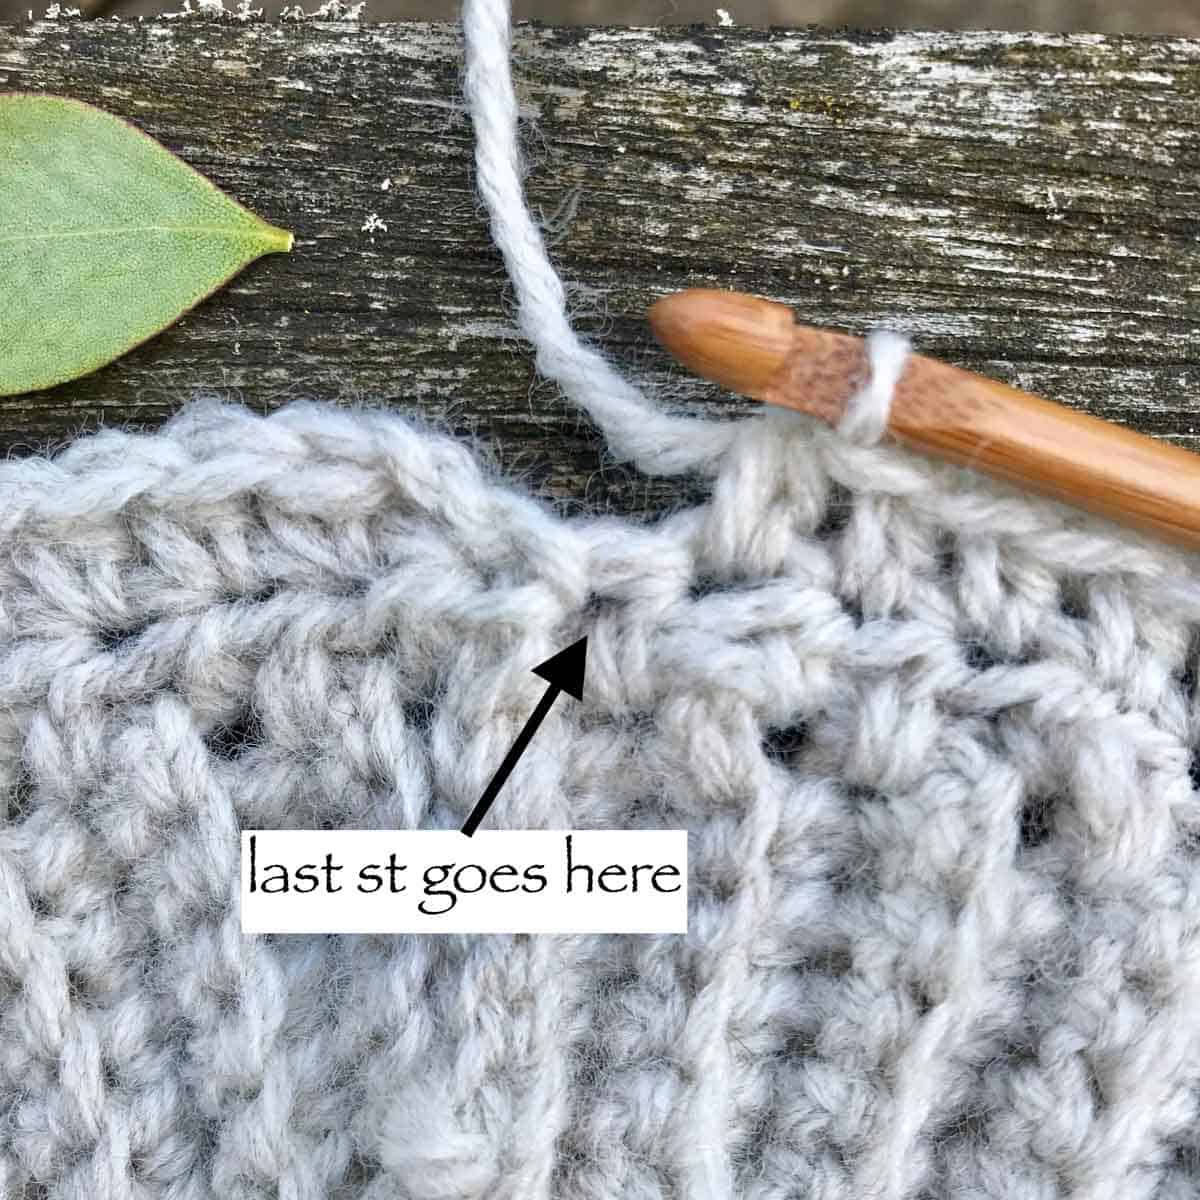
Sl st to the first hdc, turn. (see picture for where to place your last st)
ROW 3 (RS)
Ch2, *hdc in each st to the ch, hdc/ch1/hdc into the ch space, repeat from * 3 times.
Hdc in each st to the end of row.
Sl st to the first hdc, turn.
ROW 4 (WS)
Ch2, hdc in each st to the ch.
Hdc/ch1/hdc in ch space.
Hdc in the next 4 [4, 4, 5, 5, 5] sts.
Bo/hdc/bo over the next 3 sts.
Hdc in the next 4 [4, 4, 5, 5, 5] sts.
Hdc/ch1/hdc in the ch space.
Hdc in each st to the ch.
Hdc/ch1/hdc in the ch space.
Hdc in the next 4 [4, 4, 5, 5, 5] sts.
Bo/hdc/bo over the next 3 sts.
Hdc in the next 4 [4, 4, 5, 5, 5] sts.
Hdc/ch1/hdc in the ch space.
Hdc in each st to the end of the row.
Sl st to the first hdc, turn.
ROW 5 (RS)
Repeat Row 3.
ROW 6 (WS)
Ch2, hdc in each st to the ch.
Hdc/ch1/hdc in ch space.
Hdc in the next 5 [5, 5, 6, 6, 6] sts.
Bo/hdc/bo/hdc/bo over the next 5 sts.
Hdc in the next 5 [5, 5, 6, 6, 6] sts.
Hdc/ch1/hdc in the ch space.
Hdc in each st to the ch.
Hdc/ch1/hdc in the ch space.
Hdc in the next 5 [5, 5, 6, 6, 6] sts.
Bo/hdc/bo/hdc/bo over the next 5 sts.
Hdc in the next 5 [5, 5, 6, 6, 6] sts.
Hdc/ch1/hdc in the ch space.
Hdc in each st to the end of the row.
Sl st to the first hdc, turn.
ROW 7 (RS)
Repeat Row 3.
ROW 8 (WS)
Ch2, hdc in each st to the ch.
Hdc/ch1/hdc in ch space.
Hdc in the next 6 [6, 6, 7, 7, 7] sts.
Bo/hdc/bo/hdc/bo/hdc/bo over the next 7 sts.
Hdc in the next 6 [6, 6, 7, 7, 7] sts.
Hdc/ch1/hdc in the ch space.
Hdc in each st to the ch.
Hdc/ch1/hdc in the ch space.
Hdc in the next 6 [6, 6, 7, 7, 7] sts.
Bo/hdc/bo/hdc/bo/hdc/bo over the next 7 sts.
Hdc in the next 6 [6, 6, 7, 7, 7] sts.
Hdc/ch1/hdc in the ch space.
Hdc in each st to the end of the row.
Sl st to the first hdc, turn.
ROW 9 (RS)
Repeat Row 3.
ROW 10 (WS)
Repeat Row 3. For size 6-12 Months, after row 10, continue to the sleeve separation.
ROW 11 (RS)
Repeat Row 3.
ROW 12 (WS)
Ch2, hdc in each st to the ch.
Hdc/ch1/hdc in ch space.
Hdc in the next n/a [13, 13, 14, 14, 14] sts.
Bo in the next st.
Hdc in the next n/a [13, 13, 14, 14, 14] sts.
Hdc/ch1/hdc in the ch space.
Hdc in each st to the ch.
Hdc/ch1/hdc in the ch space.
Wanna save this pattern?
Hdc in the next n/a [13, 13, 14, 14, 14] sts.
Bo in the next st.
Hdc in the next n/a [13, 13, 14, 14, 14] sts.
Hdc/ch1/hdc in the ch space.
Hdc in each st to the end of the row.
Sl st to the first hdc, turn.
For size 1-2, continue to sleeve separation.
ROW 13 (RS)
Repeat Row 3.
ROW 14 (WS)
Ch2, hdc in each st to the ch.
Hdc/ch1/hdc in ch space.
Hdc in the next n/a [n/a, 14, 15, 15, 15] sts.
Bo/hdc/bo over the next 3 sts.
Hdc in the next n/a [n/a, 14, 15, 15, 15] sts.
Hdc/ch1/hdc in the ch space.
Hdc in each st to the ch.
Hdc/ch1/hdc in the ch space.
Hdc in the next n/a [n/a, 14, 15, 15, 15] sts.
Bo/hdc/bo over the next 3 sts.
Hdc in the next n/a [n/a, 14, 15, 15, 15] sts.
Hdc/ch1/hdc in the ch space.
Hdc in each st to the end of the row.
Sl st to the first hdc, turn.
For size 3-4, continue to sleeve separation.
ROW 15 (RS)
Repeat Row 3.
ROW 16 (WS)
Ch2, hdc in each st to the ch.
Hdc/ch1/hdc in ch space.
Hdc in the next n/a [n/a, n/a, 16, 16, 16] sts.
Bo/hdc/bo/hdc/bo over the next 5 sts.
Hdc in the next n/a [n/a, n/a, 16, 16, 16] sts.
Hdc/ch1/hdc in the ch space.
Hdc in each st to the ch.
Hdc/ch1/hdc in the ch space.
Hdc in the next n/a [n/a, n/a, 16, 16, 16] sts.
Bo/hdc/bo/hdc/bo over the next 5 sts.
Hdc in the next n/a [n/a, na, 16, 16, 16] sts.
Hdc/ch1/hdc in the ch space.
Hdc in each st to the end of the row.
Sl st to the first hdc, turn.
For size 5-6 continue to sleeve separation.
ROW 17 (RS)
Repeat Row 3.
ROW 18 (WS)
Ch2, hdc in each st to the ch.
Hdc/ch1/hdc in ch space.
Hdc in the next n/a [n/a, n/a, n/a, 17, 17] sts.
Bo/hdc/bo/hdc/bo/hdc/bo over the next 7 sts.
Hdc in the next n/a [n/a, n/a, n/a, 17, 17] sts.
Hdc/ch1/hdc in the ch space.
Hdc in each st to the ch.
Hdc/ch1/hdc in the ch space.
Hdc in the next n/a [n/a, n/a, n/a, 17, 17] sts.
Bo/hdc/bo/hdc/bo/hdc/bo over the next 7 sts.
Hdc in the next n/a [n/a, n/a, n/a, 17, 17] sts.
Hdc/ch1/hdc in the ch space.
Hdc in each st to the end of the row.
Sl st to the first hdc, turn.
For size 7-8 continue to sleeve separation.
ROW 19 (RS)
Repeat Row 3.
Row 20 (WS)
Repeat Row 3.
For size 9-10 continue to sleeve separation.

Sleeve Separation (RS)
Ch2, hdc in the next 16 [19, 21, 24, 26, 29] sts.
Hdc in the ch space.
Skip the next 25 [29, 33, 39, 43, 47] sts.
Hdc in the ch space.
Hdc in the next 32 [38, 42, 48, 52, 58] sts.
Hdc in the ch space.
Skip the next 25 [29, 33, 39, 43, 47] sts.
Hdc in the ch space.
Hdc in the next 16 [19, 21, 24, 26, 29] sts.
Sl st to the first hdc, turn.
You should have 68 [80, 88, 100, 108, 120] sts after you separate the sleeves.
Continue to Body.
Body
Row 1 (WS)
Ch2, hdc in each st around, sl st to the first hdc, turn.
Repeat Row 1 until you have completed 16 [18, 20, 22, 24, 26] rows from under the arm or your desired length (end on the RS).
The body should measure approximately 5in [5.5in, 6in, 6.5in, 7in, 7.5in] from under the arm. Remember that the edging will be approximately 2in.
Edging
Row 1 (WS)
ch2, dc in each st around, sl st to the first dc, turn
Row 2 (RS)
ch2, alternate fpdc/bpdc around the row, sl st to the first fpdc, turn
Row 3 (WS)
ch2, alternate fpdc/bpdc around the row, sl st to the first fpdc, turn
Repeat rows 2 & 3, break yarn.
Sleeves
*Note* Sleeves are worked in rows back and forth and then seamed up.When deciding on sleeve length, keep in mind the final decreases and edging measures approximately 3in.
Make sure to turn the sweater to the right side before joining the yarn to the armhole.
You may want to mark Sleeve Row 1 with a stitch marker so it is easy to count the row you are on. I have included an instructional picture for Row 1 of the sleeves for your viewing pleasure!

Find a video tutorial for the raglan Sleeve Join on my website. Follow the directions for the size you are making, I had to write each size separately to continue the bobble motif.

Sleeves - Baby Size 6-12 Months
Join yarn to the center bottom of the armhole.
Row 1 (RS)
Ch2, work 2 hdc [between ch and first of the armhole sts], work a hdc in the next 25 sts around the armhole, work 2 more hdc [between last armhole st and the ch2], turn. [29 sts]
Row 2 (WS)
Ch2, hdc2tog, hdc in the next 12 sts, bo in the next st, hdc in the next 12 sts, hdc2tog, turn. [27 sts]
Row 3 (RS)
Ch2, hdc2tog, hdc in each st to the last 2 sts, hdc2tog, turn. [25 sts]
Row 4 (WS)
Ch2, hdc in the next 11 sts, bo/hdc/bo over the next 3 sts, hdc in the next 11 sts, turn. [25 sts]
Row 5 (RS)
Ch2, hdc in each st, turn [25 sts]
Row 6 (WS)
Ch2, hdc in the next 10 sts, bo/hdc/bo/hdc/bo over the next 5 sts, hdc in the next 10 sts, turn. [25 sts]
Row 7 (RS)
Ch2, hdc in each st, turn. [25 sts]
Row 8 (WS)
ch2, hdc in the next 9 sts, bo/hdc/bo/hdc/bo/hdc/bo over the next 7 sts, hdc in the next 9 sts, turn. [25 sts]
Row 9 (RS)
ch2, hdc in each st, turn. [25 sts]
Row 10 (WS)
ch2, hdc in each st, turn. [25 sts]
Row 11 (RS)
ch2, hdc in each st, turn. [25 sts]
Rows 12-14
Repeat row 11
Size 6-12 Months, Continue to Sleeve Decrease & Edging
Sleeves - Toddler Size 1-2 Years
Join yarn to the centre bottom of the armhole.
Row 1 (RS)
Ch2, work 2 hdc [between ch and first of the armhole sts], work a hdc in the next 29 sts around the armhole, work 2 more hdc [between last armhole st and the ch2], turn. [33 sts]
Row 2 (WS)
Ch2, hdc2tog, hdc in the next 13 sts, bo/hdc/bo over the next 3 sts, hdc in the next 13 sts, hdc2tog, turn. [31 sts]
Row 3 (RS)
Ch2, hdc2tog, hdc in each st to the last 2 sts, hdc2tog, turn. [29 sts]
Row 4 (WS)
Ch2, hdc in the next 12 sts, bo/hdc/bo/hdc/bo over the next 5 sts, hdc in the next 12 sts, turn. [29 sts]
Row 5 (RS)
Ch2, hdc in each st, turn. [29 sts]
Row 6 (WS)
Ch2, hdc in the next 11 sts, bo/hdc/bo/hdc/bo/hdc/bo over the next 7 sts, hdc in the next 11 sts, turn. [29 sts]
Row 7 (RS)
Ch2, hdc in each st, turn. [29 sts]
Row 8 (WS)
Ch2, hdc in each st, turn. [29 sts]
Row 9 (RS)
Ch2, hdc in each st, turn. [29 sts]
Row 10 (WS)
Ch2, hdc in the next 14 sts, bo in the next st, hdc in the next 14 sts, turn. [29 sts]
Row 11 (RS)
Ch2, hdc in each st, turn. [29 sts]
Rows 12 (WS)
Ch2, hdc in the next 13 sts, bo/hdc/bo over the next 3 sts, hdc in the next 13 sts, turn. [29 sts]
Row 13 (RS)
Ch2, hdc in each st, turn. [29 sts]
Row 14-17
Repeat rows 4-7
Size 1-2, Continue to Sleeve Decrease & Edging
Sleeves - Kids Size 3-4 Years
Join yarn to the centre bottom of the armhole.
Row 1 (RS)
Ch2, work 2 hdc [between ch and first of the armhole sts], work a hdc in the next 33 sts around the armhole, work 2 more hdc [between last armhole st and the ch2], turn. [37 sts]
Row 2 (WS)
Ch2, hdc2tog, hdc in the next 14 sts, bo/hdc/bo/hdc/bo over the next 5 sts, hdc in the next 14 sts, hdc2tog, turn. [35 sts]
Row 3 (RS)
Ch2, hdc2tog, hdc in each st to the last 2 sts, hdc2tog, turn. [33 sts]
Row 4 (WS)
Ch2, hdc in the next 13 sts, bo/hdc/bo/hdc/bo/hdc/bo over the next 7 sts, hdc in the next 13 sts, turn. [33 sts]
Row 5 (RS)
Ch2, hdc in each st, turn. [33 sts]
Row 6 (WS)
Ch2, hdc in each st, turn. [33 sts]
Row 7 (RS)
Ch2, hdc in each st, turn. [33 sts]
Row 8 (WS)
Ch2, hdc in the next 16 sts, bo in the next st, hdc in the next 16 sts, turn. [33 sts]
Row 9 (RS)
Ch2, hdc in each st, turn. [33 sts]
Row 10 (WS)
Ch2, hdc in the next 15 sts, bo/hdc/bo over the next 3 sts, hdc in the next 15 sts, turn. [33 sts]
Row 11 (RS)
Ch2, hdc in each st, turn. [33 sts]
Rows 12 (WS)
Ch2, hdc in the next 14 sts, bo/hdc/bo/hdc/bo over the next 5 sts, hdc in the next 14 sts, turn. [33 sts]
Row 13 (RS)
Ch2, hdc in each st, turn. [33 sts]
Rows 14-15
Repeat rows 4-5
Rows 16-21
Repeat row 13. [33 sts]
Size 3-4, Continue to Sleeve Decrease & Edging


Sleeves - Size 5-6 Years
Join yarn to the center bottom of the armhole.
Row 1 (RS)
Ch2, work 2 hdc [between ch and first of the armhole sts], work a hdc in the next 39 sts around the armhole, work 2 more hdc [between last armhole st and the ch2], turn. [43 sts]
Row 2 (WS)
Ch2, hdc2tog, hdc in the next 16 sts, bo/hdc/bo/hdc/bo/hdc/bo over the next 7 sts, hdc in the next 16 sts, hdc2tog, turn. [41 sts]
Row 3 (RS)
Ch2, hdc 2tog, hdc in each st to the last 2 sts, hdc2tog, turn. [39 sts]
Row 4 (WS)
Ch2, hdc in each st, turn [39 sts]
Row 5 (RS)
Ch2, hdc in each st, turn. [39 sts]
Row 6 (WS)
Ch2, hdc in the next 19 sts, bo in the next st, hdc in the next 19 sts, turn. [39 sts]
Row 7 (RS)
Ch2, hdc in each st, turn. [39 sts]
Row 8 (WS)
Ch2, hdc in the next 18 sts, bo/hdc/bo over the next 3 sts, hdc in the next 18 sts, turn. [39 sts]
Row 9 (RS)
Ch2, hdc in each st, turn. [39 sts]
Row 10 (WS)
Ch2, hdc in the next 17 sts, bo/hdc/bo/hdc/bo over the next 5 sts, hdc in the next 17 sts, turn. [39 sts]
Row 11 (RS)
Ch2, hdc in each st, turn. [39 sts]
Rows 12 (WS)
Ch2, hdc in the next 16 sts, bo/hdc/bo/hdc/bo/hdc/bo over the next 7 sts, hdc in the next 16 sts, turn. [39 sts]
Row 13 (RS)
Ch2, hdc in each st, turn. [39 sts]
Rows 14-23
repeat rows 4-13
Rows 24-27
repeat row 13
Size 5-6, Continue to Sleeve Decrease & Edging
Sleeves - Size 7-8 Years
Join yarn to the centre bottom of the armhole.
Row 1 (RS)
Ch2, work 2 hdc [between ch and first of the armhole sts], work a hdc in the next 43 sts around the armhole, work 2 more hdc [between last armhole st and the ch2], turn. [47 sts]
Row 2 (WS)
Ch2, hdc2tog, hdc in each st to the last 2 sts, hdc2tog, turn. [45 sts]
Row 3 (RS)
Ch2, hdc2 tog, hdc in each st to the last 2 sts, hdc2tog, turn. [43 sts]
Row 4 (WS)
Ch2, hdc in the next 21 sts, bo in the next st, hdc in the next 21 sts, turn. [43 sts]
Row 5 (RS)
Ch2, hdc in each st, turn. [43 sts]
Row 6 (WS)
Ch2, hdc in the next 20 sts, bo/hdc/bo over the next 3 sts, hdc in the next 20 sts, turn. [43 sts]
Row 7 (RS)
Ch2, hdc in each st, turn. [43 sts]
Row 8 (WS)
Ch2, hdc in the next 19 sts, bo/hdc/bo/hdc/bo over the next 5 sts, hdc in the next 19 sts, turn. [43 sts]
Row 9 (RS)
Ch2, hdc in each st, turn. [43 sts]
Row 10 (WS)
Ch2, hdc in the next 18 sts, bo/hdc/bo/hdc/bo/hdc/bo over the next 7 sts, hdc in the next 18 sts, turn. [43 sts]
Row 11 (RS)
Ch2, hdc in each st, turn. [43 sts]
Rows 12 (WS)
Ch2, hdc in each st, turn. [43 sts]
Row 13 (RS)
Ch2, hdc in each st, turn. [43 sts]
Rows 14-23
repeat rows 4-13
Rows 24-29
repeat row 13
Size 7-8, Continue to Sleeve Decrease & Edging
Sleeves - Size 9-10 Years
Join yarn to the centre bottom of the armhole.
Row 1 (RS)
Ch2, work 2 hdc [between ch and first of the armhole sts], work a hdc in the next 47 sts around the armhole, work 2 more hdc [between last armhole st and the ch2], turn. [51 sts]
Row 2 (WS)
Ch2, hdc2tog, hdc in the next 23 sts, bo in the next st, hdc in the next 23 sts, hdc2tog, turn
[49 sts]
Row 3 (RS)
Ch2, hdc2tog, hdc in each st to the last 2 sts, hdc2tog, turn. [47 sts]
Row 4 (WS)
Ch2, hdc in the next 22 sts, bo/hdc/bo over the next 3 sts, hdc in the next 22 sts, turn. [47 sts]
Row 5 (RS)
Ch2, hdc in each st, turn. [47 sts]
Row 6 (WS)
Ch2, hdc in the next 21 sts, bo/hdc/bo/hdc/bo over the next 5 sts, hdc in the next 21 sts, turn. [47 sts]
Row 7 (RS)
Ch2, hdc in each st, turn. [47 sts]
Row 8 (WS)
Ch2, hdc in the next 20 sts, bo/hdc/bo/hdc/bo/hdc/bo over the next 7 sts, hdc in the next 20 sts, turn. [47 sts]
Row 9 (RS)
Ch2, hdc in each st, turn. [47 sts]
Row 10 (WS)
Ch2, hdc in each st, turn. [47 sts]
Row 11 (RS)
Ch2, hdc in each st, turn. [47 sts]
Rows 12 (WS)
Ch2, hdc in the next 23 sts, bo in the next st, hdc in the next 23 sts, turn. [47 sts]
Row 13 (RS)
Ch2, hdc in each st, turn. [47 sts]
Rows 14-23
repeat rows 4-13
Rows 24-32
repeat row 13
Size 9-10, Continue to Sleeve Decrease & Edging

Sleeve Decrease & Edging
Row 1
Ch2, hdc2tog, hdc in each st to the last 2 sts, hdc2tog, turn. 23 [27, 31, 37, 41, 45 sts]
Row 2
Ch2, hdc2tog, hdc in each st to the last 2 sts, hdc2tog, turn. 21 [25, 29, 35, 39, 43 sts]
Row 3
Ch2, dc2tog, dc in each st to the last 2 sts, dc2tog, turn. 19 [23, 27, 33, 37, 41 sts]
Row 4
Ch2, alternate fpdc/bpdc to the last st, fpdc around the last st, turn. 19 [23, 27, 33, 37, 41 sts]
Row 5
Ch2, alternate bpdc/fpdc to the last st, bpdc around the last st, turn.
Rows 6-7
repeat rows 4 & 5
Leave a long tail to seam up the sleeve.
Finishing
*Using a mattress stitch (or your choice) seam up the sleeves (there is a video tutorial for this on my website).
*Weave in any ends.
Like all crochet garments, your baby sweater may benefit from some light blocking.
Final Thoughts
Congratulations! You just finished a baby crochet sweater that will make any baby boy or baby girl the snuggliest and coziest bundle on the block. And if they have older siblings, consider whipping up another sweater in a larger size for a matching set.
Thanks again to Nadia of The Moule Hole for sharing this free raglan crochet baby sweater pattern! Be sure to check out Nadia's blog for lots more free modern crochet patterns!
Frequently Asked Questions
Curious about baby sweater patterns? Find the answers to your questions in this section.
Because baby clothes are smaller than adult clothes, they usually only take a few hours to make. You may need more time if the pattern is complex or if you're a beginner crocheter.
The crochet hook size for a baby sweater will depend on the pattern you're following. This pattern recommends using a size H (5.0mm) crochet hook. A larger hook will produce a bigger sweater with looser stitches, while a smaller hook will make your stitches smaller and tighter.
Find Your Next Sweater Project
Easy crochet sweaters are our absolute fave. Level up your handmade wardrobe with some of our most loved cardigan, pullover, and hoodie patterns.
You must use the category name, not a URL, in the category field.Learn a New Skill
When you're ready to master a new skill, check out our detailed guides that include everything you need to know to level up your crochet game.
- How to Corner to Corner (C2C) Crochet for Beginners - with video tutorials to get you started
- How to Crochet a Beginner Hat - make an entire beanie in 1.5 hours!
- How to Crochet Amigurumi for Beginners - the ultimate guide to making your own toys and plushies
- How to Tunisian Crochet - learn with this video and a standard hook
That was so fun! Now what?
Invitation to our Facebook group
Come discuss baby sweater crochet patterns and lots of other crochet projects and techniques in our Make & Do Crew Facebook group. Here thousands of helpful crocheters answer each others questions and share their stitches. Come join us here.
Deborah Graham says
I wanted to leave this message to let you know that I LOVE THIS PATTERN!
It is very quick and easy.
I am attempting to make a matching toque with a bobble tree on the front. Hope it works!
Thank you very much for sharing this pattern.
Susan Nightingale says
Hi there! In process of making raglan sweater. Same hook same yarn. My body at 18 rows under the arm is much more than 5.5 inches for a 1-2. Finished rubbing and wondering if I should shorten body before I continue with the sleeves. Thoughts? Thank you! Love the pattern just want to make sure body isn’t to long.
L says
Hi! Thank you so much for sharing this! I have a quick question - when you say 'hdc in each st to the ch', do you mean to hdc in each chain? I've worked into a chain before and worked into a chain space, but haven't run into this terminology before.
Donna says
It would be nice to have the number of stitches at the end of each row certainly when beginning this pattern. I tried the pattern using 50 sts but when I came to row 4 it didn’t work out.
Maryam says
Would you please explain about exact meaning of “n/a “?
I know it means not applicable but I don’t know what’s that and what should I do? Please help me
Best wishes