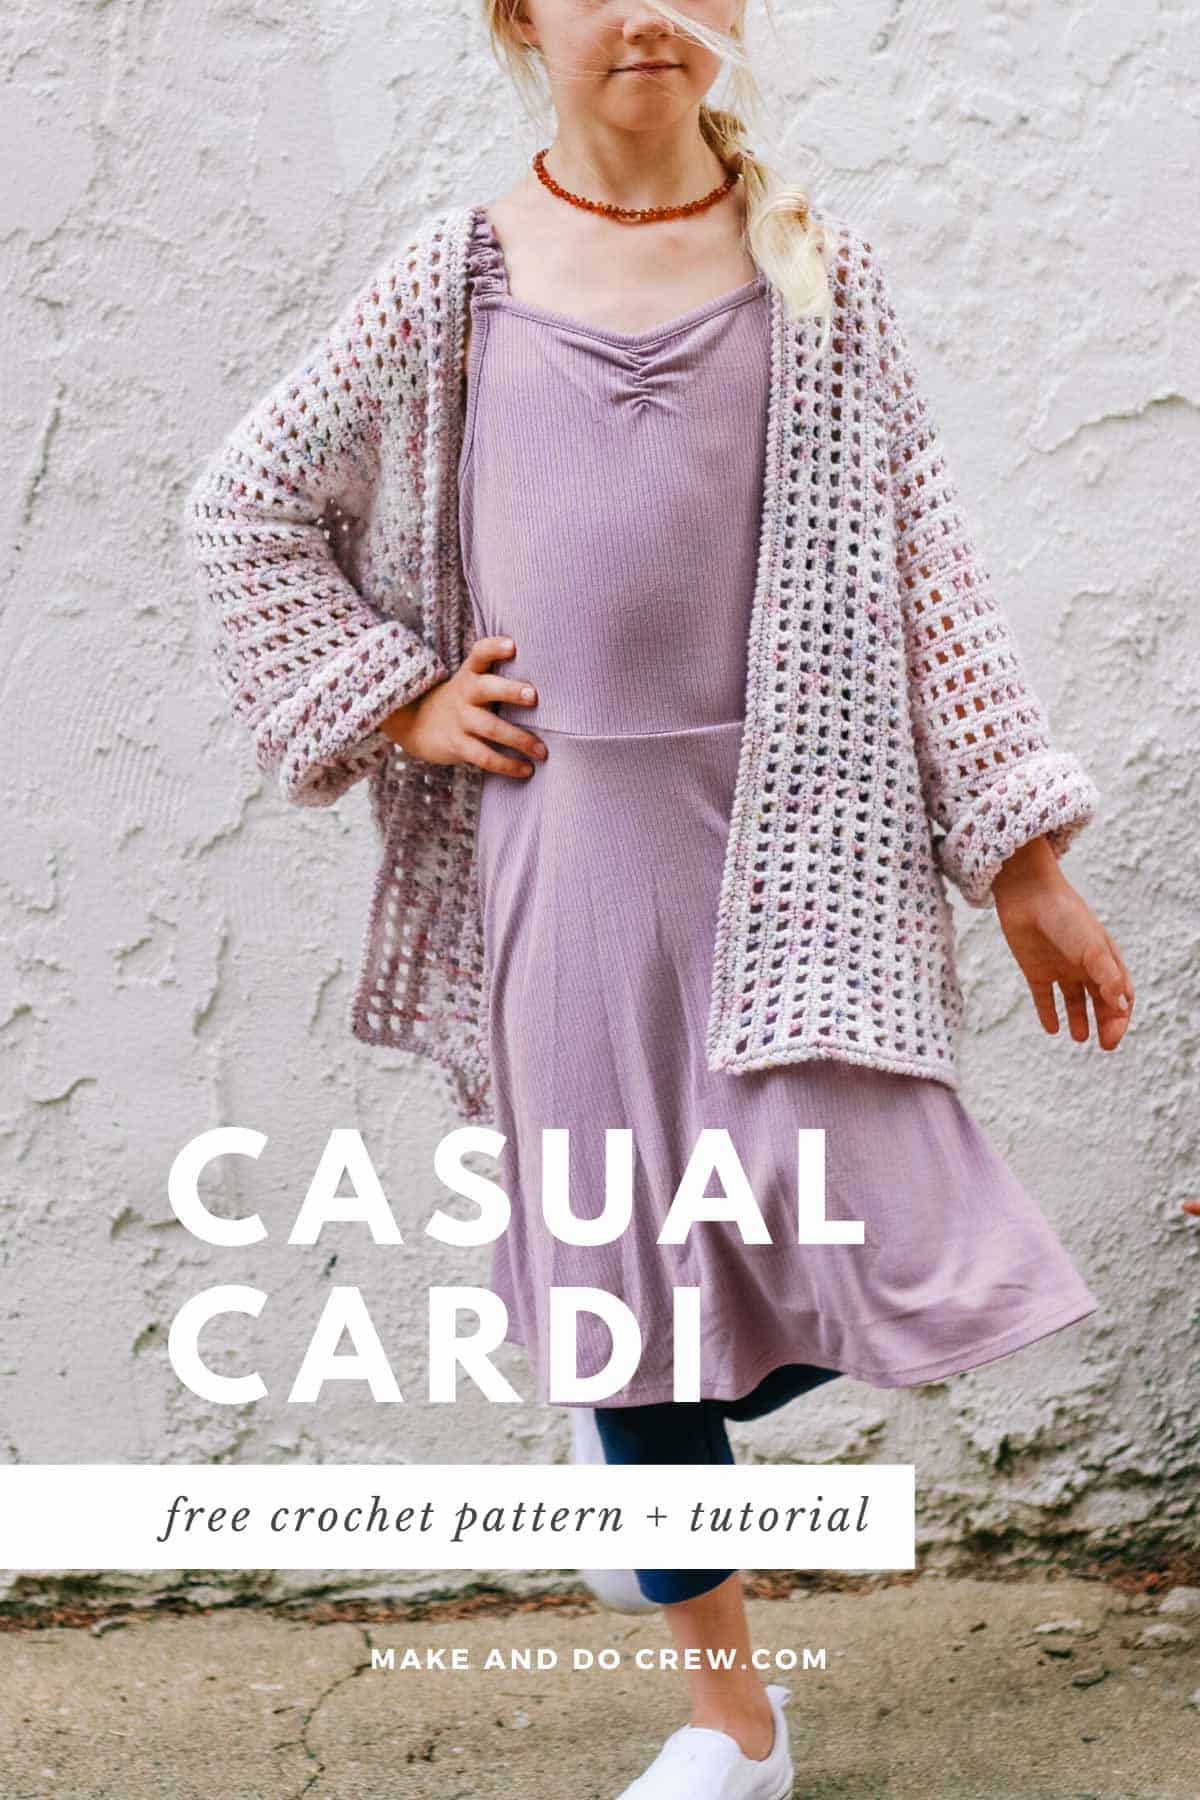
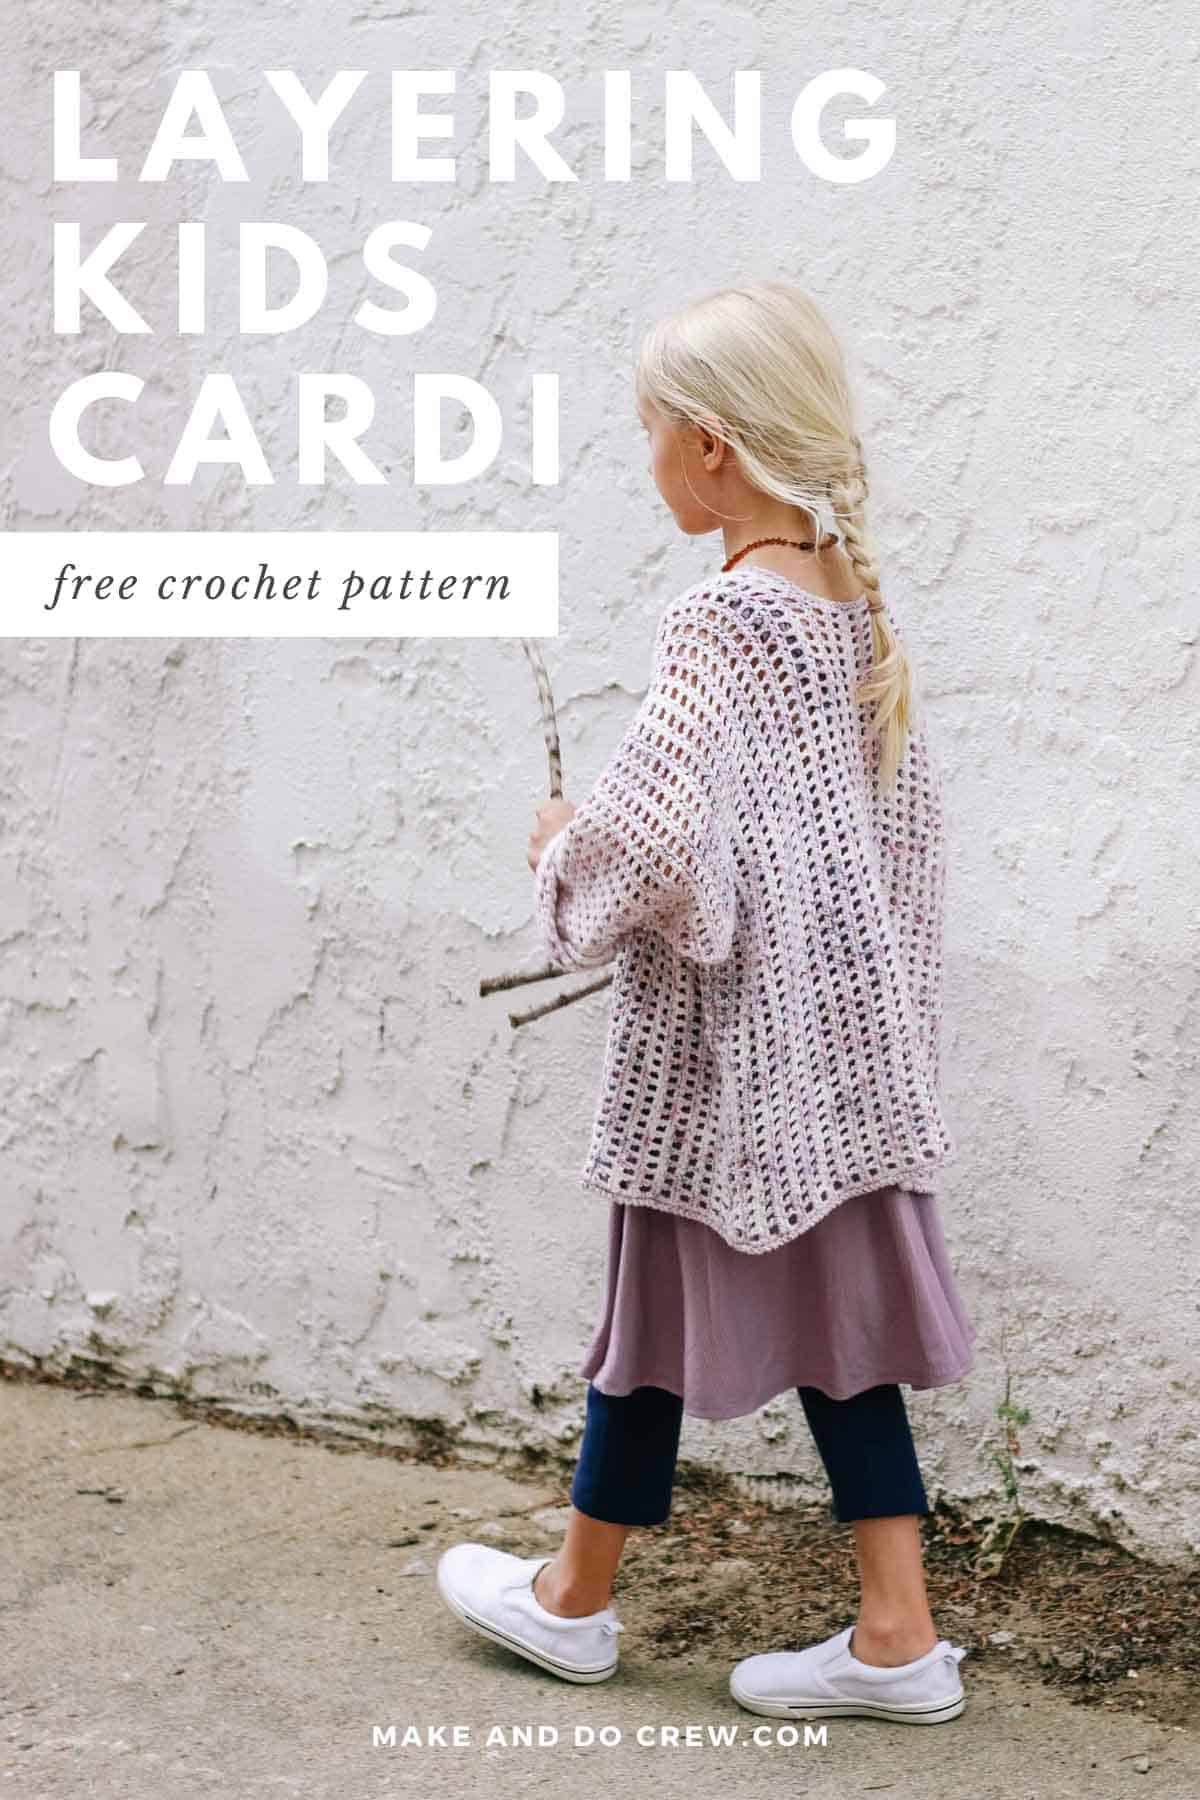
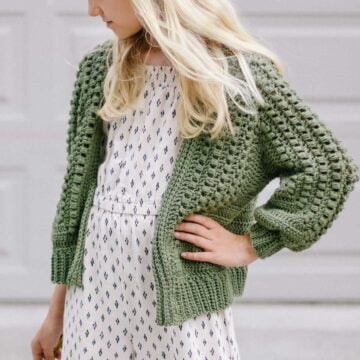
Designed especially for the young girl who brings color to your life, this free kids crochet sweater pattern is as comfy as it is cute. Get the full free pattern below or purchase the ad-free, printable PDF here.
This free kids crochet sweater pattern is part of a collaboration with Lion Brand Yarns. This post contains affiliate links.
This kids crochet sweater pattern is casual, drapey and easy to toss on whenever you need a lightweight layer. Read on for all the yarn and inspiration details or scroll down for the free pattern and tutorial.
Flowy, Feminine + Sophisticated
On any given day, my kids can look like a walking art project. I love that they each express themselves so differently with what they wear. My 5-year-old is always wearing something sparkly, often with clip-earrings and lip gloss. My 7-year-old much prefers comfortable, flowy and functional clothes. And my 1-year-old, well he's just usually covered in mud these days.
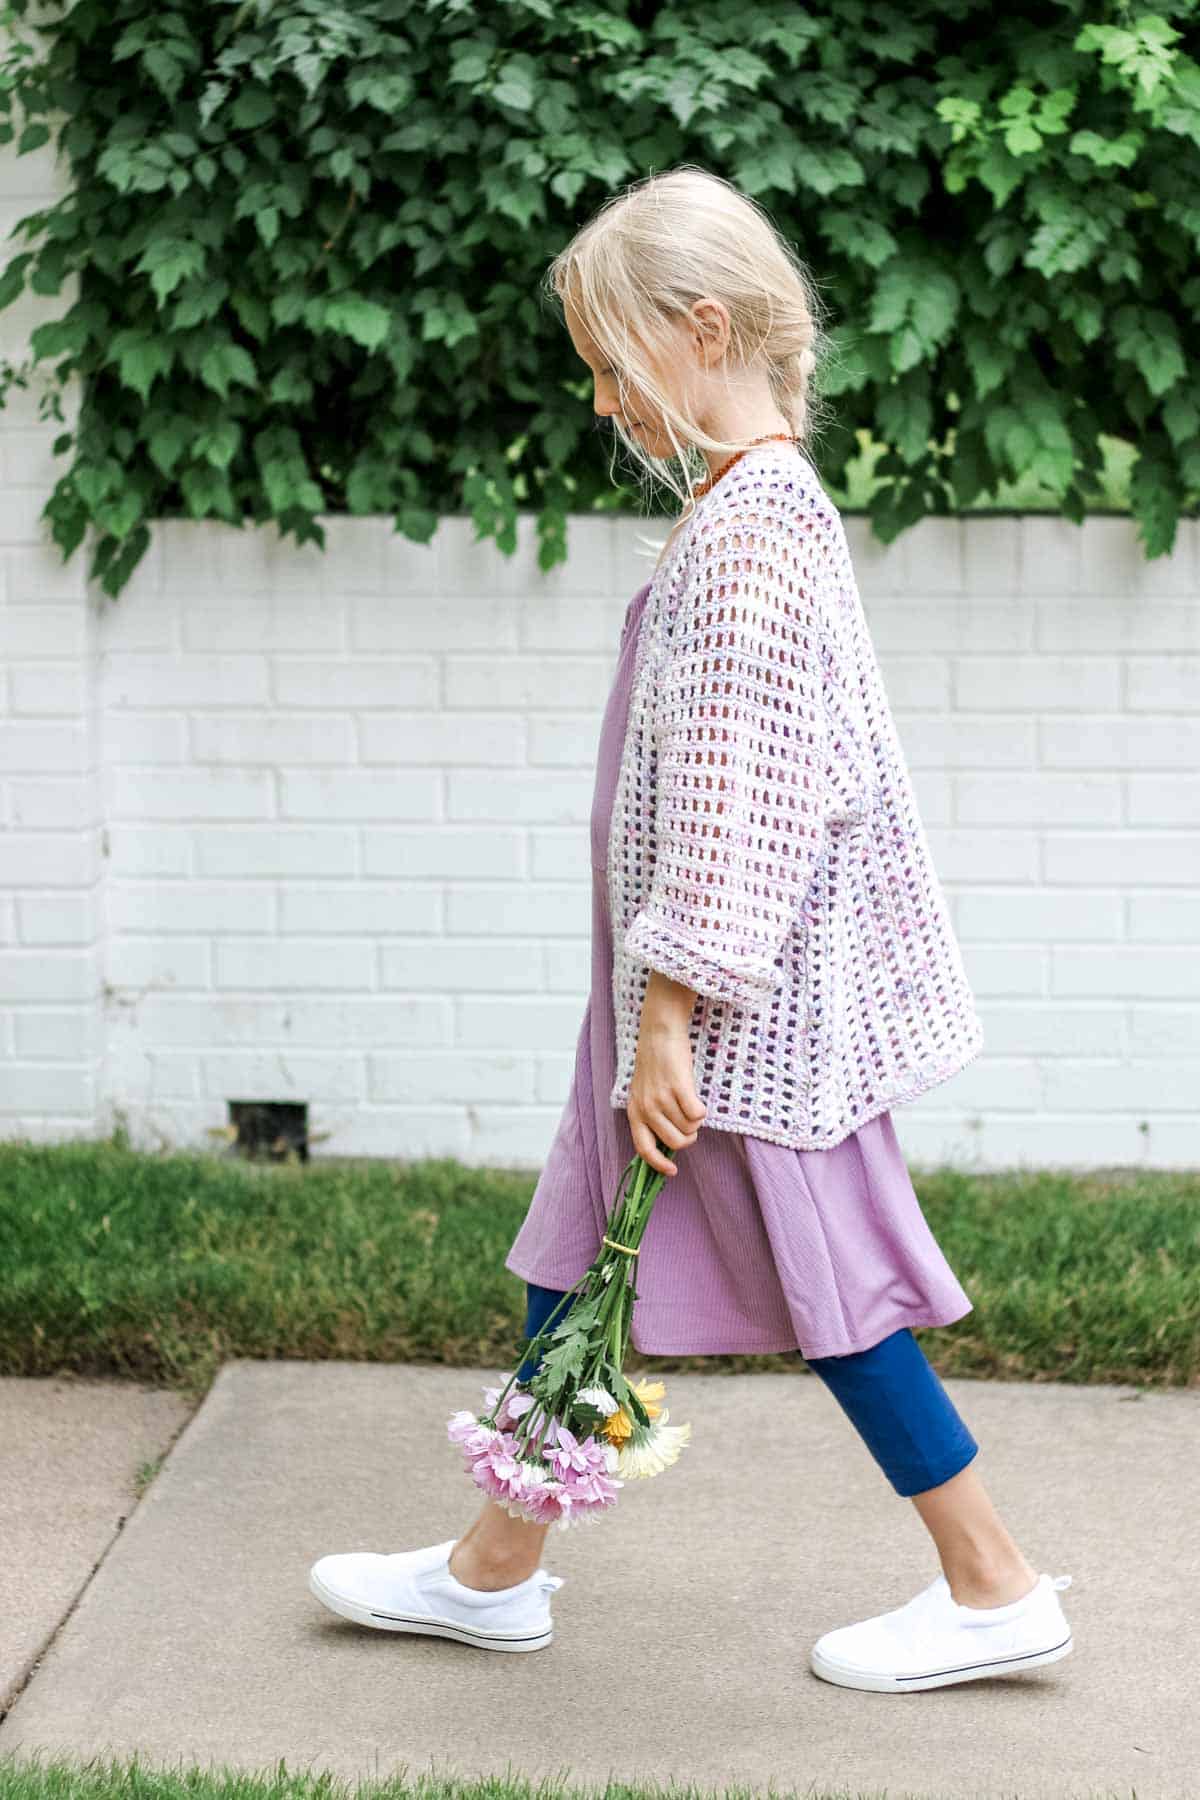
I really like being able to give my kids creative clothing that lets them express themselves and it's a double win if like the clothing too. This kids crochet sweater pattern checks so many of these boxes. My daughter loves the colors and I appreciate that they're not saccharine and too over-the-top. She likes that the sweater feels like a "grown up" garment and I love that it's comfy enough that she'll turn to it often.
I've really been getting into the idea of creating a seasonal capsule wardrobe to simplify my kids' clothing and I'm hoping this sweater can get some good use three or four seasons a year.
A Kaleidoscope of Colors
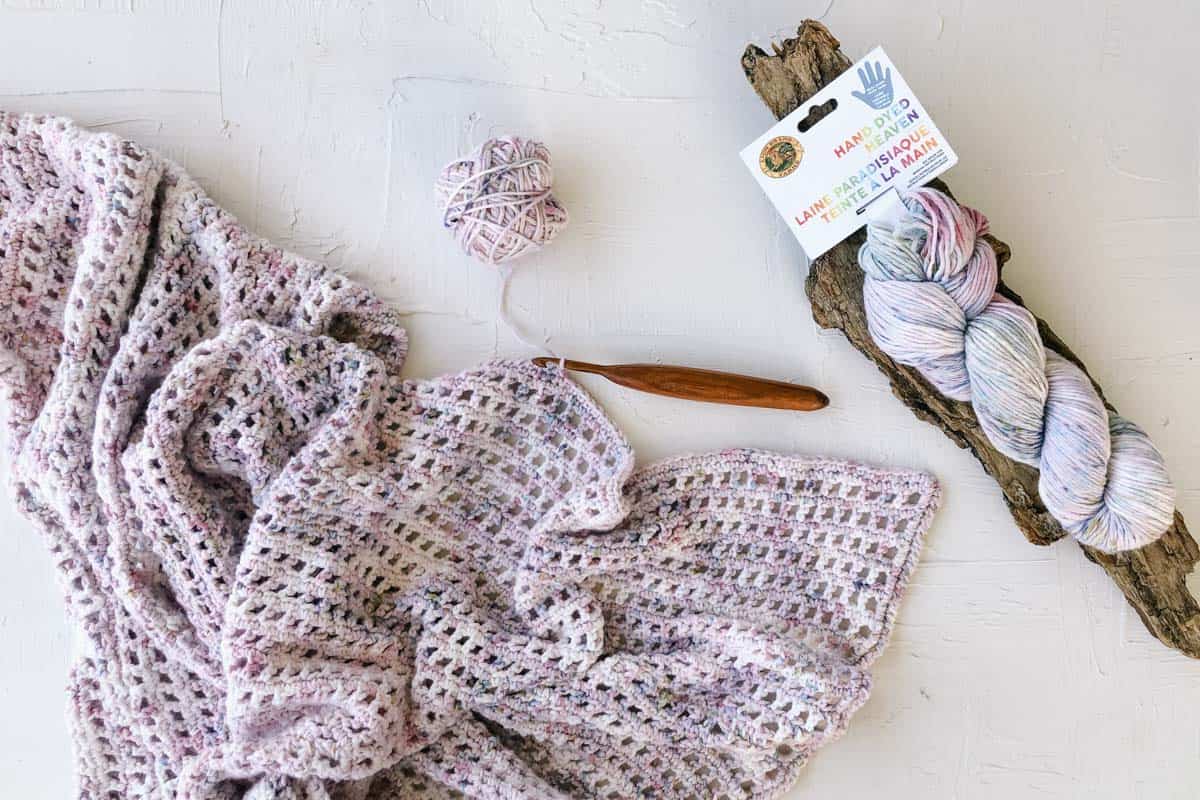
This yarn! Isn't it gorgeous? It's called Hand Dyed Heaven and it's something Lion Brand came out with a little while ago. The colors are truly dyed by hand which means each skein is unique and the colors are so playful and fun. You might remember Hand Dyed Heaven from the Wildflowers in the Wind Wrap pattern.
Hand Dyed Heaven is made from 100% nylon, which is a new pretty new fiber to me. And if this is what nylon feels like, I'm SOLD! Hand Dyed Heaven is incredibly soft and drapey. It reminds me of a soft cotton you'd use for baby patterns. It's machine washable and surprisingly affordable. I would love for Lion Brand would introduce some solid colors of this yarn because it's really, really nice to touch. You can check out all the current colors of Hand Dyed Heaven here.
Two Crochet Pieces - That's It!
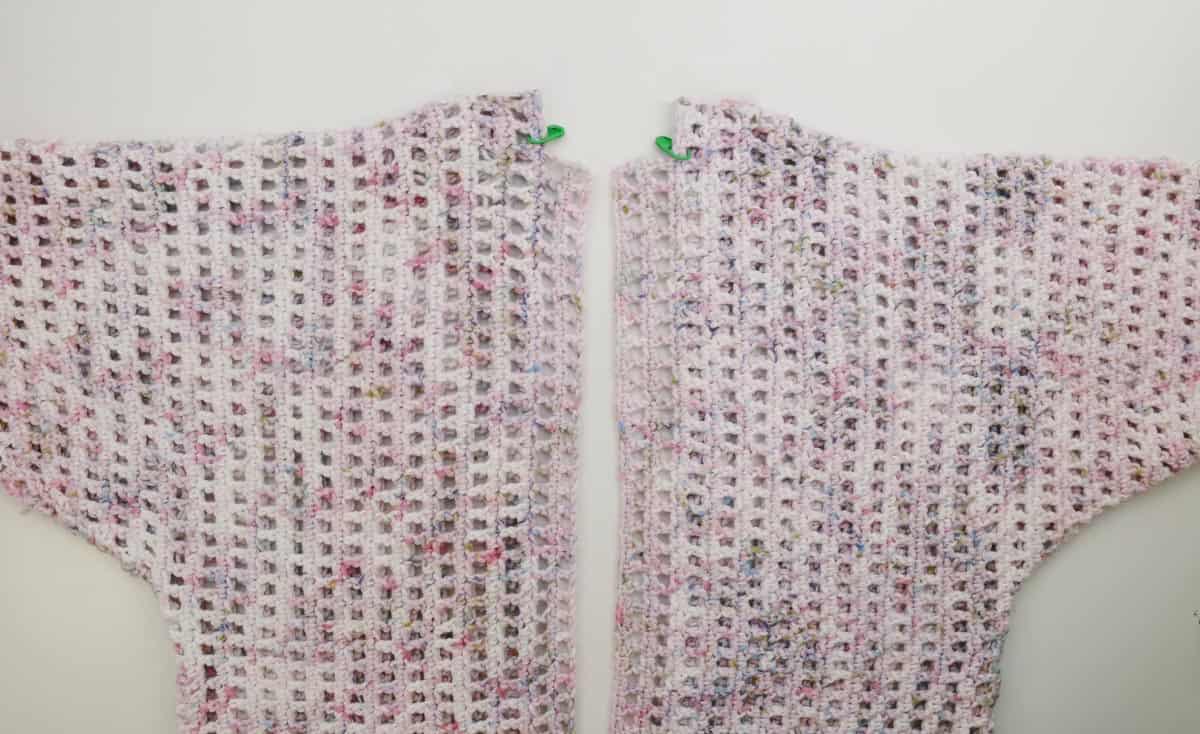
If you've followed along for a while, you might know that I really enjoy the geometry of crochet. Sweaters made from hexagons, Urban Nomad Boho Bag and shape-shifting crochet rectangles are the type of patterns you'll see often around here. For this free kids crochet sweater pattern, I've had a two-piece concept in mind for ages. I think I've even "built" it from paper several times trying to understand what shapes I'd need to create to make it work.
This pattern did not come together without some serious frogging, reworking and even cutting of the crochet fabric (with scissors--gasp!), but I finally got the shaping right and you should have none of the drama I did. By simply crocheting two "T" shaped pieces and seaming them together, you'll have a children's crochet cardigan with flowy dolman sleeves. And because of the oversized nature of this cardi, your kiddo should be able to enjoy it for a few years before growing out of it.
click to pin this pattern for later ⇨
If You'd Like a Printable Version or a Kit
I love offering patterns for free here on the blog (scroll down for the complete free version), but I know some people prefer a printable version without ads. If that's you, you can purchase the ad-free, printable PDF on Etsy here or LoveCrafts here. The PDF has large type and is formatted for easy printing.
And if you'd like the printable pattern PLUS all the yarn you'll need to crochet this kids cardi, you can grab it from Lion Brand here. You can choose from any of the beautiful colors of Hand Dyed Heaven to design your perfect crochet kit.
More Free Crochet Sweater Patterns
Crochet sweater patterns don't need to be difficult. In fact, most of ours are made with very simple shapes. Dive into the wonderful world of crochet garments with cardigans, pullovers, ponchos, shrugs and more!
See more free crochet sweater patterns →
Kaleidoscope Kids Crochet Cardigan
Free Pattern
Purchase the ad-free, printable PDF on Etsy here or LoveCrafts here.
Save this pattern to your Ravelry here.
Pin this pattern for later here.
Explanation:
Designed especially for the young girl who brings color to your life, this kids crochet cardigan is creatively constructed from two pieces and seamed down the middle.
You’ll begin working from the wrist up and build a dolman-sleeved, oversized cardi that’s sure to be as comfortable as it is cute. Hand-dyed yarn adds a painterly quality to this flowy design.
Supplies:
Purchase a kit with all the yarn you'll need, plus a printable copy of the pattern here.
• A: Lion Brand Hand Dyed Heaven (Weight: 3/light - 175 yds, 2.5 oz)
- Lady Marmalade (186-202) – 6 (7, 8, 9) skeins [(approx. 365 (450, 525, 605) g)]
• Tapestry needle
• Size J (6.0 mm) crochet hook or size needed to obtain gauge
• Stitch markers or safety pins
A Note on Substituting Yarns:
Lion Brand Comfy Cotton Blend and Jeans are similar in weight to Hand Dyed Heaven and are a nice alternative. Please make sure to check your gauge using the instructions below before beginning full pattern. It may be necessary to adjust hook size.
| Child Size | Fits Chest | |
| S | 5-6 | 25” |
| M | 7-8 | 26.5” |
| L | 9-10 | 28” |
| XL | 11-12 | 30” |
Fit is intended to be oversized. Sample pictured is a size M on a child with a 26” chest.
Gauge:
6 sc rows + 6 dc rows= 4”
17 sc = 4”
Abbreviations and Glossary (US Terms):
ch(s) – chain(s)
ch1sp(s) – space(s) created by one chain
dc – double crochet
PM – place marker
rep – repeat
RS – right side
rsc – reverse single crochet
sc – single crochet
sk – skip
slst – slip stitch
st(s) – stitch(es)
tch – turning chain
WS – wrong side
!! Gauge Check !!
Please don’t skip this step or you will risk your sweater not fitting as expected.
To check gauge:
Foundation Row: Ch 22.
Row 1 (RS): Sc in second ch from hook and each ch to end; turn. (21 sc)
Row 2 (WS): Ch 4, sk first 2 sc, dc in next sc, *ch 1, sk 1 sc, dc in next sc; rep from * to end of row; turn. (10 ch1sps)
Row 3 (RS): Ch 1, sc in each dc and ch1sp to last ch1sp, 2 sc in last ch1sp; turn. (21 sc)
Rep Rows 2 and 3 six more times.
Measure center four inches of swatch vertically and horizontally. Compare to pattern gauge listed above. If there are too many stitches in 4” horizontally, increase your hook size and re-swatch. If there aren’t enough stitches in 4” horizontally, decrease your hook size and re-swatch.
Main Pieces
Notes:
- Pattern begins at wrist and works sideways up toward shoulder.
- Ch 4 counts as 1 dc and 1 ch1sp.
- For longer or shorter sleeves, adjust number of repeats of Rows 2 and 3.
- Throughout piece, ch1sps should line up visually with the ch1sps below forming a grid-like appearance. (The only exception is where increases are created at the sleeve edges.)
- Hand-Dyed Heaven can have some color variation, even within the same dye lot. To ensure consistency, work from two balls at a time. Crochet two rows from one ball, then switch and work two rows from the second ball. Keep both balls attached as you work.
Working Even
Make 2.
All Sizes:
Foundation Row: Ch 50 [52, 54, 54].
Row 1 (RS): Sc in second ch from hook and each ch to end; turn. (49 [51, 53, 53] sc)
Row 2 (WS): Ch 4, sk first 2 sc, dc in next sc, *ch 1, sk 1 sc, dc in next sc; rep from * to end of row; turn. (24 [25, 26, 26] ch1sps)
✨Unlock this free subscriber-exclusive pattern ✨
Follow these steps to view the full free pattern below
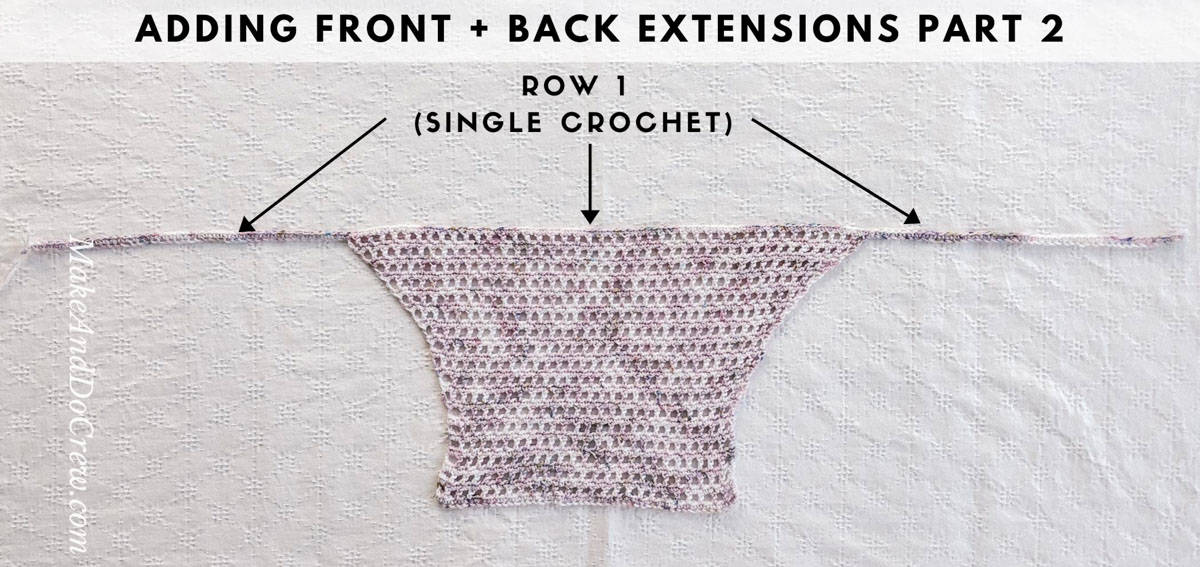
Adding Front and Back Extensions
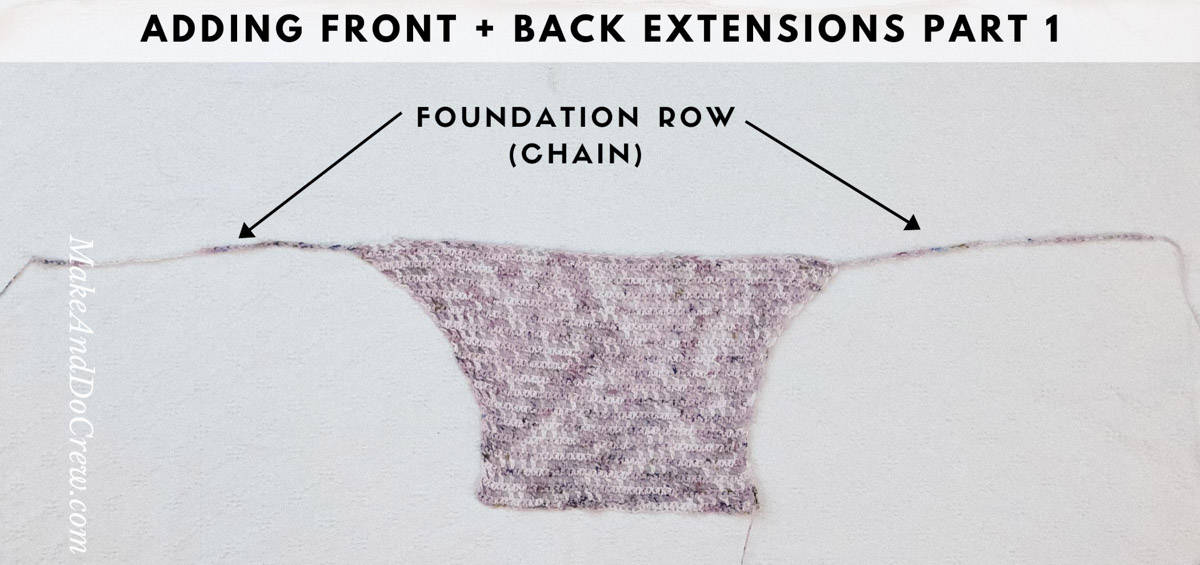
With yarn still attached at the end of last row:
Foundation Row Part 1: Ch 45 for all sizes. Put loop on hold.
On opposite side of piece, attach a second ball of yarn in top of tch from the previous row.
Foundation Row Part 2: Ch 45. Fasten off and pull yarn tail through last ch to create 44 total chs.
Begin Row 1 using the yarn that is still attached from Foundation Row Part 1.
Row 1 (RS): Sc in second ch from hook and each ch to sleeve; sc in each dc and ch1sp to last ch1sp, 2 sc in last ch1sp, sk tch, sc in each ch to end of row; turn.
Each extension should contain 44 sc. Main Sleeve section should contain 69 [87, 99, 107] sc.
Row 2 (WS): Ch 4, sk first 2 sc, dc in next sc, *ch 1, sk 1 sc, dc in next sc; rep from * to end of row; turn. (78 [87, 93, 97] ch1sps)
Row 3 (RS): Ch 1, sc in each dc and ch1sp to last ch1sp, 2 sc in last ch1sp; turn. (157 [175, 187, 195] sc)
Wanna save this pattern?
Working Even - Front and Back
Rep Rows 2 and 3 six (seven, eight, nine) more times.
Increasing for Shoulder
PM in center sc on the last row. Count 39 [44, 47, 49] ch1sps from either end. Place marker in sc made in this ch1sp. For size S, move marker one st closer to the center so it is above the next dc. There should be 39 (43, 46, 48) ch1sps on either side of marker (and one row below).
Size S Only:
Row 1 (WS inc): Ch 4, sk first 2 sc, dc in next sc, *ch 1, sk 1 sc, dc in next sc; rep from * to one st before marked sc, ch 1, dc in next sc (do not skip), ch 1, dc in marked sc, [ch 1, dc in next sc] twice, **ch 1, sk 1 sc, dc in next sc; rep from ** to end of row; turn. (80 ch1sps)
Sizes M, L, and XL Only:
Row 1 (WS inc): Ch 4, sk first 2 sc, dc in next sc, *ch 1, sk 1 sc, dc in next sc; rep from * to two sts before marked st, ch 1, sk next sc, (dc, ch 1, dc) in next sc, ch 1, sk marked st, (dc, ch 1, dc) in next sc, **ch 1, sk 1 sc, dc in next sc; rep from ** to end of row; turn. (- [89, 95, 99] ch1sps).
Working Even
Row 1 (RS): Ch 1, sc in each dc and ch1sp to last ch1sp, 2 sc in last ch1sp; turn. (161 [179, 191, 199] sc)
Row 2 (WS): Ch 4, sk first 2 sc, dc in next sc, *ch 1, sk 1 sc, dc in next sc; rep from * to end of row; turn. (80 [89, 95, 99] ch1sps)
Rep Rows 1 and 2 twice more.
Rep Row 1 once more.
Piece should now contain 53 [59, 63, 69] total rows. Do not fasten off.
From here, we will work a few partial rows to extend panels in the back and make room for the neck. Instructions vary slightly for Right and Left sweater sides.
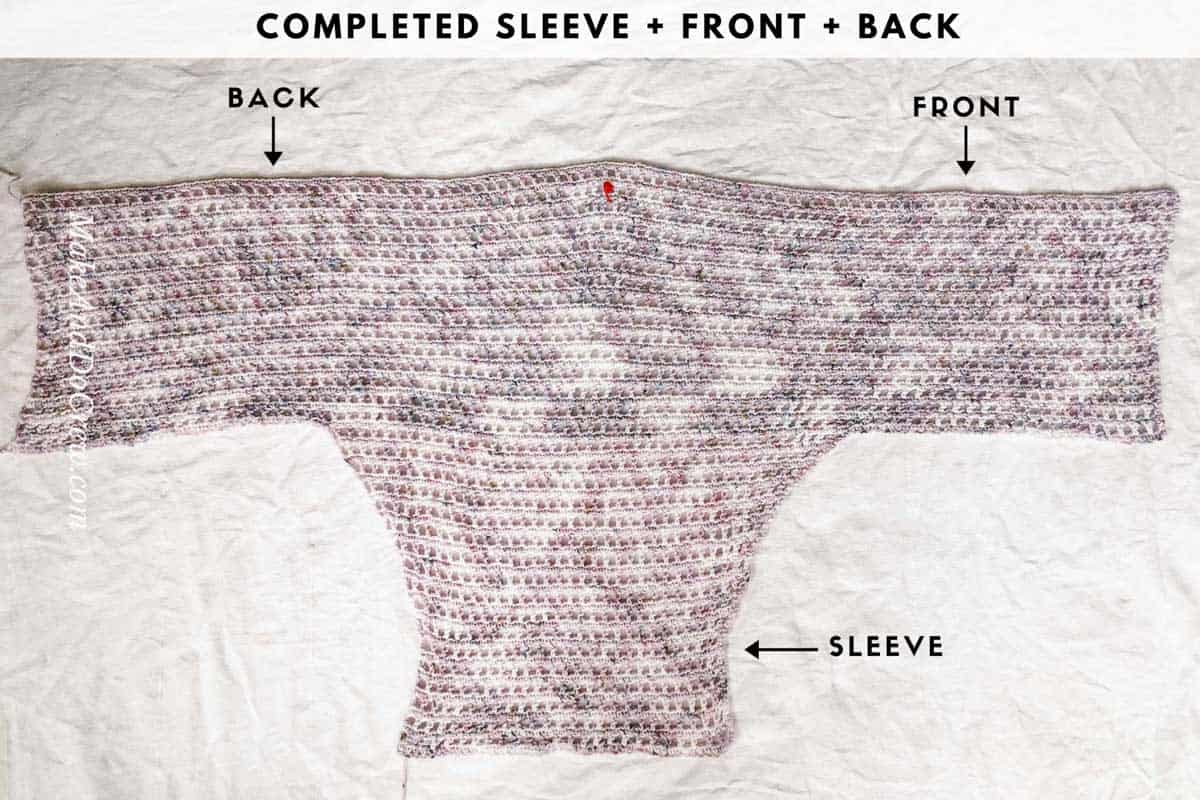
Right Side of Sweater Back
First Piece
Keep yarn attached from main piece. Counting from where yarn is attached, PM in sc directly above 40th [45th, 48th, 50th] ch1sp. Marker is in the 80th [90th, 96th, 100th] sc.
Row 1 (WS): Ch 4, sk first 2 sc, dc in next sc, *ch 1, sk 1 sc, dc in next sc; rep from * until 3 sts rem before marked st, ch 1, sk 1 sc, dc in next sc; turn, leaving remaining sts unworked. (39 [44, 47, 49] ch1sps)
Row 2 (RS): Ch 1, sc in each dc and ch1sp to last ch1sp, 2 sc in last ch1sp; turn. (79 [89, 95, 99] sc)
Stop here for size S.
Sizes M, L, and XL Only:
Row 3 (WS): Ch 4, sk first 2 sc, dc in next sc, *ch 1, sk 1 sc, dc in next sc; rep from * to end of row; turn. (-- [44, 47, 49] ch1sps)
Row 4 (RS): Rep Row 2.
All Sizes:
Fasten off leaving a 36” tail for seaming.
Left Side of Sweater
Second Piece
Fasten off yarn from main piece. Counting from opposite side of where yarn was previously attached, PM in sc directly above 40th [45th, 48th, 50th] ch1sp. Marker is in the 80th [90th, 96th, 100th] sc.
With WS facing, attach yarn in sc to the left of marked sc. (Left Handed: in sc to the right of marked sc). For all sizes, this sc is directly above a dc.
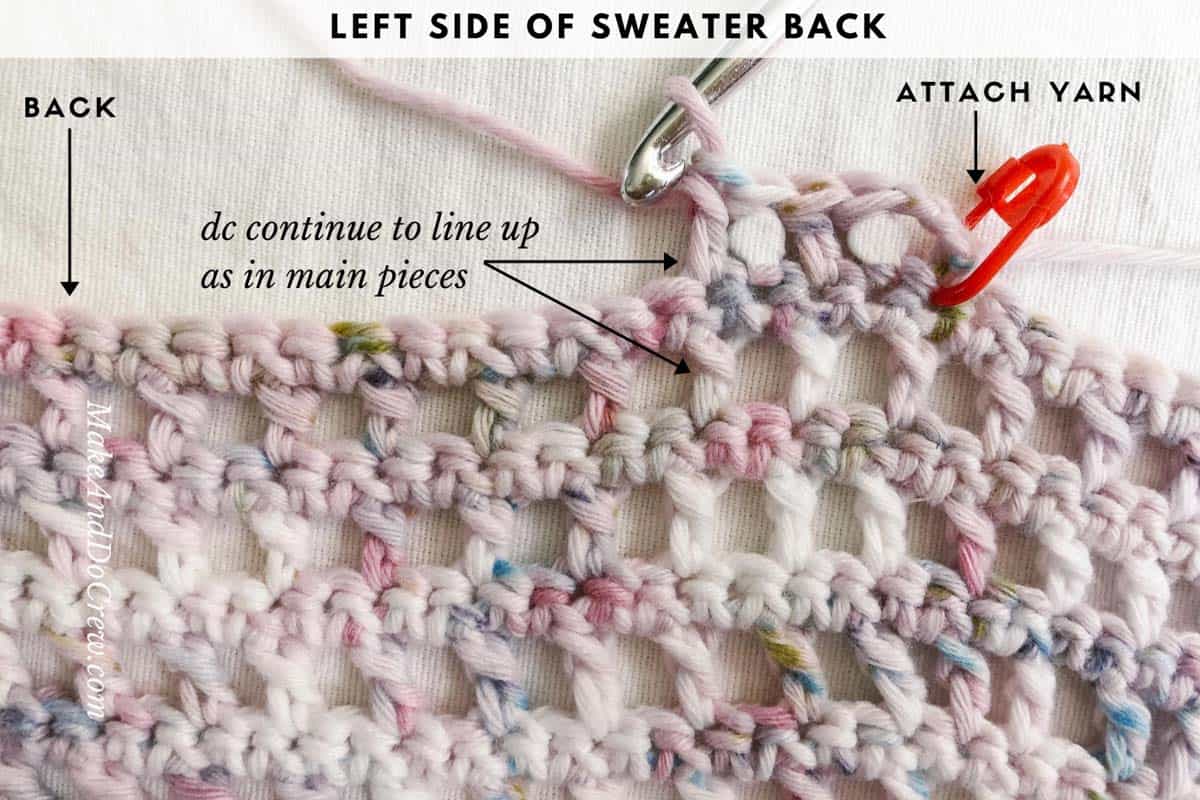
All Sizes:
Row 1 (WS): Ch 4, sk sc yarn is attached in, sk next sc, dc in next sc (directly above a dc two rows below), *ch 1, sk 1 sc, dc in next sc; rep from * to end of row; turn. (39 [44, 47, 49] ch1sps)
Row 2 (RS): Ch 1, sc in each dc and ch1sp to last ch1sp, 2 sc in last ch1sp; turn. (79 [89, 95, 99] sc)
Stop here for size S.
Sizes M, L, and XL Only:
Row 3 (WS): Ch 4, sk first 2 sc, dc in next sc, *ch 1, sk 1 sc, dc in next sc; rep from * to end of row; turn. (-- [44, 47, 49] ch1sps)
Row 4 (RS): Rep Row 2.
All Sizes:
Fasten off leaving a 36” tail for seaming.
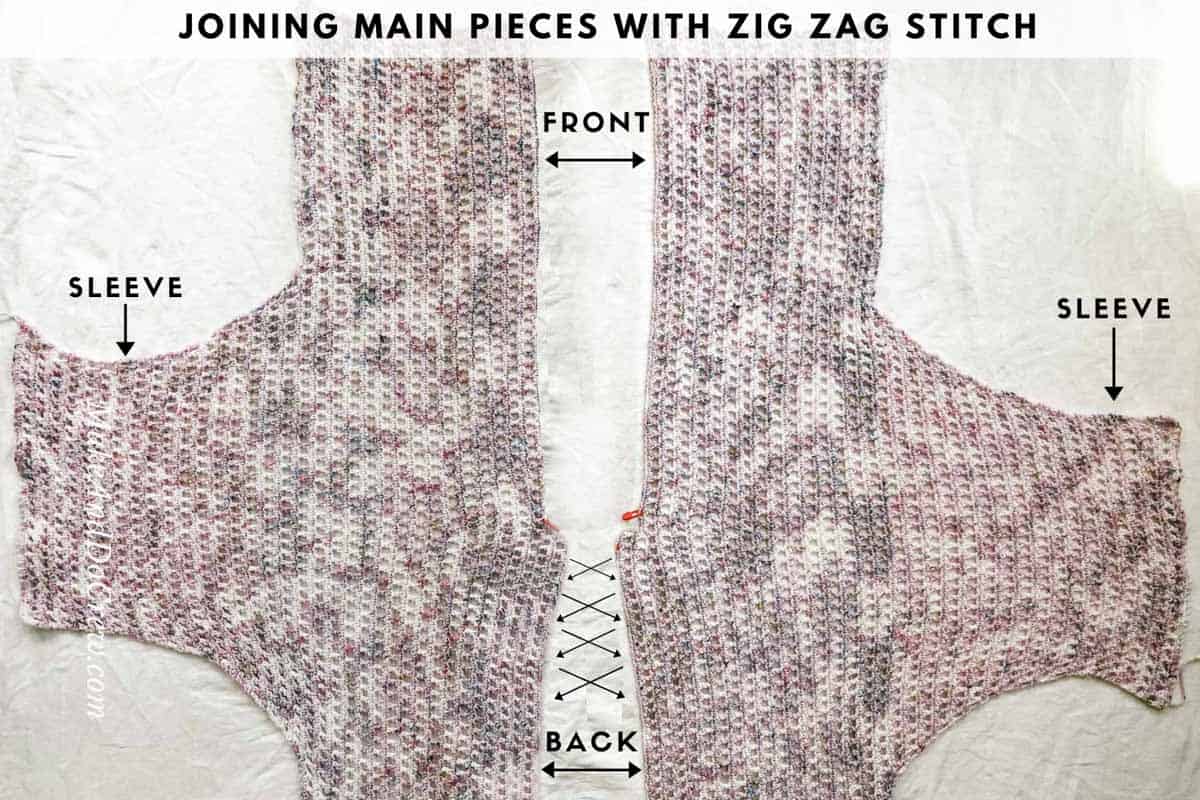
Seaming
Seaming Sleeves + Sides
With WS facing out, fold each half of sweater so it is creased along the shoulder. Using stitch markers, pin piece in half so that ch1sps line up along sleeve and sides. Beginning at the wrist, whip stitch up sleeve and then down side seam. Repeat on second side.
Joining Two Main Pieces:
With RS facing out, pin two main sweater pieces together so ch1sps are lined up along sweater back. Beginning at either the bottom of sweater or neckline, zig zag stitch to join.
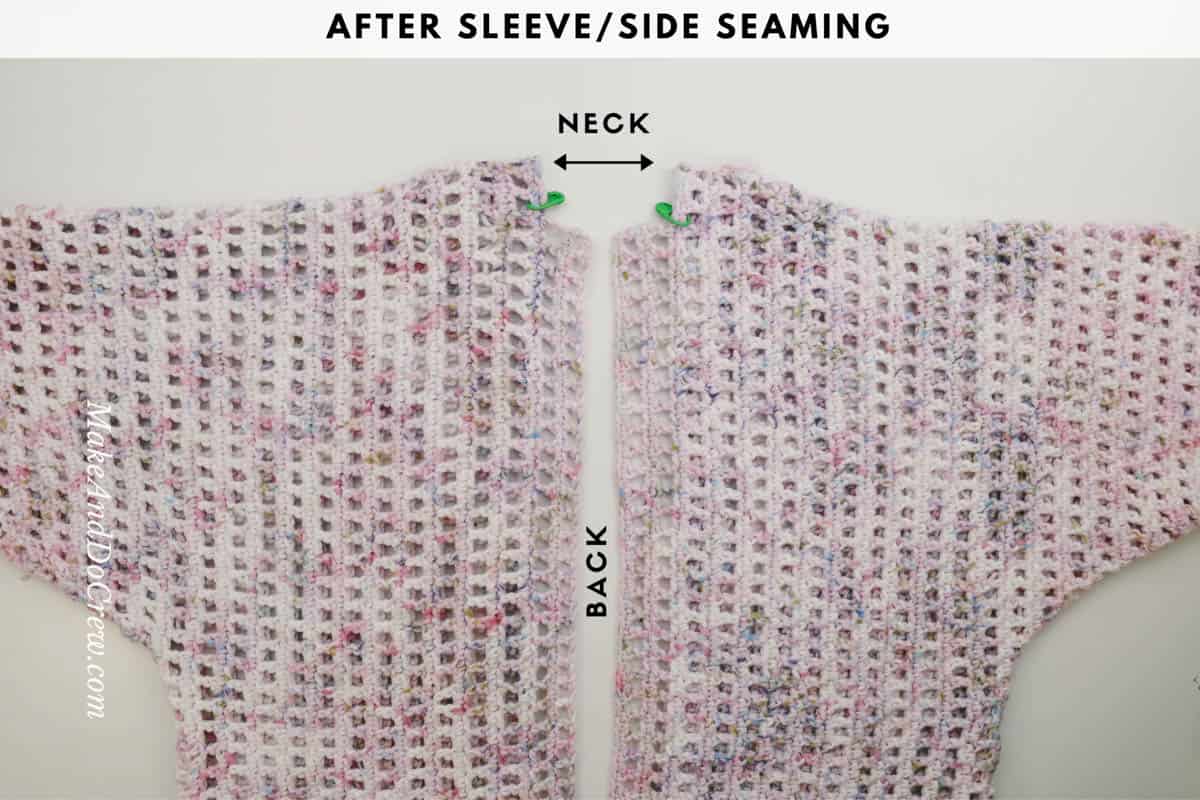
Border
Main Sweater
Attach yarn anywhere along bottom edge of cardigan.
With RS facing:
Round 1 (RS): Ch 1, sc around entire cardigan, slst to first st to join. When working into raw row edges along sweater bottom edge and back of neck, work 3 sc for every set of two rows (1 sc row + 1 dc row). Everywhere else, place 1 sc in each st.
Note: Round 2 is worked in the opposite direction you normally crochet. Right-handed: work clockwise. Left-handed: work counterclockwise.
Round 2 (RS): Ch 1, rsc in each sc, slst to first st to join.
Fasten off.
Sleeves
Attach yarn anywhere in Foundation Row of sleeve. With RS facing:
Round 1: Ch 1, rsc in each st to end of round, slst to join.
Fasten off. Rep on second sleeve.
Blocking
Pin cardigan to towel or blocking mat. Spread edges out as necessary to remove any ripples. Steam block using an iron or steamer taking care not to touch heat source to yarn.
Bestow the new cardigan on the most colorful young girl in your life!
Find Your Next Sweater Project
- Color Block Cardi Pattern - drapey and soft
- Easy Tunisian Crochet Cardigan - clever reversible cardi
- Casual Pullover Sweater - with exposed seams
- Simple Everyday Cardigan - using the easy V-stitch
- Lightweight Jacket Pattern - seamless + beginner-friendly
- V-Neck Sweater -simple, easy striped design
- Crochet Wrap Sweater Pattern - unique take on a raglan
- Beginner Raglan Sweater Pattern - ideal first top down pattern
That was so fun! Now what?
Invitation to our Facebook group
Come discuss crocheting children's sweater patterns and lots of other crochet projects and techniques in our Make & Do Crew Facebook group. Here thousands of helpful crocheters answer each others questions and share their stitches. Come join us here.
More Free Patterns + Tutorials
Can't get enough free crochet patterns!? Me either. You'll definitely want to breeze through these collections to find your next project.
- 55+ Free Crochet Sweater and Cardigan Patterns - our most popular garments
- 40+ Free Crochet Blanket Patterns - baby blankets, throws + c2c graphgans
- 36+ Granny Square Patterns + tips for the perfect square
- 30+ Crochet Animal Patterns - adorable amigurumi stuffed animals
- Crochet Gift Ideas - easy patterns to make for others
- Fast Crochet Projects - start to finish in less than a day
Learn a New Skill
And when you're ready to master a new skill, check out our detailed guides that include everything you need to know to level up your crochet game.
- How to Corner to Corner (C2C) Crochet for Beginners - with video tutorials to get you started
- How to Crochet a Beginner Hat - make an entire beanie in 1.5 hours!
- How to Crochet Amigurumi for Beginners - the ultimate guide to making your own toys and plushies
- How to Tunisian Crochet - learn with this video and a standard hook
More Free Crochet Patterns
We've got lots more modern, approachable crochet project ideas where this came from. Peruse our free pattern archives or check out more ideas for babies and children, garments for adults or projects you can finish in a few hours.
Check out more free crochet patterns from Make & Do Crew ⇨



Tracy McDonald says
Oh. Could you please use the proper term. They are packaged and sold as Stitch Markers. You are the Only one calling then "place markers.". I had to stop and think. NEW people using you as their teacher will go into a store and ask for "place markers" and the clerk will wonder if they mean a Bookmark or an Ink based marker.
Tracy McDonald says
Some [many] of your items are cute looking but very many have boring "stitch patterns" A whole sweater in ch1 dc, then 1 row of sc? [!!!] Maybe the same "shape" / "style" but a choice of stitch patterns for those of us who are more advanced. Please??? [Like more than 40 YEARS more experience. When you were born I was possibly 20 years old. Yet I really need to follow a pattern as Designing one's own items Every Time takes so long that I've designed only 3 items. (And They were simple stitch patterns because I was learning. Oh well. Maybe that is why yours use simple. patterns ]
I DO LIKE that you provide Sizes.