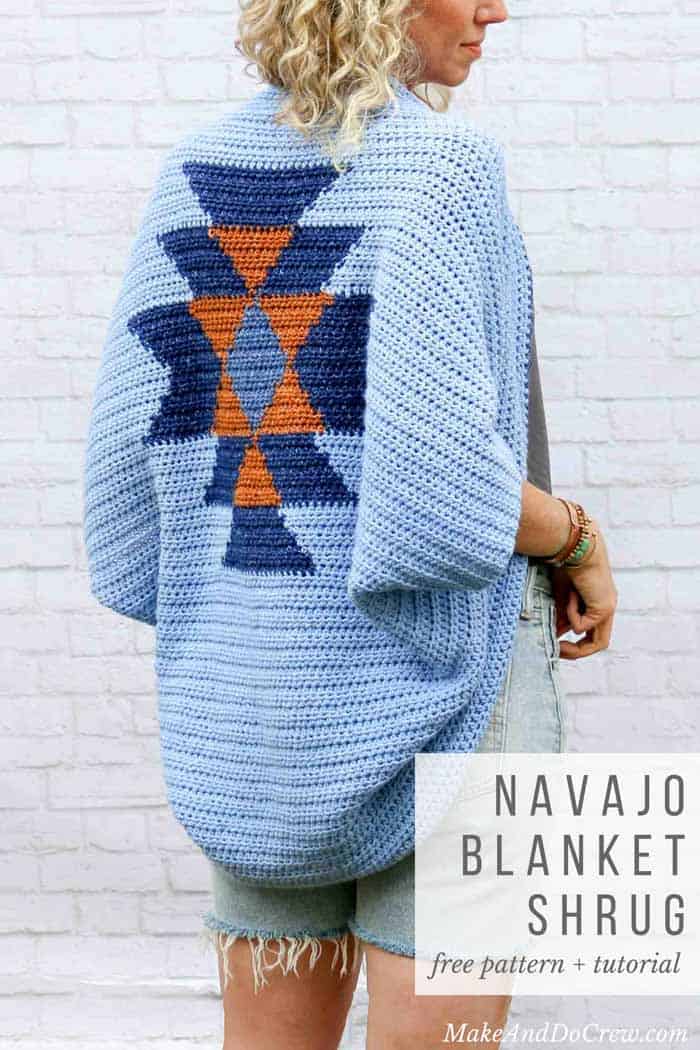
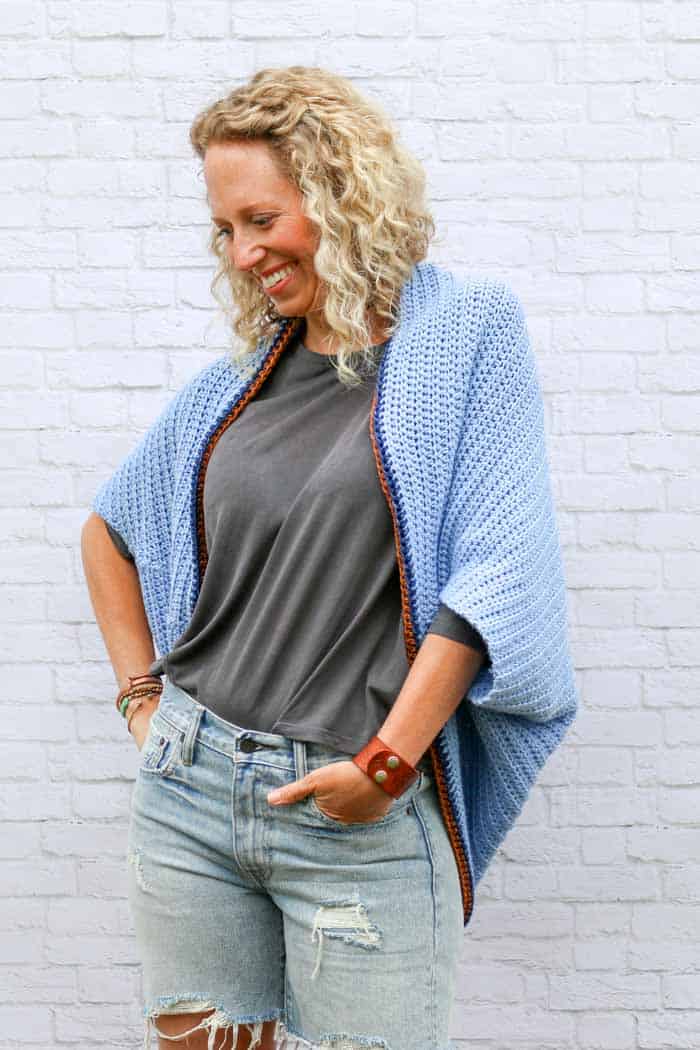
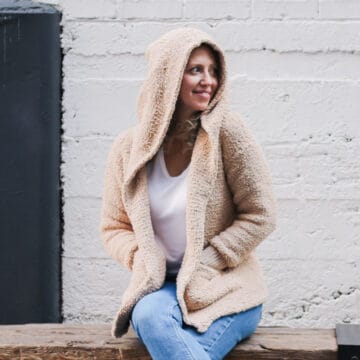
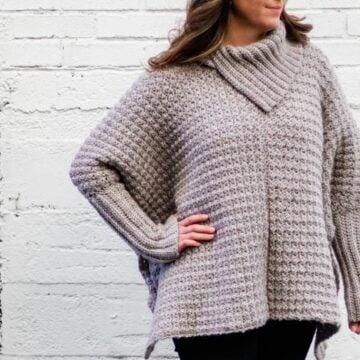
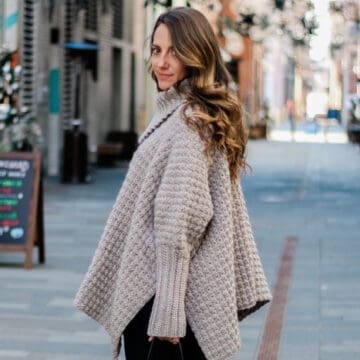
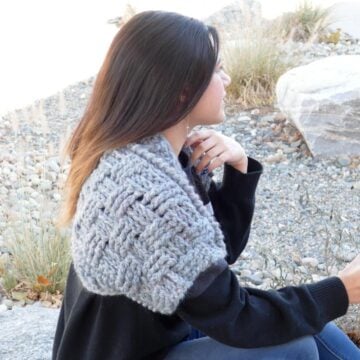
While this free crochet shrug pattern resembles the look of tapestry crochet, its blanket-inspired design is actually made by switching colors mid-row using basic crochet techniques! Get the free crochet pattern below or purchase the ad-free, printable PDF with line-by-line graph instructions here.
This free crochet shrug pattern is in collaboration with Lion Brand Yarns. This post contains affiliate links.
The second I laid eyes on this Jeans yarn from Lion Brand I knew I was going to need to make some kind of Urban Nomad Boho Bag. It's no secret that I love boho crochet style and crocheting from graphs, so I decided to try combine the two ideas to sort of "paint" my vision with yarn.
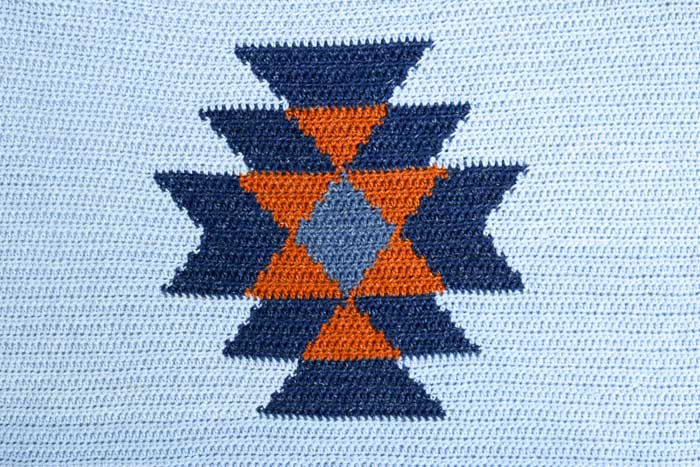
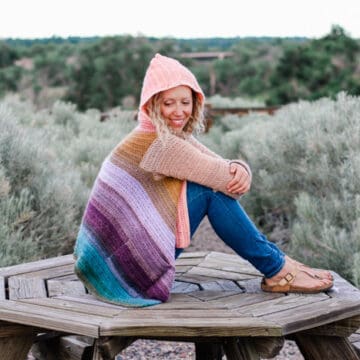
For this free crochet shrug pattern, I was inspired by a very common design that can be found on many southwestern blankets.
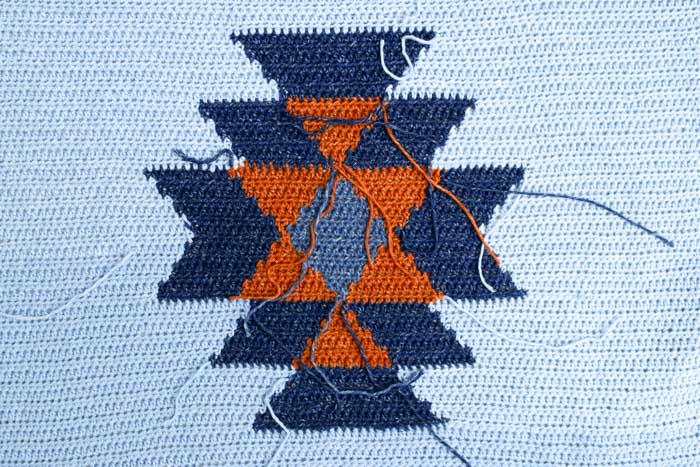
While working on developing this pattern, one thing I knew for sure was that I didn't want to have 8,000 ends to weave in when I was finished. I'm always too excited to start my next project to bother with anything tedious like that. I'm guessing you might be able to relate?
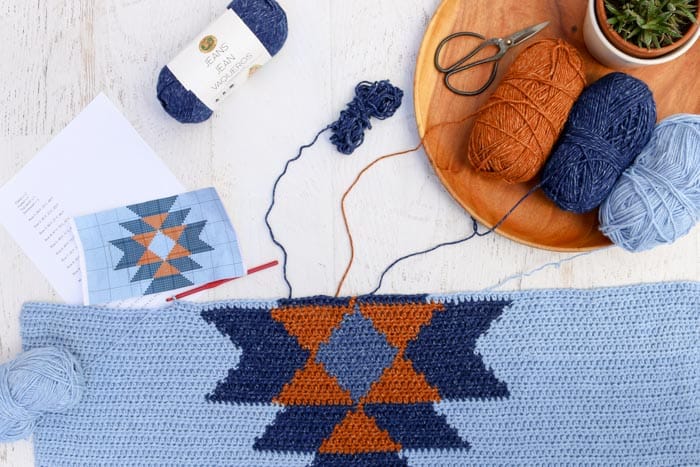
So, in the process of working on this, I learned a lot of lessons about how to change colors without actually cutting your yarn. I created a video tutorial on five quick tips for working the graph section of this pattern and minimizing your ends to weave in--because, you know, fewer ends to weave in means more crochet time. You can find the video below (right above the free pattern).
In the printable pattern PDF for this pattern, I've included line-by-line written instructions for how many stitches to work in each color. This may be helpful if you aren’t inexperienced in reading a graph, just prefer to have written instructions or like to double check your work because you get lost in Netflix while you crochet. (Me too!) You can purchase the PDF here.
(You can download the printable graph without the line-by-line instructions for free here.)
And while you're getting excited for crochet sweater making, you might enjoy these free sweater patterns as well:
More Free Crochet Sweater Patterns
Crochet sweater patterns don't need to be difficult. In fact, most of ours are made with very simple shapes. Dive into the wonderful world of crochet garments with cardigans, pullovers, ponchos, shrugs and more!


See more free crochet sweater patterns →
Lion Brand has turned this Blanket Shrug into a kit that includes all the yarn you need, plus a black and white printed copy of the pattern! You can pick up your kit here.
Please do not publish or share this pattern as your own. You may make items to sell with this pattern. In exchange, please link back to this post. Do NOT use my photos as your own sales photos. You can read my policies here. Now let’s make something awesome!
New to making garments? Don't miss our beginner's guide to crocheting your first sweater.

Don't spend hours for a "meh" result!
Tired of crocheting garments that don't fit? Learn our C.R.A.F.T. Framework to make sweaters that fit and feel amazing!
Free Crochet Blanket Shrug Pattern
Purchase the printable PDF with optional line-by-line written graph instructions here.
Add this pattern to your Ravelry favorites here.
Pin this pattern for later here.
Explanation:
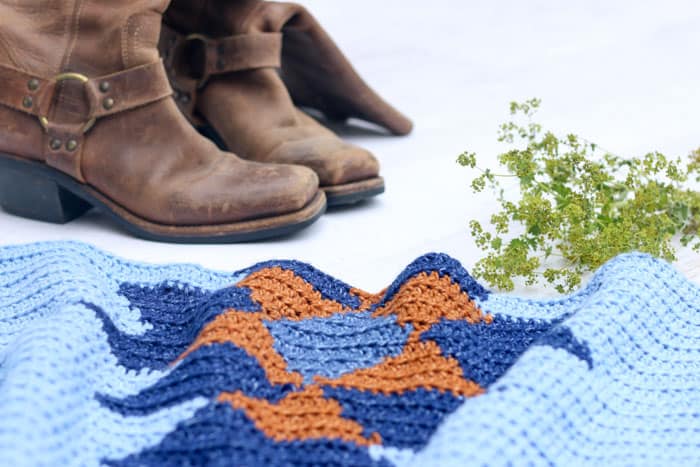
This southwestern-inspired shrug uses very simple stitches to achieve a unique end result. While this design resembles the look of tapestry crochet, it’s actually made by switching colors mid-row using basic crochet techniques. The result is quite a showstopper and looks far from DIY-ed. Paired with jeans, leggings or cutoffs, it’ll become your favorite comfy statement piece. If you’re looking for a mindless project with a bit of magic tossed in the middle, this crochet shrug pattern is for you!
Supplies:
Purchase a kit with all the yarn you need, plus a printed copy of the pattern here!
• Lion Brand Jeans (Weight: 4/medium - 246 yds, 3.5 oz)
- Color F: Faded (4 skeins)
- Color C: Classic (1 skein
- Color T: Topstitch (1 skein)
- Color S: Stonewash (1 skein) (This color is used in the sample, but it is optional. You may replace it with Color F if desired.)
• Tapestry needle
• Size I (5.5 mm) crochet hook
• Stitch markers or safety pins
• Printout of the Navajo design graph
• Optional: The printable pattern PDF includes line by line written instructions for how many stitches to work in each color for the graph portion. This may be helpful if you aren’t inexperienced in reading a graph, just prefer to have written instructions or like to double check your work.
Measurements/Sizes:
This crochet shrug pattern is written in one size that will accommodate a wide range of body types. To adjust the pattern sizing, see notes below.
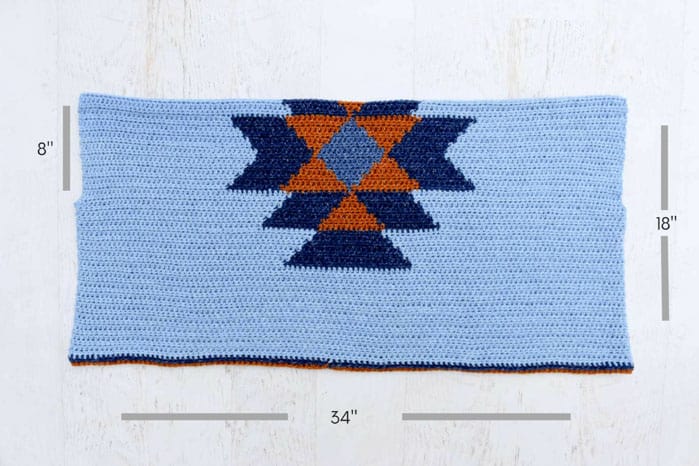
Length when worn: approx. 36”
Width: 34”
Wanna save this pattern?
Gauge:
13.5 hdc = 4”
11 rows hdc = 4”
Abbreviations and Glossary (US Terms):
ch – chain
hdc – half double crochet
tch – turning chain
sl st – slip stitch
RS – right side
WS – wrong side
rep – repeat
Overall Pattern Notes:
• This shrug is constructed from one large rectangle worked from the bottom up. The pattern is divided into three sections: the solid section of "Faded" color before the Navajo design, the Navajo design and the solid section of "Faded" after the Navajo design.
• To create a shorter shrug, work fewer rows before and after the design section. Similarly, to create longer shrug, work additional rows before and after the design section.
• To create a wider shrug, add additional stitches by increasing the number of chains in the foundation chain. Use an odd number of chains. Take your number of chains and subtract 115. Divide that number by 2. The resulting number is how many extra stitches you should work using Color F before beginning each row of the chart (or written pattern) in the “Navajo Design Section.” This will ensure the Navajo design is perfectly centered width-wise on your shrug.
Below Design Section
Notes:
• There will be no difference between the RS and WS in this section of the pattern.
Foundation Row: Using Color F, ch 114. (If you prefer to do a foundation hdc stitch instead of a ch, create 113 stitches.)
Row 1: Sk 2 ch, hdc in each ch to end of row; turn. (113 hdc)
Row 2: Ch 2, hdc in each hdc to end of row; turn. (113 hdc)
Using Color F, rep Row 2 until piece measures 14” (about 40 rows).
✨Unlock this free subscriber-exclusive pattern ✨
Follow these steps to view the full free pattern below
Navajo Design Section
Notes:
• Row 1 of this section is now considered a RS row. Row 2 is a WS row, etc. Keep yarn that isn’t being used to the back (WS) of the work as you crochet in order to keep the RS of the design looking as clean as possible.
• I'll be sharing a video tutorial this week that offers all my tips for how to switch colors mid-row without cutting your yarn (which means fewer ends to weave in!) Stay tuned!
Work Navajo design graph in it’s entirety using hdc. As described on the graph, be sure to add the necessary 32 stitches in "Faded" yarn (Color F) before you work each line of the graph.
The printable pattern PDF includes line by line written instructions for how many stitches to work in each color. This may be helpful if you aren’t inexperienced in reading a graph, just prefer to have written instructions or like to double check your work. You can purchase the PDF here.
Above Design Section
Row 1: Using Color F, ch 2, hdc in each hdc to end of row; turn. (113 hdc)
Using Color F, rep Row 1 until the section above the design measures 6.5” (about 19 rows). The total length of the piece should measure approx. 34” at this point.

Seaming
With RS facing out, fold rectangle so that the original foundation chain is touching the last row you worked. Pin each side of the rectangle together with safety pins or stitch markers. With a tapestry needle and a doubled-over length of Color F yarn, seam 10” along the side seam, leaving an 8” armhole. (Begin at the corners and work toward what will be the armhole.) Repeat for second side.
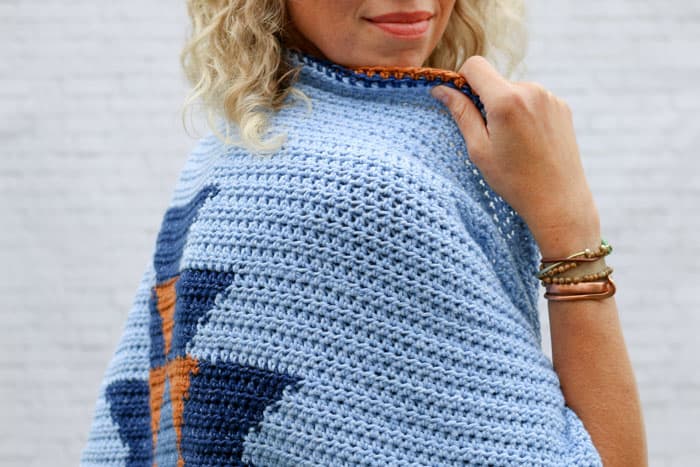
Edging
Attach Color C in middle of top of shrug, near the neck.
Round 1: Ch 2, hdc in same hdc yarn attached in, hdc in each hdc around shrug, sl st to first hdc of round to join. Do not turn.
Fasten off Color C. Attach Color F in near back of neck.
Using Color T, rep Round 1.
Fasten off.
Weave in any remaining ends.
Hey you, Picasso, you just painted your own southwestern masterpiece entirely with yarn! This probably deserves a night on the town and a new pair of moccasins!
That was so fun! Now what?
Invitation to our Facebook group
Come discuss crocheting Navajo blanket patterns and lots of other crochet projects and techniques in our Make & Do Crew Facebook group. Here thousands of helpful crocheters answer each others questions and share their stitches. Come join us here.
Find Your Next Sweater Project
- Beginner Cardigan - made from rectangles
- Pullover Yoke Sweater - nearly seamless
- Long Boho Cardigan Pattern - with fringe!
- Summer Crochet Cardigan Pattern - short sleeved topper
- Lightweight Cardigan - made from hexagons
- Color Block Cardi Pattern - drapey and soft
- Easy Tunisian Crochet Cardigan - clever reversible cardi
- Casual Pullover Sweater - with exposed seams
More Free Patterns + Tutorials
Can't get enough free crochet patterns!? Me either. You'll definitely want to breeze through these collections to find your next project.
- 55+ Free Crochet Sweater and Cardigan Patterns - our most popular garments
- 40+ Free Crochet Blanket Patterns - baby blankets, throws + c2c graphgans
- 36+ Granny Square Patterns + tips for the perfect square
- 30+ Crochet Animal Patterns - adorable amigurumi stuffed animals
- Crochet Gift Ideas - easy patterns to make for others
- Fast Crochet Projects - start to finish in less than a day
Learn a New Skill
And when you're ready to master a new skill, check out our detailed guides that include everything you need to know to level up your crochet game.
- How to Corner to Corner (C2C) Crochet for Beginners - with video tutorials to get you started
- How to Crochet a Beginner Hat - make an entire beanie in 1.5 hours!
- How to Crochet Amigurumi for Beginners - the ultimate guide to making your own toys and plushies
- How to Tunisian Crochet - learn with this video and a standard hook
Now that you've finished this free crochet shrug pattern, you might like to check out these other free boho-inspired crochet patterns from Make & Do Crew:
1. Campfire Cardigan free crochet hexagon jacket pattern
2. Crochet moccasins with flip flop soles
Serenity Kelczewski says
Loooooove this pattern!! I am having some trouble figuring out how to sew the edges together. If i am understanding the pattern, i fold my work into thirds and then sew up the sides until i reach the armhole, starting at the bottom crease . This is leaving me with a square sticking out where the bottom crease is. Is that normal, or did I mess it all up.? Thank you in for your awesome patterns?
Serenity Kelczewski says
thank you so much for your response! I feel super silly, I sewed it wrong. You are so awesome and I love your patterns! I am making this for my 11 year old. She fell in love with this pattern!
lucie weeks says
HI, i got the pattern and the yarn, but the blak and white picture does not show enough detail. Saw the color photo, great.
I am a knitter, but a friend of men is going to make this for me. She is a a loss as the pattern description is missing the navajo block insert, there are just pictures, but no graph or an explanation on how to insert the design. HELP. So could you send either instructions or a graph showing how to insert the beautiful design? Thanks