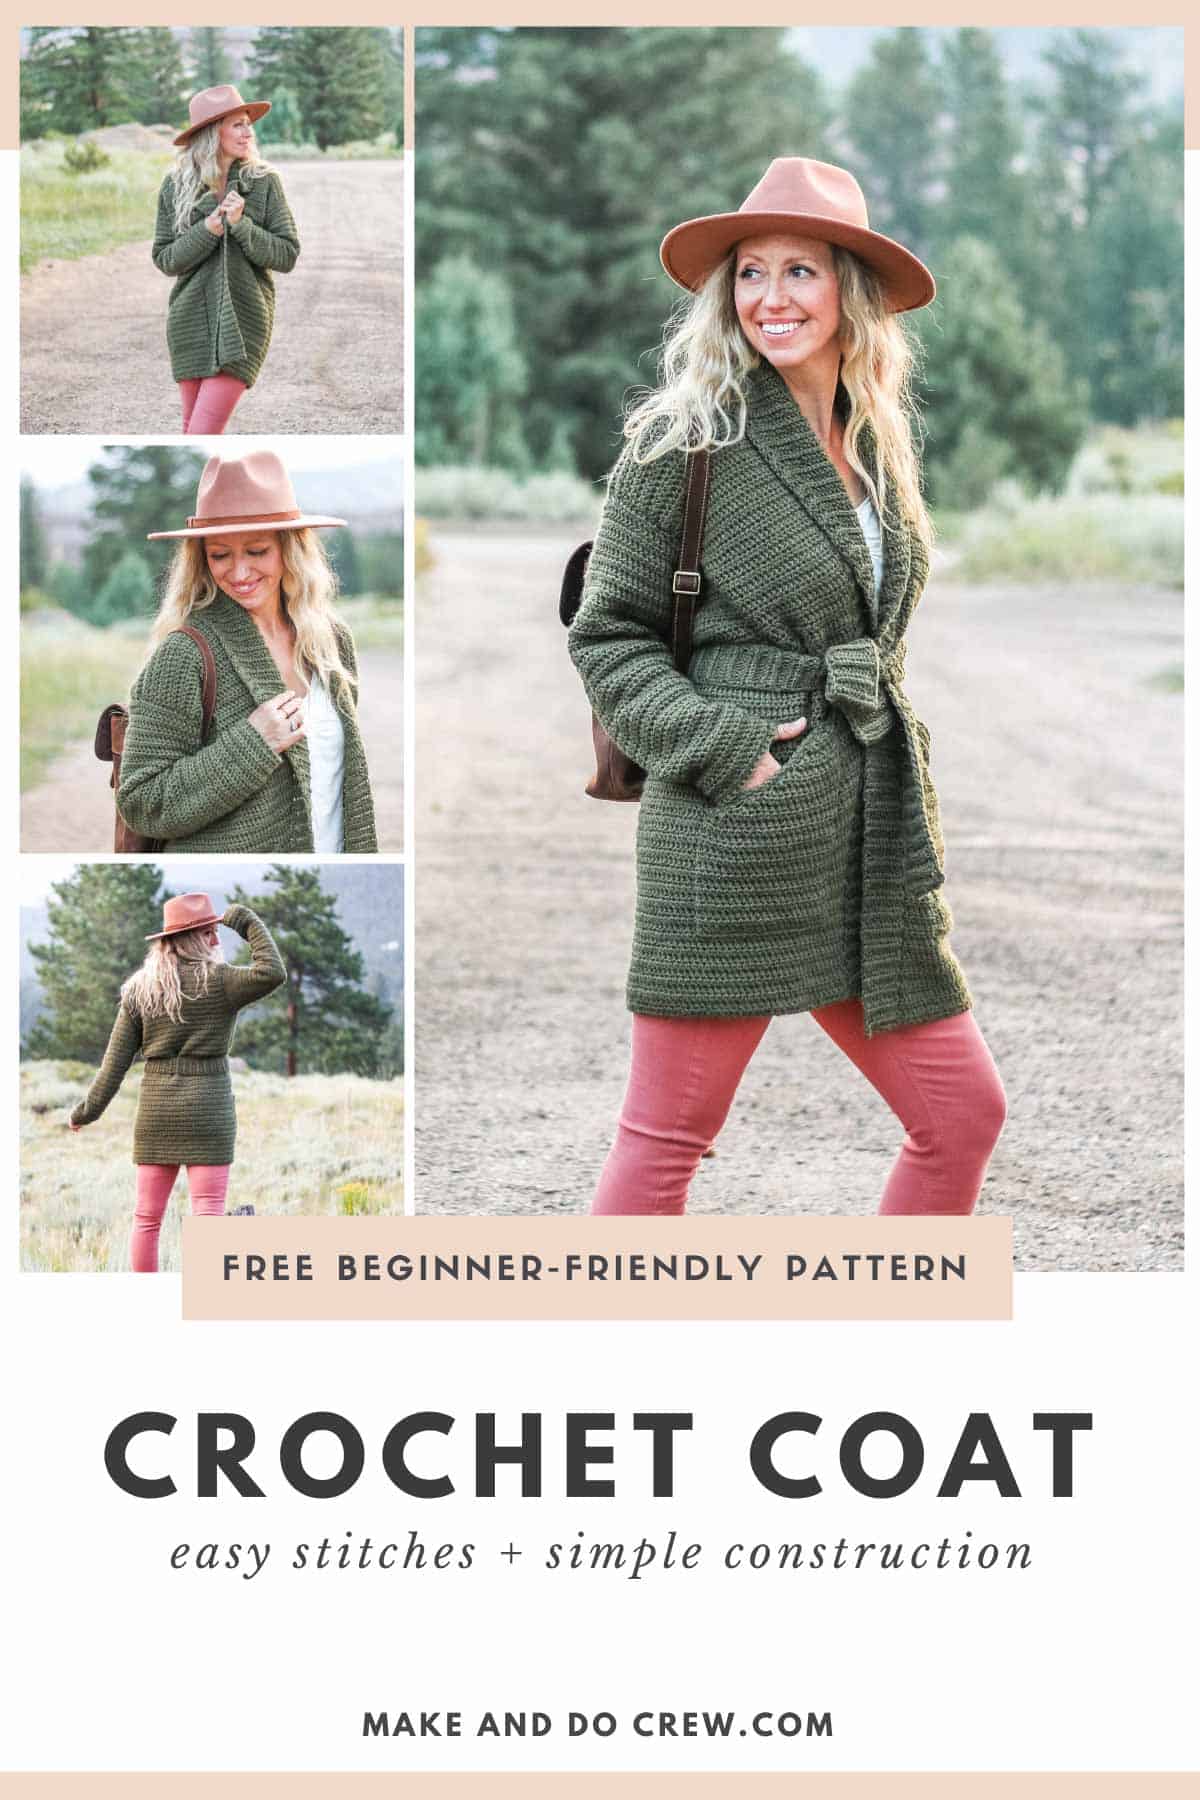
This surprisingly easy crochet jacket pattern uses very simple stitches and construction to create a stylish cold-weather staple. Add an optional belt or leave it open for a comfy, oversized look!
Get the free pattern below or purchase the ad-free, printable PDF here.
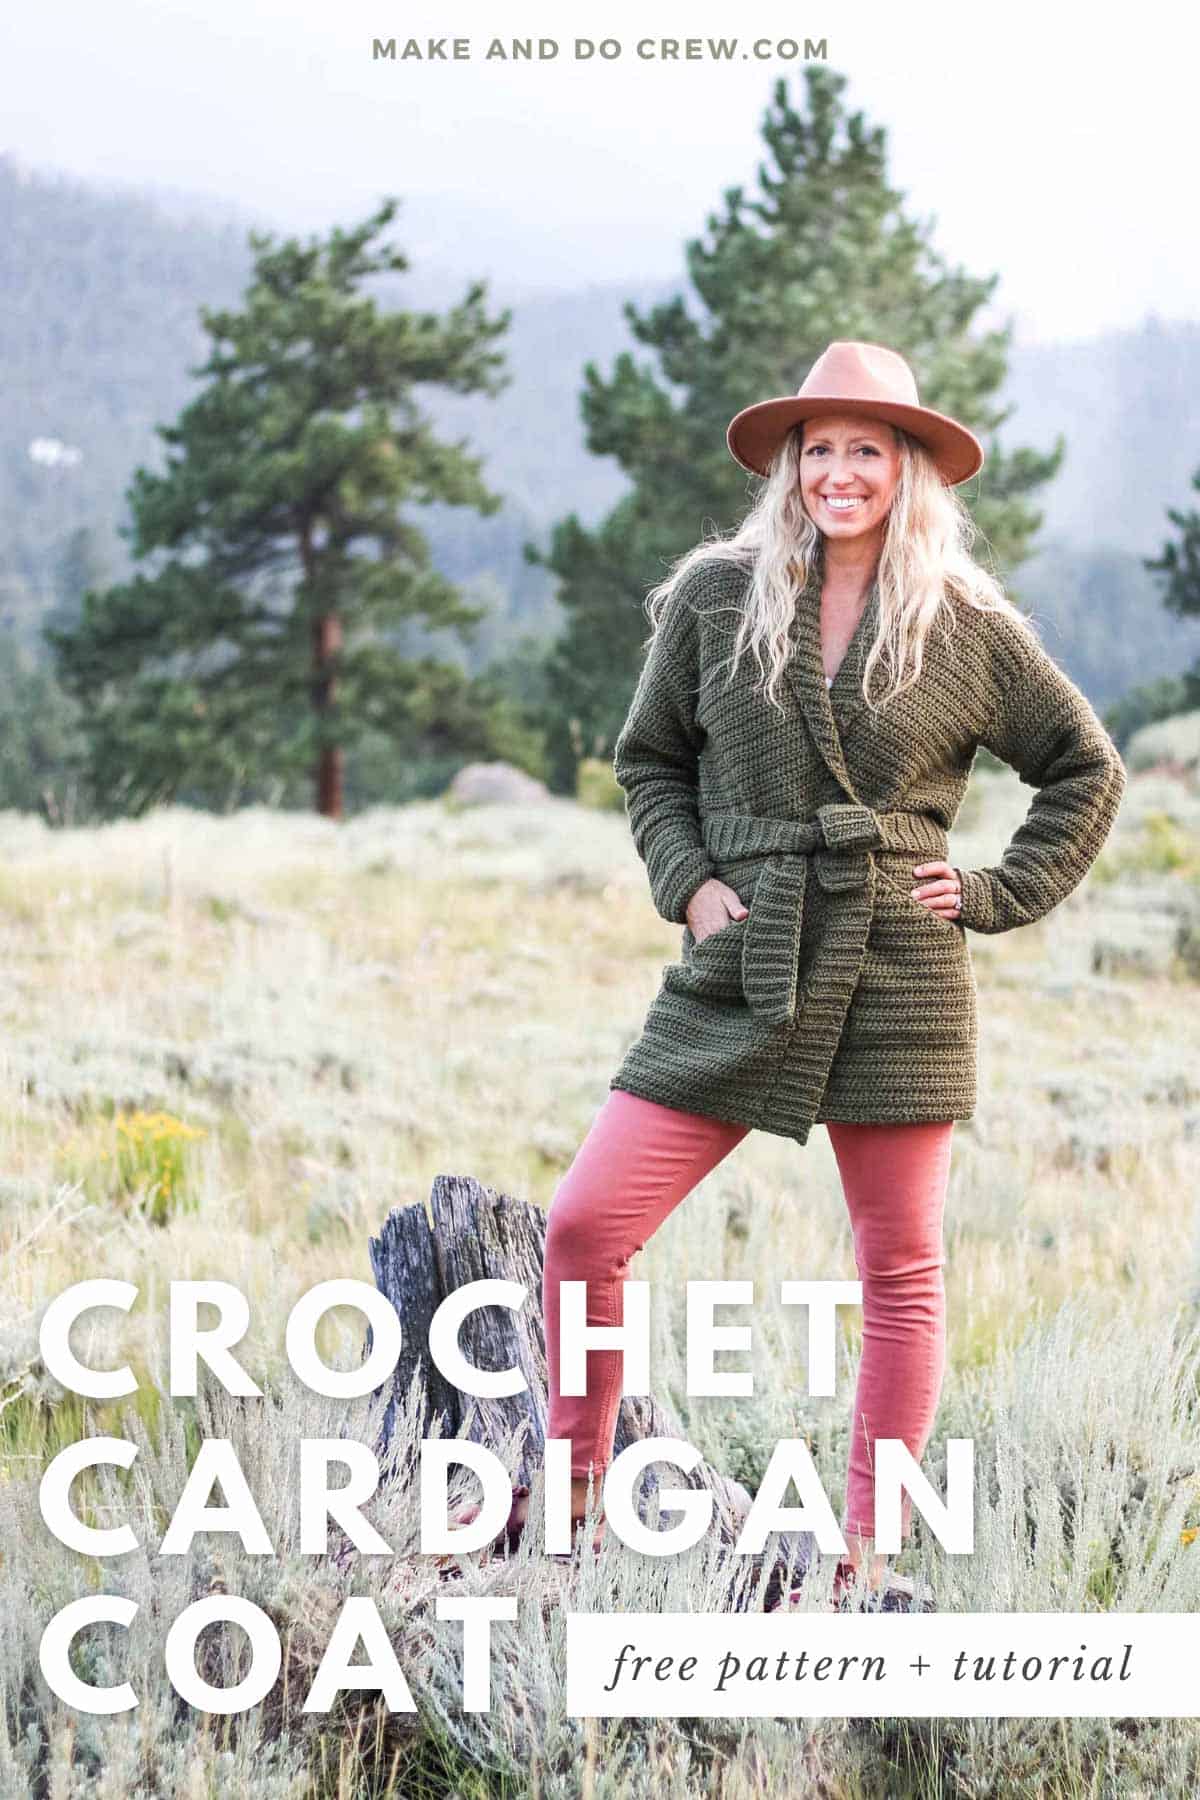
This crochet sweater jacket pattern is part of a collaboration with Lion Brand Yarns. This post contains affiliate links.
Crochet Sweater Jacket Pattern
With the main fronts and back of this coat worked in one piece, you’ll kick of the pattern with a good dose of easy cruise control crochet.
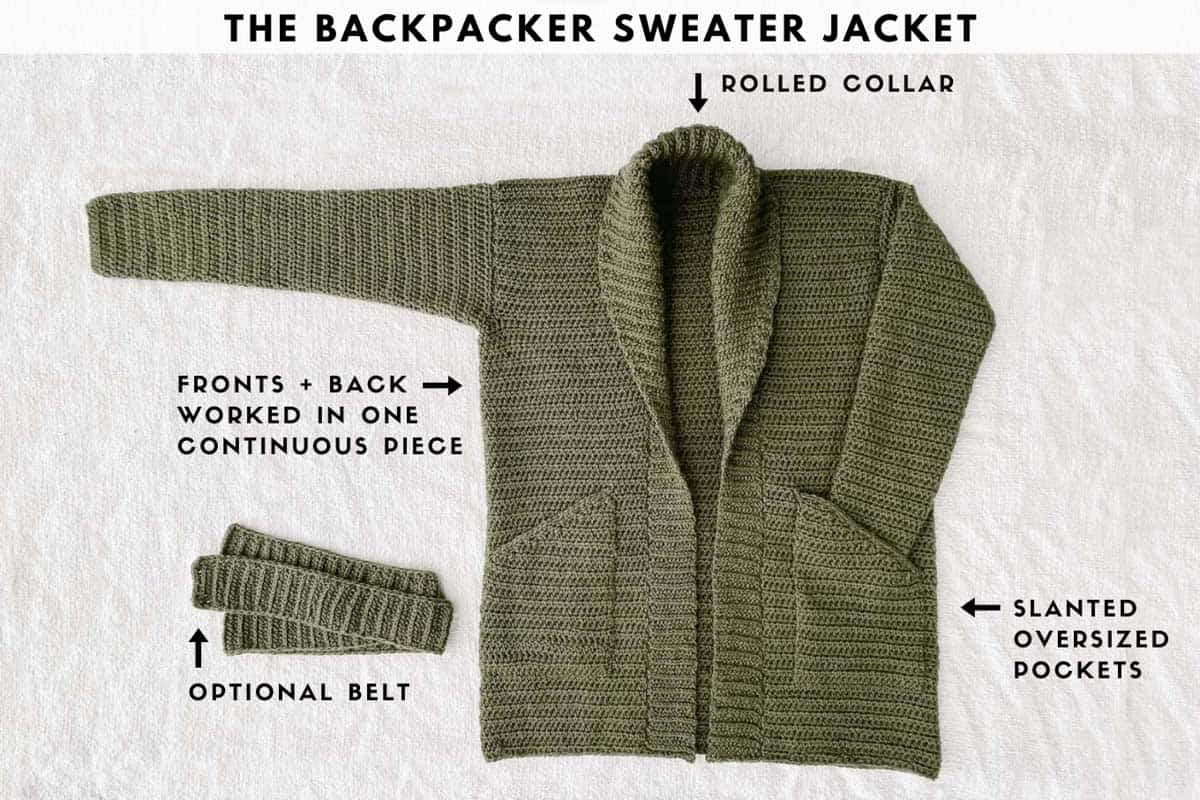
Later, you’ll elevate the entire look of your crochet sweater jacket with a shawl collar and comfy angled pockets.
Read on for all the yarn details and pattern inspiration or scroll down for the complete free pattern and tutorial.
Crochet Coat Inspiration
Nothing quite nails the comfy-casual-yet-intentionally-styled look like a belted cardigan. It was that easy going vibe we were going for when we set out to design this crochet sweater jacket.
If you're familiar with our Up North Beginner Crochet Cardigan, this pattern borrows many of the same concepts: simple stitches, nearly seamless design and a shawl collar.
For the Backpacker jacket though, we added some extra "ooph" to the collar, angled the pockets to up the sophistication factor, and of course, designed an optional belt that can tied or skipped entirely.
The Backpacker Jacket - Video Overview
Watch all the cozy, comfy glory of the Backpacker Crochet Jacket in action in the brief video below. See how the pattern comes together as you prepare to crochet your own!
(If you have an ad-blocker running, you'll need to disable it to view the video.)
Comfy Jacket Yarn
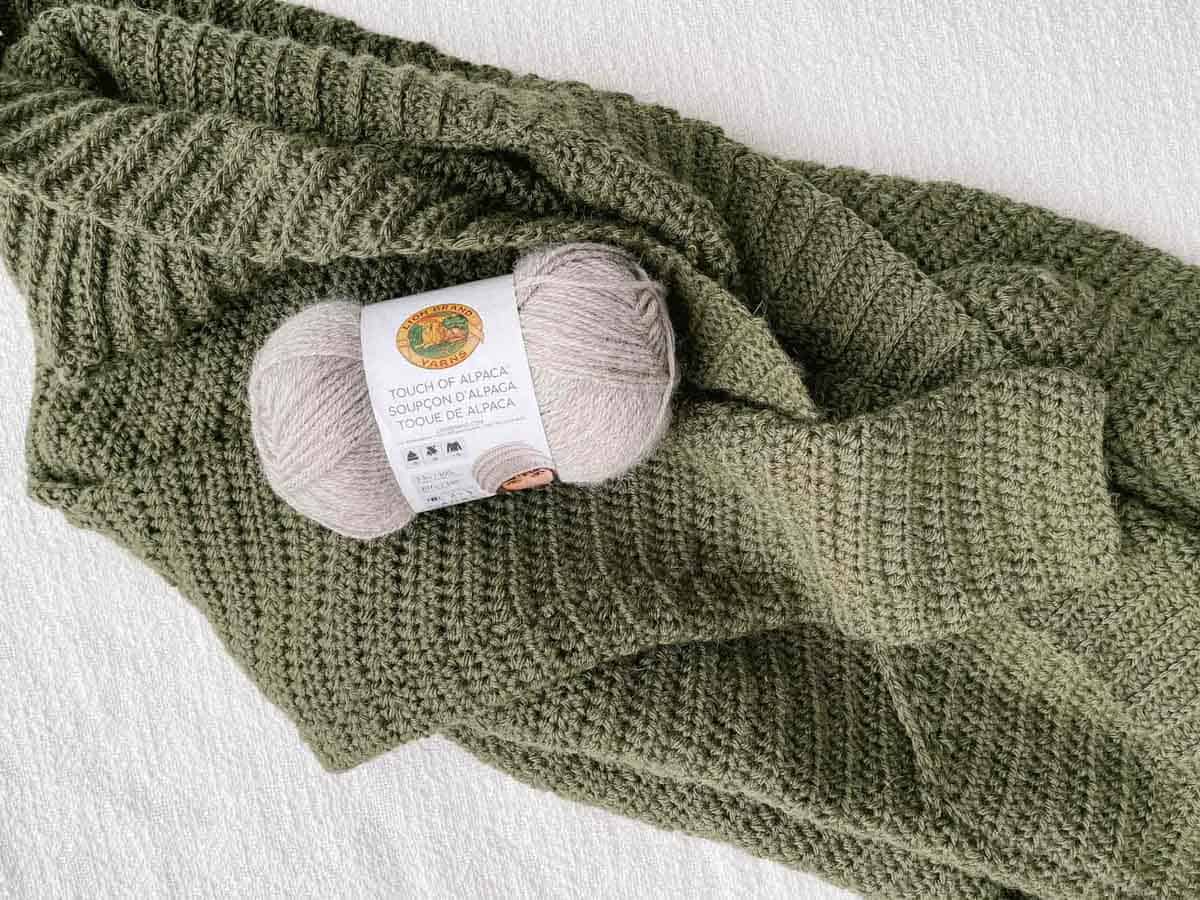
For this crochet coat, we chose Lion Brand's Touch of Alpaca yarn. It's washable, easy to work with and comes in a nice variety of muted colors. (See them all there!)
Touch of Alpaca is also the yarn we used in the At First Blush Triangle Shawl and the Alpine Poncho.
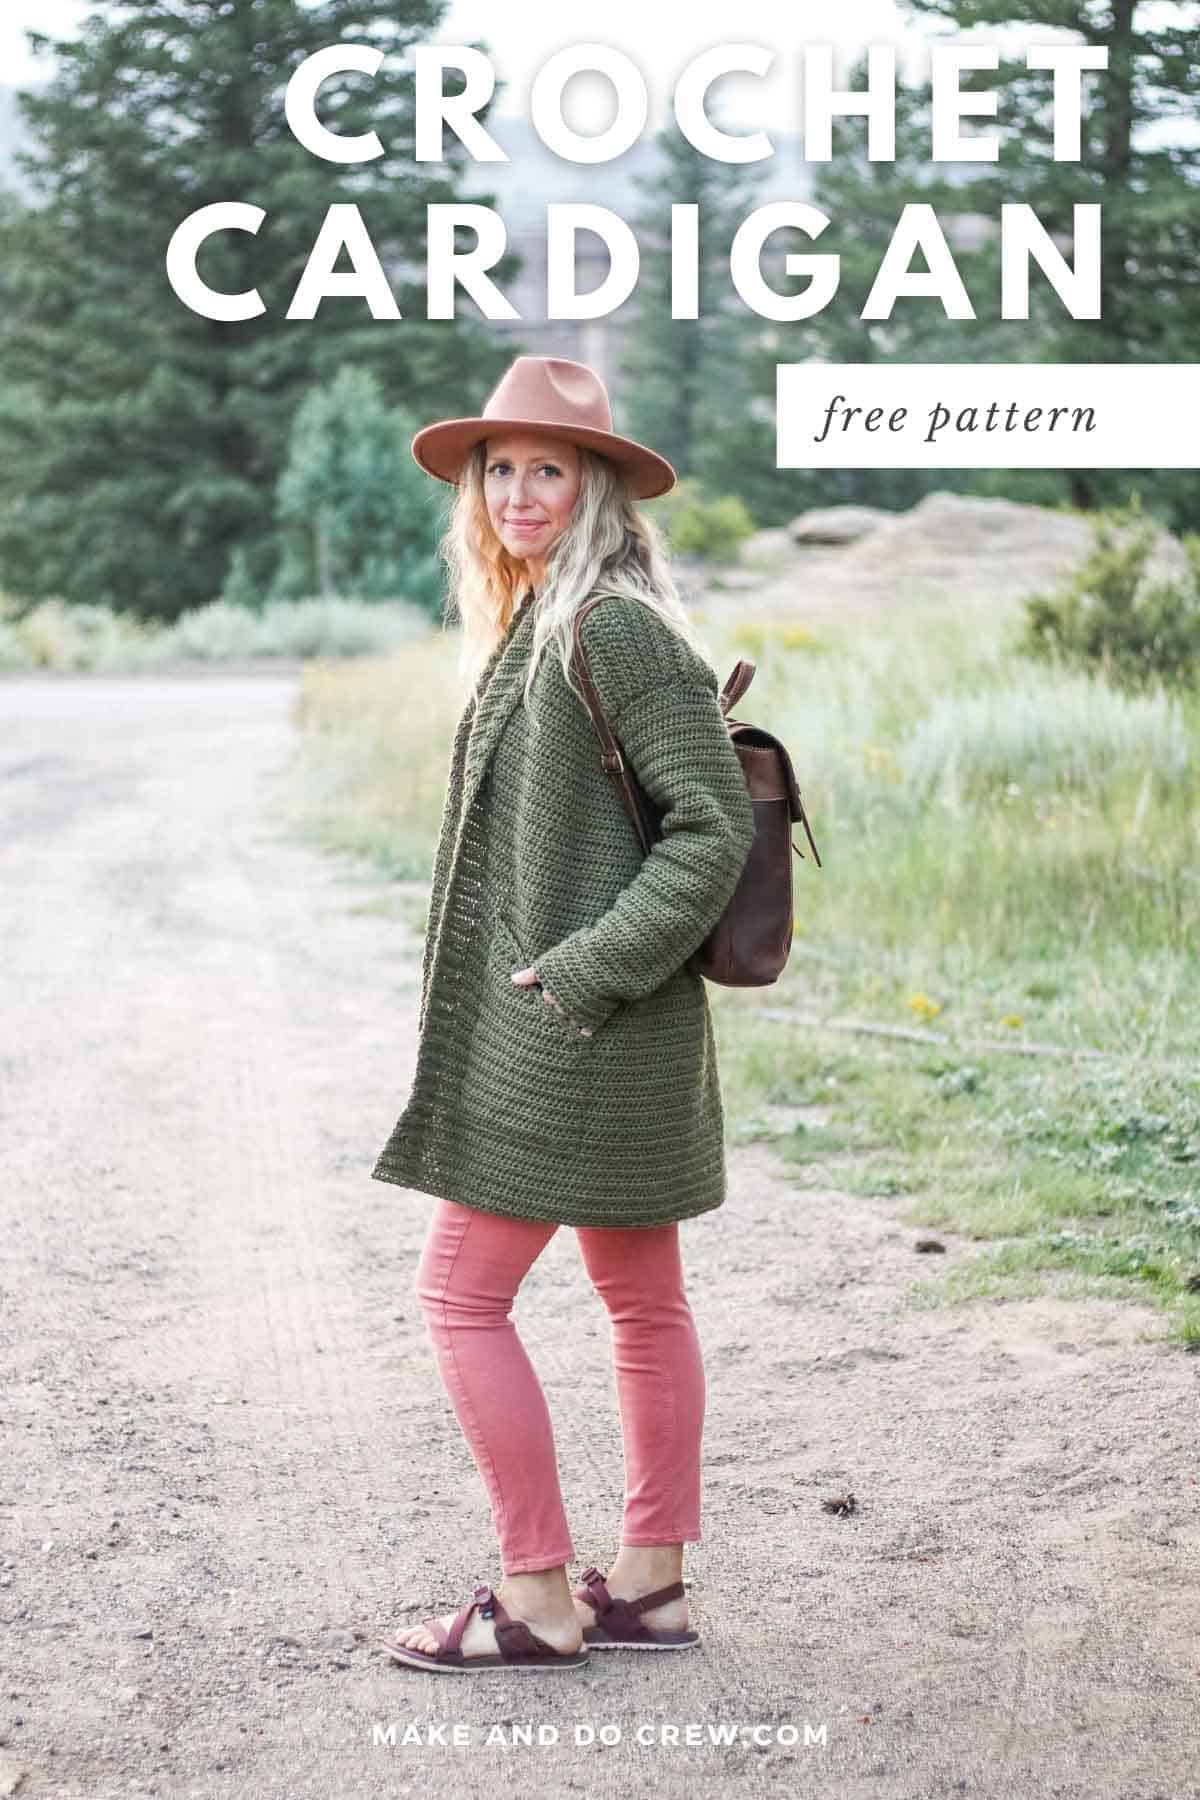
Why you'll love Crocheting Sweater Jackets!
Finding a Yarn Substitute
Lion Brand Touch of Alpaca is a category 4, worsted weight yarn which means it's pretty quick to make progress with, but thin enough to provide a nice drape to your sweater jacket. It's also quite easy to find a substitute yarn if animal fibers don't work for you.
What to look for in a substitute yarn:
• Category 4 (worsted weight)
• Slight "halo" around the yarn will create a look most similar to Touch of Alpaca
• Look for a yarn with a flexible drape so that your sweater has flattering and relaxed fabric
If Touch of Alpaca is not available near you, you can check YarnSub.com for similar suggestions.
Crochet Jacket Pattern Customizations
In addition to the optional belt, you can further customize the look of your Backpacker Sweater Jacket by adding stripes. Because the ribbed collar is crocheted last, it can form a nice solid-colored border to finish off any color work you decide to add.
If you'd prefer a less oversized look for your crochet coat, choose one size smaller than you'd typically wear.
New to making cardigans? Don't miss How to Crochet a Sweater for our best beginner tips
Pin it! Click to pin this pattern for later ⇨
Upgrade to the Premium PDF
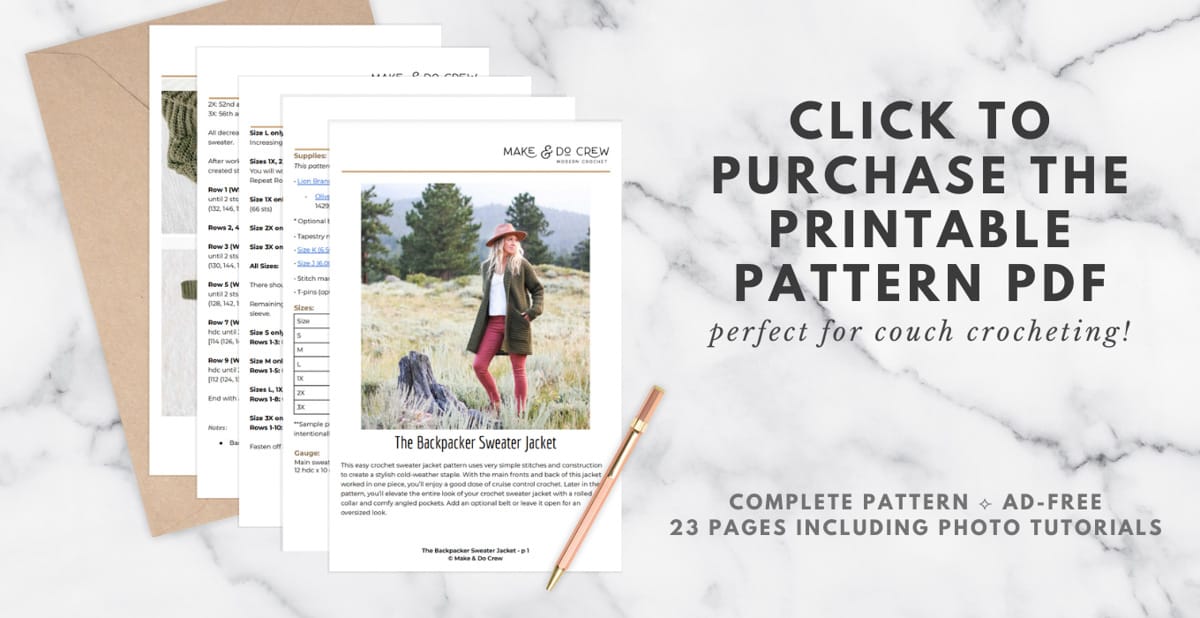
We know many people like to work from a paper copy of a crochet pattern. This is why we love offering our patterns in large-type, ad-free PDFs that are formatted for easy printing.
We are so grateful to those of you who support our small business by upgrading to the premium printable versions of our patterns. They help us continue to keep designing and we hope they give you a comfortable way to crochet!
The Backpacker Sweater Jacket printable PDF includes the complete pattern and all the photo tutorials.
Print it! Purchase the ad-free PDF ⇨
Get an All-In-One Crochet Kit
If you don't have access to incredible yarn stores or if you just like to get fun packages in the mail, the all-in-one crochet kit is a perfect way to crochet your Backpacker Sweater Jacket.
This bundle from Lion Brand includes all the Touch of Alpaca you'll need, plus a free printable PDF of the pattern (delivered digitally).
Deliver it! Click to purchase the an all-in-one crochet kit ⇨
More Free Crochet Sweater Patterns
Crochet sweater patterns don't need to be difficult. In fact, most of ours are made with very simple shapes. Dive into the wonderful world of crochet garments with cardigans, pullovers, ponchos, shrugs and more!
See more free crochet sweater patterns →
Backpacker Free Crochet Jacket Pattern
Purchase the ad-free, printable PDF on Etsy here and on LoveCrafts here.
Save this pattern to your Ravelry here.
Pin this pattern for later here.
Explanation:
This easy crochet sweater jacket pattern uses very simple stitches and construction to create a stylish cold-weather staple. With the main fronts and back of this jacket worked in one piece, you’ll enjoy a good dose of cruise control crochet.
Later in the pattern, you’ll elevate the entire look of your crochet sweater jacket with a shawl collar and comfy angled pockets. Add an optional belt or leave it open for an oversized look.
Supplies
• Lion Brand Touch of Alpaca (Weight: 4/medium - 207 yds, 3.5 oz)
- Olive [674-132] – 10 (11, 12, 13, 14, 15) balls [(approx. 950 (1010, 1110, 1200, 1313, 1429) g)*
* Optional belt requires an additional 82 (85, 91, 96, 101, 108)g of yarn
• Tapestry needle
• Size K (6.50 mm) crochet hook or size needed to obtain gauge
• Size J (6.00 mm) crochet hook for collar ribbing
• Stitch markers or safety pins
• T-pins (optional) and iron or steamer for blocking
Deliver it! Click to purchase the an all-in-one crochet kit ⇨
Measurements:
| Size | Fits Actual Bust** | |
| S | 28-32" | |
| M | 32-36" | |
| L | 36-40" | |
| 1X | 40-44" | |
| 2X | 44-48" | |
| 3X | 48-52" |
**Sample pictured is a size medium on a model with a 38” bust. Sweater is intentionally oversized. For a more fitted look, size down.
Gauge:
Main sweater with larger hook:
12 hdc x 10 rows = 4”
Abbreviations and Glossary (US Terms)
ch – chain
dec – decrease
hdc – half double crochet
hdc2tog – half double crochet two together
hdcflo – half double crochet through the front loop only
hdcflo2tog – half double crochet two together through the front loop only
inc – increase
PM – place marker
RS – right side
sk – skip
sl st – slip stitch
st(s) – stitch(es)
yoslst – yarn over slip stitchWS – wrong side
Overall Pattern Notes:
• To minimize seaming, cardigan back and fronts are worked in one piece. Similarly, sleeves are worked in the round and added to main sweater piece. Collar and pockets are worked separately and added last. An optional belt can be added and requires an additional 82 - 108g of yarn.

Don't spend hours for a "meh" result!
Tired of crocheting garments that don't fit? Learn our C.R.A.F.T. Framework to make sweaters that fit and feel amazing!
• Chain 2 at beginning of row never counts as a half double crochet.
• Pattern is written for smallest size, with larger sizes following in parentheses: S (M, L, 1X, 2X, 3X). It can be helpful to circle all notes for your size before beginning.
• Step-by-step video tutorial for most of the concepts in this crochet coat pattern: The Up North Cardigan

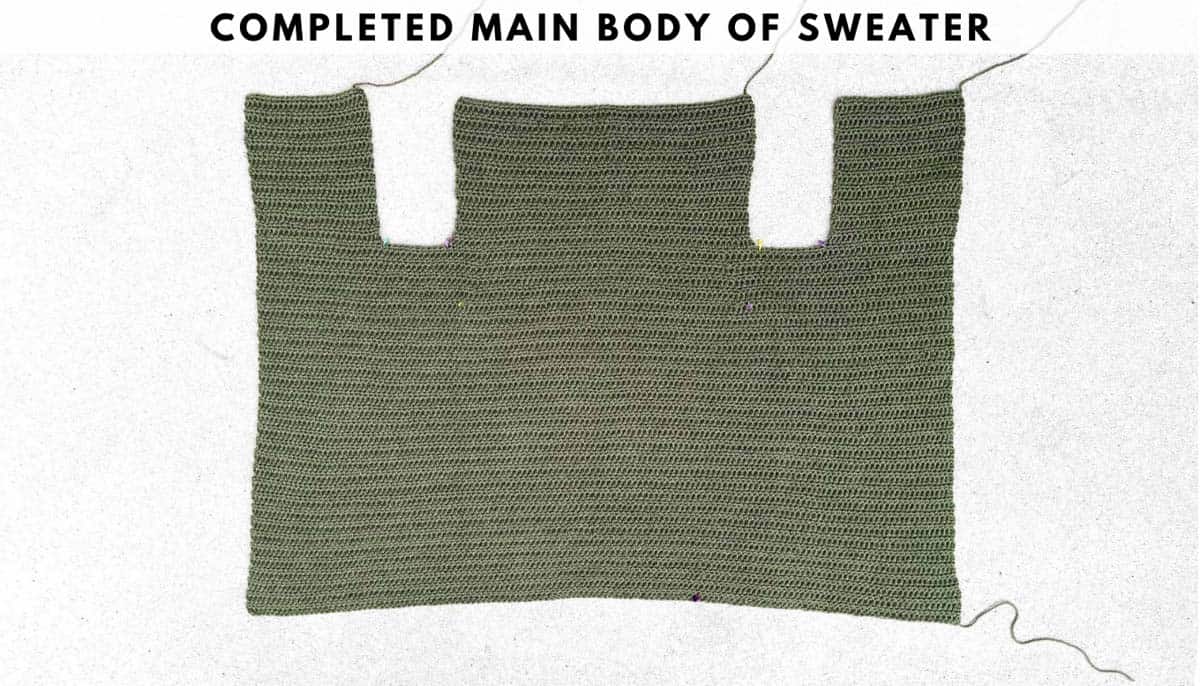
Main Body of Jacket
Notes:
• Recommended Foundation Row is worked in foundation half double crochet stitches because it’s much easier than working into a long chain. If foundation half double crochet intimidates you, use Alternative Foundation Chain followed by Alternative Foundation Row 1.
Recommended Foundation Row 1 (RS): 122 (134, 148, 160, 174, 186) foundation hdc; turn. [122 (134, 148, 160, 174, 186)]
Or
Alternative Foundation Chain (WS): Ch 124 (136, 150, 162, 176, 188).
Alternative Foundation Row 1 (RS): Sk 2 ch, hdc in each ch to end; turn. [122 (134, 148, 160, 174, 186)]
Rows 2-43 (45, 45, 45, 47, 49) : Ch 2, hdc in each hdc; turn. [122 (134, 148, 160, 174, 186)]
End with a RS row. Do not fasten off.
Decreasing
PM in between the stitches listed below counting from each side of sweater front edges. (2 markers total for each size)
S: 35th and 36th sts
M: 40th and 41st stsL: 46th and 47th sts
1X: 49th and 50th sts
2X: 52nd and 53rd sts
3X: 56th and 57th sts
All decreases will take place between the two markers in the center section of the sweater.
After working the decrease stitch, remove marker and replace it in top of newly created stitch.
Row 1 (WS dec): Ch 2, hdc in next 35 (40, 46, 49, 52, 56) hdc, hdc2tog, hdc in each hdc until 2 sts remain before marker, hdc2tog, hdc in each hdc to end of row; turn. [120 (132, 146, 158, 172, 184)]
Rows 2, 4, 6, 8: Ch 2, hdc in each hdc; turn. Move markers up as row is worked.
Row 3 (WS dec): Ch 2, hdc in next 35 (40, 46, 49, 52, 56) hdc, hdc2tog, hdc in each hdc until 2 sts remain before marker, hdc2tog, hdc in each hdc to end of row; turn. [118 (130, 144, 156, 170, 182)]
Row 5 (WS dec): Ch 2, hdc in next 35 (40, 46, 49, 52, 56) hdc, hdc2tog, hdc in each hdc until 2 sts remain before marker, hdc2tog, hdc in each hdc to end of row; turn. [116 (128, 142, 154, 168, 180)]
Row 7 (WS dec): Ch 2, hdc in next 35 (40, 46, 49, 52, 56) hdc, hdc2tog, hdc in each hdc until 2 sts remain before marker, hdc2tog, hdc in each hdc to end of row; turn. [114 (126, 140, 152, 166, 178)]
Row 9 (WS dec): Ch 2, hdc in next 35 (40, 46, 49, 52, 56) hdc, hdc2tog, hdc in each hdc until 2 sts remain before marker, hdc2tog, hdc in each hdc to end of row; turn. [112 (124, 138, 150, 164, 176)]
End with a WS row. Do not fasten off. Remove markers.
Dividing for Back and Fronts
Notes:
• Back and both fronts will now be worked in separate columns. (See photo above.)
• When working between markers, last stitch will be completed in stitch before marker, then turn work.
PM in between the stitches listed below counting from each side of sweater front edges (2 new markers from each edge, 4 markers total). These 4 markers mark the edges of the two armholes.
| First Set | Second Set |
| S: 22nd and 23rd sts | S: 30th and 31st sts |
| M: 24th and 25th sts | M: 35th and 36th sts |
| L: 24th and 25th sts | L: 41st and 42nd sts |
| 1X: 27th and 28th sts | 1X: 44th and 45th sts |
| 2X: 30th and 31st sts | 2X: 47th and 48th sts |
| 3X: 32nd and 33rd sts | 3X: 51st and 52nd sts |
First Front:
Continuing with yarn attached:
Row 1 (RS): Ch 2, hdc in each hdc to first armhole marker; turn. [22 (24, 24, 27, 30, 32)]
Row 2 (WS): Ch 2, hdc in each hdc to end; turn. [22 (24, 24, 27, 30, 32)]
Repeat Rows 1 and 2 until 22 (22, 24, 26, 26, 28) rows total are completed in First Front. End with a WS row. Fasten off leaving a 24” tail.
Back:
With RS facing, attach yarn in 31st (36th, 42nd, 45th, 48th, 52nd) stitch, right on the other side of armhole from First Front.
Row 1 (RS): Ch 2, hdc in each hdc to armhole marker; turn. [52 (54, 56, 62, 70, 74)]
Row 2 (WS): Ch 2, hdc in each hdc to armhole marker; turn. [52 (54, 56, 62, 70, 74)]
Repeat Rows 1 and 2 until 22 (22, 24, 26, 26, 28) rows total are completed in Back. End with a WS row. Fasten off.
Second Front:
With RS facing, attach yarn in st after last st marker.
Row 1 (RS): Ch 2, hdc in each hdc to end; turn. [22 (24, 24, 27, 30, 32)]
Row 2 (WS): Ch 2, hdc in each hdc to armhole marker; turn. [22 (24, 24, 27, 30, 32)]
Repeat Rows 1 and 2 until {22 (22, 24, 26, 26, 28) rows total are completed in Second Front. End with a WS row. Fasten off leaving a 24” tail.
Sleeves
Main Sleeves:
Notes:
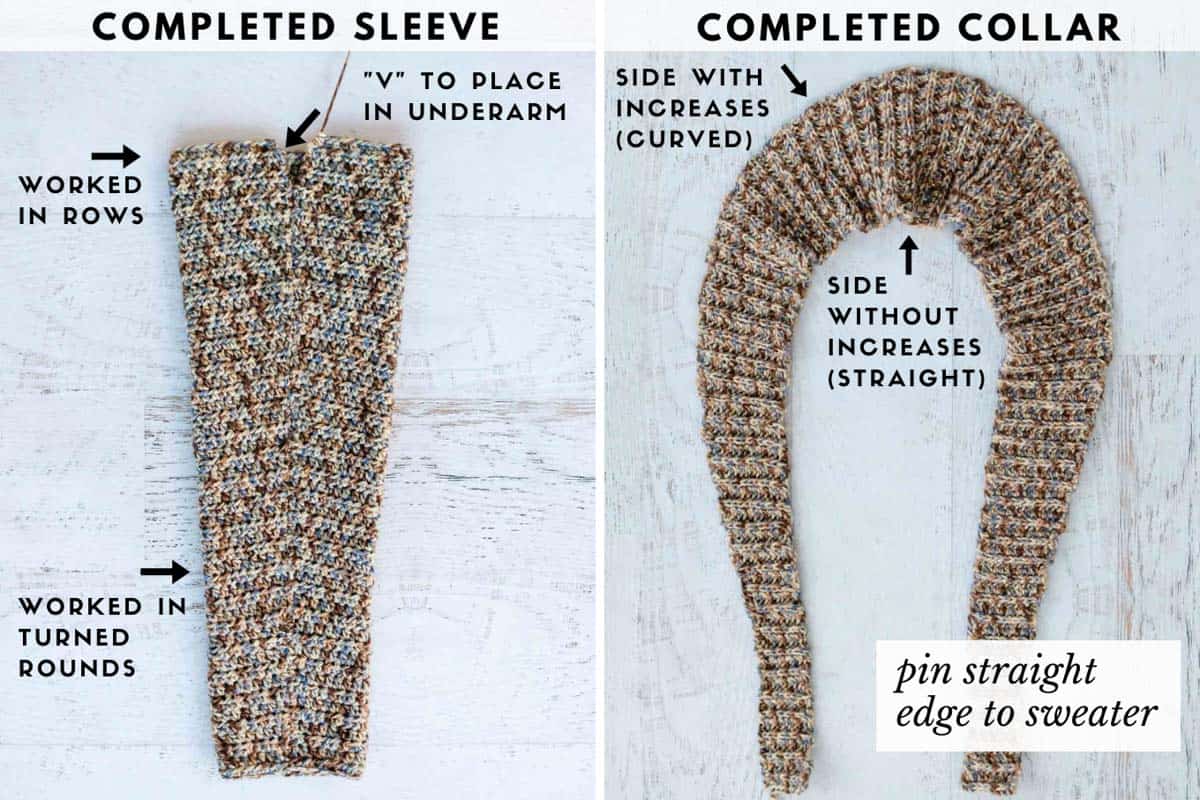
• Sleeves are worked in turned rounds. After slip stitch to join at end of each round, TURN work so next round can be worked in opposite direction.
• See photo above for completed sleeve.
Make 2.
Foundation Round: Ch 30 (30, 34, 34, 36, 38), sl st to join taking care not to twist ch.
Round 1 (RS): Ch 2, hdc in each ch, sl st to join; turn. [30 (30, 34, 34, 36, 38)]
Rounds 2-4: Ch 2, hdc in each hdc, sl st to join; turn. [30 (30, 34, 34, 36, 38)]
Round 5 (RS inc): Ch 2, 2 hdc in first hdc, hdc in each hdc until 1 st remains, 2 hdc in last hdc, sl st to join; turn. [32 (32, 36, 36, 38, 40)]
Repeat Rounds 2-5 an additional 11 (11, 11, 2, 5, 4) times. Sleeve should have 54, (54, 58, 40, 48, 48) sts.
Sizes S and M only: Increasing completed, go to All Sizes.
Size L only: Repeat Round 5 once more. (60 sts)
Increasing completed, go to All Sizes.
Wanna save this pattern?
Sizes 1X, 2X, and 3X only:
You will work 2 even rounds followed by 1 increase round.
Repeat Rounds 3-5 an additional - (-, -, 12, 9, 9) times. [-, (-, -, 64, 66, 66)]
Size 1X only: Repeat Round 5 one more time. Increasing completed, go to All Sizes. (66 sts)
Size 2X only: Increases completed, go to All Sizes.
Size 3X only: Repeat Rounds 4-5 twice. Increasing completed, go to All Sizes. (70 sts)
All Sizes:
There should be 49 (49, 50, 50, 52, 52) rounds completed before starting next section.
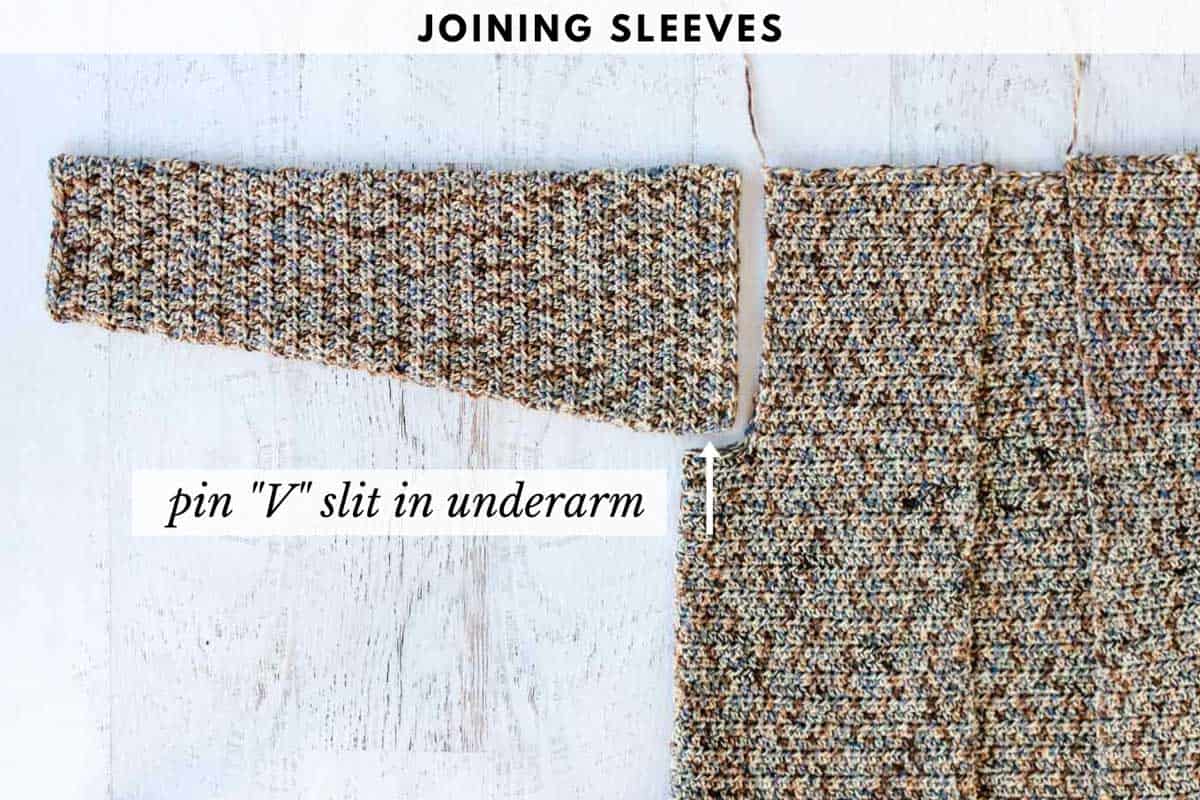
Remaining rows are worked without a sl st to join so as to create a slight “V” in top of sleeve.
Size S only:
Rows 1-3: Ch 2, hdc in each hdc; turn. [54 (-, -, -, -, -)]
Size M only:
Rows 1-5: Ch 2, hdc in each hdc; turn. [- (54, -, -, -, -)]
Sizes L, 1X, and 2X only:
Rows 1-8: Ch 2, hdc in each hdc; turn. [- (-, 60, 66, 66, -)]
Size 3X only:
Rows 1-10: Ch 2, hdc in each hdc; turn. (70 sts)
Fasten off leaving a 30” tail.
Collar
Notes:
• Collar is worked separately and joined during finishing.
• Increases always take place on same side of collar. It can be helpful to place a marker on this side of work to easily differentiate it as you crochet.
• See photo above for completed collar.
Working Even:
With smaller hook:
Foundation Row: Ch 13.
Row 1 (RS): Hdc in third ch from hook and in each ch to end; turn. (11 sts)
Row 2: Ch 2, hdcflo in each hdc; turn. (11 sts)
Repeat Row 2 34 (36, 38, 40, 42, 44) more times for a total of 36 (38, 40, 42, 44, 46) even rows.
Increasing:
Row 1 (RS inc): Ch 2, hdcflo in first hdc, 2 hdcflo in next hdc, hdc in each st to end of row; turn. (12 sts)
Row 2 (WS): Ch 2, hdcflo in each hdc; turn. (12 sts)
Repeat Rows 1 and 2 twice more. (14 sts)
Row 7 (RS inc): Ch 2, hdcflo in first st, (2 hdcflo in next st) twice, hdcflo in each st to end of row; turn. (16 sts)
Row 8 (WS): Repeat Row 2.
Repeat Rows 7 and 8 six more times. (28 sts)
Repeat Rows 1 and 2 seven more times. (35 sts)
Working Even:
Repeat Row 2 an additional 18 (20, 20, 22, 26, 30) times.
Decreasing:
Row 1 (RS): Ch 2, hdcflo in each hdc; turn. (34)
Row 2 (WS dec): Ch 2, hdcflo2tog, hdcflo in each hdc; turn. (34)
Repeat Rows 1 and 2 six more times. (28)
Row 15 (RS): Ch2, hdcflo in each st to end of row; turn.
Row 16 (WS dec): Ch2, hdcflo in first st, hdc2tog twice, hdcflo in each st to end or row; turn. (26)
Repeat Rows 15 and 16 six more times. (14)
Repeat decrease Rows 1 and 2 three times (11)
Working Even:
Row 1: Ch 2, hdcflo in each st to end of row; turn. (11)
Repeat Row 1 35 (37, 39, 41, 43, 45) times.
Fasten off leaving a 84” tail.
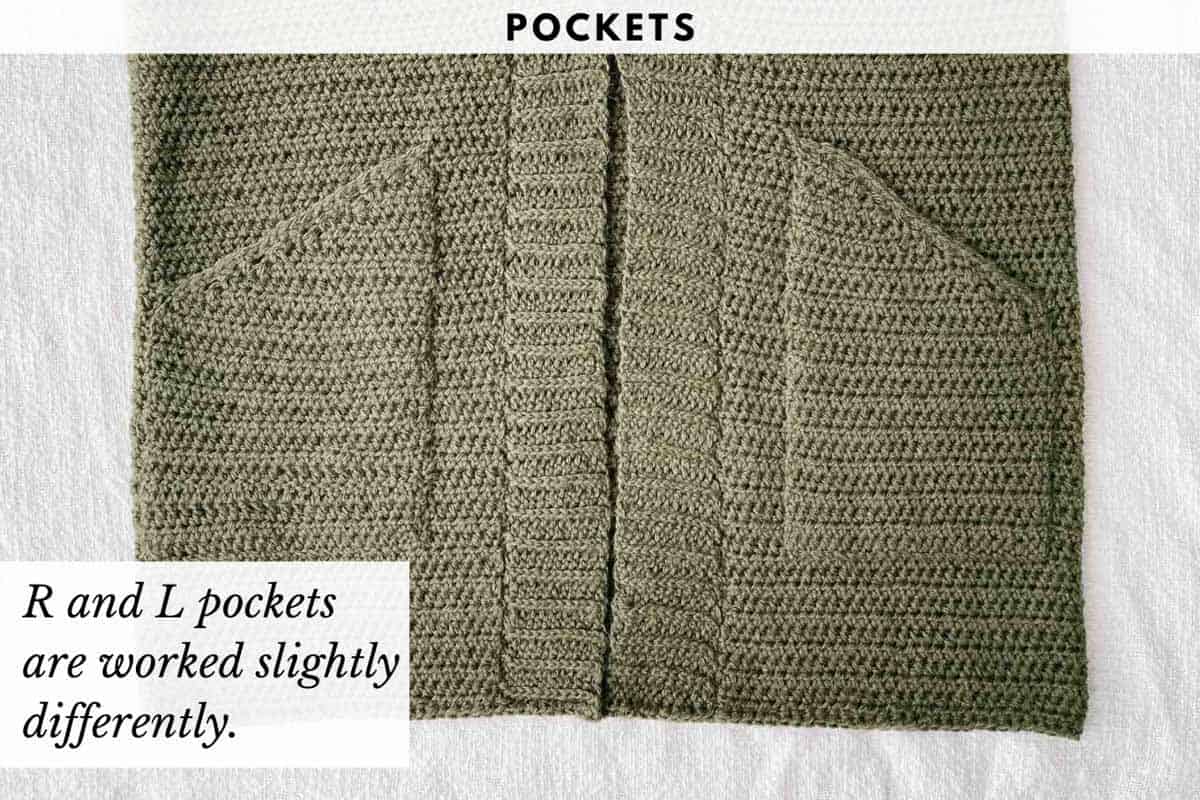
Pockets
Make 2.
RIGHT POCKET
With larger hook:
Foundation: Ch 24.
Row 1 (RS): Hdc in 3rd st from the hook and in each ch to end of row; turn. (22 sts)
Row 2 (WS): Ch 2, hdc in each st to end of row; turn. (22)
Repeat Row 2 twelve more times for a total of 14 rows.
Decreasing:
Note: Take care not to work into slst of previous row.
Row 15 (RS): Ch 2, hdc in each st until 3 sts remain, hdc2tog, sl st in last st; turn. (20 sts)
Row 16 (WS): Ch 2, hdc in first st, hdc2tog, hdc in remaining st. (19 sts)
Repeat Rows 15-16 four times. (7 sts)
Repeat Row 15 once more. (5 sts)
Row 26 (WS): Ch 2, skip first st, hdc2tog twice. (2 sts)
Border of Pocket:
Working down sloping angle of pocket:
Border Row (RS): Ch 2, sc in first st, work 21 sts evenly down angle edge of pocket.
Fasten off leaving a 36” tail to join pocket to sweater.
LEFT POCKET
Follow Right Pocket instructions through Row 14.
Row 15 (RS): Ch 2, skip first st, hdc2tog, hdc in remaining sts. (20 sts)
Row 16 (WS): Ch 2, hdc in each st until 3 sts remain. Hdc2tog, hdc in last st. (19 sts)
Repeat Rows 15 and 16 four times. (7 sts)
Repeat Row 15 once more. (5 sts)
Row 26 (WS): Hdc2tog twice and leave last st unworked (or you could sl st into the last st). (2 sts)
Border of Pocket:
With RS facing, attach yarn in first dec row of pocket at lower right edge.
Border Row(RS): Ch 1, sc in first st, sc 21 sts evenly up the angle edge of pocket. Fasten off leaving a 36” tail to join pocket to sweater.
Finish
Notes:
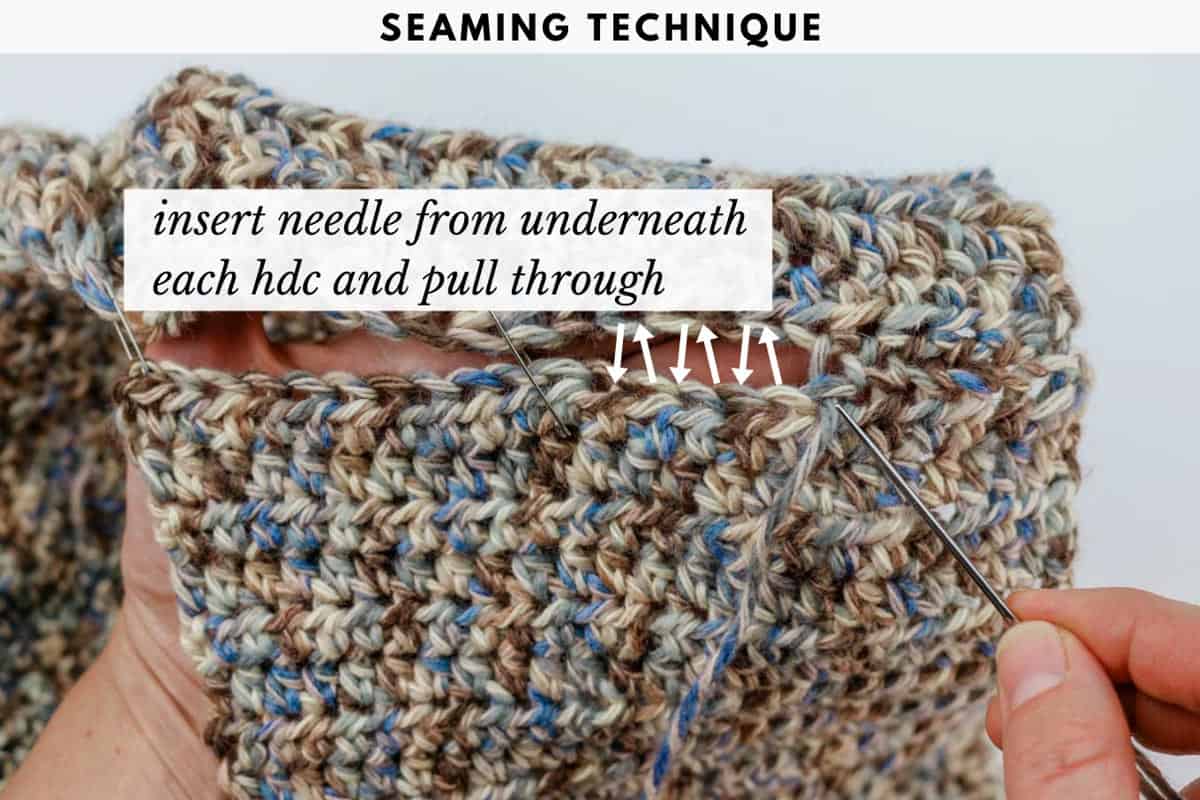
• For all seaming, use tapestry needle and existing yarn tails when possible. See photo above for recommended seaming technique for shoulder, sleeves and collar.
• Position pockets using st markers and sew to sweater matching the spacing of rows of the main sweater.
Blocking:
IMPORTANT: Do not actually touch iron to yarn as any acrylic component in yarn will melt.
If using a yarn with a natural fiber component like Lion Brand Touch of Alpaca, it can be helpful to block sweater pieces before joining. Lay sweater jacket pieces out flat on a towel or blocking board. From 4-8” away, aim steam from hot iron or steamer at sweater pieces.
DO NOT touch yarn directly with iron as it will melt any synthetic component of yarn.
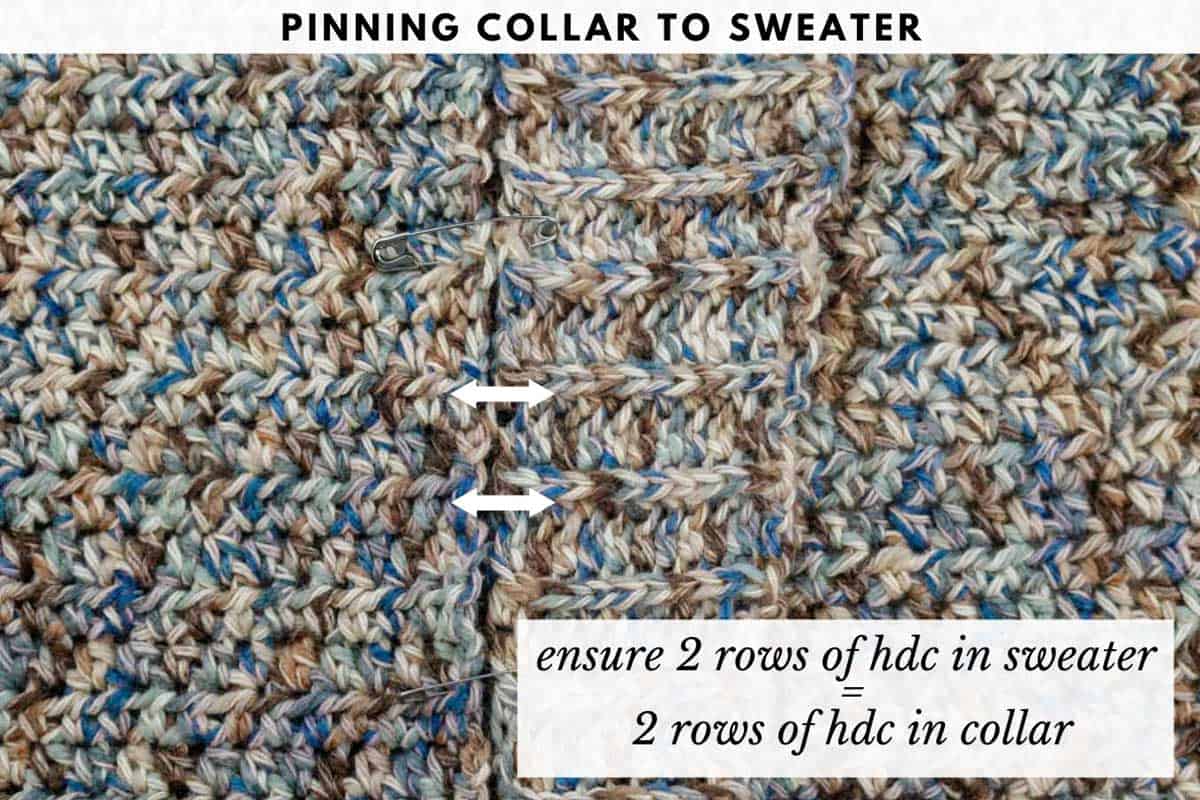
Take specific care to block collar rows to mimic the spacing of rows in main sweater piece. This will ensure collar lies flat on finished sweater.
Seaming Shoulders:
With WS of main sweater piece facing out, pin both shoulder seams. Begin seaming from outer shoulder edge and work toward neck.
Joining Sleeves in Place:
With WS of main sweater piece facing out and WS of sleeves facing out, pin both sleeves in place. “V” shape at top of sleeve should be pinned to underarm inset. Seam each sleeve in place.
Joining Collar:
With WS of main sweater piece facing out and WS of collar facing out, pin collar in place around sweater fronts and neck. Take care to line up rows of hdc in main sweater piece with rows of hdc in collar. (See photo above.)
Begin seaming from bottom of one side of collar and work toward neck, around back of neck and back down second front piece.
Attaching Pockets:
Pin each pocket to main sweater taking care to line up RS/WS rows of pocket with RS/WS rows of sweater.
Border on Bottom of Sweater:
With WS of sweater facing, attach yarn in first st of ribbing.
Border Row(WS): Ch 1, yoslst in each st around bottom of sweater. Fasten off.
Jacket Belt
Notes:
• Belt is optional and requires approximately 82 (85, 91, 96, 101, 108)g of yarn as written. Final measurements will be approximately 2.75 x 52 (54, 58, 62, 66, 70)” before any stretching.
With larger hook:
Foundation Row(RS): Ch 13.
Row 2 (WS): Hdc in 3rd ch from hook and in each ch to end orf row; turn. (11)
Row 3-119 (124, 133, 142, 151, 161): Ch 2, hdcflo in each st to end of row; turn.
With WS facing and using attached yarn:
Border Row: Ch 1, yoslst in each st and each raw row around around outside edge of belt. Fasten off.
Toss on your sweater jacket, grab your pack and head out to take on the world!
Share your work! Mention @MakeAndDoCrew and tag #MakeAndDoCrew + #BackpackerSweaterJacket to show off your stitches ⇨
That was so fun! Now what?
Invitation to our Facebook group
Come discuss crochet jacket patterns and lots of other crochet projects and techniques in our Make & Do Crew Facebook group. Here thousands of helpful crocheters answer each others questions and share their stitches. Come join us here.
Find Your Next Sweater Project
- Seamless Crochet Poncho - a great first garment for beginners
- Basic V-Neck Pattern - classic styling
- High Low Jumper Pattern - finish in one weekend
- Rectangle Crochet Poncho - made from two simple pieces
- Oversized Cardi - with fur collar
- Sherpa Fleece Sweater Jacket - extremely cozy cardi
- Raglan Baby Sweater - cute for Christmas
- Pullover with Removable Cowl - unique and easy design
More Free Patterns + Tutorials
Can't get enough free crochet patterns!? Me either. You'll definitely want to breeze through these collections to find your next project.
- 55+ Free Crochet Sweater and Cardigan Patterns - our most popular garments
- 40+ Free Crochet Blanket Patterns - baby blankets, throws + c2c graphgans
- 36+ Granny Square Patterns + tips for the perfect square
- 30+ Crochet Animal Patterns - adorable amigurumi stuffed animals
- Crochet Gift Ideas - easy patterns to make for others
- Fast Crochet Projects - start to finish in less than a day
Learn a New Skill
And when you're ready to master a new skill, check out our detailed guides that include everything you need to know to level up your crochet game.
- How to Corner to Corner (C2C) Crochet for Beginners - with video tutorials to get you started
- How to Crochet a Beginner Hat - make an entire beanie in 1.5 hours!
- How to Crochet Amigurumi for Beginners - the ultimate guide to making your own toys and plushies
- How to Tunisian Crochet - learn with this video and a standard hook
Ready to Find Your Next Project?
Whether you're into crochet sweaters, C2C crochet blankets, Tunisian or crocheting your own fedora hat, we've got you covered. You can find all our free crochet patterns here.
See more free crochet sweater patterns →
How to Crochet a Jacket
Materials
Yarns
- Lion Brand Touch of Alpaca Weight: 4/medium - 207 yds, 3.5 oz
- COLOR: Olive [674-132] – 10, 11, 12, 13, 14, 15 balls [(approx. 950 (1010, 1110, 1200, 1313, 1429) g)*
- Optional belt requires an additional 82, 85, 91, 96, 101, 108g of yarn
Additional Supplies
- Tapestry needle
- Size K 6.50 mm crochet hook or size needed to obtain gauge
- Size J 6.00 mm crochet hook for collar ribbing
- Stitch markers or safety pins
- T-pins optional and iron or steamer for blocking
Abbreviations + Glossary (US Terms)
- ch – chain
- dec – decrease
- hdc – half double crochet
- hdc2tog – half double crochet two together
- hdcflo – half double crochet through the front loop only
- hdcflo2tog – half double crochet two together through the front loop only
- inc – increase
- PM – place marker
- RS – right side
- sk – skip
- sl st – slip stitch
- st(s) – stitch(es)
- yoslst – yarn over slip stitchWS – wrong side
Abbreviations and Glossary (US Terms):
Want some company while you crochet?
Get support (and camaraderie!) in the Make & Do Crochet Crew Facebook Group. Search “Make and Do Crochet Crew” on Facebook.com.
Permissions + Copyright
Please do not publish or share this pattern as your own. You may make items to sell with this pattern. In exchange, please link back to this page. Do NOT use my photos as your own sales photos.
Overall Pattern Notes
Instructions
Basic Crochet Sweater Jacket making process
- 1. Beginning at the bottom of jacket, crochet fronts and back in one piece.
- 2. Separate for armholes
- 3. Join shoulders.
- 4. Work sleeves directly into armhole openings.
- 5. Crochet collar and pockets.
- 6. Join collar to sweater fronts.
- 7. Join pockets to jacket.
- 8. Lightly steam block crochet jacket.
- 9. Add border on the bottom of the jacket.
- 10. (Optional) Crochet simple belt.
- 11. Hit the trail with your new Backpacker Crochet Jacket!




Leave a Reply