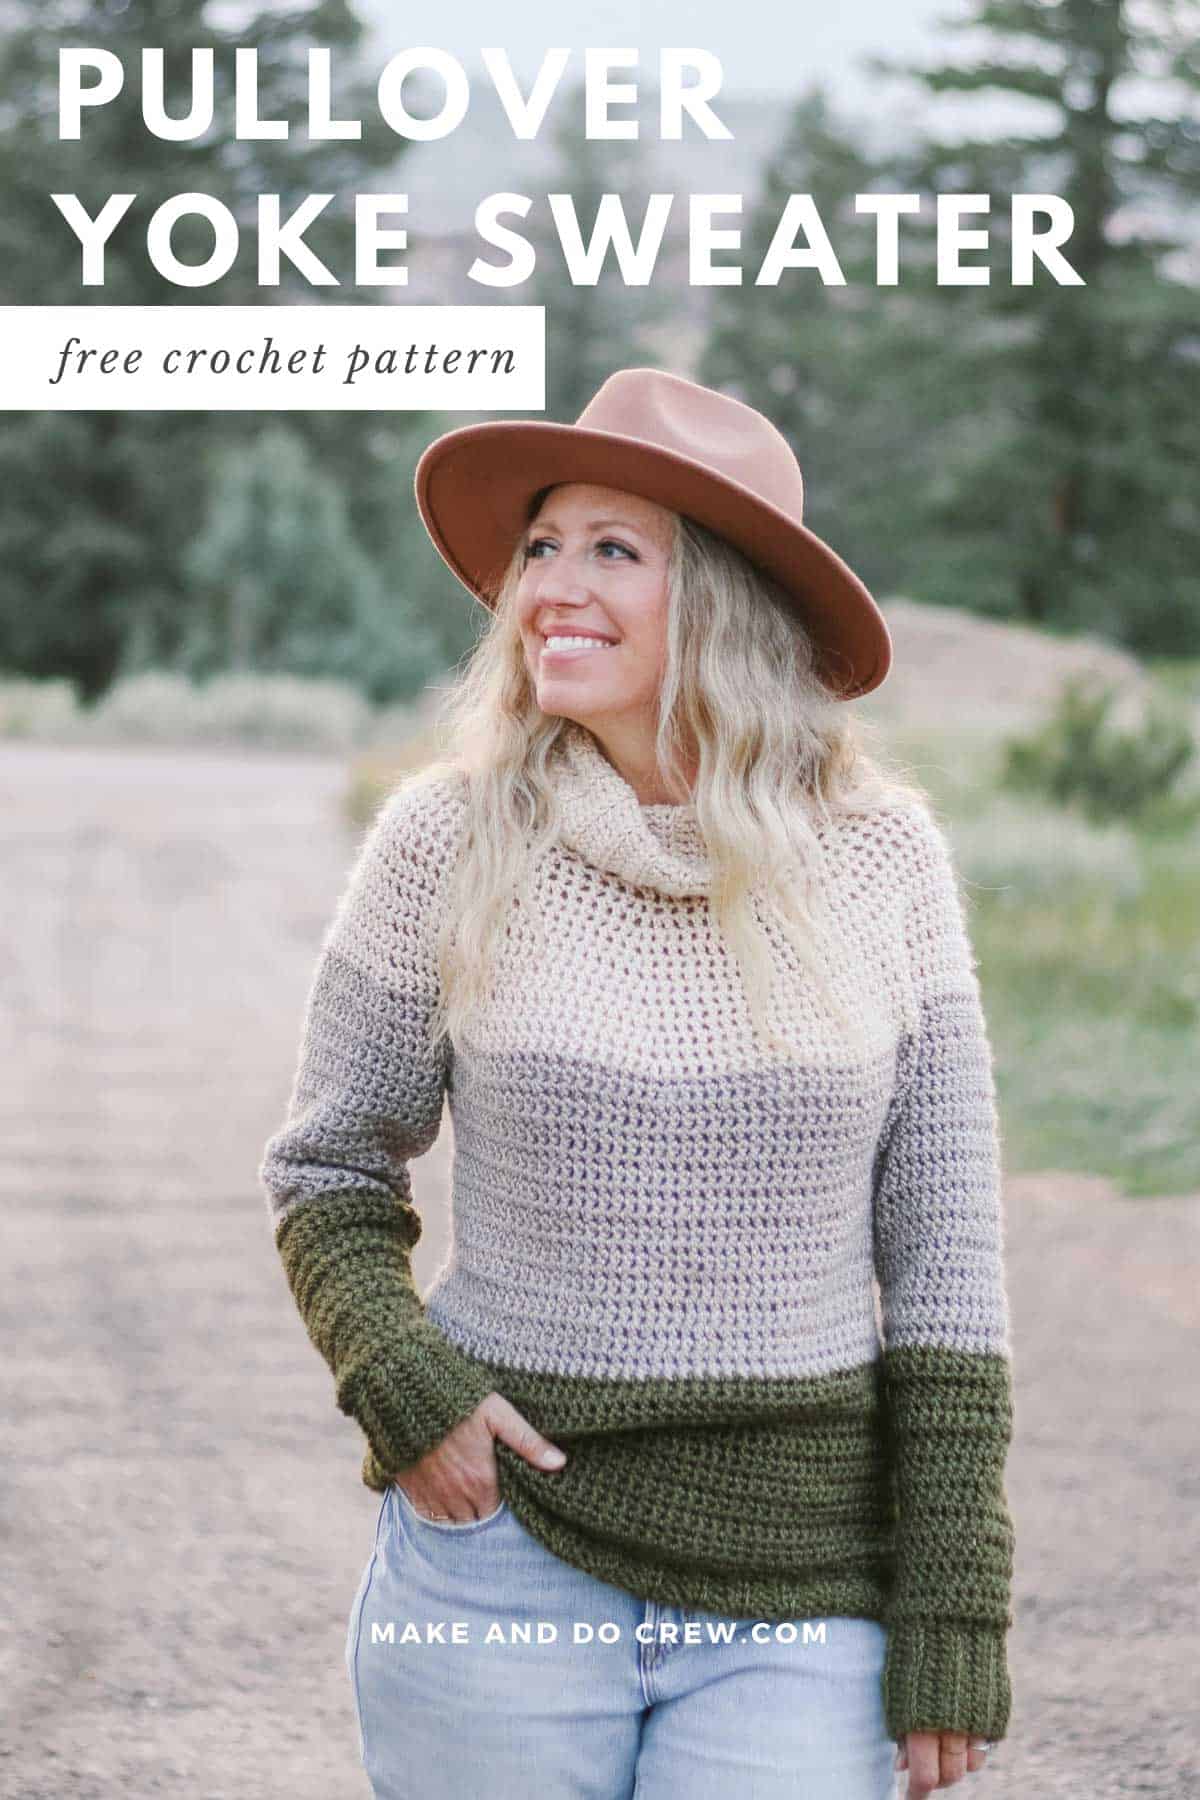
Don't let the top-down method of constructing garments intimidate you any longer! This very easy free crochet yoke sweater pattern will teach you all the concepts of crocheting a pullover you can try on as you go. The free pattern is below or you can purchase the ad-free, printable PDF here.
This easy crochet yoke sweater pattern is part of a collaboration with Lion Brand Yarns. This post contains affiliate links.
Using a simple stitch and construction, the Snowbound easy crochet yoke sweater strikes a perfect balance of comfy warmth and flattering drape. You’ll practice crocheting in the round, increasing and basic yoke skills to complete this beginner-friendly wardrobe staple.
Keep reading for more yarn and inspiration details or scroll down for free pattern.
The Snowbound - Video Overview
See the relaxed, casual ease of the Snowbound Pullover in action in the brief video below. Get an idea of how the pattern comes together as you prepare to crochet your own!
(If you have an ad-blocker running, you'll need to disable it to view the video.)
At Long Last - A Yoke Sweater!
Designing a crochet yoke sweater pattern has been on my bucket list for years. I've watched as guest designers like Colourful Crochet shared the playful Slice of Nice Sweater pattern right here on Make & Do Crew, but I was always intimidated by getting the proportions just right in my own design. So while this pattern really only took the summer to dream up, crochet and frog and re-crochet the sample, it's really been in progress in my mind for years.
One of the positives of the pandemic is that many of us have gained access to a whole new world of online events that were previously only available in person. This year, Vogue Knitting Live going virtual meant that I could take yoke sweater design classes from both Sandra of Nomad Stitches and Stephanie of By Stephanie Erin.
These two designers are really the queens of crochet yoke sweater patterns and I'm certain the Snowbound Pullover pattern would not exist if they didn't give me the confidence boost to give a top down sweater design a try.
A *Simple* Crochet Yoke Sweater Pattern
This design uses one very easy stitch to create the entire sweater body, making this an appropriate pattern for an advanced beginner. If you're new to garment making all together, or just new to the concepts of a top down yoke sweater, this pattern will allow you to build your confidence without worrying about lots of shaping or complicated color changes.
To further guarantee you'll be a yoke sweater success story, there's a detailed photo tutorial within the free pattern below that shows you each step of the process. Once you've made one crochet yoke sweater, the general concepts will make so much and you'll be ready to approach more complicated patterns with all the beginner foundations you learned in the Snowbound Pullover in mind.
RELATED for your furry friends - easy crochet dog sweater pattern for small and large dogs
Worsted Weight for the Win
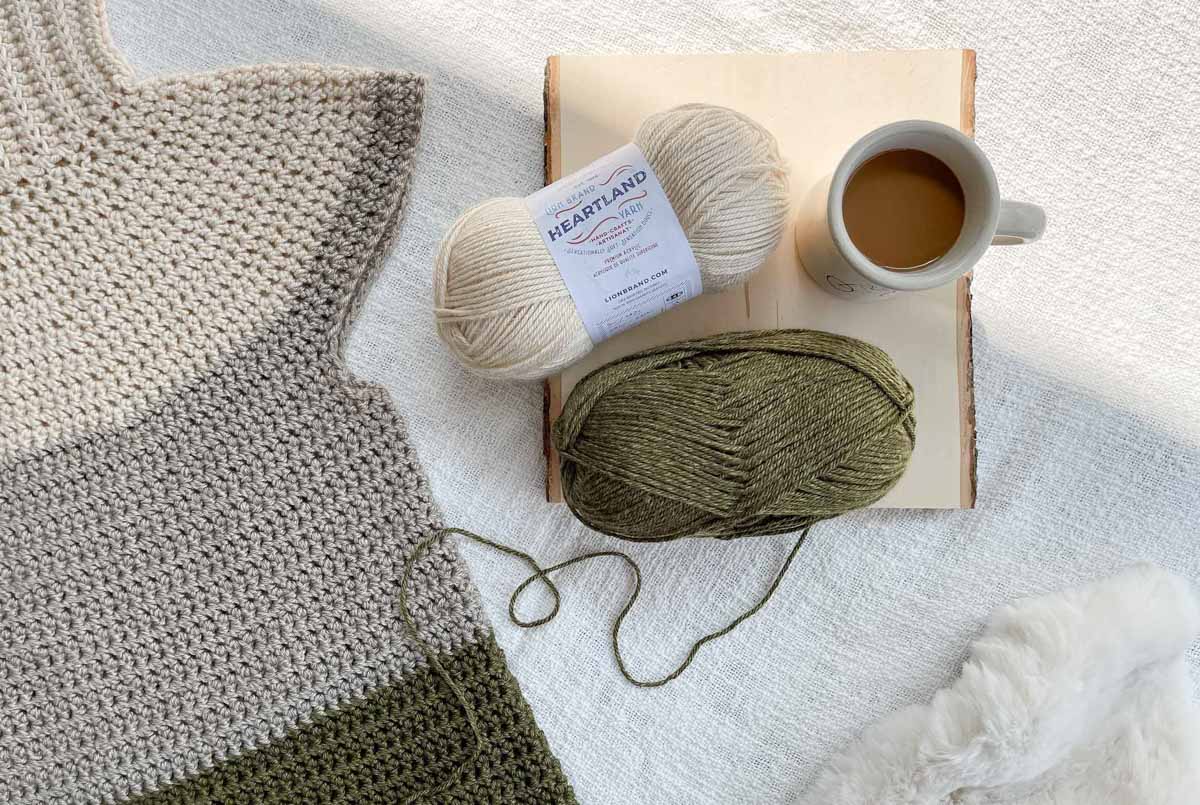
In my opinion, category 4 (worsted weight) yarn strikes a nice blend of quick crochet progress without sacrificing too much drape of garment wearability. And in the case of Lion Brand Heartland yarn, which was used in the sample pictured here, worsted weight yarn manages to achieve the comfy, cozy aesthetic meets body-flattering fabric that I'm always looking for in a crochet sweater.
If you're new to Lion Brand Heartland yarn, it's a machine washable, super soft acrylic that comes in a wide variety of earthy colors. (See all the colors here!) We've used it in the Habitat Cardigan, the Elevation Duster, the Good Morning Sunshine Blanket and the Stained Glass Tunisian Cowl.
Top Down Sweater Customizations
If ever there was a crochet sweater that's easy to customize this is it! Because it’s worked from the top down, you can try it on as you go and adjust the fit. Not only is it helpful to verify your sizes as you go, it's also just fun to "taste" the fruits of your labor along the way!
Some simple customization ideas:
- Choose one delicious color and use it throughout the pattern to make a solid-colored turtleneck pullover.
- Eliminate rounds in the Main Body section to create a cropped yoke sweater.
- Add additional rounds in the Main Body section to extend the length. (Perfect for pairing with leggings!)
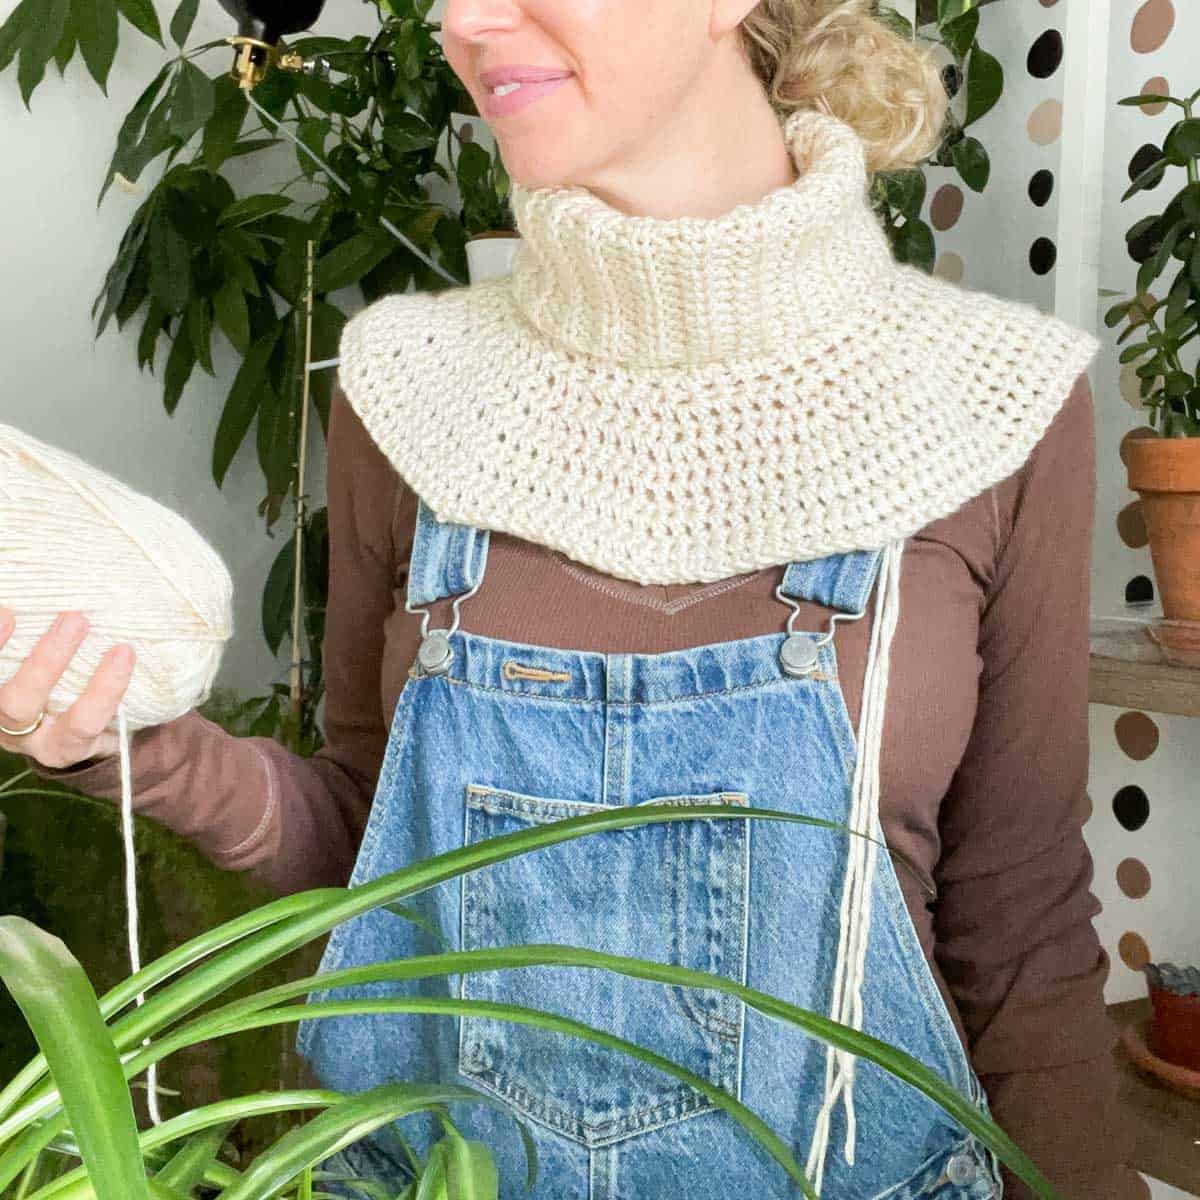
- Decrease the number of foundation chain stitches in the Turtleneck Ribbing section to crochet a shorter, mock turtleneck collar.
This crochet yoke sweater for beginners is really flexible and the perfect jumping off point to make the comfy, cozy pullover of your crochet dreams!
New to crocheting garments? Don't miss our Step-By-Step Guide To Sweater Success
Pin it! Click to pin this pattern for later ⇨
Get an All-In-One Yoke Sweater Crochet Kit
If you don't you don't have a massive yarn stash (or you just to get fun packages in the mail!), the all-in-one crochet kit is a perfect way to make your Snowbound Pullover. This bundle from Lion Brand includes all the Heartland yarn you'll need, plus a free printable PDF of the pattern (delivered digitally).
Deliver it! Click to purchase the an all-in-one crochet kit ⇨
How do I print this pattern?
We know many people like to work from a paper copy of their crochet pattern. This is why we love offering our patterns in large-type, ad-free PDFs that are formatted for easy printing.
The Snowbound Pullover printable PDF includes the complete free pattern as well as all the photo tutorials you see below. The PDF makes printing a snap, but also comes in handy if you'd like to view the pattern on a phone or tablet without ads or when want to crochet but don't have internet access.
Print it! Purchase the ad-free PDF ⇨
How To Crochet a Top Down Sweater - Resources
Learning how to design your own crochet yoke sweater pattern is a puzzle of proportions, geometry and construction. Once you understand the basic technique, it's quite easy to see how it can be expanded upon.
There are several designers that do crochet yoke sweaters really well and are generous enough to offer some of their tips and tricks for designing your own. Here are the resources I found really helpful when studying how to design a crochet yoke sweater pattern:
- Tips for Crocheting Top Down Crochet Garments - Dora Does
This guide offers several tips I haven't ever seen elsewhere (hello, running stitch marker!) and is a comprehensive list of ways to crochet yoke sweaters come together more smoothly. Michelle's Any Yarn Will Do crochet sweater pattern is a really thorough study in beginner crochet yoke sweaters and is written for FIVE yarn weights! - Tips for Designing a Crochet Raglan Sweater - Knits N' Knots
Janine outlines her learnings from starting a raglan pullover design from scratch in this helpful post. She also lists other designers of crochet raglan patterns who you can follow for more inspiration. Her Rosebud Raglan pattern is a beautiful example of just how simple and elegant a top down crochet sweater can be.
- Virtual Classes: As mentioned above, Vogue Knitting Live holds virtual seminars and periodically a crochet yoke sweater class is offered. I found these classes very worth the money as they are more comprehensive than any single free resource I've come across.
More Free Crochet Sweater Patterns
Crochet sweater patterns don't need to be difficult. In fact, most of ours are made with very simple shapes. Dive into the wonderful world of crochet garments with cardigans, pullovers, ponchos, shrugs and more!
See more free crochet sweater patterns →
Don't spend hours for a "meh" result!
Tired of crocheting garments that don't fit? Learn our C.R.A.F.T. Framework to make sweaters that fit and feel amazing!
Snowbound Pullover
Free Crochet Yoke Sweater Pattern
Purchase the ad-free, printable PDF on Etsy here and on LoveCrafts here.
Save this pattern to your Ravelry here.
Pin this pattern for later here.
Explanation:
Using a simple stitch and construction, the Snowbound strikes a perfect balance of comfy warmth and flattering drape. Follow the pattern as written to create a color block effect or choose one delicious color to crochet a solid sweater. Because it’s worked from the top down, you can try it on as you go and customize the fit. You’ll practice crocheting in the round, increasing and basic yoke skills to complete this beginner-friendly wardrobe staple.
Supplies:
Order an all-in-one Snowbound Pullover kit from Lion Brand here.
• Lion Brand Heartland (Weight: 4/medium - 251 yds, 5.0 oz) [approx. 646 (667, X777, 817, 891, 1030, 1172, 1208, 1262) g total]
- Color A: Acadia [136-098] – 2 balls for all sizes (approx. 385 g)
- Color B: Grand Canyon [136-122] - 2 (2, 3, 3, 3, 4, 4, 4, 4) balls
- Color C: Joshua Tree [136-174] - 2 (2, 3, 3, 3, 4, 4, 4, 4) balls
• Tapestry needle
• Size L (8.0 mm) crochet hook (for main sweater)
• Size K (6.5 mm) crochet hook (for ribbing)
• Stitch markers or safety pins
Measurements:
| Size | Fits up to actual bust | Sweater length (neckline to bottom) |
| XS | 30" | 25" |
| S | 34" | 25" |
| M | 38" | 27.5" |
| L | 42" | 27.5" |
| 1X | 46" | 27.5" |
| 2X | 50" | 30" |
| 3X | 54" | 30" |
| 4X | 60" | 30" |
| 5X | 62" | 30" |
Sample pictured is a size M on a model with a 38” bust.
Gauge:
10 sts x 10 rows = 4” as worked in main sweater pattern using larger hook
Abbreviations and Glossary (US Terms):
ch – chain
dc – double crochet
esc – extended single crochet
esc2tog – extended single crochet two together
hdc – half double crochet
hdcblo – half double through the back loop only
rep – repeat
RS – right side
sc – single crochet
sk – skip
slst – slip stitch
st(s) – stitch(es)
WS – wrong sidetch – turning chain
See other Snowbounds! Check out the #SnowboundPullover on Instagram for inspiration ⇨
Overall Pattern Notes:
• Sweater is worked from the top down, allowing you to try it on as you go. You’ll begin by crocheting the turtleneck ribbing, seaming it into a tube and working the sweater directly into it. If you’d prefer to omit the turtleneck collar, simply begin at the Main Sweater section by crocheting 42 (42, 44, 44, 50, 50, 54, 54, 54) foundation single crochet stitches and slip stitching to the first stitch to join into a circle. Proceed with Main Sweater Round 2 and beyond.
• Pattern is written for smallest size, with stitch counts for larger sizes following in parentheses. XS (S, M, L, 1X, 2X, 3X, 4X, 5X) It can be helpful to highlight all numbers related to your size before beginning. When only one number is given, it pertains to all sizes.
!! Gauge Check !!
Please don’t skip this step or you will risk your sweater not fitting as expected.
To check gauge, with any color and larger hook:
Foundation Row: Ch 19.
Row 1 (RS): Sk 1 ch, esc each ch to end; turn. (18)
Row 2 (RS): Ch 1, esc in each st to end; turn.
Rep Row 2 twelve times. Lightly steam block swatch following blocking instructions at end of pattern. Measure center four inches of swatch vertically and horizontally. Compare to pattern gauge listed above. If there are too many stitches in 4” horizontally, increase your hook size and re-swatch. If there aren’t enough stitches in 4” horizontally, decrease your hook size and re-swatch
Turtleneck Ribbing
Notes:
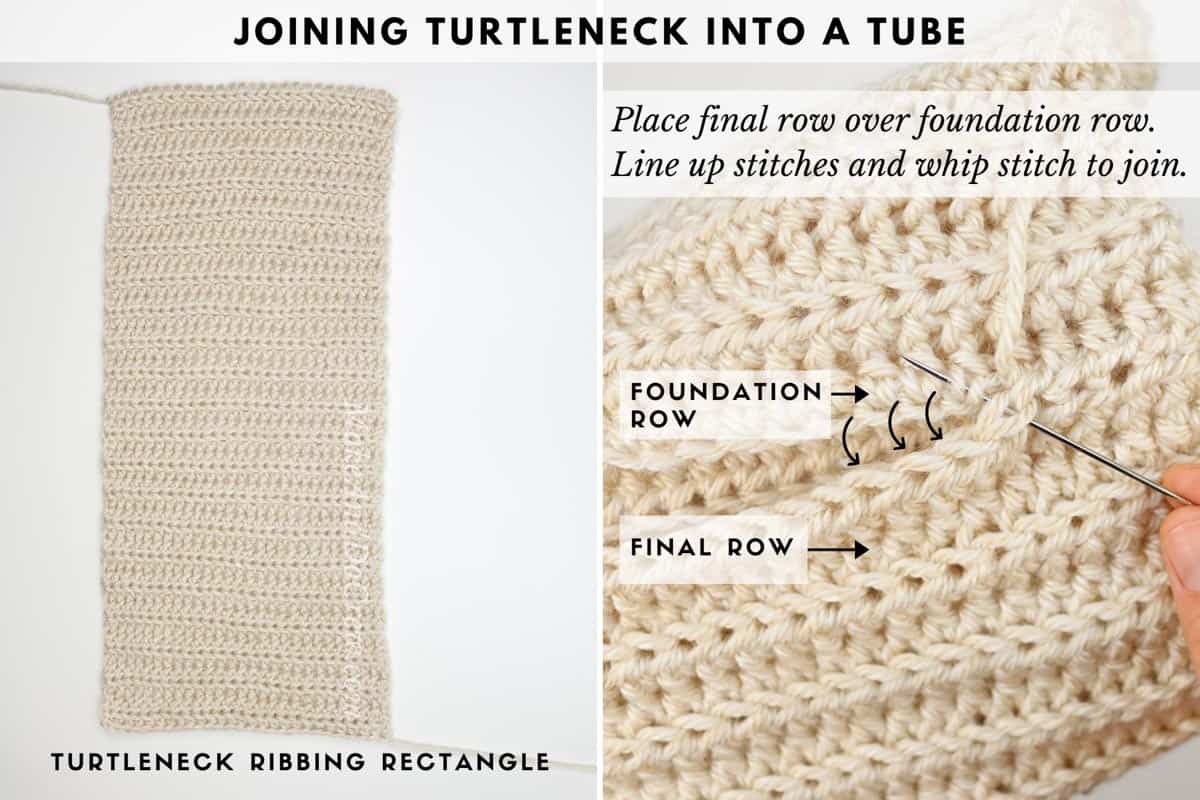
• Ribbing is worked as a flat rectangle and then seamed into a tube.
• Row 2 and beyond are worked into the back loop only of each hdc stitch. This is always the horizontal loop furthest away from you, even when you flip your work to begin a new row.
• Ch 1 does not count as a hdc.
With color A and smaller hook:
Foundation Row: Ch 28.
Row 1 (RS): Sk 1 ch, hdc in each ch to end; turn. (27)
Row 2 (WS): Ch 1, hdcblo in each hdc; turn. (27)
Rep Row 2 38 (38, 40, 40, 46, 46, 50, 50, 50) more times to create a total of 40 (40, 42, 42, 48, 48, 52, 52, 52) rows. Fasten off leaving a 30” tail.
Joining Turtleneck Tube
Fold rectangle in half so the short ends come together. (RS/WS designation does not matter at this point). Stack final ribbing row on top ribbing Row 1. Using tapestry needle and existing yarn tail, whip stitch each corresponding stitch together. See photo at end of pattern.
Main Sweater
Notes:
• Sweater is worked in turned rounds. Each round is joined with a slip stitch, which doesn’t count as a stitch in the stitch count given at the end of each row.
Position turtleneck collar so that bump joining seam is facing out. Attach Color A with a slst in either end of turtleneck seam.
Yoke:
With larger hook:
Wanna save this pattern?
Foundation Round (RS): Ch 1, place 42 (42, 44, 44, 50, 50, 54, 54, 54) esc around edge of turtleneck tube (accomplish this by working 2 esc in first and 21st (21st, 22nd, 22nd, 25th, 25th, 27th, 27th, 27th) raw row edge and 1 esc in every other raw row edge), slst to first esc of round to join; turn. 42 (42, 44, 44, 50, 50, 54, 54, 54) sts
Round 2 (WS inc): Ch 1, *2 esc, esc in next 2 (2, 3, 3, 4, 4, 2, 2, 2) sts; rep from * around; slst to first esc of round to join; turn. 56 (56, 55, 55, 60, 60, 72, 72, 72) sts
Round 3 (RS inc): Ch 1, *2 esc, esc in next 6 (6, 4, 4, 4, 4, 5, 5, 5) sts; rep from * around; slst to first esc of round to join; turn. 64 (64, 66, 66, 72, 72, 84, 84, 84) sts
✨Unlock this free subscriber-exclusive pattern ✨
Follow these steps to view the full free pattern below
Continuing with Color B:
Round 17 (RS): Rep Round 7. 144 (144, 154, 154, 168, 168, 192, 198, 200) sts
Size XS only: proceed to Back Extension section.
Round 18 (WS inc): Ch 1, *2 esc, esc in next X (13, 13, 13, 13, 15, 17, 19) sts; rep from * around; slst to first esc of round to join; turn. X (156, 165, 165, 180, 180, 204, 209, 210) sts
Size S only: proceed to Back Extension section.
Round 19: Rep Round 7. X (X, 165, 165, 180, 180, 204, 209, 210) sts
Size M only: proceed to End Yoke section.
Round 20: Ch 1, *2 esc, esc in next X (X, X, 14, 17, 14, 16, 18, 20) sts; rep from * around; slst to first esc of round to join; turn. X (X, X, 176, 190, 192, 216, 220, 220) sts
Round 21: Rep Round 7. X (X, X, 176, 190, 192, 216, 220, 220) sts
Size L proceed to Back Extension section; size 1X proceed to End Yoke section.
Round 22: Ch 1, *2 esc, esc in next X (X, X, X, X, 11, 23, 19, 21) sts; rep from * around; slst to first esc of round to join; turn. X (X, X, X, X, 208, 225, 231, 230) sts
Round 23: Rep Round 7. X (X, X, X, X, 208, 225, 231, 230) sts
Size 2X proceed to Back Extension section, size 3X proceed to End Yoke section.
Round 24: Ch 1, *2 esc, esc in next X (X, X, X, X, X, X, 32, 22) sts; rep from * around; slst to first esc of round to join; turn. X (X, X, X, X, X, X, 238, 240) sts
Round 25: Rep Round 7. X (X, X, X, X, X, X, 238, 240) sts
Size 4X proceed to End Yoke section.
Round 26: Ch 1, *2 esc, esc in next X (X, X, X, X, X, X, X, 29) sts; rep from * around; slst to first esc of round to join; turn. X (X, X, X, X, X, X, X, 248) sts
Size 5X proceed to End Yoke section.
End Yoke:
Sizes M, 1X, 4X and 5X only: work one additional rep of Round 7. X (X, 165, X, 190, X, X, 238, 248) sts
Size 3X only: work two additional reps of Round 7. (225) sts
All sizes proceed to Back Extension section.
Back Extension:
Your yoke should now have 17 (18, 20, 21, 22, 23, 25, 26, 27) rounds with a total of 144 (156, 165, 176, 190, 208, 225, 238, 248) sts. The next rows are worked over only a portion of the stitches in order to create a slight extension for the back of the sweater.
Row 1 (RS): Ch 1, esc in next 36 (41, 45, 50, 54, 58, 63, 66, 70) sts; turn. 36 (41, 45, 50, 54, 58, 63, 66, 70) sts
Row 2 (WS): Ch 1, esc in next 36 (41, 45, 50, 54, 58, 63, 66, 70) sts; turn. 36 (41, 45, 50, 54, 58, 63, 66, 70) sts
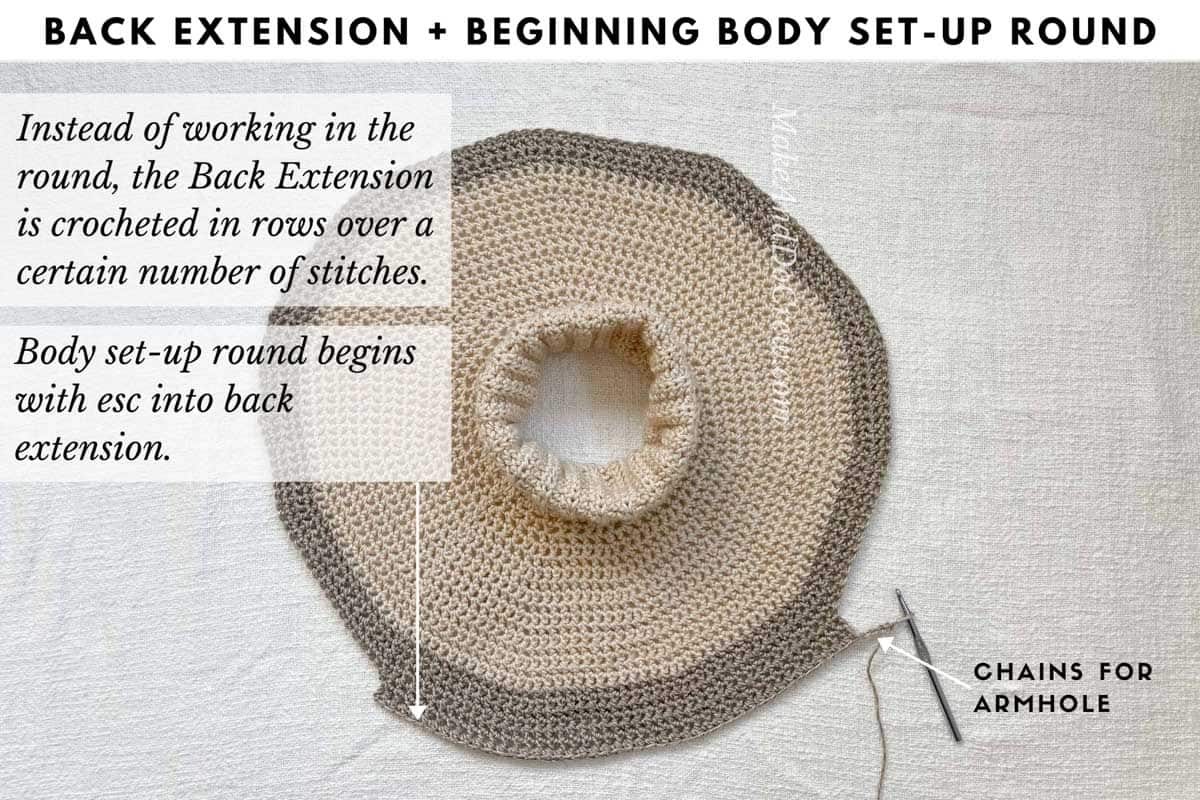
Body Set-Up:
The next round is worked around entire yoke to divide for the sleeves and set up the body section.
Round 1 (RS): Ch 1, esc in next 36 (41, 45, 50, 54, 58, 63, 66, 70) sts (back), skip 35 (35, 36, 36, 39, 44, 48, 50, 50) esc (sleeve #1), ch 3 (3, 4, 4, 5, 5, 6, 6, 6) (underarm #1), esc in next 38 (45, 48, 54, 58, 62, 66, 72, 78) sts (front), skip 35 (35, 36, 36, 39, 44, 48, 50, 50) esc (sleeve #2), ch 3 (3, 4, 4, 5, 5, 6, 6, 6) (underarm #2), slst to first esc of round to join; turn.
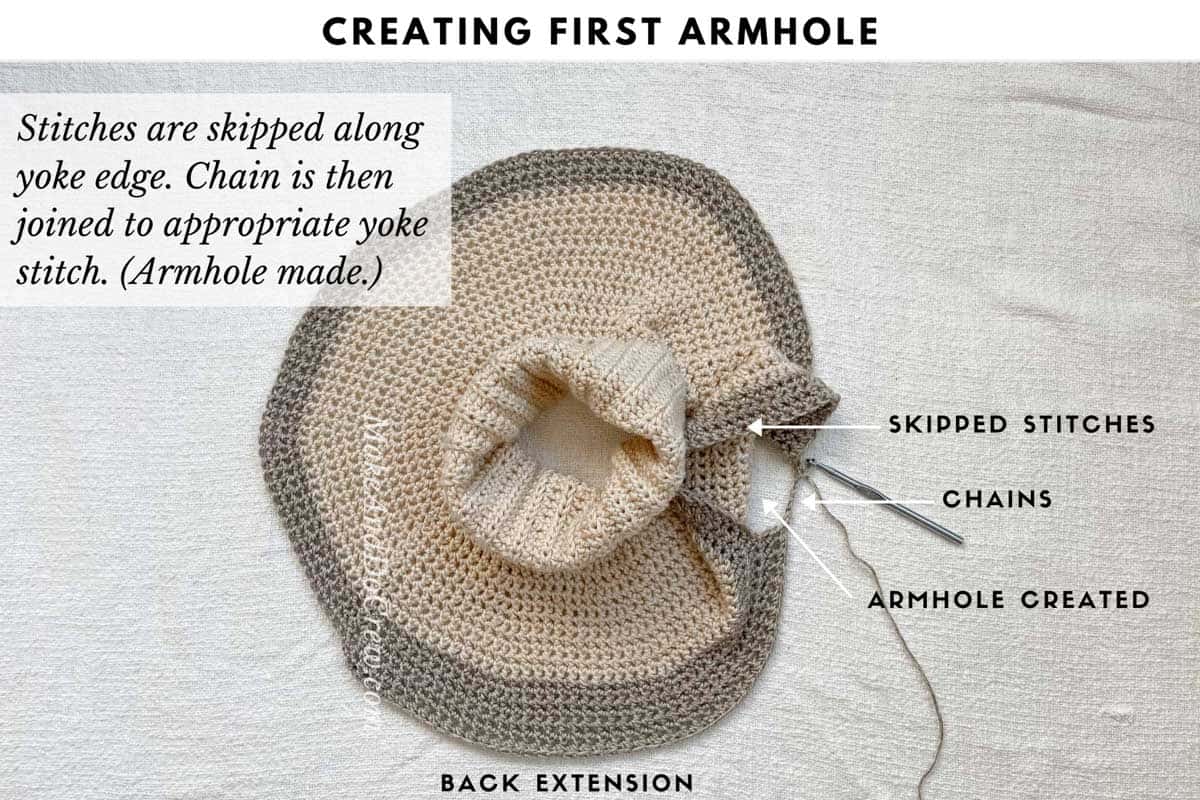
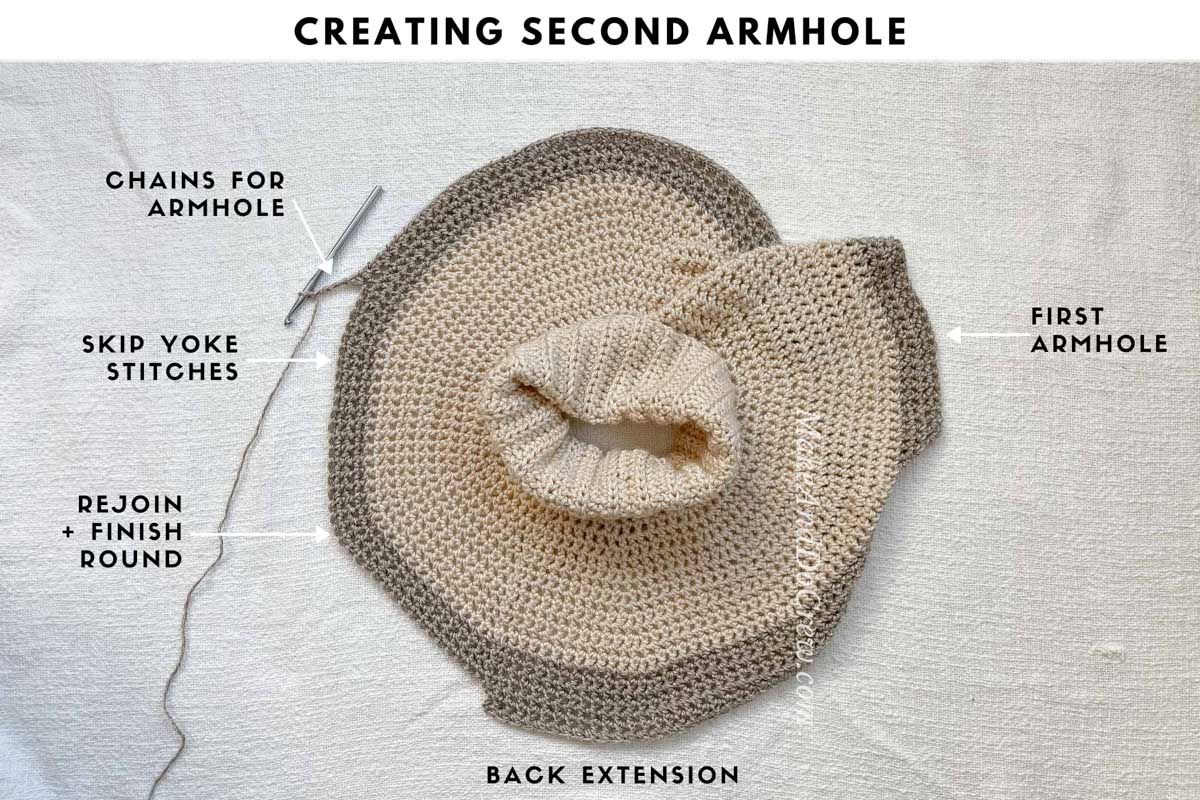
Last round should now contain a total of 80 (92, 101, 112, 122, 130, 141, 150, 160) sts, broken down as follows:
Back: 36 (41, 45, 50, 54, 58, 63, 66, 70) esc
Sleeve #1: 35 (35, 36, 36, 39, 44, 48, 50, 50) skipped sts
Underarm #1: 3 (3, 4, 4, 5, 5, 6, 6, 6) ch
Front: 38 (45, 48, 54, 58, 62, 66, 72, 78) esc
Sleeve #2: 35 (35, 36, 36, 39, 44, 48, 50, 50) skipped sts
Underarm #2: 3 (3, 4, 4, 5, 5, 6, 6, 6) ch
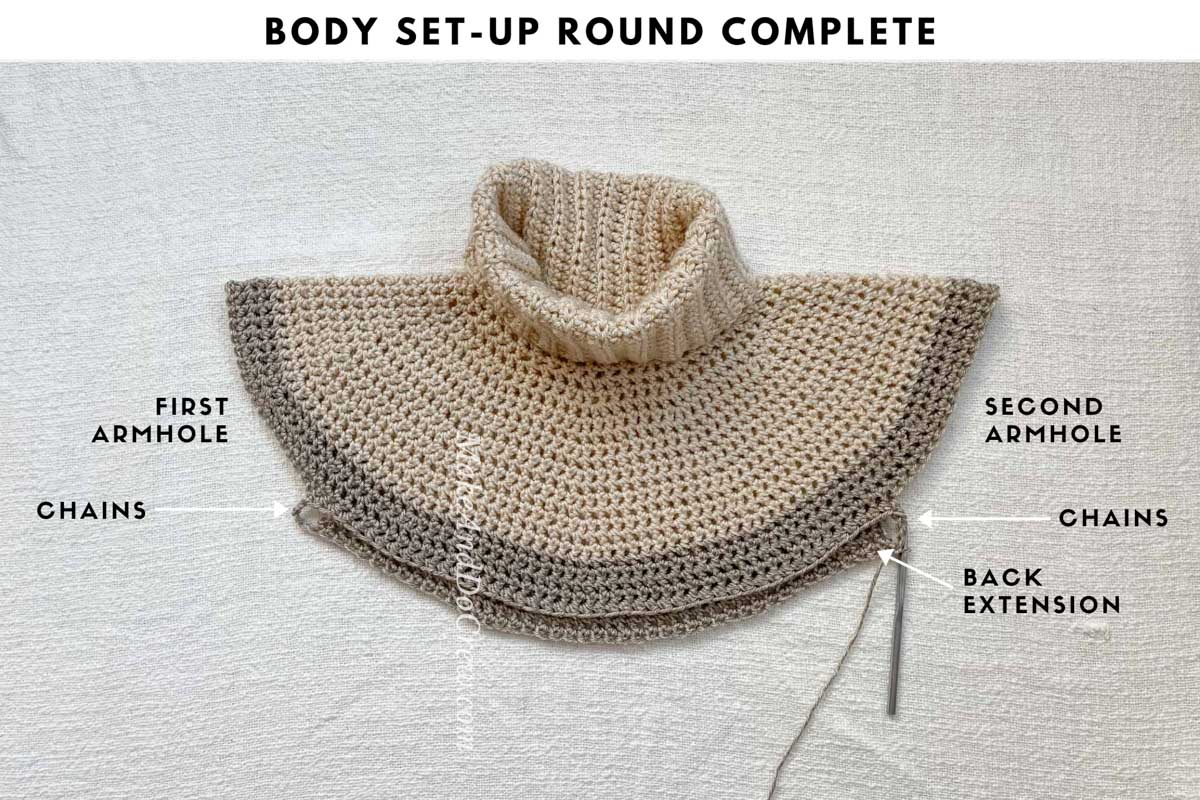
Main Body:
Round 2 (WS): Ch 1, esc in each esc and ch around, slst to first esc of round to join; turn.
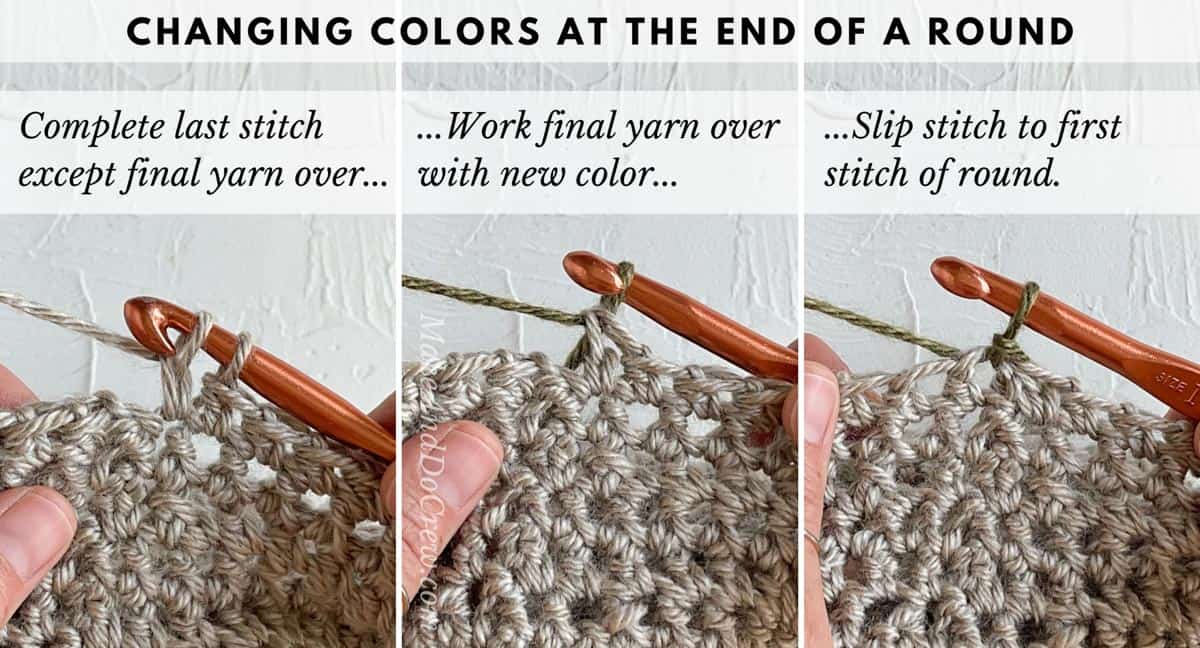
Continuing with Color B, rep Row 2 21 (19, 19, 18, 17, 22, 21, 19, 18) more times. In last round: Complete final yo of last esc of round as well as the slst to join with Color C.
Continuing with Color C, rep Row 2 15 (15, 20, 20, 20, 20, 20, 20, 20) more times. The body of the sweater from the armhole down should now contain 38 (36, 41, 40, 39, 44, 43, 41, 40) rounds. Do not fasten off.
Bottom Ribbing:
• Bottom ribbing is worked perpendicular to main sweater and joined as you go.
• Note that there is no chain 1 at the beginning of WS rows.
With smaller hook and Color C already attached:
Foundation Row: Ch 9.
Row 1 (RS): Sk first ch, hdc in each ch, slst to next available sweater st, slst in each of next 2 sweater sts; turn. (8)
Row 2 (WS): Hdcblo in each st; turn. (8)
Row 3 (RS): Ch 1, hdcblo in each st, slst to next available sweater st, slst in each of next 2 sweater sts; turn. (8)
Rep Rows 2 and 3 to end of sweater bottom, ending with a Row 2. This may require slip stitching only one stitch instead of two along sweater bottom on the final repeat. It’s fine to improvise here to ensure you end with a Row 2. Fasten off leaving a 15” tail for seaming.
Finishing Bottom Ribbing:
Stack final ribbing row on top ribbing Row 1. Using tapestry needle and existing yarn tail, whip stitch each corresponding stitch together.
Sleeves
Begin with either armhole. With RS of sweater facing out, attach Color B at bottom of armhole.
With larger hook:
Round 1 (RS): Ch 1, place 44 (44, 46, 46, 50, 55, 60, 62, 62) esc around armhole (accomplish this by working 1 esc in each esc/ch, 2 esc in the side of the stitch from the body set-up round and 4 esc in back extension raw row edges), slst to first esc of round to join; turn. 44 (44, 46, 46, 50, 55, 60, 62, 62) sts
Round 2 (dec): Ch 1, esc, esc2tog, esc in each st until 3 rem, esc2tog, esc; turn. 42 (42, 44, 44, 48, 53, 58, 60, 60) sts
Round 3: Ch 1, esc in each st around; turn. 42 (42, 44, 44, 48, 53, 58, 60, 60) sts
Round 4: Ch 1, esc in each st around; turn. 42 (42, 44, 44, 48, 53, 58, 60, 60) sts
Sizes XS, S, M and L: Rep Rounds 2-4 10 times. At the end of Round 20: Complete final yo of last esc of round as well as the slst to join with Color C. Continue with Color C for remainder of sleeve.
Sizes 1X, 2X, 3X, 4X and 5X: Rep Rounds 2 and 3 (5, 6, 9, 12, 12) times, then rep Rounds 2-4 (6, 7, 6, 4, 4) times. At the end of Round 20: Complete final yo of last esc of round as well as the slst to join with Color C. Continue with Color C for remainder of sleeve.
When these repeats are complete sleeve should contain 34 (34, 34, 34, 32, 37, 40, 40, 40) rounds and 22 (22, 24, 24, 26, 27, 28, 28, 28) stitches.
All Sizes: Rep Round 3 6 (7, 7, 8, 10, 7, 4, 5, 5) more times for a total of 40 (41, 41, 42, 42, 44, 44, 45, 45) rounds. For a longer or shorter sleeve, adjust this number, being sure to end with a RS round. (Ribbing will add additional 3.25” to sleeve length.)
Sleeve Ribbing:
• Just as with main sweater, ribbing is worked perpendicular to sleeve and joined as you go.
• Note that there is no chain 1 at the beginning of WS rows.
With smaller hook and Color C already attached:
Foundation Row: Ch 12.
Row 1 (RS): Sk first ch, hdc in each ch, slst to next available sweater st, slst in each of next 2 sleeve sts; turn. (11)
Row 2 (WS): Hdcblo in each st; turn. (11)
Row 3 (RS): Ch 1, hdcblo in each st, slst to next available sleeve st, slst in each of next 2 sweater sts; turn. (11)
Rep Rows 2 and 3 to end of sleeve edge, ending with a Row 2. This may require slip stitching only one stitch instead of two along sweater bottom on the final repeat. It’s fine to improvise here to ensure you end with a Row 2. Fasten off leaving a 15” tail for seaming.
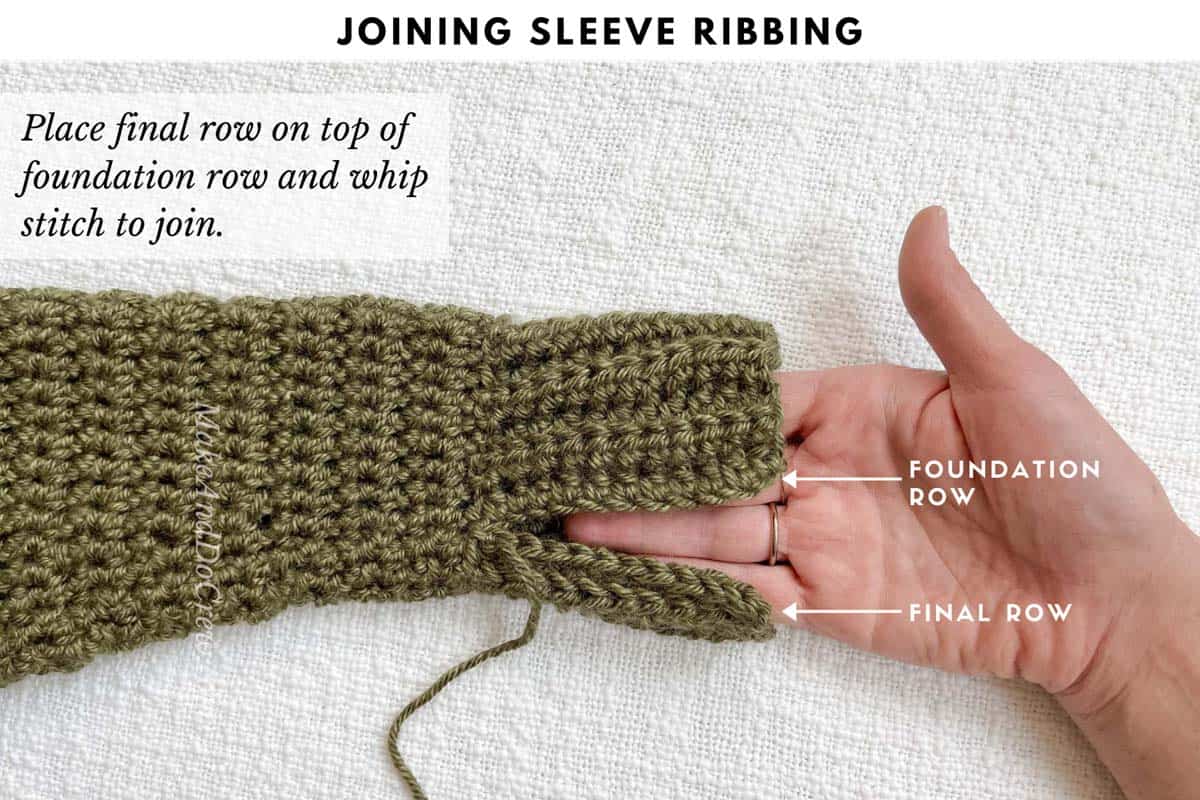
Finishing Sleeve Ribbing:
Stack final ribbing row on top ribbing Row 1. Using tapestry needle and existing yarn tail, whip stitch each corresponding stitch together.
Repeat sleeve process on second armhole.
Weave in remaining ends. There shouldn’t be many!
Whether you’re headed out or snowed in, take pride in knowing you created your own cozy!
That was so fun! Now what?
Invitation to our Facebook group
Come discuss crocheting yoke sweater patterns and lots of other crochet projects and techniques in our Make & Do Crew Facebook group. Here thousands of helpful crocheters answer each others questions and share their stitches. Come join us here.
Find Your Next Sweater Project
- High Low Jumper Pattern - finish in one weekend
- Rectangle Crochet Poncho - made from two simple pieces
- Oversized Cardi - with fur collar
- Sherpa Fleece Sweater Jacket - extremely cozy cardi
- Raglan Baby Sweater - cute for Christmas
- Pullover with Removable Cowl - unique and easy design
- Hooded Sweater Pattern - Self, striping Mandala yarn pattern
- Tapestry Crochet Pattern - classic fisherman's sweater
More Free Patterns + Tutorials
Can't get enough free crochet patterns!? Me either. You'll definitely want to breeze through these collections to find your next project.
- 55+ Free Crochet Sweater and Cardigan Patterns - our most popular garments
- 40+ Free Crochet Blanket Patterns - baby blankets, throws + c2c graphgans
- 36+ Granny Square Patterns + tips for the perfect square
- 30+ Crochet Animal Patterns - adorable amigurumi stuffed animals
- Crochet Gift Ideas - easy patterns to make for others
- Fast Crochet Projects - start to finish in less than a day
Learn a New Skill
And when you're ready to master a new skill, check out our detailed guides that include everything you need to know to level up your crochet game.
- How to Corner to Corner (C2C) Crochet for Beginners - with video tutorials to get you started
- How to Crochet a Beginner Hat - make an entire beanie in 1.5 hours!
- How to Crochet Amigurumi for Beginners - the ultimate guide to making your own toys and plushies
- How to Tunisian Crochet - learn with this video and a standard hook
Ready to Find Your Next Project?
Whether you're into crochet sweaters, C2C crochet blankets, Tunisian or crocheting your own fedora hat, we've got you covered. You can find all our free crochet patterns here.



Gitte Strauss says
Love the look of the sweater, but I'm not familiar with your use of X when you talk about how may stitches to do. For example: row 20 - *esc in next X (X, X, 14, 17, 14 ...) sts. Would you please explain to me. I really want to try and make this sweater.
Thanks a bunch.
Cheryl Benedick says
Just a note. On row 8 you have the total stitches as 120. I took out that row 3 times trying to come up with 120 stitches then saw row 9 has 110. Lol. Anyway just wanted to send a note. Love this sweater and hope it turns out half as nice as yours.